How to Add Fonts to Shopify Theme?
If you want your Shopify store to feel more like your brand, one of the easiest changes you can make is to add custom font to Shopify. Fonts play a big role in how your store looks and how customers connect with it.
In this guide, LitOS will walk you through the process step by step. You’ll learn how to:
- Add your font file to Shopify
- Add the code that makes Shopify recognize your font
- Change the font on the parts of your store that matter most
By the end, your store will have a font that matches your brand style.
Important Considerations Before You Add Custom Font to Shopify
Before you upload a custom font to your Shopify store, there are a few things to prepare and check. Doing this first will save you time and help avoid issues later. For more details, you can also review Shopify’s official font documentation.
1. Choose the right source for your font
Use fonts from trusted places like Google Fonts, Adobe Fonts, or licensed type foundries. If you already have a brand font, make sure you also have the webfont version that is intended for websites.
2. Check the correct file formats & convert if needed
Shopify works best with .woff and .woff2 files. These formats are web-optimized, quick to load, and supported by modern browsers. Formats like .ttf and .otf may upload but are not always reliable for web use.
If your font is only available as .ttf or .otf, you should convert it into .woff or .woff2. Free tools such as CloudConvert or Transfonter can do this for you.
Note: Converting a font may cause small changes in appearance, such as spacing or weight. So that you should always test your converted font on a sample page. If you see large differences, consider downloading or purchasing an official webfont version for better results.
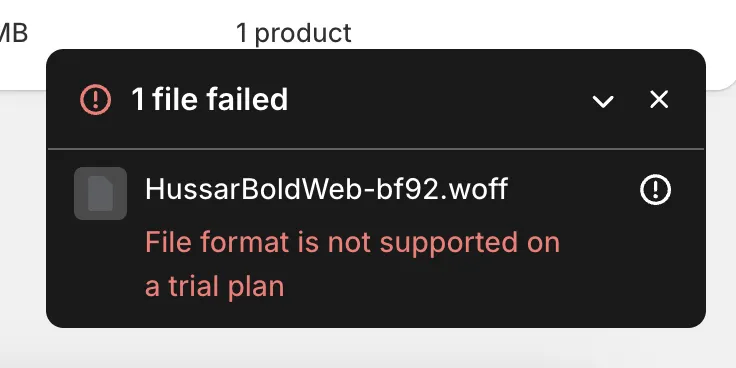
3. Understand Shopify plan requirements
If you are on a free trial, you cannot upload font files (.woff, .woff2, .ttf, .otf) into the Files section. Trial stores only allow certain formats such as images, JS, CSS, JSON, and PDF. To host font files in the Files section, you need to be on a paid plan. Trial users can still upload fonts through the Assets folder in the code editor.
4. Test for performance and compatibility
Large font files can slow down your store. Stick to .woff2 when possible, upload only the weights you really need (for example, Regular and Bold), and always test your font across different browsers and devices to make sure it displays correctly.
These checks will save you trouble later when you follow the steps for how to add a custom font to Shopify.
How to Add Custom Font to Shopify via Files Section
For the Files Section method, this approach is best for beginners or store owners who want a quick way to upload and use a custom font without touching too much code. It’s simple, safe, and works well if you just want to give your store a fresh look.
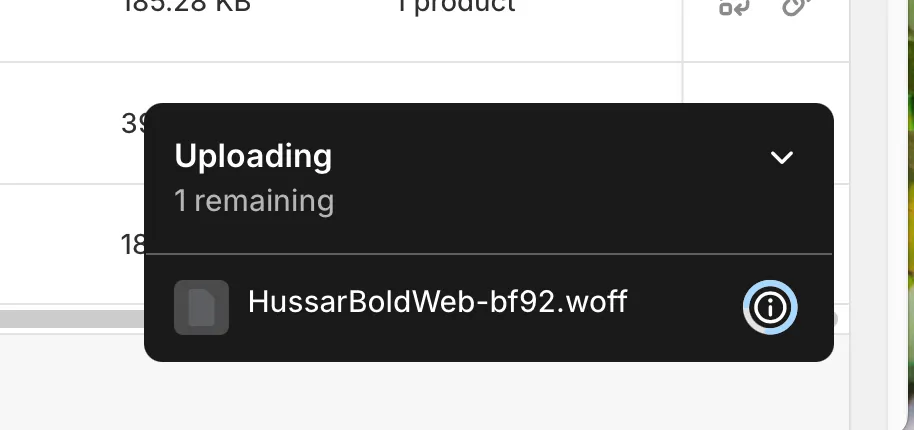
Step 1: Upload your font to the Files section
If you are on a paid Shopify plan, the easiest way to host your custom fonts is through the Files section in your Shopify admin. This keeps your fonts safely stored on Shopify’s servers and gives you a direct URL you can use later in your CSS.

- In your Shopify admin, go to Content > Files.
- Click Upload files, then select your .woff or .woff2 font files from your computer.
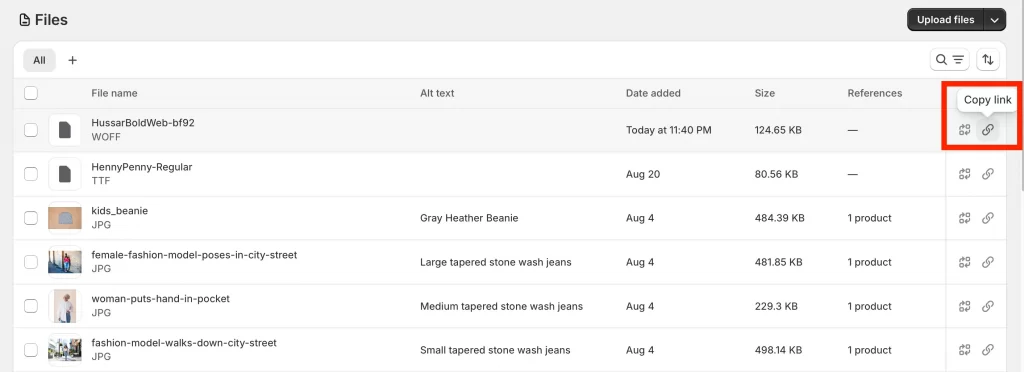
- Once uploaded, Shopify will generate a unique URL for each file. It will look something like: https://cdn.shopify.com/s/files/1/0123/4567/files/MyCustomFont.woff2?v=1234567890
- Copy these URLs and save them in a notepad or document. You will need them when you write the @font-face rule in the next step.
Note: If possible, upload both .woff and .woff2 versions of your font. This ensures compatibility with various browsers while maintaining your site’s speed.
Step 2: Add the @font-face Rule in Theme Settings
Now that your font files are uploaded and you have the URLs, the next step is to tell your Shopify theme how to use them. This is done with a CSS rule called @font-face.
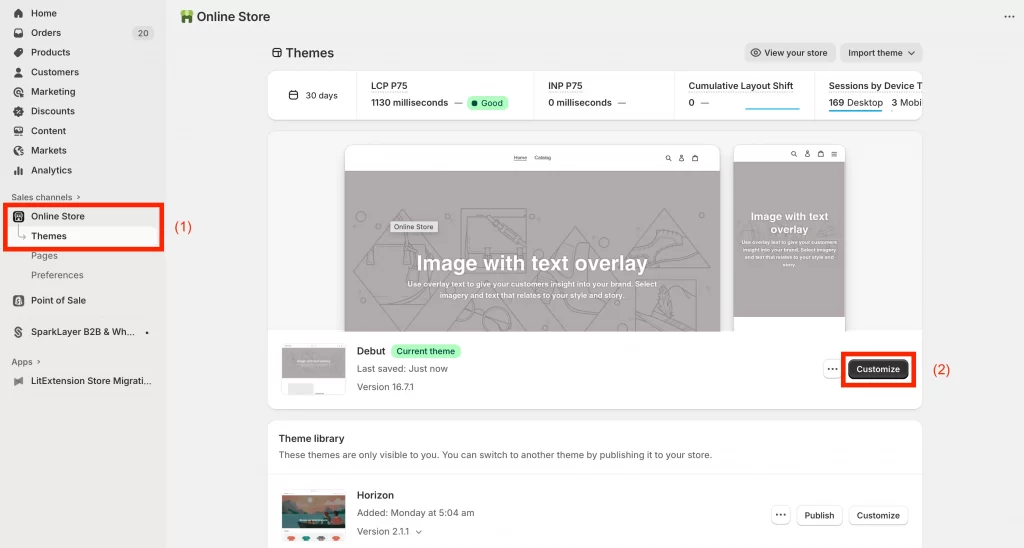
- In your Shopify admin, go to Online Store > Themes (1).
- Find your current theme and click Customize (2).
- In the left-hand sidebar, scroll down and open Theme settings (3).
- Select Custom CSS (4) (sometimes called “Additional CSS” depending on your theme).
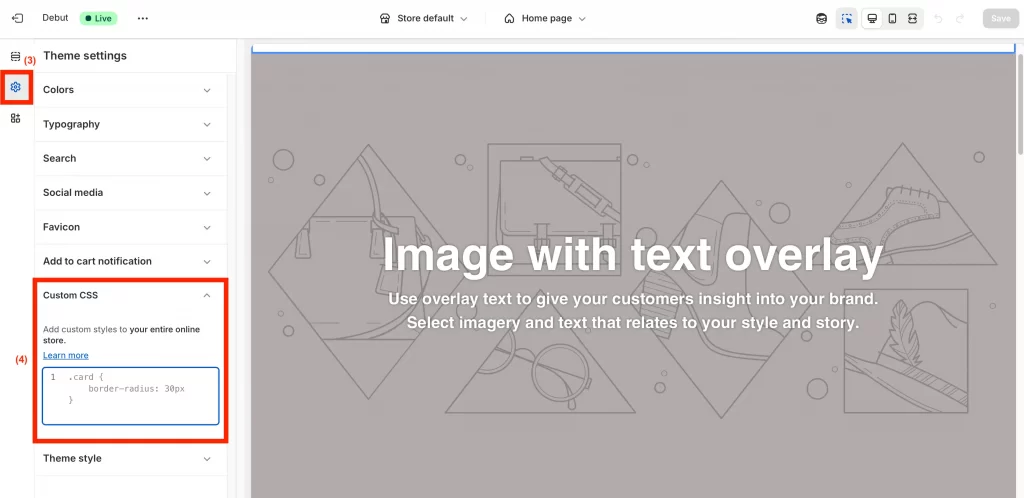
- Paste in the following code, replacing the file names with the URLs you copied earlier:
@font-face {

  font-family: 'MyCustomFont';

  src: url('{{ "MyCustomFont.woff2" | file_url }}') format('woff2'),

       url('{{ "MyCustomFont.woff" | file_url }}') format('woff');

  font-weight: normal;

  font-style: normal;

  font-display: swap;

}- Use file_url because you uploaded the fonts through the Files section.
- Keep the font-family name simple (e.g., MyCustomFont) as you will use this exact name again when applying the font in the next step.
- The property font-display: swap; is important because it shows a fallback font first and swaps in your custom font once it loads. This prevents a blank screen effect.
After adding the code, click Save. Your whole store will now use your custom font unless you override it for specific elements in the next step.
Step 3: Apply the custom font to specific store elements
If you want more control, you can keep the global font for body text and then apply your custom font only to certain parts of the store. Add these rules under your @font-face code in Theme settings → Custom CSS.
1. Apply to headings only
h1, h2, h3, h4, h5, h6 {
font-family: 'MyCustomFont', serif;
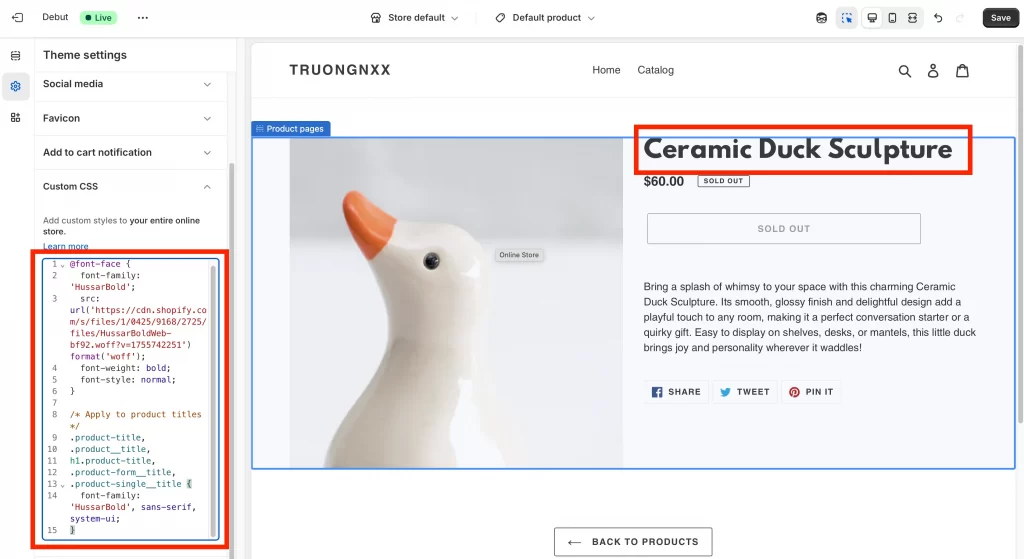
}2. Apply to product titles
.product-title,

.product__title {

  font-family: 'MyCustomFont', sans-serif;

}
Here’s an example you can paste into your Custom CSS section:
3. Apply to navigation links
.header__menu-item,

#menu-drawer a {

  font-family: 'MyCustomFont', sans-serif;

}
4. Keep body on a system font, style just key accents
body { font-family: system-ui, -apple-system, Segoe UI, Arial, sans-serif; }

.button,

.price,

.badge {

  font-family: 'MyCustomFont', sans-serif;

}
5. If your change does not show
Your theme’s CSS may be more specific. Target deeper selectors, for example:
.header h1.site-header__title {

  font-family: 'MyCustomFont', sans-serif;

}
As a last resort, you can use !important:
h1 { font-family: 'MyCustomFont', serif !important; }Adding more specific selectors ensures your custom font is applied exactly where you want it.
Step 4: Save and preview your store
Once you have applied your custom font rules, click Save in the Theme settings panel. Then open your storefront in a new tab to check how the font looks.
- Refresh the page to make sure the changes load.
- If you don’t see the update right away, try a hard refresh (Ctrl + Shift + R on Windows or Cmd + Shift + R on Mac) to clear cached styles.
- Test a few different pages, such as your homepage, product pages, and checkout, to confirm the font displays consistently.
If the font shows correctly, congratulations! You have successfully added a custom font to your Shopify store using the Files section.
How to Add Custom Font to Shopify to Assets Folder (Code Editor)
For the Assets Folder method, this option is better suited for developers or anyone comfortable editing theme files directly. It keeps your fonts organized alongside other theme assets and gives you more control, especially if you’re managing your theme with Shopify CLI or GitHub.
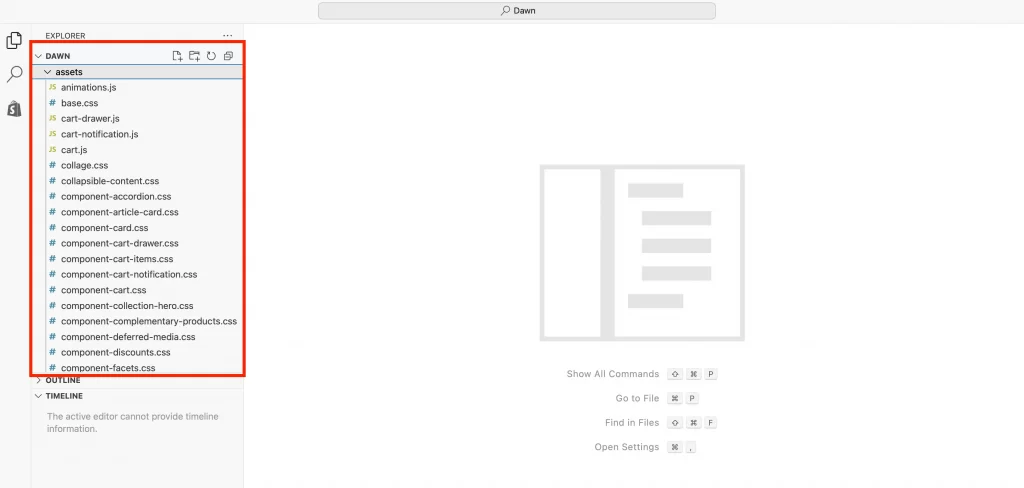
If you want to add a custom font to Shopify Dawn theme, this is the method you’ll follow. Dawn’s main stylesheet is usually called base.css, and that’s where you’ll place your code.
Step 1: Upload your font to the Assets folder
- In your Shopify admin, go to Online Store > Themes.
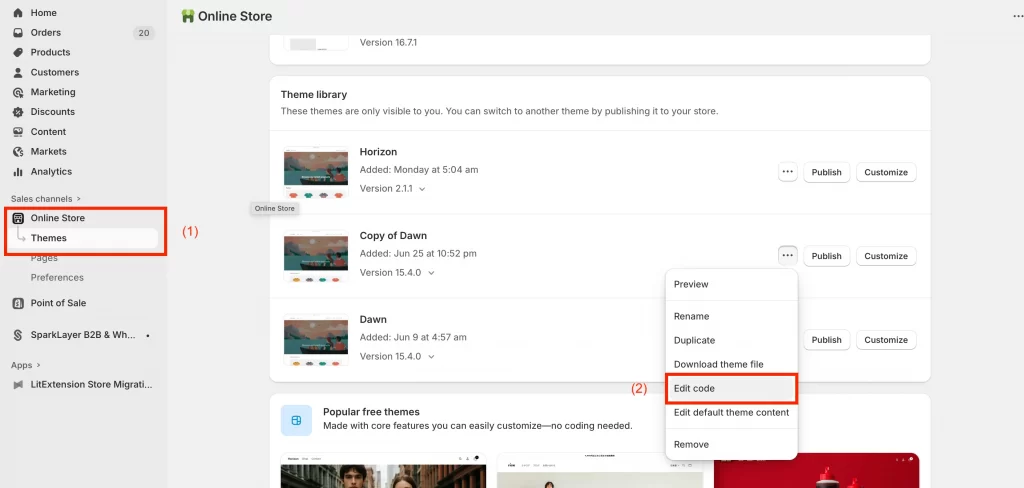
- Find your current theme, click Actions, then choose Edit code.
- In the sidebar, open the Assets folder.
- Click Add a new asset or drag and drop the font files.
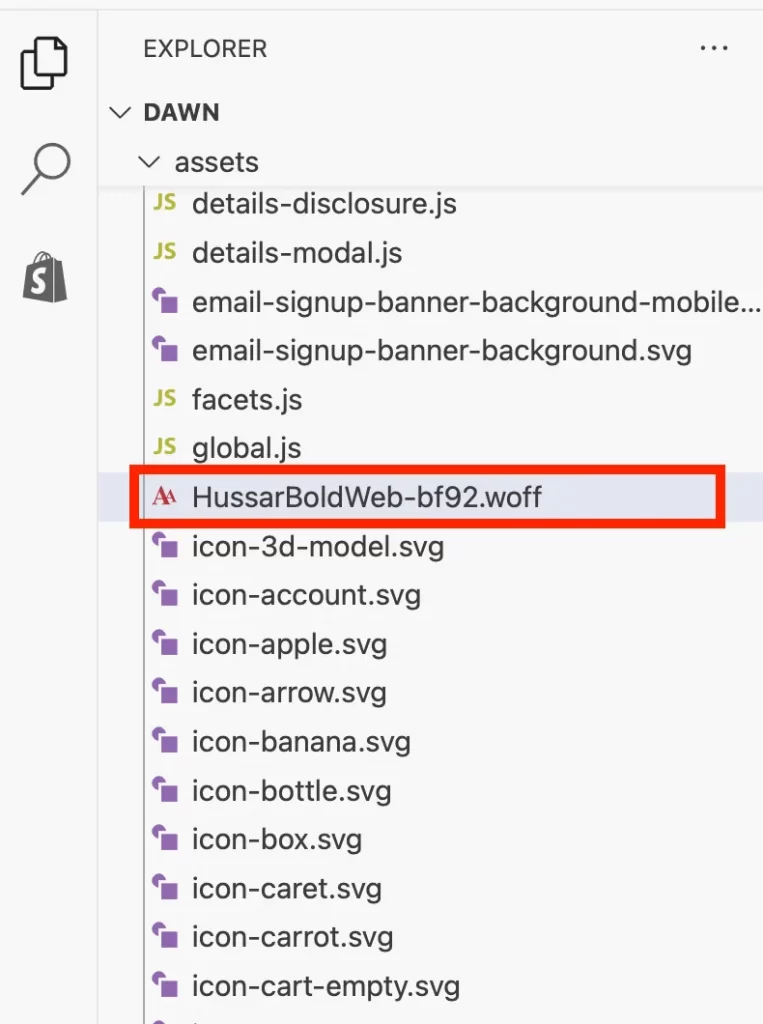
- Once uploaded, the files will appear inside the Assets folder along with your CSS and JavaScript files.
Step 2: Add the @font-face rule in CSS file
- Still inside the Assets folder, open your theme’s main CSS file. Common names include base.css, theme.css, or theme.scss.liquid.
- Scroll to the bottom of the file and paste in the following code. Replace the file names with your uploaded font files:
@font-face {

  font-family: 'MyCustomFont';

  src: url({{ 'MyCustomFont.woff2' | asset_url }}) format('woff2'),

       url({{ 'MyCustomFont.woff' | asset_url }}) format('woff');

  font-weight: normal;

  font-style: normal;

  font-display: swap;

}- Use asset_url because your fonts are stored in the theme’s Assets folder.
- Add separate @font-face rules if you have multiple weights or styles (e.g., bold, italic).
Click Save when finished.
Step 3: Apply the custom font to your store elements
Now that Shopify recognizes the font, apply it with CSS rules. You can choose to apply it globally or only to certain elements.
1. Apply globally to body text
body {

  font-family: 'MyCustomFont', sans-serif;

}
2. Apply to headings only
h1, h2, h3, h4, h5, h6 {

  font-family: 'MyCustomFont', serif;

}
3. Apply to a specific element (like product titles)
.product-title {

  font-family: 'MyCustomFont', sans-serif;

}
If the font doesn’t appear right away, use more specific selectors (for example: .header h1.site-header__title) to make sure your rule overrides the theme’s default CSS.
Step 4: Save and test your store
- Click Save in the code editor.
- Visit your storefront and refresh the page.
- Try a hard refresh (Ctrl + Shift + R or Cmd + Shift + R) if the font does not appear.
- Test your store on both desktop and mobile to confirm the font loads correctly.
If you see your new font in action, then you’ve successfully added a custom font using the Assets folder.
How to Change Fonts in Shopify Theme?
Sometimes, you might not want to add a completely new font but simply change the existing font in your Shopify theme. Adhere to our guides to do it:
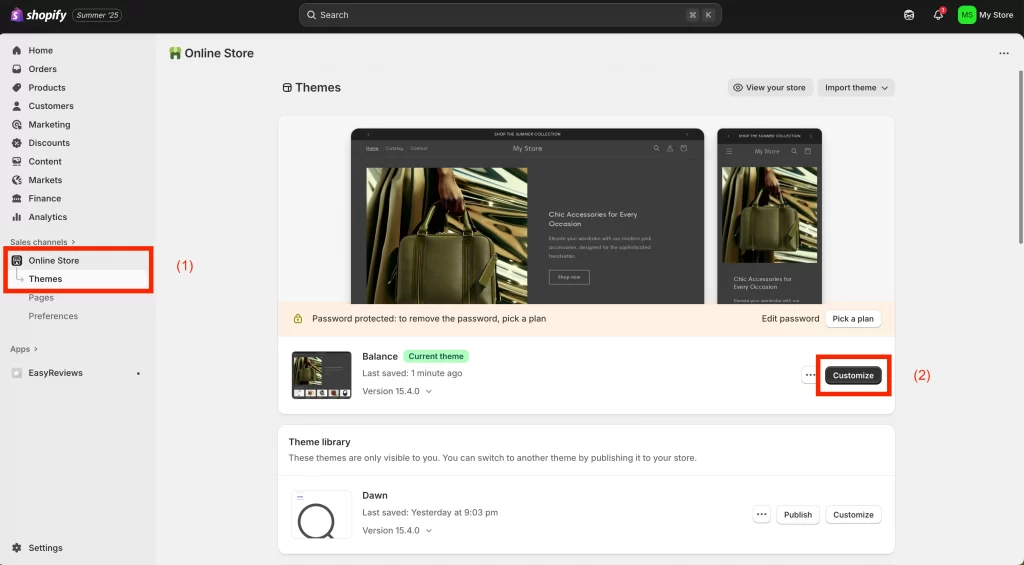
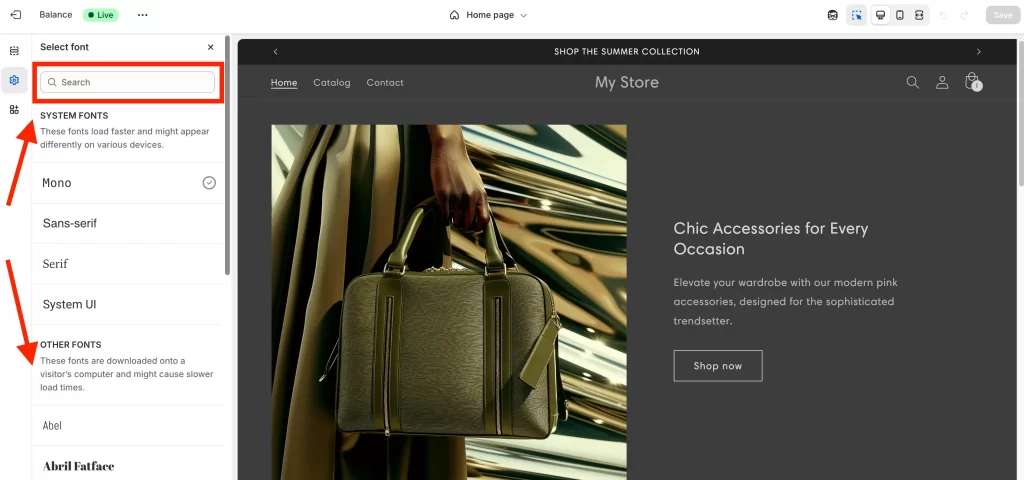
Step 1: Access the Theme Editor
First, go to Online Store > Themes (1) > Customize (2) the current theme.
Step 2: Navigate to Typography
Next, from the Themes section, access Theme Settings (1) > Typography (2).
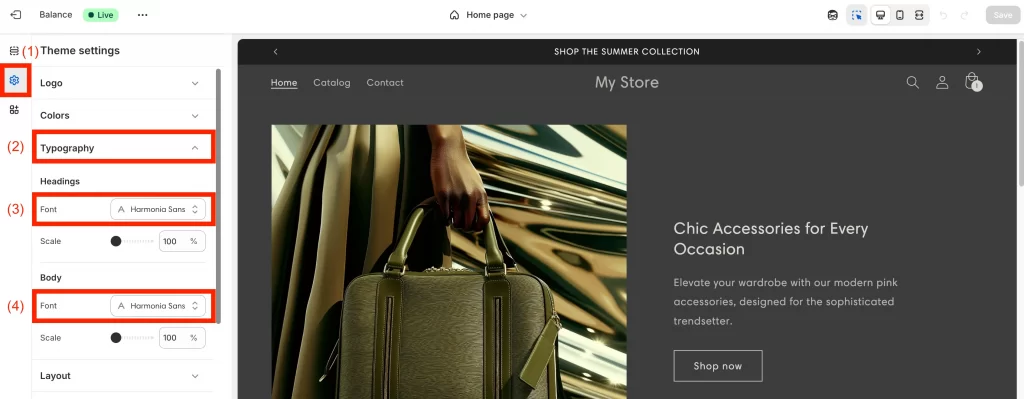
Then, under Typography, you can choose Heading font (3) or Body font (4).
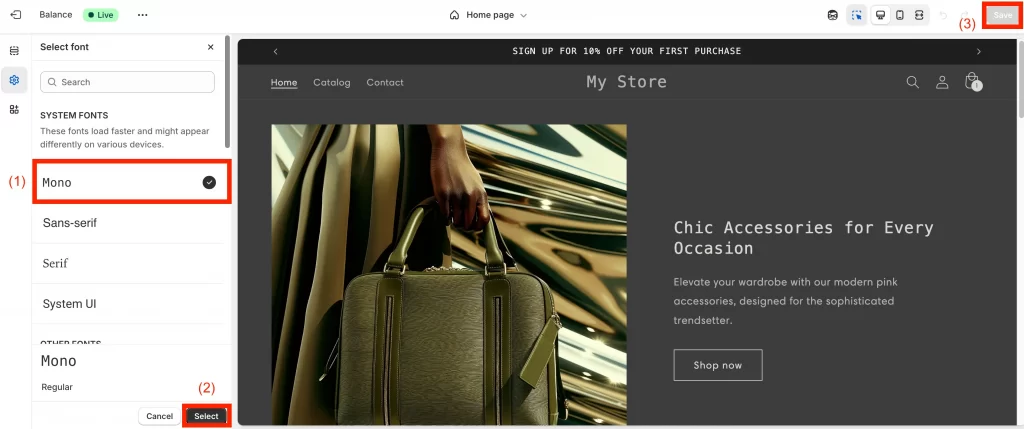
Step 3: Choose the font name
Browse through the available fonts and select the one that aligns with your brand vision and website design.
Step 4: Save changes
After choosing the font (1), click Select (2), then Save (3) your changes, and preview your website to see the new font in action.
From now on, if you wonder how to add Google fonts to Shopify, just apply our instructions mentioned above.
Troubleshooting and Best Practices for Custom Fonts on Shopify
1. Font not appearing
If your custom font does not load at all, check that you used the right Liquid filter. Use file_url if you uploaded through Files, and asset_url if you uploaded through Assets. Also make sure the font-family name you apply in CSS matches exactly the name you declared in your @font-face rule.
2. Only some elements are changing
When only parts of your store update, it usually means the theme’s default CSS is overriding your rule. To fix this, target more specific selectors. For example:
.header h1.site-header__title {

  font-family: 'MyCustomFont', sans-serif;

}
3. Changes not showing after save
If you saved your code but the font is still not appearing, your browser may be showing a cached version. Do a hard refresh (Ctrl + Shift + R on Windows, Cmd + Shift + R on Mac) to load the newest stylesheet.
4. Performance considerations
For faster loading, always use .woff2 if it is available. Only upload the weights you need, such as Regular and Bold, instead of the full font family. Add font-display: swap; to your @font-face rule so text appears immediately with a fallback font, then switches to your custom font when it is ready.
5. Browser and device testing
After adding your custom font, view your store in Chrome, Safari, Firefox, and Edge, as well as on mobile devices. This helps you confirm the font renders consistently across different platforms.
6. Licensing and permissions
Make sure you have the right to use your font online. A desktop license does not cover embedding fonts on a website. Always check the EULA and, if needed, purchase a proper webfont license before using the font in your Shopify store.
7. Theme-specific notes
Fonts added manually through CSS will not show up in the Theme Editor’s Typography menu. Some themes may also store font rules in snippet files like head-variables.liquid. If your theme already has @font-face rules there, you can place your custom font code in the same location for consistency.
For store owners who want a fully polished setup without the hassle, our team at LitOS can help. From custom fonts to complete theme development, we make your Shopify store truly match your brand.
👉 Get expert help with our Shopify store development service.
How to Add Custom Font to Shopify: FAQs
Can I add my own font to Shopify?
Yes, you can. Shopify lets you upload custom font files and then apply them with CSS rules in your theme. You’ll need your font in .woff or .woff2 format, and a paid plan if you want to upload through the Files section.
How do I import custom fonts to Shopify?
You first upload the font file to Shopify (either through Content > Files on paid plans or the Assets folder in the code editor). Then you add an @font-face rule in your CSS to tell the theme how to use it, and finally apply it to elements like body text, headings, or product titles.
How do I add custom text in Shopify?
If you want to change the actual text (like button labels, product descriptions, or navigation links), go to Online Store > Themes > Edit default theme content. From there, you can edit any text fields in your store. If you want to style the text with a custom font, you’ll need to follow the font upload steps.
Do I need a license for my font?
Yes. Fonts are licensed software. A desktop license does not cover web use. Always check that you have a webfont license before adding it to your Shopify store, even if the font was free.
Why don’t my fonts show up in the Theme Editor’s Typography menu?
Fonts you add manually with CSS won’t appear in the Typography dropdown. They are applied only through your custom code. If you want to switch fonts later, you’ll need to adjust your CSS again.
Final Words
Fonts play a big role in shaping how your store feels. The right typeface makes your brand stand out, improves readability, and gives your site a professional look. By learning how to add custom font to Shopify, you now have the steps to move beyond the defaults and create a style that matches your brand.
At LitOS, we help brands take these small customizations further. From unique fonts to full theme design, our team builds Shopify stores that are not only on-brand but also built to convert.
Ready to give your store a sharper look?