
How to Add a Collaborator on Shopify (and Manage Staff Access)
Learning how to add a collaborator on Shopify helps you securely share access to your store with developers, agencies, or freelancers without revealing your own login. Collaborator accounts allow trusted partners to help with setup, design, or troubleshooting while keeping your data safe.
You can add collaborators and manage permissions in several ways:
- Add a collaborator to give temporary access to Shopify Partners or developers
- Invite staff members with specific roles and permissions for internal work
- Approve collaborator requests from your Shopify Partner Dashboard
In this guide, you will learn how to add collaborators, invite staff accounts, and handle collaborator access from both the store owner and Shopify Partner sides, ensuring smooth teamwork and strong store security.
What Is a Collaborator on Shopify?
Collaborator vs staff account
A collaborator is a Shopify Partner, such as a developer, designer, or agency, who receives secure access to your store. You grant this access so the collaborator can help with setup, customization, or troubleshooting. Collaborators sign in through the Shopify Partner Dashboard using their Shopify collaborator login, and their collaborator accounts do not count toward your store’s staff limit.
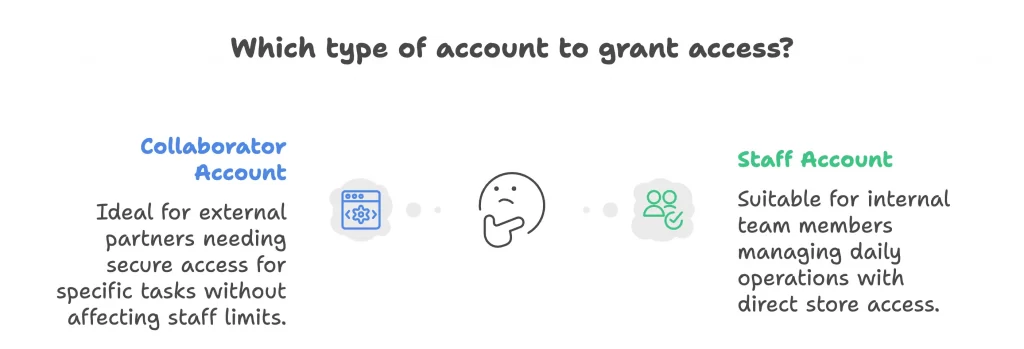
A staff account belongs to someone on your internal team who manages daily operations. Staff members sign in directly through your store’s admin and keep access until you remove or edit their roles.
When to use each type of access on your store?
Store owners should use collaborator accounts when working with external Shopify Partners or freelancers who only need temporary or limited access. This method helps protect store security and makes it easy to remove access after a project ends.
Store owners should use staff accounts for employees or long-term team members who manage products, orders, or customers regularly. Staff accounts provide ongoing access and allow you to assign roles with specific permissions.
How to Add a Collaborator on Shopify (For Store Owners)
Store owners can grant secure access to Shopify Partners, developers, or freelancers who need to work on the store. The process begins with generating a collaborator request code and ends with reviewing and approving the request inside the admin.
Overview of steps:
- Generate a collaborator request code
- Share your store URL and code
- Review and approve the request
- Adjust permissions or roles
Now, let’s follow these detailed steps below to add a collaborator safely.
Note: Many store owners add collaborators during the early build stage to speed up launch and avoid mistakes. If you are still in the setup phase, this works best alongside a full Shopify store setup process where developers handle themes, payments, and basic settings. Collaborator access allows experts to work while you keep full control.
Step 1. Generate a collaborator request code
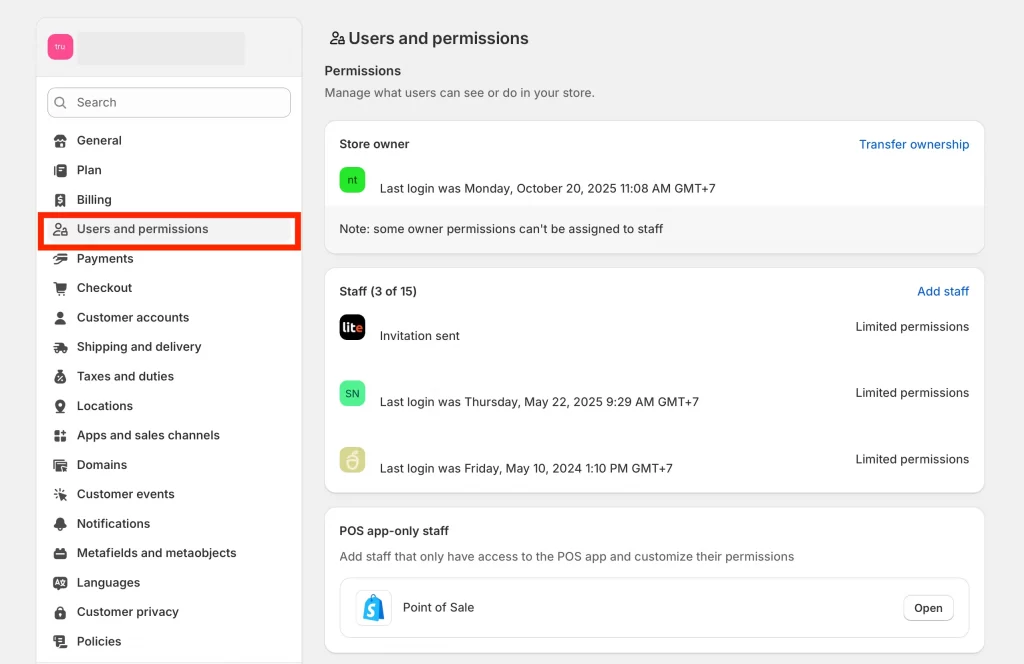
The store owner needs to log in to the Shopify admin and go to Settings > Users and permissions.
In the Collaborators section, select Only people with a collaborator request code can send a collaborator request. Then click Generate new code to create a unique four-digit collaborator request code.
This code allows only trusted Shopify Partners to request access to your store. You can see an example of this setting below:
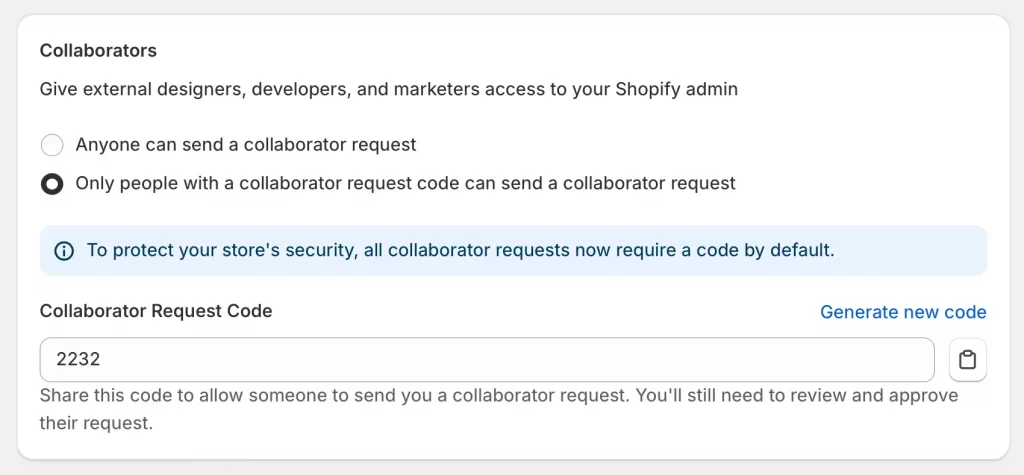
Note: All collaborator requests now require a code by default to protect your store’s security. You should share this code only with verified partners or developers.
Step 2. Share your store URL and code
You must then send the collaborator two pieces of information: the store URL (for example, your-store-name.myshopify.com) and the four-digit request code. The collaborator will use this information to submit their access request through the Shopify Partner Dashboard.
Step 3. Review and approve the request
After the collaborator sends a collaborator request, you will receive a notification by email address and inside the Shopify admin. Next, you should review the access requests and check the requested collaborator permissions before approval.
Step 4. Adjust permissions or roles
Once the request is approved, you can open the collaborator’s profile in Users and permissions and edit their access. You will now be able to assign specific roles, adjust permissions for apps or channels, or remove access if it is no longer needed.
Collaborators often help with content tasks such as creating policies, landing pages, or custom layouts. To support this work, store owners should understand how to add pages on Shopify and give collaborators only the permissions they need. This keeps content changes organized and reduces the risk of errors.
How to Add Staff Members on Shopify (For Internal Team)
Store owners can invite employees or team members to help manage daily operations such as orders, inventory, or customer support. Staff accounts are best for long-term access and can include custom roles with specific permissions.
Overview of steps:
- Go to Settings > Users and permissions
- Click “Add staff” and enter email
- Assign a role or create a custom role
- Control app and channel-specific permissions
- Send the invitation and confirm access
Follow these steps below to add a staff member and manage their permissions effectively.
Step 1. Go to Settings > Users and permissions
You need to log in to the Shopify admin and select Settings, then Users and permissions. This section lists all current users and includes the option to add new staff members.
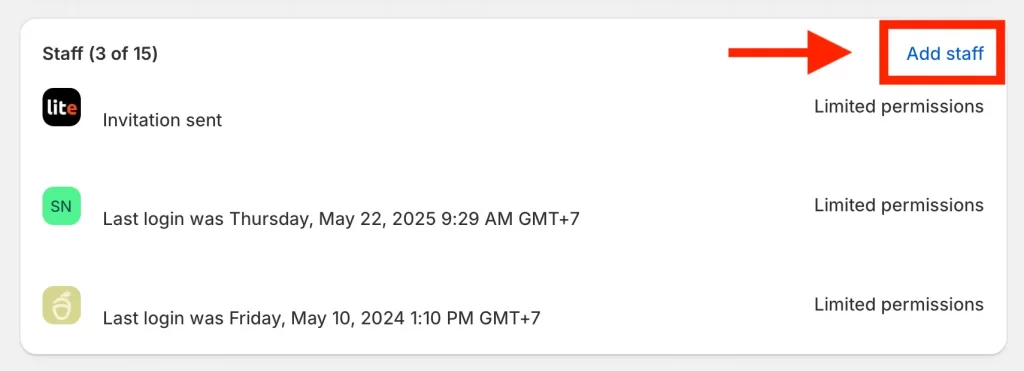
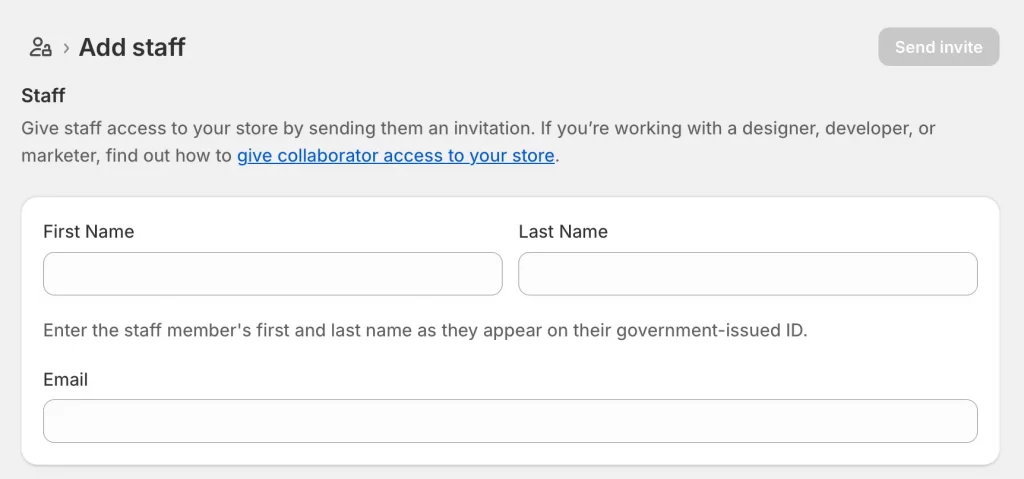
Step 2. Click “Add staff” and enter email
Click Add staff, then fill in the first name, last name, and email address of the person you want to invite. This email will receive the invitation to join your store.
Step 3. Assign a role or create a custom role
Scroll down to the Store permissions section. You can decide which parts of your store the new staff member can access – such as Orders, Products, or Customers. This helps you control what data each user can view or change.
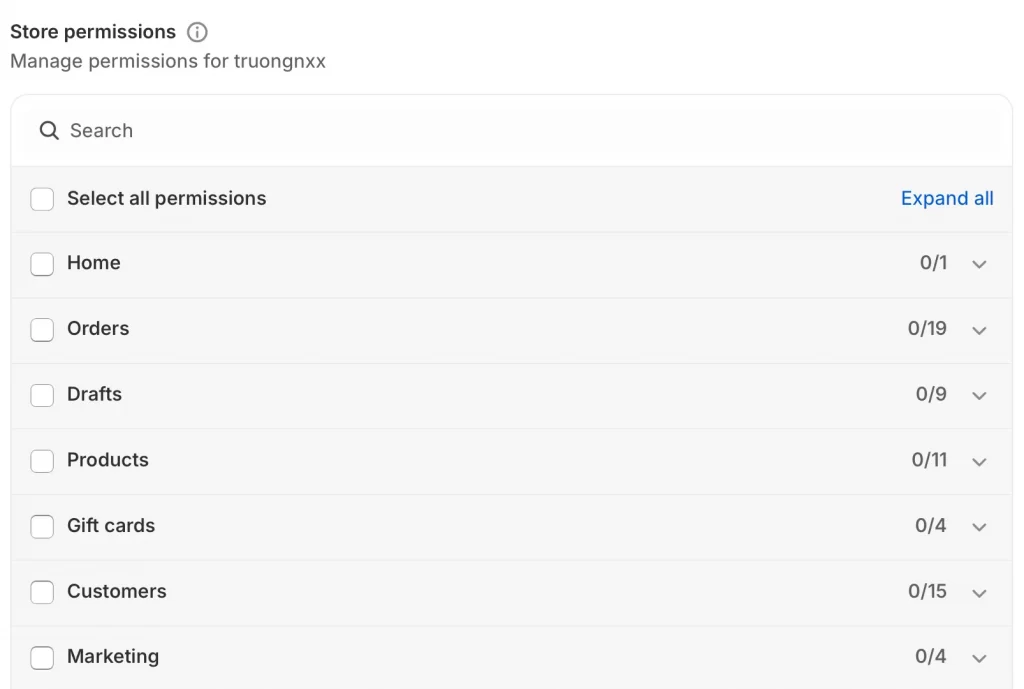
If you expand Customers, you can choose detailed permissions such as viewing customer data, exporting records, or editing store credit balances. You can also manage company-related permissions for B2B customers.

Note: Give only the access needed for the staff member’s responsibilities. Limiting permissions helps keep customer data secure and ensures compliance with privacy standards.
Step 4. Control app and channel-specific permissions
Below the main store permissions, you can manage which apps, sales channels, and Point of Sale features each staff member can use. This section helps ensure that every team member has exactly the tools they need.
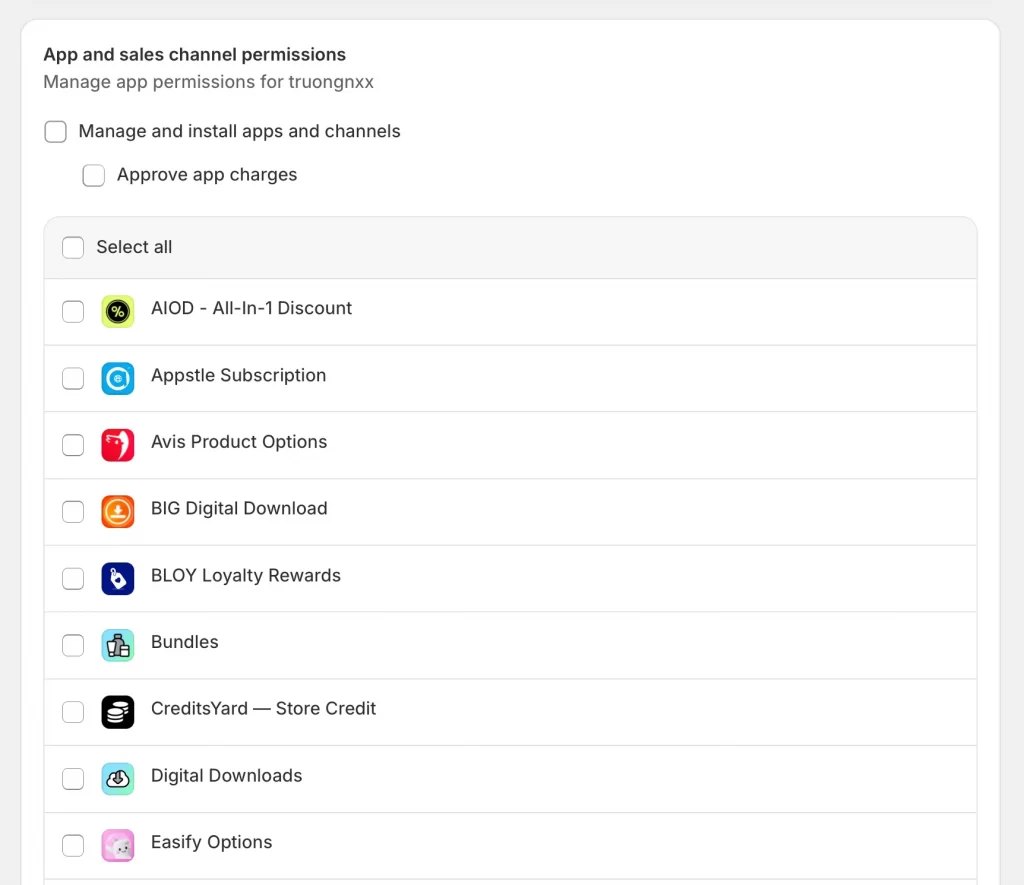
In the App and sales channel permissions area, select which apps and channels the staff member can manage. You can also allow them to install new apps, approve app charges, or access only specific integrations.
If your store uses Shopify POS, scroll down to the Point of Sale section and check Access Point of Sale. You can also enable Set up new or updated POS devices so the user can connect hardware through the Shopify POS app.
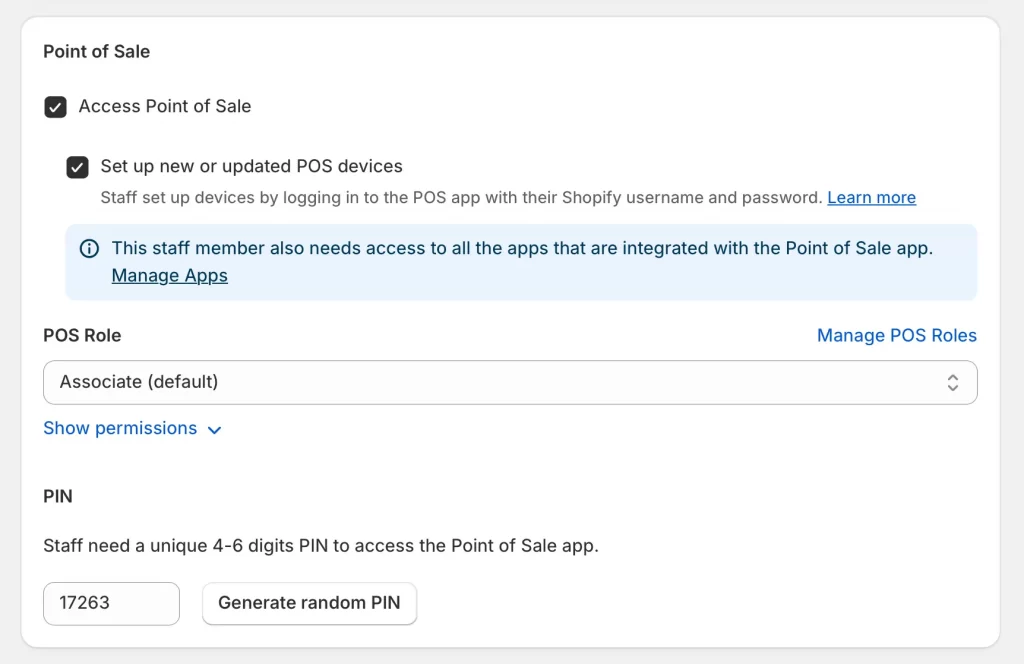
Choose a POS role (for example, Associate default) and set a unique 4- to 6-digit PIN for login access.
Note: Each staff member should have a separate POS PIN to track in-store activity accurately and maintain checkout security.
Step 5. Send the invitation and confirm access
After setting all permissions, click Send invite. The staff member receives an email to create their login and join your store. Once accepted, their profile appears in your Users and permissions list.
You can open their profile anytime to manage access, reset their password, or check two-step authentication settings.
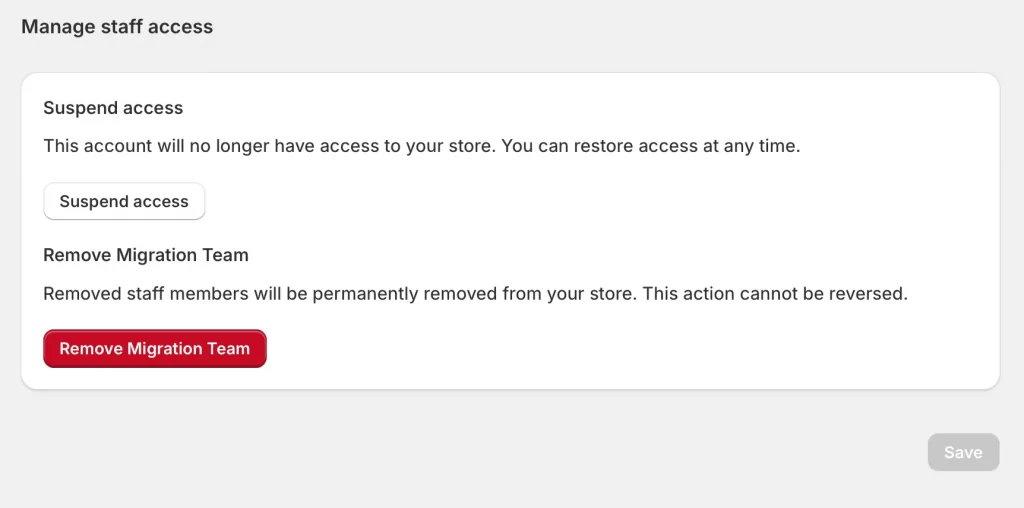
If you need to stop access temporarily, click Suspend access. To remove them permanently, select Remove [Staff Name]. Once removed, the user no longer appears in your staff list.
How to Request Access (For Shopify Partners or Freelancers)
Shopify Partners, agencies, or freelancers can request collaborator access to a client’s store directly from their Partner Dashboard. This access lets them work on design, setup, or troubleshooting without needing the store owner’s login details.
Step 1. Log in to your Shopify Partner Dashboard
The collaborator needs to open the Shopify Partner Dashboard and sign in using their Partner account credentials.
Step 2. Click “Add Store” > “Request access to store”
From the Dashboard, the collaborator should go to the Stores section, select Add Store, and then choose Request access to store from the available options.
Step 3. Enter the store URL and 4-digit code
The collaborator must enter the URL of the Shopify store along with the four-digit collaborator request code provided by the store owner. The system automatically verifies that the request requires a collaborator request before continuing.
Step 4. Select permissions and send a request
The collaborator should choose the specific areas of the store they need to access, such as products, orders, or themes. They can also include a short message explaining the purpose of the request before selecting Request access to store. Once submitted, the store owner receives a notification to approve or reject the request.
Special Cases and Additional Options
Some Shopify stores have unique access needs, especially larger teams or Plus merchants. Shopify provides several options to manage access efficiently and keep accounts secure.
1. Change or reset collaborator codes
Store owners can create a new four-digit collaborator request code at any time from the Users and permissions page. When a new code is generated, the old one becomes invalid, which helps maintain security for all collaborator accounts.
2. Reactivate expired collaborator accounts
Collaborator access automatically expires if the user has not logged in for 90 days. The store owner can reactivate the account by going to Users and permissions, selecting the collaborator’s name, and clicking Actions > Reactivate user.
3. Assign roles in bulk (for large teams)
When managing multiple staff members, the store owner can select several accounts at once and assign the same role to all. This option saves time and keeps permissions consistent across the team.
4. Give sales reps limited access in Shopify Plus & B2B
Shopify Plus merchants who use B2B features can give sales representatives limited admin access. This permission allows them to manage B2B orders and customer accounts without viewing sensitive store data.
Note: Certain store changes require extra care, especially when collaborators are active. If you plan to rebrand, it is important to know how to change your Shopify store name and review collaborator permissions before making updates. This avoids confusion and broken links during the transition.
Troubleshooting Common Collaborator on Shopify Issues
Sometimes collaborators or store owners experience errors when managing access. Most problems come from incorrect request codes, duplicate accounts, or expired permissions. The following solutions can help fix these common issues.
1. Incorrect collaborator request code
If a collaborator sees an “Incorrect code” message, they should confirm the code directly with the store owner. The store owner can check the current code in Settings > Users and permissions > Collaborators. If the code still does not work, the store owner can generate a new one and share it again.
2. You already have a staff or collaborator account
If a collaborator cannot send a new request because their email address already has a staff account or collaborator account, the store owner should go to Users and permissions and clicking Remove the existing user before allowing a new request. Once removed, the collaborator can send a new access request through the Partner Dashboard.
3. Can’t access store after approval
If the collaborator has been approved but cannot access the store, they should log in from the Stores section of their Partner Dashboard, not directly through the store URL. They also need to make sure two-step authentication is active, since it is required for all collaborator accounts.
4. Collaborator access expired after 90 days
Collaborator access automatically expires if the user has not logged in within 90 days. The store owner can reactivate the collaborator by going to Users and permissions, selecting the user, clicking Actions, and choosing Reactivate user.
Many successful brands rely on collaborators to scale faster and stay secure. Reviewing Shopify blog examples and real Shopify jewelry stores shows how teams use collaborators for design, marketing, and technical work. These examples help store owners plan smarter access strategies.
How to Add a Collaborator on Shopify: FAQs
How do I send a collaborator on Shopify?
You can send a collaborator invitation by generating a four-digit request code in your Shopify admin. Share your store URL and the code with the person you want to grant access to. Once they send a request through their Partner Dashboard, you can approve it from Settings > Users and permissions.
How do I give access to someone on Shopify?
You can give access by adding them as a collaborator or as a staff member. Collaborators are external Shopify Partners, while staff accounts are for internal team members. Both types of users can have custom permissions based on their role.
How to set up collabs on Shopify?
To set up collaborations, create a collaborator code, share it with your Shopify Partner, and approve their request once it appears in your admin. You should make sure to assign only the permissions they need for their tasks.
How do I remove a collaborator or staff member?
You can remove any user by going to Settings > Users and permissions, selecting their name, and clicking Remove collaborator account or Remove staff account. Once removed, their access to your store ends immediately.
Is a Shopify Partner Account free?
Yes. Anyone can create a Shopify Partner account for free. This account gives access to the Shopify Partner Dashboard, where developers and agencies can manage stores, submit collaborator access requests, and monitor client projects.
Final Notes
Learning how to add a collaborator on Shopify or how to add someone as a collaborator on Shopify helps store owners safely manage access to your store. Collaborator accounts let trusted experts work efficiently while maintaining control of your data and permissions inside the Shopify Partner Dashboard.
Make your Shopify collaboration secure and efficient!
At LitOS, we help store owners and Shopify Partners work together safely. From setting up collaborator access to managing permissions and store roles, our team ensures your Shopify workspace stays organized and protected for smoother projects and faster results.
CONTACT US
