
How to Add Size Chart in Shopify: A Complete Guide for Store Owners
If you sell apparel, shoes, or any other product with sizing on Shopify, you know how crucial it is to help customers find the right fit. Confusion about sizing is one of the top reasons shoppers abandon their carts or return products. That’s why knowing how to add size chart in Shopify isn’t just a helpful skill but is essential for reducing returns and building customer trust.
In this guide, you’ll learn:
- Why a size chart is essential for any Shopify store that sells sized products
- Step-by-step methods to add a size chart in Shopify using built-in features, metafields, and custom code
- Practical tips for creating a size chart that’s clear, mobile-friendly, and visually appealing
By following these proven methods, you can build trust, reduce returns, and give your customers the confidence they need to buy from your store.
How to Add Size Chart in Shopify via Page (Basic Table or Image)
Adding a size chart page in Shopify is a straightforward way to give your customers the information they need, without relying on extra apps or technical skills.
This method is best for beginners, small stores, or anyone who wants a simple, no-code solution.
Step 1. Create a new page for your size chart
First, head to your Shopify admin and click “Online Store” > “Pages.” Here, you’ll create a brand new page dedicated to your size chart.
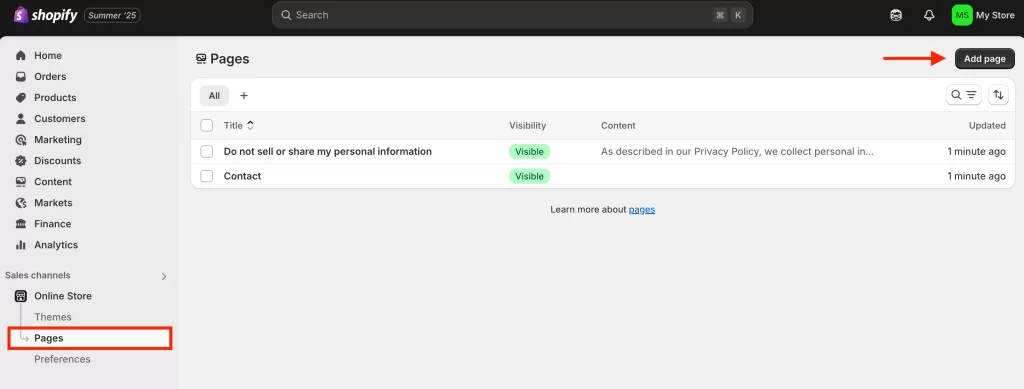
Name it something clear, like “Size Chart” or “Find Your Size.”
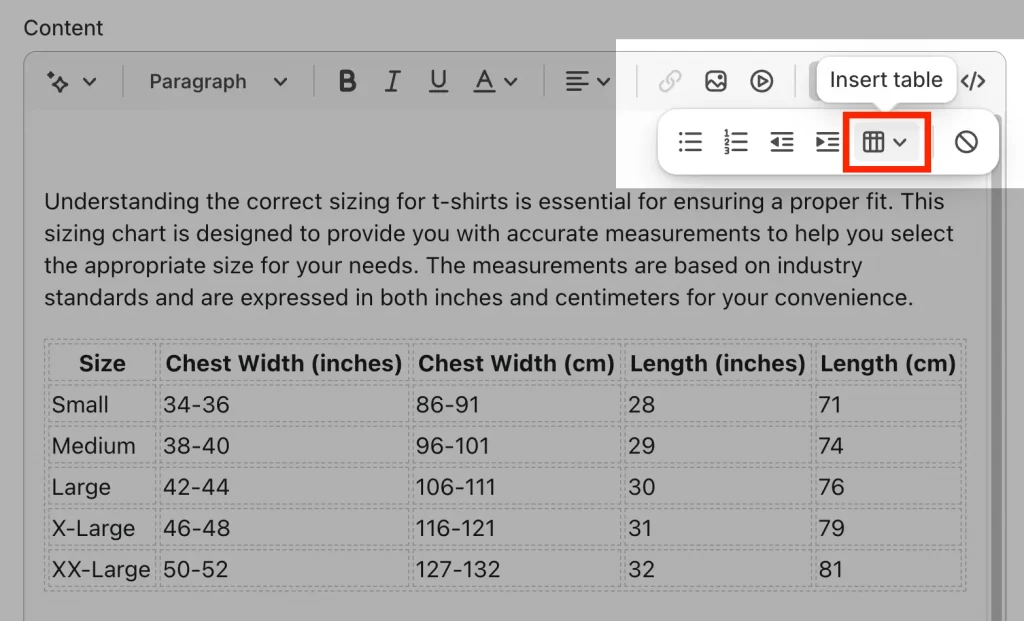
Step 2. Add your table, image, or visual guide
On your new page, you have a few options for presenting sizing information.
For the table, you can use Shopify’s built-in editor to create a simple table with sizes and measurements.
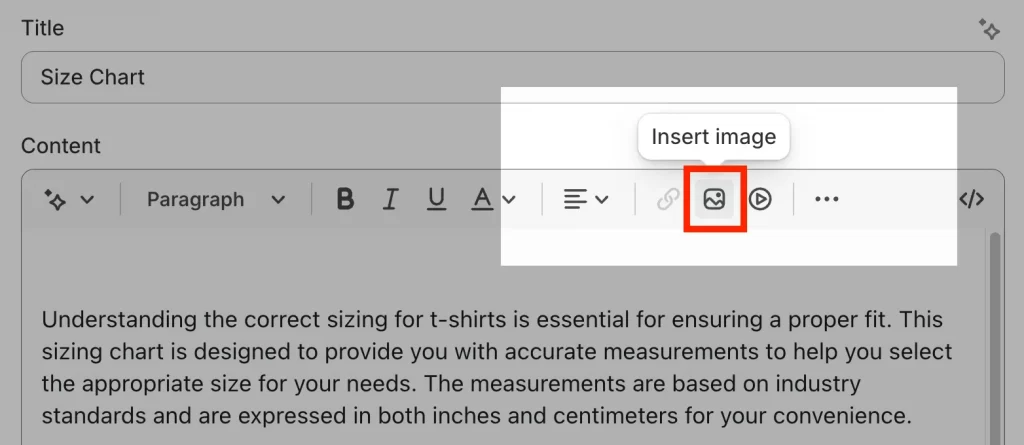
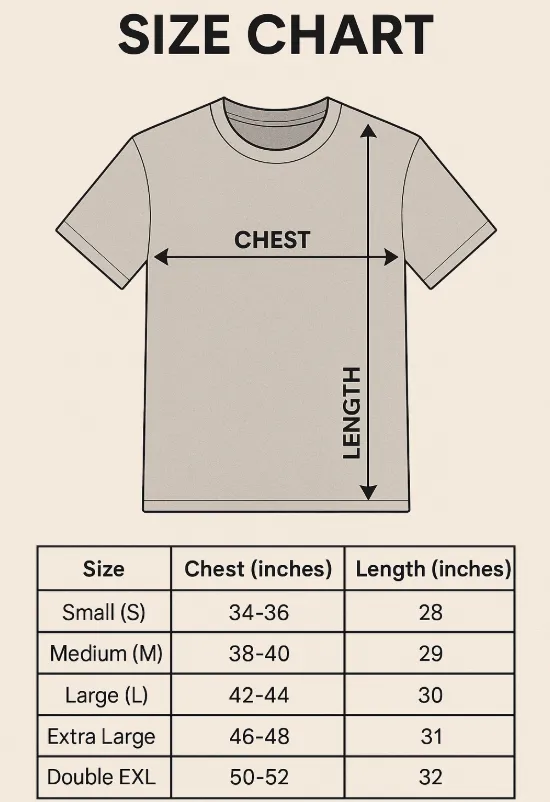
For the image, if your supplier provides a branded size chart or you’ve designed one yourself, simply upload the image. For a visual guide, you can add an illustration or diagram showing how and where to measure, which can be especially helpful for customers new to online sizing.
You should keep the chart easy to read, avoid cramming too much information or using small fonts. A clear, visual layout fosters trust and simplifies the customer experience.
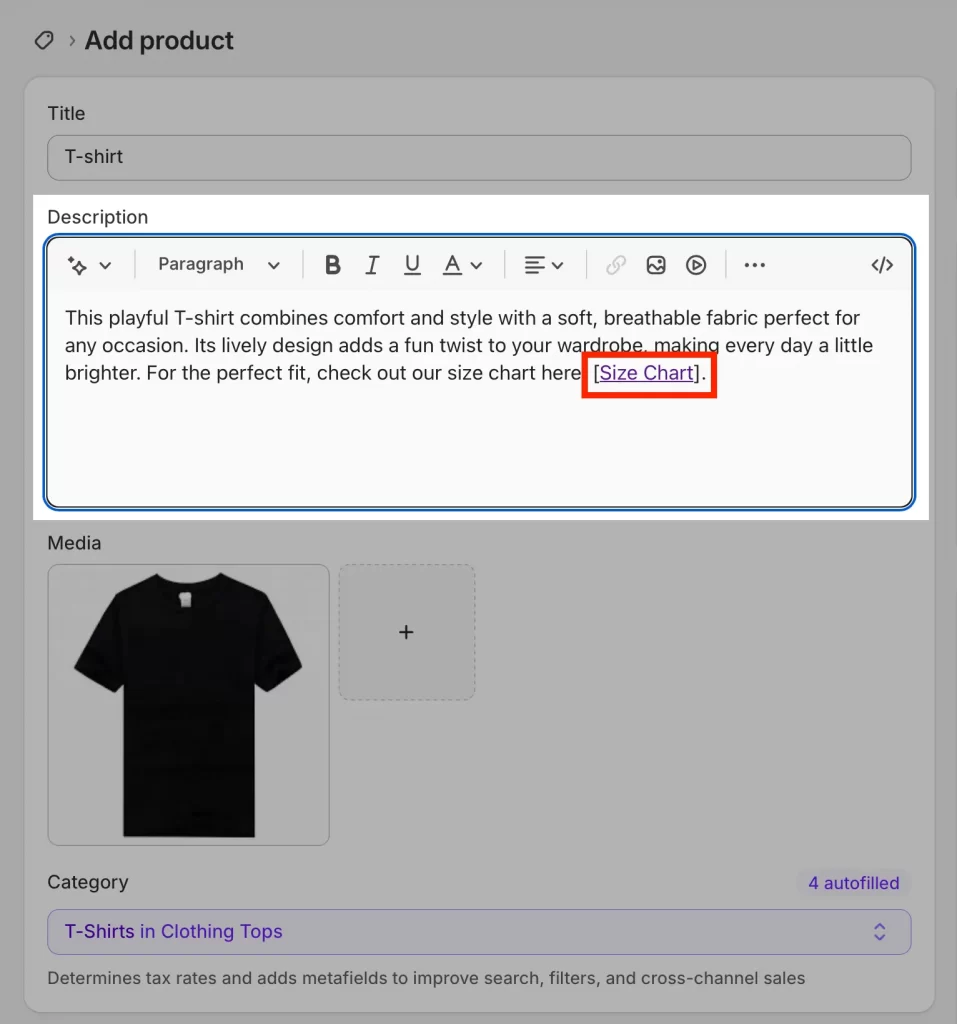
Step 3. Link the page to product descriptions or size selectors
Once your size chart page looks great, make sure shoppers can find it at the exact moment they’re deciding what to buy. The best practice is to add a clear link or button (“View Size Chart”) right next to your product’s size options or in the product description.
To do this:
- Edit your product template or product descriptions.
- Add a hyperlink to your new size chart page.
- For extra visibility, use bold text or a styled button.
Consider adding that product or page to the correct collection.
Imagine shopping for jeans and not seeing any sizing info until you’re at checkout. That’s a recipe for abandoned carts! By linking your size chart directly to where customers select their size, you eliminate doubt and make purchasing from your store.
See our product description tutorial for step-by-step editing.
How to Add a Pop-Up Size Chart Using Shopify Metafields
Want your size chart to feel modern and effortless, just a click away, without cluttering your product pages? Using Shopify metafields, you can add a sleek pop-up size chart that keeps your product pages tidy. It’s more advanced than a basic link, but you don’t need to be a coder to pull this off.
This method is perfect for stores with multiple product types or large catalogs, giving you full control over which chart appears for each product.
Step 1. Set up a metafield definition for the size chart
Start by creating a metafield definition in your Shopify admin.
- Go to Settings > Metafields and metaobjects > Products
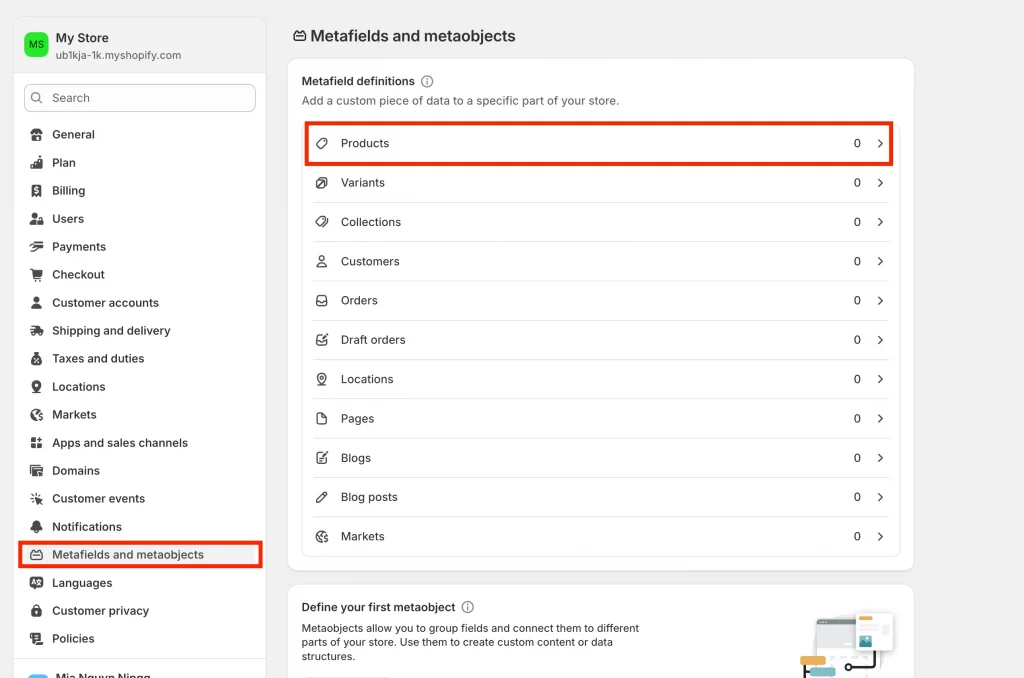
- Click “Add definition.”
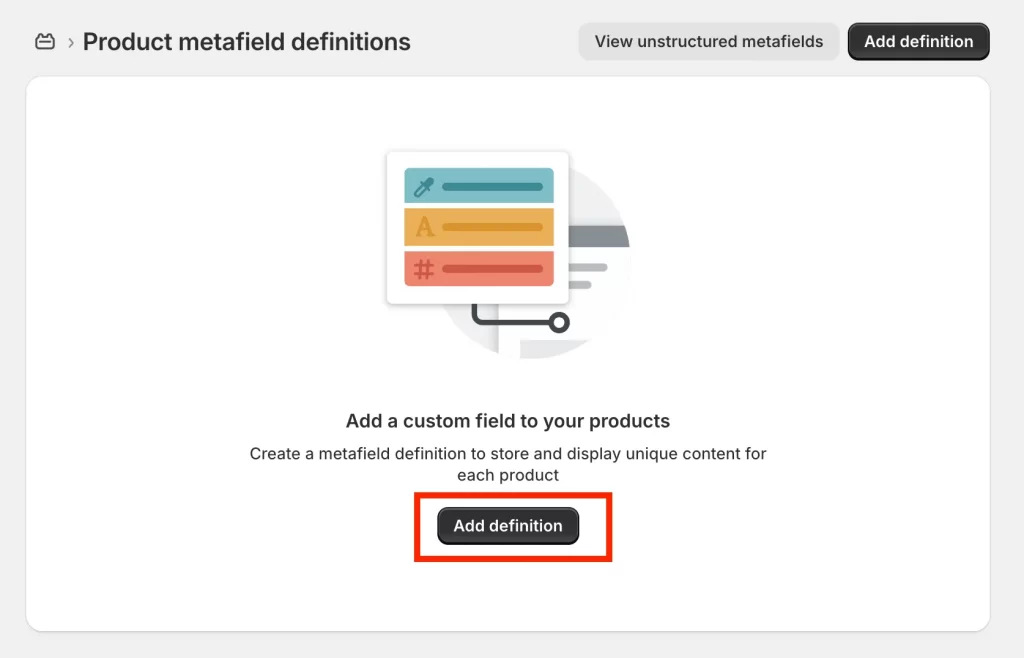
- Name it something like “Size Chart” so it’s easy to find later.
- Content type: Select Page, File, or Rich text, depending on how your size chart is formatted
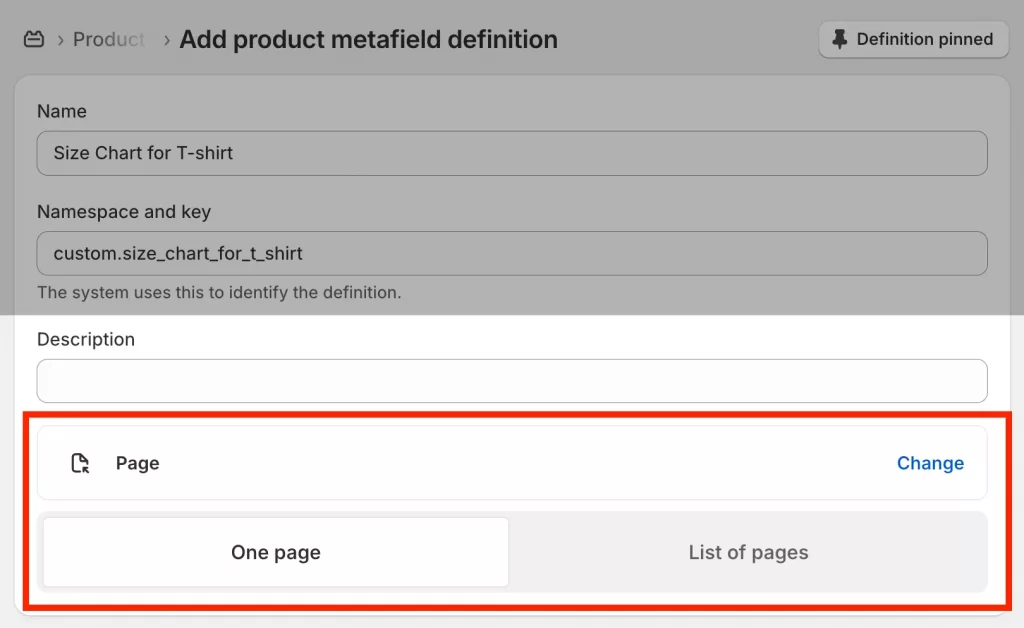
- Leave the rest as default, then Save
Metafields act like custom fields for products. They allow you to assign different size charts to different products without editing multiple templates which is ideal for stores with shirts, shoes, or other varied items.
Step 2. Add your content (table, image, or illustration) to the metafield
Now it’s time to fill your metafield with the actual size chart.
- Head to any product in your Shopify admin (if you’re new to product setup, see how to add products to Shopify).
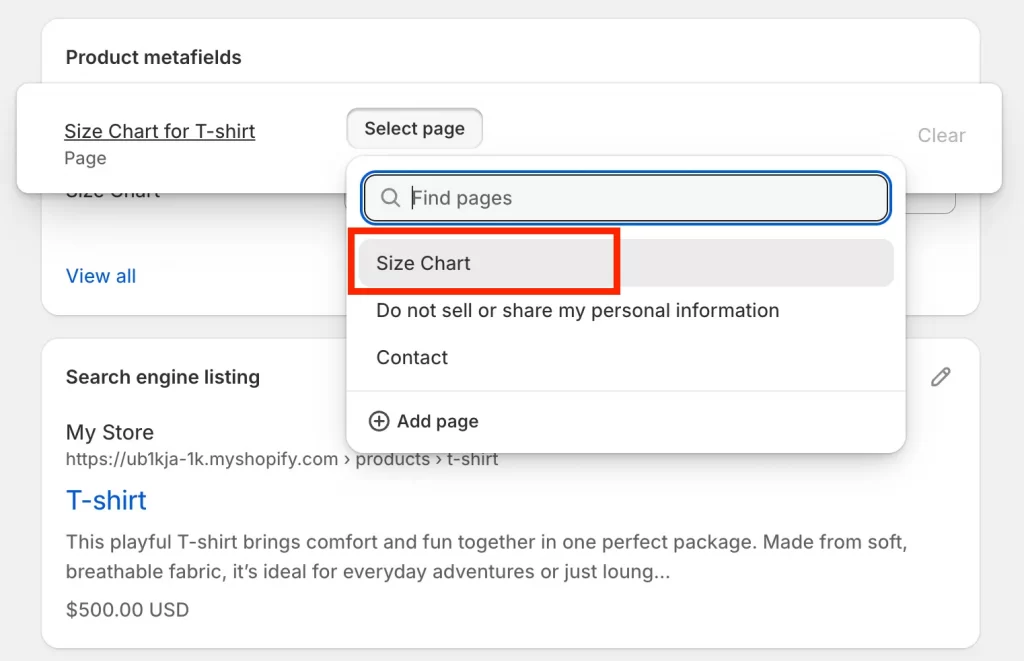
- Scroll down to the new “Size Chart” metafield you created.
- Paste in your table, upload an image, or enter your size chart content.
If you sell multiple product types (like shirts and shoes), you can add different charts to each product’s metafield, learn best practices to organize products so your size charts stay consistent.
Step 3. Display the size chart as a pop-up or collapsible row
This is where the magic happens. You’ll need to adjust your theme so the size chart appears as a pop-up when a shopper clicks a link or button.
- Open your theme editor (Online Store > Themes > Customize).
- Go to Products > Default product to assign to all products
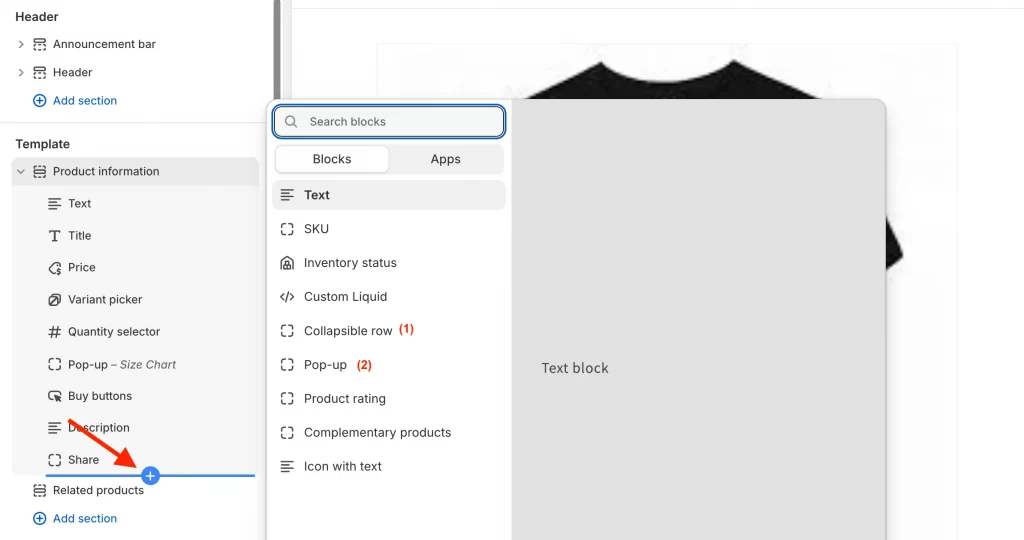
- Click “Add block” → Choose:
- (1) Collapsible row (useful for accordion-style sections)
- (2) Popup (best for modern UX)
Option 1: Collapsible row block
- Choose “Collapsible row”
- Label it “Size Chart”
- Under “Row content,” connect the Size Chart metafield
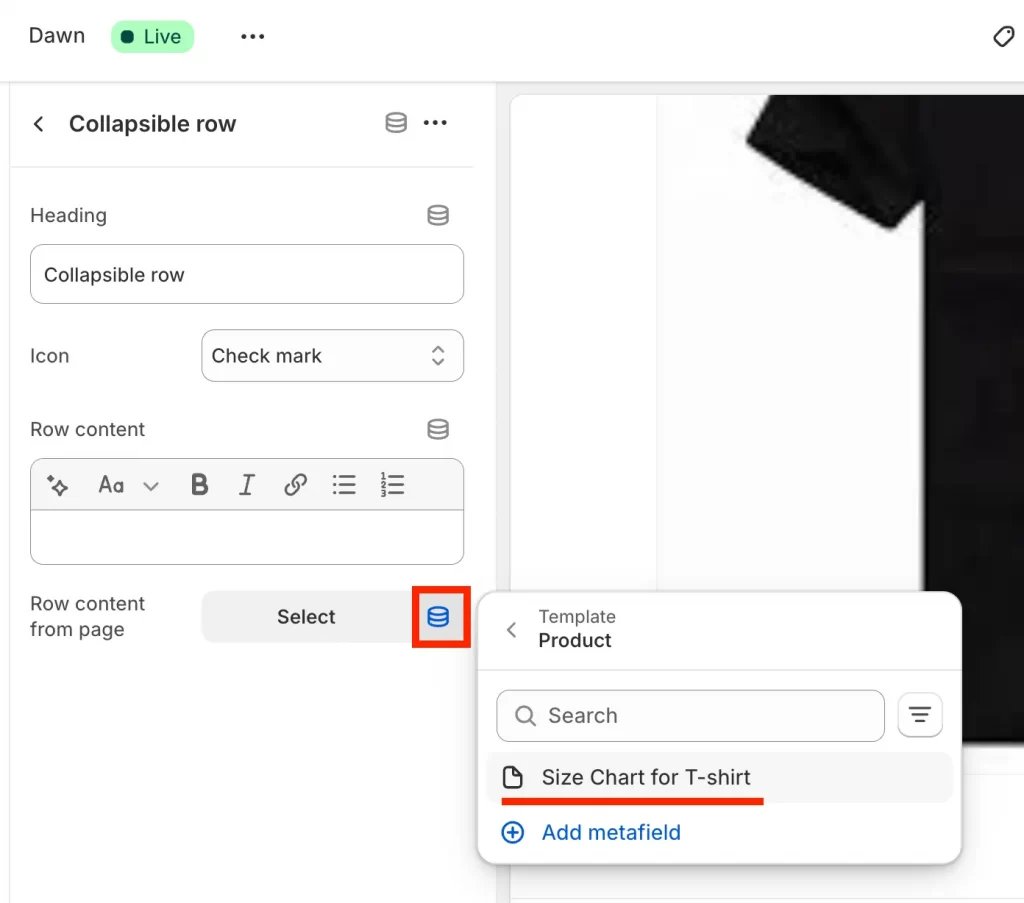
Both options pull from the Page you assigned in Step 2, so each product shows the right chart automatically.
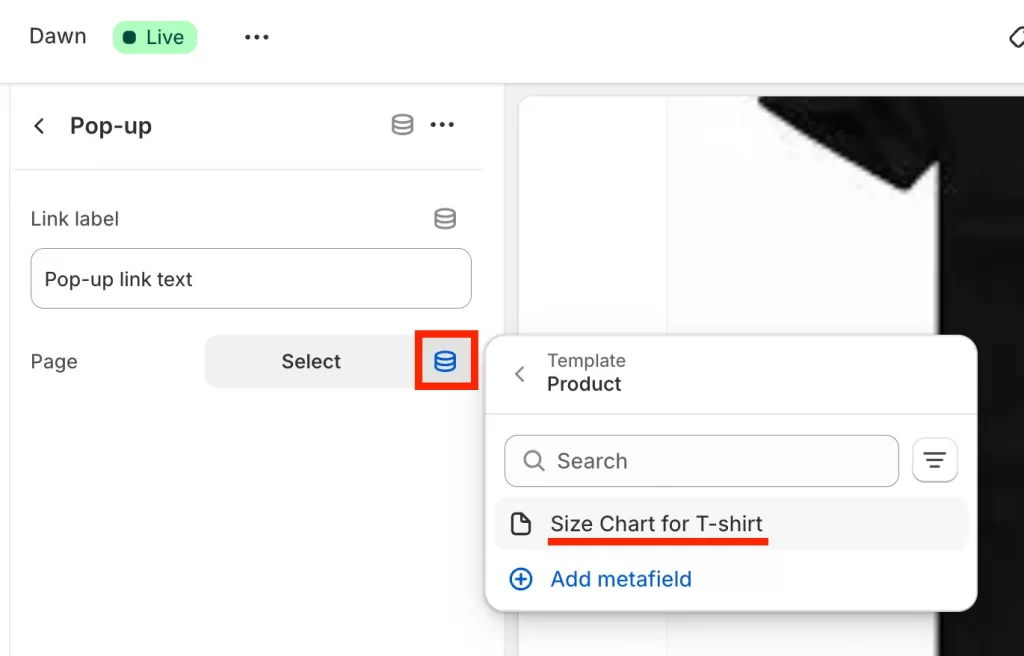
Option 2: Pop-up block (Recommended)
- Choose “Pop-up”
- Title it something like “View Size Chart”
- Under “Page,” click “Connect dynamic source”
- Select your Size Chart metafield (e.g., products.custom.size_chart)
A pop-up size chart looks professional, keeps your layout clean, and improves customer confidence at key decision moments. Using metafields with Shopify’s Theme Editor gives you:
- Flexibility to show different charts by product
- Ease of use for non-developers
- Scalability for growing catalogs
If you ever get stuck or want a totally custom look, LitOS can help you set up advanced size charts, product modals, and fully customized Shopify themes.
How to Embed a Custom Visual Chart with Code
Sometimes, you want your size chart to go beyond the basics, a branded table, a beautiful illustration, or even an interactive visual. With a bit of code, you can embed a custom chart directly on your product pages and ensure it looks great on any device.
This method is best for brands wanting full design control, visual branding, or an interactive chart embedded directly on the product page. You get a fully customized, responsive size chart with zero app reliance.
Step 1. Prepare a branded, responsive chart (table, image, or illustration)
Start by designing your size chart:
- Table: Use a tool like Google Sheets or Excel to make a clean, easy-to-read chart. Export it as HTML or copy the table code.
- Image/illustration: Create a visually appealing chart using Canva, Photoshop, or your favorite design tool. Save it as a PNG or JPEG, ideally under 100 KB for fast loading.
- Responsive design: Make sure your chart is readable on both desktop and mobile. If you use an image, check that the text stays clear on small screens. For tables, keep columns and rows to a minimum and use larger fonts.
For example, a branded chart with your store’s colors, simple icons, or a “How to Measure” diagram can boost confidence and reinforce your brand identity.
Here’s an example of HTML table an you can always customize the values as needed:
<div class="size-chart">
  <h4>Size Chart</h4>
  <table>
    <thead>
      <tr>
        <th>Size</th>
        <th>Bust (in)</th>
        <th>Waist (in)</th>
        <th>Hip (in)</th>
      </tr>
    </thead>
    <tbody>
      <tr>
        <td>S</td>
        <td>34-36</td>
        <td>26-28</td>
        <td>36-38</td>
      </tr>
      <tr>
        <td>M</td>
        <td>36-38</td>
        <td>28-30</td>
        <td>38-40</td>
      </tr>
      <tr>
        <td>L</td>
        <td>38-40</td>
        <td>30-32</td>
        <td>40-42</td>
      </tr>
    </tbody>
  </table>
</div>
Step 2. Add the custom code to your product template
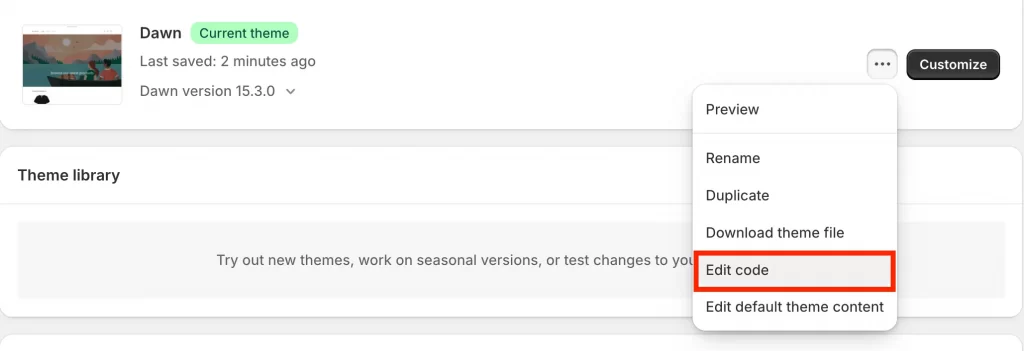
Next, you’ll place your chart in the product template by going to Online Store > Themes > Actions > Edit code.
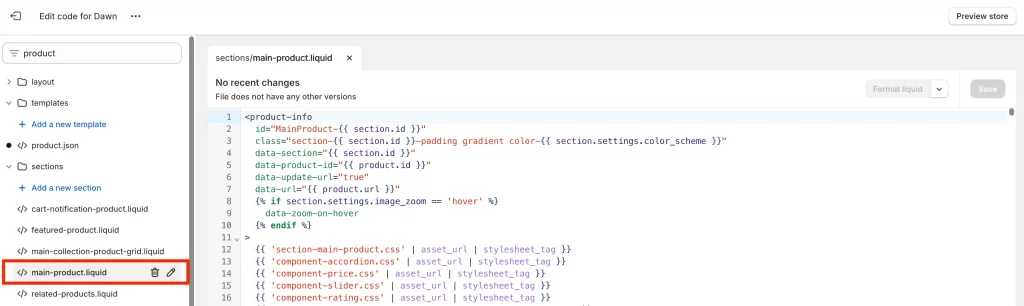
Next, find your product template. This is often called product.liquid, main-product.liquid, or similar (depends on your theme).
Then, decide where you want the chart to appear, typically just below the size selector or product description.
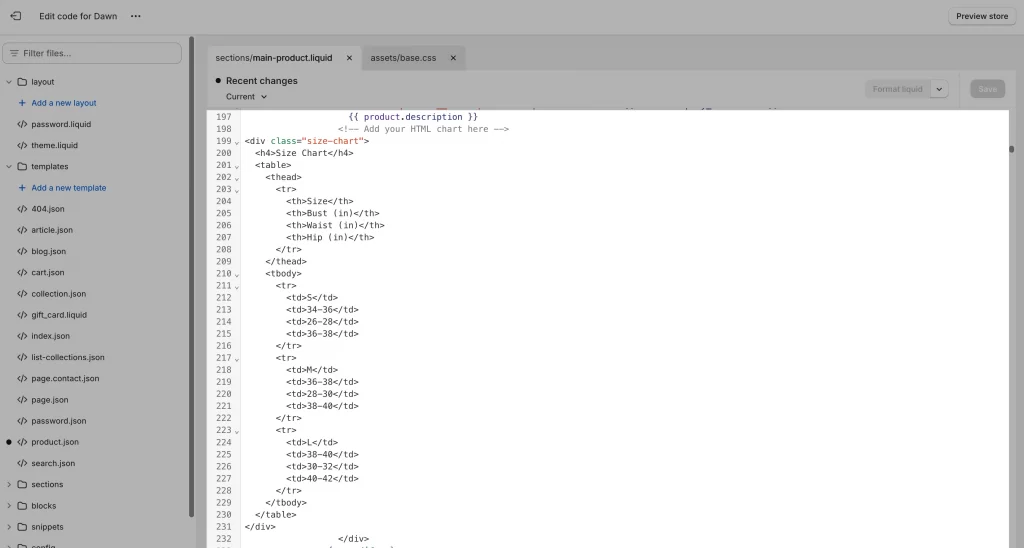
- For tables: Paste your HTML table code in main-product.liquid then insert the HTML code in the spot where you want the size chart to appear, for example under the {{ product.description }}
- For images: Upload your chart image in Shopify’s “Files” section, then insert it with an <img> tag and alt text for accessibility.
- For illustrations: Same as images, but you can add custom CSS for extra style (rounded corners, brand colors, etc.).
You should wrap your chart in a <div class=”size-chart”> for easy styling later.
Step 3. Test placement and functionality on desktop and mobile
Before you go live, you should make sure your size chart looks and works perfectly everywhere:
- Preview a product page on both desktop and mobile.
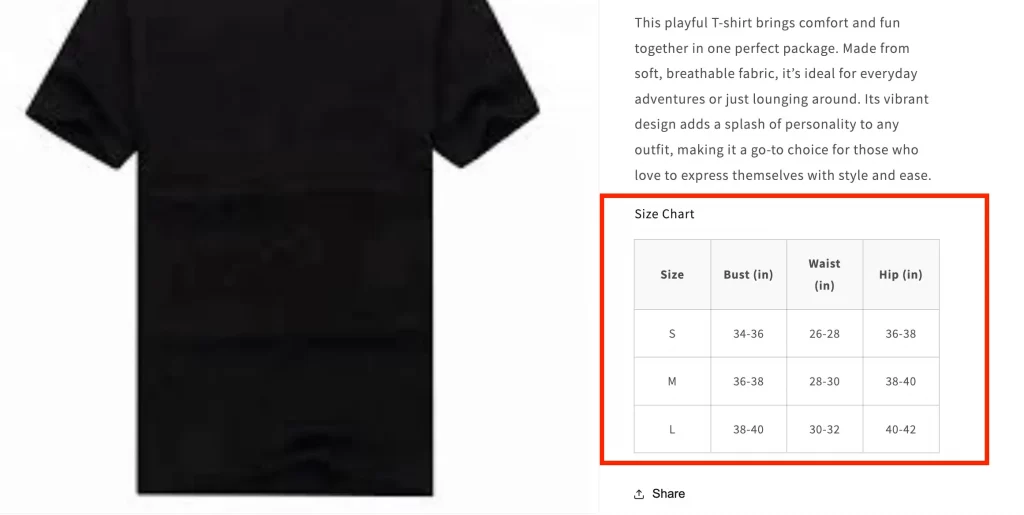
- Check that the chart is visible, loads quickly, and doesn’t break your layout.
- Adjust spacing, fonts, or image size in your theme’s CSS as needed.
A custom-coded chart puts you in full control, no app fees, no limitations, just a professional, on-brand experience that makes your store stand out.
Pro Tip: If you use size variants, don’t forget to track inventory per size.
Actionable Tips for an Effective Shopify Size Chart
Creating a helpful size chart isn’t just a nice-to-have but a key part of reducing returns and improving customer confidence. Let’s start with the most important step:
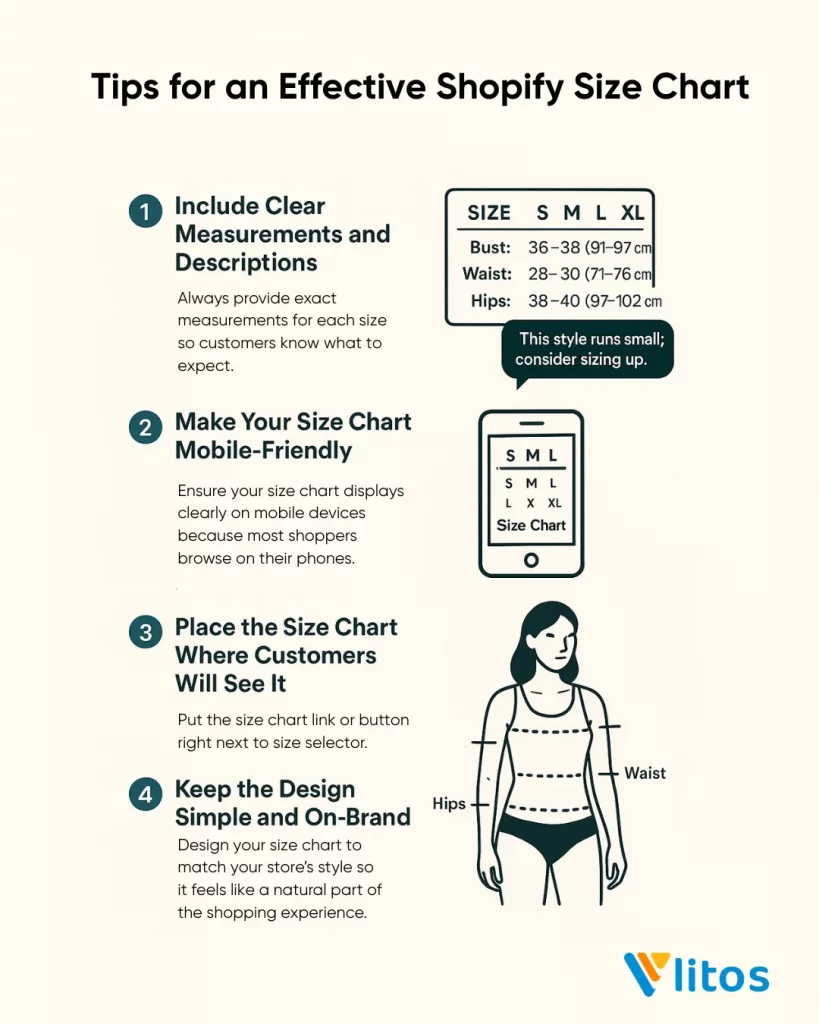
1. Include clear measurements and descriptions
You should always provide exact measurements for each size so customers know what to expect. When you add both inches and centimeters, you help shoppers from different regions understand your sizing. If your sizing differs from standard fits, add clear notes like:
“This style runs small, consider sizing up.”
Instead of listing just “Size M,” use a format like:
M – Bust: 36–38 in (91–97 cm), Waist: 28–30 in (71–76 cm), Hips: 38–40 in (97–102 cm)
The more specific you are, the more confident your customers will feel.
2. Make your size chart mobile-friendly
You should ensure your size chart displays clearly on mobile devices because most shoppers browse on their phones. If you use a responsive table or a simple, easy-to-read image, you make the information accessible to everyone. When you check your size chart on your own phone, you can spot and fix any layout issues before your customers see them.
3. Place the size chart where customers will see it
You should place the size chart link or button directly next to the size selector or above the product description, so customers notice it when they need it most. If you use a pop-up or modal, you allow shoppers to check sizing details without leaving the product page. When you make the chart easy to find, you remove barriers that could cause hesitation or cart abandonment.
4. Keep the design simple and on-brand
You should design your size chart to match your store’s style so it feels like a natural part of the shopping experience. If you use clean fonts, clear headings, and plenty of white space, you make the chart easy to read and less intimidating. When you add simple illustrations that show how to measure, you provide extra guidance and help customers visualize the process.
Pro Tip: If you sell bundles that depend on size, read about product bundles to avoid sizing errors.
Need help creating the perfect size chart?
If you’re not comfortable editing your Shopify theme or adding layout adjustments, the team at LitOS can help. We create size charts that are responsive, visually polished, and built to convert, all while keeping things budget-friendly.
Explore Shopify services: Shopify Store Development with LitOS
FAQs
Why is a size chart is essential for your Shopify store?
A size chart reduces returns, boosts customer confidence, and improves conversion rates. Without one, shoppers may hesitate, order the wrong size, or abandon their cart. Adding a clear, visible size chart helps customers make informed choices and creates a smoother shopping experience.
How do I add a sizing chart in Shopify?
You can add a sizing chart in Shopify by creating a dedicated size chart page, using Shopify metafields to display a pop-up, or embedding a custom chart with code on your product pages. Each method allows you to present clear sizing information right where your customers need it most.
How do I add a size option in Shopify?
You can add size options by creating product variants in your Shopify admin. Go to Products > [Product Name] > Variants in your Shopify admin. Click “Add variant” and enter size options like S, M, L, etc. You can also set different prices, images, and inventory per size.
How do I add size swatches in Shopify?
You can display size swatches (buttons or tiles instead of a dropdown menu) by customizing your theme or using a compatible app. If you want a seamless, branded look, LitOS can help you implement custom swatches that match your store’s design.
How do I add a size filter in Shopify?
You can add a size filter by setting up product tags or metafields and then configuring your collection or search pages to display filter options. Many modern Shopify themes include built-in filtering, or you can enhance filtering with the Shopify Search & Discovery app.
Final Words
An effective size chart does more than reduce returns, it builds trust and improves the shopping experience. When you provide clear measurements, optimize for mobile, place the chart where it matters, and keep the design on-brand, you help customers make confident buying decisions.
If you want help customizing your size chart for Shopify, adding swatches, or setting up advanced filtering, LitOS is here to support your Shopify growth every step of the way. Reach out today to make your store easier to shop and easier to love!
