Shopify Theme Development: Build Shopify Theme with Liquid & Dawn (2025)
If you’re planning to build Shopify theme in 2025, there are two clear paths: start from scratch for full control, or customize Shopify’s official starter theme, Dawn. Both options rely on understanding Shopify’s theme architecture, using the right tools, and working with Liquid, JSON, and modern dev workflows.
This guide walks you through everything you need to get started:
- How Online Store 2.0 changed theme development
- Folder structure, templates, and schema explained
- What tools and languages you actually use
- Step-by-step instructions for both custom and Dawn-based builds
- Lessons and tips from real developers working inside Shopify themes
By the end, you’ll have a clear view of how Shopify themes work and how to confidently build or customize one that meets your project’s needs.
Let’s start by understanding how Shopify themes are structured.
Understanding Shopify Theme File Structure (Online Store 2.0 Essentials)
Shopify theme folder structure explained
Every Shopify theme follows a consistent file and folder structure. Below is a breakdown of each main folder when creating a Shopify theme:
| Folder | File types | What it does |
| /templates/ | .json, .liquid | Defines page-level layout for resources such as products, collections, and blogs. In OS 2.0, most templates are written in JSON to allow section-based layouts. |
| /sections/ | .liquid | Modular components that can be dragged and dropped into JSON templates. Each section can include a schema block to make it customizable via the Theme Editor. |
| /snippets/ | .liquid | Small, reusable pieces of code (e.g., icons, price display) that can be included inside sections or templates. Helps avoid repetition. |
| /assets/ | .css, .js, media | Static files: CSS stylesheets, JavaScript files, fonts, images. These control the appearance and client-side interactivity of your theme. |
| /config/ | .json | Holds theme-wide configuration: settings_schema.json defines global theme settings visible in the Theme Editor, while settings_data.json stores a specific instance’s values. |
This structural foundation sets the stage for everything else – templates call sections, sections call snippets, and assets power them all visually.
JSON templates vs Liquid templates
When creating a Shopify theme, there are two primary template types: JSON and Liquid, which are typically used. Each serves a different purpose and is tied to the level of flexibility or dynamism your page requires:
| Template type | File extension | Best bor | Customizable in Theme Editor | Example |
| JSON template | .json | Dynamic, section-based page layouts | Yes | product.json, index.json |
| Liquid template | .liquid | Static layouts or system-level pages | No (hardcoded layout) | cart.liquid, 404.liquid |
When to use JSON templates
- For product, collection, index (home), and custom pages
- Lets you assign and reorder sections dynamically via the Theme Editor
- Required for themes that fully support Online Store 2.0
When to use Liquid templates:
- For pages Shopify doesn’t support via JSON yet (e.g., cart, password, checkout)
- Layout and logic are hardcoded using HTML + Liquid
- Cannot be configured visually in the Theme Editor
Even in Liquid templates, you can call modular sections, but you lose flexibility. If you want the merchant to control the layout visually, JSON is the way to go.
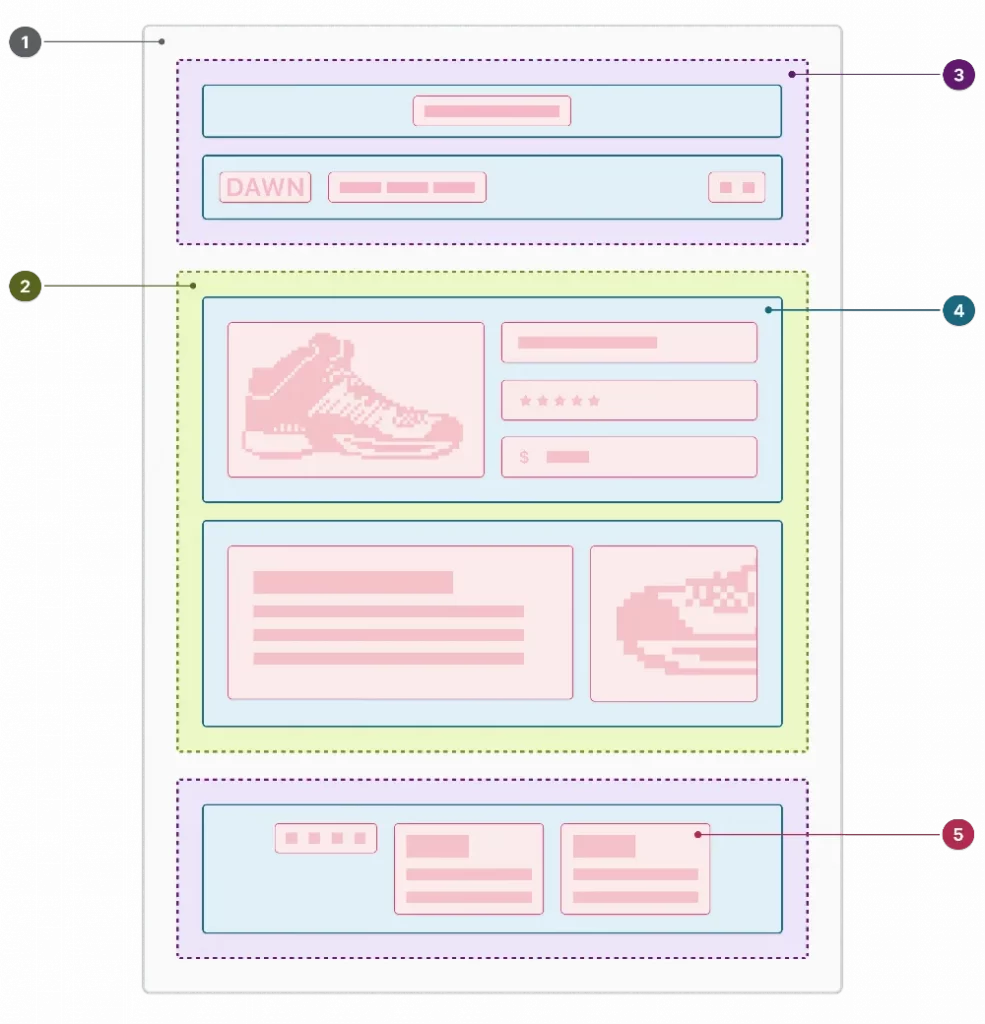
How Shopify theme components work together
A Shopify theme is a system of connected parts that work together to render dynamic, modular storefronts. Here’s the rendering flow from template to frontend:
- Page URL is requested (e.g., /products/shirt)
- Shopify loads the matching template file from /templates/. If it’s product.json, it contains a list of sections
- Each section is loaded from /sections/ – written in .liquid, with HTML + logic + schema
- Inside each section, snippets may be included from /snippets/ for smaller reusable elements
- Layout and functionality are styled and powered by CSS/JS assets from /assets/
- Schema (defined in each section) controls what can be edited in the Theme Editor
This modular system enables developers to create flexible themes and gives merchants control over layout, without requiring code editing.
Key Page Templates in a Shopify Theme (And How They Work)
1. Homepage – templates/index.json
The homepage is entirely section-driven. Built from an index.json file, it allows you to stack and reorder content blocks without modifying the code. Most themes use this to highlight products, collections, testimonials, or announcements. For example, a simple index.json might load a hero banner, a featured collection, and a newsletter signup section – all defined in the order array.
2. Product & collection pages – product.json, collection.json
Product templates display titles, prices, variants, and add-to-cart functionality, all structured using JSON and populated by dynamic product data. Collection templates, on the other hand, load multiple products using a grid or list format. Both rely on modular sections, such as product-main, product-recommendations, or collection-banner, which you can create or override to suit your UX.
3. Cart & checkout pages – cart.liquid, checkout.liquid
The cart page is still built using Liquid and doesn’t support JSON-based layouts. You’ll typically include sections like cart-items and cart-summary, which handle line items, totals, and any upsell logic. Unlike most other templates, the cart requires more logic-based validation, especially around free gifts, discount codes, or custom properties.
Note: checkout.liquid is now unsupported for the Information, Shipping, and Payment checkout steps. checkout.liquid, additional scripts, and script tags are deprecated for the Thank you and Order status pages and will be sunset on August 28, 2025.
4. Blog, articles & static pages
Blog (blog.liquid) and article (article.liquid) templates are largely static and follow Shopify’s standard structure. However, static pages like About or Contact can be built using JSON, making them ideal for flexible, branded layouts. For instance, a custom About page might incorporate a team grid, a rich text block, and an embedded video, all constructed from modular, drag-and-drop sections.
Tools & Skills You’ll Need to Build a Shopify Theme
1. Core languages to learn
Shopify themes rely on a blend of familiar front-end tech and platform-specific logic. You’ll be writing:
- Liquid: Shopify’s theme templating language
- HTML: For creating and structuring content
- CSS: For styling your theme’s appearance
- JavaScript: For adding interactive and dynamic content
- JSON: For data management and configuration
2. Dev environment setup
To work locally, you’ll use the Shopify CLI, a command-line tool that lets you preview themes in real-time, push changes, and scaffold new projects. It integrates directly with your dev store, which you can create for free via the Shopify Partner Dashboard.
VS Code is the go-to editor, and pairing it with Liquid extensions will make the workflow smoother. Theme Check, an optional linter, helps catch syntax errors and flags performance or schema issues early on. While not required, versioning your theme with Git (and optionally linking to GitHub) is highly recommended, especially if you’re working as a team or plan to maintain the theme over time.
Shopify’s native GitHub integration lets you sync a specific branch directly with your theme. Whenever you push to GitHub, Shopify can automatically update the live theme which is ideal for staging, collaboration, or rollback support.
3. What’s new in Shopify Editions Summer 2025
Shopify’s recent Editions release added some helpful upgrades for theme developers:
- AI-assisted layout suggestions via Shopify Magic, which can recommend sections based on content
- Improved real-time previews in the theme editor, no more lag when toggling settings
- App block enhancements, giving merchants more control over installed app widgets without touching Liquid
These features make the visual editing experience smoother for clients, but behind the scenes, you’re still responsible for writing clean Liquid, organizing schema, and structuring your files properly.
How to Build a Shopify Theme from Scratch
If you need complete control over layout, performance, and theme logic – or you’re building something highly custom – starting from scratch is the cleanest way to do it. Just know: you’ll be responsible for every line of structure, styling, and schema.
Step 1. Set up your development environment
To build a Shopify theme locally, you’ll need a working Command Line Interface (CLI) setup, a development store, and a modern code editor. Here’s how to get started:
1.1. Install Shopify CLI
The Shopify CLI allows you to preview your theme, push changes, and connect your local files to a development store. Use one of the following methods:
- With npm (cross-platform): npm install -g @shopify/cli
- With Homebrew (for macOS users): brew install shopify-cli
Before running any commands, make sure you have:
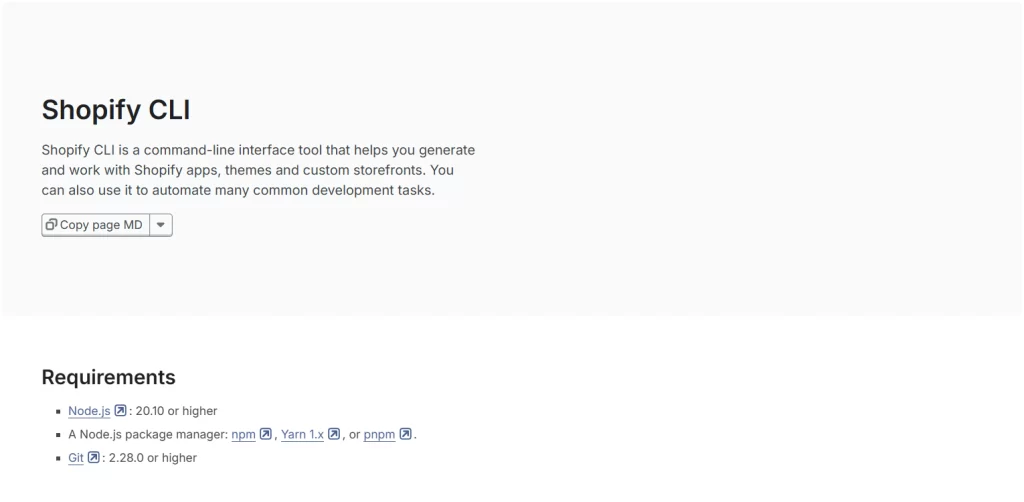
If you’re unsure whether CLI is working, check shopify version:

1.2. Create or access a development store
You’ll need a Shopify Partner account to create dev stores. Visit partners.shopify.com and log in or sign up. From your dashboard:
- Click Stores → Add store → Development store
- Choose a store name and set the password
- Once created, open the store’s admin interface – this is where your theme will eventually be previewed
1.3. Log in via CLI
Inside your local project directory, connect your CLI to the store: shopify login –store your-store.myshopify.com
If this is your first time running CLI commands, it will prompt you to authenticate in your browser. Once logged in, you’re ready to start local development.
Step 2. Create the theme folder structure manually
Shopify themes rely on a specific folder architecture. When building from scratch, you’re responsible for setting up this structure yourself. Each folder serves a clear purpose, and skipping any one of them will likely result in broken layouts or missing functionality.
- /layout/ – Contains the global theme wrapper. At minimum, you’ll need theme.liquid, which controls the HTML <head>, body structure, and layout scaffolding for all pages.
- /templates/ – These define page types (e.g., product.json, collection.json, cart.liquid). A product.json file might call in product-main and product-recommendations sections.
- /sections/ – Where your editable page blocks live. Each section is a .liquid file that includes HTML markup, Liquid logic, and a {% schema %} block to make it configurable via the Theme Editor.
- /snippets/ – Great for smaller components like pricing displays, badges, or reusable buttons. These are inserted into sections or templates using {% render ‘snippet-name’ %}.
- /assets/ – Add your CSS (e.g., theme.css), JavaScript (e.g., theme.js), fonts, and image files here. Shopify will manage caching and delivery for you.
- /config/ – This folder includes settings_schema.json, which defines your Theme Editor settings and global configurations (like enabling/disabling a sticky header, color schemes, etc.).
Step 3. Build base templates and layouts
Once your folders are in place, it’s time to scaffold your theme’s core structure, the templates that determine what content appears where.
In Online Store 2.0, templates are typically .json files placed inside the /templates/ folder. Each template is mapped to a specific page type (such as product, collection, or index) and defines which sections to include and in what order.
For example, your homepage (index.json) might include:
{

  "sections": {

    "hero": { "type": "hero-banner" },

    "features": { "type": "feature-grid" }

  },

  "order": ["hero", "features"]

}
These sections must exist in /sections/ as hero-banner.liquid and feature-grid.liquid.
At minimum, you’ll want to include templates for:
- Homepage → index.json
- Product page → product.json
- Collection page → collection.json
- Cart page → cart.liquid (this one is still Liquid-based)
- Default page → page.json
- 404 → 404.json or 404.liquid
- Search → search.json
If you’re working with blog content, also consider:
- Blog listing → blog.json
- Single article → article.json
Each of these templates serves as the core for that page. The actual design and logic come from the sections you assign.
Tips: “Start small. Even just rendering a banner or single section correctly from a JSON template helps you understand how the system assembles a page.”
Step 4. Write your own sections, snippets, and schema
With templates in place, it’s time to build the modular components that actually render content on the page, and make it editable via Shopify’s Theme Editor.
4.1. Sections
Each .liquid file in /sections/ represents a block you can use in your templates. A section typically contains:
- HTML & Liquid markup – What gets rendered to the frontend
- Schema block – Defines which settings (text, images, toggles) the user can control in the Theme Editor
Let’s have an example: hero-banner.liquid.
<section class="hero">

  <h1>{{ section.settings.heading }}</h1>

  <p>{{ section.settings.subtext }}</p>

</section>

{% schema %}

{

  "name": "Hero Banner",

  "settings": [

    {

      "type": "text",

      "id": "heading",

      "label": "Heading Text",

      "default": "Welcome to our store"

    },

    {

      "type": "textarea",

      "id": "subtext",

      "label": "Subheading"

    }

  ],

  "presets": [{ "name": "Default Hero" }]

}

{% endschema %}
Once this section is added to a JSON template, Shopify renders it on the page and displays the settings in the Theme Editor, requiring no additional configuration.
4.2. Snippets
Snippets are placed in /snippets/, and are ideal for logic or markup reused across multiple sections, like star ratings, price formatting, and trust badges.
They’re inserted with: {% render ‘price’, product: product %}
Snippets don’t support schema, they’re invisible in the editor, but powerful for modularity.
If you skip schema or build sections purely with static HTML, that may work in the short term, but clients won’t be able to move or edit them visually, and you’ll likely be called back for every update.
Step 5. Test locally and push to your store
Once your templates and sections are built, it’s time to test the theme, both for functionality and editability, and then push it to your Shopify store for review or live use.
5.1. Run a local preview with Shopify CLI
Inside your theme folder, use: shopify theme dev
This command launches a live preview of your theme, served through your development store. As you edit Liquid, JSON, or asset files, changes update in real time, so you can test layout, styling, and Theme Editor configuration.
You can use this to verify that:
- Sections render properly
- Schema settings appear and save correctly
- Layout and styles match your design spec
- Dynamic data (product titles, images, etc.) are pulling in via Liquid
You can also switch to previewing different templates (product, blog, etc.) through URL params or the editor.
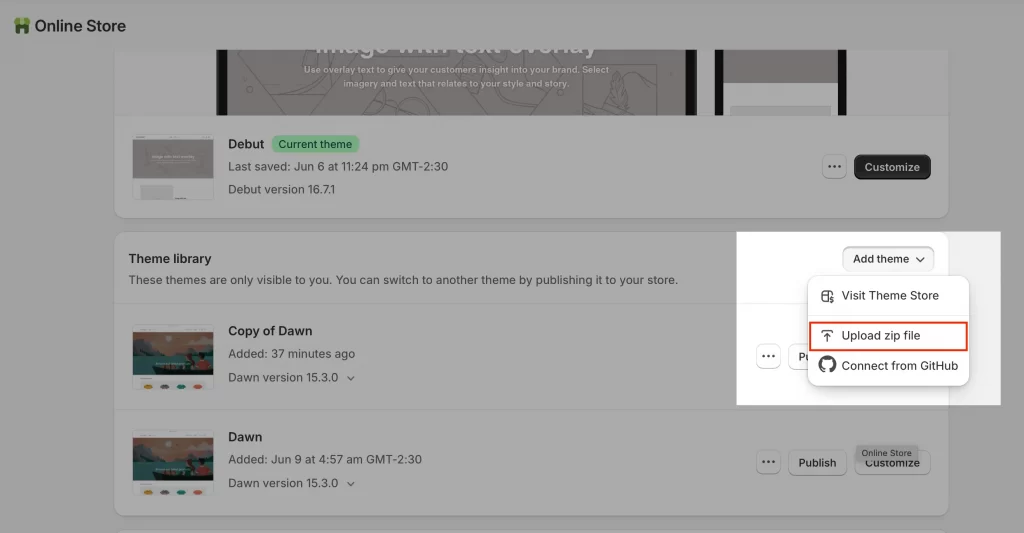
5.2. Push the theme to your store
When you’re ready to deploy your work: shopify theme push
This uploads your theme files to the connected development store. From there:
- You can preview and test from the Shopify admin
- Or publish the theme for staging/live use
Optionally, you can use: shopify theme publish
…but be cautious, this makes your custom theme live immediately. You should always verify it first in a preview state, especially if you’re replacing an active theme.
Once your custom theme is polished and production-ready, you can also submit it to the Shopify Theme Store. It’s a great way to monetize your work and gain exposure to thousands of merchants. Just note: Shopify’s review process is strict, so make sure your theme meets all technical and UX requirements before applying.
How to Build Shopify Theme Using Dawn (Best for Most Devs)
If you’re new to Shopify or working on a tight deadline, building from scratch might be overkill. Shopify’s Dawn theme is the official reference theme – clean, performant, and built with best practices. It’s the recommended starting point for 90% of custom theme projects.
Step 1. Initialize your project with Dawn
Shopify offers a command-line shortcut to quickly set up a new theme based on Dawn, ready for local development and customization.
1.1. Use Shopify CLI to frame the theme
Inside your working directory, run:
shopify theme init my-theme --clone-url=https://github.com/Shopify/dawn.gitThis command:
- Clones the latest Dawn repository into a folder named my-theme
- Preserves all folder structure, templates, and best practices from the reference theme
- Gets you started with fully functional Liquid, schema, and JSON templates
If you don’t specify a –clone-url, it will prompt you to choose a template; Dawn is the default choice.
1.2. Folder structure you’ll see
After running the command, you’ll have a full theme with:
- Editable JSON templates for all core pages (product, index, etc.)
- Modular sections with schema for the Theme Editor
- Clean Liquid files using best practices
- Theme settings defined in /config/settings_schema.json
You can now immediately run:
cd my-theme

shopify theme dev
This gives you a live preview, just like with a scratch build, but with all the hard setup work done.
Step 2. Edit existing sections and remove what’s not needed
Once you’ve initialized your theme with Dawn, you don’t have to keep everything. In fact, customizing Dawn is all about trimming the excess and shaping the theme around your store’s unique layout and content needs.
Dawn comes with a wide set of default sections, like:
- main-product.liquid
- main-collection-product-grid.liquid
- image-banner.liquid
- multi-column.liquid
- collapsible-content.liquid
If your design doesn’t use collapsible tabs or multi-column blocks, delete them from /sections/ – or move them to a backup/ folder to keep the repo clean but reversible.
Instead of rebuilding everything from scratch, you can now open a section like image-banner.liquid and:
- Replace the HTML structure to fit your design
- Keep the schema JSON structure if it works for your layout
- Rename settings to be more intuitive (e.g., subtext → tagline)
- Remove unused settings from the schema to avoid clutter
This allows you to retain Theme Editor compatibility while fully customizing the UI.
If you’re unsure which sections you’ll need, comment them out in your index.json first, then test, clean, and rename as you go.
Step 3. Create custom sections or override components
Once you’ve cleaned up Dawn and adjusted existing sections, the next step is to build your own. This is where your Shopify theme starts to reflect your client’s brand or your own creative vision.
3.1. Build your own sections
To create a new section:
- Navigate to /sections/
- Create a new file, e.g., custom-hero.liquid
- Add your custom HTML + Liquid logic
- Define a {% schema %} block at the bottom
3.2. Override core components (if needed)
Some of Dawn’s built-in behavior (like how product prices or buttons render) lives in snippets like:
- price.liquid
- buy-buttons.liquid
- icon-* snippets
To override:
- Find the snippet in /snippets/
- Copy and rename it (e.g., custom-price.liquid)
- Replace all references in your sections/templates to use your version
Step 4. Ensure your theme is editor-friendly
One of the biggest advantages of starting with Dawn (or Online Store 2.0 themes in general) is enabling non-developers to update the storefront without touching code. But that only works if you configure your theme with thoughtful schema and editor support.
4.1. Add schema settings for all sections
Make sure every custom section you build includes a {% schema %} block with:
- Clear labels. Bad: “label”: “Text. Good: “label”: “Hero Heading Text”
- Defaults for each setting. This ensures the section previews correctly the moment it’s added.
- Presets. Presets allow your section to be draggable into any template from the Theme Editor’s “Add Section” panel.
4.2. Add blocks when needed
For repeated items (e.g., FAQs, icons, features), use blocks in your schema:
"blocks": [

  {

    "type": "feature",

    "name": "Feature Item",

    "settings": [

      { "type": "text", "id": "title", "label": "Title" },

      { "type": "image_picker", "id": "icon", "label": "Icon" }

    ]

  }

],

"max_blocks": 4
This makes sections like feature rows or FAQs fully dynamic in the editor with no duplication required.
4.3. Test in the Theme Editor
Before wrapping up, you can:
- Run shopify theme dev
- Open the live preview
- Go to “Customize”
- Try:
- Adding your custom sections
- Changing settings
- Reordering blocks
- Switching between templates
If anything’s broken or uneditable, you’ll catch it here.
“Editor-friendly” means your client or future team member doesn’t need to call a developer every time they want to change a heading or hide a banner. That’s what makes custom themes truly maintainable.
Step 5. Customize Shopify theme
Once you’ve initialized your theme and edited the structure, it’s time to tailor it to your brand or client needs. This step is where the real transformation happens, from default Dawn to something uniquely yours.
There are two ways to custom your Shopify theme: via the Theme Editor (no code) and in code.
You can use Shopify’s built-in visual editor to:
- Change colors, typography, logos, and spacing
- Show/hide or reorder homepage sections
- Add app blocks or metafields (if configured)
- Test responsiveness and section visibility across devices
If you need deeper control:
- Modify Liquid section files inside /sections/
- Create new custom sections (e.g. banner-alt.liquid) with schema options
- Override or extend CSS/JS in /assets/
- Adjust layout logic in theme.liquid or individual templates
We at LitOS have one small insight for you: The more you hardcode now, the less flexible the theme becomes later. Always think about what the merchant needs to edit.
Common Mistakes and How to Avoid Them
When you’re deep in theme development, it’s easy to take shortcuts or miss details that cost you later, in support tickets, broken layouts, or frustrated clients. Here’s what we’ve learned from real-world projects and how to avoid unnecessary headaches from the start at LitOS.
| Mistake | What LitOS does | Practical fix |
| Editing live theme without backup> Live store breaks, no undo, stressed client | Work locally with shopify theme dev, use Git, always clone the live theme first | Duplicate the theme before editsUse Git for version controlPreview changes with a shareable link |
| Overcomplicating what doesn’t need it> Too many schema fields, hard to maintain, clients overwhelmed | Keep static content hardcoded if it won’t be changed often | Ask if the client actually needs to edit itOnly add schema where it adds value |
| Skipping accessibility> Customers can’t navigate, poor UX, legal risk | Use semantic HTML, test nav and forms, check color contrast | Add alt text for imagesUse headings correctlyTest keyboard nav before launch |
| Ignoring performance bottlenecks> Slow store = fewer sales, especially on mobile | Compress assets, remove unused sections, and test with Shopify Performance Dashboard | Use optimized mediaAvoid unused CSS/JSLoad scripts conditionally |
Support issues don’t always come from bad code, they often come from unmaintainable code. Let’s build like someone else will edit it (because one day, they will).
Build Shopify Theme: FAQs
How much does it cost to build a Shopify theme?
If you’re building it yourself, the cost is mostly time. You’ll need a development store (available for free through the Shopify Partner program) and basic tools, such as a code editor. If hiring a developer or agency, expect to spend anywhere from $2,000 to $20,000+ depending on complexity.
Can I build my own Shopify theme?
Yes, if you’re comfortable with HTML, CSS, and willing to learn Liquid. Shopify provides excellent documentation, and starting with a base theme like Dawn can significantly shorten your learning curve.
How long does it take to build a Shopify theme?
Anywhere from a few days to a few months. A basic theme based on Dawn might take a week or two. A fully custom theme from scratch with advanced functionality could take 4–8+ weeks.
Is Shopify theme development worth it?
Yes, if you need full control over design, performance, and scalability. A custom theme gives you flexibility that app-heavy setups or stock themes don’t, especially when you’re optimizing for conversions or unique branding.
Do I really need to build a Shopify theme?
Not always. If your business goals can be met with existing themes and app configurations, it’s smarter to customize instead of build. But if your store has very specific design or UX needs, building (or commissioning) a theme makes sense.
Is building a Shopify theme difficult?
It depends on your background. If you’ve never touched Liquid or JSON templates, it’ll feel different from standard web dev. But with a solid understanding of HTML/CSS and some patience, the learning curve is manageable, especially if you start with Dawn.
Final Thoughts: Should You Build or Customize?
There’s no one-size-fits-all answer for best way to build Shopify theme, but here’s how we frame it at LitOS.
If you’re building a unique brand experience that no theme or app can deliver, a custom-built theme gives you full control, performance gains, and long-term flexibility.
If you’re aiming for a faster launch or still validating your store idea, customizing an existing theme like Dawn is often the smarter move, especially with the improvements Shopify has made in theme editing, app blocks, and performance tooling.
What we usually recommend: Start with Dawn if you’re new or short on time. Build from scratch if you have a solid design system, dev resources, and long-term plans for growth.
From our experience, custom builds pay off most when there’s a real need, not just because “custom” sounds better.
Need help choosing the right path, or building it the right way? LitOS helps growing Shopify brands design, build, and scale high-performance storefronts, whether you’re starting from Dawn or going full custom.
→ Explore our Shopify development services
→ Talk to our team about your next theme build

