
How to Create A Custom Contact Form in Shopify: 2026 Guide
For Shopify merchants, collecting customer contact information plays a huge role in customer retention and marketing campaigns. Unfortunately, Shopify’s native contact form only includes a few basic fields, which are not enough to capture deeper insights. So, how to create a custom contact form in Shopify, then?
No worries; we’re here to help you answer that question! In this article, we’ll walk you through two different methods to build a custom contact form in Shopify, including:
Let’s begin.
Why Shopify’s Native Contact Form Is Not Enough
Shopify’s native contact form might seem completely sufficient for stores that only need a basic communication channel. However, the limitations become clear once you need more than just a standard “Name, Email, Message” setup!
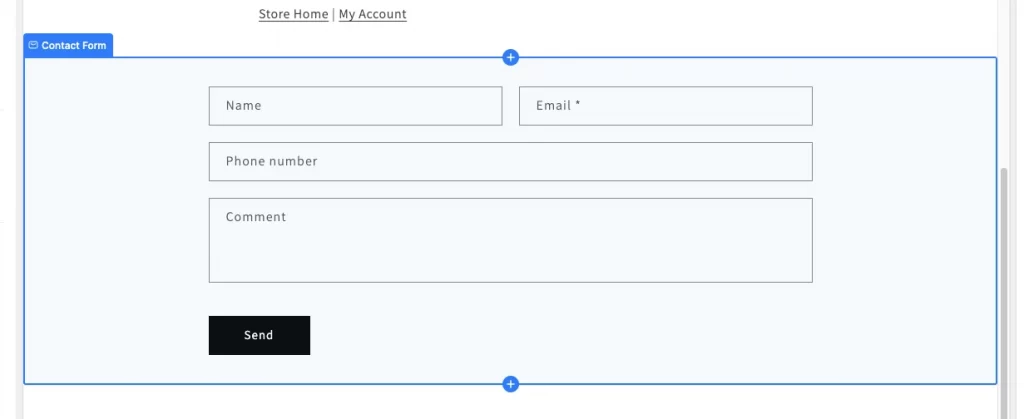
Not to mention, although the form typically matches your theme’s design, customization options are very limited. You don’t have much flexibility to adjust the layout or significantly change how the form looks. Worse, since you can’t easily modify the input fields to collect specific types of information, it’s difficult to categorize inquiries, prioritize support requests, or gather structured data for sales, wholesale, or partnership purposes.
A custom contact form, fortunately, can address all of these issues. Let’s explore the first method to create one in the next section.
How to Create A Custom Contact Form Using Code
The most direct method is to edit your theme code directly, though it does require some basic coding knowledge. Not to mention, since Shopify themes do not share the same structures, you may need to adjust the code depending on the theme you’re using.
In this guide, we’re using Dawn – Shopify’s default, OS 2.0–based theme. So if you’re working with a different theme, the file structure or code placement might vary slightly.
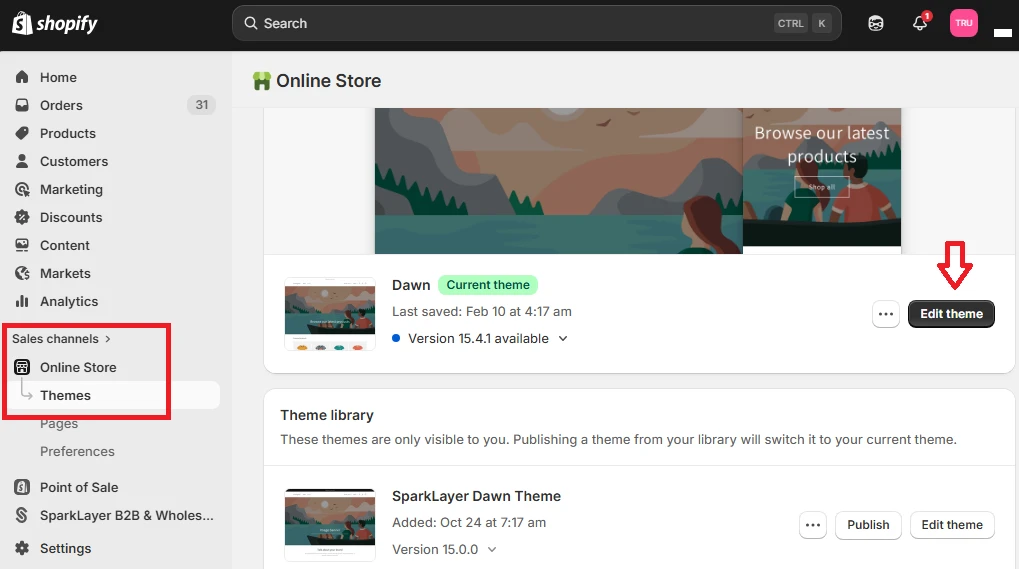
To begin, go to Shopify Admin > Online Store > Themes. Locate your current theme and click Edit theme to access the theme file editor.
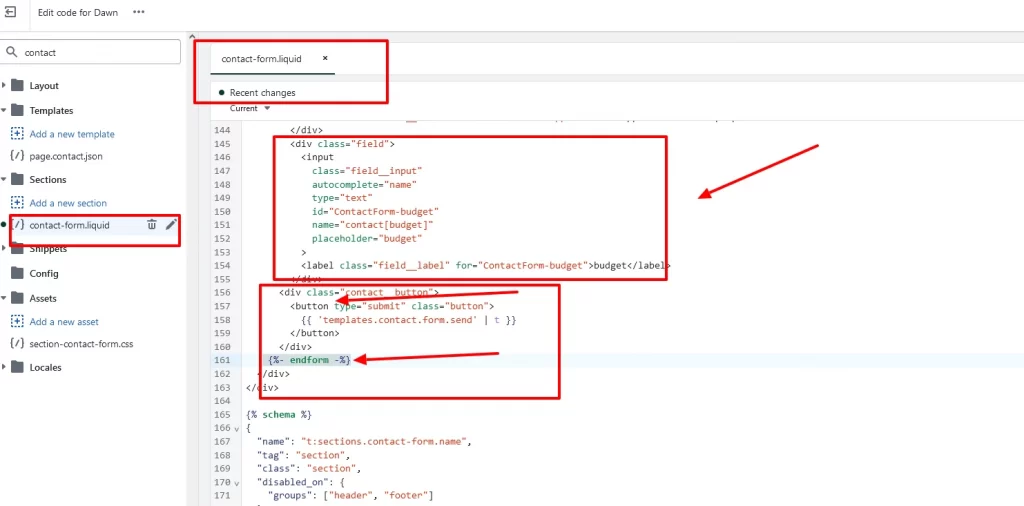
Next, find the contact form template file. In many themes, this file is located under Sections/contact-form.liquid, although the exact file name may vary depending on the Liquid template of each theme. If you don’t see it immediately, look through the Sections folder for a file related to “contact.”
Once you’ve opened the correct file, scroll down until you find the line: {%- endform -%}. To add custom fields, insert your new Shopify contact form code right above this line (refer to the example image below).
After adding your code and making any necessary adjustments to the form attributes, click Save.
All in all, this method is pretty straightforward for developers, but not so much for those without a technical background.
Hence, if you’re looking for a more accessible and user-friendly solution, using a customizable form app is worth considering. We’ll discuss this approach further in the next section.
How to Create A Custom Contact Form in Shopify Using an App
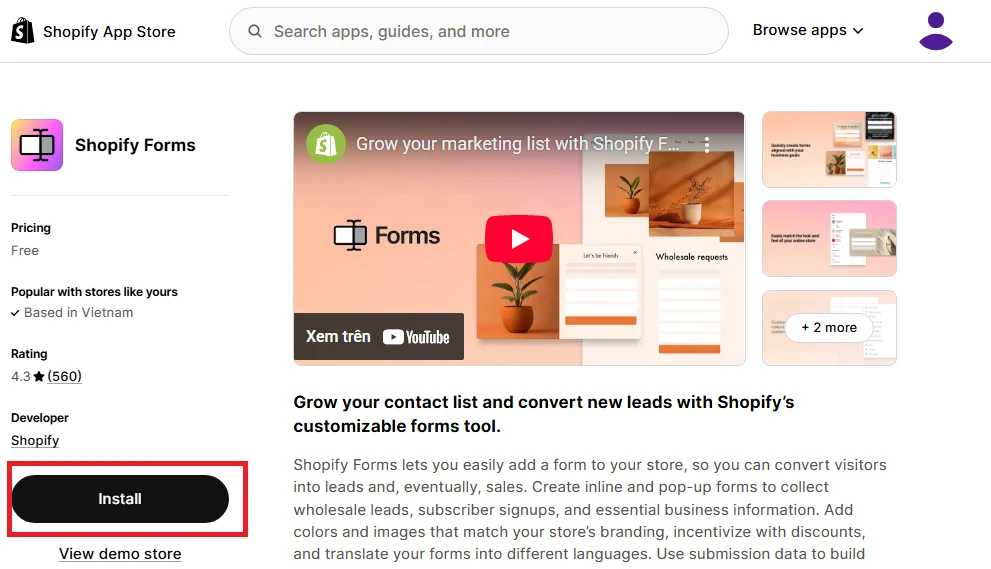
One of the most widely used apps for this method is Shopify Forms (often simply called Forms). Since it’s developed by Shopify itself, the app can integrate very smoothly with your store. Most importantly, it’s beginner-friendly and completely free to use!
Once you install and enable the app in your theme, create your pop-up form and configure its settings, including fields, design, behaviors, Captcha, etc. Finally, save and publish the form to make it live on your storefront:
Step 1. Install and embed the Shopify Forms app
First, go to the Shopify App Store, search for Shopify Forms, then click Install to set up the app.
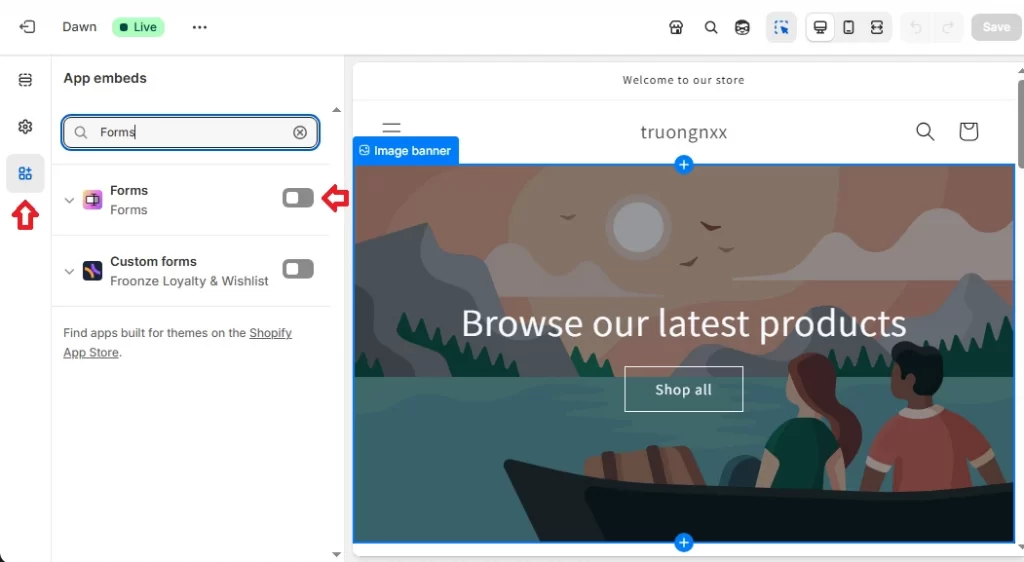
Once installed, go back to your Shopify admin dashboard and navigate to Online Store > Themes, then click Edit Theme.

After the theme editor opens, select the App embeds icon and type “Shopify Forms” into the search bar. Once you click on the app’s logo and slide the toggle to turn it on, it will be embedded into your active theme. Click Save.
Step 2. Create the form
Next, from your Shopify admin, go to Apps > Forms and click Create form.
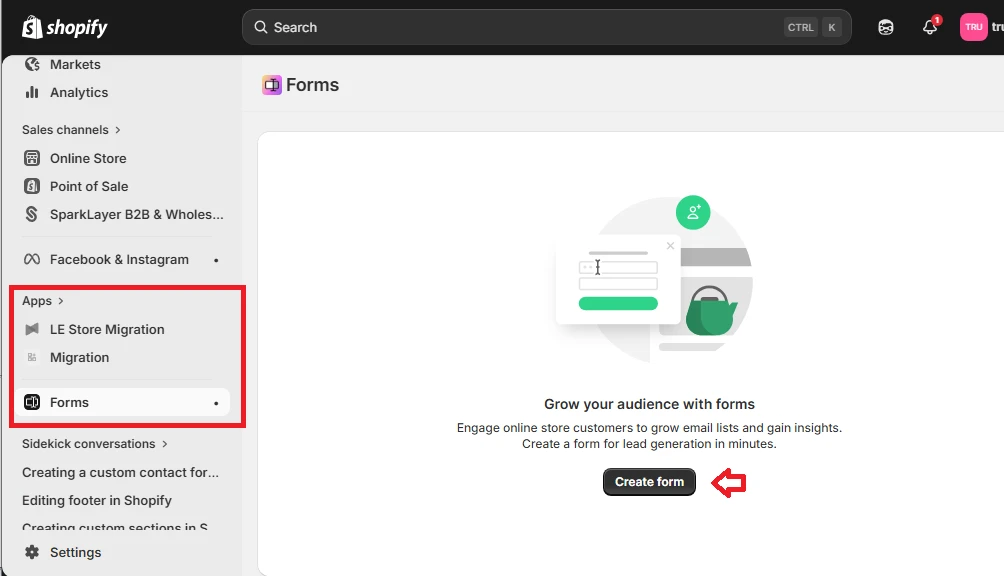
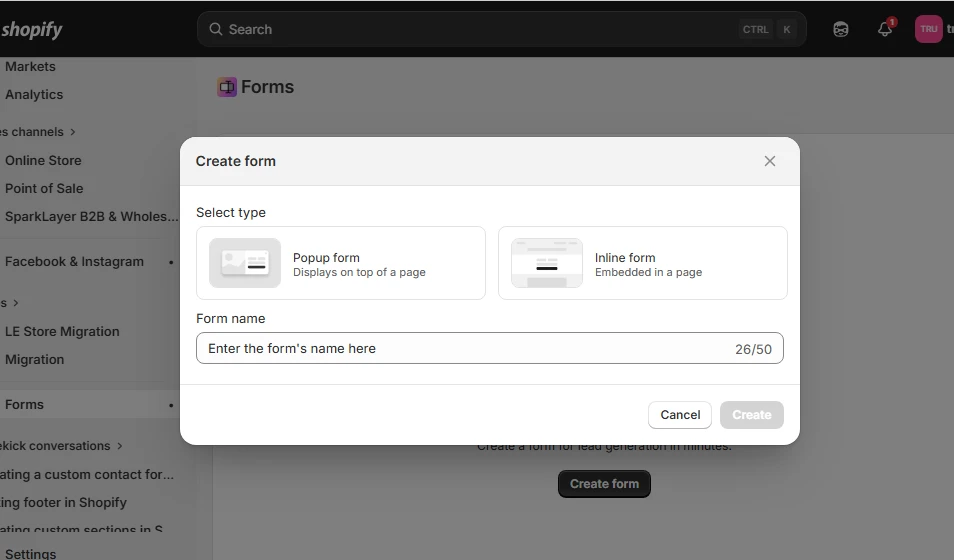
Choose Popup form as the form type, then enter a name for internal reference. Once done, click Create to proceed.
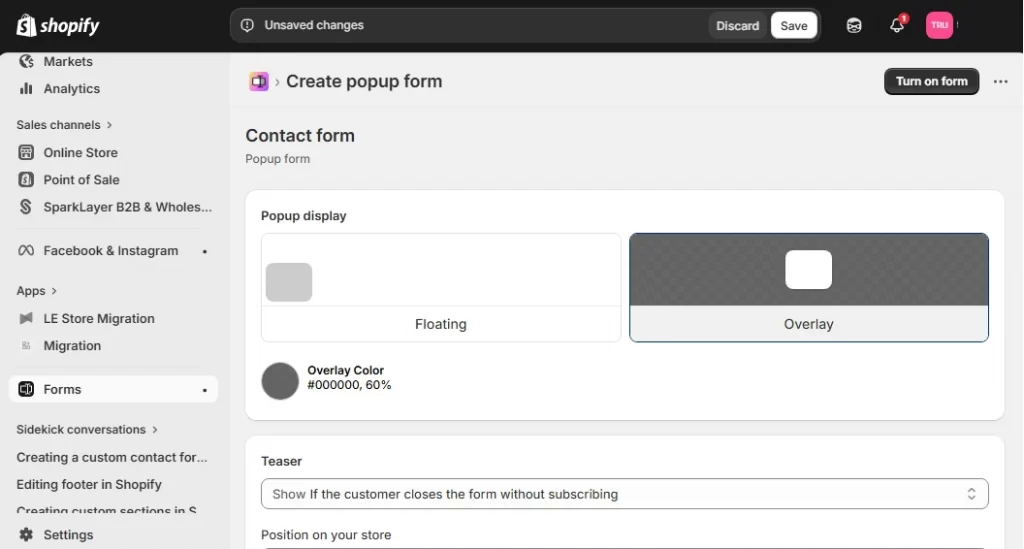
Step 3. Configure the Shopify contact form settings
Next, you need to configure how the pop-up form should appear on your store. In the Popup display section, you have two main options:
- If you want a smaller, less intrusive form, choose Floating and select its position from the dropdown menu. This option allows the form to sit neatly in a corner of your store.
- If you prefer a more prominent format, select Overlay. You can customize the overlay color using the color picker to match your branding or create visual contrast.
Plus, once the display style is selected, you can also customize the core components of your form. Specifically:
- Teaser settings control the short message that encourages visitors to open the pop-up form.
- Form settings define the main content and structure of the form.
- Form fields allow you to manage the information you want to collect, such as name, email address, or other Shopify custom form fields.
- Success settings determine what customers see after submitting the form.
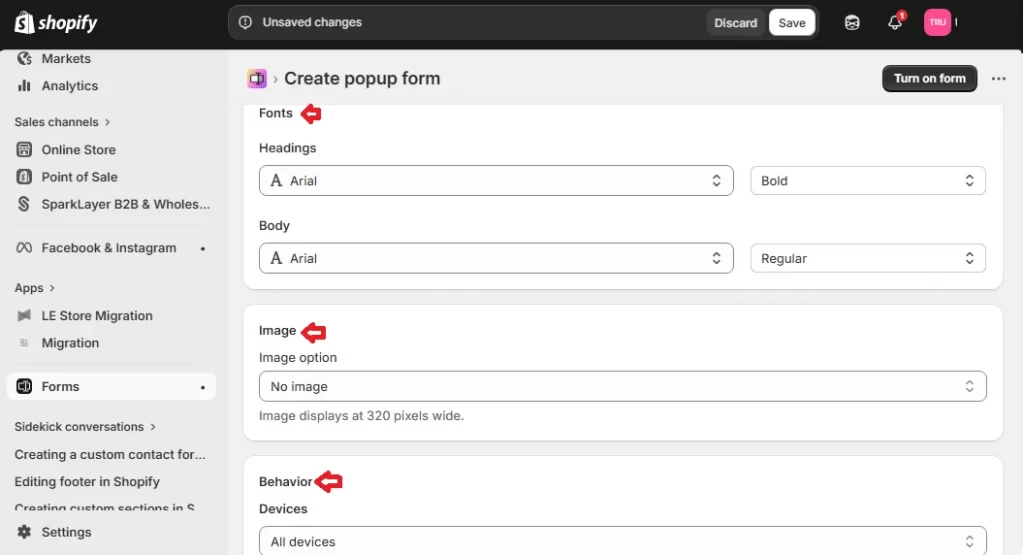
- Styling settings help you adjust colors, fonts, and overall appearance to match your brand.
- Image settings allow you to include visuals if needed.
- Behavior settings define when and how the pop-up appears on your site.
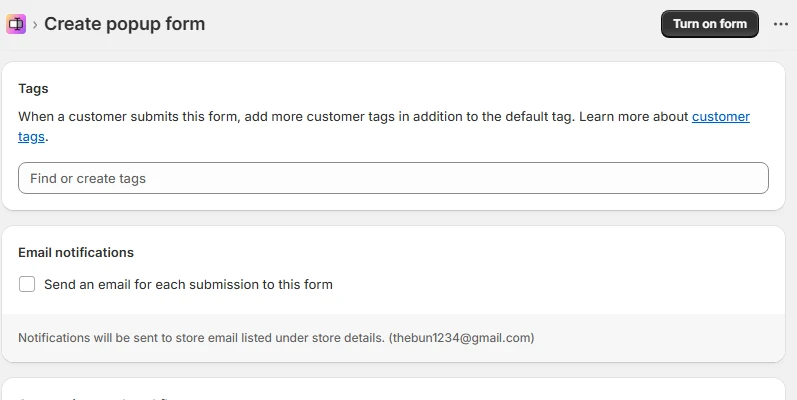
In addition, if you want customers to be automatically categorized after submitting the form, enter a tag in the Tags field. Shopify will apply this tag to the customer profile once the form is submitted.
Similarly, for merchants who want to receive an email notification for every submission, enable the option to send an email for each submission in the Email notifications section.
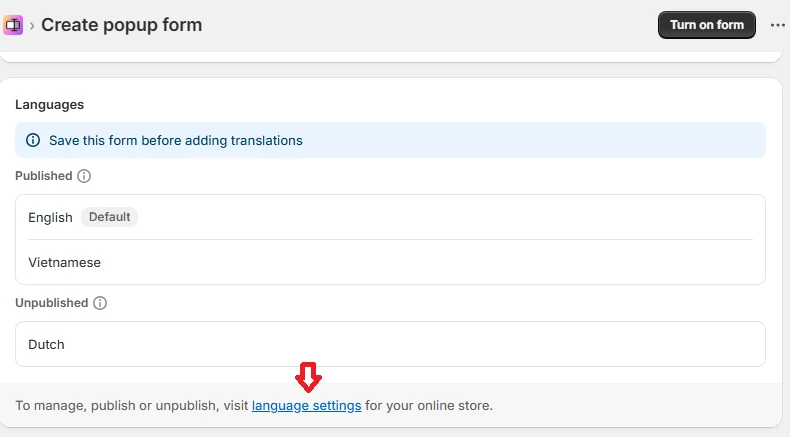
Most importantly, Shopify also allows you to translate your form to improve accessibility for international customers. Simply locate the Languages section, then click Language settings > Add a language. Select the language from the dropdown menu and click Done.
Step 4. Save the form
After completing all configurations and translations, make sure to click Save to finalize your changes.
At this stage, it’s a good practice to test the form directly on your storefront. You can submit a sample entry to confirm that email notifications are sent and any connected workflows are triggered as expected. When you are satisfied with the results, click Turn on form to activate it.
Recommended Contact Form Apps to Consider
Besides Shopify Forms, you can also customize your contact form using paid apps like Hulk Contact Form Builder, Qikify Contact Form Builder, and Powerful Contact Form Builder.
| Hulk Contact Form Builder | Qikify Contact Form Builder | Powerful Contact Form Builder | |
| Summary | Advanced forms with extensive integrations | Unlimited forms with typeform-style options | Simple no-code builder with popup options |
| Unique features | Google Calendar/Sheets integration, Zapier, bulk order forms, cart forms | Multi-step forms, UTM tracking, Slack integration, custom sending domain, booking element | Popup/bubble/embedded display modes, image banner, image choice fields |
| Built for Shopify | Yes | Yes | Yes |
| Integrations | Mailchimp, Klaviyo, Hubspot, Omnisend, Google Calendar/Sheets, Zapier, ActiveCampaign | Klaviyo, Google Sheets, Slack, MailChimp, Stripe, PayPal, Zapier | Mailchimp, Klaviyo, Omnisend, reCaptcha |
| Support | Email, FAQ docs | Email, support portal, FAQ | Email, help center |
| Languages | 8 languages (EN, FR, JA, IT, DE, ZH-CN, ES, NL) | 20 languages | English only |
| Pricing | Free plan (1 form, 40 submissions/mo), Premium $9.90/mo, Pro $19.90/mo | Free plan (unlimited forms), Pro $9.90/mo, Pro+ $24.90/mo | Free plan (1 form), Basic $5.99/mo, Premium $7.99/mo |
1. Hulk Contact Form Builder
Hulk Contact Form Builder is designed for stores that want their forms to connect smoothly with marketing and operational tools.
It integrates with platforms such as Mailchimp, Klaviyo, HubSpot, Omnisend, Google Calendar, Google Sheets, Zapier, and ActiveCampaign. Furthermore, the app also supports bulk order forms and cart forms, which makes it a practical option for wholesale or B2B stores.
2. Qikify Contact Form Builder
If user experience and flexibility are your main concerns, Qikify Contact Form Builder is worth considering. It supports unlimited forms even on its free plan and allows you to create Typeform-style, HTML forms, or multi-step forms that feel more interactive and engaging.
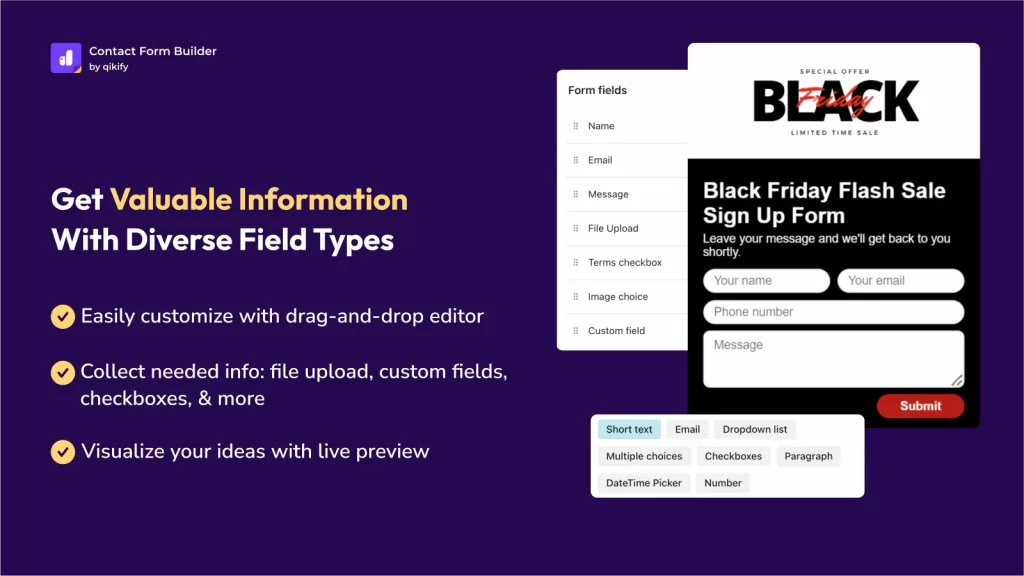
Beyond basic form building, Qikify includes features like UTM tracking, Slack integration, custom sending domains, and even a booking element. These features make it particularly suitable for stores running marketing campaigns or wanting better visibility into where leads are coming from.
3. Powerful Contact Form Builder
Lastly, Powerful Contact Form Builder focuses on ease of use while still offering solid customization options.
One of its main strengths lies in its flexible display modes. You can show forms as popups, bubbles, or embedded sections, depending on how and where you want to capture inquiries. It also includes visual elements such as image banners and image choice fields, which can make your forms more engaging and visually aligned with your brand.
FAQs
How to make a custom contact form on Shopify?
To create a custom contact form on Shopify, you can use the free Shopify Forms app, edit your contact-form.liquid file for custom input fields, or use third-party apps like Hulk Form Builder.
How to create a fillable form in Shopify?
To create a fillable form in Shopify, you can use the free Shopify Forms app, which allows you to build custom inline or pop-up forms for leads, surveys, or returns. You can add fields like text, dropdowns, radio buttons, and file uploads directly in the admin.
Where do form submissions go and can I change the email address?
By default, submissions from Shopify’s native contact form are sent to your store’s sender email address, which you can find under Settings → Notifications in your Shopify admin.
You can’t change the recipient email directly within the native form itself. However, you can still use a third-party app or implement custom code.
Can I add the contact form to multiple pages or as a popup?
Yes, you can add a contact form to multiple pages or display it as a popup. Some methods to choose from include: embedding the form directly into specific pages or page templates, using plugins (like Contact Form 7 or pop-up builders) to trigger forms on button clicks, or utilizing lightbox/popup apps.
Final Words
Overall, learning how to create a custom contact form in Shopify can help you better gather structured data and streamline communication, which supports future marketing and retention efforts!
And if you’re looking to take your Shopify store even further – whether through advanced customization, performance optimization, or a comprehensive technical audit – LitOS can support you every step of the way.
Ready to level up your Shopify store?
At LitOS, we help Shopify brands move beyond basic setups with advanced customization, performance optimization, and in-depth technical audits. Whether you need a fully tailored contact form, better integrations, or ongoing technical support, our team ensures your store runs smoothly and scales sustainably.
Contact Us
