
How to Customize a Shopify Theme: Step-by-Step Guide
If you use Shopify, your theme is what gives your store its look and feel. Learning how to customize a Shopify theme is easier than you might think. You don’t need to be a designer or a developer to make it your own. Shopify lets you change colors, fonts, and layouts so your store matches your brand. You can also add sections, update menus, and adjust the checkout page.
In this guide, we’ll walk through the steps of a Shopify theme customization tutorial in clear, simple language so you can customize with confidence and make your store stand out.
Overview: What You Can Customize in Shopify
Your Shopify theme is the base design of your store. It controls how pages are arranged and how your brand is presented.
Shopify gives you plenty of ways to make it your own without needing special skills. Its powerful Shopify personalization options let you change colors, fonts, and your logo so everything matches your style. You can also add or move sections, update menus, and create different layouts for your homepage, product pages, and collections. Even the footer and checkout page can be customized to deliver a smooth, consistent shopping experience.
With these tools, it’s easy to shape a store that feels unique and welcoming.
How to Customize a Shopify Theme via the Theme Editor
The Theme Editor is the easiest way to make changes to your store. It works with a simple click-and-drag system, so you can see updates as you make them. This is where you’ll adjust colors, fonts, sections, and more without touching any code.
Step 0: Before you start in the Theme Editor
When you first open the Theme Editor, here are a few things to keep in mind:
- Duplicate your theme first to create a backup copy in case you want to undo changes.
- Check theme support to know what help and documentation you can access.
- Prepare your images so they display properly.
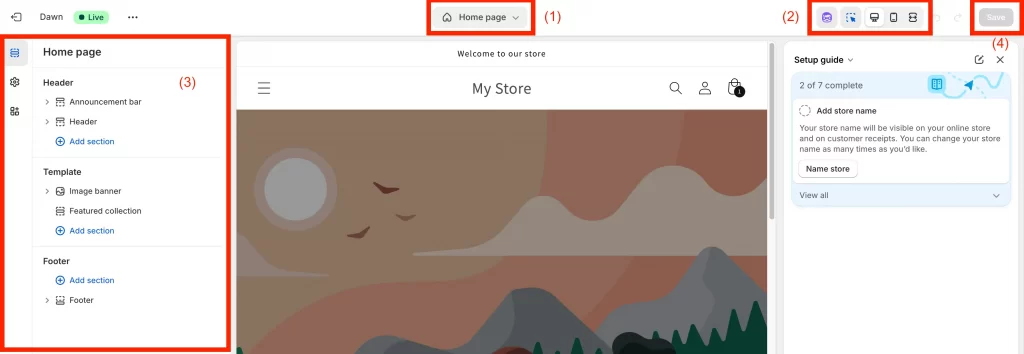
Inside the editor, you’ll be able to adjust your store’s content, layout, fonts, and colors without touching code. You can also:
- (1) Switch between templates (home, product, collection, blog)
- (2) Preview changes in real time across desktop, tablet, and mobile
The editor itself is simple: the sidebar (3) lists what you can edit, the preview window shows your changes live, and the save button (4) locks them in. If you need help, you can always open the menu bar for documentation or shortcuts, or try Shopify Sidekick, the built-in AI assistant that can guide you through customization tasks.
Important note: Each theme will have slightly different settings and design options, but the core concepts remain the same. In this Shopify theme customization tutorial, we’ll use the Dawn theme as an example.
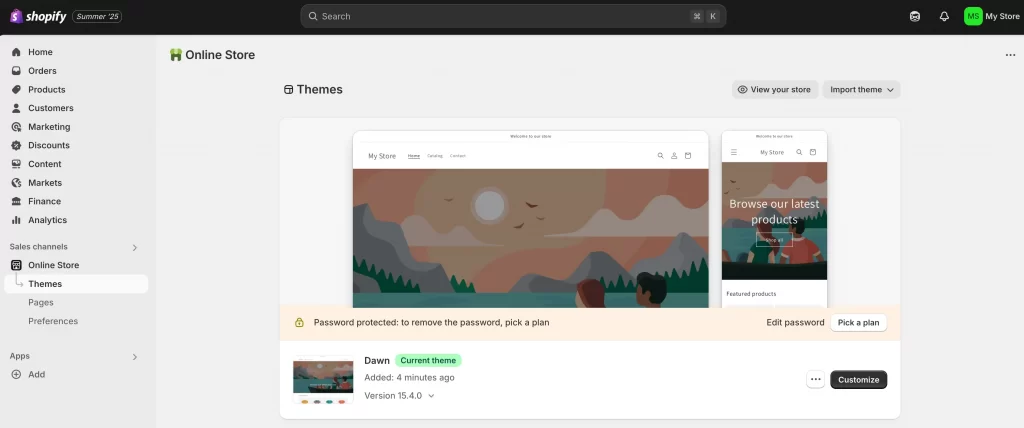
Step 1: Access the Theme Editor
Log in to your Shopify admin. Go to Online Store > Themes. Find the theme you want to work on and click Customize. This will open the Theme Editor, where you can start making changes right away.
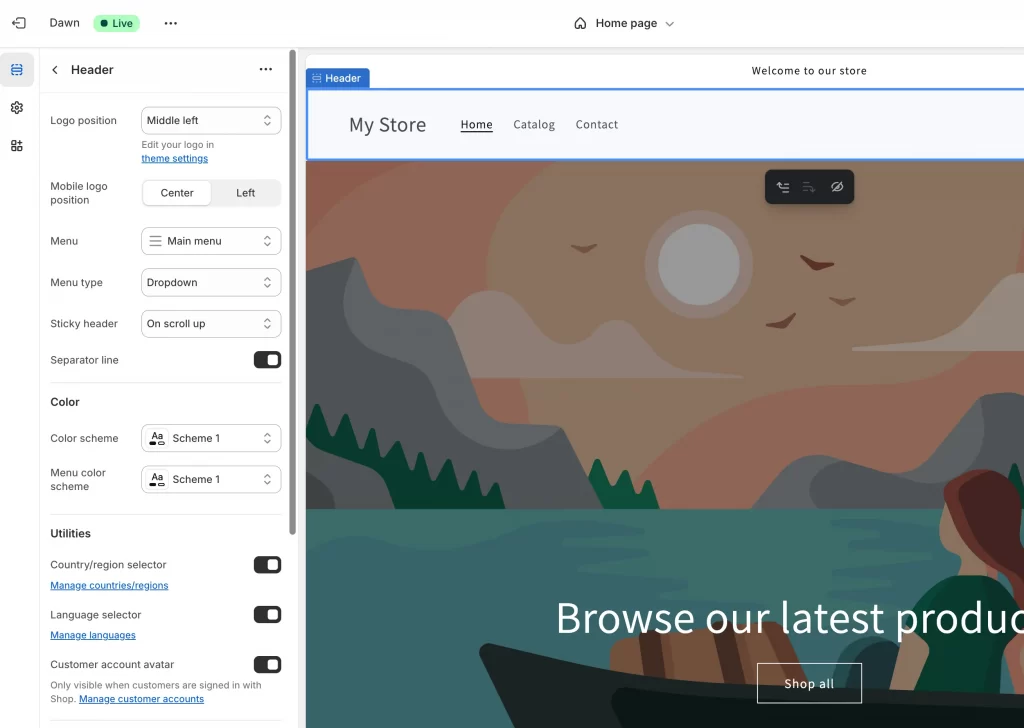
Step 2: Adjust theme settings (logo, colors, fonts and more)
In the Theme Editor, click Theme settings. Here you’ll find all the controls that shape the overall look of your store. This is the foundation of most custom Shopify themes with:
- Brand basics: Upload your logo image, set brand colors, and choose fonts.
- Layout and style: Change how buttons, cards, and sections look. Add animations if you want a little motion.
- Store details: Update things like currency format, cart style, and checkout appearance.
- Extras: Connect your social media links or add custom CSS if you’re comfortable with code.
Take your time with these settings. Let’s take the brand basics as an example.
- Logo: Upload your store logo so it shows in the header and checkout.
- Colors: Choose your brand colors for text, buttons, and backgrounds.
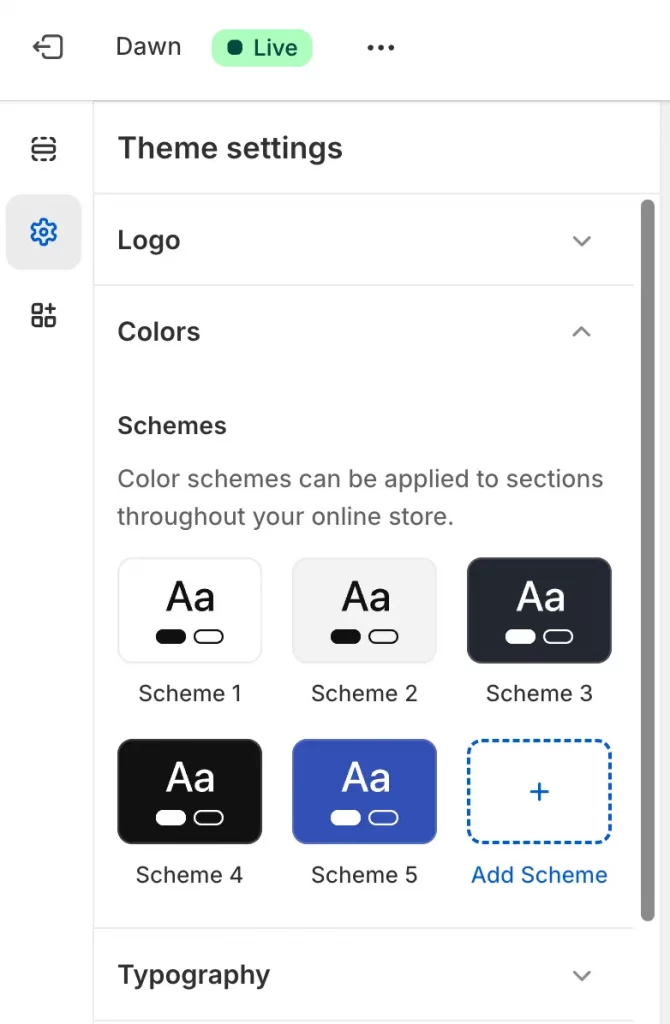
- Typography: Pick heading and body fonts that are easy to read and match your style.
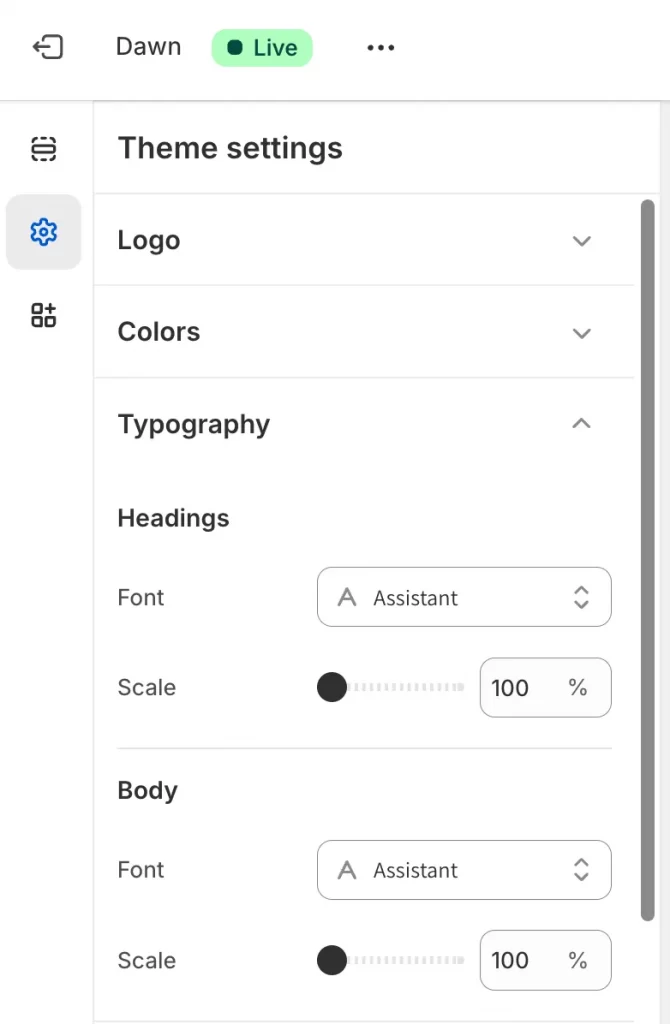
Even small changes, like a new font or button color, can make your store feel more professional and on-brand.
Step 3: Add or rearrange sections
Sections are the main pieces of each page. They can be banners, featured products, collections, blog posts, or even simple text blocks. This step is where Shopify theme customization feels most visual: you’re dragging and dropping to design a layout.
In the left panel of the Theme Editor, you’ll see the sections that make up the page you’re working on. For example, on the Homepage, you might see an image banner, featured collections, or a footer. From here you can:
- Add a section: Click Add section and choose from options like image banners, featured collections, or testimonials.

- Rearrange a section: Drag a section up or down to change the order it appears on the page.
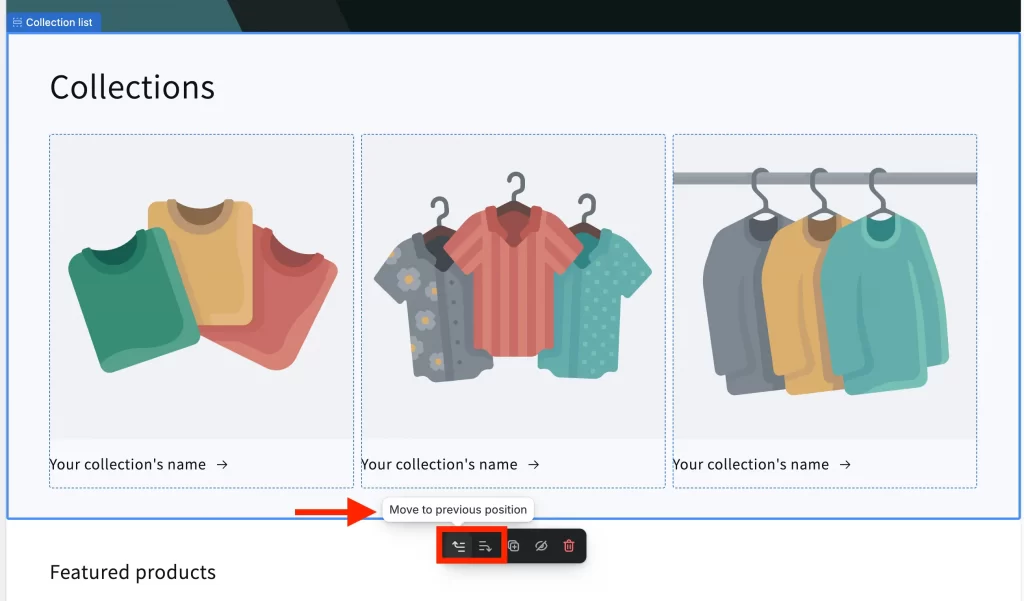
- Remove a section: Click the section, then select Remove section if you don’t need it.
You can also use the dropdown at the top of the editor to switch between templates, such as the homepage, product pages, collection pages, or blogs. Each page type can have its own set of sections, so you can design them to match their purpose.
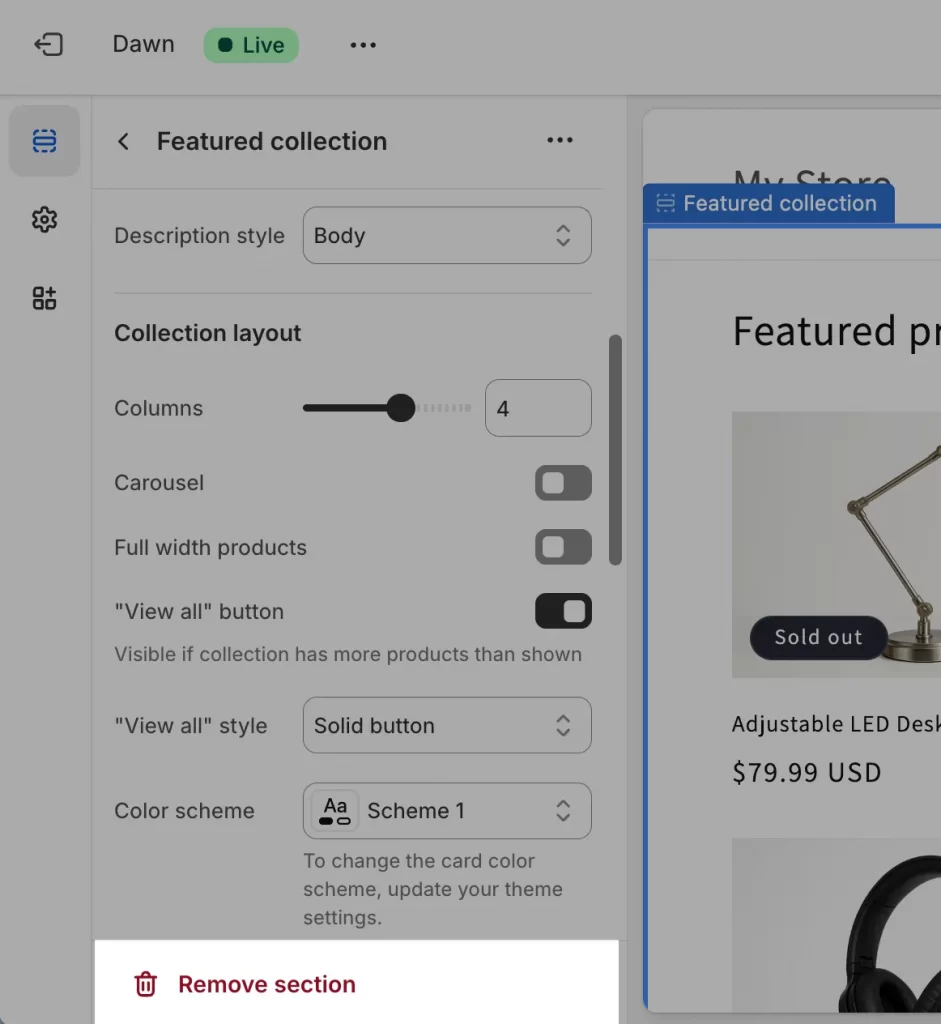
For example, in the screenshot below, the editor is on the Default product. On the left, you see three groups: Header, Template, and Footer.
- Under Template you have Product information and Related products.
- Each group has an Add section link.
- The big preview is on the right. The Save button is at the top right.
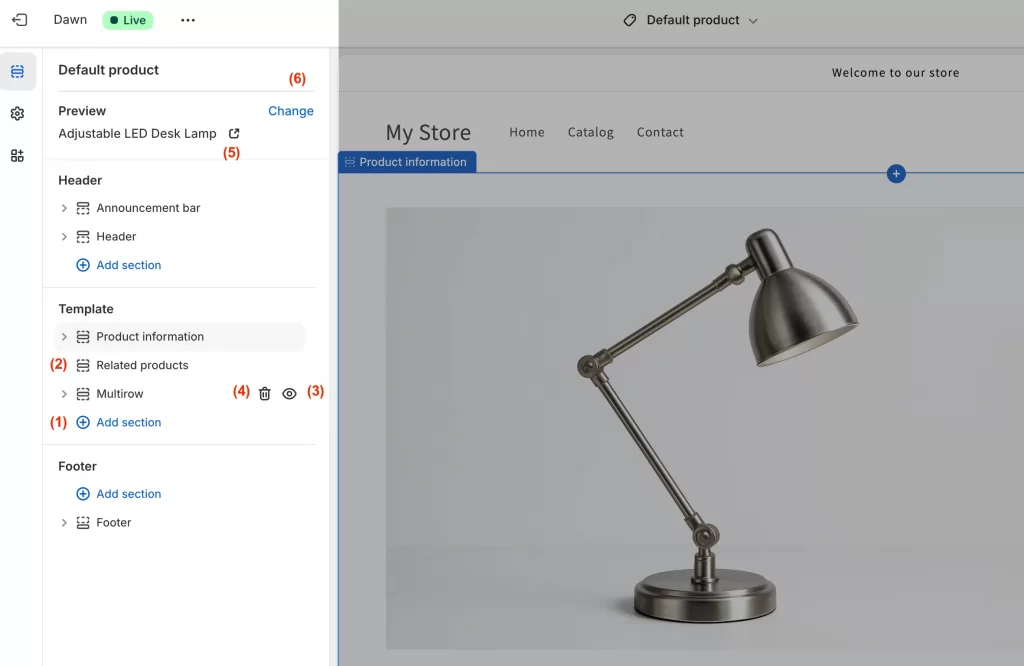
Here’s what to do next:
- Click Add section (1) under Template. Pick something useful for product pages, like Collapsible content, Image with text, Complementary products, or a Reviews block from your app.
- In the left panel, drag Related products (2) above or below Product information to change the order.
- Click a section, use the eye (3) icon to hide it, or choose Remove section (4) if you do not need it.
- At the top left you will see Preview (5) with a product name and Change (6). Click Change to pick a different product while you design.
Step 4: Customize blocks within sections
In this part of our Shopify theme customization tutorial, we’ll focus on customizing blocks within sections.
Each section is made up of smaller parts called blocks. For example, in a product information section, the blocks might include the product title, price, images, description, and the buy button.
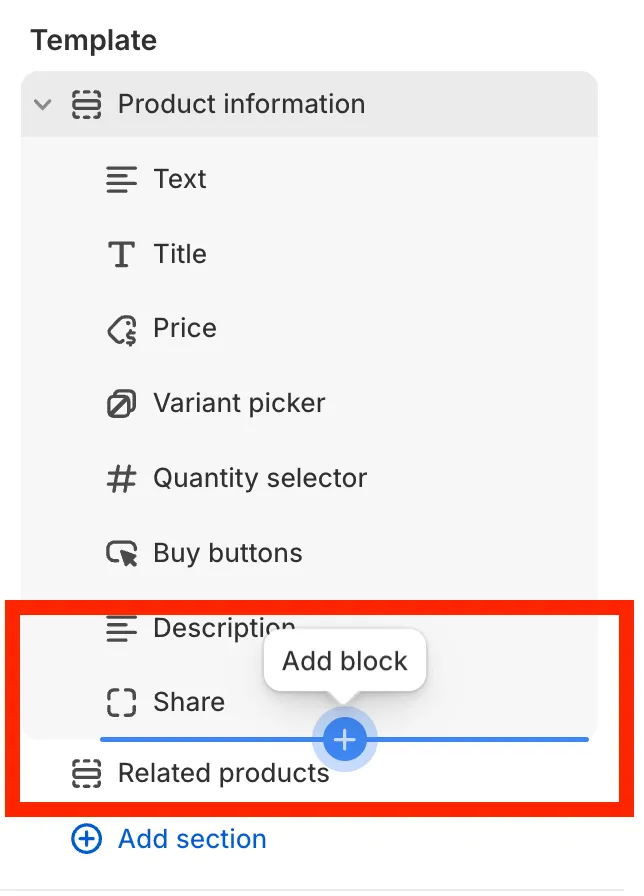
In the left panel of the Theme Editor, click on a section to see its blocks. From here you can:
- Edit a block: Click on it and change the text, image, or button link.
- Add a block: Select Add block to include more items, such as an image, text, button, or icon.
- Rearrange blocks: Drag them up or down to change the order.
- Remove a block: Click the block and select Remove block if you don’t need it.
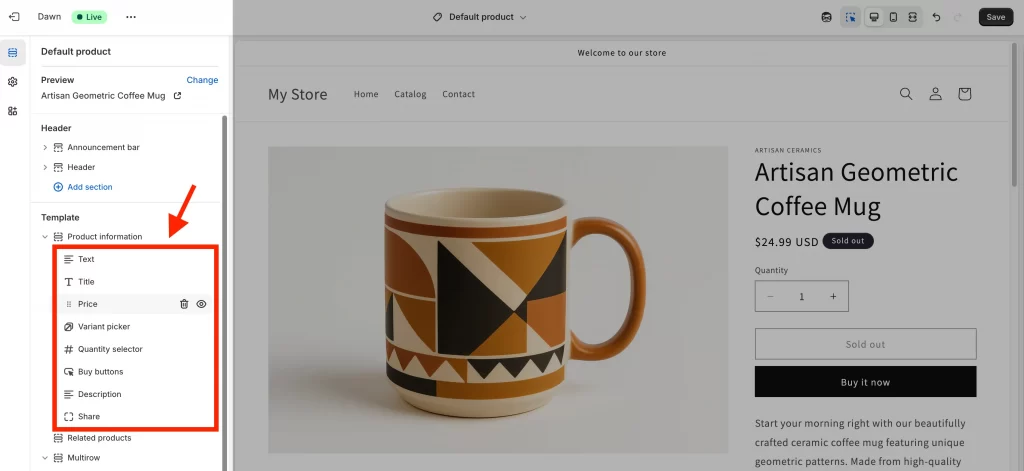
On the default product page, this means you can control exactly how the product details appear. For example, you might place the product title above the images, add extra text below the price, or include a collapsible block for FAQs.
This level of control helps you highlight the most important details and keep the page easy for shoppers to scan.
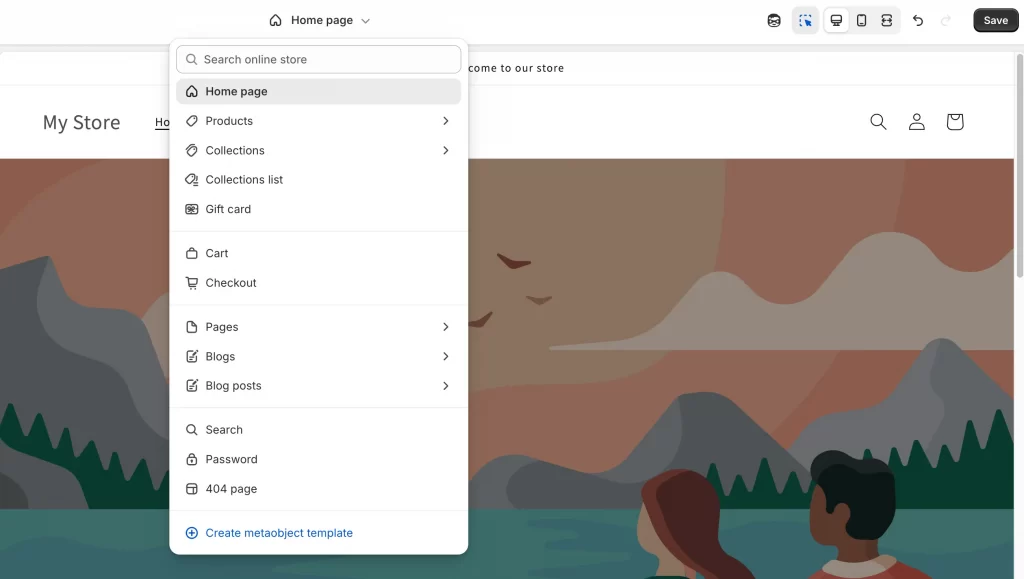
Step 5: Edit page templates (homepage, product, collection)
At the top of the Theme Editor, use the dropdown menu to switch between different page templates. These include your homepage, product pages, collection pages, and blog posts.
Each template has its own layout and sections. The same steps you used above, like adding, moving, or removing sections, also apply here.
- On the homepage, highlight banners, featured collections, or promotions.
- On product pages, focus on product details, reviews, and related products.
- On collection pages, use grids and filters to make browsing easy.
- On blog posts, add sign-up forms or related posts to keep readers engaged.
For example, in the screenshot below the editor is showing the Default blog post template. On the left you’ll still see the same:
- A Header with an announcement bar.
- A Template area with blocks like featured image, title, share, and content.
- A Footer with space to add more blocks.
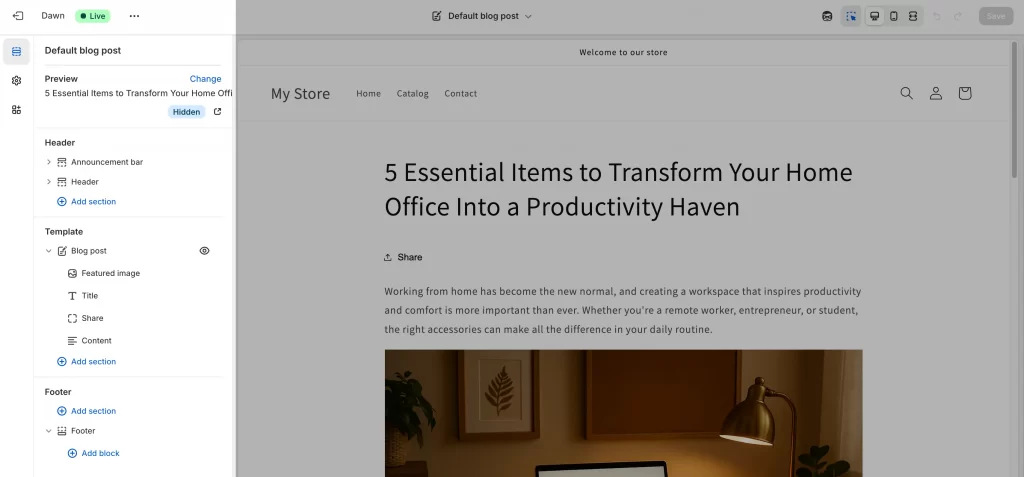
This setup is different from the default product page, but you manage it the same way. You can add a new section under Template, move blocks around, or remove ones you don’t need. For a blog, you might add a related posts section, a signup form, or social sharing to keep readers engaged.
You can apply the same techniques you learned earlier to each template. This way, every page serves its purpose while keeping your design consistent.
Step 6: Update navigation & footer
Your store’s navigation and footer guide shoppers around your site. Both can be adjusted in the Theme Editor.
1. Navigation (header menus)
- In the left panel, open Header section.
- Choose which menu to display, such as the Main menu.
- To change the actual menu items, go to Online Store > Navigation in your Shopify admin. There you can add, remove, or reorder links.
2. Footer
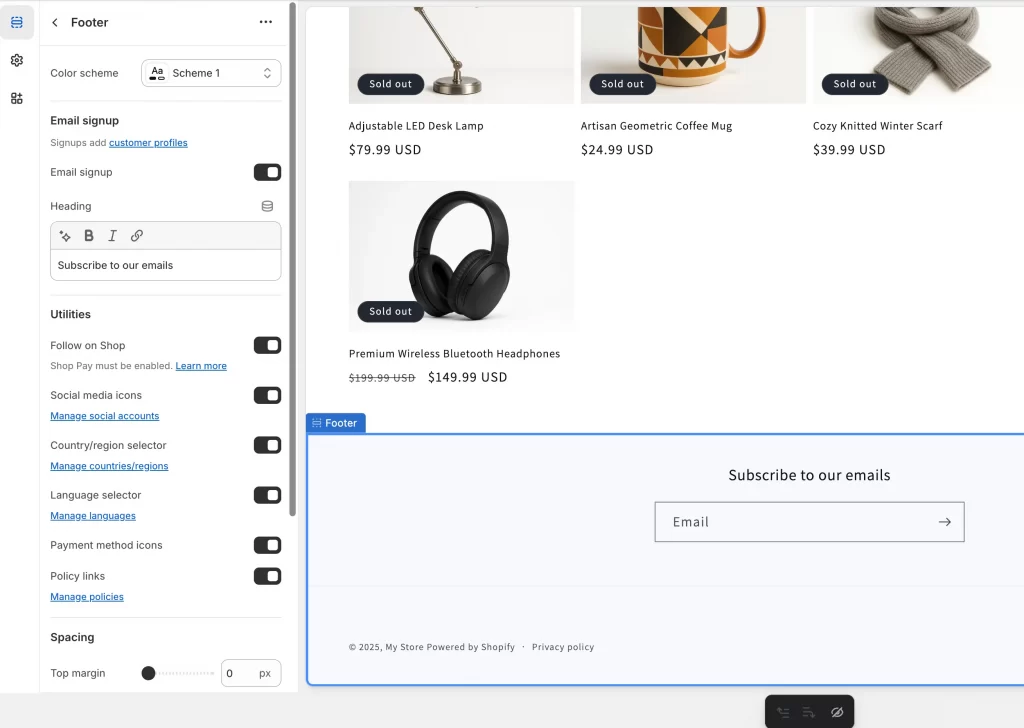
- In the left panel, scroll down to Footer.
- Add blocks such as menus, contact details, social media icons, or a newsletter signup.
- Drag blocks to reorder them or remove ones you don’t want.
A clear menu at the top helps visitors reach your products faster. The footer works well for extra links, like return policies, customer service, or social media pages.
Step 7: Customize checkout experience
The checkout page is where shoppers complete their purchase, so it’s worth making it match your brand.
In the Theme Editor, open Checkout under Theme settings. Here you can:
- Add your logo so it appears at the top of the checkout.
- Choose colors for buttons, backgrounds, and accents.
- Pick fonts that are consistent with the rest of your store.
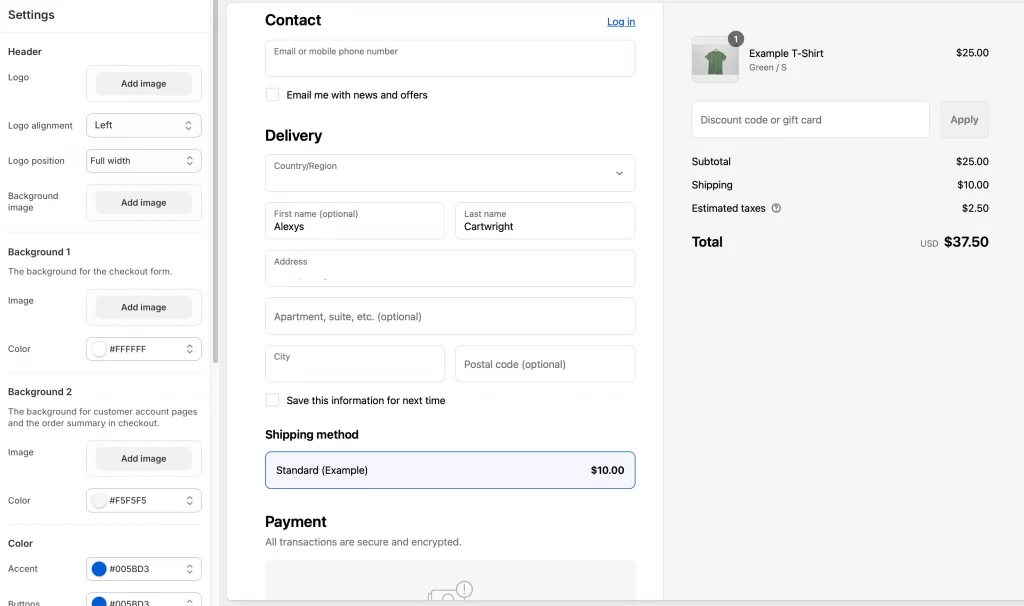
For extra features, you can install apps from the Shopify App Store. These can add things like upsells, gift options, or delivery date pickers.
Step 8: Add third-party apps & make advanced edits
The Theme Editor gives you a lot of control, but sometimes you’ll want features it doesn’t include by default. If you’re comfortable with code, you can also learn how to edit Shopify theme code (Liquid, CSS, or JS) to create deeper customizations.
But let’s learn all one by one.
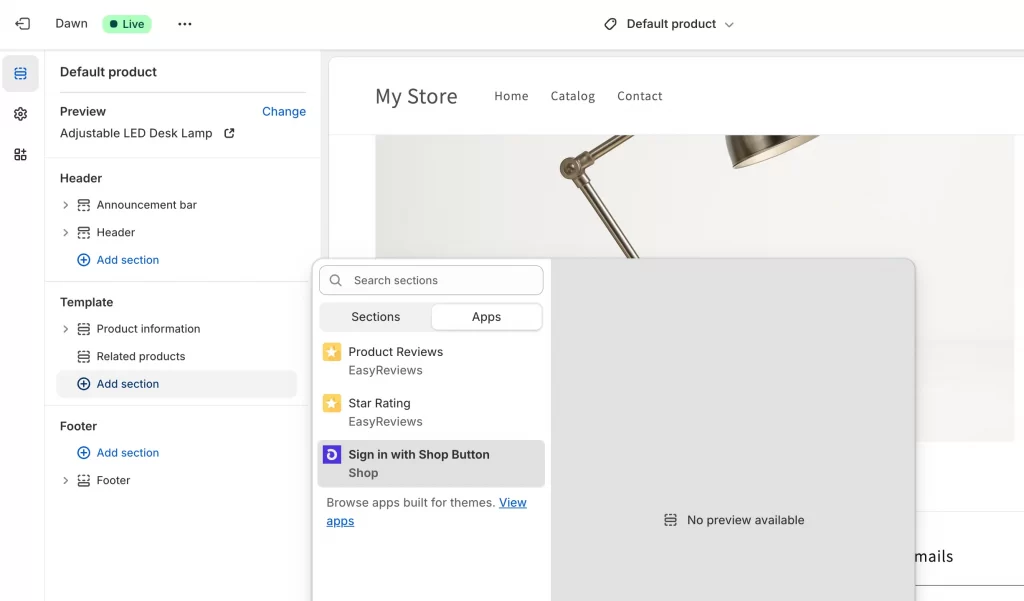
1. Add apps from the Shopify App Store
Apps are the simplest way to add new features without coding. You can go to the Shopify App Store and search for what you need. Popular examples include:
- Product reviews to build trust.
- Size charts for apparel stores.
- Product filter and search to make browsing easier.
- Upsell or cross-sell apps to boost order value.
- Subscription tools if you sell recurring products.
For example, below I’ve added Product Reviews and Star Rating apps. These appear in the Theme Editor under “Apps” and can be dropped into your product template like any other section.
2. Use custom CSS in the Theme Editor
If you want small design changes without editing your full theme code, you can use the Custom CSS box built into many sections.
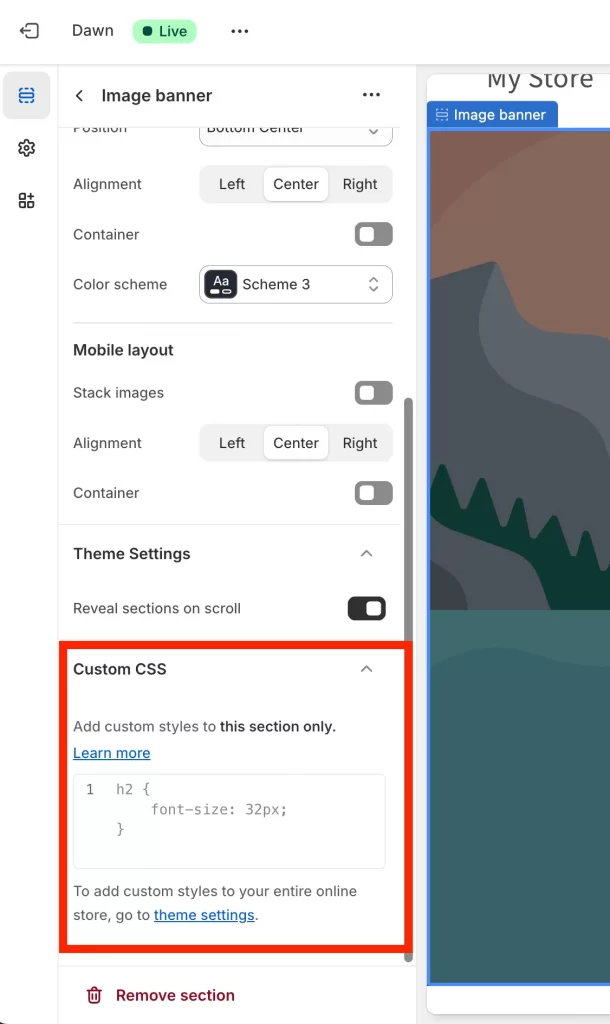
- Open the Theme Editor and click on a section (for example, an Image banner or Product information).
- Scroll down and you’ll see a Custom CSS box.
- Add your CSS here, it only affects that section.
For example, in an Image banner, you could add:
h2 {

  font-size: 32px;

}
This would make the heading text larger, but only in that banner.
For store-wide CSS changes, use Theme settings > Custom CSS instead.
3. Make advanced edits with code
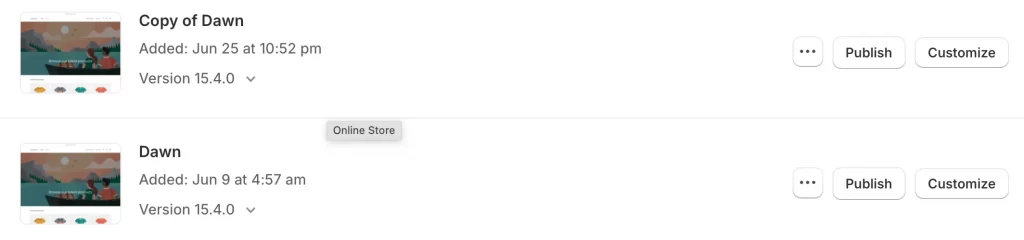
If you want full control over your theme’s design and functionality, you can edit the code. In your Shopify admin, go to Online Store > Themes > … > Edit code.
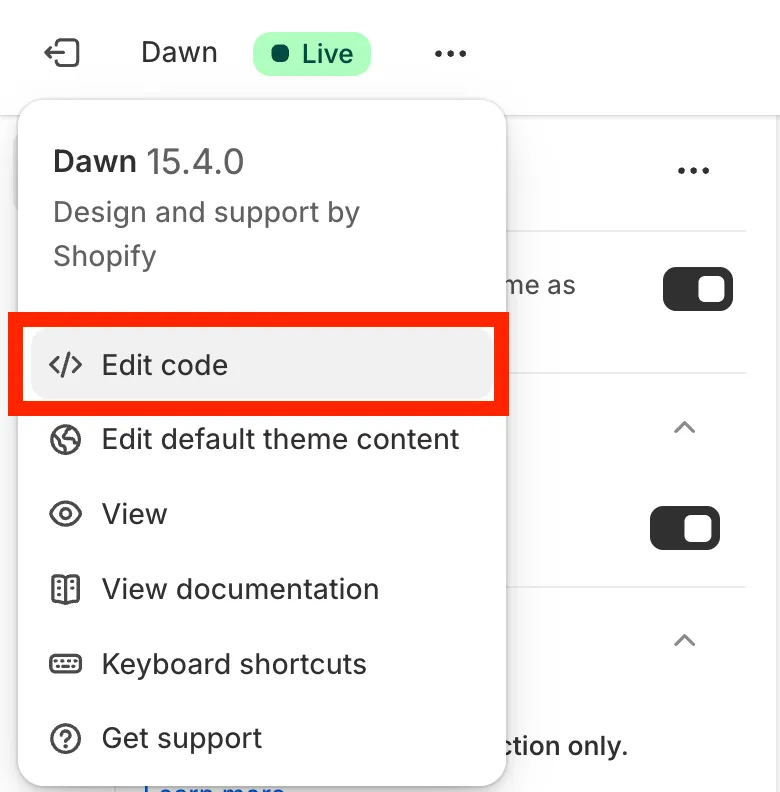
Here you’ll see your theme files:
- Liquid templates (control layout and structure).
- CSS files (control styles like colors, spacing, and fonts).
- JavaScript files (control interactive features like sliders or pop-ups).
But you should always duplicate your theme before making code changes. This gives you a safe backup if something breaks.
You can also add comments to your edits so you (or another developer) can track what was changed.
Finally, let’s make one change at a time and test it in preview mode before publishing.
With apps and advanced edits, you can take your theme far beyond its default options, just balance the convenience of apps with the control of coding.
Step 9: Save, test, and publish your changes
Once you’ve customized your theme, you need to make sure everything works before going live.
1. Save as you go
In the Theme Editor, click Save often so you don’t lose changes. Saving only affects the theme you’re editing. If it’s a draft theme, your live store won’t change until you publish it.
2. Test your store
Now, let’s walk through the shopping journey as a customer: browse products, add items to the cart, and go through checkout (use Shopify’s test payment option). You should make sure links, menus, and buttons work and test on mobile, since most shoppers buy on their phones.
3. Publish when ready
If you’re editing a draft theme, it won’t affect your live store yet. When you’re confident in the changes, go to Online Store > Themes and click Publish next to your draft. Shopify will then replace your current live theme with the updated one, but your old theme stays saved as a backup.
That’s how you can customize a Shopify theme using the Theme Editor and enhance it further with apps.
Common Shopify Theme Customization Issues & Fixes
Even with Shopify’s Theme Editor, you may run into a few common problems. Here’s how to handle them.
1. Layout breaking after code edits
Issue: After editing Liquid or CSS, the page layout looks broken.
Fix: Always duplicate your theme before coding so you have a backup. Use the Theme Check tool in the code editor to find missing templates or syntax errors. If problems remain, roll back to the duplicate copy.
2. Colors or fonts not applying correctly
Issue: You change a font or color in Theme settings, but it doesn’t appear on the live store.
Fix: Confirm the change was made in the correct place (Theme settings vs. a block). Clear your browser cache or check in incognito mode. Test on different devices to rule out local issues.
Pro Tip: Check out the detailed tutorial on how to add fonts to a Shopify theme and troubleshoot common issues when adding them.
3. Conflicts with installed apps
Issue: Parts of your theme look broken or different after installing an app.
Fix: Temporarily disable or uninstall the most recent app to see if the issue resolves. If it does, contact the app developer for support. In some cases, adding “Wait” steps in Shopify Flow prevents apps from overwriting theme changes.
4. Mobile display problems
Issue: Your store looks fine on desktop but not on mobile.
Fix: Use the Theme Editor’s mobile preview to spot layout issues. Check that images and sections are set to scale properly. Test on iOS and Android devices to confirm whether it’s device-specific.
Need expert help?
If you’d rather not spend hours troubleshooting theme issues, our team at LitOS can help. We specialize in Shopify store development and theme customization – from fixing layout problems to building custom features that match your brand.
How to Customize a Shopify Theme: FAQs
Is it possible to customize a Shopify theme?
Yes, Shopify themes are built to be customizable. You can use the Theme Editor to adjust colors, fonts, layouts, and sections without touching code.
How do I edit a theme template in Shopify?
Open the Theme Editor and use the dropdown at the top to switch between templates, such as product pages or collections. From there, you can add, move, or remove sections just like on your homepage.
Why can't I edit my theme on Shopify?
This often happens if you don’t have the right admin permissions, or if you’re trying to edit a theme that isn’t published or duplicated. Make sure you’re working on a draft copy with full access.
How to personalize your Shopify store?
Start with simple changes like your logo, brand colors, and fonts. Then add sections that highlight your products, customer reviews, or brand story to make the store feel unique.
Do I need coding to customize a Shopify theme?
No. Most changes can be done with the Theme Editor. Coding (using Liquid, CSS, or JavaScript) is only needed for advanced or very specific customizations.
How to customize Shopify themes using Shopify Liquid?
Go to Online Store > Themes > … > Edit code. There, you can edit Liquid files to change templates, layouts, or add logic. Always duplicate your theme before making code edits so you have a safe backup.
Final Words: Should You Customize Yourself or Hire a Pro?
Learning how to customize a Shopify theme is possible for anyone, even without coding skills. The Theme Editor gives store owners enough tools to build a polished, professional-looking shop. For many, that’s all they need.
But if you want advanced design, unique layouts, or custom features, it can be quicker and safer to work with a Shopify expert.
At LitOS, we help brands build, customize, and scale their Shopify stores the right way. Whether you just need a quick fix or a fully custom design, our team makes the process simple and stress-free.
Have a project in mind? Contact us now →

