
How to Setup Shopify Store (A Complete Launch Checklist for 2025)
If you want to learn how to setup Shopify store, this guide walks you through every step from creating your account to launching and promoting your shop. This process works for beginners starting their first online store and for business owners moving from another platform. You will learn how to build a professional, high-converting Shopify store that is ready to sell and grow.
To make setup simple, the process is divided into three clear phases:
- Phase 1 – Set up your Shopify store: Create your account, add products, set up payments, and connect your domain.
- Phase 2 – Design and optimize: Customize your theme, build essential pages, test your checkout, and prepare for launch.
- Phase 3 – Launch and grow: Go live, add more sales channels, and promote your store through SEO and marketing.
Each phase includes step-by-step checklists, setup tips, and expert advice to help you launch smoothly and grow with confidence.
Before You Start: Prepare for a Successful Shopify Launch
Before you set up your Shopify store, it is important to plan carefully. A clear direction helps you save time and avoid mistakes later. Start by defining your goals and understanding what kind of store you want to build.
1. Understand your business goals and target audience
Every successful store begins with a clear purpose. You should identify what you want to achieve and define who your ideal customers are. This understanding helps you decide which products to offer, how to price them, and how to present your brand.
2. Decide where you will sell
Your selling channels play a key role in shaping your business strategy. You can choose to sell products on your Shopify website, in person using Shopify POS, or through social media platforms such as Facebook and Instagram.
3. Choose a Shopify plan that fits your needs
Understanding how much does it cost to setup a Shopify store helps you plan your budget before launch. Each Shopify plan includes different tools, features, and levels of support. You should compare the available plans carefully to find one that matches your business size, goals, and expected sales volume.
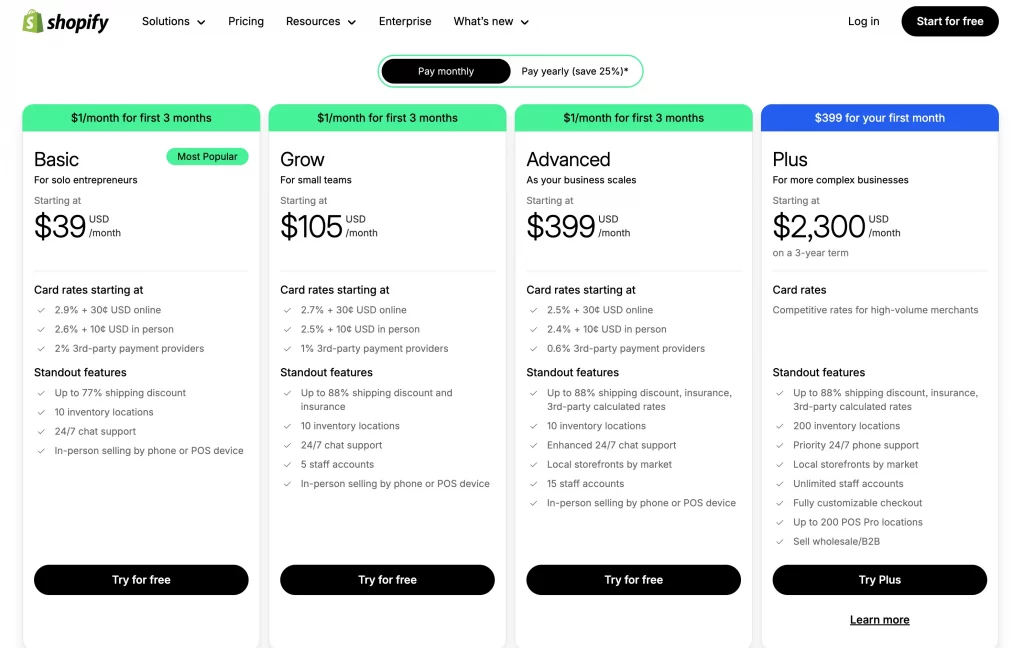
Shopify offers a free trial that lets you explore the platform before committing to a plan. Once you are ready to launch, the Basic plan starts at around $39 per month, while higher-tier plans provide advanced reporting, lower transaction fees, and more staff accounts.
4. Check legal, tax, and payment requirements
Your business must comply with local laws and tax regulations. You should register your business name, verify your tax identification number, and confirm which payment gateways are supported in your country before launching your store.
5. (Optional) Migrate your existing store to Shopify
If you already have an existing online store, you can move your products, customers, and order history to Shopify using our Shopify Migration Service. As an official Shopify partner, LitExtension provides one of the fastest and most accurate migration services available. You can seamlessly transfer products, customers, orders, and other data from more than 140 eCommerce platforms to Shopify with full accuracy and security.
Now, let’s explore each phase step by step and see how to setup Shopify store with confidence.
Phase 1: The Essential 5 Steps to Set Up Your Shopify Store
This phase covers the technical foundation of your store. You will create your Shopify account, add your first products, set up payments and shipping, and connect your custom domain. These steps ensure your store is fully functional before you design and promote it.
Step 1. Create your Shopify account and store name
You should start by visiting the Shopify website and signing up for a free trial. During registration, you will enter your business details and choose a store name that reflects your brand. Once your account is active, Shopify gives you access to the admin dashboard, where you can manage every part of your store.
If you want to save time during setup, explore LitOS QuickLaunch Essentials – your shortcut to a fully functional Shopify store.
👉 Get a custom-built Shopify store that fits your brand, live in just five working days. Fast, tailored, and starting from $599, powered by AI and built by Shopify experts.
Step 2. Add and organize your products
After you log in, you can begin adding products to your store.
1. Add your products
You can add products by going to Products (1) → Add product (2) in your Shopify admin.
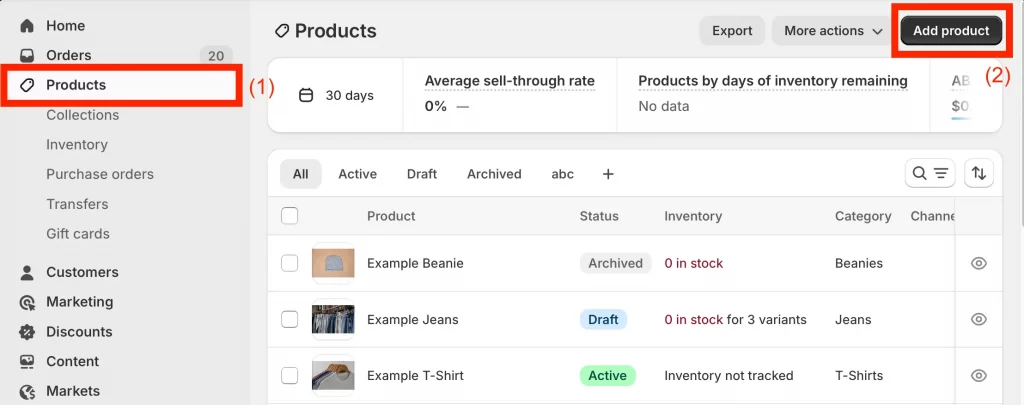
Enter a product title, write a descriptive summary that highlights key features or benefits, and upload multiple images to show your product clearly. Make sure to include SKU numbers and inventory quantities so your stock stays accurate.
Some product types require extra setup details, especially when visuals and trust matter. Jewelry stores often need high-quality images, clear variant options, and strong product descriptions to convert visitors. Reviewing successful Shopify jewelry stores can help you learn how to structure collections and product pages for this niche.
2. Add product variants
If your items come in different options, such as size, color, or style, you can add them as product variants. Each variant can have its own price, image, and inventory count. This makes it easier for customers to choose exactly what they want without leaving the product page.
3. Organize products into collections
You can group related products into collections to make browsing easier for shoppers. Collections can be created manually or set up automatically based on tags, price, or product type.
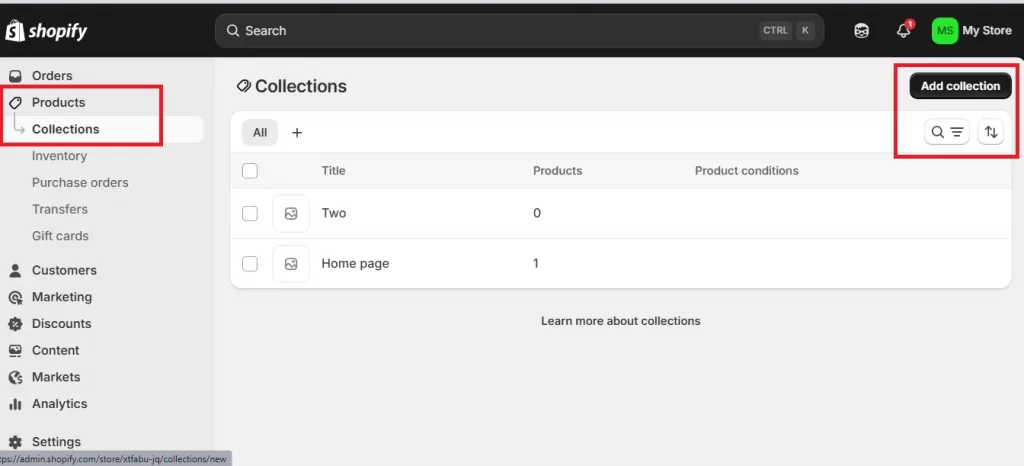
Common collection examples include “New Arrivals,” “Best Sellers,” or “Summer Collection.” A well-organized structure also helps improve your SEO visibility and customer experience.
For a full step-by-step guide, kindly refer to: How to add products to Shopify.
Step 3. Configure payments and taxes
Your store must be ready to accept payments securely and process orders smoothly. You can set up Shopify Payments to start accepting major credit cards, debit cards, and digital wallets directly through your store. If Shopify Payments is not available in your country, you can select another trusted payment gateway that supports your region.
1. Set up Shopify Payments
You can activate Shopify Payments by going to Settings → Payments in your Shopify admin. Follow the on-screen instructions to connect your business bank account, choose your payout schedule, and confirm the currencies you plan to accept.
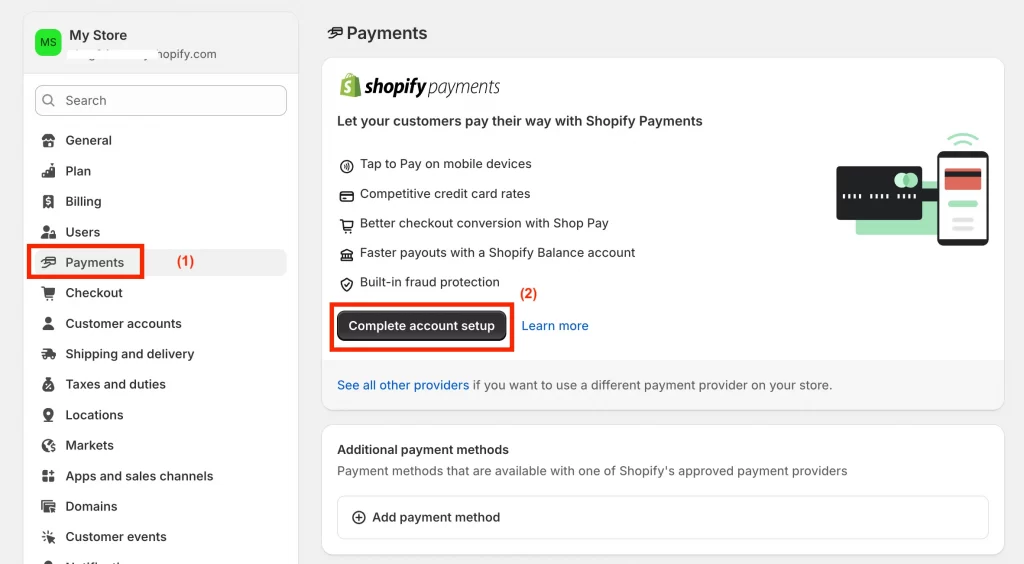
Once activated, your customers can pay instantly using credit cards or local payment methods supported in their region.
For detailed steps, see: How to set up Shopify Payments.
2. Add alternative payment gateways
If Shopify Payments is not available in your location, you can integrate other gateways such as PayPal, Stripe, or Authorize.net. Each gateway may have its own setup requirements and transaction fees, so you should review their details carefully before enabling them.
3. Configure tax settings
Shopify lets you apply automatic tax rates based on your customer’s location. You can go to Settings → Taxes and Duties to verify these settings and adjust them for your region. Adding accurate tax rules ensures transparency at checkout and helps your store stay compliant with local regulations.
Step 4. Set up shipping, pickup, or local delivery
You can manage how customer orders are delivered by defining your shipping zones, rates, and methods. Start by creating clear shipping rules for the regions you serve, including domestic and international destinations. If you have a physical location, you can also enable local pickup or local delivery to give nearby customers more convenient options.
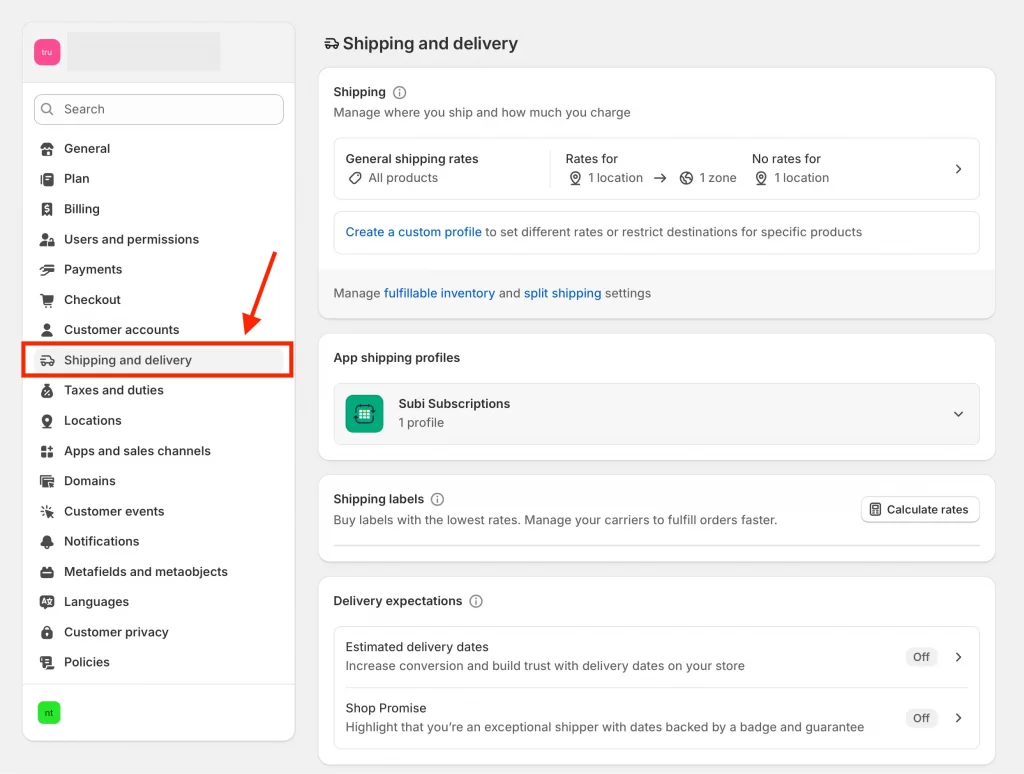
Make sure to add accurate package weights and dimensions so that your shipping costs are calculated correctly at checkout. Taking time to set these details ensures that your customers see reliable delivery options and pricing before they place an order.
For more guidance, see these related tutorials:
Step 5. Connect a custom domain
A custom domain helps customers recognize your brand and trust your online store. You can purchase a new domain directly through Shopify or connect one that you already own from another provider.
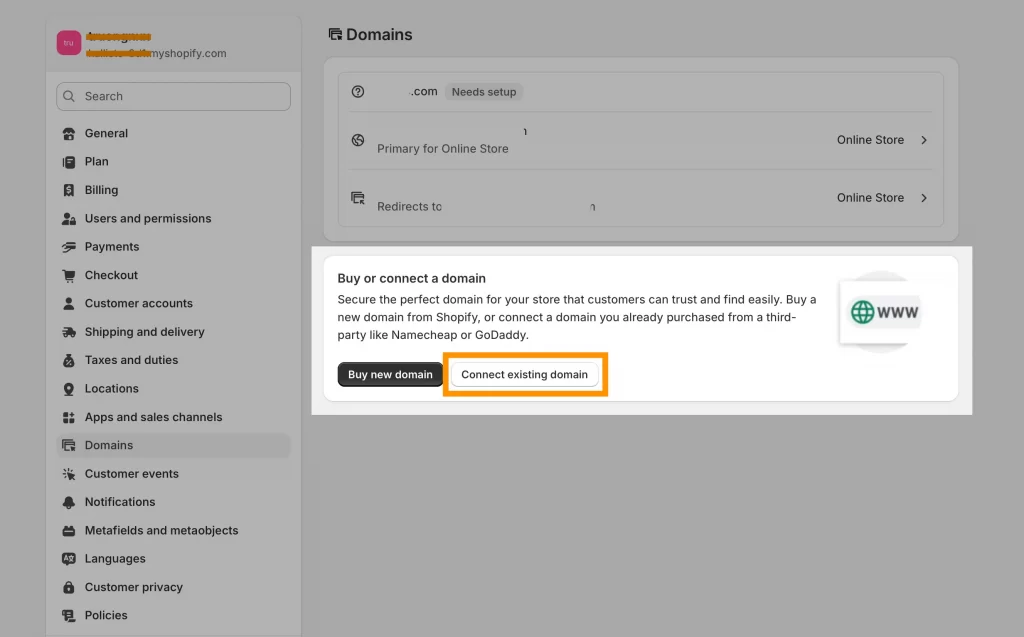
Once your domain is linked, you should enable SSL encryption to protect customer data and ensure that all transactions are secure.
If you already have a domain registered elsewhere, you can easily move it to Shopify by following this guide: How to transfer a domain to Shopify.
Phase 2: How to Design and Optimize Your Shopify Store
Once your store foundation is ready, you can focus on design and layout. This phase helps you make your Shopify store visually appealing, easy to navigate, and optimized for conversions. You will choose a theme, customize your pages, and test your store before launch.
Before finalizing your store design, it helps to see how real businesses structure their layouts, product pages, and branding. Reviewing proven stores can give you ideas for homepage sections, navigation, and conversion-focused design. You can explore these Shopify blog examples to understand what works across different industries and niches.
Step 6. Choose and customize a Shopify theme
Your theme defines the overall design, layout, and first impression of your Shopify store. Choosing the right theme helps your products stand out and builds a consistent brand experience for every visitor.
1. Browse and preview themes
You can start by opening your Shopify admin and going to Online Store → Themes. From there, explore free and paid options in the Shopify Theme Store.
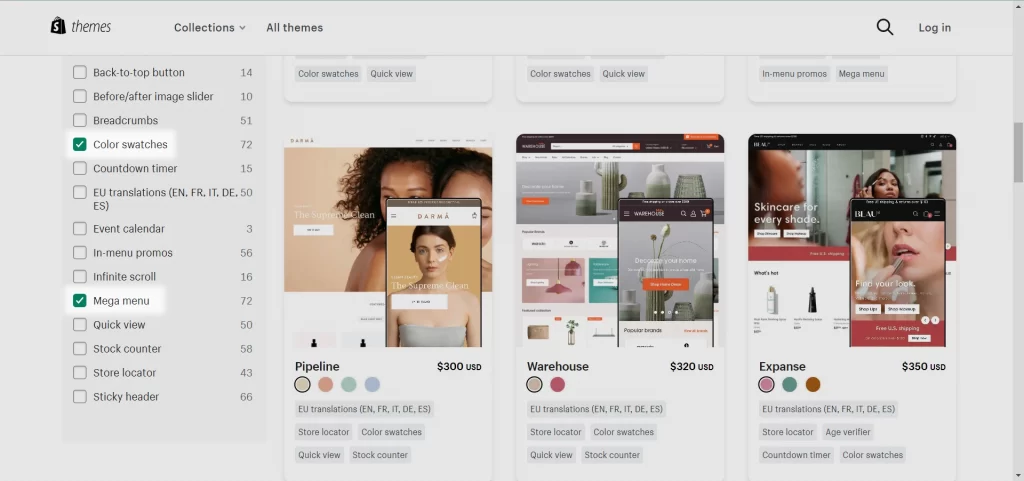
You can use the preview feature to see how each theme looks on desktop and mobile devices. When you find one that matches your brand’s style and product range, click Add or Try Theme to install it.
2. Customize your theme in the Theme Editor
After installation, you can customize your theme in the Theme Editor. This tool allows you to change colors, fonts, and layout sections without writing code.
You should upload your logo, adjust the header and footer, and organize your homepage to feature best sellers or key product categories. These adjustments help your store look professional and user-friendly.
3. Adjust product and collection pages
If your store sells multiple types of products, you can further customize your product and collection pages. You can rearrange product images, refine descriptions, and adjust how filters or tags appear to help shoppers find items easily. Let’s preview your changes on both mobile and desktop to make sure the layout stays clear and responsive.
For a complete step-by-step guide, kindly read: How to customize a Shopify theme.
Step 7. Build essential pages and menus
Every Shopify store needs clear navigation and well-written pages that help customers understand your brand, find information easily, and feel confident making a purchase. You should start by creating the most important pages for your store, then organize them into menus that make browsing simple.
1. About Us page
Your About Us page tells the story behind your brand. You should explain what inspired your business, what makes your products unique, and how your values connect with your customers. Adding real photos or a short founder story helps build authenticity and trust.
2. Contact page
The Contact page allows customers to reach you quickly. You should include a contact form, your email address, and social media links. If you have a physical store or office, it is helpful to add your address and a map for easy directions.
3. FAQs page
A Frequently Asked Questions page answers common questions about products, shipping, returns, or payment methods. Writing clear, short answers saves customers time and reduces the number of support requests you receive.
4. Privacy Policy page
The Privacy Policy explains how you collect, use, and protect customer information. Shopify offers a free privacy policy generator that you can customize for your store. Having this page visible shows that your business respects data privacy laws and builds customer confidence.

5. Menus and navigation
Once your key pages are ready, you can organize them into menus. Go to Online Store → Navigation to create your main menu and footer menu. Your main menu should highlight your product categories or collections, while your footer can include links to policies, contact details, and social media. A simple, consistent menu structure helps visitors explore your store easily.
6. Add a blog (optional)
If you plan to share updates, product tips, or stories, you can add a blog section to your store. Blogging improves SEO performance and gives you new ways to connect with your audience over time.
As your business grows, you may need extra pages such as size guides, brand values, or landing pages for ads. Shopify makes it easy to create and manage these pages from your admin panel. Follow this guide on how to add pages on Shopify to expand your site without affecting your main navigation.
Step 8. Test your store before launch
Before you open your store to the public, it is essential to test everything to make sure your checkout, payments, and order fulfillment work correctly. Testing helps you find small issues before real customers do, ensuring a smooth shopping experience from start to finish.
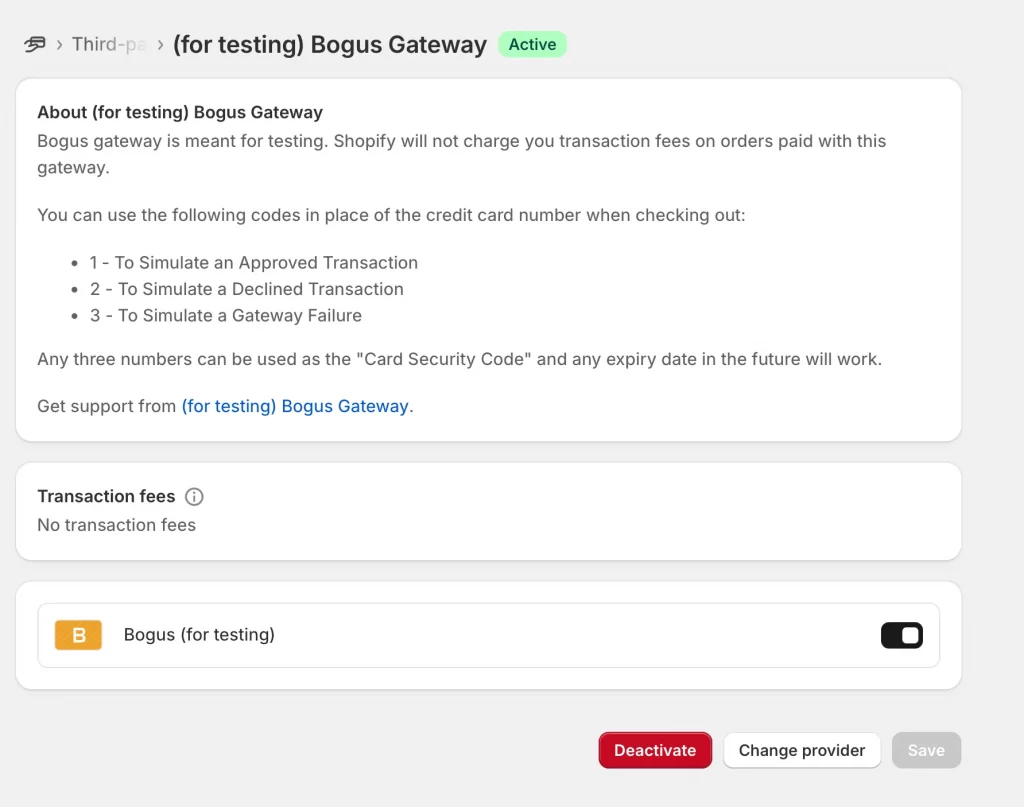
1. Place test orders
You can place test orders to see exactly how your checkout process works. In your Shopify admin, go to Settings → Payments, activate the Bogus Gateway for testing, and complete a purchase as if you were a customer. This allows you to confirm that payments, taxes, and shipping rates are applied correctly.
2. Test payment methods and refunds
You should test both successful and failed transactions to verify that your payment gateways handle different cases properly. Afterward, practice refunding and canceling orders to make sure the process works as expected for your team and customers.
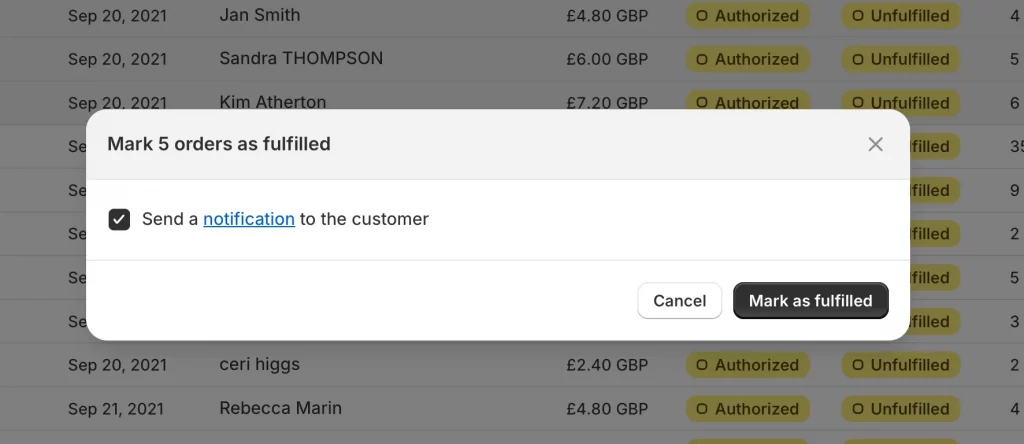
3. Test order fulfillment
Go to your Orders section and mark a few test purchases as fulfilled or partially fulfilled. This helps you review how Shopify updates order statuses, sends email notifications, and tracks shipments.
4. Review your store design and navigation
Finally, browse your store as a customer would. You should check that menus, buttons, and links work on both desktop and mobile devices. Let’s also review images and text for clarity, and confirm that all pages load quickly. A clean, responsive layout helps build trust and keeps customers engaged.
Phase 3: How to Launch and Promote Your Shopify Store
After you finish testing and customizing your store, it is time to make it public and start driving traffic. This phase helps you launch confidently, expand your sales channels, and promote your store through effective marketing strategies.
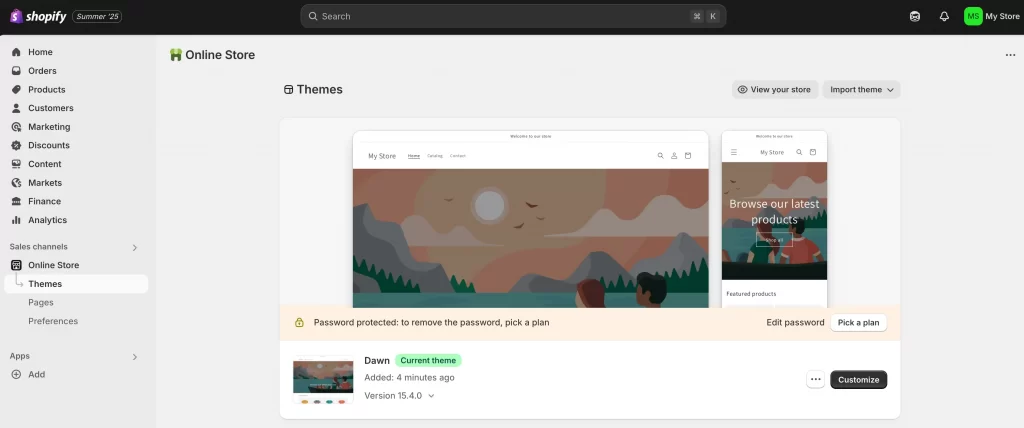
Step 9. Remove your store password and go live
Before customers can visit your website, you need to remove the password protection. Go to Online Store → Preferences and disable the password page. Once your store is live, you can share your domain across social media, marketing emails, and product packaging.
You should also review your checkout settings one final time to confirm that payments, taxes, and shipping work correctly for all regions. Adding a live chat widget or contact form at this stage helps customers ask questions easily and encourages trust.
If you work with designers, marketers, or developers, you may want to give them limited access to your store. Shopify allows you to invite collaborators without sharing your main login details. This guide explains how to add a collaborator on Shopify safely and efficiently.
Step 10. Add other online sales channels
After you launch your online store, you can reach more customers by selling on additional channels that connect directly to your Shopify admin. Popular options include Facebook and Instagram by Meta, Shopify POS, and the Buy Button for embedding products on external websites or blogs.
Each sales channel has its own eligibility requirements based on your region and product type, so it is important to review Shopify’s guidelines before enabling them.
Step 11. Promote your store and drive traffic
Once your store is live, promotion becomes your key to growth. Start by optimizing your SEO settings and go to Online Store → Preferences to add a meta title and description for your homepage. Creating a marketing plan will help you stay consistent and track what works best for your audience.
You can use Shopify Email to send newsletters, launch promotions, and build relationships with your customers. Setting up discount codes, sales, and abandoned cart emails encourages repeat purchases and helps recover potential lost sales. You should also monitor your performance through Shopify Analytics to understand your visitors’ behavior and improve over time.
And that’s how to setup Shopify store. Your Shopify journey continues after launch. Keep improving your products, updating your design, and enhancing your customer experience to drive long-term growth. With a strong setup and steady effort, your store can grow into a successful online business.
How to Setup Shopify Store: FAQs
How much does it cost to open a Shopify store?
The cost of opening a Shopify store depends on the plan you choose. Shopify offers a free trial so you can test the platform before subscribing. After that, plans start from $39 per month for the Basic plan and go up based on features and business size. Additional costs may include a custom domain, paid apps, or premium themes.
Do I need an LLC to sell on Shopify?
You do not need to form an LLC to start selling on Shopify. Many sellers begin as individuals or sole proprietors. However, creating an LLC can provide legal protection and tax benefits once your business grows, so it is worth considering in the long term.
What do I need to start a Shopify store?
To start a Shopify store, you need a product to sell, a valid email address, a payment method for your plan, and a clear brand name. You should also prepare product descriptions, images, and basic store content such as an About page and policies.
How much does Shopify take from a $100 sale?
The transaction fees depend on your plan and payment method. If you use Shopify Payments, there are no additional transaction fees beyond standard credit card processing (around 2.9% + 30¢ on the Basic plan). For a $100 sale, Shopify would keep about $3.20 in processing fees.
Can I migrate my existing store to Shopify?
Yes, you can migrate your existing store to Shopify easily using LitExtension’s Migration Service. This service helps you transfer your products, customers, and orders securely.
Final Words
A Shopify store gives you the tools to start and grow a successful online business. By following this guide on how to setup Shopify store, you can move from planning to launch with confidence. Each phase helps you build a strong foundation, create a professional storefront, and promote your products effectively.
Take time to test, refine, and learn as you go. With careful setup and consistent effort, your Shopify store can grow into a lasting brand that reaches customers around the world.
Ready to set up your Shopify store the right way?
Starting a new Shopify store can feel overwhelming, but you don’t have to do it alone. At LitOS, we help merchants launch faster with expert setup, store optimization, and seamless integrations that prepare your business for growth.
CONTACT US FOR STORE SETUP SUPPORT
