
How to Show Discount on Product Page Shopify by 3 Methods 2025
For many eCommerce stores, running discounts is one of the easiest ways to boost conversions. Still, if your discounts aren’t displayed clearly, customers might not even notice them! For that reason, learning how to show discount on product page Shopify is a must.
Fortunately, Shopify gives you several ways to make your discounts stand out beautifully on your product pages. In this guide, we’ll walk you through three simple yet effective methods to show discounts on your Shopify product pages in 2025:
Let’s get started!
How to Show Discount on Product Page Shopify Manually
For this process, you don’t need any special apps or technical tweaks; Shopify already has built-in tools that let you display sale prices in just a few clicks! Let us show you the steps:
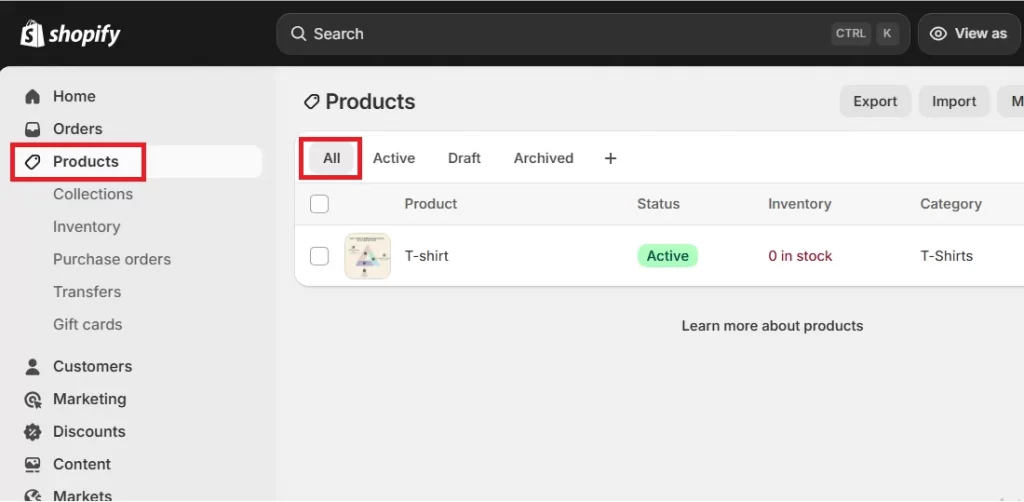
Step 1. Access your product dashboard
First, log in to your Shopify admin and head to your product management area. From the left-hand menu, select “Products”, then click “All.” This is where all your existing products are listed, and you can easily locate the one you’d like to update with a discount.
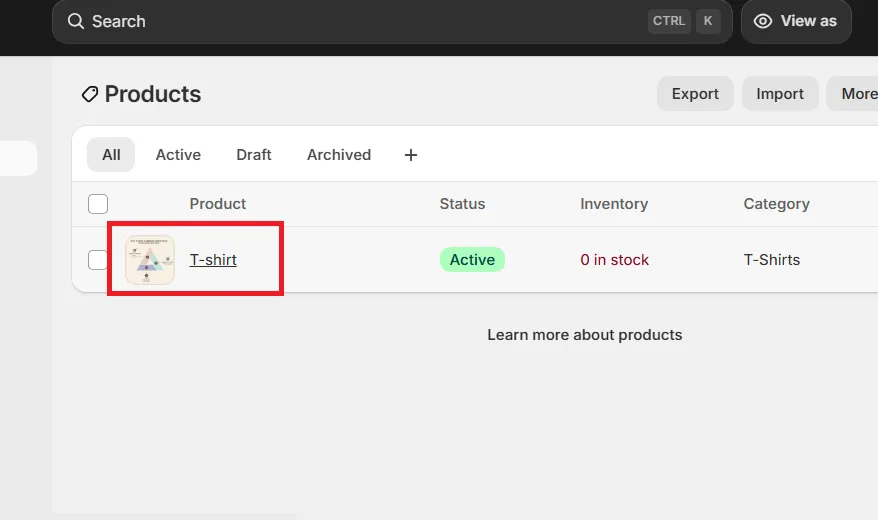
Step 2. Open the product you want to discount
Next, click on the name of the product you want to put on sale to open that product’s detail page. Make sure you’re editing the main product (not a variant) unless your product has multiple variants with different prices. In that case, you’ll need to set the discount for each variant separately.
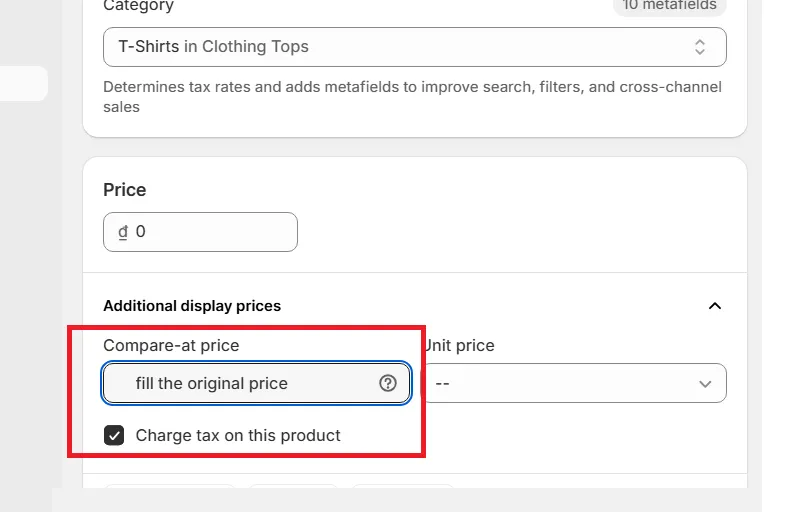
Step 3. Set the compare-at price
Now, scroll down to the Pricing section. Here, you’ll see two important fields: Price and Compare-at price.
The Price is the current amount customers will pay for the product – specifically, the discounted or sale price you’re offering right now. The Compare-at price, on the other hand, is the product’s original, non-discounted amount.
Now, enter the product’s original selling price in the “Compare-at Price” field. This step tells Shopify what the regular price was before your sale began, so the storefront can automatically show that the product is now discounted.
Step 4. Enter the new sale price
After setting the original value in the “Compare-at price” field, move to the “Price” field directly above it. This is where you’ll input your discounted or sale price. Shopify will calculate and display the discount automatically, showing customers the price difference between the original and the new sale amount.
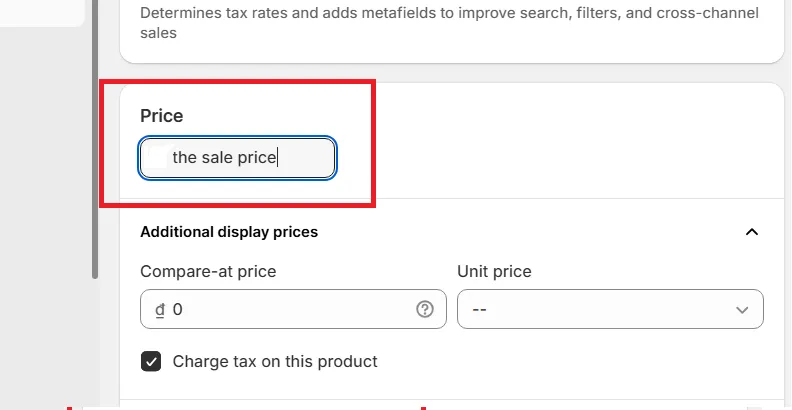
Note: Remember, your “Compare-at price” must always be higher than your “Price” for Shopify to recognize it as a sale; otherwise, no discount label will appear on the product page.
Step 5. Save your changes
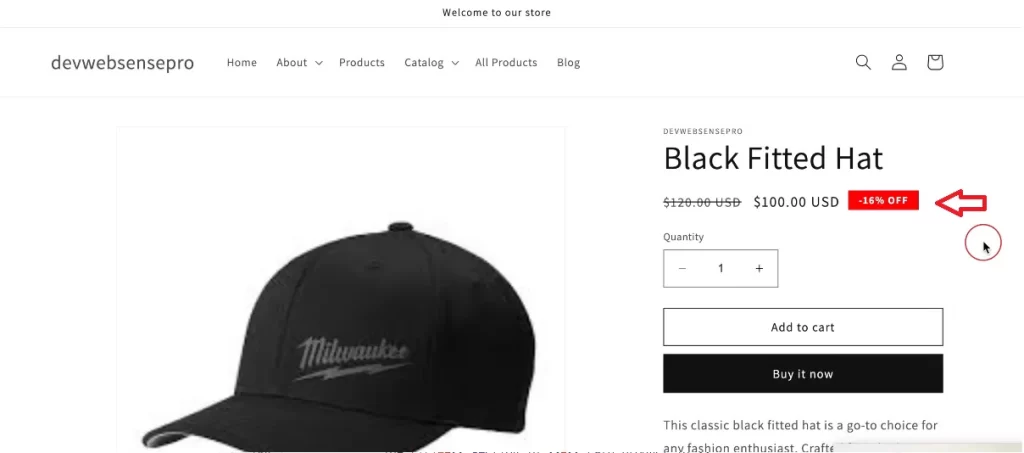
Once you’ve entered both prices correctly, scroll to the top or bottom of the page and click “Save.” That way, the store will immediately display the discounted price to customers browsing your product page. You should now see both the original price crossed out and the new, lower price highlighted, indicating a sale.

To double-check, open your storefront and refresh the product page to make sure everything looks as expected. And that’s how to show discount on product page Shopify!
How to Show Discount on Product Page Shopify Using Code
The method we discussed earlier only lets you show both the original and sale prices. It doesn’t actually tell shoppers what they’re saving!
Fortunately, with the next approach we’re about to cover, you can make that difference stand out by adding a bold percentage-off badge (like “25% OFF”) right beside the product price. Here’s how to show discount on product page Shopify:
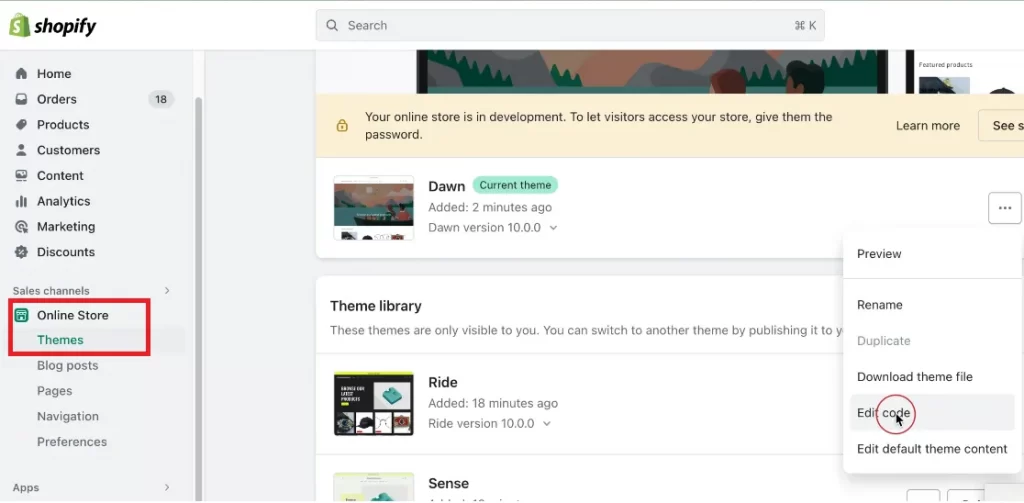
Step 1. Open your theme code editor
First, go to your Shopify admin and navigate to Online Store > Themes. Next, find the theme you’re currently using, click the three-dot icon, and select “Edit Code.” This step will open Shopify’s built-in code editor, where you can access all the Liquid files that control how your store looks and behaves.
Step 2. Add the discount percentage to the product
Next, navigate to the “price.liquid” file on the left sidebar of the code editor. Once you’ve opened it, search within the file for the snippet {{ ‘products.product.on_sale’ | t }}. This line of code determines how your sale prices are displayed on the product page.
When you find it, replace that snippet with the following line:
–{{ compare_at_price | minus: price | times: 100 | divided_by: compare_at_price }}% OFF
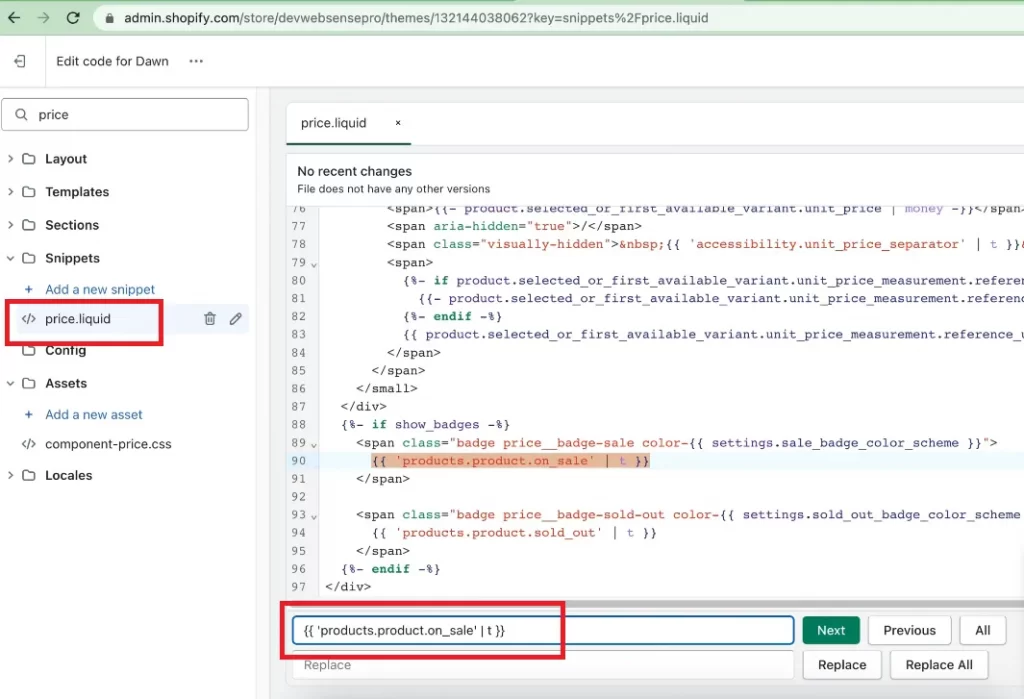
This formula calculates the percentage difference between the original price and the sale price, then displays it automatically on your product page as something like “20% OFF.”
After saving, refresh your storefront to check if the badge appears next to your discounted products.

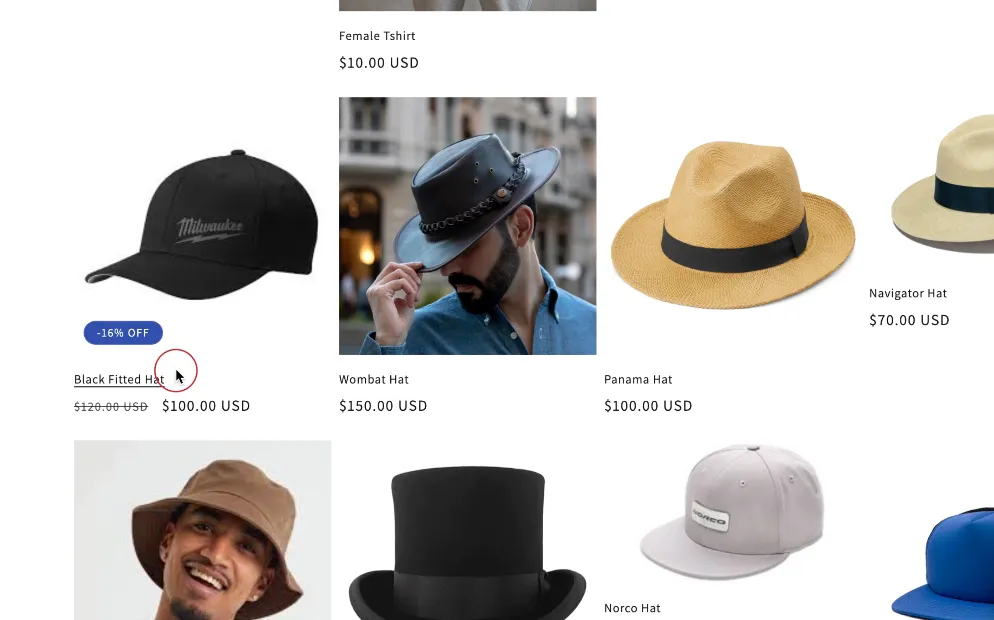
Step 3. Display the discount badge on collection pages
At this point, the percentage badge will appear only when someone opens an individual product page. But what if you want shoppers to see the discount while browsing through collections, before they even click into the product? To do that, you’ll need to make one more quick edit.
In the code editor, find and open the card-product.liquid file. Use the search bar inside the file to look for this line: {{- ‘products.product.on_sale’ | t -}}
You’ll likely see it show up twice. Replace both instances with this code instead:
-{{ card_product.compare_at_price | minus: card_product.price | times: 100 | divided_by: card_product.compare_at_price }}% OFF

Once you save your changes, the discount badge will now appear not only on individual product pages but also next to every discounted item across your collection grids!
Step 4. Customize the look of your discount badge (Optional)
Want to match the badge with your store’s branding or make it stand out more? You can customize its appearance with a bit of CSS!
Head over to your base.css file and scroll down to the bottom. Then, paste in the following code (feel free to change the colors, numbers, etc.):
.card__badge .badge{
border-radius: 0;
font-size: 13px;
background-color: red;
font-weight: bold;
border: none;
}
.price .price__badge-sale {
border-radius: 0;
font-size: 13px;
background-color: red;
font-weight: bold;
border: none;
margin-top: 0 !important;
margin-bottom: 0 !important;
}
After saving all your updates, refresh your store, and you’ll see your brand-new % OFF badge displayed beautifully across your products. And that’s how to show discount on product page Shopify using code!
Showing Discount on Product Page Shopify Using Apps
We have discussed two common methods of how to show discount on product page Shopify. But what if Shopify’s built-in tools feel a little too limited, and learning how to add custom field in Shopify product page using code isn’t really your thing?
In that case, using a dedicated Shopify app can be the perfect middle ground. There are dozens of options out there, but the three apps below are the ones we genuinely recommend for creating attractive, high-converting discount displays on your product pages:
1. Discounty: Bulk Discount Sales
Free plan available; Paid plans from $9.9 to $49.9/month
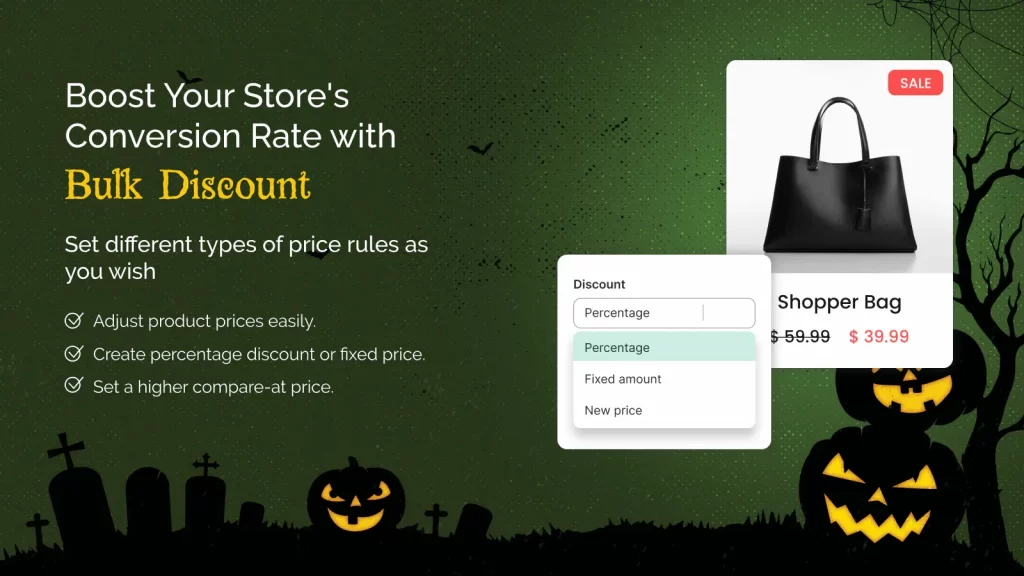
If you want an app that can handle all your discount campaigns in one place, Discounty is a fantastic choice. It’s a complete discount management system that lets you set up bulk discounts, BOGO (Buy One Get One) deals, quantity-based pricing, and even automatic cart discounts. You can run flash sales, add countdown timers, and customize your sale badges to instantly grab shoppers’ attention.
Not to mention, what makes Discounty especially useful is how flexible it is. You can apply discounts to individual products, whole collections, or your entire catalog, and even combine different discount types like volume and cart discounts. Better yet, the app supports multiple pricing formats, whether you want to show a percentage off, a fixed amount discount, or a new sale price compared to the original. Everything integrates seamlessly with Shopify’s checkout, and you can track your active discounts through an intuitive dashboard.
2. Buy Box: Product Page Blocks
Free or $12.99/month
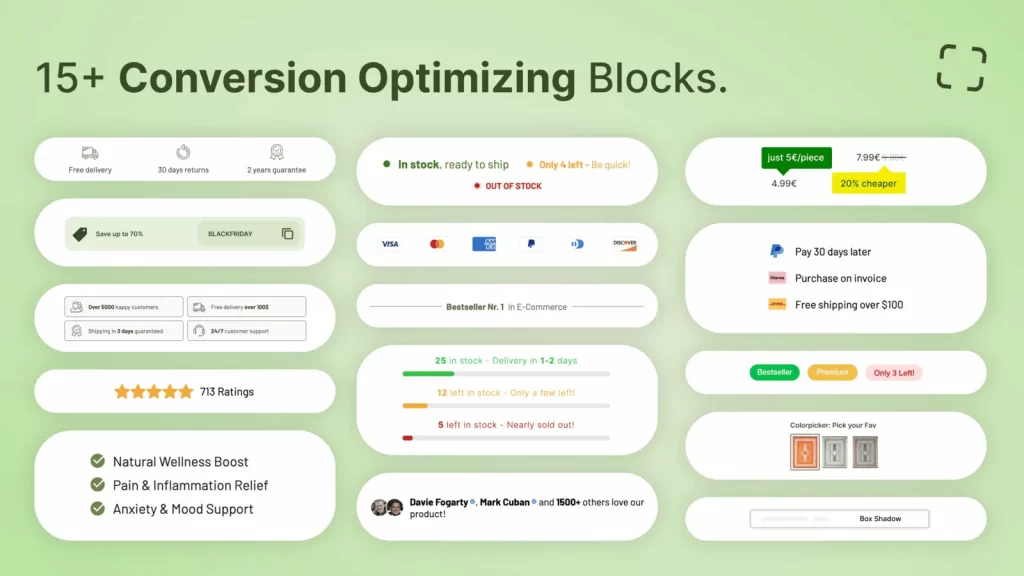
Many Shopify themes look clean but lack key trust elements (e.g. social proof, urgency indicators, and benefit highlights) that actually motivate shoppers to buy. Buy Box fixes that by letting you add these proven, high-impact components directly to your discount pages.
Within minutes, you can insert customizable blocks such as low-stock counters, trust badges, social proof notifications, and even discount copy banners. Everything can be managed from your Shopify theme editor; plus, since the app integrates smoothly with Shopify 2.0 themes and loads instantly, you can be confident that it won’t slow down your site.
3. GG Product Page Image Slider
Free or $8.99/month
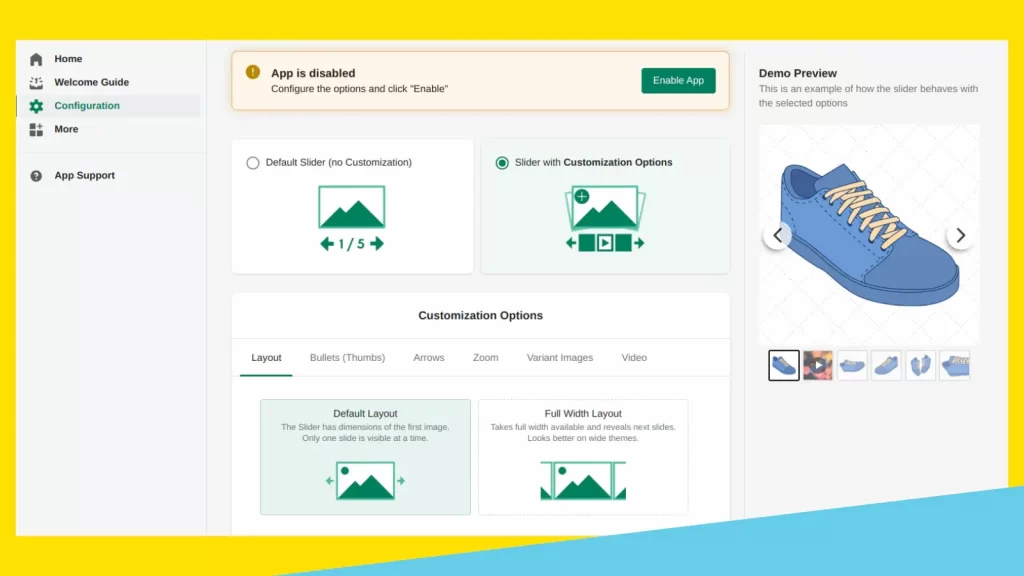
If visuals are the heart of your brand, GG Product Page Image Slider is the app you’ll love most. It replaces Shopify’s basic image gallery with a sleek, interactive slider that feels modern and professional. With just one click, you can turn your product discounts, images, videos, and more into a smooth, scrollable slideshow that lets customers explore your products from every angle.
The app supports multiple layouts (carousels, grids, and lightboxes) with built-in zoom and autoplay features for a more engaging browsing experience. It’s also fully optimized for mobile, allowing users to swipe through photos and videos just like they would on Instagram. Plus, if your products come in variants with different discounts and prices, GG Image Slider automatically updates the gallery to show only images relevant to the selected option.
Best Practices for Discount Display on Shopify
Now that you know how to show discount on product page Shopify, it’s time to make sure your discounts actually convert. The way you present discounts can significantly affect how customers perceive value, urgency, and trust in your store.
To maximize conversions and maintain a professional, cohesive look, follow these best practices regarding how to create custom product page in Shopify:
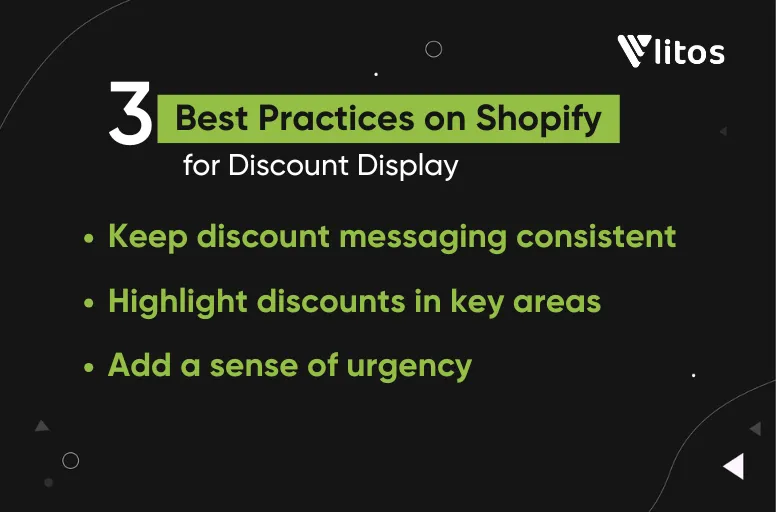
1. Keep discount messaging consistent
Needless to say, consistency is key when it comes to discount communication. If your Shopify homepage banner says “Up to 30% Off,” but your product pages show a different percentage or use another format (like “Save $10”), it can create confusion and reduce credibility.
To avoid this, standardize your discount style across all touchpoints, including homepage, product pages, collection pages, and even cart notifications. Plus, you should also use the same color for sale badges and a similar placement for discount information.
2. Highlight discounts in key conversion areas
Don’t let your discounts hide in plain sight. Strategic placement can make all the difference between a Shopify shopper scrolling past and one who clicks “Add to Cart!”
Ideally, your discount or sale badge should appear in multiple high-visibility areas, such as on product thumbnails in collections, directly beside the product price on the product page, and within the cart summary before checkout. You can also reinforce the message with small touches like adding a discount countdown timer or displaying the original price with a strikethrough beside the discounted price.
3. Add a sense of urgency without overdoing it
Lastly, keep in mind that although urgency is one of the most effective psychological triggers on Shopify, it still needs to be handled carefully. Overusing flashing countdowns, bold colors, or constant “Sale Ends Soon!” messages can make your store look spammy and reduce credibility.
For that reason, we suggest your store use urgency selectively and strategically.
For example, showing a limited-time sale badge or a simple countdown timer can create subtle pressure to act, especially during special events like Black Friday or seasonal promotions. Or, if your inventory is low, displaying “Only 3 left in stock” or “Almost sold out” next to the discount can also motivate customers to purchase quickly.
How to Show Discount on Product Page Shopify: FAQs
How do you show discount percentage on products on Shopify?
To display the exact percentage, you can add a short formula in your theme’s price.liquid file that calculates the discount rate (for example, {{ compare_at_price | minus: price | times: 100 | divided_by: compare_at_price }}) and shows it as “% OFF.” Alternatively, apps like Discounty automate this for you with no coding required.
How to do a discount pop-up page on Shopify?
To create a discount pop-up on Shopify, you can use apps like Popupsmart, Privy, or OptiMonk, which allow you to display discount codes or special offers in pop-up windows. These pop-ups can be triggered by time spent on the page, exit intent, or user actions (like adding an item to the cart).
How to customize the product page on Shopify?
You can customize your product page directly through the Online Store > Themes > Customize section in Shopify. Here, you can rearrange product elements, adjust colors, or add sections like related products or customer reviews. If you need more flexibility, Shopify 2.0 themes support drag-and-drop blocks, letting you personalize each product page individually.
How do I add a discount code to a product on Shopify?
Discount codes can be created and managed under Discounts in your Shopify admin. Click “Create Discount,” then choose whether it’s a percentage, fixed amount, or free shipping discount. You can limit the code to specific products, collections, or customer segments, and even set minimum purchase requirements.
Final Words
So, we have walked through how to show discount on product page Shopify. Whichever method you choose, it can help shoppers recognize value instantly, increasing the chances they’ll complete their purchase at your store!
And if you want to take things a step further and create a fully optimized, conversion-driven Shopify product page, our LitOS development team can help. We specialize in custom Shopify themes, high-performing product pages, and advanced discount integrations that make your brand stand out. Contact LitOS today to get tailored support and turn your Shopify store into a powerful sales engine.
Ready to make your discounts stand out?
At LitOS, we help Shopify brands design and optimize product pages that convert, from dynamic discount displays to fast, flawless performance. Whether you need help customizing price badges, improving UX, or scaling for sales season, we make it simple, seamless, and built to boost revenue..
Contact Us
