
Shopify Liquid Tutorial: A Shopify Coding Guide for Beginners
If you’ve ever wanted to go beyond the drag-and-drop editor in Shopify, this Shopify Liquid tutorial will show you how. Liquid is Shopify’s own coding language that powers every theme and lets you control how products, pages, and collections appear in your store.
Quick note:
Liquid is only recommended if you need deeper customization than what the theme editor provides. It’s suitable for beginner developers, freelancers, or store owners with some coding interest. If you only want simple design adjustments, the visual editor is enough. But if you want to change layouts, add new elements, or customize how data appears, Liquid is the tool you should use.
In this tutorial, you will learn:
- What Shopify Liquid is and why it matters
- The fundamentals of objects, tags, and filters
- Step-by-step instructions to create and edit a new template safely
Let’s dive in!
What is Shopify Liquid?
Shopify Liquid is a template language created by Shopify. It lets you combine static content, like headings or images, with dynamic content, such as product titles, prices, or customer information. When a page loads, Liquid pulls the right data from your Shopify store and displays it inside your theme.

For example: Instead of hardcoding a product name, you can use {{ product.title }} in your theme file (Online Store > Themes > Edit code). This Liquid variable dynamically pulls the product’s actual title from your store data, so the correct name is shown automatically on each product page without needing manual edits.
In short, Liquid makes your Shopify theme flexible and reusable. Rather than building separate pages for each product or collection, you create one liquid template, and Liquid fills in the details for every item in your store.
The Fundamentals of Shopify Liquid
This section of the Shopify Liquid tutorial covers the basics of syntax, objects, tags, and filters that shape your storefront.
1. Liquid syntax and delimiters
Liquid relies on two kinds of curly braces. You can use {{ }} to output values and use {% %} to run tags like conditions or loops. Here are two main types of markup:
- {{ }} → for output (shows data like product titles or prices).
- {% %} → for logic (controls how data is displayed, like loops or conditions).
Example:
{% if product.available %}

  <p>In stock</p>

{% else %}

  <p>Sold out</p>

{% endif %}
2. Objects, tags, and filters
Objects are variables that hold pieces of store data, such as a specific product, collection, or the customer’s cart. They let you pull dynamic information directly from your Shopify store into your theme.
Tags are programming-like instructions that control the logic and flow of your template. For example, {% if %} can show content only under certain conditions, {% for %} lets you loop through a list of products or collections, and {% assign %} creates a new variable to store temporary data.
Filters are used to change how Liquid outputs data. They don’t change the data itself but adjust how it appears to customers. For instance, {{ product.title | upcase }} shows the product title in uppercase, while filters like money, date, or truncate format prices, dates, or shorten text.
3. Liquid logic and loops
Liquid lets you check conditions and repeat content so you don’t have to duplicate code manually. This is especially useful for dynamic data, where the number of items or their details can change depending on the product or collection.
For example, when you loop through product variants:
{% for variant in product.variants %}

  <p>{{ variant.title }} - {{ variant.price | money }}</p>

{% endfor %}
Instead of hardcoding each variant, Liquid automatically cycles through all the variants linked to that product and prints their title and price. This way, if a product has 3 variants or 15, the code stays the same, and the storefront updates automatically.
If you find learning Liquid overwhelming, you don’t have to do it alone. At LitOS, we help Shopify brands with theme customization, smarter setups, and long-term growth support so you can focus on running your store.
How to Use Liquid for Shopify Page
Before you start editing with Liquid, it’s important to work safely. The best way to do this is by creating a copy of your theme so your live store isn’t affected. This Shopify custom Liquid section tutorial will walk you through it.
Step 1. Duplicate your theme (safe practice)
Always back up your Shopify theme before making changes. This ensures you can restore the original if something goes wrong.
- In your Shopify Admin, go to Online Store > Themes (1).
- Find your live theme and click Actions > Duplicate (2).
- A copy of the theme will appear in your library with “Copy of…” in the name.

You will work on this duplicate theme and keep your live store safe.
Step 2. Open the code editor in Shopify Admin
Once you have a duplicate theme, the next step is to access the code editor where all the Liquid files are stored:
- In your Shopify Admin, go to Online Store > Themes.
- Find the duplicated theme you just created.
- Click Actions (3) > Edit Code (4).
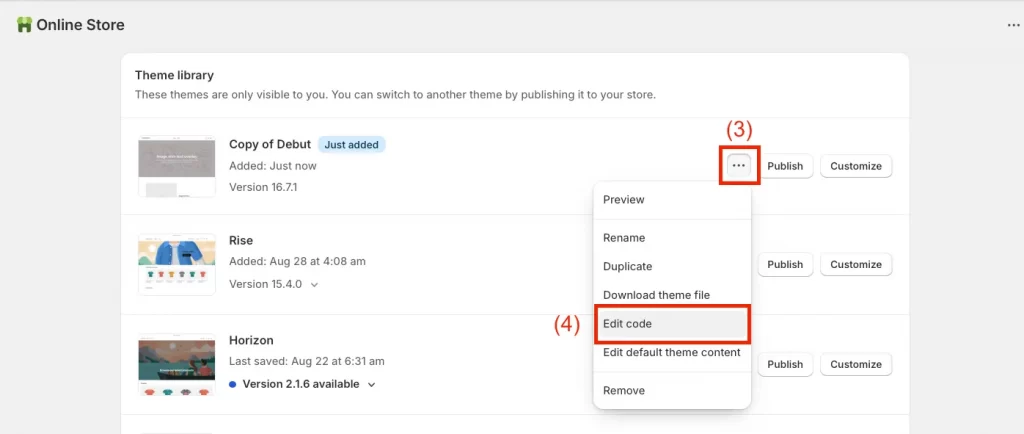
This will open the theme code editor, where you can see folders like Templates, Sections, Snippets, and Assets. These are the building blocks of your Shopify theme.
Step 3. Add a new template (e.g., product.custom.liquid)
Now that you’re in the code editor, you can create a new template to practice with Liquid without touching the default files:
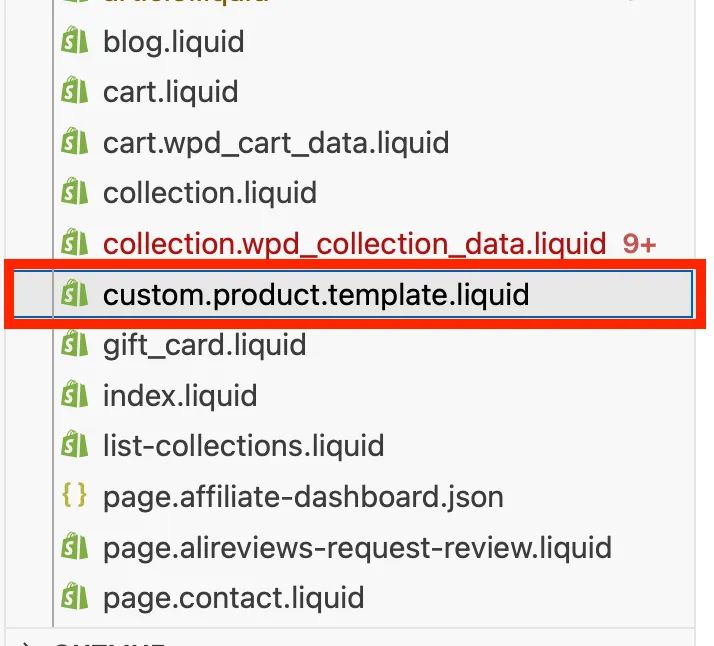
- In the sidebar of the code editor, open the Templates folder.
- Click New File under the Template folder
- Give it a name like custom.product.template.liquid.
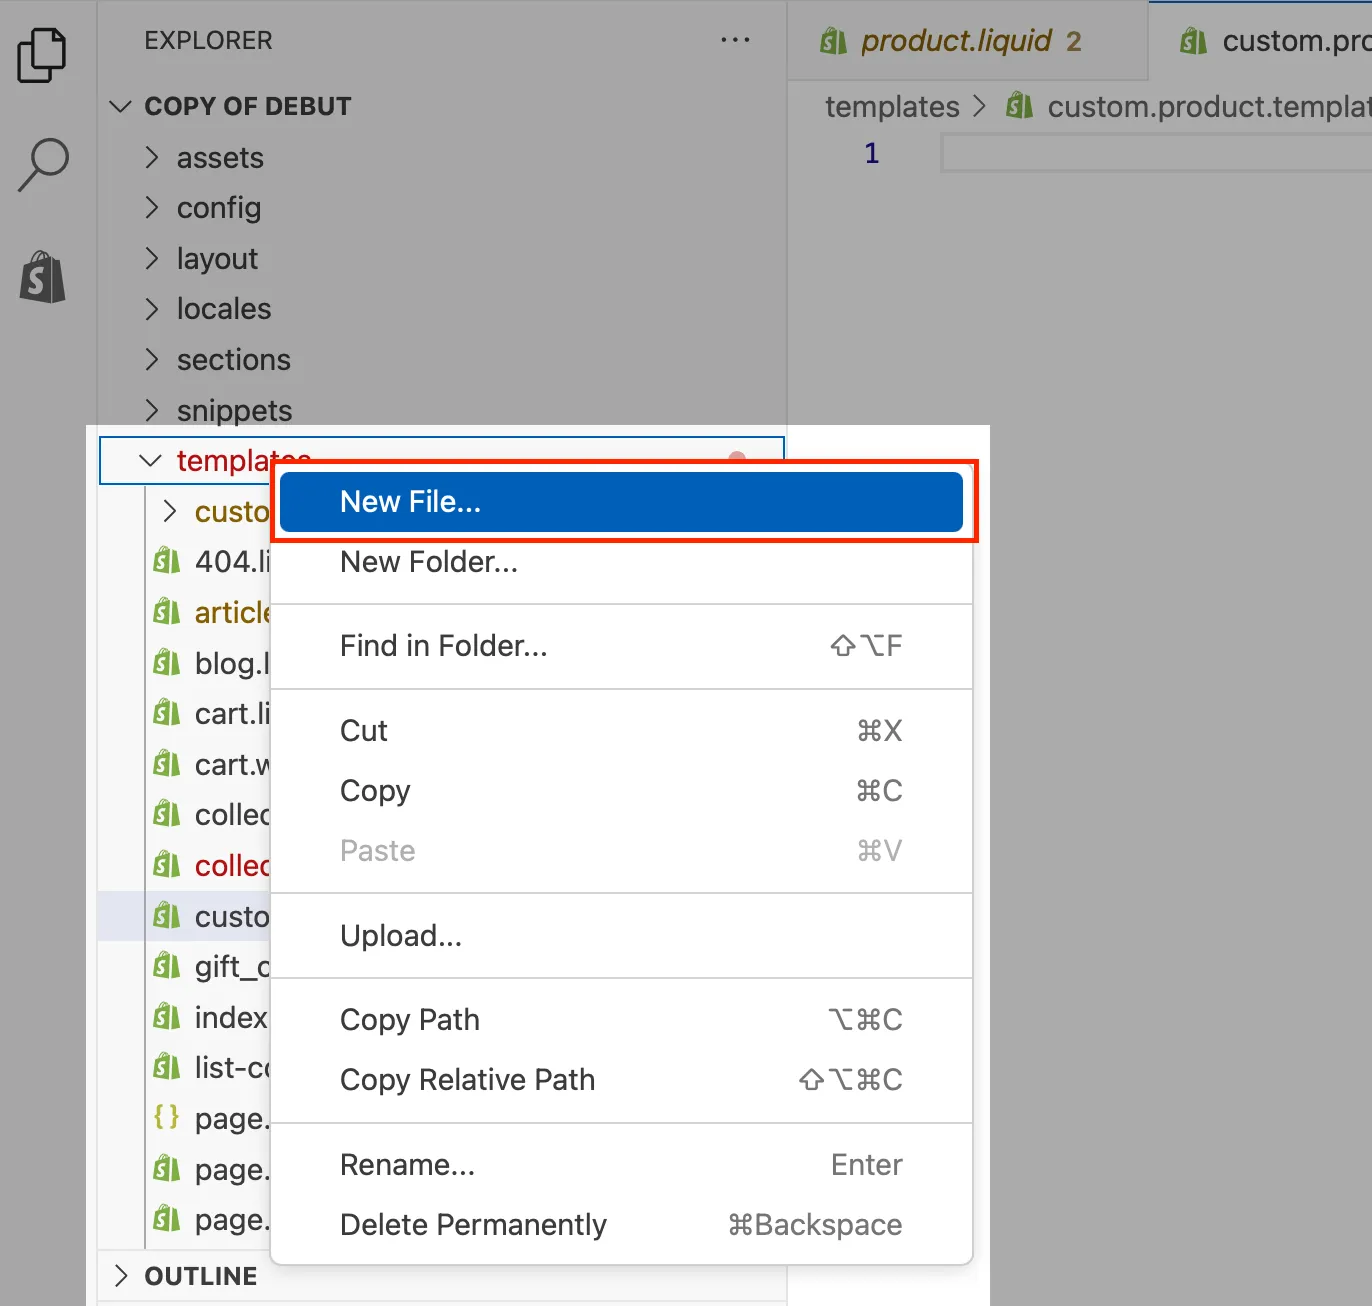
This new template won’t affect your main product template as it’s a safe space to try out Liquid code.
Step 4. Insert Liquid code for product title, description, price, and variants
With your new template open, you can start adding Liquid code to display product information. Remember: Liquid code is mixed with HTML, so don’t remove the existing HTML unless you know what it does.
In your product.custom.liquid file, paste this simple block:
<h2>{{ product.title }}</h2>

<p>{{ product.description }}</p>

<p>Price: {{ product.price | money }}</p>

<h3>Available Variants:</h3>

<ul>

  {% for variant in product.variants %}

    <li>{{ variant.title }} — {{ variant.price | money }}</li>

  {% endfor %}

</ul>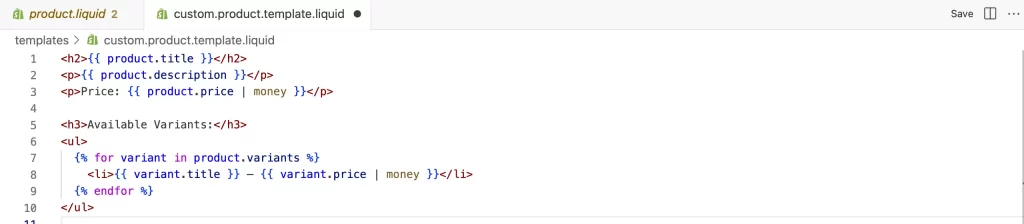
Let’s understand this a bit:
- {{ product.title }} → pulls in the product’s name.
- {{ product.description }} → shows the description you entered in Shopify dmin.
- {{ product.price | money }} → displays the price in your store’s currency format.
- {% for variant in product.variants %} → loops through each variant (like size or color) and lists its title and price.
Note: If there’s a mistake in your Liquid code, Shopify will highlight an error in the code editor. Don’t worry, you can just check your brackets {}, tags {% %}, and filters.
Step 5. Save, assign template to a product, and preview live
Once you’ve added the code, it’s time to test it on an actual product.
- Click Save in the code editor to store your changes.
- In Shopify Admin, go to Products and select any product you want to test.
- Scroll down to the Theme template section on the right.
- From the dropdown, choose product.custom (the template you just created).
- Save the product, then click View to open it in your storefront.
Now you’ll see your product page displaying the title, description, price, and variants using your custom Liquid code.
Tip: Because you’re working on a duplicate theme, nothing on your live store is at risk. If something looks broken, let’s switch the product back to its original template.
Shopify Liquid Objects in Depth
Objects are the building blocks of Liquid. They represent data from your store that you can display inside template files. Each object can have multiple properties (like title, price, or URL). Here are some Shopify Liquid code examples to make it clear:
1. Content objects (pages, blogs, articles)
These objects let you display content you’ve created in Shopify Admin. For example:
<h2>{{ page.title }}</h2>

<div>{{ article.content }}</div>- page.title → shows the title of the current page.
- article.content → shows the full content of a blog article.
2. Global objects (shop, cart, collections)
These objects can be used across your theme, no matter which template you’re editing. For example:
<p>Welcome to {{ shop.name }}!</p>

<p>You have {{ cart.item_count }} item(s) in your cart.</p>- shop.name → outputs your store’s name.
- cart.item_count → displays the number of items in the customer’s cart.
3. Product & variant objects (title, price, images, availability)
Product and variant objects are the most common objects you’ll use on product pages. For example:
<h2>{{ product.title }}</h2>

<img src="{{ product.featured_image | img_url: 'medium' }}" alt="{{ product.title }}">

{% if product.available %}

  <p>Price: {{ product.price | money }}</p>

{% else %}

  <p>Sorry, this product is sold out.</p>

{% endif %}- product.title → product name.
- product.featured_image → product’s main image.
- product.available → true/false, lets you show “sold out” if stock is zero.
Shopify Liquid Tags and Filters in Action
Liquid is not only about pulling in data. It also gives you tools to control and shape how that data appears. These tools are called liquid tags and filters.
For quick reference, you can always check the Shopify Liquid cheat sheet or the official Shopify Liquid documentation.
1. Tags
Tags let you add conditions or repeat code.
If/Else example:
{% if product.available %}

  <p>In stock</p>

{% else %}

  <p>Sold out</p>

{% endif %}
This checks if a product is available and shows the right message.
For loop example:
{% for image in product.images %}

  <img src="{{ image.src | img_url: 'small' }}" alt="{{ image.alt }}">

{% endfor %}
This loops through all product images and displays each one.
Case/When example:
{% case product.type %}

  {% when 'Shoes' %}

    <p>Footwear collection</p>

  {% when 'Shirt' %}

    <p>Clothing collection</p>

  {% else %}

    <p>Other product type</p>

{% endcase %}
This changes the output depending on the product type.
2. Filters
Filters adjust the way data looks. They are added with the pipe symbol |.
Text example:
{{ product.title | upcase }}This displays the product title in uppercase letters.
Money example:
{{ product.price | money }}This formats the raw price into your store’s currency style.
Image example:
{{ product.featured_image | img_url: '300x300' }}This resizes the product image to 300 × 300 pixels.
Shopify Liquid Tutorial: FAQs
Is Shopify Liquid easy to learn?
Yes, Liquid is easier than most programming languages because it mainly uses simple tags, objects, and filters. If you know a little HTML, you can pick it up quickly.
How does Shopify Liquid work?
Liquid acts as a middle layer between your Shopify store data and your theme. It pulls the right data, like product titles or prices, and places it inside your template files.
How hard is Liquid to learn compared to HTML or CSS?
HTML and CSS control the design and layout. Liquid is about pulling data and showing it in the right place. Once you understand the syntax, Liquid is not harder than HTML. They are usually used together.
How long does it take to learn Shopify Liquid?
Most beginners can understand the basics in a few hours. To be comfortable using objects, tags, and filters in real projects, expect to practice for a few weeks.
Key Takeaways
This Shopify Liquid tutorial for beginners introduced you to the basics of the Liquid language and showed how it powers every Shopify theme. You learned how Liquid works as the bridge between your store’s data and your theme design, and how it uses objects, tags, and filters to control what appears on each page.
By following the step-by-step guide, you created a safe duplicate theme, opened the code editor, built a custom template, and inserted simple Liquid code examples. Along the way you also saw how liquid objects, tags, and filters shape the structure of your Shopify store.
Liquid is only worth using if you want customization beyond what the theme editor allows. Simple design changes can be made visually, but if you want to change layouts, add data-driven elements, or adjust how content is structured, Liquid is the right tool.
And now, let’s build what’s next!
At LitOS, we help brands grow smarter on Shopify with better technology, practical strategy, and hands-on support that delivers real results. From migration to long-term growth, we make the process seamless and scalable.
Contact Us
