Google Analytics is one of the best solutions to provide helpful information about the visitors to your online store. Thus, when you have WooCommerce Google Analytics integration into your WooCommerce sites, you can effectively enhance control over site traffic. If so, don’t miss our blog on how to add Google Analytics to WooCommerce below.
In this blog, LitExtension – #1 Shopping Cart Migration Expert will guide you through 5 steps to complete WooCoomece Google Analytics integration:
- Download WooCommerce Google Analytics plugin
- Add Google Analytics plugin
- Set up a new configuration for integration
- Establish Google Analytics goals
- Run a test version
Right now, let’s start your journey to discover how to install Google Analytics for WooCommerce with us!
WooCommerce Google Analytics – A Quick Summary
With various powerful functions, WooCommerce Google Analytics has become a widely used tool for most WooCommerce websites. To clearly understand what Google Analytics is and how it is used on WooCommerce, let’s look at our brief explanation:
What is WooCommerce Google Analytics?
WooCommerce Google Analytics is a set of tools to track your site traffic, allowing you to manage the number of visitors, links clicked on, or page views in WooCommerce sites. It is also highly compatible with Cart and Checkout blocks – outstanding features to increase eCommerce values.
Undoubtedly, integrating Google Analytics into WooCommerce will be one of the best ways to run your business effectively.
Classification of WooCommerce Google Analytics & Which is better?
You can consider 2 versions, including fee and non-fee plans, when installing Google Analytics eCommerce tracking WooCommerce. Below are detailed reviews of both options to help you to attain an optimal one:
#1. Free version
With this version, you can easily add your Google Analytics account to get basic analytics for your WooCommerce without paying any fee. This not only supports our budget-saving but also offers a broad range of functions, such as:
- Report data with Universal Analytics
- Get essential eCommerce data with Enhanced eCommerce tracking
- Offer Display Advertising for the website
- Excluse Admins from tracking; anonymize IPs; and manage products in carts
#2. Paid version
WooCommerce Google Analytics Pro (fee plan) provides advanced options to track and enhance your eCommerce values on your online store. With $79/year or $6.59/month, you can experience this version without being limited. Let’s take a look at some of its outstanding features with us!
- Provide a full set of functions of Google Analytics’s free plan
- Support Checkout Behavior Analysis on the visitors
- Allow to change cart quantity and cart page viewed
- Deliver billing emails and payment services
- Control how customers access the website content
We consider that WooCommerce Google Analytics would be a better option for you to run on your site. Basically, this version offers you most of the essential functions to track your site operation without costing you anything. However, if you want to invest more in eCommerce features, you can consider using WooCommerce Google Analytics Pro to get better results.
Need a full how-to guide for a whole new WooCommerce store? Here is our full WooCommerce tutorial to guide you all the way out!
How To Integrate Google Analytics With WooCommerce
If you find it difficult to add Google Analytics to your WooCommerce store, don’t miss our step-by-step guide below. Only with 5 basic steps can you successfully have an addition to the Google Analytics eCommerce Dashboard.
Step 1 – Download Google Analytics Plugin
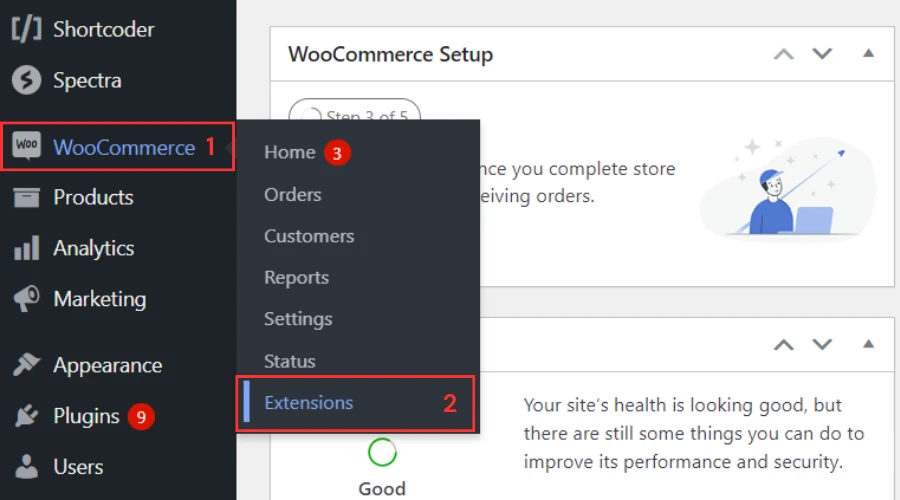
In your WordPress Admin Dashboard, click WooCommerce and select Extensions to open Extensions section.
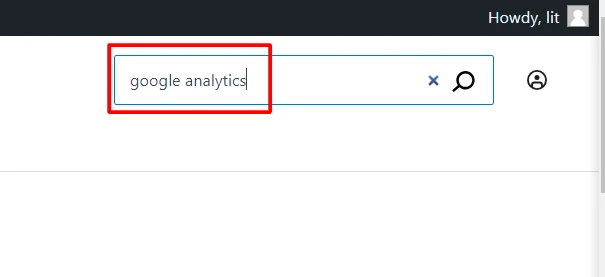
Then, search “Google Analytics” in a search box and Enter to find.
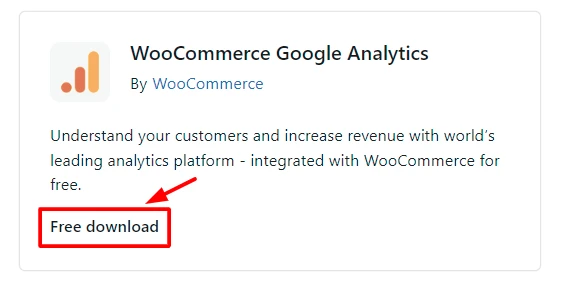
Next, click Free download in WooCoomerce Google Analytics box to navigate WooCommerce store.
After that, click Free Download button on the right side and fill in the relevant information in Checkout Form.
Finally, click Pay $0.00 and select Download button in “Thank you for your order” to complete WooCommerce Google Analytics download.

Step 2 – Install Google Analytics plugin to WooCommerce
After downloading Google Analytics Plugin, you need to install it to WordPress to activate Google Analytics on your WooCommerce site.
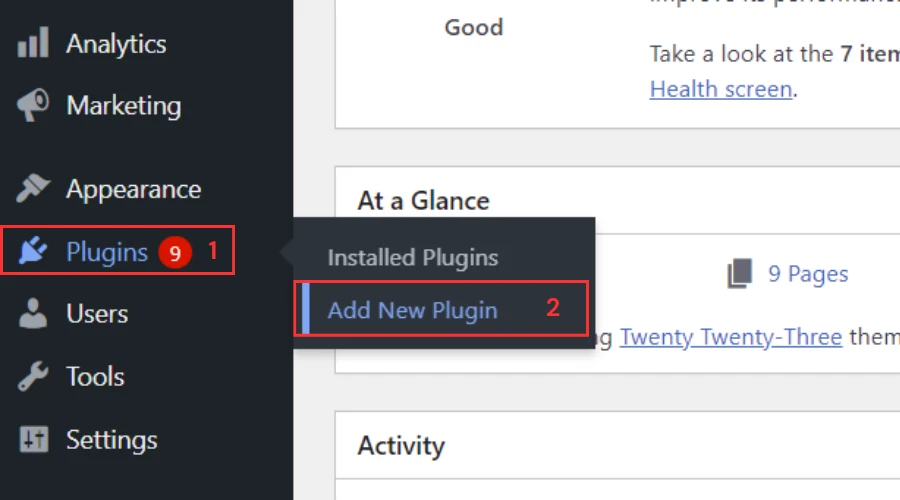
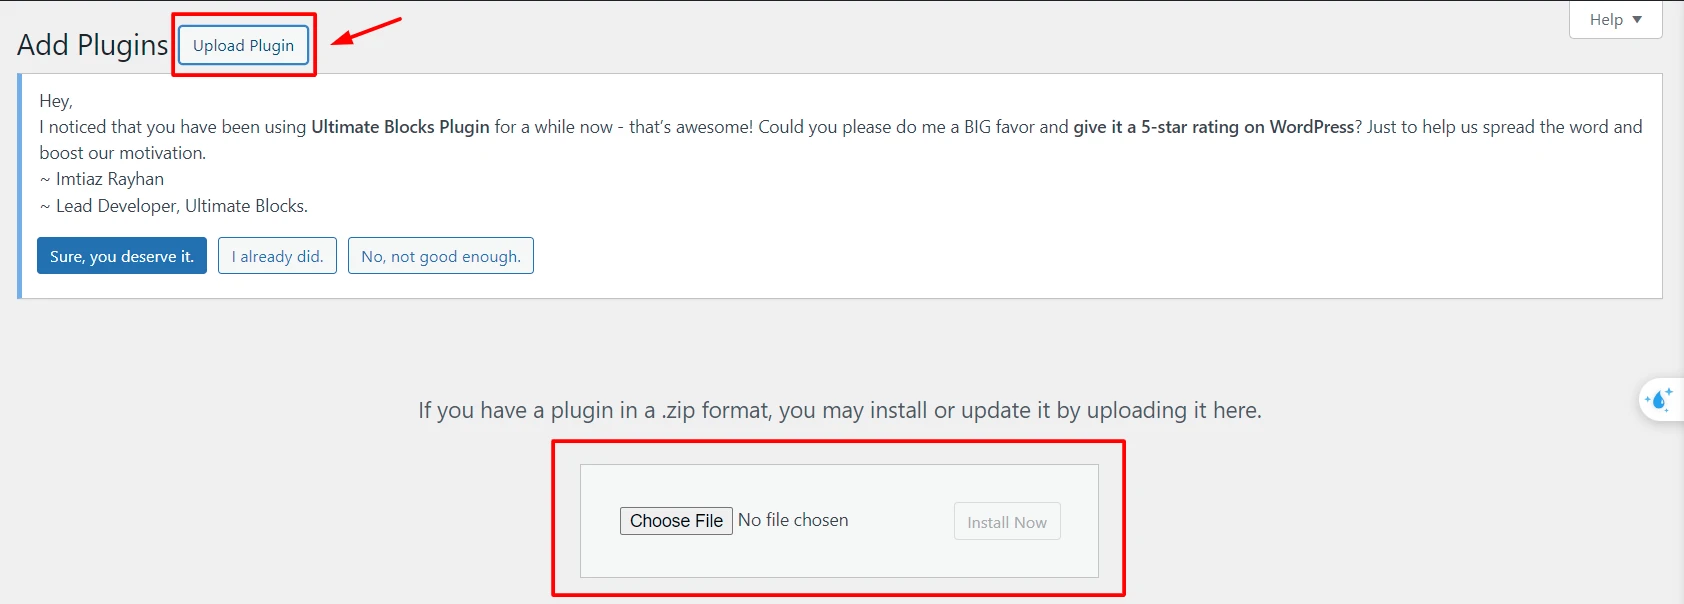
In your WordPress Admin Dashboard, click Plugins and select Add New Plugin.
Then, click Upload Plugin, then select Choose File and select Install Now to finish.
Note: If your WooCommerce Analytics not working, you can take a look at some useful solutions below:
- #1: In WooCommerce, select Status and click Tools. After that, click Clear Analytics cache and rerun your Analytics.
- #2: In WooCommerce, select Status and click Scheduled Actions to check whether there is any event restricting updated information from Analytics or not.
- #3: Disable/ uninstall the Analytics plugin and install it again.
Step 3 – Set up a new configuration for integration
Firstly, click WooCommerce on the left bar and select Settings.

In General section, click Integration button to open Integration tab.

Next, click Google Analytics to set up a new configuration with 2 options (Google Analytics 4 – GA4 & Universal Analytics).
Universal Analytics (UA-) has not processed data since July 1, 2023; thus, we will instruct you to use WooCommerce GA4 eCommerce tracking as a smarter solution.
To set up Google Analytics 4(G-) for your WooCommerce Google Analytics, let’s follow our guidelines below:
- #1: Log in to your Google Analytics account, and select Admin.
- #2: In Property column, click Data Streams to open Data Streams page.
- #3: Select a relevant data stream and copy your Measurement ID with “G-”.
- #4: Add your Measurement ID copied in Google Analytics Tracking ID box (Google Analytics Integration tab).
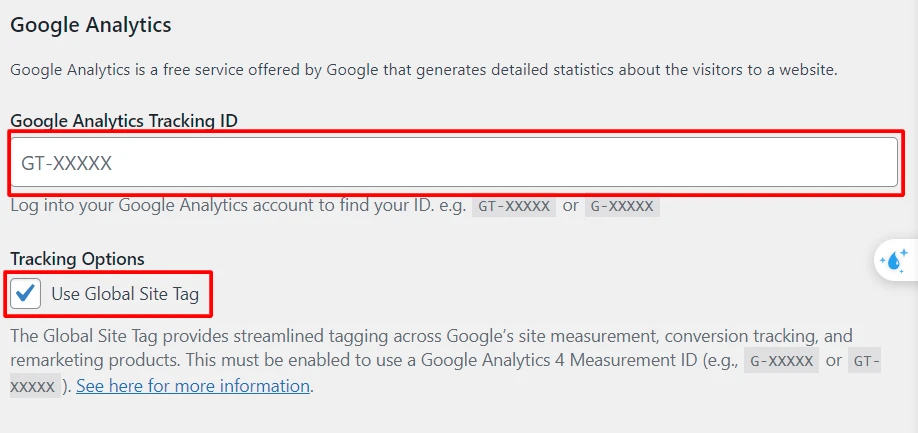
Note: When you customize the configuration with GA Properties (G-), don’t forget to take care of tracking options. In particular:
- Always check “Use Global Site Tag” box enabled
- Tick Enable Standard Tracking box to get basic tracking data
- Check “Display Advertising” Support in case running ads
- Enable Track 404 (Not found) Errors to find dead or broken links
- Allow Purchase Transactions to control purchasing activities
- Enable Add to Cart Events to track products in customers’ carts.
Step 4 – Establish Google Analytics goals
In this case, we will suggest to you how to establish goals with GA 4 properties thanks to conversion events and funnels. Below is our introduction to these values:
#1. Conversion events
Analyzing conversions helps you easily determine whether your marketing channels are effective or not. It is one of the important conditions to enhance your sales funnels. To have the finest evaluations, you can set up a conversion event with GA 4 for detailed research. In particular:
- #1: In Google Analytics Admin, click Events under Data display.
- #2: Select Create event and click Create.
- #3: Enter a new event’s name in Custom event name field.
- #4: Complete Matching conditions section and Parameter configuration section.
- #5: Click Create to complete a confirmation page.
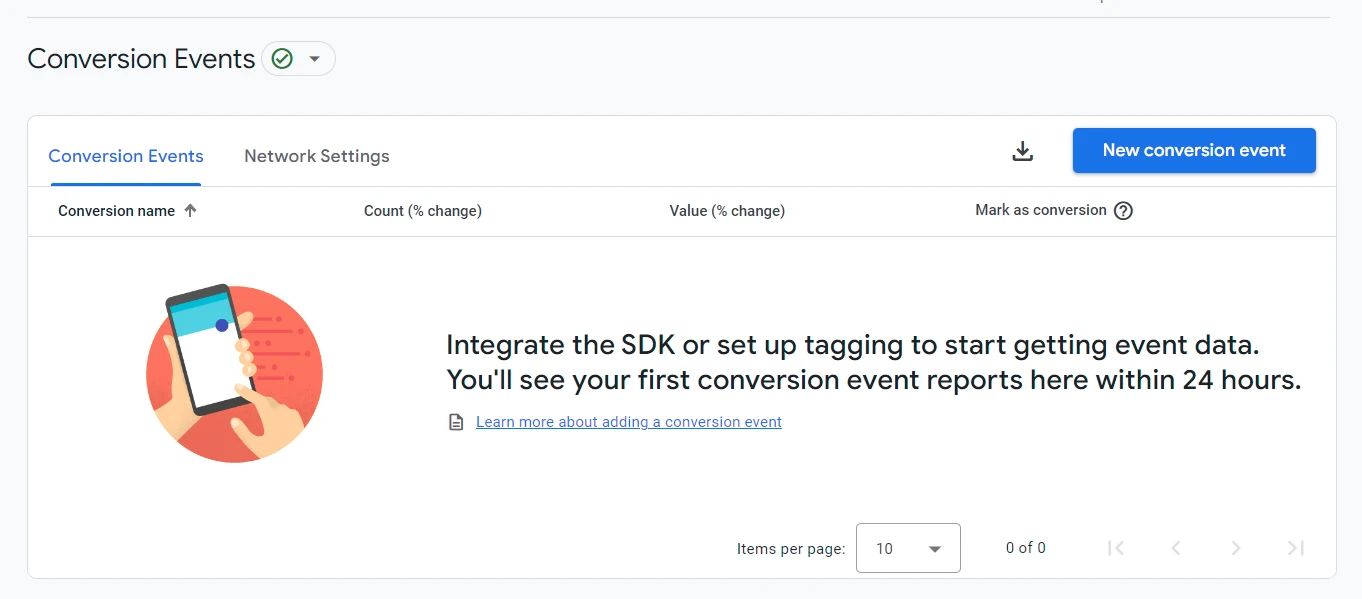
- #6: Click Conversions in Data display to select New conversion event.
- #7: Enter the name above and click Save to finish.
#2. Funnels
Funnels allow you to monitor how well your customers complete their buying process, with detailed steps. To get the final report on your funnels in Google Analytics, let’s follow our instructions below:
- #1: Log in to Google Analytics Admin
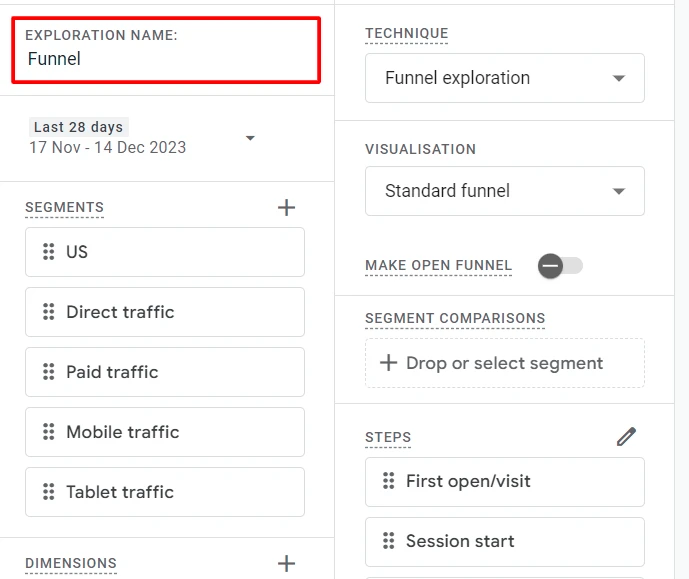
- #2: Click Explore and select Funnel exploration template
- #3: Click Save to finish
You should also establish your funnels’ status to optimize your site’s performance, including:
- Open funnel: Allow users to enter your funnels in any step.
- Closed funnel: Require users to enter your funnels in a certain sequence.
Step 5 – Run testing analytics
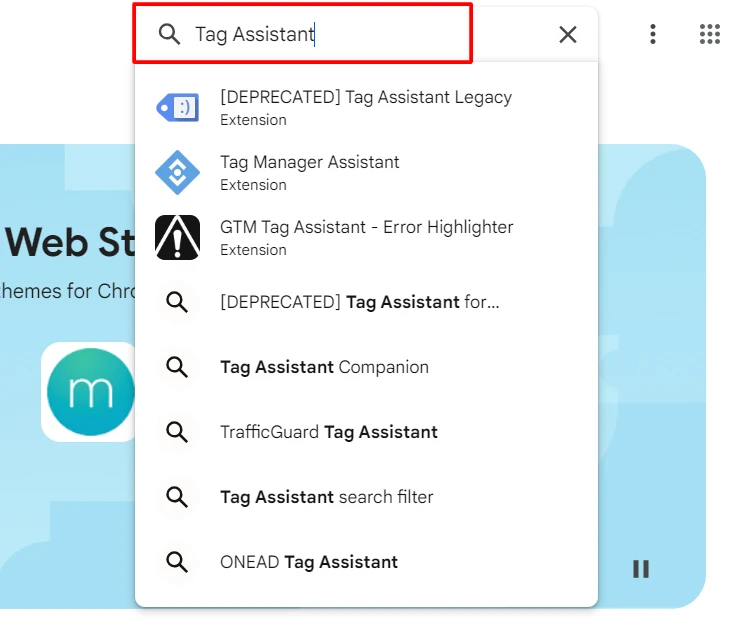
To run a test on your WooCommerce Google Analytics, you need to install Google Tag Assistant. Firstly, visit the Google Web Store and enter “Tag Assistant” in a search box.
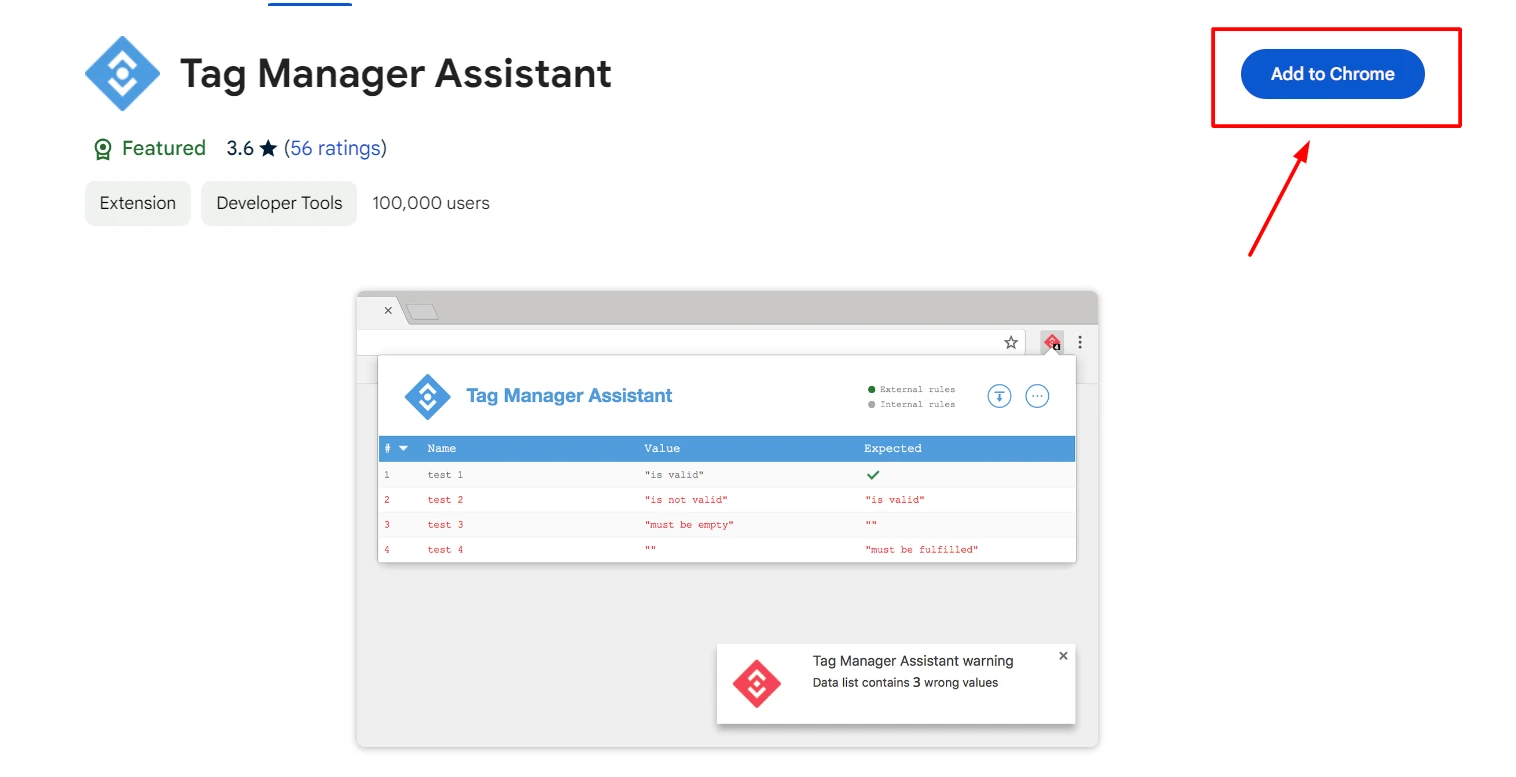
Then, select Tag Manager Assistant and click Add to Chrome.
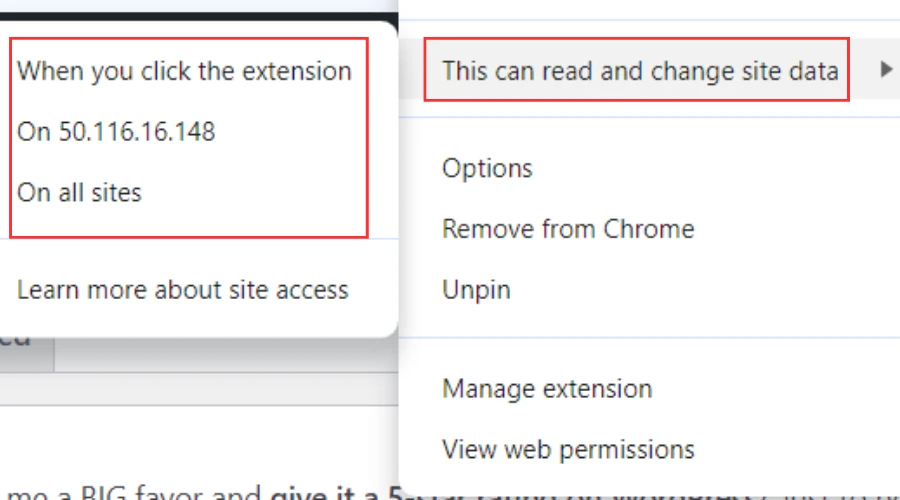
Finally, click Tag Manager Assistant extension installed and select “This can read and change site data” to start a tracking test on your site.
Once you complete 5 steps above, we believe that you can successfully run your WooCommerce Google Analytics.
Why Should You Integrate WooCommerce With Google Analytics?
Below are some of the outstanding reasons why we recommend you add WooCommerce to Google Analytics, including:
- Track visitors on WooCommerce store:
Google Analytics allows you to track visitors’ activities on your site to release proper forecasts of their shopping demands. Additionally, you can get data reports from Google Analytics for deeper research about customer behaviors.
- Increase eCommerce values:
In Google Analytics, you can enable eCommerce features to get relevant reports about revenues or sales on your site. It is great for you to pinpoint which products are worthy to develop.
- Enhance site’s competitiveness:
Google Analytics presents the picture of your online business over time. Depending on the information collected, you can evaluate your site’s weaknesses and strengths to make proper modifications. From that, you can easily improve your brand’s competitiveness in the E-market.
Basically, having WooCommerce GA4 eCommerce tracking can be beneficial to your site to some extent. Thus, we think that you should try installing Google Analytics in your WooCommerce for one time!
Want some more tips & tricks for WooCommerce tutorials? Let’s learn how to add blog to WooCommerce today.
Add Blog To WooCommerce – FAQs
[sp_easyaccordion id=”68674″]
Conclusion
Our blog has just guided you on how to add WooCommerce Google Analytics to support your site’s traffic management effectively. Don’t forget to use Google Analytics 4 (G-) to set up a configuration and turn on tracking options to optimize Google Analytics’s performance.
LitExtension, #1 Shopping Cart Migration Expert, hopes your WooCommerce Google Analytics integration is successful. Let’s check out our LitExtension Blog or join our Facebook Community Group for more tips.