BigCommerce is no doubt one of the best eCommerce platforms in the world. If you’ve decided to go for this hosted solution and are looking for a guide on how to use BigCommerce, welcome to our in-depth BigCommerce tutorial!
In this article, LitExtension – #1 Shopping Cart Migration Expert will walk you through comprehensive instructions on:
- BigCommerce tutorial for beginners
- 4 essential tips on using BigCommerce
- What is BigCommerce and how much does it cost?
Without further ado, let’s get started!
BigCommerce Tutorial Guide for Beginners
In the next section of our BigCommerce tutorial, we will provide comprehensive instructions on BigCommerce store setup. Essentially, there are also some useful tips you may need along the way. Let’s check it out!
Before getting to the nitty-gritty of this BigCommerce tutorial, see how this eCommerce platform benefits your business below:
Create a BigCommerce account
In the very first step of our BigCommerce tutorial, you need to create an account. For easy access, you can sign-up and start your free trial here.
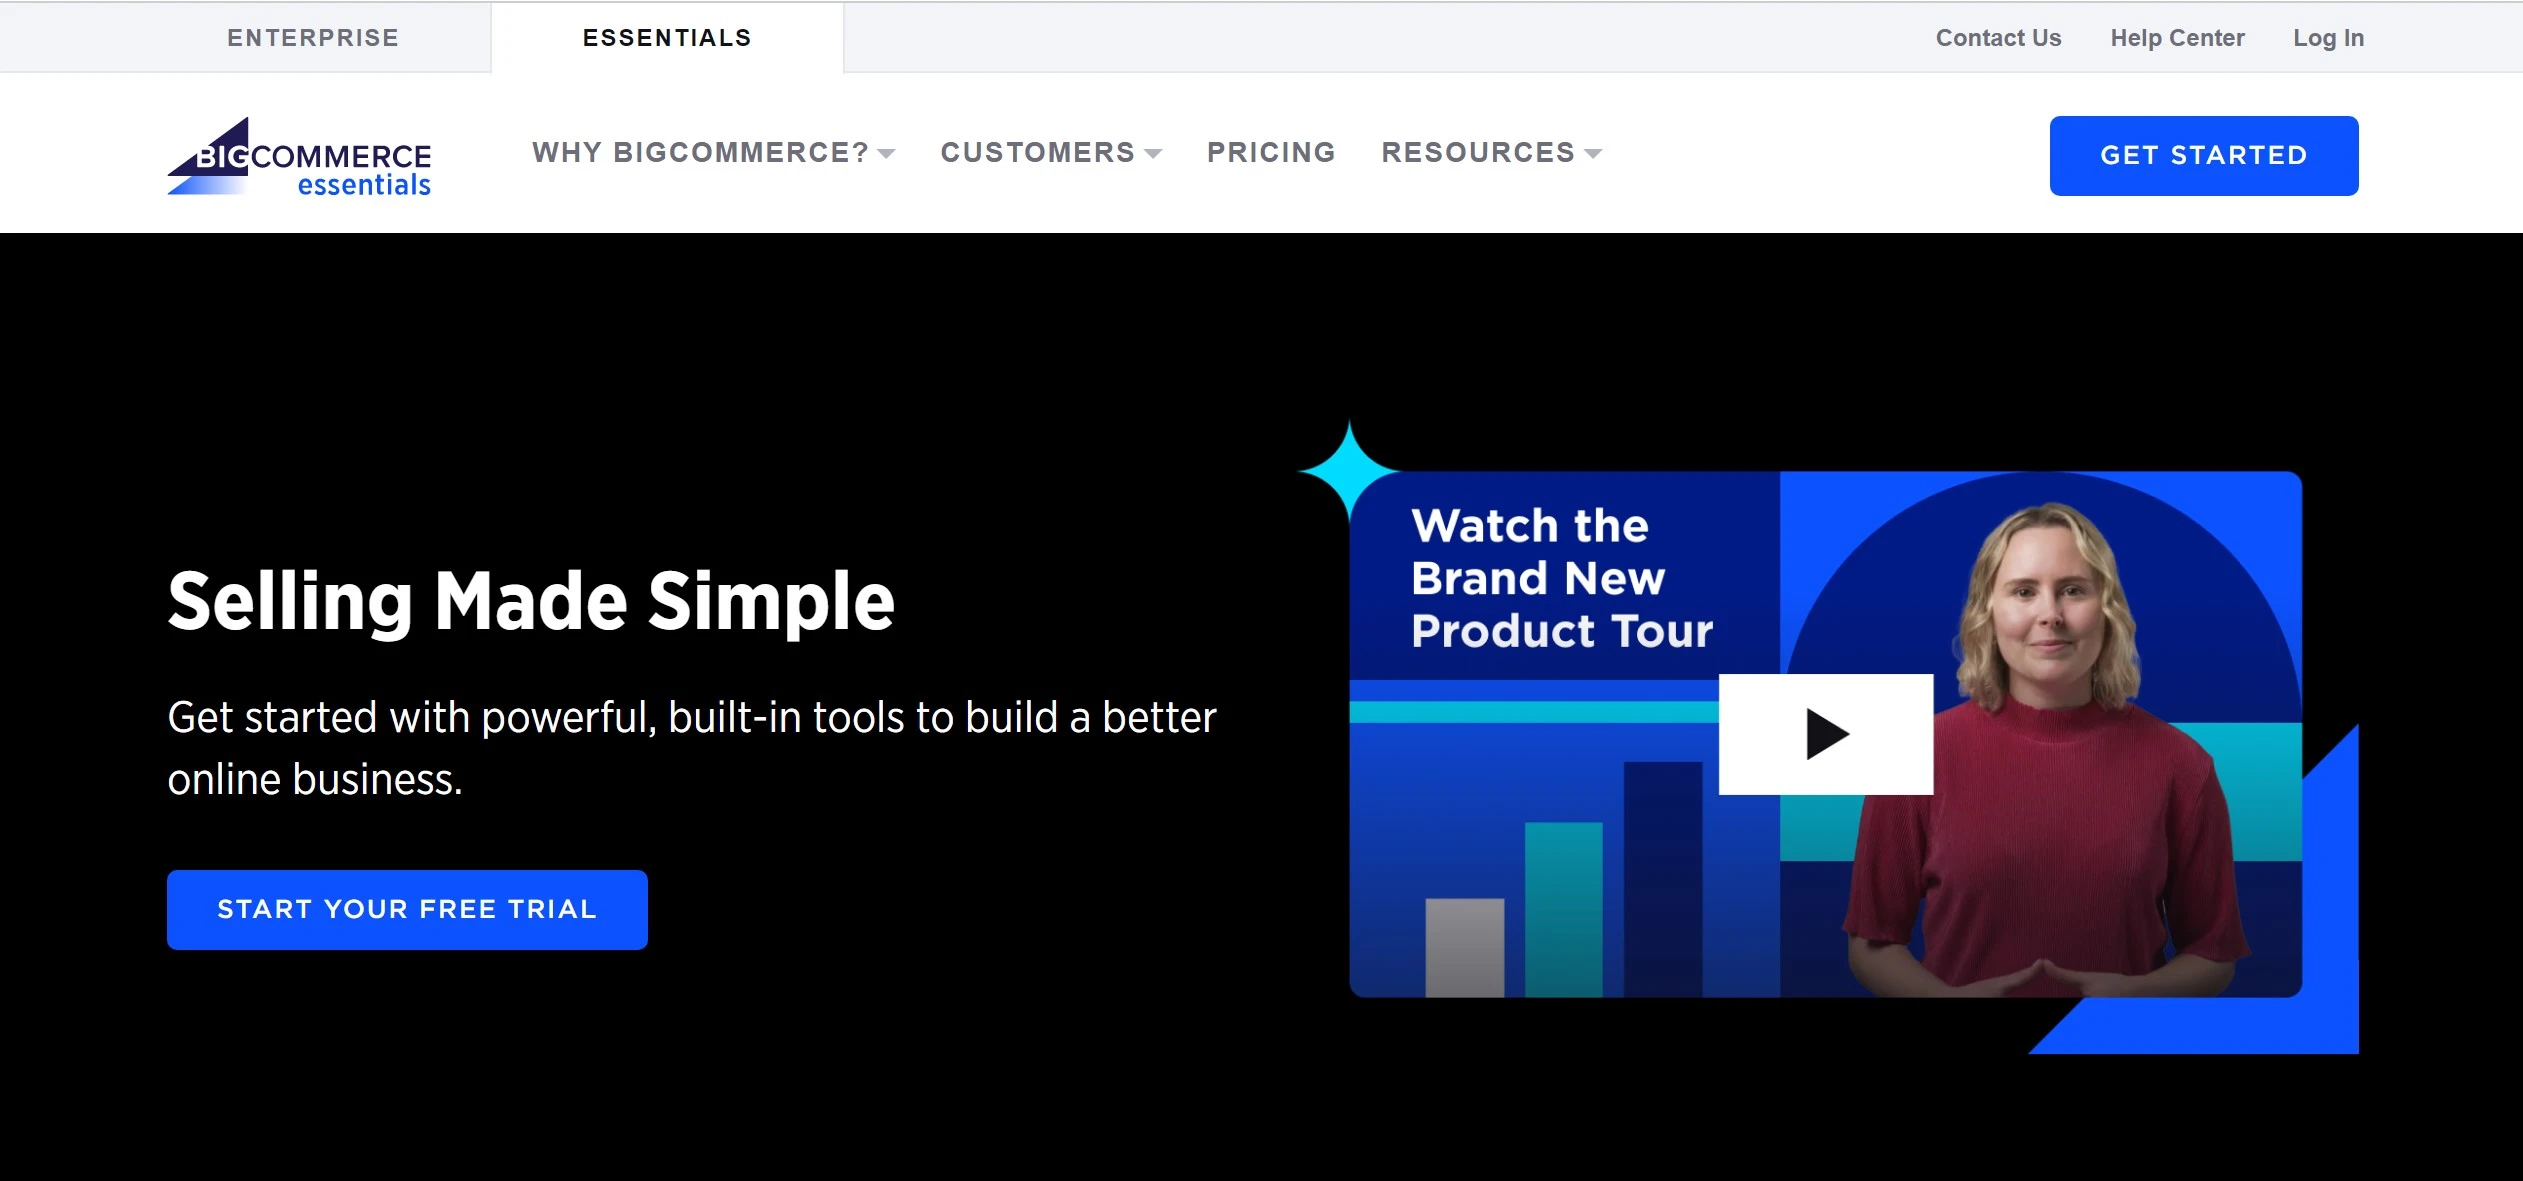
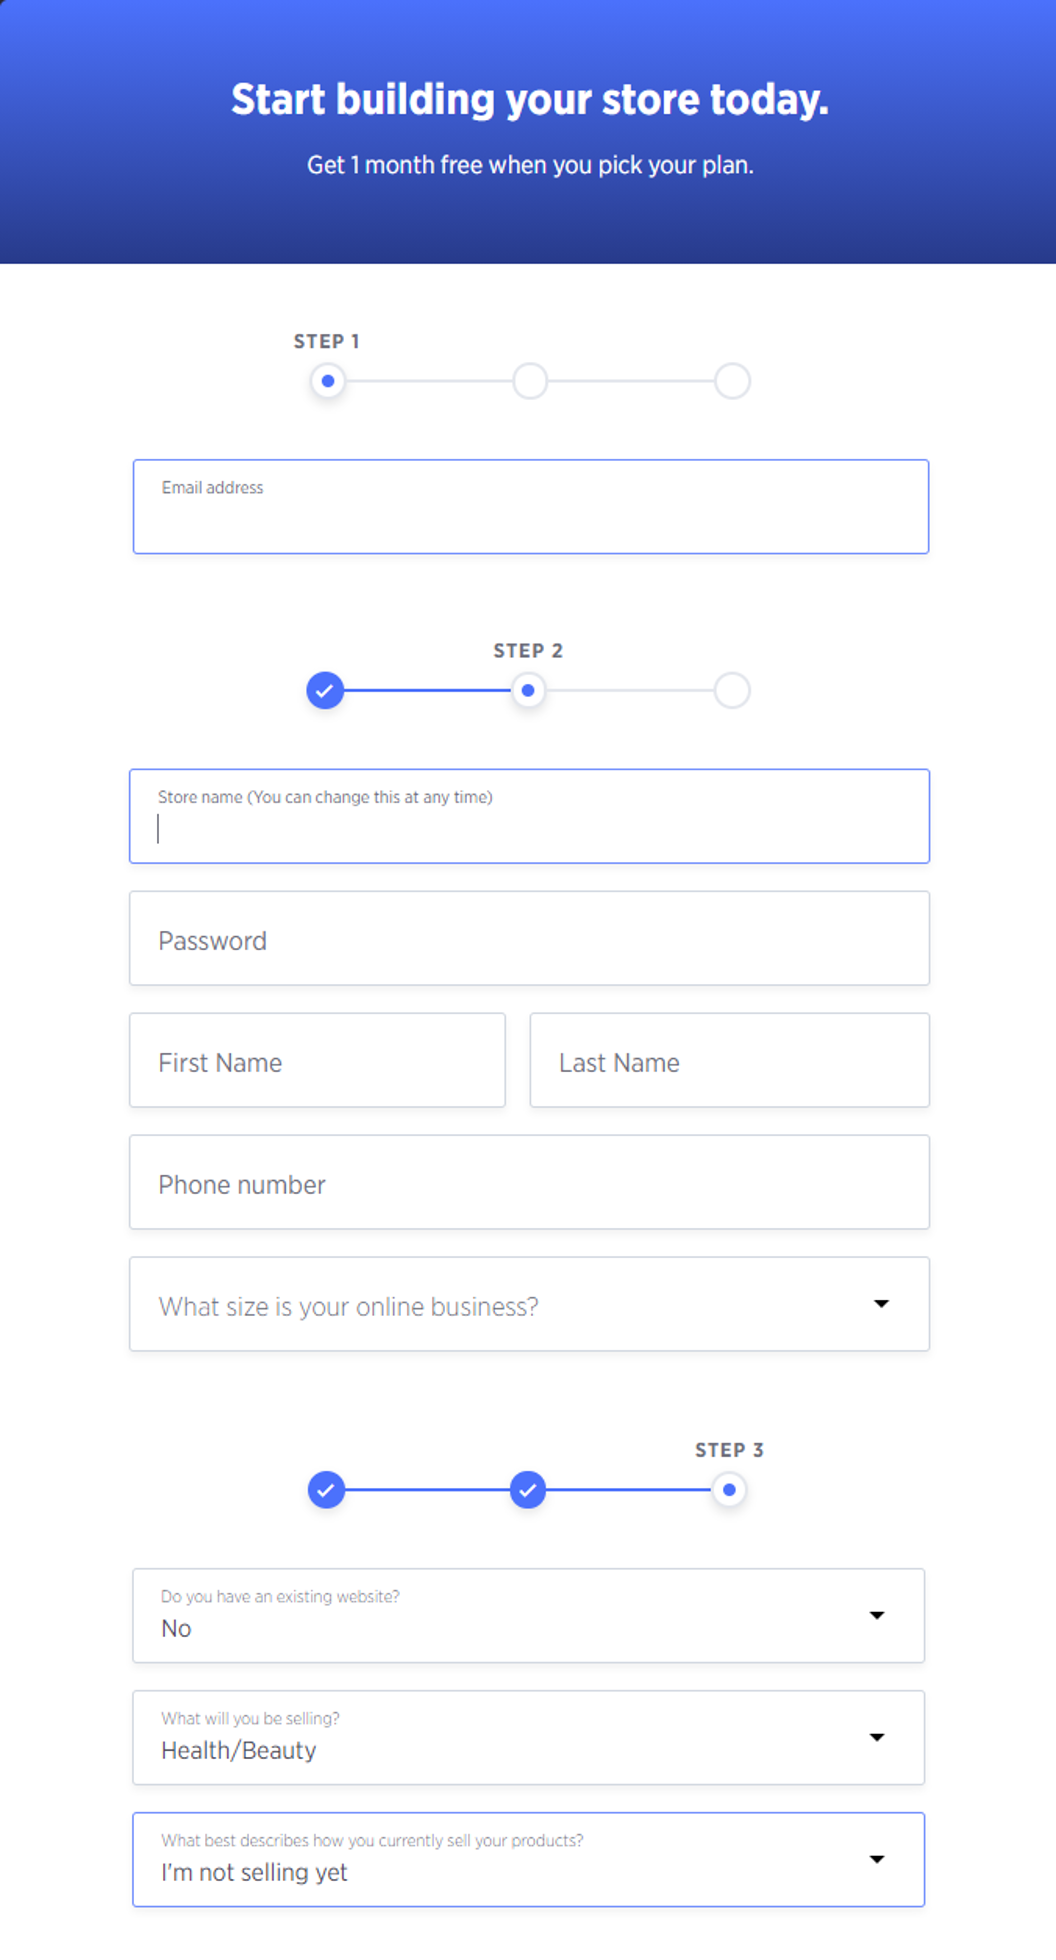
Next, click on the Start Your Free Trial button in the middle of the site. You will need to provide the necessary information like email address, password, and store name,…
The BigCommerce store setup comes in three steps. In step 3, this platform will ask you some questions to learn more about your business. Therefore, we suggest that your answers should be as detailed as possible.
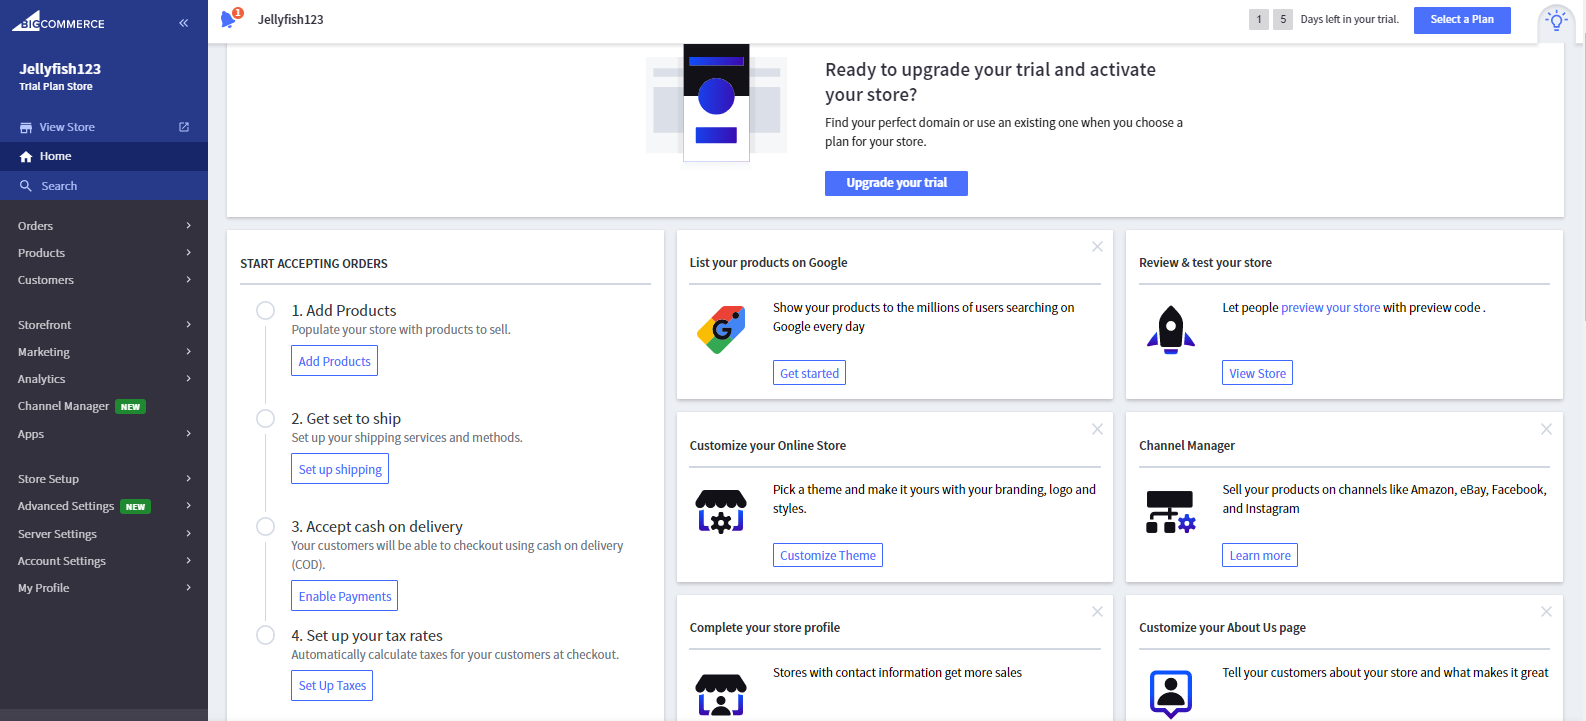
Then, you will be redirected to your BigCommerce store dashboard. Here, this website comes with a BigCommerce tutorial, including a list of 4 steps to help you start accepting orders before publishing your store.
We will dive deeper into these tasks in the latter part of this article, so please keep on reading to learn more about how to use BigCommerce.
Not ready for a long-term commitment with BigCommerce yet? Sign up for BigCommerce free trial now and enjoy this eCommerce platform in 15 days with no credit card required and no financial burden!
Need Help To Migrate Your Store To BigCommerce?
LitExtension provides a well-optimized Cart to Cart migration service that will help you transfer all your data accurately, painlessly with utmost security.
Setting up BigCommerce store profile
Now that your account is ready, let’s move on to the next step of our BigCommerce tutorial: Setting up your store.
Store profiles introduce your BigCommerce store to Internet visitors. It may contain your payment gateway details, your contact information on the order invoices, and the like. Hence, it is important to enter these fields accurately.
To edit or update store profiles, navigate to Store Setup > Store Profile. Then you need to fill in the Contact Information section as in the image below:
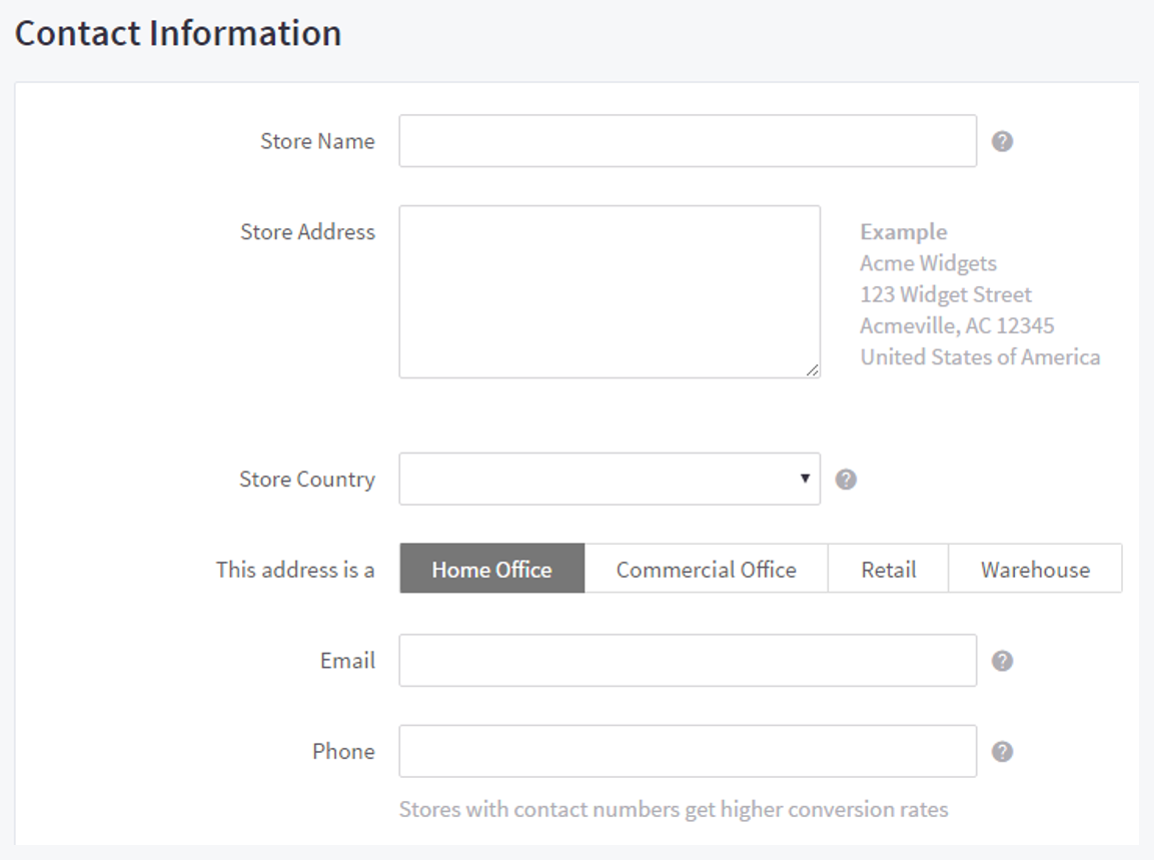
Pro Tips: Try to show a precise, visible contact number because it helps you to get higher conversion rates. Plus, you can add your business’s phone number to the homepage and contact page as well.
Choose and customize a BigCommerce theme
In this part of our BigCommerce tutorial, let’s learn how to elevate your website design and page content.
1. Select a BigCommerce theme
As mentioned in the section above, this platform provides a wide range of mesmerizing BigCommerce themes (both paid themes & free ones) for your storefront. You can select store themes from the Theme Marketplace in the Storefront section.
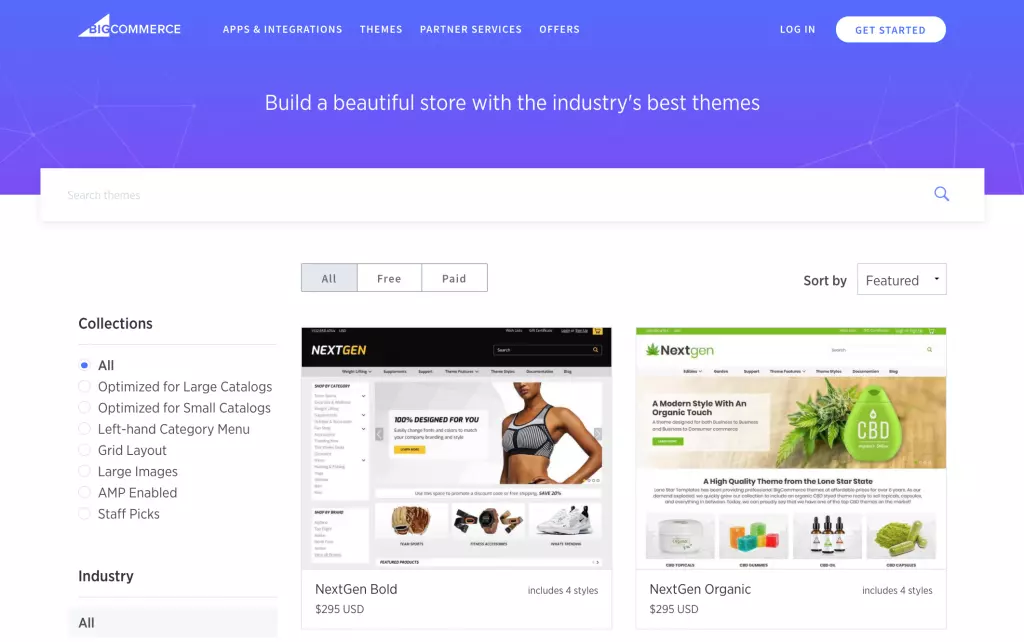
Click Add Theme to continue once you find a suitable theme for your store. Remarkably, you can add various themes to your store and manage them in the My Themes page.
More importantly, you can design your own theme and upload the zip file to BigCommerce website. However, please note that BigCommerce will not offer any technical support for those customized themes.
Read on: Top 8 best BigCommerce themes under $200
2. Customizing your website
You can customize the elements of your theme such as colors, text font size, featured products on the homepage, and the like using Page Builder. Plus, BigCommerce offers a drag-and-drop interface that enables you to arrange content of the web pages easily.
To launch Page Builder, please go to Storefront > My Themes and click on the Customize button below the theme.

Then, you will see the Page Builder section lies on the left-hand side of the editing screen. There are Layout, Text, Image, Hero Banner,… and what you need to do is drag and drop these widgets into the edit page.
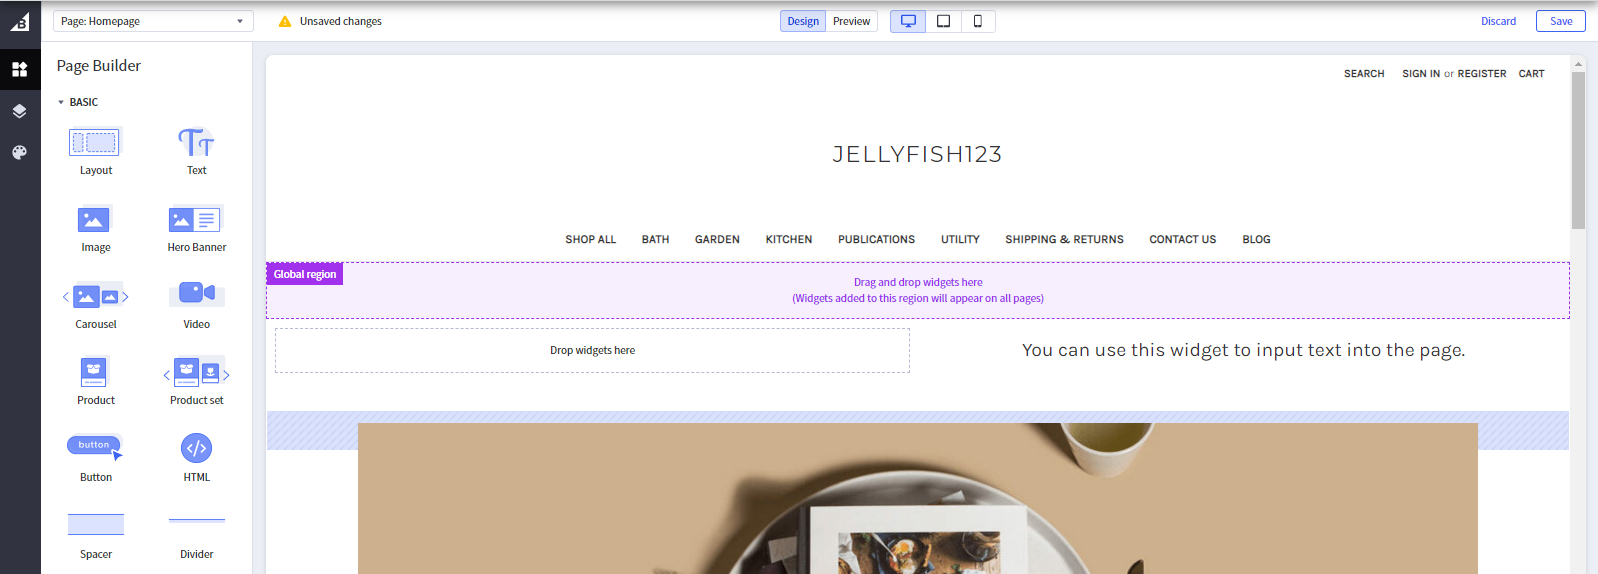
Besides, you can edit Theme Styles by clicking on the icon color palette below the Widgets and Layers section. Theme Styles feature allows you to customize attributes like color, font, font size, and several theme design elements like header, logo, BigCommerce navigation menu, and footer.

3. Adding content pages and blog
Content pages
To add a web page, you need to go to Storefront > Web Pages. The View Web Pages screen will show all the web pages of your BigCommerce store. You can edit, preview or delete any pages you want. To start, please click on the Create a Web Page button.
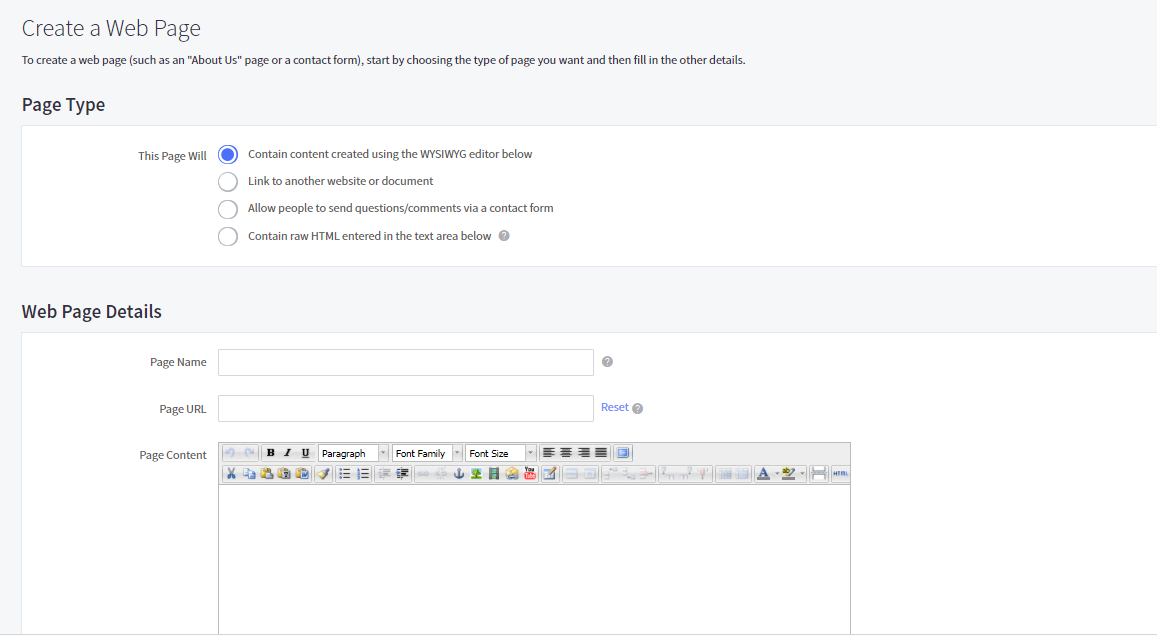
Once you’re done, click on Save & Exit or Save & Add Another to continue adding web pages.
Also, you can add a contact form, which is an indispensable page for customers to get in touch with you. All you need to do is select the option Allow people to send questions/comments via a contact form when creating a web page. Then you can add any information, messages or images in the Page Content section and they will display above the contact form.

On another note, BigCommerce allows users to add other third-party apps as substitutions for its built-in contact form. Feel free to visit the BigCommerce App Store and add any plugin that suits your business.
Blog
Every new BigCommerce store has a built-in blog visible by default. To create a blog post, you need to go to Storefront > Blog and click the “+” button.
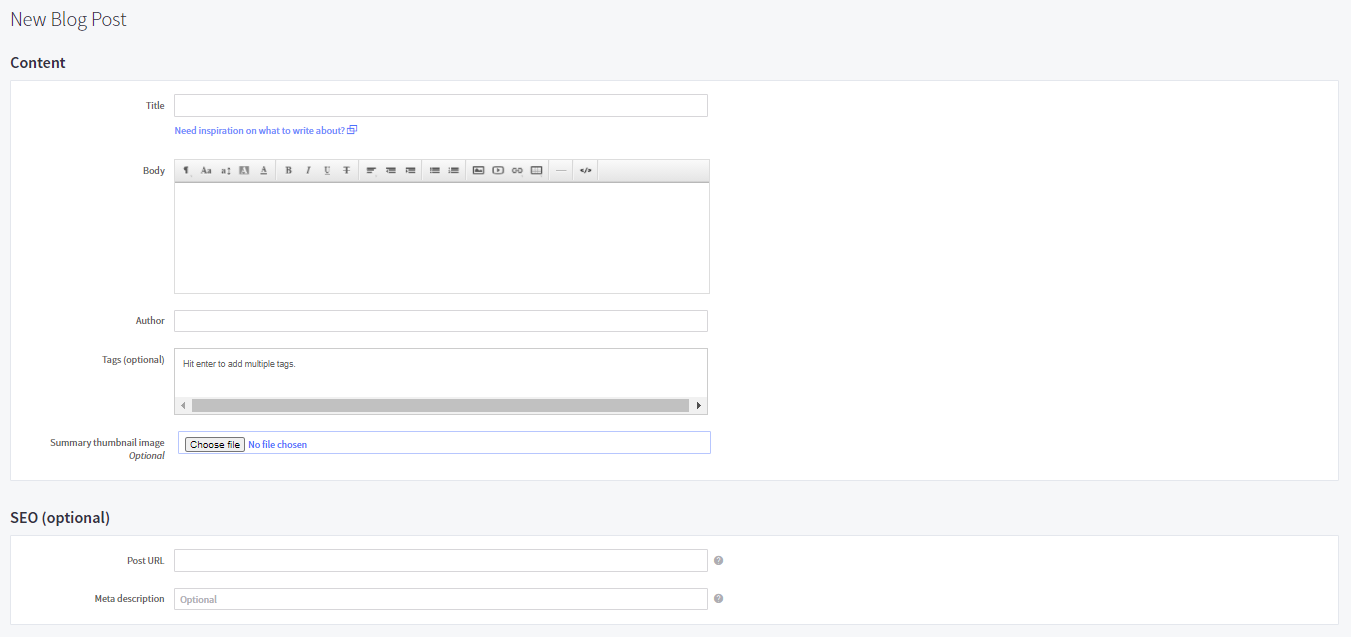
Next, click Save Draft to continue editing, or select Publish to display that blog post in your BigCommerce store. Besides, you can update the blog’s navigation title, URL, and social settings and allow readers to post comments by clicking the Action menu on the Blog page. Then you will be redirected to the Blog Settings page.
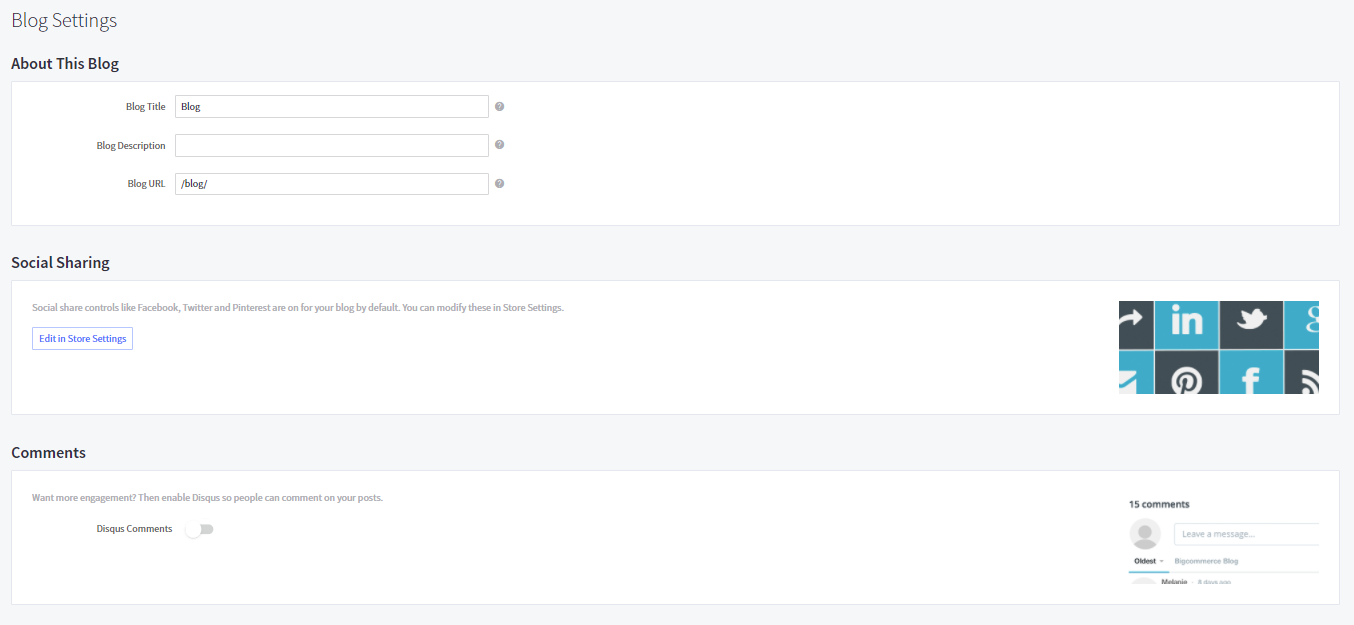
You can also link to a third-party blog service if you need more features. To do so, go to Storefront > Web Pages, then click Create a Web Page. In the This Page Will options, select Link to another website or document. After that, enter the link of the third-party blog into the Web Page Details box.

Add products, customers, and orders
1. Products
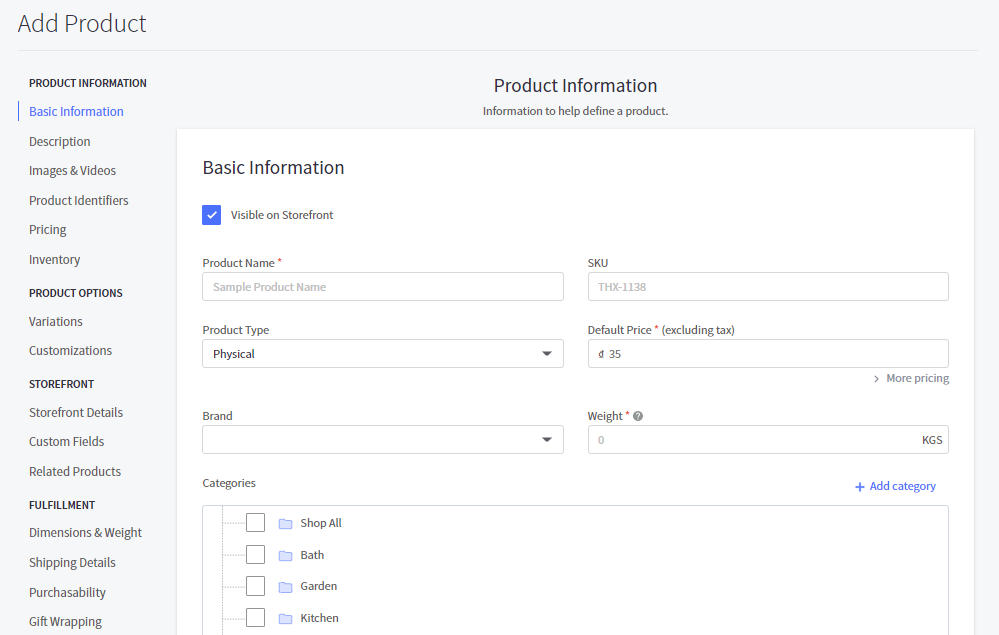
Please pay attention to three basic pieces of information: Product Name, Default Price and Weight. We suggest that you should add images, descriptions, and any identifiers (e.g. SKU, UPC, MPN,…) although this information is not compulsory. After that, click Save to keep these changes.
2. Orders
Similarly, you can add and view order lists in the Order section. It is quite easy to add an order as you only need to go through three simple steps including Customer Info, Items, and Shipping.

3. Customers
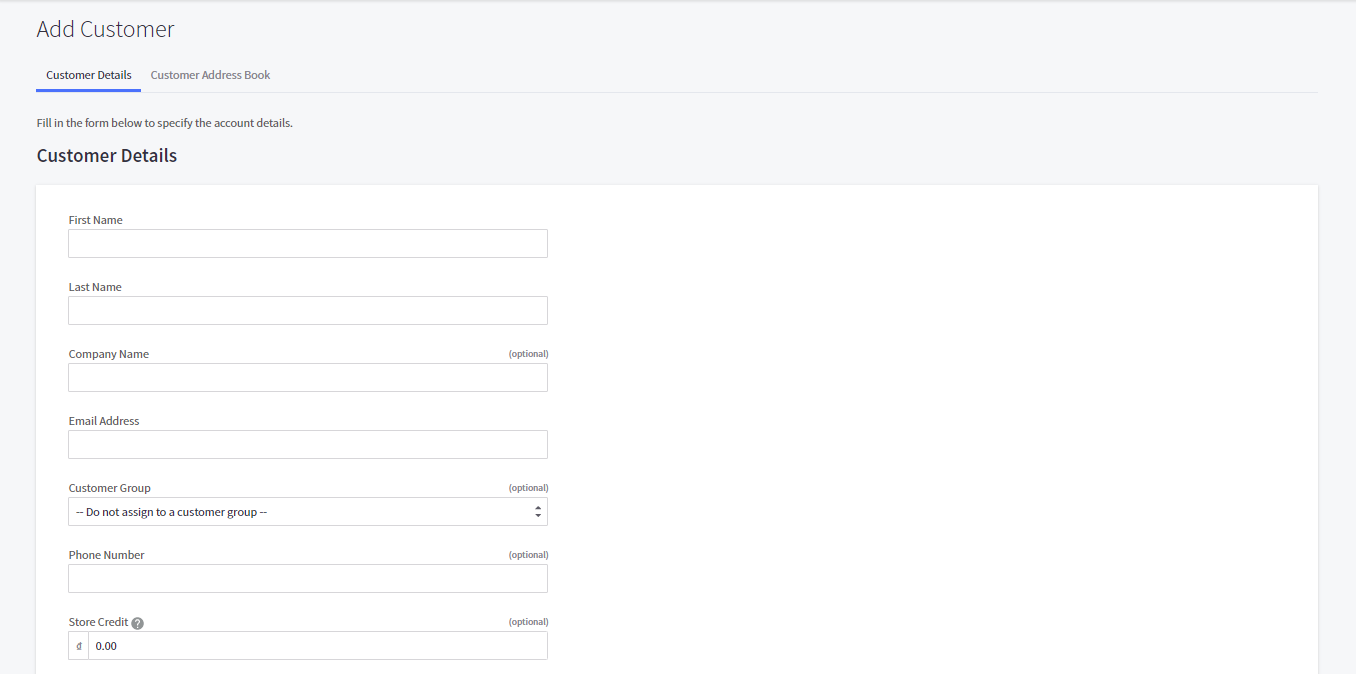
To add customers into your BigCommerce store, you need to select Customers > Add. In the Add Customer page, BigCommerce requires you to fill in the Customer Details form to specify the account details. Note that you can assign that customer into a specific customer group and manage it in the Customer Groups section.
Configure tax, currency, payment, and shipping
Currency
Indeed, BigCommerce is an ideal option for your internationalization plans because you are able to display product prices in different currencies. As a result, your customers can check out using their preferred currency, leading to the improvement of the shopping experience.
In BigCommerce, you are able to set up two types of currencies, which are display currency and transactional currency. If a currency is set to display-only, your store visitors will see prices on the storefront in that currency, however, the transactions will proceed in the store default’s currencies.
Meanwhile, the transactional currency will be displayed in the product prices in the storefront as well as in the check-out details. Please note that you need to enable a supported payment gateway for a currency to be transactional.
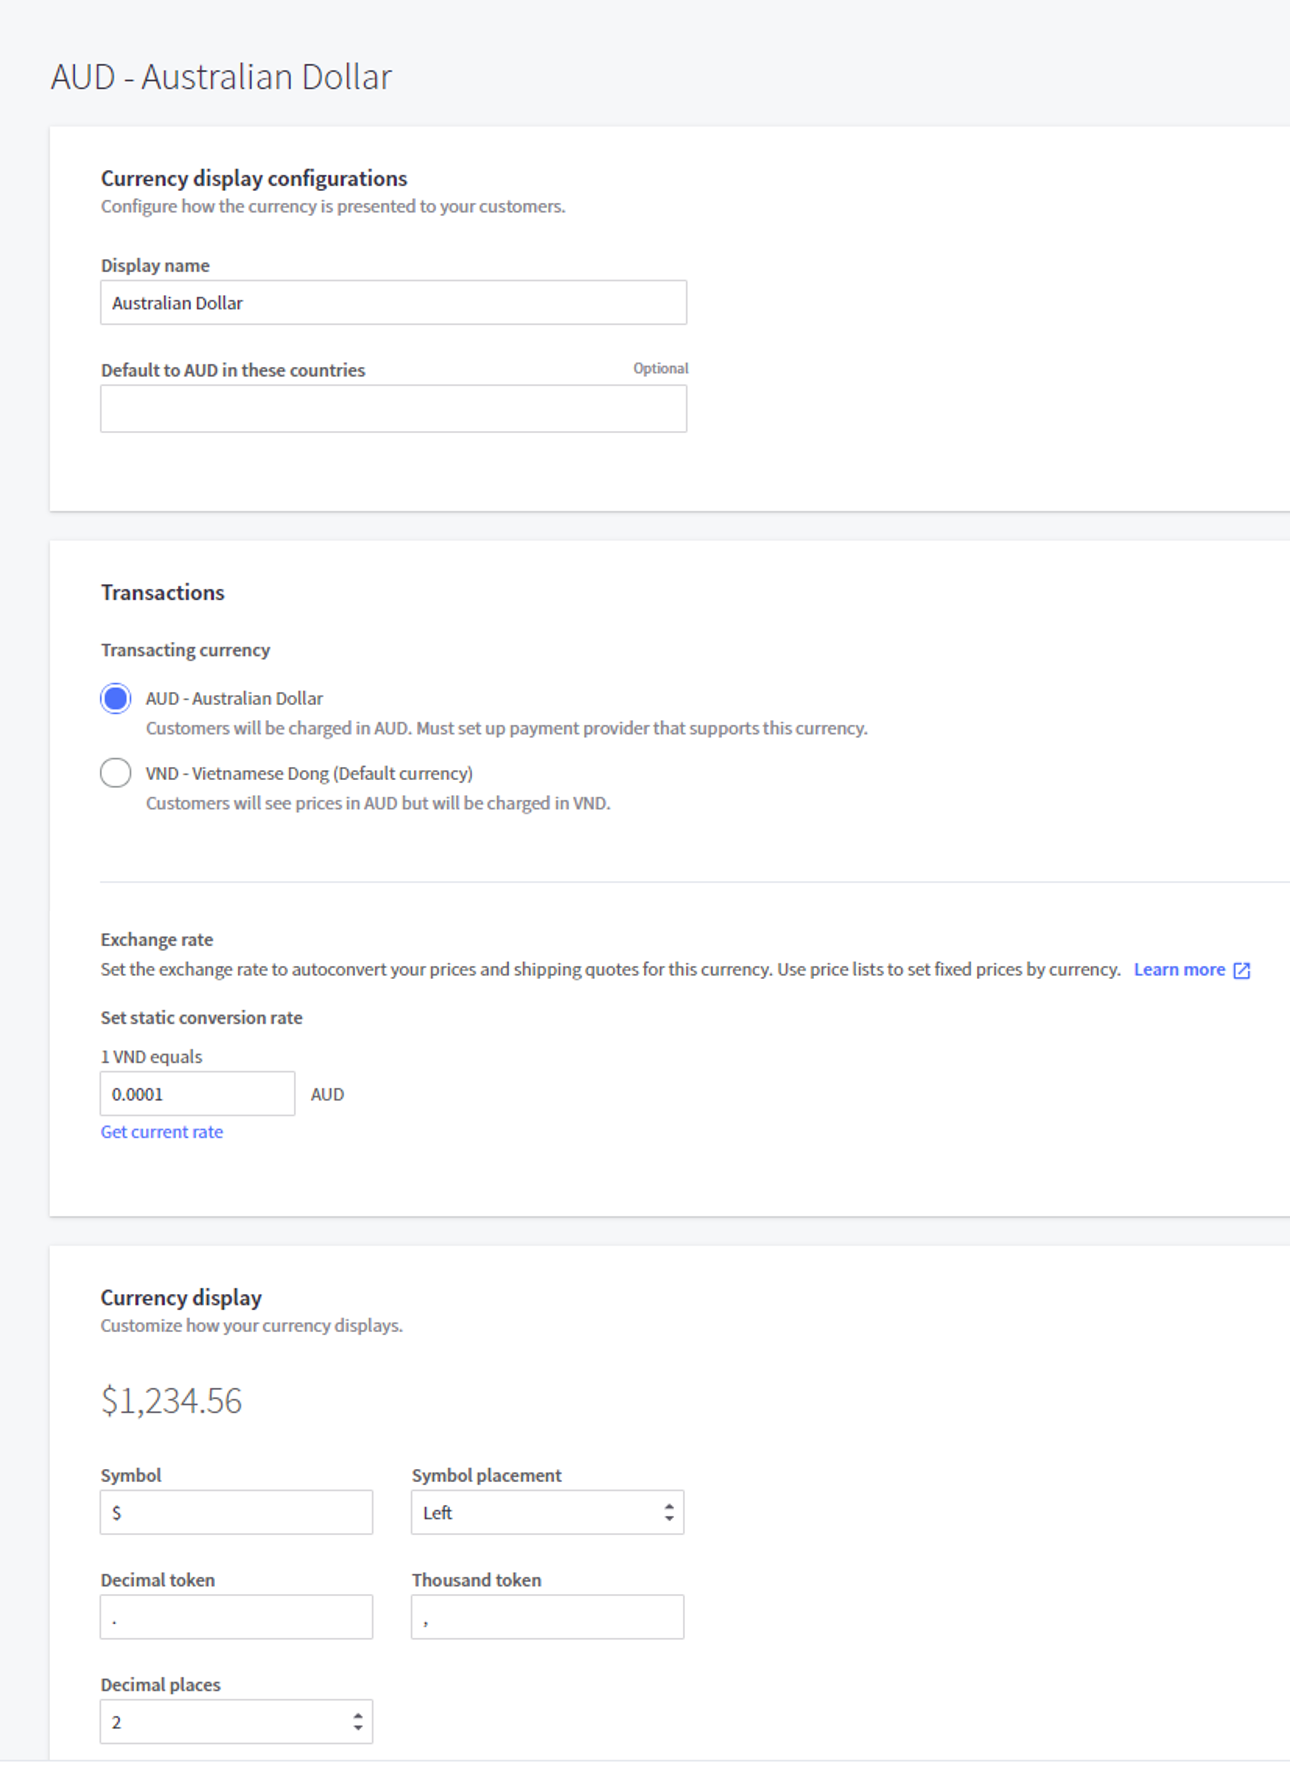
To set up the currency of your store, navigate to Store Setup > Currency. In the Default Currency section, you can click on Edit to set up the Currency display.
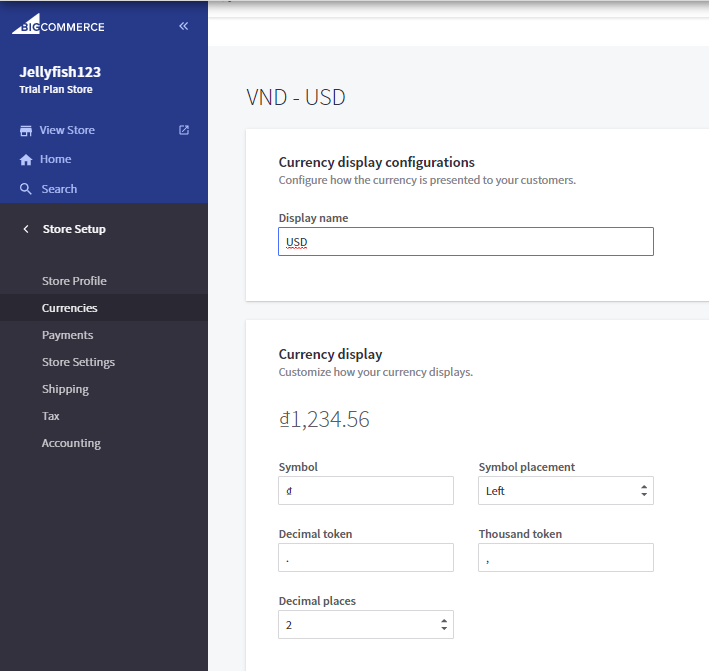
In the Default Currency section, you can set up Transactional currency. Click on “Add new currency” button and provide a currency code to begin. Then, you need to edit some information as follows:
Checkout
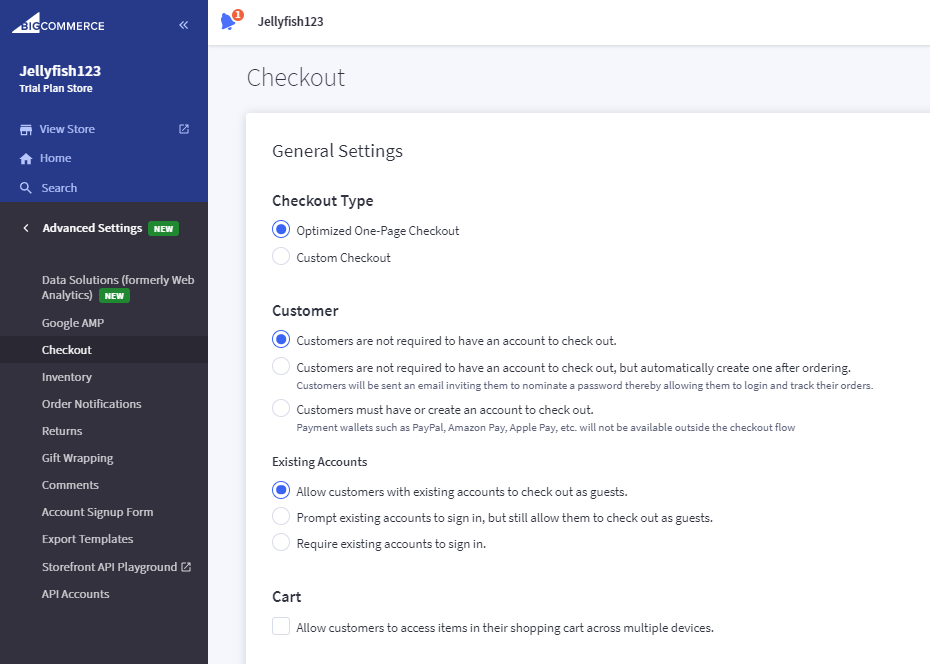
BigCommerce allows you to customize checkout details on your own or using its Optimized One-Page Checkout to minimize friction and streamline the process of checkout to increase sales conversions. You need to navigate Advanced Settings > Checkout. On the Checkout page, select the checkboxes to finish setting up the order confirmation page.
Payment
There are two payment methods you can choose from, which are offline and online.
The offline payment method doesn’t require a credit card or a traditional payment gateway. In BigCommerce, the options for this payment method are Bank Deposit, Check, Money Order, and Cash on Delivery. To set up, navigate to Store Setup > Payments.
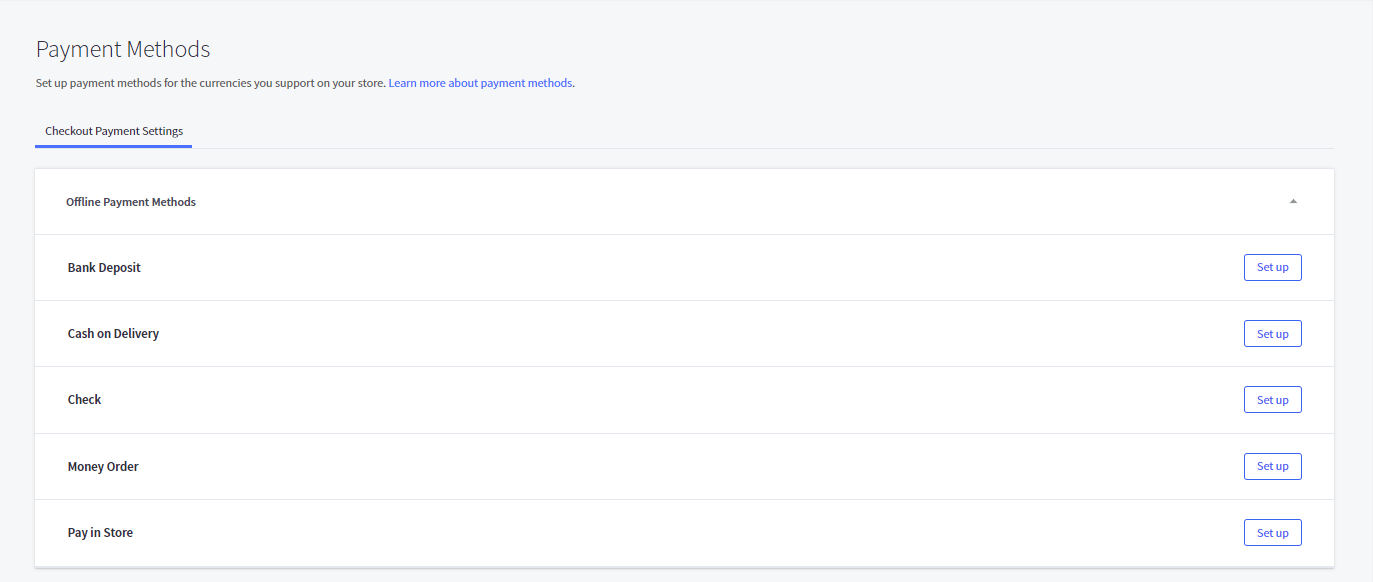
Then, select the method you want to use by clicking on the “Set up” button next to it and provide the necessary information to complete.
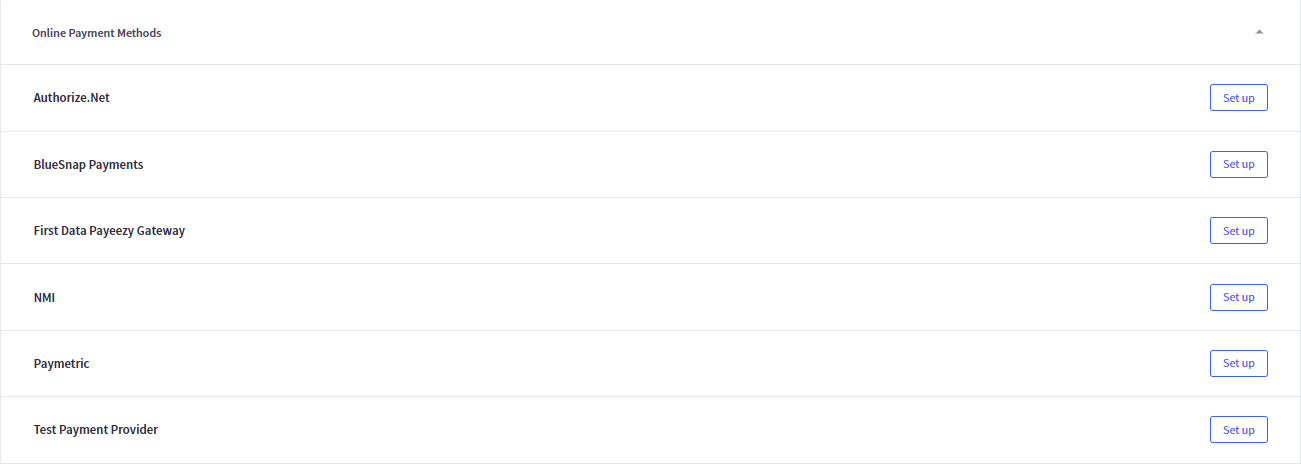
Regarding the Online Payment method, you are able to integrate third-party payment gateways. Here, you need to navigate to Store Setup > Payments again. Next, expand the Online Payment Methods or Digital Wallets section right below and perform the same process as when you set up offline payment.
Other resources that might be helpful for you:
Tax
Similar to other eCommerce platforms, BigCommerce requires you to collect tax on orders. To set up automatic tax for your store, you need to select Store Setup > Tax. Then, please scroll down to the Tax settings section and select Edit to continue.
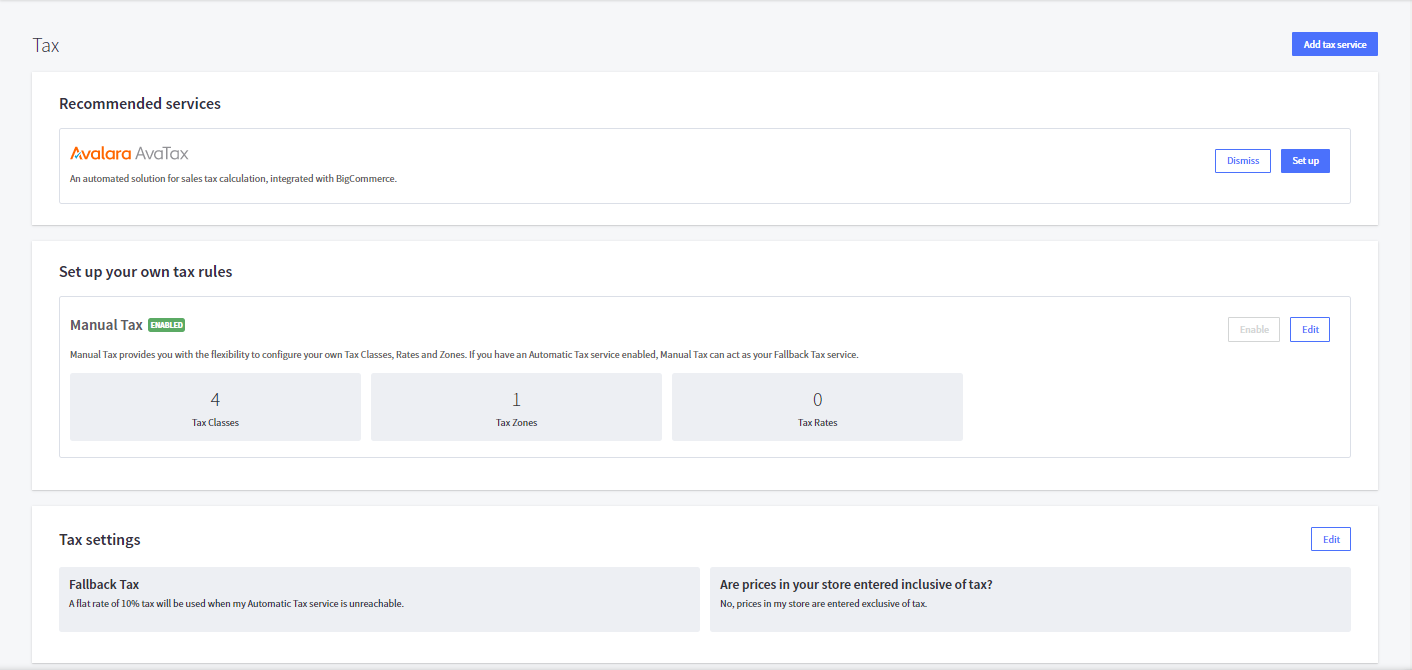
You can manually set up your own tax rule in the Manual Tax section in case your location is outside the regional coverage of BigCommerce’s automatic tax providers.
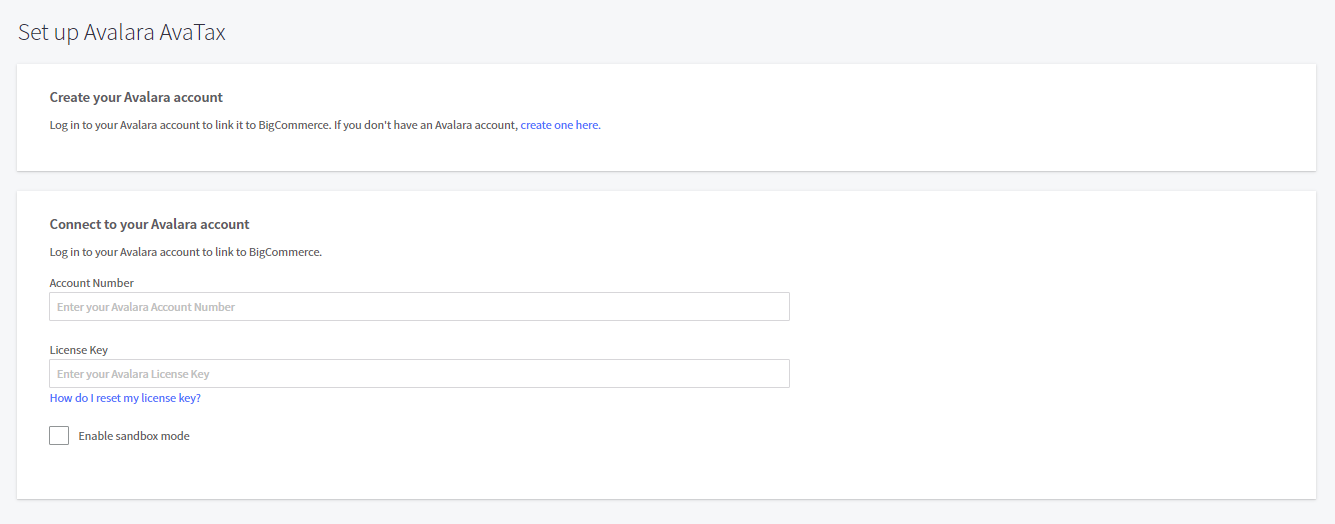
Or, you can set up automatic tax using Avalara AvaTax, a service that eases the complication of calculating tax. Also, it provides sales tax reports for better tracking. More importantly, Avalara AvaTax allows you to set up tax exemptions for specific customers, such as non-profit organizations or government agencies and the like. Also, you can charge certain rates for some particular product once creating a different tax class.
Promote your BigCommerce store
Set up BigCommerce SEO
Search Engine Optimization or SEO helps Internet shoppers discover your products on search engines such as Google and Bing faster. With BigCommerce SEO feature, you can optimize page titles, descriptions, and keywords for content pages, category pages, product pages, blog posts, and brands.
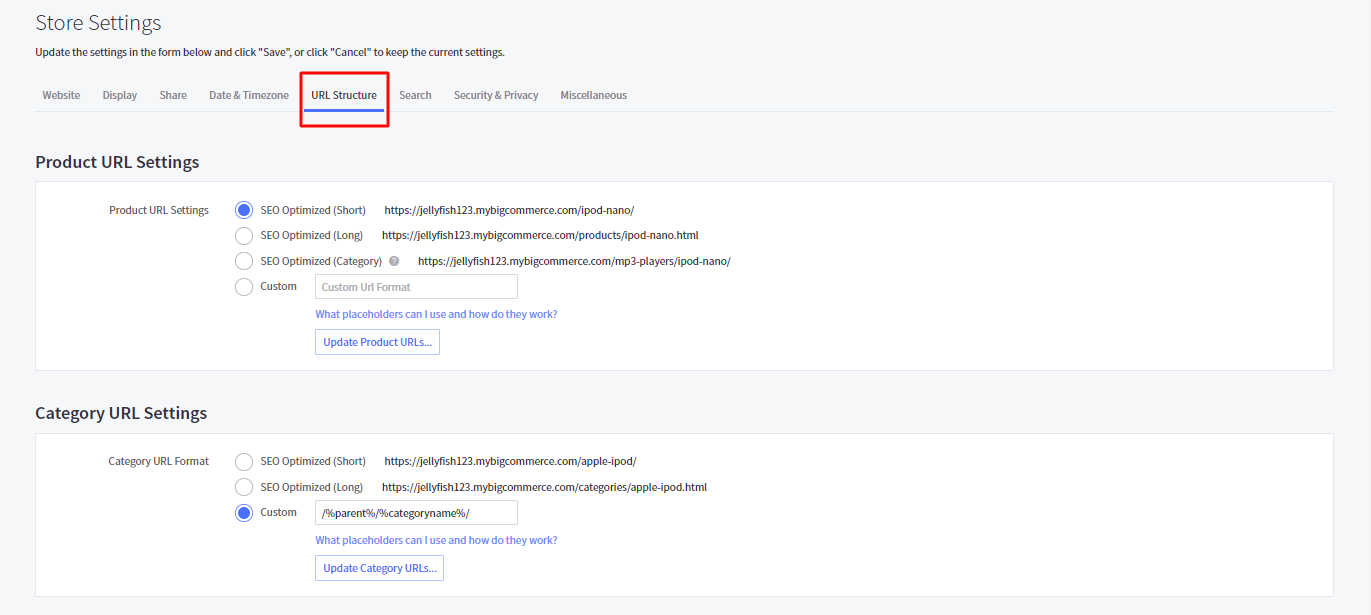
In your BigCommerce dashboard, navigate to Store Setup > Store Settings > Website. Scroll down, and you will see the Search Engine Optimization section. Provide the necessary information and click Save when you complete.

Next, select the URL Structure section and keep optimizing your product URL, category URL, and web page URL.
Establishing BigCommerce on multiple channels
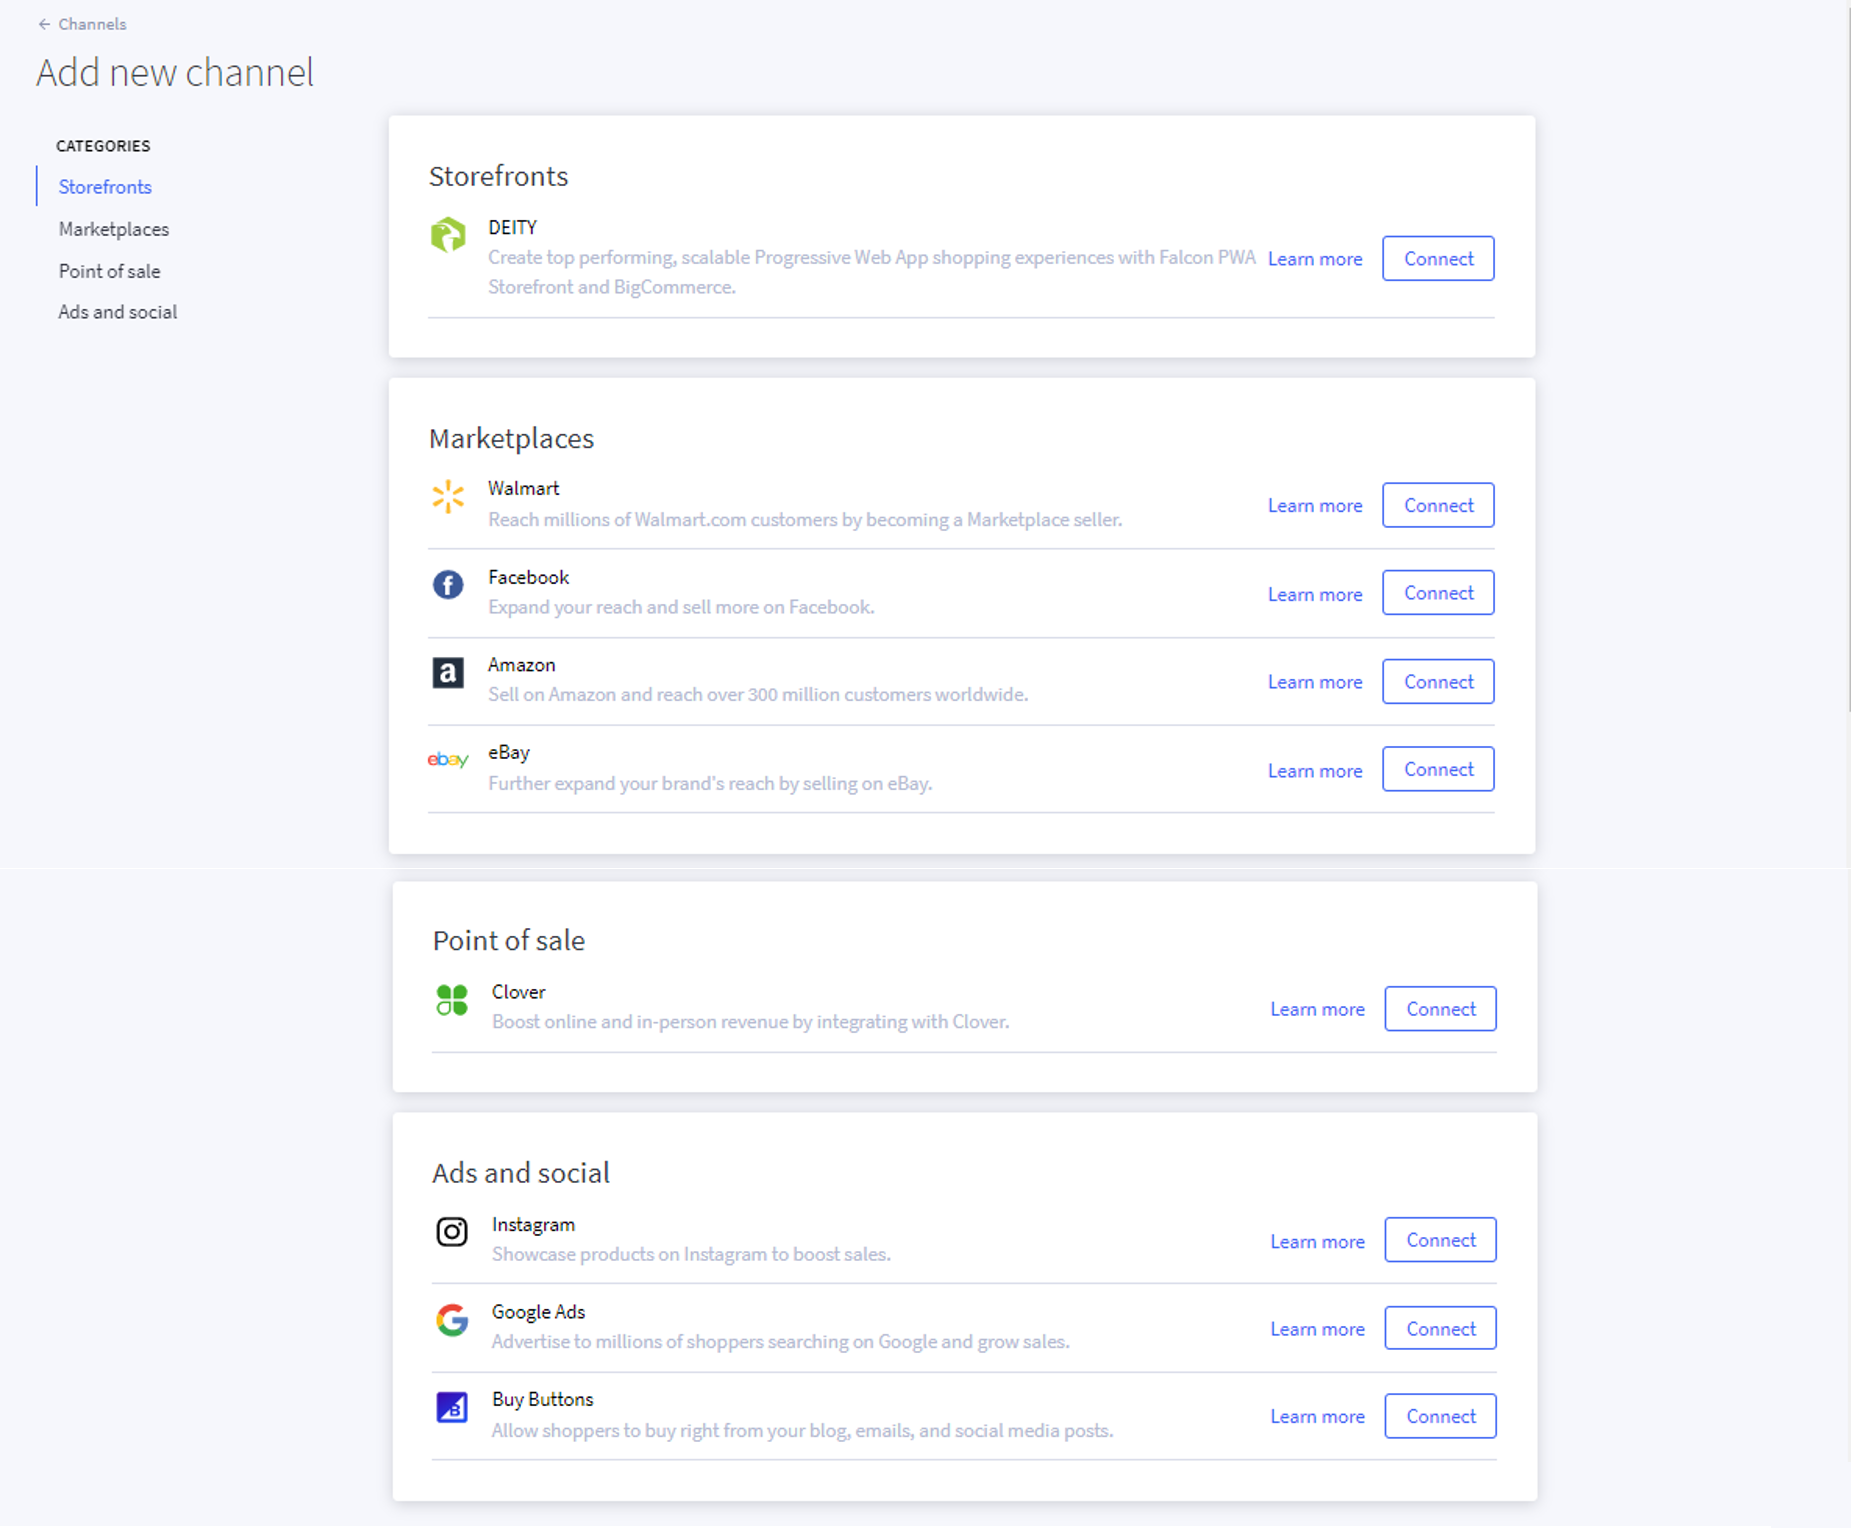
Spectacularly, you can sell on multiple channels by integrating your BigCommerce store to prominent marketplaces like Walmart, Facebook, Amazon and eBay. Simply select the Channel Manager section from your BigCommerce dashboard and you will see a list of channels you can connect to sell on.
Set up email marketing
Fortunately, BigCommerce comes with a built-in newsletter sign-up box that helps you to promote your business easily. To find the Email Marketing page, you need to navigate Marketing > Email Marketing. Here you will see the Newsletter Settings section, and you only need to select the checkbox as the description of each option is displayed right below them.

Add promotions and coupons
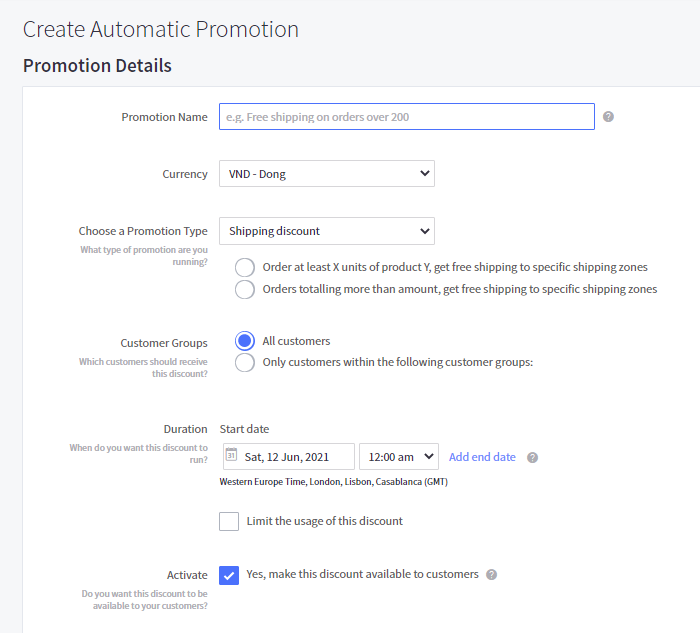
Promotions play as essential incentives that encourage your customers to buy your store’s products. To set up promotions, please navigate to Marketing > Promotions. Here you will see Automatic promotions and Coupon promotions.
Automatic promotions automatically reduce the total price that your customers need to pay when they enter the cart or checkout as long as these orders meet specific requirements. Simply click on the New automatic promotion button and start modifying.
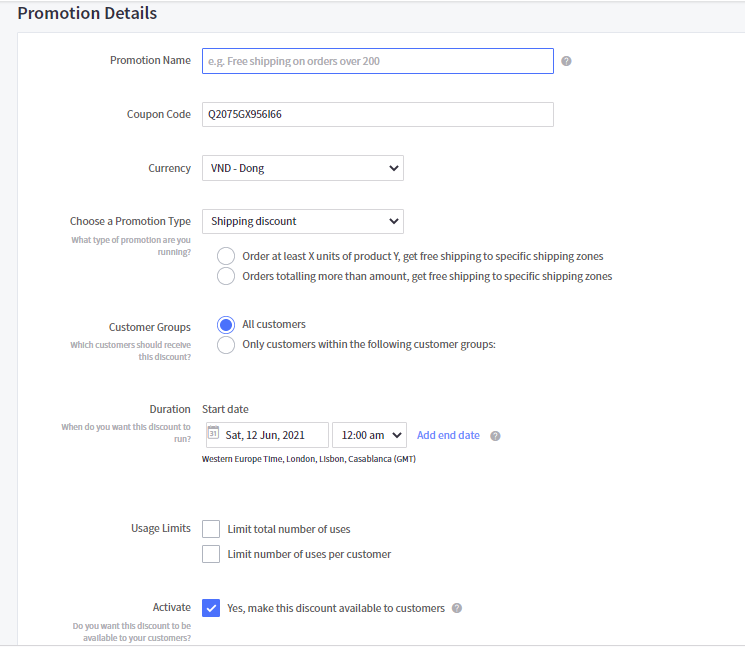
Coupons are a little bit different from Automatic Promotions. Your customers need to enter the coupon code you set up previously to get the discount. To do so, please click on the New coupon promotion button in the Coupon section and you will need to complete the Promotion Details as in the image below:
Launch your BigCommerce store
After dealing with tons of elements to set up your store, it’s time for the last step in our BigCommerce tutorial, launching. Now, your BigCommerce store is ready to go live and start selling products to thousands of online consumers.
In your BigCommerce dashboard, navigate to Home, scroll down a little bit and you will find a box named Review & test your store. Here you will see the Launch Store button. Simply click on it, and you’re done!
Make sure to:
- Complete the checklist that BigCommerce provides you right after you sign in: Add products, Set up shipping, Enable Payments and Set up Taxes.
- Upgrade your store with premium BigCommerce plans before publishing.
4 Tips on Using BigCommerce
Now that we have guided you through every step in this BigCommerce tutorial, let’s learn how to improve your store. We’re about to provide you with 4 ultimate tips that BigCommerce store owners should follow.
1. Visuals and content are everything
The first tip in our BigCommerce tutorial today is to pay attention to visuals and content. A well-organized storefront is a key to impressing your visitors when they access your BigCommerce store. Therefore, try investing in finding dazzling images and pictures to describe your items.
Plus, don’t forget to arrange the content of your website clearly, and logically so that your customers can easily understand what you are offering. Besides, we recommend that you should plan to upload blog posts on a regular basis to attract more potential customers.

2. Try simplifying the checkout process
Complicated checkout details may increase the abandonment rate of your store. Instead, there should not be too much compulsory but unnecessary information to fill in. In addition, we recommend that you should put the order confirmation and shipping details on the same page to streamline the process.
Fortunately, BigCommerce offers Optimized One-Page Checkout that integrates Customer Info, Shipping, Billing, and Payment on the same page, which saves customers a lot of time. You can navigate to the Checkout section above to activate this feature for your BigCommerce store.

3. Have an eye on your figures regularly
BigCommerce possesses comprehensive analytics and reports for store owners to keep track of business effectiveness. These figures help you know more about customer behaviors. By doing this, you can set up suitable promotions to keep your shoppers returning to your store.

Besides built-in analytics, please keep in mind that you are able to connect your BigCommerce store with Google Analytics, Facebook Pixel, or Google BigQuery as well.
4. Consider connecting your site with social media channels and marketplaces
This is a useful tip for you to leverage your social media strength and gain more sales from the Internet. More importantly, selling on multiple sites greatly introduces your brand to consumers who live in different regions or countries. Click on the Connect button and integrate your website with Facebook, Walmart, eBay, Amazon, and more.

BigCommerce Overview
What is BigCommerce?
BigCommerce is a leading hosted eCommerce platform that allows e-merchants to build an online store effortlessly thanks to numerous built-in features. Thus, all you need to do is to sign up and personalize your website as you wish. Along with Shopify and Magento, BigCommerce has become the top choice for e-merchants to build their businesses.
See how BigCommerce differs from these popular platforms:
This platform gets its name on the scoresheet by providing professional, rich features and themes with a high level of customizability. Also, BigCommerce eases the complicity of store settings with a drag-and-drop interface, which means no coding skills are needed. There is no need to worry about data protection because BigCommerce already attaches a full security patch within every subscription plan.
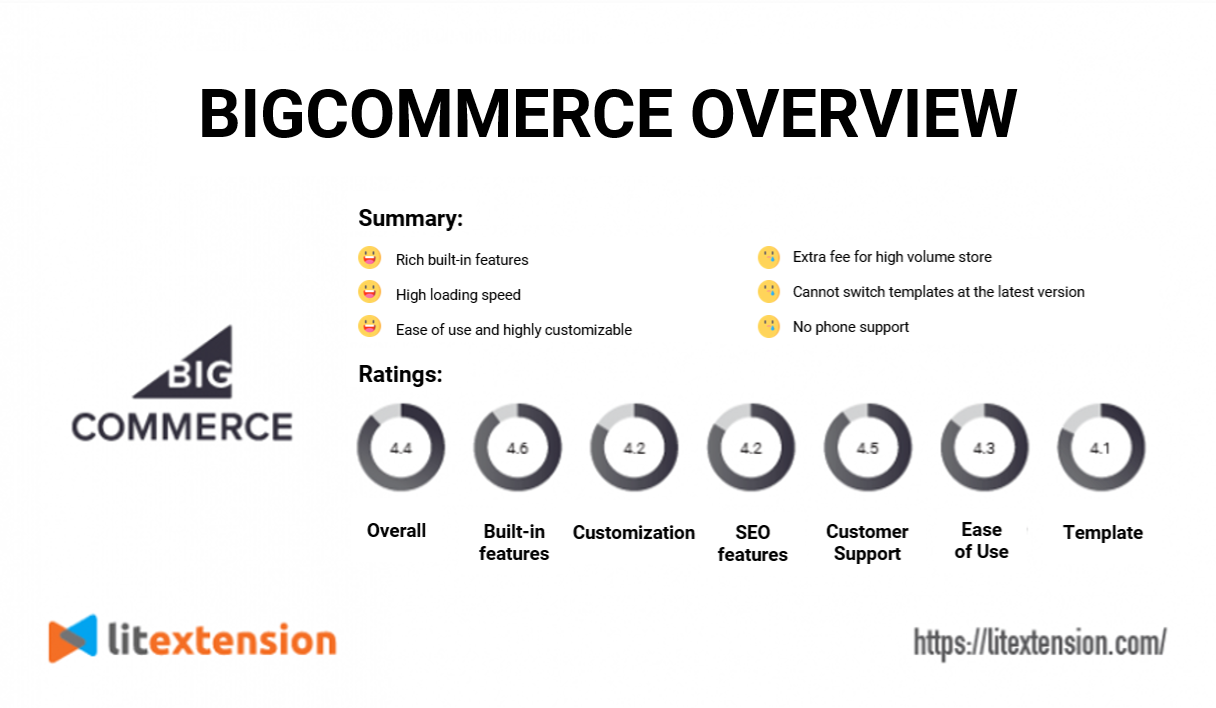
Defining itself as an open Software-as-a-Service platform, BigCommerce gives flexibility to all sizes of online businesses. However, it is preferable for enterprise brands or those who want to enter the middle market, like Bliss, LARQ, or DressUp, rather than entry-level retailers.
How much does a BigCommerce store cost?
Before getting to the detailed BigCommerce tutorial, it’s vital to learn about BigCommerce pricing. Unlike free-to-download open-source carts like Magento or WooCommerce, BigCommerce requires you to pay some compulsory fees to make your store go live:
- BigCommerce plans
- Domain name
- Theme
- Apps and Integrations
- Transaction fees
- Point Of Sale
For more details, visit our in-depth analysis of BigCommerce pricing.
BigCommerce Tutorial – FAQs
[sp_easyaccordion id=”48369″]
BigCommerce Tutorial – Final Thoughts
This is the end of our insightful BigCommerce tutorial for beginners. With all of the factors discussed above, we hope that you find it much easier to set up your BigCommerce store and quickly benefit from selling things on the Internet. Don’t forget to have a glance at our pro tips that greatly help you get more sales after publishing your store. Or visit LitExtension blog and join our social community, where we share the latest trends and news you need to know about the eCommerce industry dynamically.
If you’re about to migrate to BigCommerce from your current store, LitExtension is always here to help! With more than 10 years working in this industry, LitExtension is proud to be your trusted expert. Our mission is to transfer all the data from your old store to a more robust platform automatically, accurately, and securely.
In case you have any questions about the BigCommerce tutorial or other related topics, don’t hesitate to contact our support team, who are available 24/7 to solve all your problems immediately.