How to Add HTML Section to Shopify the Right Way
If you’ve ever searched for how to add HTML to Shopify, you know it’s about getting real control over your store, adding things like Pinterest HTML tags for marketing, building custom homepage sections, or simply making your site look and work the way you want.
Shopify’s standard features are solid, but sometimes you need a little extra: maybe you want to embed a custom form, use a Shopify HTML code generator for quick layouts, or safely add code to your Shopify website without breaking anything.
In this guide, you’ll learn:
- When it’s smart to use custom HTML (and when to avoid it)
- Step-by-step methods for adding HTML to Shopify safely
- Practical examples, from contact forms to promo banners
- How to sidestep common mistakes that trip up store owners
You’ll leave knowing exactly what to do next, and if you want hands-on support, LitOS is here to help you get it right.
How to Add HTML to Shopify via Theme Files
Adding HTML to your Shopify theme files may seem challenging at first, but many store owners learn it quickly with a bit of guidance. This approach gives you complete control over where and how your custom code appears, making it ideal for features or design details you can’t create with the standard editor.
Step 1: Back up your theme
Before adding HTML to your Shopify theme files, always back up your theme first.
To back up your Shopify theme:
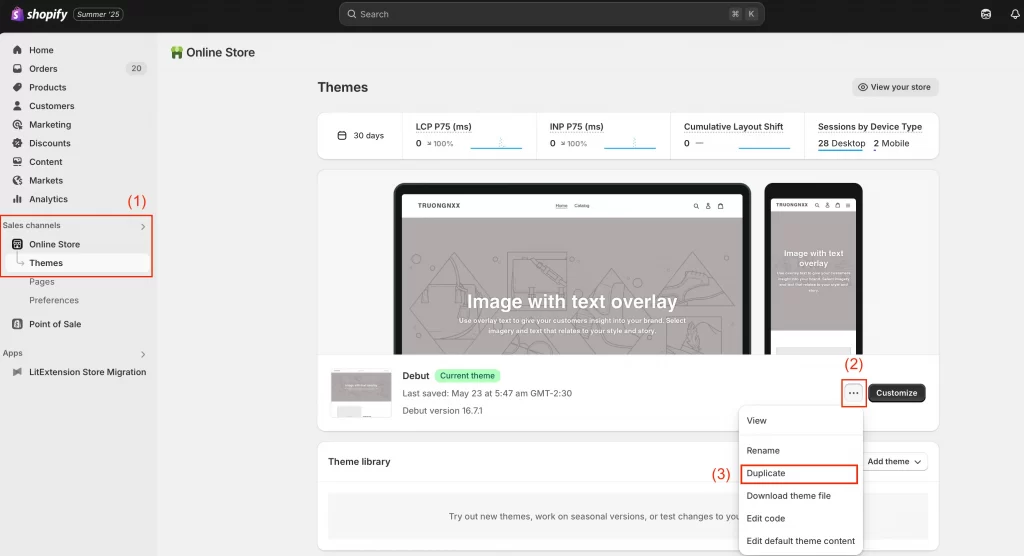
- Go to Online Store > Themes (1) in your Shopify admin.
- Find your current theme, click “…” (2), then select Duplicate (3).
- Shopify creates a copy of your theme, so you can revert to it if needed.
This step is your safety net. If your edits don’t go as planned, you can switch back to your backup with zero downtime or panic.
Step 2: Open the theme code editor
Now it’s time to access your theme code. Don’t worry, you’re not rebuilding your entire site, just editing a small section. And since you’ve already backed up your theme, any mistakes won’t affect the original version.
From the same Themes page, click “…” again, then choose Edit code.
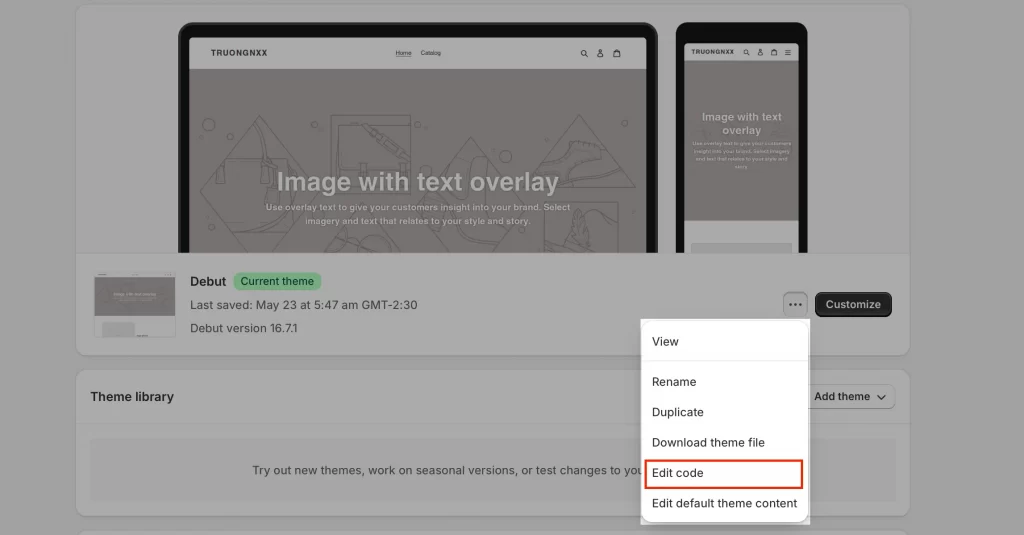
This opens Shopify’s built-in code editor, where you can view and edit your theme’s files.
Step 3: Choose the right file (section, template, etc.)
Where you add your HTML depends on what you want to change:
- For site-wide elements (like tracking codes or verification tags), edit the theme.liquid file in the Layout folder.
- For specific pages or areas, look in the Sections or Templates folders (e.g., product-template.liquid, footer.liquid, or create a new section like custom-html.liquid).
- For custom sections, click “Add a new section,” give it a name, and Shopify will create a blank Liquid file for you.
Step 4: Insert your HTML and save
Now paste your HTML code where you want it to appear. For example, let’s say you want to add a custom HTML banner or widget to all your collection pages:
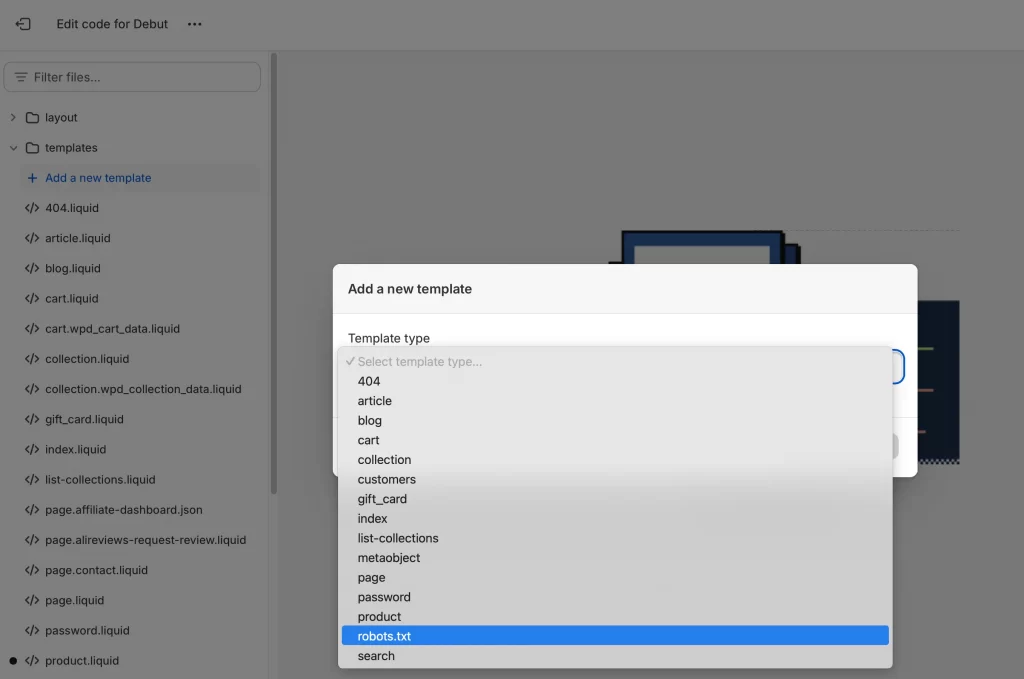
- In the theme code editor, click “Add a new template.”
- From the dropdown, select collection as your template type.
- Choose the format (most modern themes use “liquid”).
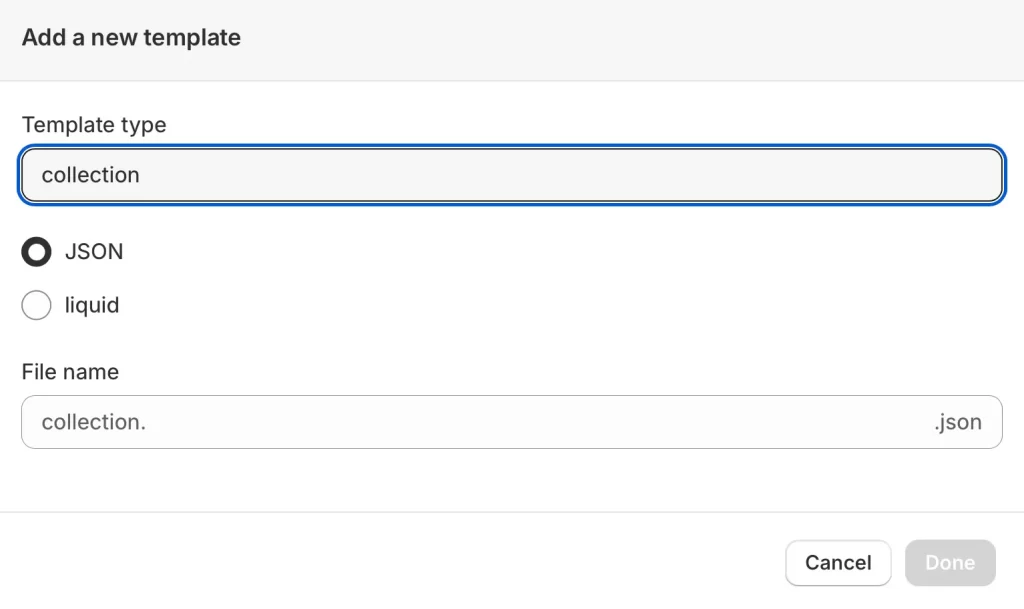
- Shopify will create a new file, typically named collection.liquid or collection.json.
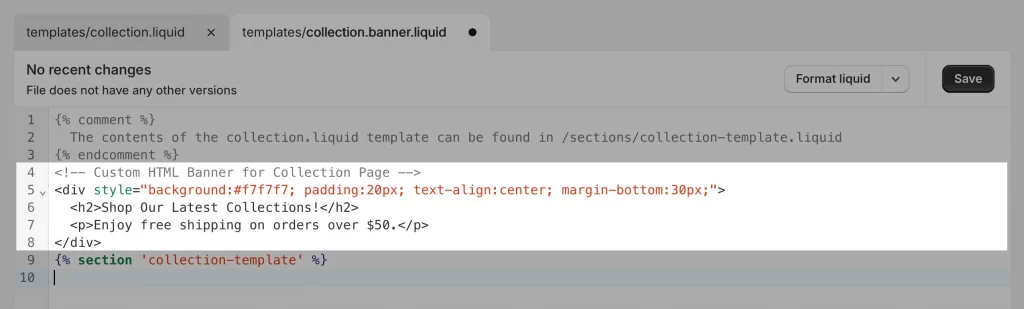
Here’s a sample code to add a simple HTML banner above your products:
<!-- Custom HTML Banner for Collection Page -->

<div style="background:#f7f7f7; padding:20px; text-align:center; margin-bottom:30px;">

  <h2>Shop Our Latest Collections!</h2>

  <p>Enjoy free shipping on orders over $50.</p>

</div>
Paste this code in your new collection.liquid file, right above the main product grid code (look for {% section ‘collection-template %} or similar).
Then click Save when you’re done.
What this does is your custom banner will now appear at the top of every collection page using this template, no extra apps or complicated code required.
If you ever want to target a specific collection, you can create a unique template (like collection.special.liquid) and assign it to a collection in your Shopify admin. This gives you total control over where and how your custom HTML appears, with no risk to your other pages.
Note: For store owners who aren’t comfortable writing code, a Shopify HTML code generator like Mega HTML/CSS/JS Code Embed or HTML.am can create simple elements (such as tables or buttons) that can be copied and pasted. However, be cautious and only paste reputable code generators, avoiding code copied from unknown websites.
Step 5: Test and preview changes
Don’t skip this step! Always check your work:
- Use the Preview feature to see your store with the new HTML.
- View on both desktop and mobile, what works in one view can look off in another.
- Ensure that all links, forms, and widgets function as intended.
If something appears to be broken, you can remove your code or restore your theme backup without losing any progress. And that’s how to add HTML to Shopify!
Optional: Use a page builder app for drag-and-drop HTML
If editing code isn’t your style, you’re not out of options. Some page builder apps, such as Shogun or PageFly, allow you to add HTML sections using a simple drag-and-drop interface, eliminating the need for coding.
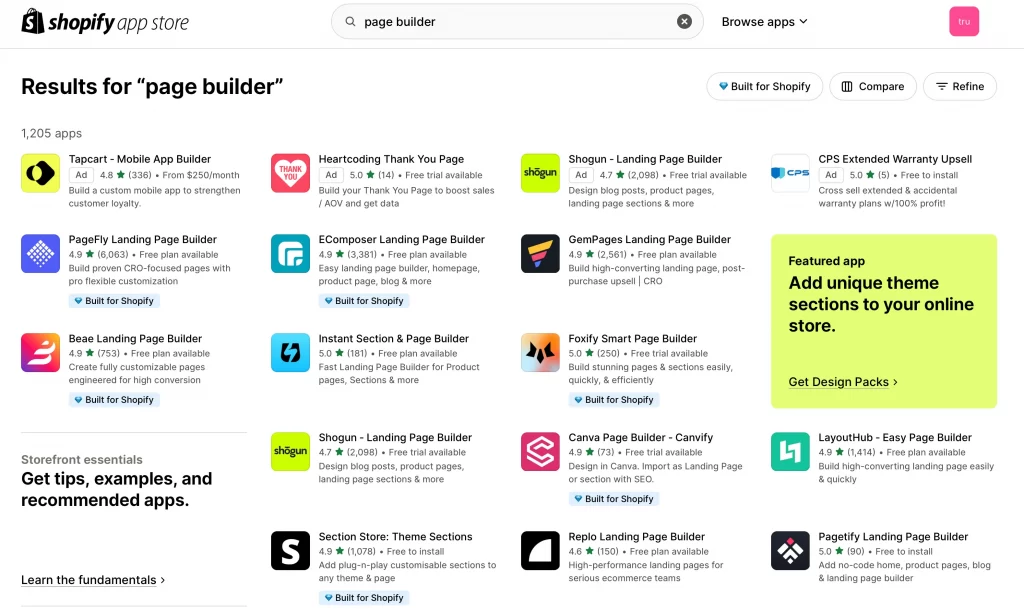
- Install your chosen app from the Shopify App Store.
- Open the app, drag an HTML block onto your page, and paste your code into it.
- Save and publish your changes with confidence.
These tools are ideal if you want flexibility but prefer a visual, hands-on approach.
After all, adding HTML via theme files gives endless customization options, but it’s safest when you back up your theme, take it one step at a time, and don’t hesitate to seek expert help if needed. If you ever want a second set of eyes, LitOS’s Shopify developers can review or implement your changes, so you can focus on growing your business.
How to Add HTML with Shopify’s Rich Text Editor
For quick changes, Shopify’s rich text editor lets you add HTML to product descriptions, pages, collections, or blog posts with no need to touch theme code
Here’s how to use it:
- In your Shopify admin, open the product, page, or blog post you want to edit.
- In the description area, click the “<>” or “Show HTML” button (like the one in your screenshot).
- Paste your HTML code directly into the editor.
- Click Save to apply the changes.
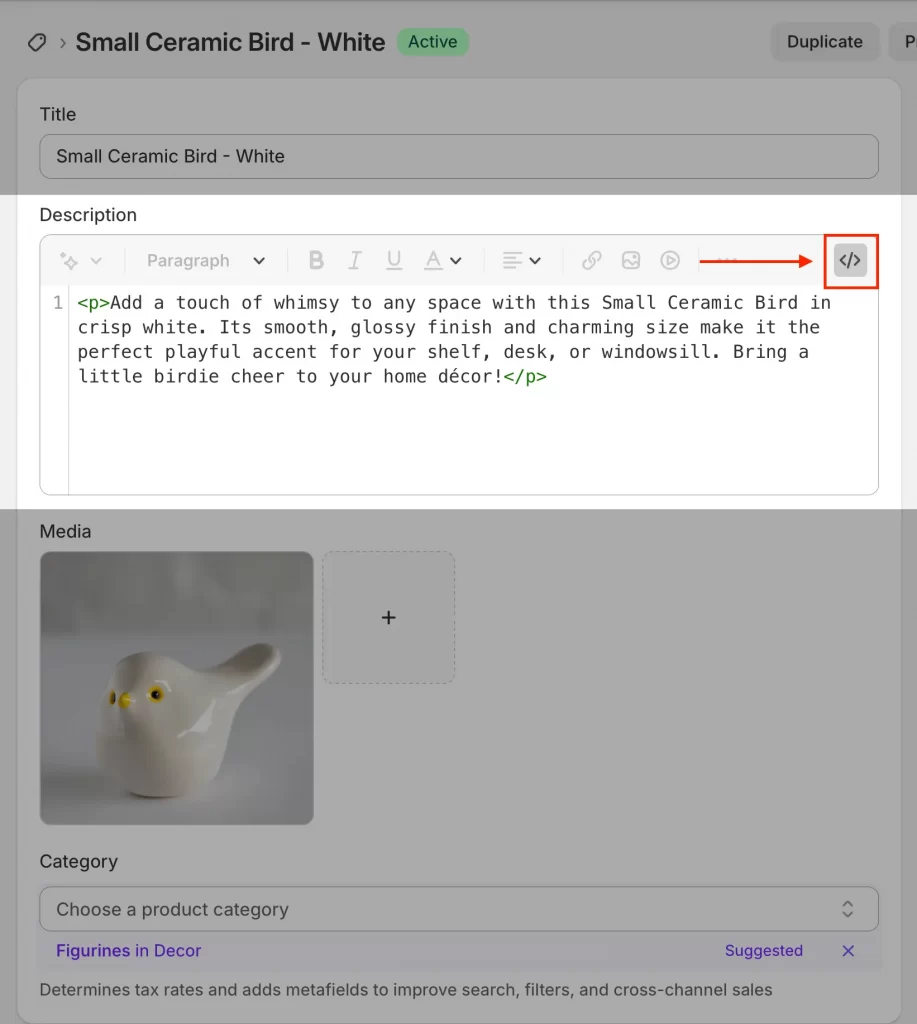
Suppose you want to style part of your product description with a green heading and a playful message. Your HTML might look like this:
<p><span style="color:green; font-size:18px;"><strong>Add a touch of whimsy to any space with this Small Ceramic Bird in crisp white.</strong></span> Its smooth, glossy finish and charming size make it the perfect playful accent for your shelf, desk, or windowsill. Bring a little birdie cheer to your home décor!</p>Then, let paste this into the description field for your product (as shown in your the image above), switch back to the regular view, and you’ll see your formatted text ready for customers.
This method is fast and low-risk. Remember to preview your page before publishing to ensure your HTML displays as expected.
Custom Elements You Can Add with HTML
Shopify is powerful, but it doesn’t offer every feature you might want. Adding custom HTML is your shortcut to creating a store that feels uniquely yours, without waiting for an app or a developer. Here’s how to add code to Shopify website for practical, business-boosting upgrades via HTML.
1. Embedding forms, reviews, or social feeds
Let’s say you want shoppers to sign up for your newsletter or send a message through a custom contact form. Sometimes, Shopify doesn’t offer these options, but most third-party services (like Mailchimp for forms, Judge.me for reviews, or SociableKIT for social feeds) give you a little piece of code, called an “embed code.”
For example, you may want to display your Instagram feed directly on your homepage. After signing up for a tool like SociableKIT, you’ll get code that looks something like this:
<!-- Instagram Feed Embed -->

<div id="instagram-feed"></div>

<script src="https://www.sociablekit.com/app/embed/12345"></script>
You can then paste this code into the section of your homepage where you want the feed to appear. You can do this in the Shopify theme editor (by adding a custom HTML section) or directly in your theme file for more control.
2. Adding tracking or verification Tags (e.g., Pinterest, Google Analytics)
If you want to track site visits or verify your store with a platform like Pinterest, you’ll be asked to “add a verification tag.” This is just a line or two of HTML.
Let’s say you want to run ads on Pinterest or get deeper analytics from Google, but you need to prove you own your store. Pinterest will give you a code like this:
<!-- Pinterest Verification -->

<meta name="p:domain_verify" content="YOUR_PINTEREST_CODE_HERE" />
You then open your theme.liquid file, find the <head> section, and paste this line inside. Save and you’re verified. And that’s how to add Pinterest HTML tag to Shopify.
3. Creating custom banners, buttons, or promotional sections
If you want to style elements your own way, you can add a custom class to your HTML and then use CSS in your theme to adjust the look.
For example, you’re running a weekend flash sale and want a banner on every collection page of your Shopify store. Here’s a simple banner example:
<!-- Custom Promo Banner -->

<div style="background:#f7f7f7; padding:20px; text-align:center; margin-bottom:30px;">

  <h2>Weekend Flash Sale! 20% Off Everything</h2>

  <a href="/collections/all" style="color: #fff; background: #333; padding: 10px 20px; border-radius: 4px; text-decoration: none;">Shop Now</a>

</div>
You can paste this at the top of your collection.liquid template, just above where your products are listed. Now every visitor sees your offer.
Hey! You don’t have to be a coder to use these examples. If you ever feel stuck or want more hands-on support, LitOS can handle the customizations for you, so you get results, not roadblocks.
Why and When to Add HTML to Shopify?
Adding custom HTML to Shopify isn’t just a technical exercise but a practical solution when the default options fall short. This is how store owners get beyond the basics and create a storefront that works for their business, not just the template.
Use cases for custom HTML (forms, widgets, tags, design adjustments)
Let’s get specific. Here’s where adding HTML makes a real difference:
- Embed a newsletter signup or custom contact form when built-in tools aren’t enough.
- Insert third-party widgets, such as review displays, social media feeds, or live chat tools; many of these services provide a simple HTML embed code.
- Add marketing and tracking tags for platforms such as Google Analytics, Pinterest, or Facebook to ensure your campaigns are accurately measured and verified.
- Adjust your design with custom banners, call-to-action buttons, or layout adjustments that your theme editor doesn’t offer.
These are everyday needs for growing stores, each addressed with a targeted snippet of HTML, rather than a full-site overhaul.
What to consider before making changes
Editing HTML is powerful, but it’s not a free-for-all. Before you start:
- Always back up your theme. Duplicating your theme before changes gives you an instant way back if something looks off.
- Know where your code is going. Pasting code in the wrong spot can cause issues, such as disappearing or displaying incorrectly. Take a moment to double-check the instructions.
- Test before you publish. Preview your changes on desktop and mobile—what looks good in one place can surprise you in another.
- Don’t overdo it. Add only what you need; less code means fewer things to maintain.
- Reach out if you’re unsure. You don’t have to figure it out alone. If a step feels risky, a Shopify expert (like the team at LitOS) can review your changes or handle it for you, so you stay focused on running your business, not fixing code.
Adding HTML to Shopify should give you more control, not more stress. Following these basics helps you get: custom features and a reliable, high-performing store.
Risks of Editing HTML in Shopify and How to Stay Safe
Making changes to your Shopify store’s code can be empowering, but even small mistakes can create headaches, from broken layouts to lost sales. The good news is that most risks are easily manageable with a few smart habits and a safety-first mindset.
Below is a quick-reference table showing common pitfalls and the practical steps you can take to avoid them:
| Common mistake or issue | How to stay safe |
| Accidentally breaking your store’s layout | Always duplicate your theme before making changes. This gives you a quick “undo.” |
| HTML or scripts not displaying correctly | Double-check where you paste your custom HTML Shopify code. Use preview mode before publishing changes. |
| Slow loading times | Limit how many external scripts or widgets you add. Remove unused code regularly. |
| Conflicts with apps or other scripts | Add one change at a time and test. If something stops working, you’ll know why. |
| Code only works on desktop, not mobile | Preview your store on both desktop and mobile. Adjust placement as needed. |
| Losing unsaved work or edits | Click “Save” often, and don’t close the editor mid-edit. |
If you’re unsure where to place code, your changes don’t appear as expected, or you’re facing persistent errors, don’t let small issues snowball into bigger problems. Getting a Shopify expert’s help early saves time, stress, and often money. The LitOS Shopify development team can review your changes, implement complex customizations, or quickly resolve errors, so you can focus on running your business with confidence.
How to Add HTML to Shopify: FAQs
How do I add HTML code to Shopify?
You can add HTML code to Shopify by using the rich text editor in product descriptions, pages, or blog posts (click the “” icon to switch to HTML view), or by editing your theme files for more advanced customizations. Always back up your theme before making changes to theme code.
Can I upload HTML to Shopify?
Shopify doesn’t let you upload standalone HTML files, but you can embed HTML code directly into your theme files, custom sections, or through the rich text editor in your admin. This allows you to add forms, widgets, or scripts exactly where you need them.
How do I get HTML on Shopify?
To get HTML on Shopify, open the relevant section (like a product page or theme file), switch to HTML view if using the editor, and paste your code. For more control, use the theme code editor to insert HTML into specific templates or sections.
How do I show the HTML button on Shopify?
In the Shopify rich text editor, you’ll see a “” or “Show HTML” icon. Click this icon to switch to HTML mode and edit or paste your HTML code directly into the content area. Save your changes to apply them.
Where is the HTML editor on Shopify?
The HTML editor is built into the rich text editor for products, pages, blog posts, and collections. Look for the “” or “Show HTML” button in the toolbar. For advanced edits, use the theme code editor under Online Store > Themes > Actions > Edit code.
Final Thoughts
Editing HTML in Shopify isn’t just about adding code, it’s about solving real problems, like embedding a newsletter signup form, adding a tracking tag, or fixing layout issues. Through this article you have learned how to add HTML to Shopify in many different ways, hope it is useful for you!
You don’t need to waste time on trial and error. Contact LitOS for fast, expert Shopify support, so you can focus on growing your business with confidence.