Complete Guide to Design Shopify Store Website
If you want your Shopify store to survive and thrive long-term, design isn’t just important, it’s mission-critical.
Yes, Shopify makes it easy to launch. But designing a store that’s visually unique, high-converting, and built to scale? That takes more than drag-and-drop. That’s why we’ve created this guide to walk you through everything you need to know to design Shopify store that performs:
- Planning Your Store Design
- Adding Products the Right Way
- Choosing a Responsive, Conversion-Ready Theme
- Designing the Homepage
- Designing the Product Page
- Optimizing the Checkout Page
- Publishing Your Store the Right Way
Let’s dive in, step by step.
Understand Your Customer Before You Build Your Shopify Store
You first need to understand your ideal customer. What are the demographics? What do you want your brand identity to look like? Is your competitor using game methods? What works well, and where can you differentiate?
Suppose that your ideal customer for a baby clothes store targets parents. Then:
- Demographics: Expecting or new parents (typically 25-45).
- Interests: Parents value safety, comfort, and style for their baby.
- Pain points: Focus on solving parents’ frustrations.
- Online behavior: These parents are likely active on social media, seek online reviews and recommendations, and love clear product information and a smooth online shopping experience.
Next, what do you want your store design to achieve? (Increase conversions, enhance brand perception, better mobile experience). If we apply the same assumption as mentioned earlier, we end up with the following result:
- Increase conversions: Simple navigation, clear product images, streamlined checkout, and prominent trust signals.
- Enhance brand perception: Visual style matches your brand (gentle, playful, etc.), emphasizes core values (quality, sustainability), and includes relatable customer photos.
- Better mobile experience: Responsive design, fast loading times, easy-to-use layout on phones.
- Support user needs: Informative descriptions, a clear ‘About Us’ page, an easy returns process, and consider gentle upselling options.
Then, you can choose a method to make your idea happen with two Shopify store design methods:
- Design manually if you’re confident on the journey on your own.
- Hire a Shopify agency like LitOS for advanced customization.
Now, let’s start your journey on Shopify store design.
Adding Products to Shopify Store
After signing up for your Shopify website, remember to import or add products to your store first, and then design everything else around your products, not the other way around. This is because, at the end of the day, it’s the products that you need to persuade your customers to add to their cart and check out.
After you add products to your Shopify store, it’s time to design your dream Shopify store. Here comes our complete guideline to design Shopify store!
Follow Shopify’s Guidelines for Adding New Products
First, let’s follow Shopify’s guidelines for adding new products. The fields of Shopify may include:
- Product title
- Description
- Price
- Inventory
- Variants (size, color, etc.)
- Vendor (if applicable)
- Images (use JPEG or PNG, include alt text)
An essential task that you should focus on is organizing your products and assigning them to relevant collections. Additionally, using tags for further filtering options will help categorize your product page and facilitate finding the most suitable design and functionality for that page.
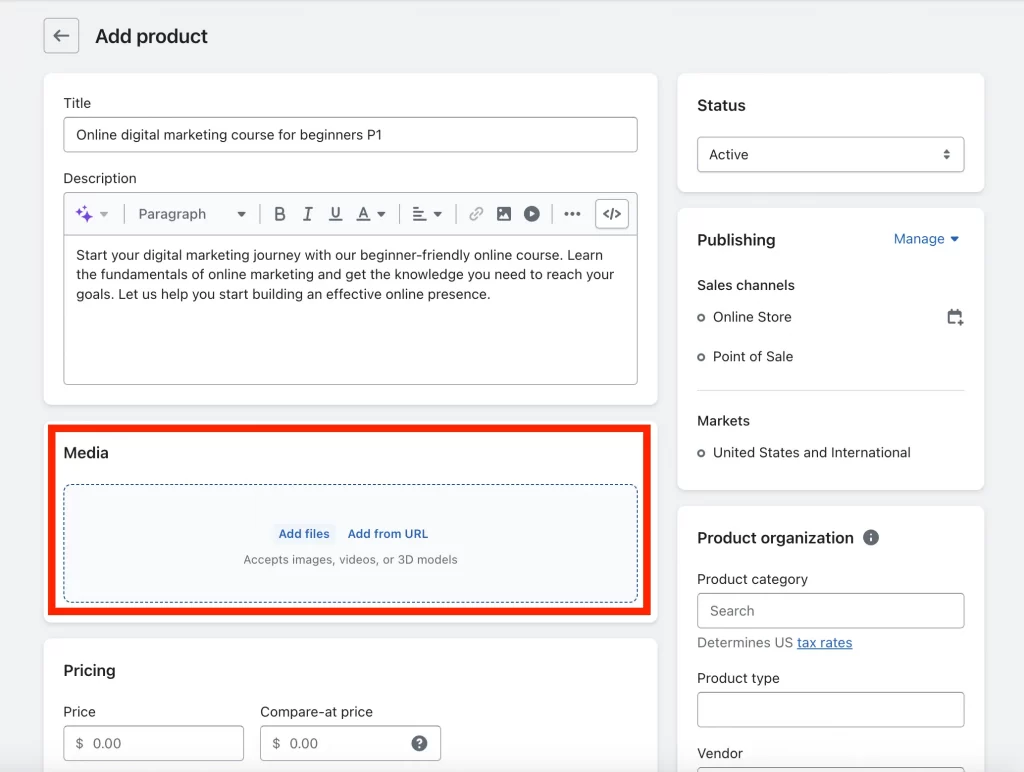
Step 2: Optimize Product Photography
Without high-quality product images, it’s challenging to build trust and convert potential customers. As these images are often the first interaction a shopper has with your product, it’s critical to maintain a consistent style in your product photography to ensure brand cohesion.
Here are some tips for you when optimizing your photography:
- Shopify recommends uploading images between 1024px and 2048px on the largest side.
- You can add alt text to each image in the product editor. This brief description helps with SEO and accessibility, as it tells search engines and screen readers what the image is about.
- While you can’t directly convert formats within Shopify, you can choose to upload JPEG images for photos with many colors and PNG images for graphics with transparent backgrounds.
Of the most important, you can arrange the order of your product images directly within the product editor. The first image is usually the main product image that appears on product listings and collections.
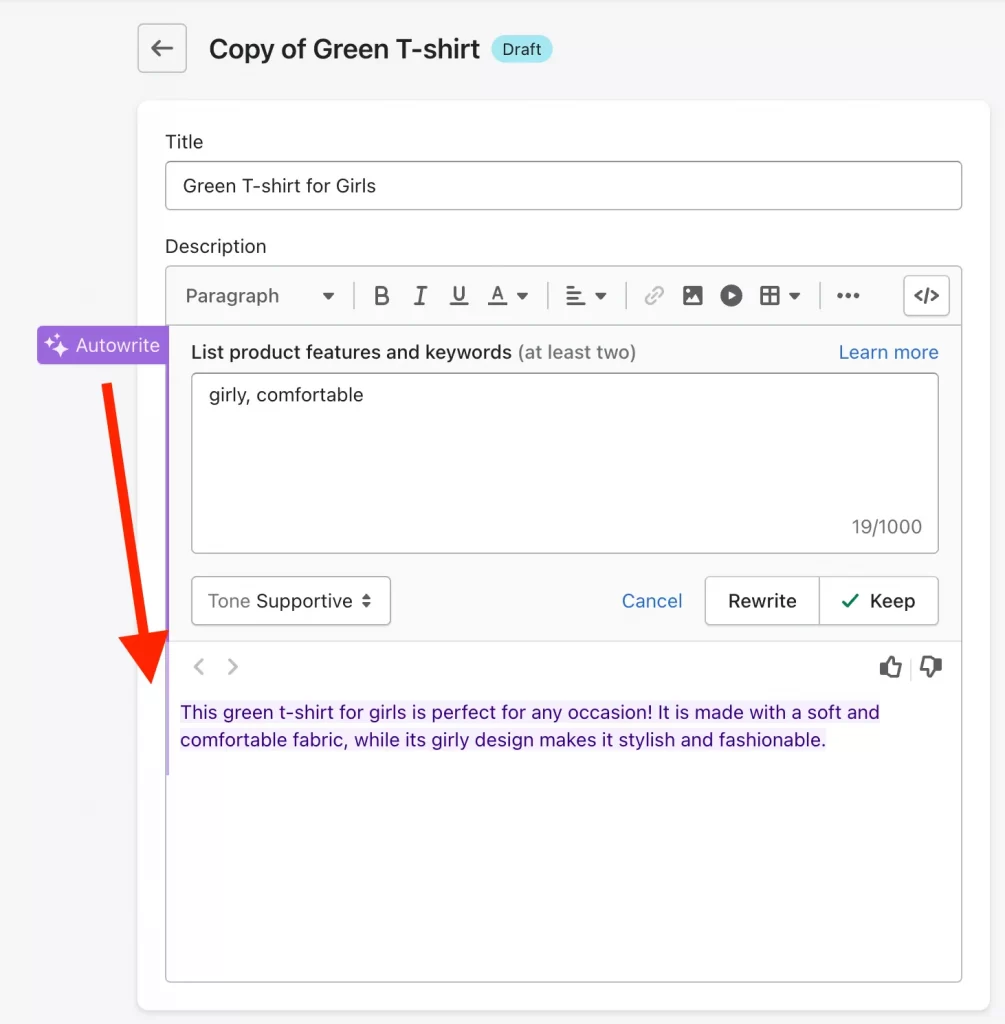
Step 3: Craft Compelling Descriptions
Product descriptions provide an opportunity to go beyond just listing the item’s features; instead, they can help shoppers imagine how the product will enhance their lives.
If you’re selling physical products, your focus should be on how the product solves a problem. Let’s
- Highlight quality materials (e.g., organic cotton, durable construction) that justify the price and appeal to specific preferences.
- Help customers picture themselves using the product in various scenarios.
- Where appropriate, use descriptive words such as smooth, vibrant, or crisp to engage the senses. You can also consider using Shopify Magic, an AI product generation tool from Shopify that can assist with creating compelling product descriptions.
The most crucial aspect of writing a product description is to highlight your unique selling points (USPs). What sets your product apart? Be sure to emphasize any special features, such as handmade or limited edition, that make your product stand out from the competition.
And you’re set! Let’s learn how to design a Shopify store with a good theme in the next section.
Choose the Shopify theme that suits your needs
If you don’t want to use the default Shopify theme, there are many sources where you can find one. We suggest choosing your theme from the Shopify Theme Store for the highest quality and support.
Why? Because every theme listed there has to meet Shopify’s strict standards. We’re talking responsiveness, customization options, performance, visual design, and overall reliability. In short, fewer headaches later.
Our 6-step process to find your ideal theme on the Shopify Theme Store:
Step 1: List the Customizations You Need
Before diving into theme options, get clear on your must-haves. This will save you from choosing a theme that doesn’t scale with your vision.
Ask yourself:
- Is this a single-product store or a full catalog operation?
- How do I want my products displayed?
- How much control do I need over layout and design?
- Are there any non-negotiable features (e.g., product filtering, upsell popups, mobile-first design)?
Getting these answers down now will make the rest of the process a whole lot smoother.
Step 2: Use Filters to Narrow Down Your Theme Options
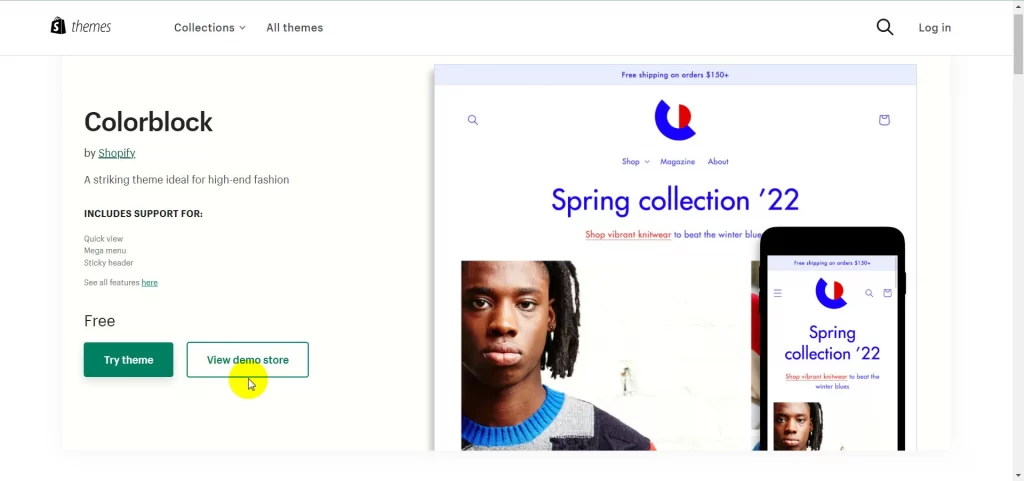
Once you’ve nailed down your product type and feature list, head over to the Shopify Theme Store and start filtering. Click ‘All themes’ in the header, and use the filters on the left-hand side. Themes are designed with specific industries and features in mind, so check every box that matches your needs.
Example: If you need built-in support for things like color swatches or a mega menu, make sure to tick those features in the filter. This will save you from having to custom-code them later.
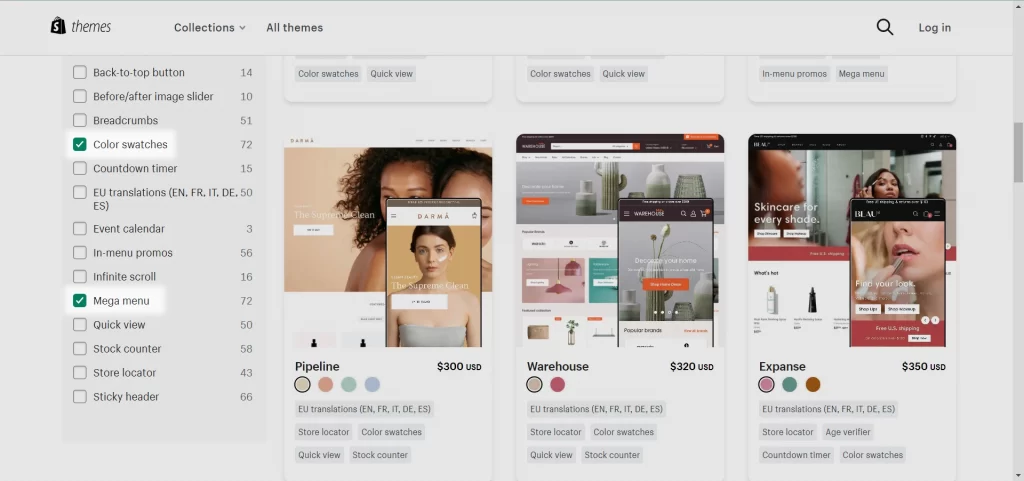
Pro Tips: If you’re new to Shopify, start with a free theme. It’ll help you get familiar with how sections and customization work before you commit to a paid option.
Step 3: Look for Real-World Feedback
Now that you’ve got a shortlist of potential themes, it’s time to validate them with real user feedback.
Head over to the Shopify Community forums and search for discussions related to your chosen themes. You’ll find honest insights from merchants who’ve used them in live stores; What works, what breaks, and what to watch out for.
You can also post your own questions. The community’s full of experienced store owners who can give you unfiltered opinions on design, performance, and support.
Step 4: Preview the Theme in Action
Never buy a theme blind. Click on any theme you’re considering, then hit ‘View demo store’.
This gives you a live preview of what the theme can actually do, from branding and layout to functionality and design flow. Pay close attention to how it handles product pages, navigation, mobile responsiveness, and visual hierarchy.
If the demo doesn’t match the look or user experience you’re aiming for, move on. What you see is pretty close to what you’ll get.
Step 5: Evaluate Theme Support
Support matters, especially as your store grows and things get more complex. Even the best themes can run into technical issues, so make sure the one you choose comes with responsive, high-quality support. Check the theme listing for support details and reviews that mention how helpful (or unhelpful) the developers are.
If support is slow or nonexistent, skip it. You don’t want to be stuck waiting days for a fix when your store is live and losing sales.
Step 6: Make the Call and Move Forward
Found a theme that checks most of your boxes? Pull the trigger. Don’t waste weeks chasing the “perfect” theme, it doesn’t exist. As your store grows, you’ll likely need customizations you can’t predict right now. What matters is choosing a solid, flexible starting point that gets you moving.
Now that you’ve locked in your theme, it’s time to design the three pages that matter most: Homepage, Product Detail Page, and Checkout Page.
Designing Homepage
Your homepage is your store’s first impression, and it needs to earn attention fast. It should guide visitors, highlight value, and push them toward action. Here’s how to build a homepage that actually converts:
Step 1: Define the Goal of Your Homepage
What’s the one thing you want visitors to do?
- Make a purchase?
- Sign up for your email list?
- Explore a specific product line?
Get clear on this goal upfront. Every design element, from the copy to the layout, should support that primary action.
Step 2: Use Clear, Simple Copy and Strong CTAs
Keep your headline copy short, bold, and focused on value. Let visitors know exactly what you offer and why it matters to them, fast.
Then back it up with strong CTAs like:
“Shop Now,” “Explore the Collection,” or “Get Started.”
Use contrasting colors, clean spacing, and position CTAs high on the page to grab clicks.
Step 3: Keep Navigation Minimal and Mobile-First
A lot of traffic coming from mobile, clean navigation is non-negotiable:
- Limit your main menu to 3–4 key links.
- Put the most important sections on the left, where thumbs naturally go.
- Avoid clutter. If everything’s a priority, nothing is.
Step 4: Highlight Your Best-Selling Products
Don’t make visitors dig. Feature your top-selling products front and center to instantly build trust and encourage conversions. If people are buying them, new visitors will want them too. Use clean product images, short descriptions, and make sure the “Add to Cart” or “View Product” buttons are instantly visible.
Designing Product Page
When a visitor lands on your product page, they’re seriously considering buying. Your job? Remove friction and push them over the edge by clearly communicating value, trust, and urgency.
Here’s how to do it right:
Step 1: Show the Value, Not Just the Features
Don’t just list product specs, sell the outcome:
- Focus on benefits: What’s in it for the customer? Example: “Protects against UV damage. Keeps skin moisturized for 24 hours.”
- Use persuasive, scannable product descriptions.
- Highlight promotions: Try different discount types (percentage, bundle, free shipping) to see what drives conversions.
Make the customer feel like they’re getting something worth more than the price tag.
Step 2: Build Instant Trust
People don’t buy from stores they don’t trust. Here’s how to win them over:
- High-quality photos: Use a clean, solid background for the main image. Show multiple angles, textures, and close-ups.
- Add a product video: Especially for younger audiences, 85% of millennials say video influenced their purchase.
- Display return & shipping policies clearly: A money-back guarantee or free shipping badge can reduce buying hesitation fast.
To go even further:
- Embed real customer reviews, social proof drives conversions.
- Add a live social feed or customer photos, let visitors see your products being used in the wild.
Step 3: Create Urgency
Urgency pushes buyers to act now instead of later. If you’re running a promo, make it feel time-sensitive:
- Add countdown timers next to the offer. Example: “Buy $100, Get 10% Off – Offer ends in 02:13:45”
- Highlight limited stock or limited-time deals.
- Use urgency-focused CTAs like “Claim Your Offer Now” or “Only 3 Left!”
Designing Checkout Page
Shopify’s default checkout is locked down in terms of customization, and that’s intentional. It’s secure, optimized, and built to reduce friction. But even with limited design control, there are still ways to improve conversions and reflect your brand.
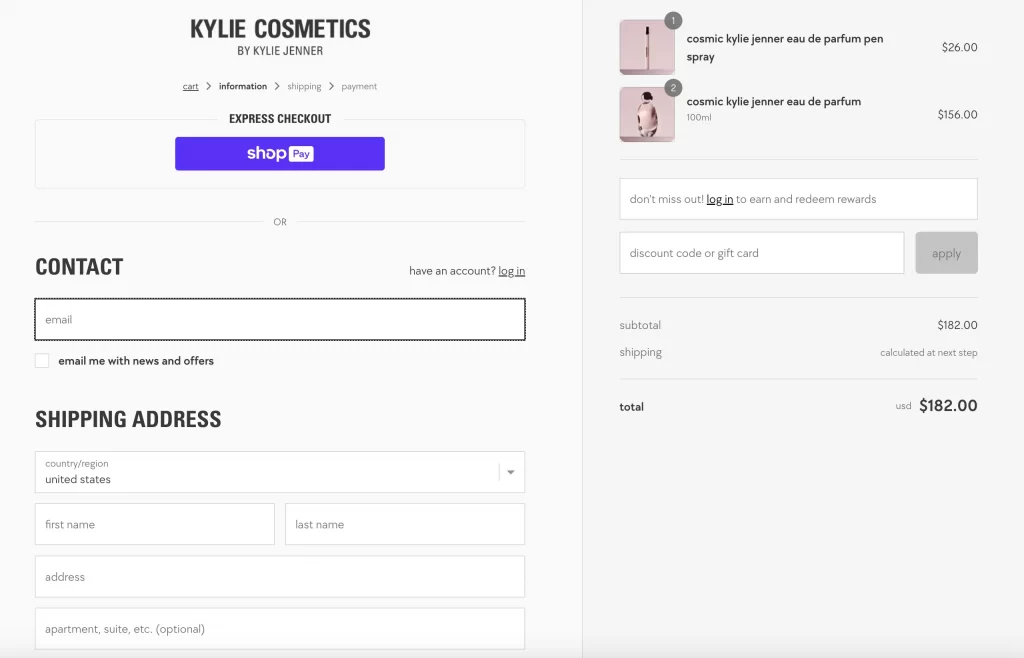
How to Optimize Your Shopify Checkout:
- Enable Guest Checkout: Don’t force account creation, it kills conversions.
- Offer Multiple Payment Options: Make it easy. Support major credit cards, PayPal, Apple Pay, Google Pay, etc.
- Use Shopify Payments (if eligible): Faster checkout, fewer abandoned carts, and lower transaction fees, win-win.
Add Light Branding to the Checkout Page:
While customization is minimal, you can still make your checkout feel like part of your store:
- Upload your logo for consistency.
- Match your brand colors to the button and accent elements.
- Use the same font as your main site to maintain a cohesive look.
That’s it! Clean, functional, on-brand.
Publishing Your Shopify Store
Before you hit “go live,” run a full QA sweep. Small issues kill trust, and trust kills sales.
Functionality Checklist:
- Place a test order from start to finish.
- Verify product links, collections, and buttons all work.
- Double-check shipping rates, discount codes, and payment gateways.
Design & Usability Checklist:
- Test your store on mobile, tablet, and desktop.
- Preview in multiple browsers to catch layout bugs.
- Proofread everything, typos scream unprofessional.
- Ask a few people to navigate your store and give blunt feedback.
Once everything’s working, polished, and feedback-checked, it’s go time.
Launch your store, and start selling.
Designing Your Shopify Store with LitOS
So, customizing Shopify themes is easy? Not really.
Everything we covered earlier lays the groundwork. But if you want a store that stands out, sells more, and builds trust from the first click, you’ll need more than just the basics.
That’s where LitOS comes in, your go-to Shopify design agency.
Why Choose LitOS to Design Shopify Store?
Here’s why brands choose LitOS when it’s time to get serious about their Shopify presence:
Certified Shopify Experts
We’re not just experienced, we’re certified pros trusted by thousands of Shopify merchants. From conversion-focused layouts to speed-optimized builds, LitOS delivers stores that perform.
Tailored, On-Brand Design
You get custom design that matches your brand, supports your goals, and actually converts. Whether it’s a seasonal promo or full store overhaul, we build what you envision, only better.
Fast, No-Nonsense Launches
We know Shopify inside out. That means no delays, no learning curves, just quick, professional rollouts. Theme setup? App integrations? Done.
24/7 Store Monitoring
Your store’s never left unattended. We provide round-the-clock maintenance and proactive support so you can focus on running your business, not fixing bugs.
Post-Launch Support That Sticks
We don’t vanish after launch. You get ongoing help from a real team who knows your store. Got an issue? We’re already on it, free of charge.
Premium Quality Without the Agency Price Tag
We deliver agency-level work at rates that make sense for startups, solo founders, and scaling brands. No bloated budgets, no surprise fees, just clear, fair pricing.
What Does LitOS’ Design Shopify Store Service Cover?
Here’s what LitOS handles for you, end to end:
- Connect your Shopify store to a custom domain
- Select and fully customize your theme (homepage, product pages, checkout, more)
- Add products, create collections, and strategically feature them across your site
- Set up payment gateways (Shopify Payments, PayPal, Stripe, etc., based on your location)
- Configure shipping rules based on product weight and destination
- Install and set up key apps (reviews, upsells, email capture, marketing, analytics, etc.)
Why Designing Your Shopify Store Actually Matters
“If you fail to prepare, you prepare to fail.” Yeah, it’s a cliché, but in eCommerce, it’s the brutal truth. If your Shopify store looks sloppy or doesn’t guide users clearly, they’ll bounce. No brand loyalty. No sales. No second chances.
Here’s why investing in solid Shopify design isn’t optional, it’s essential:
Build a Strong, Memorable Brand
A well-designed store builds a consistent brand identity, your competitive edge in crowded markets. According to Investopedia, strong branding helps you:
- Attract more organic traffic
- Charge more for the same products
- Retain more loyal customers
In short: good design = long-term leverage.
Guide Users with Clear Navigation
Only 9% of users stay on a site if they can’t find what they’re looking for quickly. Good design ensures your navigation is intuitive, making it easier for visitors to browse, explore, and eventually buy.
Deliver a Seamless User Experience
Ugly, clunky, or confusing sites don’t convert. 38% of users will bounce immediately if your design is poor.
Good design keeps users engaged and moving through your funnel, not hitting the back button.
Boost Ad & Campaign Performance
Your ads are only as good as the page they land on. Clean, compelling design means better first impressions, higher engagement, and improved conversion rates on every campaign.
Drive More Sales
It’s simple: The better your store looks and functions, the easier it is for people to buy. When users enjoy browsing your site, they explore more products, and you close more sales.
Design Shopify store isn’t decoration. It’s strategy. If you want a store that attracts, engages, and converts, design it like you mean it.
Design Shopify Store: FAQs
1. Do I need a developer to design my Shopify store?
Not necessarily. Shopify’s built-in tools let you launch a basic store on your own. But if you want a custom, high-converting store that reflects your brand and scales with your business, working with an expert or agency like LitOS can save you time, money, and headaches.
2. What’s the difference between customizing a theme and designing a store?
Customizing a theme means tweaking fonts, colors, and layout using pre-built options. Designing a store involves strategic layout planning, UX design, conversion optimization, and performance tuning. It’s the difference between looking “okay” and selling like a pro.
3. How do I know which Shopify theme is right for me?
It depends on your product type, industry, and feature needs. Use the Shopify Theme Store filters, test demos, read reviews, and consider your future customization goals. We also break down a 6-step process for picking the right theme in our guide.
4. Can I redesign my Shopify store after it’s live?
Yes, and you should. Store design is never "set and forget." As your brand grows, products evolve, and customer behavior shifts, ongoing design updates help you stay relevant and competitive.
5. How long does it take to design a Shopify store with LitOS?
It varies based on complexity, but we move fast. For most stores, our end-to-end design process, from planning to launch, can be completed in a few weeks. We’ll give you a custom timeline upfront, with zero fluff and full transparency.
Ready to Build a Shopify Store That Actually Performs?
If you’re serious about scaling your Shopify store, design Shopify store isn’t optional, it’s foundational. Sure, customizing a theme is easy. But building a high-converting, on-brand, and future-ready Shopify store? That takes strategy, skill, and real experience.
That’s where LitOS comes in. We help ambitious brands unlock the full power of Shopify, with clean code, conversion-driven design, and scalable solutions that grow with your business.
Whether you’re just launching or ready to level up, LitOS has your back.
