
How to Set Up Shopify Payments: 2025 Complete Guide
Learning how to set up Shopify Payments is one of the first steps to getting your Shopify store ready for real sales. This built-in payment solution enables you to accept credit cards, Shop Pay, Apple Pay, and more, all without requiring third-party gateways.
In this guide, we’ll walk you through the full setup process, from choosing your store currency to verifying your account and testing your checkout. We’ll also cover fees, requirements, and common issues to watch for.
Let’s get started.
What to Know Before You Set Up Shopify Payments
What is Shopify Payments?
Shopify Payments is the built-in method for accepting payments directly through your Shopify store. It supports major credit and debit cards, Shop Pay, Apple Pay, Google Pay, and local payment methods, all without requiring a third-party gateway connection.
Instead of managing multiple tools, you can:
- Accept payments right away
- Handle refunds, chargebacks, and payouts inside your Shopify admin
- Offer faster checkout experiences with Shop Pay and mobile wallets
But how does it compare to third-party gateways?
Unlike PayPal or Stripe, Shopify Payments doesn’t add extra transaction fees (on top of credit card rates), which saves you money on every sale. Plus, your customers stay on your site during checkout, which helps build trust and improve conversions.
Eligibility requirements for Shopify Payments
Before you can use Shopify Payments, your store needs to meet a few basic requirements:
1. Your business must be based in a supported country
Shopify Payments is only available in select countries. This includes the United States, Canada, the United Kingdom, Australia, New Zealand, Japan, Singapore, Ireland, Germany, and a growing list of others. If your region isn’t supported, you’ll need to use a third-party provider, such as PayPal or Stripe.
2. Your products must comply with Shopify’s policies
Certain industries (like CBD, adult products, or weapons) are restricted. You should review the Shopify Payments Acceptable Use Policy before launching.
3. Your business and banking details must be accurate
This includes your legal name, business address, and bank account info. If your details don’t match official records, your payouts may be delayed.
4. Two-step authentication is required
You must enable two-factor authentication on your Shopify account for added security.
You can still use Shopify Payments as a sole proprietor, and you don’t need to register a company. But the information you submit must be valid and verifiable.
Pricing, fees, and cost considerations
Shopify Payments is free to activate and built directly into your Shopify dashboard. You only pay standard card processing fees when a customer checks out. These fees vary depending on your plan, card type, and whether you use Shopify Payments as your primary gateway.
Here’s a simplified look:
| Plan | Online card rate | Third-party fee (if not using Shopify Payments) |
| Basic ($39/month) | 2.9% + 30¢ | 2% |
| Grow (105/month) | 2.7% + 30¢ | 1% |
| Advanced ($399/month) | 2.5% + 30¢ | 0.6% |
| Plus (from $2,300/month) | Most competitive rates | 0.2% |
You should also keep in mind:
- Using Shopify Payments = no extra transaction fees from Shopify
- Additional fees apply for international, premium, or converted currency payments
- You’ll also see chargeback fees if disputes occur (usually $15-$20)
Before choosing a payment gateway, review Shopify transaction fees to understand how each method affects your margins.
How to Set Up Shopify Payments
Setting up Shopify Payments is simple, but there are a few important steps that can affect your payouts, taxes, and verification.
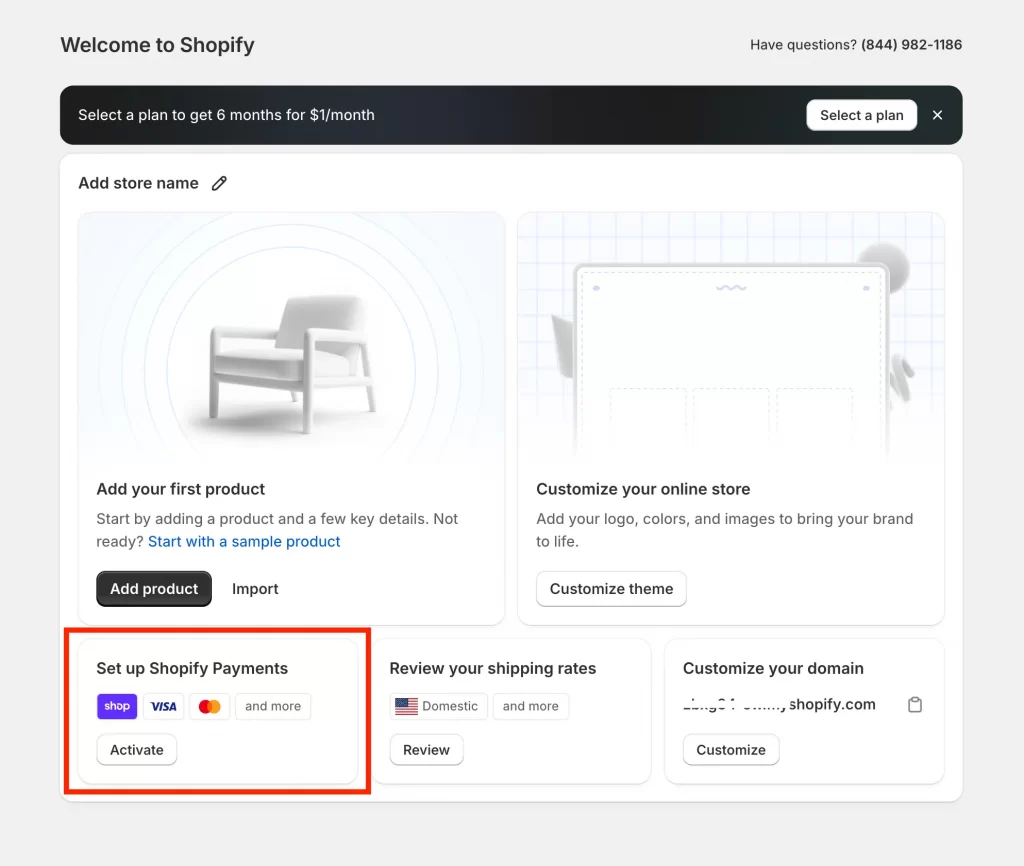
For new Shopify stores: If you just signed up, you’ll see a “Set up Shopify Payments” button right on your home dashboard. You can click Activate there to jump straight into setup, and there’s no need to dig through your admin yet.
For everyone else, here’s exactly how to set up payments on Shopify the first time:
Step 1. Choose your store currency
Before activating Shopify Payments, you need to set your store currency. This determines how product prices appear to customers and can impact the payout process depending on your business location.
If you’re located in the United States, Shopify will default your store currency to USD, and your store will use English (US). Since the U.S. is a supported region, you can activate Shopify Payments right away.
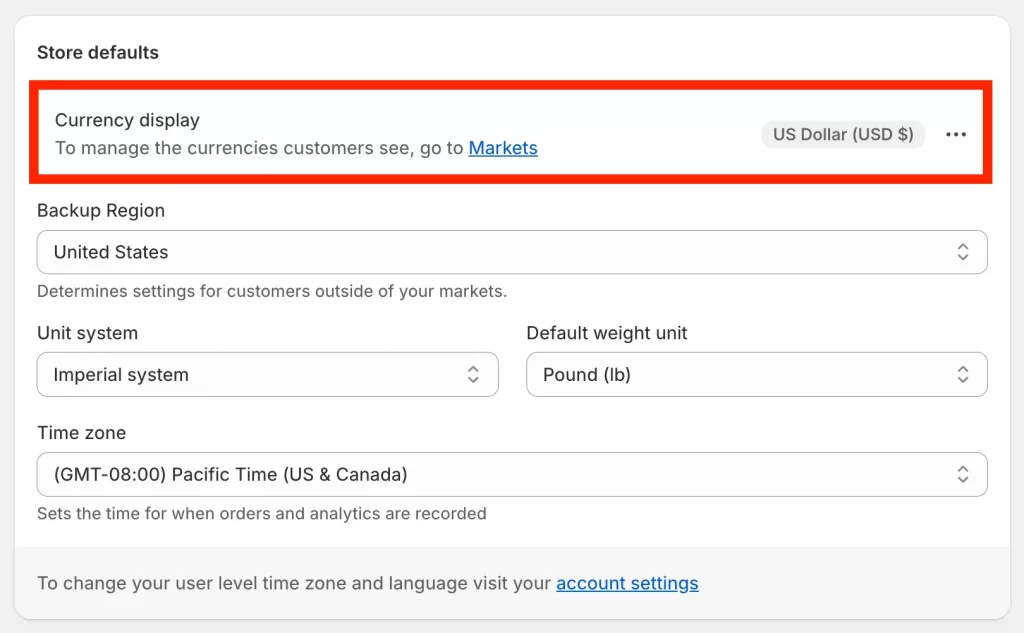
To verify or change your store currency:
- Go to Settings > Store details
- Scroll to Store currency and click the ••• menu next to it.
- Select Change store currency
- Choose your currency and save.
Important note: Once you make your first sale, you’ll need Shopify Support to change your store currency.
Additionally, your payout currency is based on your store’s country, not your chosen store currency. So if your store is located in the US, your payouts will be in USD, even if you choose another store currency like CAD or EUR.
Step 2. Activate Shopify Payments
Once your store currency is set, it’s time to activate Shopify Payments. If you’re a new user, you can do this directly from the Home dashboard. Look for the “Set up Shopify Payments” box and click Activate. Otherwise, go to:
Settings > Payments (1) in your Shopify admin panel.
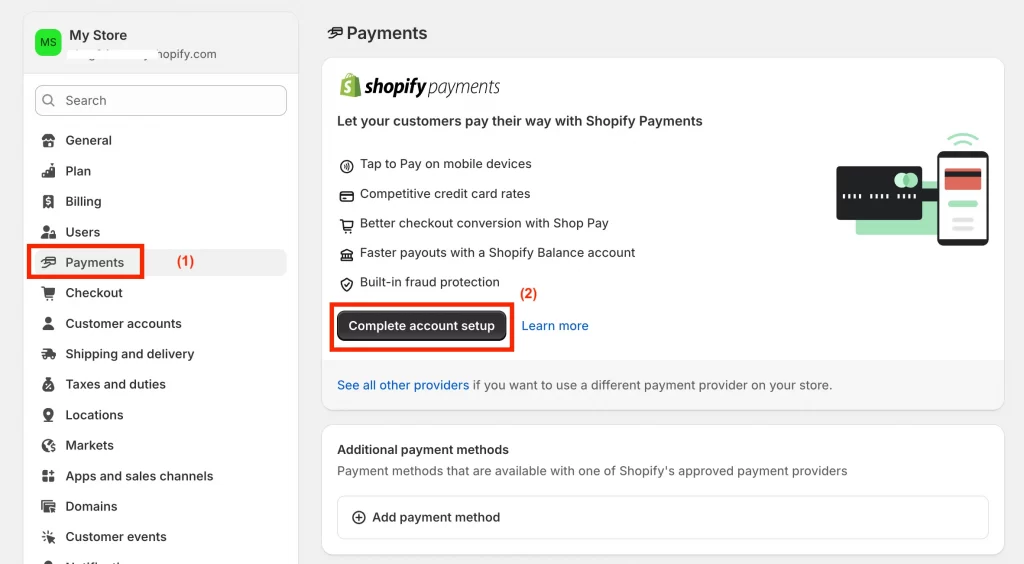
You’ll see a “Complete account setup” (2) section with two key actions:
- Submit information about your business
- Turn on two-step authentication

Step 3: Submit business details
You’ll now be asked to complete the account setup process. This ensures you meet legal verification and tax compliance requirements.
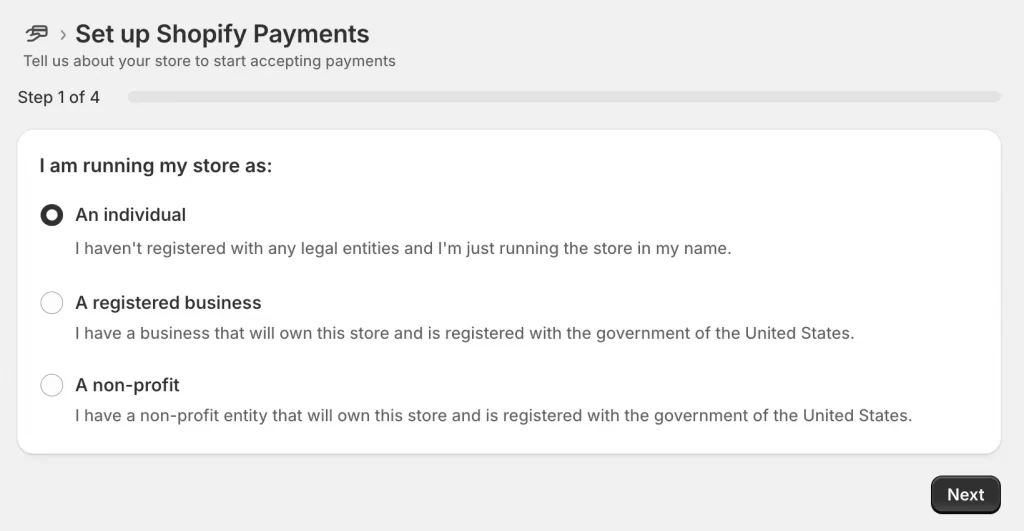
Step 3.1. Business information
- Click Submit details
- Choose your business type:
- An individual (no legal registration)
- A registered business
- A non-profit
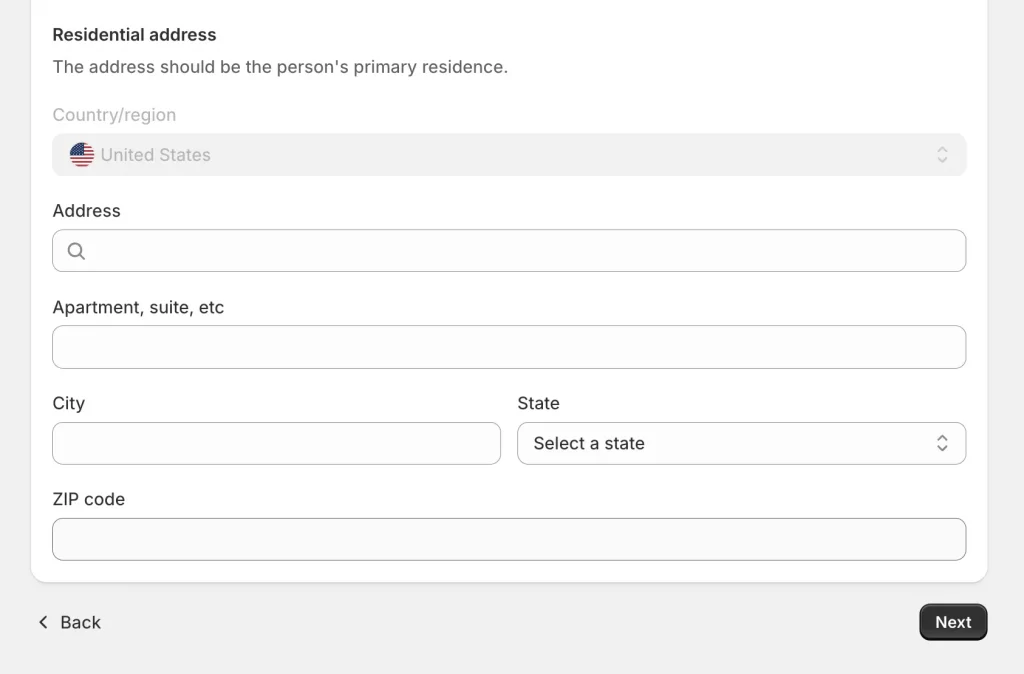
Step 3.2. Account representative info
So, as I select ‘An individual’, I’ll need to fill in:
- First + Last name
- Date of birth
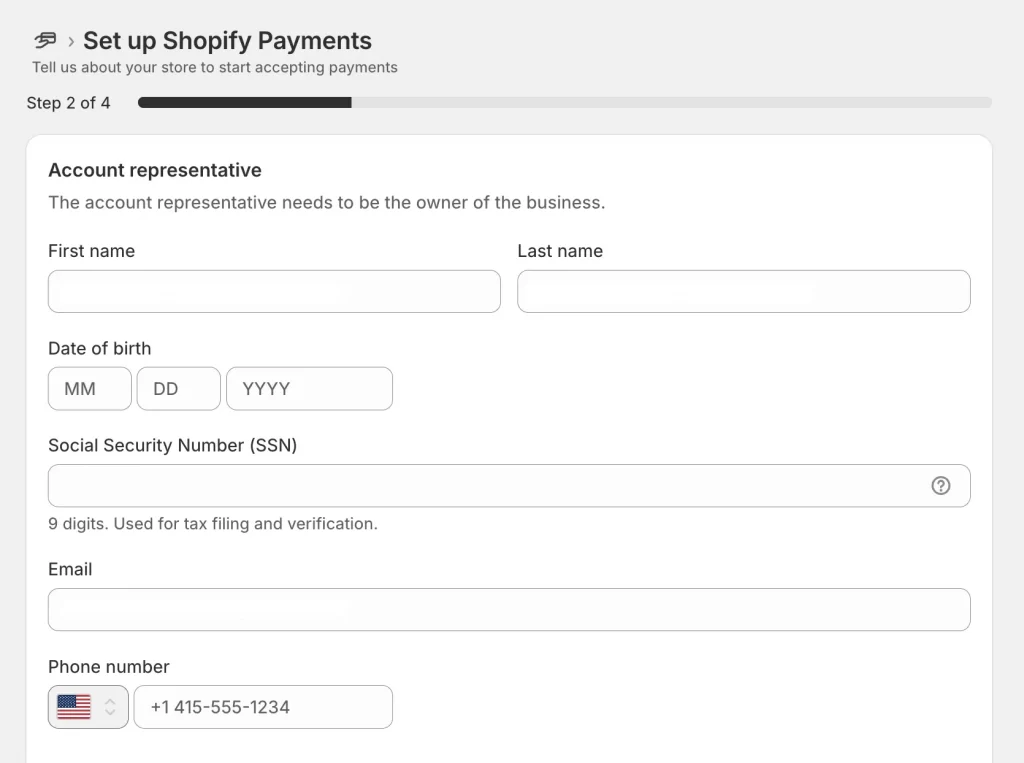
- SSN (required for U.S. tax reporting)
- Email + U.S. phone number
- Residential address
Step 4: Enter store industry & description
Now, Shopify needs to understand what your store sells.
- Industry type: Choose a category and sub-category (e.g., Clothing and Accessories → Apparel)
- Description: Use first-person, full sentences. For example, I sell affordable everyday clothing for men, women, and kids, including t-shirts, jeans, outerwear, and seasonal basics.
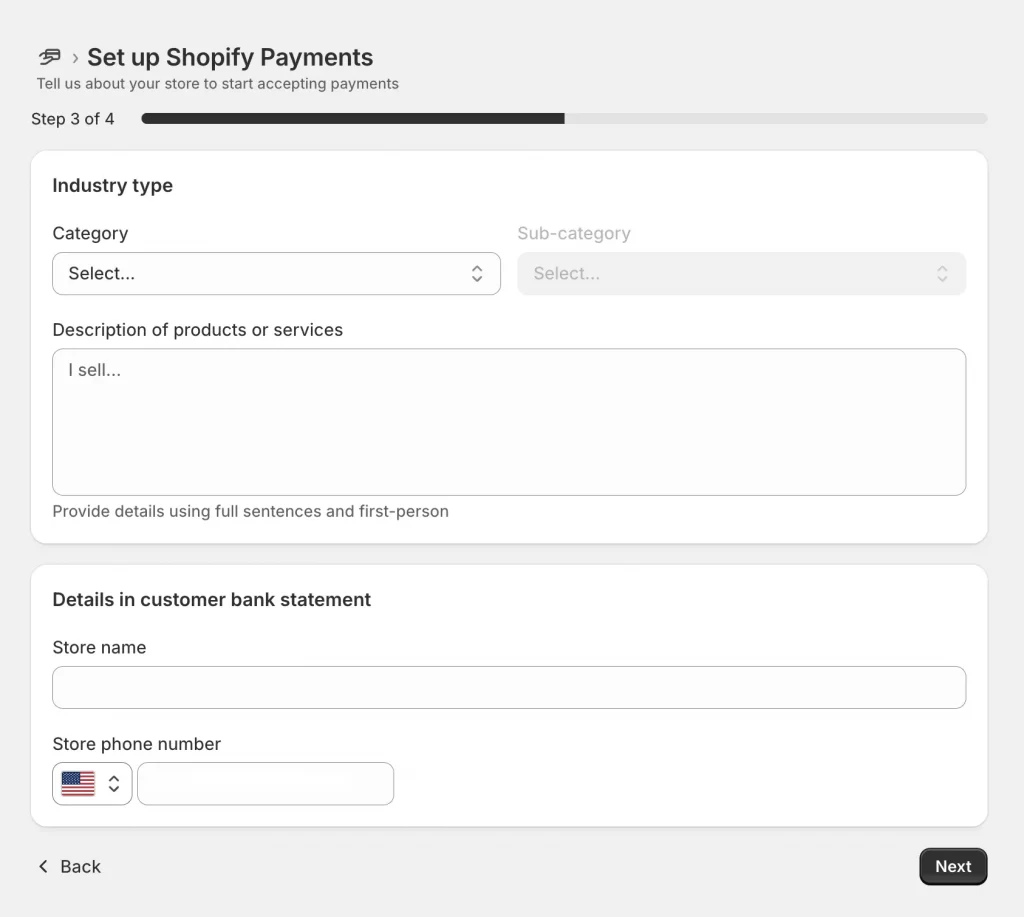
- Customer bank statement info:
- Store name (what appears on customer bank statements)
- Store phone number
Step 5: Review & upload verification documents
You’ll be taken to a final review screen.
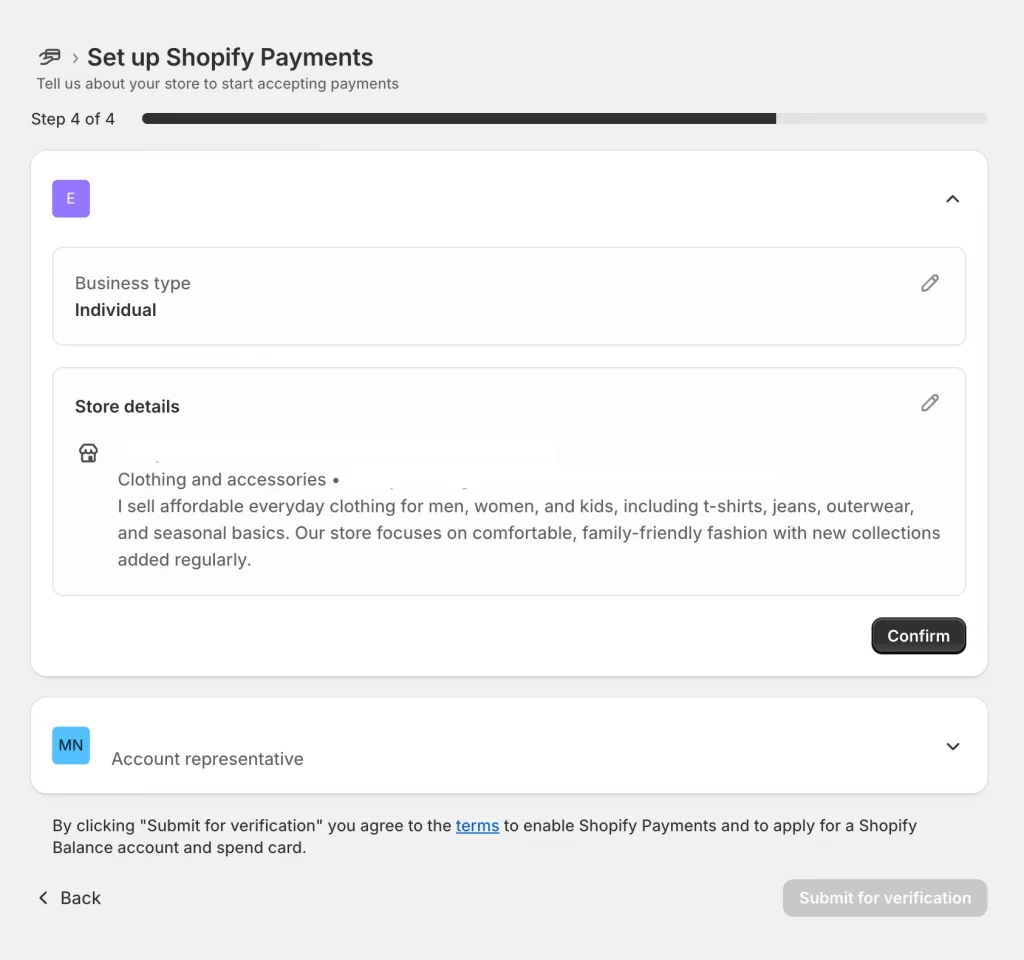
Depending on your business type, you may be asked to upload:
- Proof of residential address (utility bill, lease, etc.)
- A valid government-issued ID (passport, license, etc.)
Make sure all information is accurate, then click Confirm.
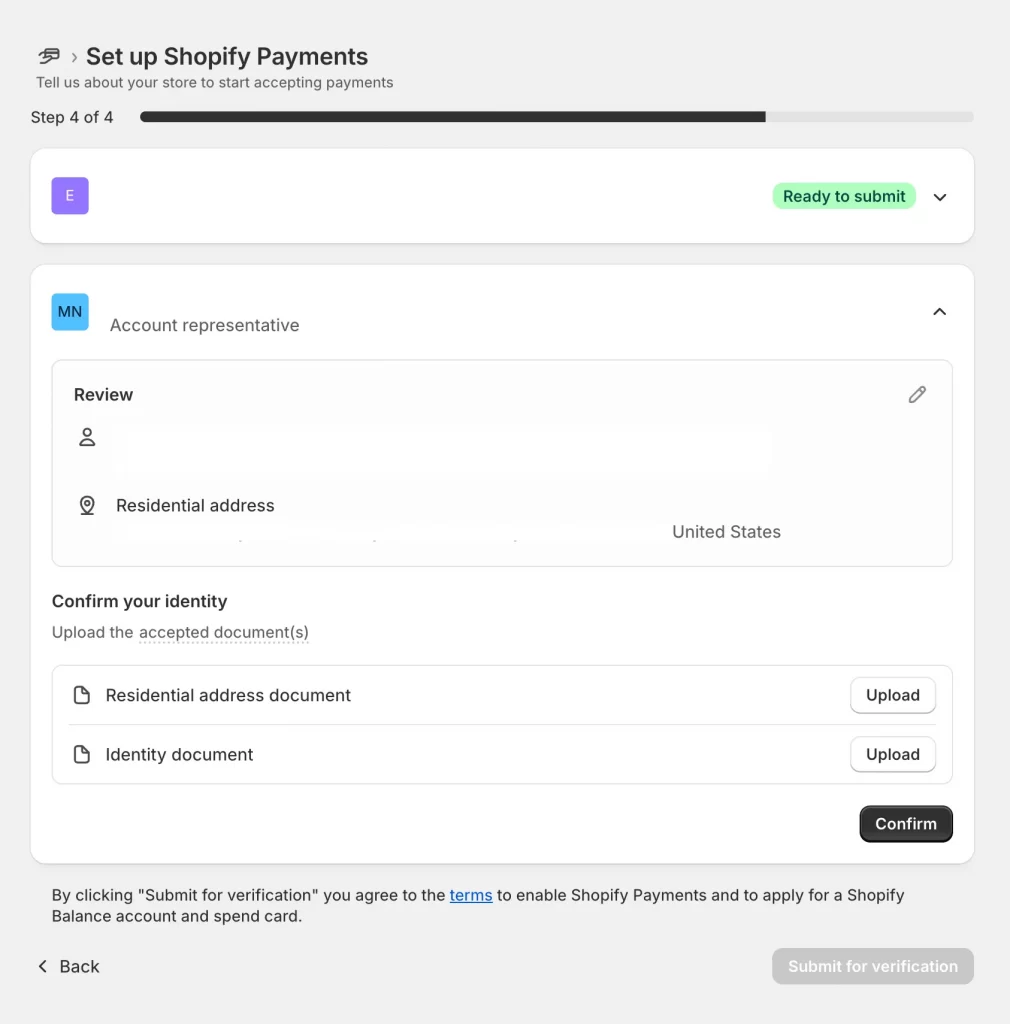
Once everything is ready, click Submit for verification.
Step 6. Wait for account verification
After you submit your details and documents, Shopify will review your application. This typically takes up to 3 business days.
Once approved, you’ll receive a confirmation in your Shopify admin. If any information is unclear or documents are missing, Shopify will notify you and request updates.
Once your account is verified:
- Shopify Payments will be activated automatically
- Your store will display all major payment options at checkout, including:
- Credit and debit cards
- Shop Pay
- Shop Pay Installments
- Apple Pay and Google Pay (if supported by the device/browser)
U.S. stores get instant access to Shop Pay features, making checkout faster and more trusted for your customers.
Additionally, if you want to expand your checkout options, you can learn how to add Apple Pay to Shopify to give customers a faster, one-tap mobile payment experience.
In contrast, adding Afterpay to your Shopify store focuses on flexibility by letting customers split purchases into interest-free installments. This makes Apple Pay ideal for speed-driven mobile shoppers, while Afterpay appeals to customers who prefer budget-friendly payment plans.
How to Test Your Shopify Checkout Before Going Live
Before launching your store, it’s important to test the entire checkout flow to ensure everything works smoothly. Shopify gives you two main ways to simulate payments:
Option 1: Shopify Payments test mode (recommended)
Use this if you’re based in a country where Shopify Payments is available (like the U.S.):
- Go to Settings > Payments > Manage under Shopify Payments
- Enable Test mode
- Use one of the following test card numbers:
- Visa: 4242 4242 4242 4242
- Mastercard: 5555 5555 5555 4444
- Enter any valid future expiry date and a 3-digit CVV
- Complete a test order as a customer
This allows you to simulate both successful and failed transactions without charging real cards.
Option 2: Shopify Bogus Gateway (alternative)
If Shopify Payments test mode isn’t available (e.g., in France), you can use Shopify’s Bogus Gateway:
- In the Payments section, choose “Third-party providers” and search for Bogus Gateway
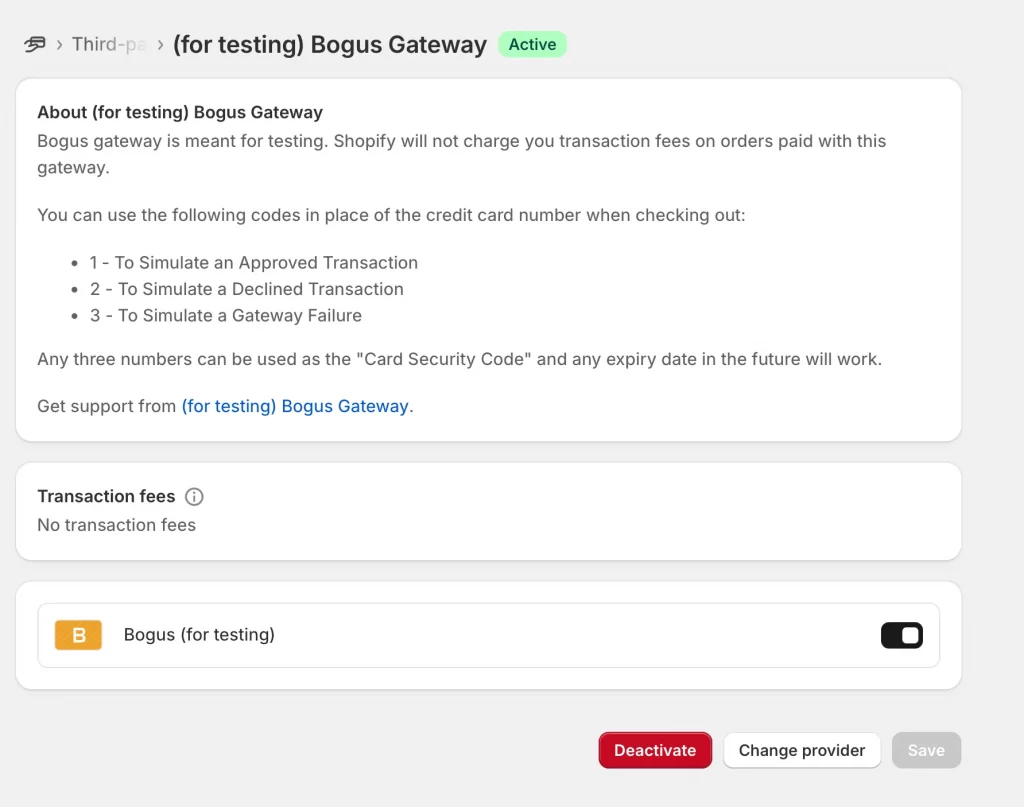
- At checkout, use these test values:
- Cardholder name: Bogus Gateway
- Card number:
- 1 = successful transaction
- 2 = declined transaction
- 3 = gateway error
- Any CVV and future expiry date
But don’t forget to disable test mode. After testing, return to Settings > Payments and disable test mode to begin accepting real payments from customers.
How to Configure Your Payout Schedule in Shopify Payments
Shopify Payments gives you control over how often you get paid like daily, weekly, or monthly depending on your cash flow and bookkeeping preferences. While your payout currency is fixed based on your store’s country (USD for U.S.-based stores), you can still customize the payout frequency.
Step 1. Open Shopify Payments settings
- From your Shopify admin, go to Settings > Payments
- In the Shopify Payments section, click Manage (right side of the screen)
- This will take you to the Shopify Payments settings page, where you can adjust payout timing, view payment history, and manage banking info
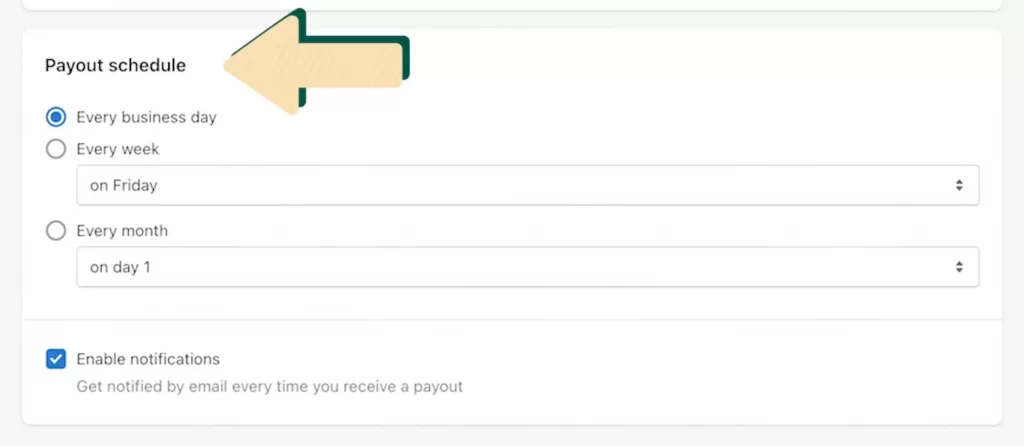
Step 2. Set your payout frequency
- Scroll down to the Payout schedule section
- Choose the frequency that works for your business:
- Daily: payouts are sent every business day (ideal for faster cash flow)
- Weekly: choose a specific day of the week (e.g., every Monday or Friday)
- Monthly: choose a specific calendar date (e.g., 1st or 15th of each month)
- Click Save to apply the changes
Note: Payouts are only sent on business days. Your first payout may take 3-7 days as Shopify verifies your account. After that, payouts are made according to your chosen schedule. Your bank may require an additional 1-3 business days to process the deposit.
Step 3. Enable payout email notifications
To get alerts when a payout is sent:
- In the same Manage view, scroll to Notifications
- Check “Enable notifications”
- Save your changes
This helps you stay updated without needing to check your dashboard daily.
Troubleshooting Shopify Payments Setup and Common Issues
Even if you follow every step in how to set up Shopify Payments, things don’t always go as planned. From verification delays to missing payment options, here are six of the most common Shopify Payments issues and how to handle them before they stall your store launch.
| Issue | What’s going on | What to do |
| 1. Identity verification delays | Your submitted info doesn’t match official records, or more documentation is needed. | Wait up to 3 business days; check your admin for document requests or contact support. |
| 2. Business type not accepted | Your products fall under Shopify’s restricted categories (e.g. CBD, adult, weapons). | Use a third-party payment gateway instead (like Authorize.net or PayPal). |
| 3. Payout not showing up | It’s a weekend, bank holiday, or your payout schedule is set to weekly/monthly. | Check payout schedule in admin and wait 1-3 business days for your bank to process deposits. |
| 4. Payment methods not showing | Shopify Payments isn’t activated properly, or theme/app conflicts are hiding options. | Recheck activation status, use private browser, or disable custom checkout scripts temporarily. |
| 5. Switching providers | You’re moving from a third-party gateway to Shopify Payments. | Deactivate the old provider, don’t delete it, so refunds for past orders still work. |
| 6. Setup stuck in review | Shopify needs more time or you missed a step in the setup process. | Look for banners or alerts in the admin; if nothing updates in 3 days or more, contact Shopify Support. |
Need help fixing setup issues?
At LitOS, we’ve helped merchants resolve everything from blocked payouts to confusing setup errors, especially during migrations or new store builds. If something isn’t working, we can step in, diagnose the issue, and get your payment system working smoothly.
How to Set Up Shopify Payments: FAQs
What is required for Shopify Payments?
You’ll need to provide your business type and legal name, a bank account in the same country as your store, government ID or tax identification number (EIN, SSN, etc.) and two-step authentication enabled on your account. In some countries, you'll also be asked for a VAT number or additional verification documents.
How to set up a payment method for Shopify?
Go to Settings > Payments in your Shopify admin. From there, you can activate Shopify Payments (Shopify’s built-in option) or choose a third-party provider like PayPal, Stripe, or manual payment methods. Most merchants start with Shopify Payments because it's the easiest to set up and has no extra transaction fees.
Can I use Shopify Payments and PayPal at the same time?
Yes and it’s actually recommended. You can use Shopify Payments for credit/debit cards, Shop Pay, and wallets, and offer PayPal as an extra checkout option. Many customers prefer PayPal, so having both improves conversion without adding extra transaction fees (as long as Shopify Payments is your primary processor).
Are there transaction fees with Shopify Payments?
No, Shopify doesn’t charge extra transaction fees when you use Shopify Payments. You only pay credit card processing fees, which vary by plan (e.g., 2.9% + 30¢ on Basic). If you use a third-party gateway instead, Shopify will charge an additional transaction fee, up to 2%, depending on your plan.
Can I set up Shopify Payments if I’m under 18?
No, you must be the legal age of majority in your country to activate Shopify Payments. If you’re under 18, you’ll need to set up your store using a parent or guardian’s name and banking info. Trying to bypass age verification can lead to account suspension or withheld payouts.
Is Shopify Payments available in my country?
Shopify Payments is only available in select countries. Some of the main supported countries includethe United States, Canada, the United Kingdom, the Netherlands,... Your store’s country must match your bank account location to activate Shopify Payments. If your country isn’t supported, you’ll need to use a third-party payment provider like PayPal or Authorize.net.
Key Takeaways
- Shopify Payments is the easiest way to accept major credit cards, Shop Pay, and digital wallets directly through your store.
- Setting it up early helps you avoid transaction fees, streamline your checkout process, and receive payment faster.
- Your store location and the country of your bank account determine your payout currency, not your store currency.
- Always test your checkout before launching to catch any setup issues and ensure everything works smoothly.
- You can choose daily, weekly, or monthly payout schedules to match your cash flow.
- Most setup issues are solvable with the right documentation and a little patience; however, having expert help can significantly speed up the process.
Need support on how to set up Shopify Payments the right way?
At LitOS, we help growing brands launch smoothly, avoid verification delays, and build checkouts that convert. From payments to full platform migration, we make your Shopify setup faster, smarter, and built to scale.
Have a project in mind? Contact us now →

