Starting your Shopify store is getting off the ground, and you are not far from making your first sale. However, you wonder how to add products to a page on Shopify?
Of course, having highly optimized images and detailed product descriptions will increase your chances of attracting and converting consumers.
In this article, we – LitExtension show you how to add products to a page on Shopify, covering some main points:
- How to add new products to a new page on Shopify
- Make Shopify display products on a page
- How to add a collection of products on Shopify page
- Pro-Tips to change product details bulkily
It sounds great, huh? Let’s get it.
How to Add Products to a Page on Shopify
The question of how to create a product page on Shopify is not yours anymore. Adding new, similar, or collection products will be easy if you strictly follow our instructions below.
#1. How to add new products to a new page on Shopify
First, go to Shopify’s admin and choose Products.
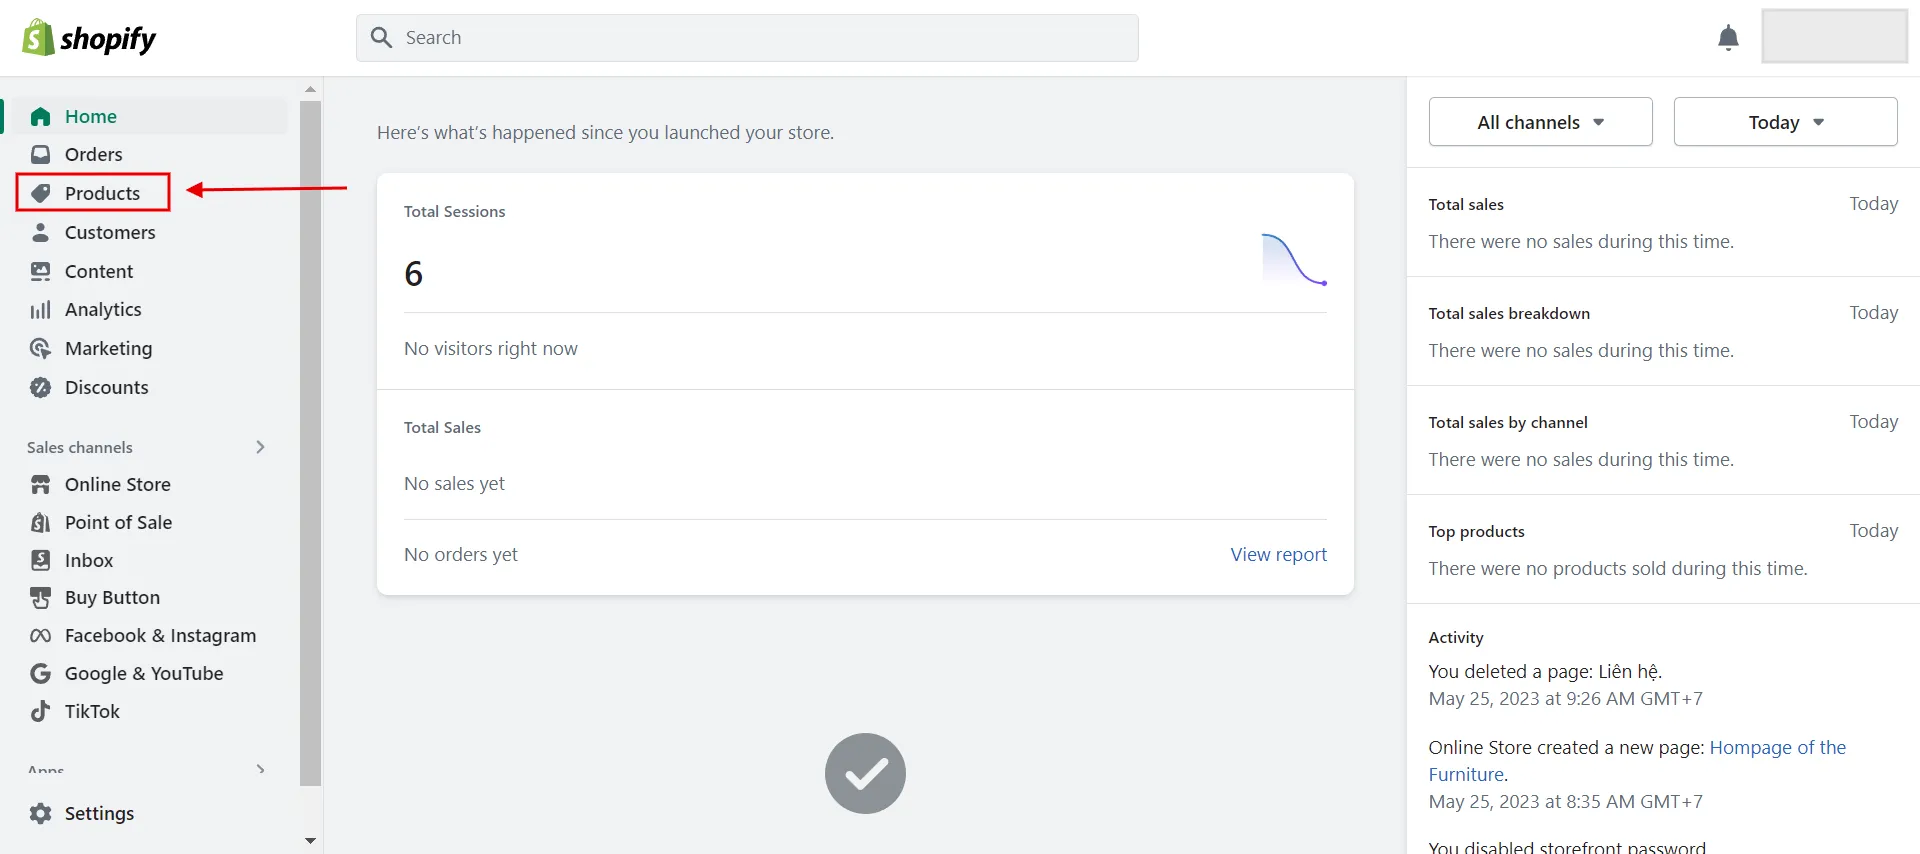
On the Products page, click Add Product.
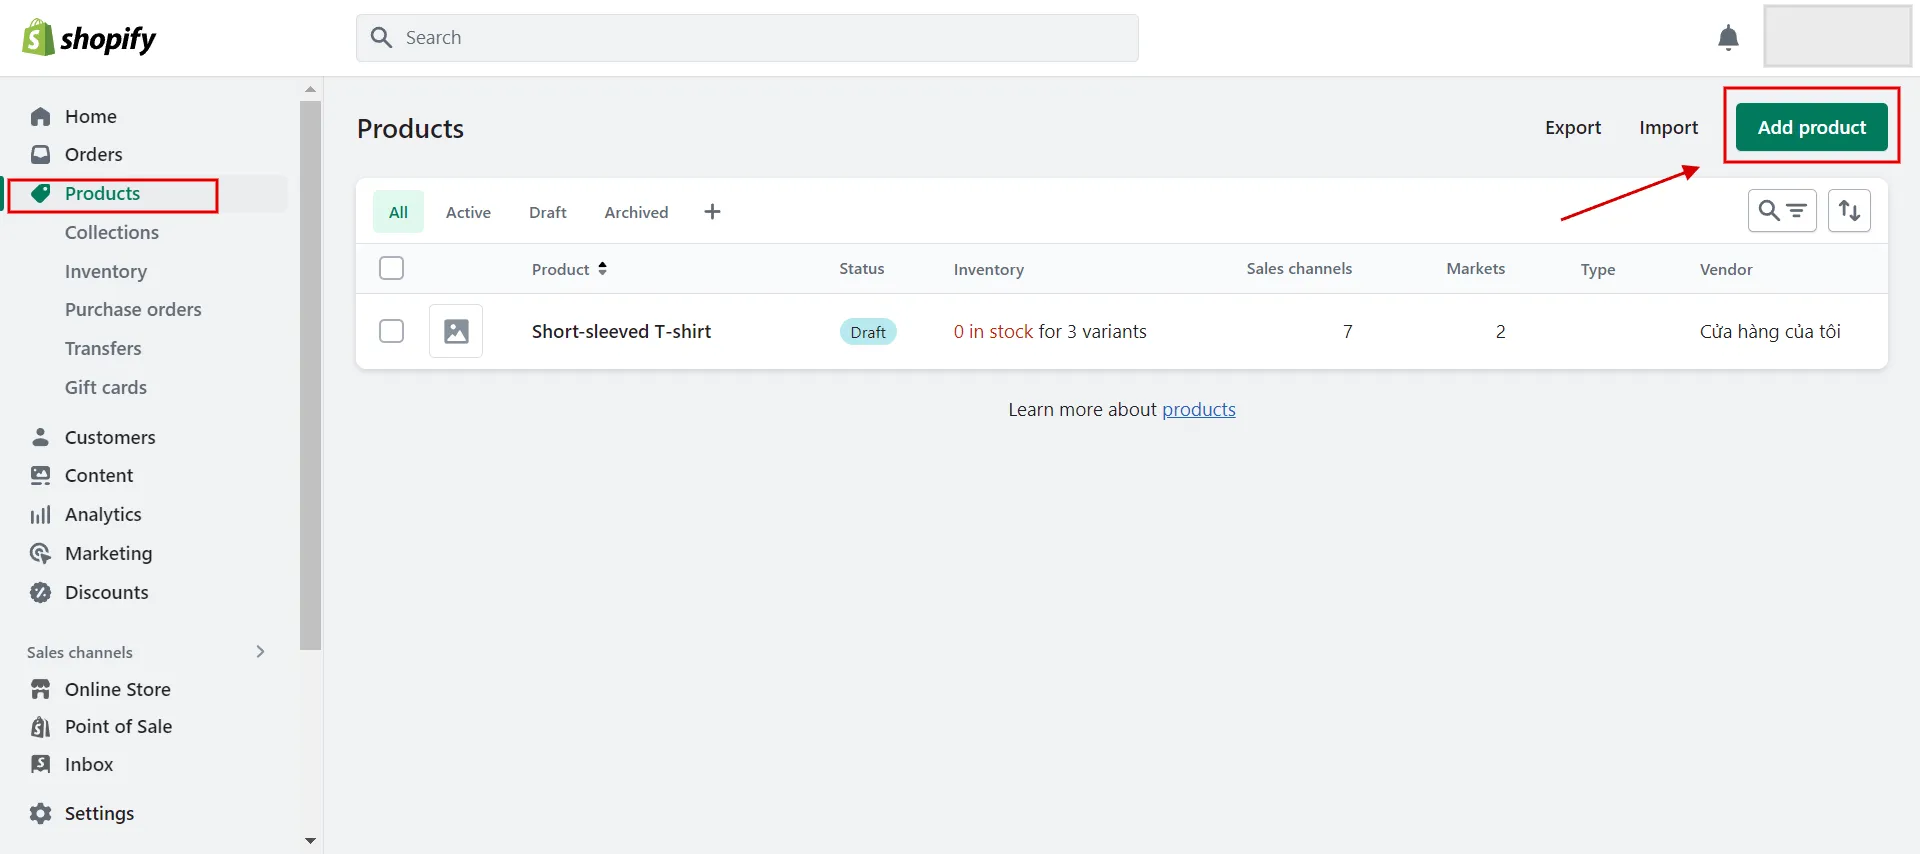
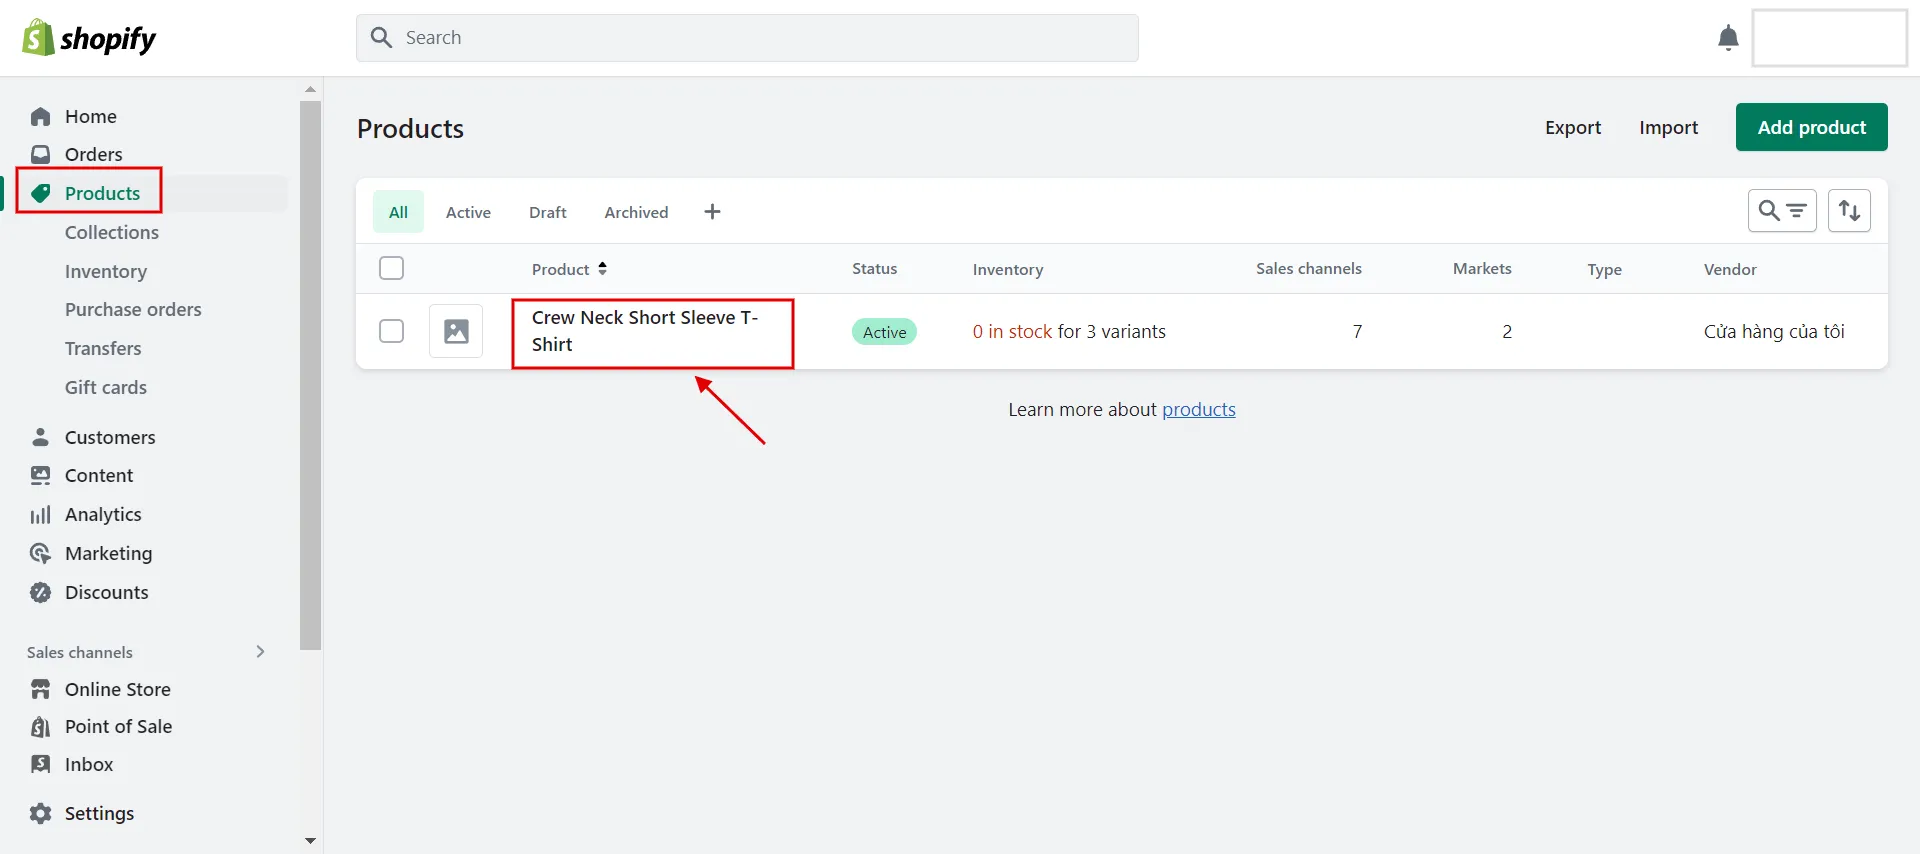
Then, enter a product title and additional details, and click Save.
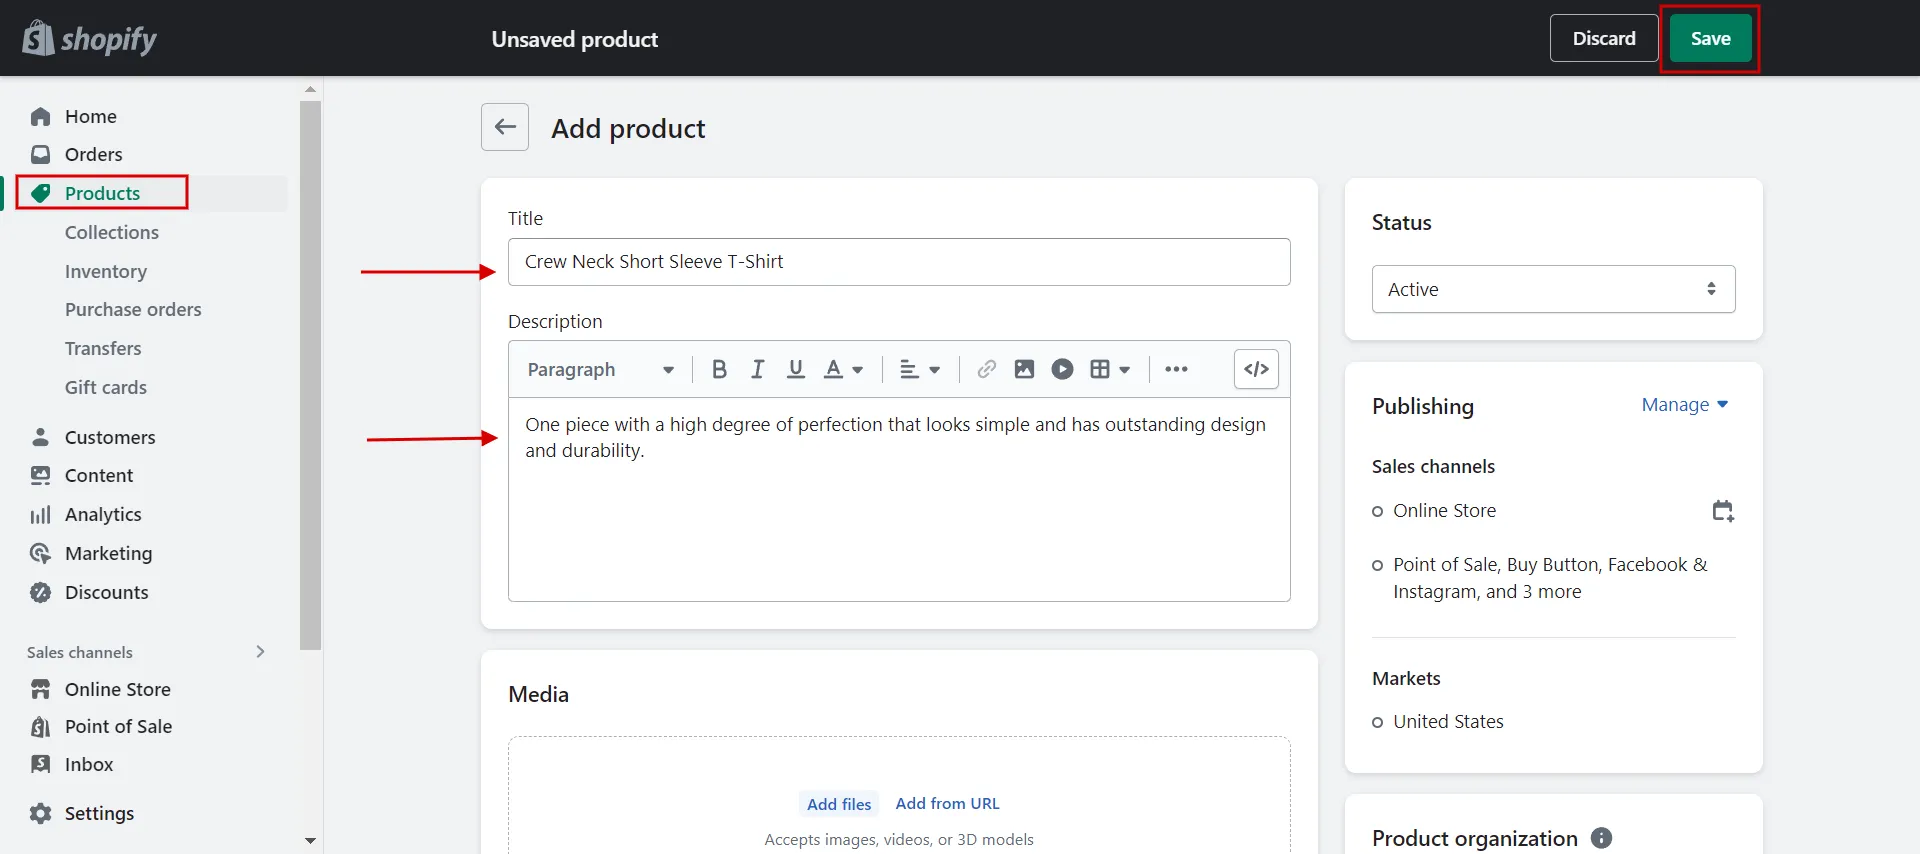
It is so quick, isn’t it? Now you get your first product on the page.
Review the process of Shopify import products – A complete guide. Check it out now!
#2. How to add additional products to same product page on Shopify
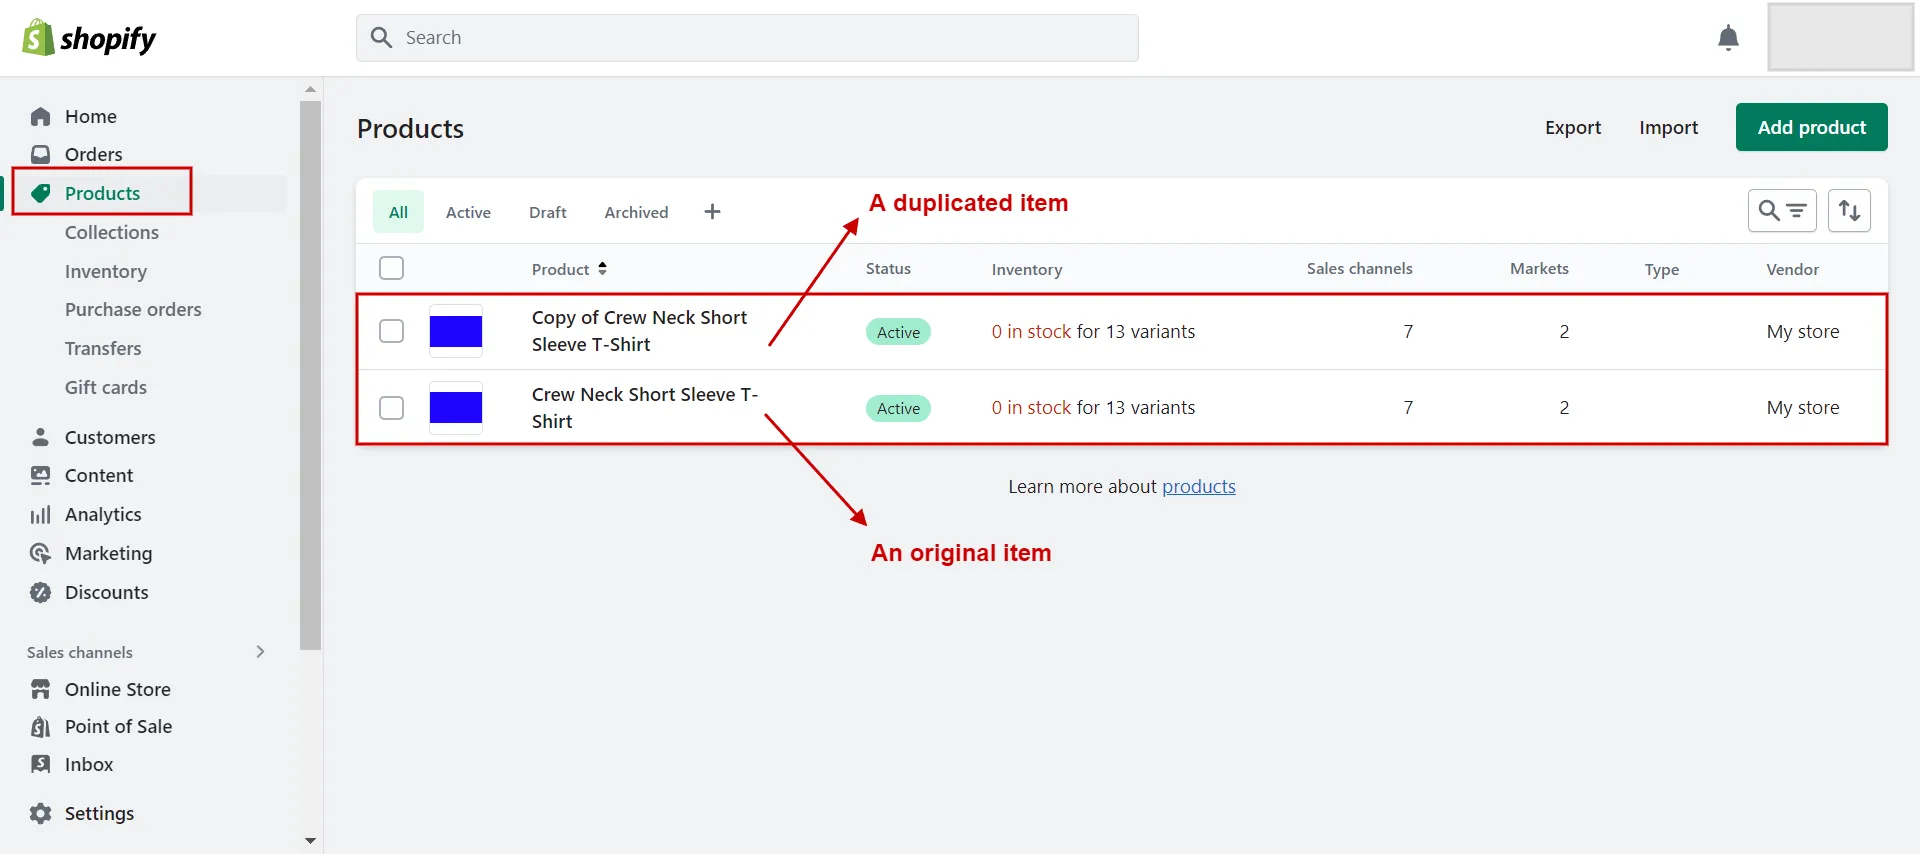
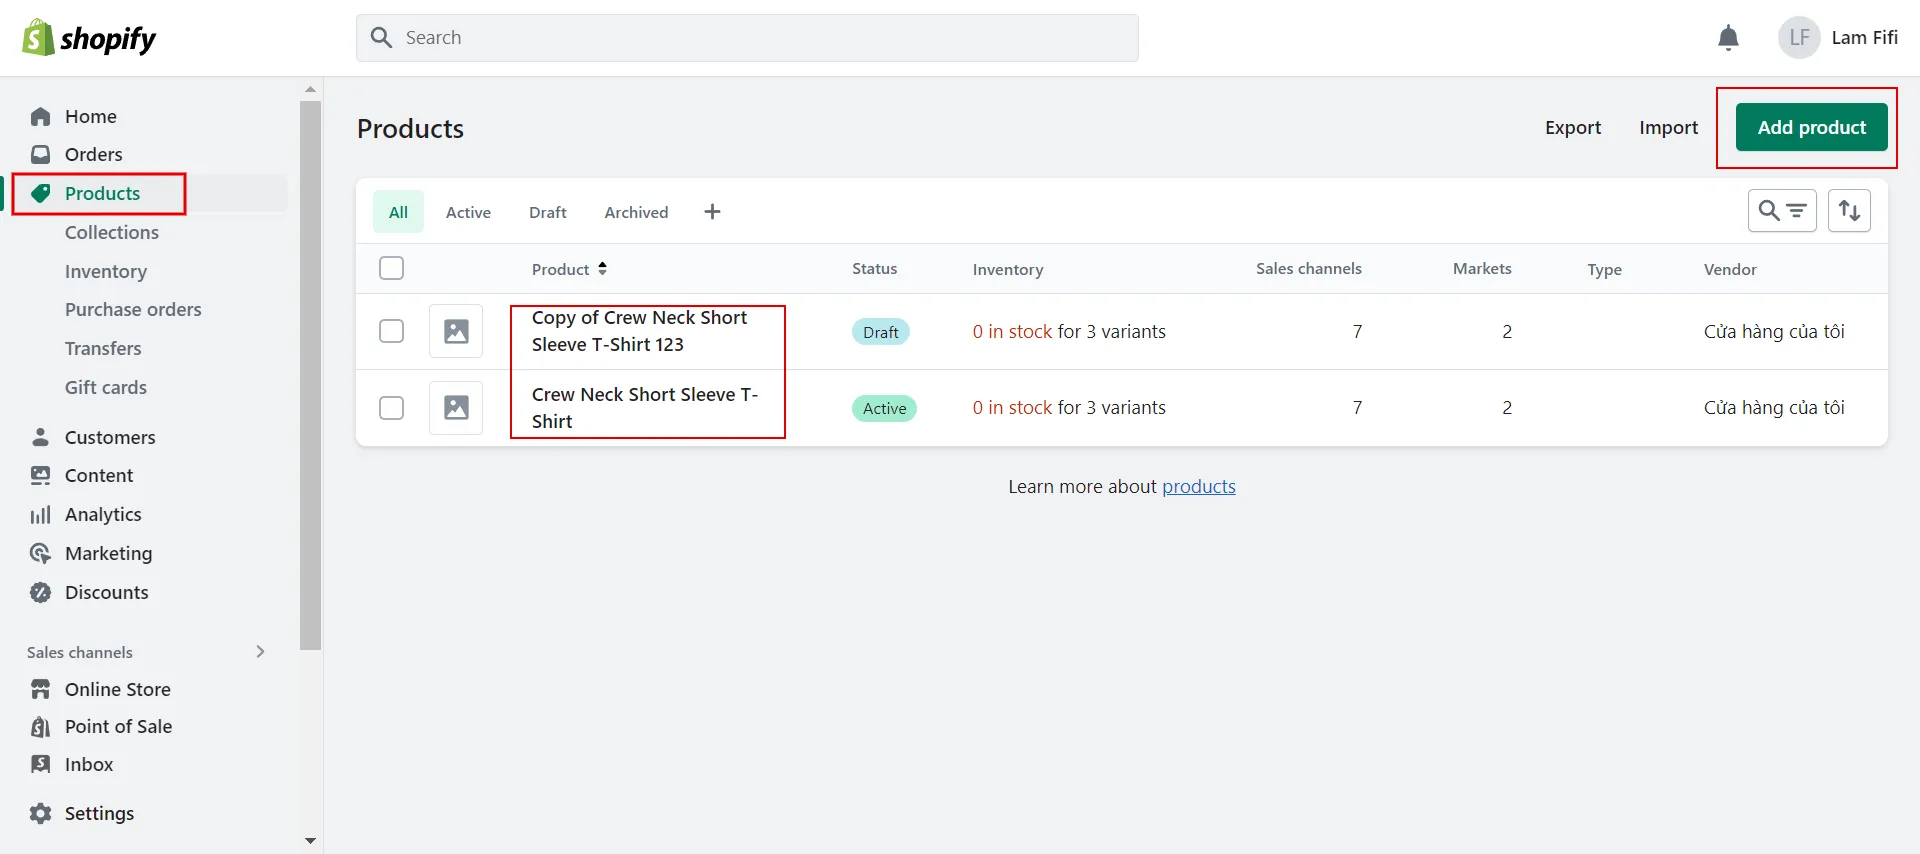
Instead of adding a new product, you can choose the duplicate option to create additional products on the same page. Duplicating saves time due to copying one or more product details, namely images, SKUs, barcodes, and inventory quantities.
If you want to add more color or size to an existing product, add a variant instead of duplicating it.
After creating the duplicate products, by default, their status is set to Draft, and they are unavailable to sales channels until you change their status to Active.
Here are quick steps!
First, go to Shopify admin > Products. Next, click the product that you want to duplicate.
After that, click Duplicate.
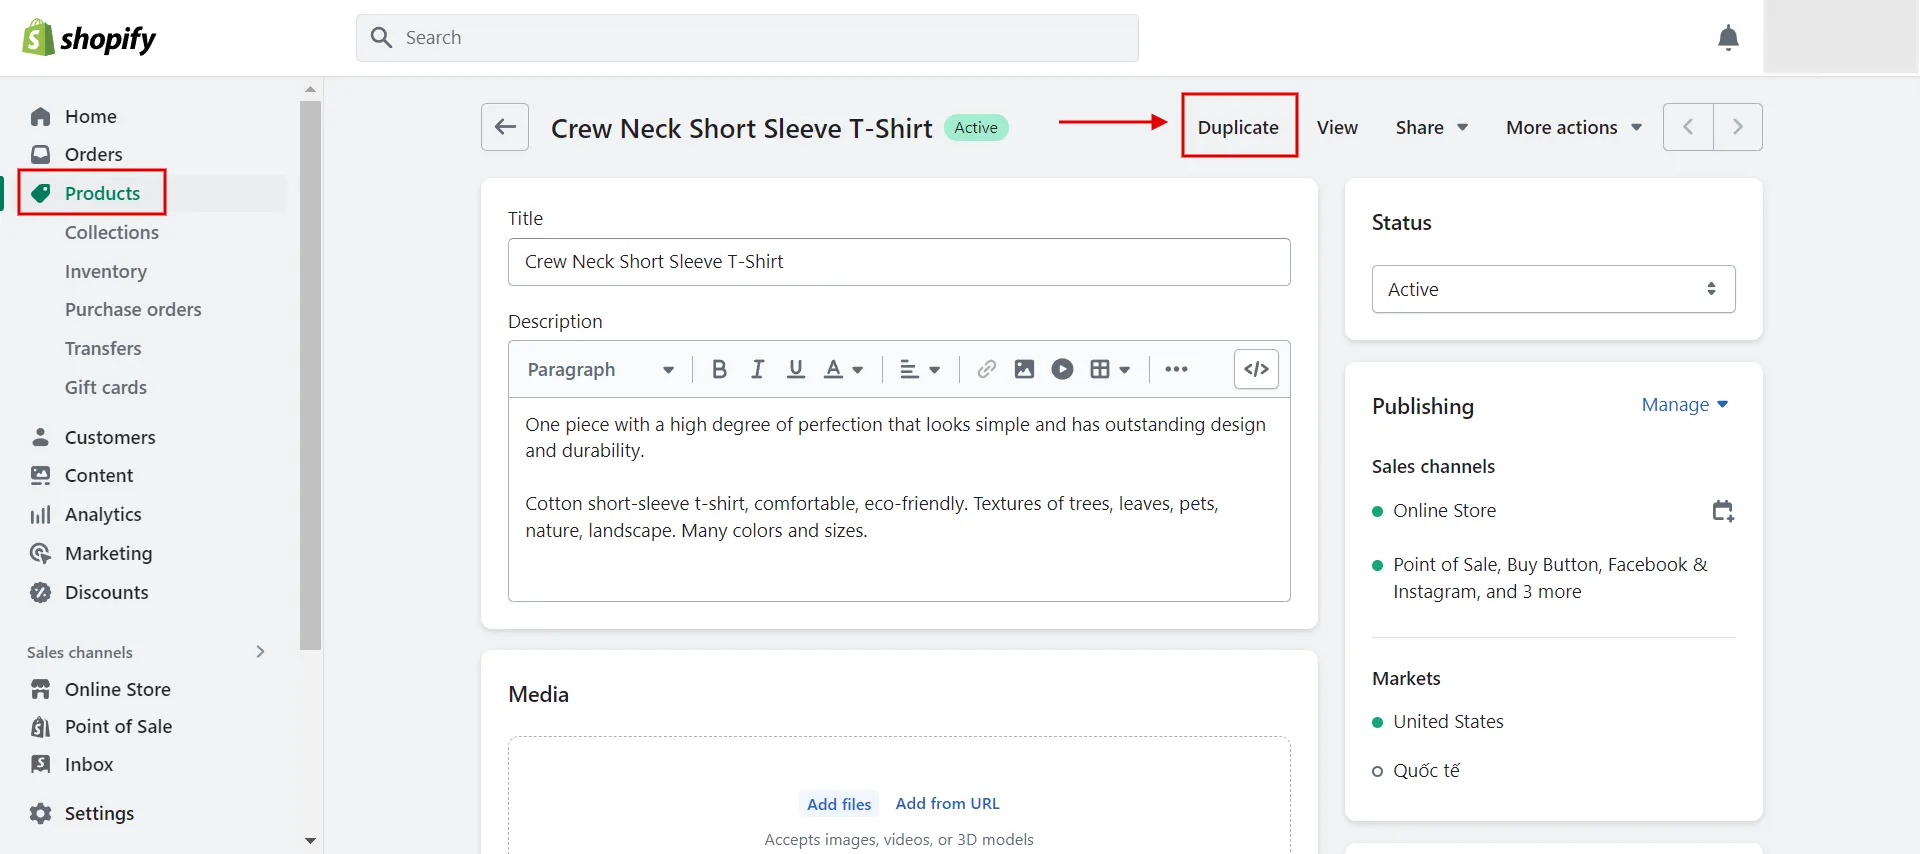
Then, enter a name for the duplicate product and click Duplicate Product.
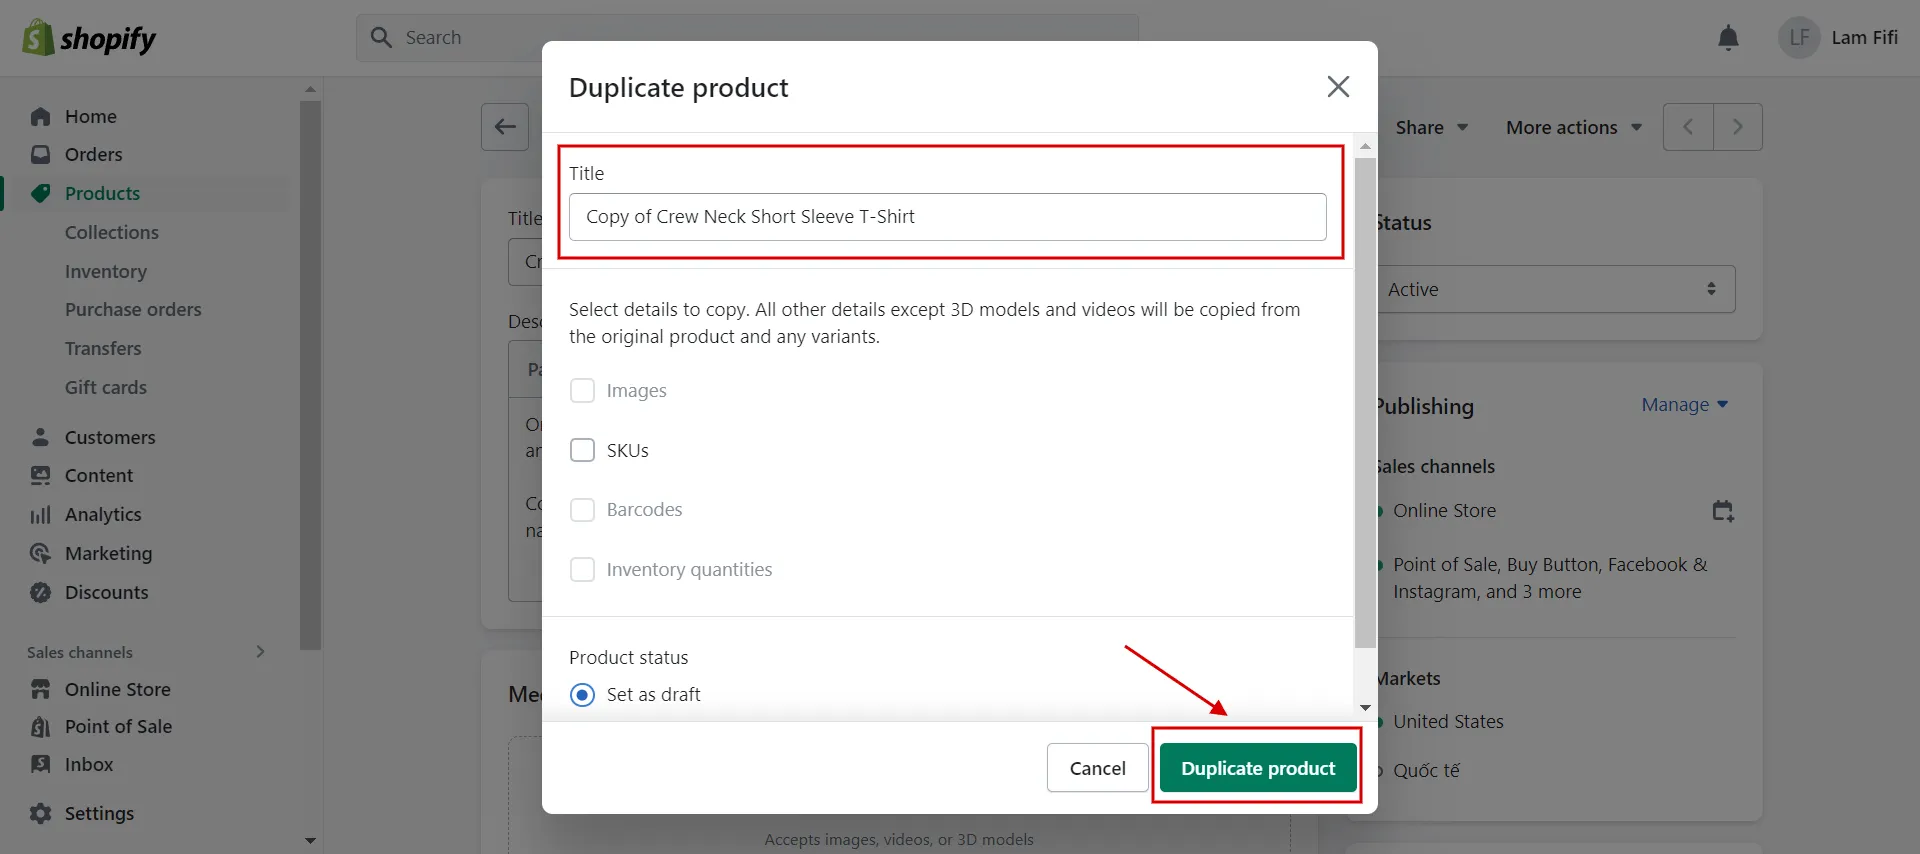
Last, modify the product details, such as title, description, and additional details, etc.
Learn more about how to create a product page on Shopify! Explore the Shopify products page – A complete guide and review.
How to Add a Similar Product to a Page
The duplicating option is the best way to add a similar product to a page as many as possible.
How does Shopify display products on a page besides the product page? There are two ways:
- using human manipulation
- or using the Shopify product page builder.
Both ways have pros and cons; thus, you just choose the most affordable method for your store.
#1. Use manual way
Manually adding items brings some benefits for merchants, such as more control. You can add products to any page on your store, and you can also rearrange them however you like.
Follow these steps to add a similar product to a page on Shopify
- First, select Products in the admin panel > select the product to duplicate > click Duplicate.
- Rename the copied product, and check the box to indicate the information you want to copy across (if any). Note: If you do not rename, it automatically gets the title following a structure “Copy of [the copied product].”
- Finally, choose Duplicate Product.
However, time-consuming is one of the cons of the manual way. In the case of various products, it will be difficult to keep track of which products are on which pages.
#2. Use Shopify product page builder
Using the Shopify product page builder to add a similar product to a page is a quick and easy way. All you need to do is select the products you want to add, then drag and drop them onto the page.
However, the downside contrasts with the manual way: merchants lose control over where their products are on the page. You can’t rearrange them; you can only add them to pages created with the tool.
When learning how to add products to a page on Shopify, you can also discover Shopify page builders – Level up your visual storefront immediately!
How to Add a Collection of Products on Shopify Page
Consumers can easily search for and find products quicker when you apply collections of products, which means breaking products down into specific groups.
Let’s follow the steps below to add products to a collection.
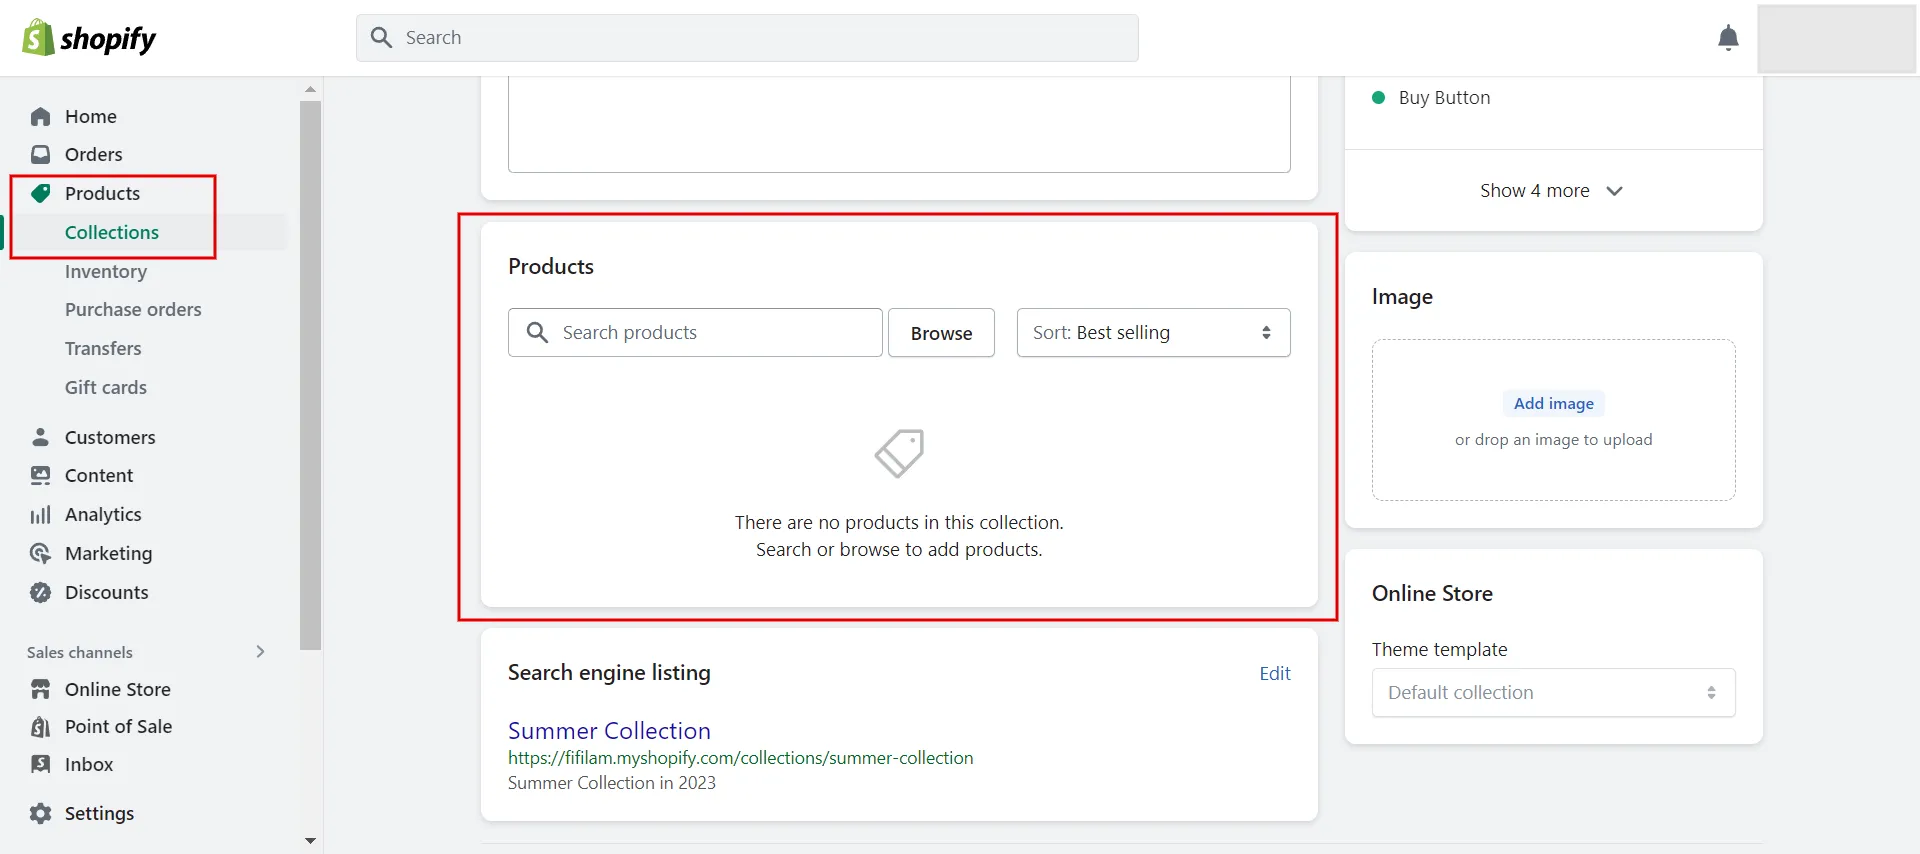
First, navigate to the admin panel and select Products, then click on Collections > Create Collection
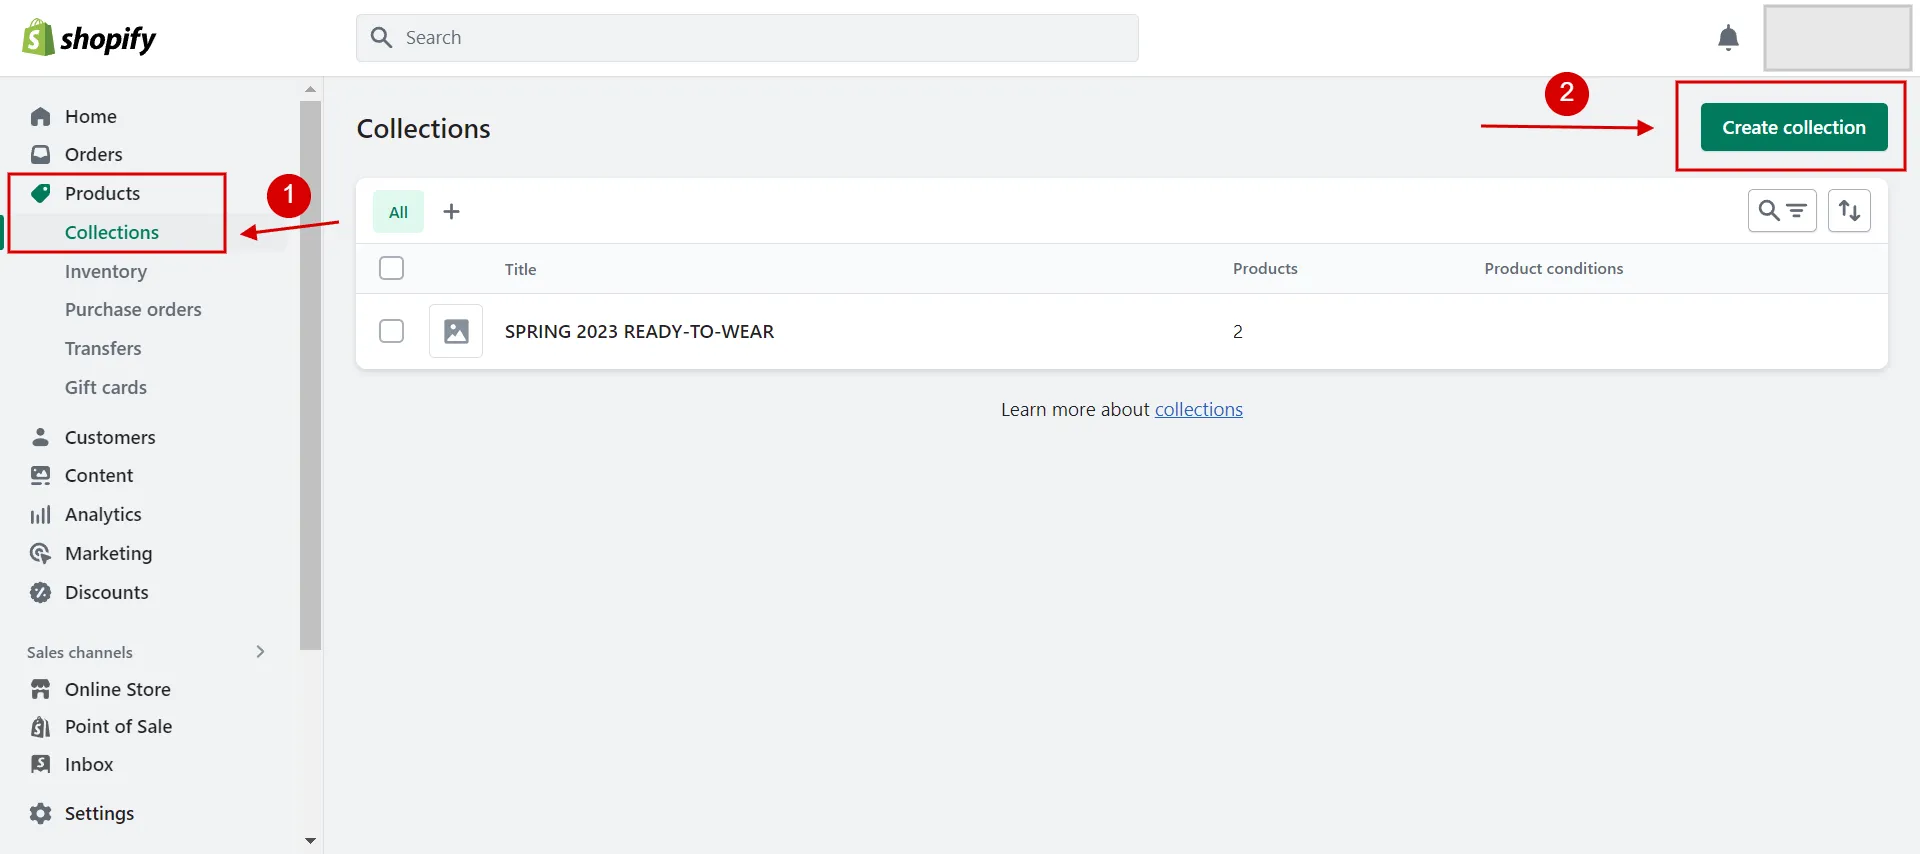
Then, insert a new collection name and write a description to explain the collection. Remember to use keywords that customers often search for to increase your ranking on the SERPs.
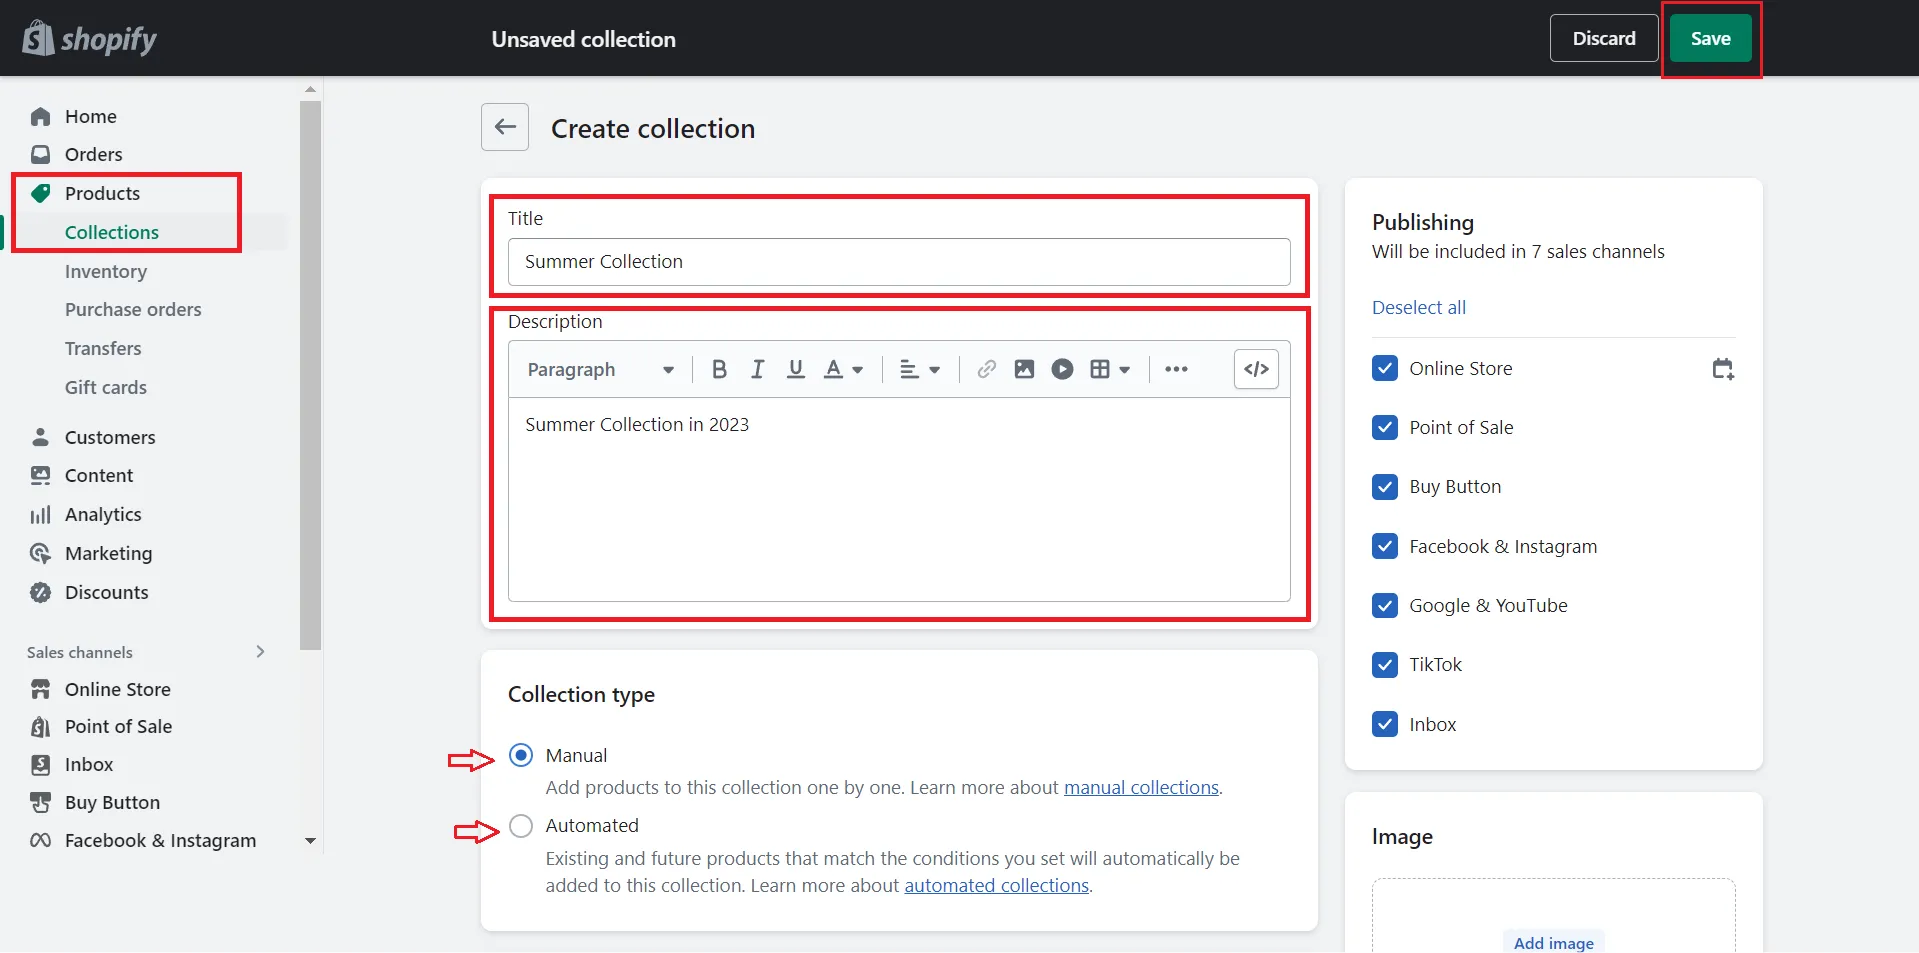
Next, choose between two options: manual collection or automatic collection.
- Manual collection option allows you to add specific products.
- Automatic collection will automatically add products to a collection based on conditions. You can choose the conditions
Click Save. Continue to choose the order in which you’d like your products sorted. Best Selling, for instance, will display your best-selling products on top.
Last, click Save to finish.
Now you know how to add products to catalog Shopify. Let’s view your page and ensure you add it to your main navigation to attract your customers.
Besides how to add products to a page on Shopify, let’s learn more: Shopify collections – Everything you need to know!
Want to migrate to Shopify?
If you are intending to migrate to Shopify, LitExtension offers a great migration service that helps you transfer your data from the current eCommerce platform to a new one accurately, painlessly with utmost security.
Pro-Tips to Change Product Details Bulkily
Besides how to add products to a page on Shopify, in this section, you’ll gain more tips to change the details of products, such as adding/removing tags, achieving/deleting products, adding barcodes by a digital device, etc.
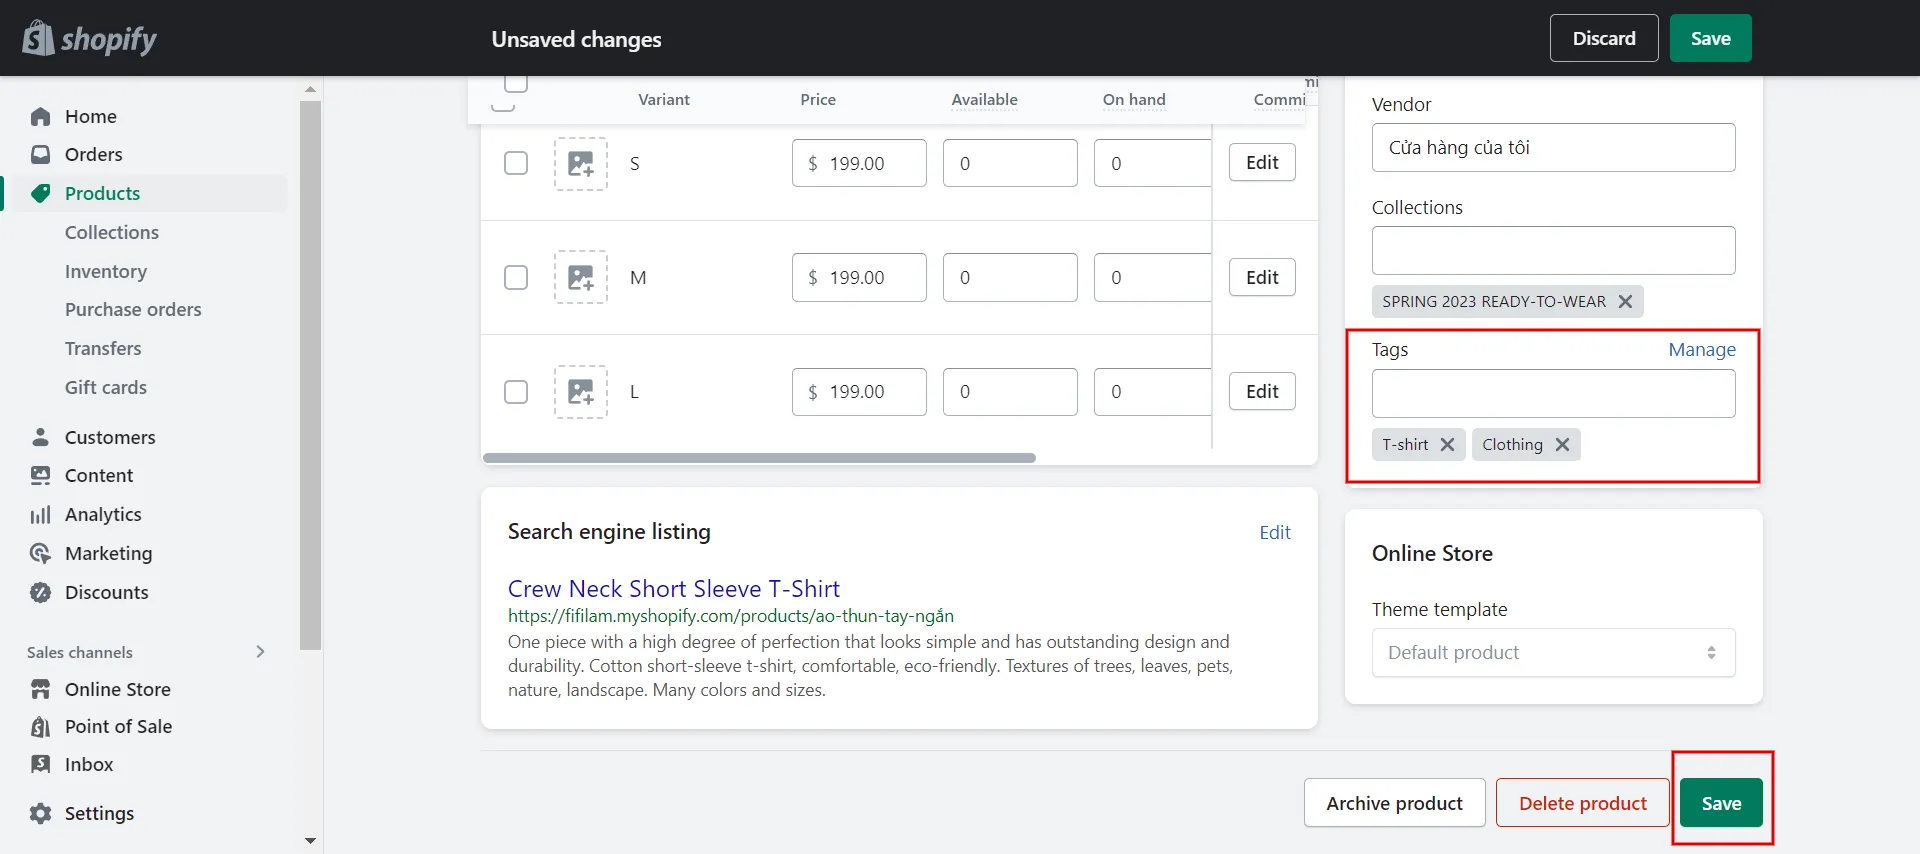
#1. How to add or remove tags
For more information, tags are searchable keywords associated with your product, helping customers find your product through your online store search and assisting you in creating automated collections.
Each product has up to 250 tags. “So, how do I add a tag?” You may have this question in mind, right? Let’s follow us to learn the process!
In Shopify admin, go to Products. Click the name of a product to edit it or create a new one.
In the Organization section, select or enter tags for your product. Use a comma to separate different tags. Tags can have up to 255 characters.
Click Save to finish.
In contrast, how to remove tags from a product
- In Shopify admin, go to Products. Click on a product’s name.
- In the Organization section, hit the x beside the tag’s name to remove it.
- Click Save to finish
#2. How to add barcode for a product on Shopify page
A barcode is scanned by digital devices. So, this is all about how to add products to a page on Shopify, especially adding a product’s barcode on iPhone and Android devices. Let’s find out how to scan.
First, go to the Shopify app > Products > All Products. Then, Create a new product or select an existing one from the Products screen. Opt for Inventory.
Next, tap the barcode icon in the barcode field to open your device’s camera. The camera’s screen displays a square box with a line through the center (for Android) or a rectangular box (for iPhone).
Place your camera so the barcode displays within the screen’s box. Give Shopify time to detect the barcode. When it does, the app switches to the inventory screen and inserts your barcode number.
#3. How to archive or delete a product on Shopify page
In contrast to how to add products to a page on Shopify, merchants may want to archive or delete some products.
Use the archived option when you do not want to display a product but do not want to delete it permanently. When you archive a single product or multiple products simultaneously using a bulk action, those are moved to the Archived tab of the Products page.
Besides, use the “Delete” option for a product you want to permanently remove from Shopify, a single product, or multiple products. Deleted products can’t be restored.
So how do I archive or delete a product?
On the Shopify admin dashboard, go to Products. Tick the box in front of the product that you want to delete.
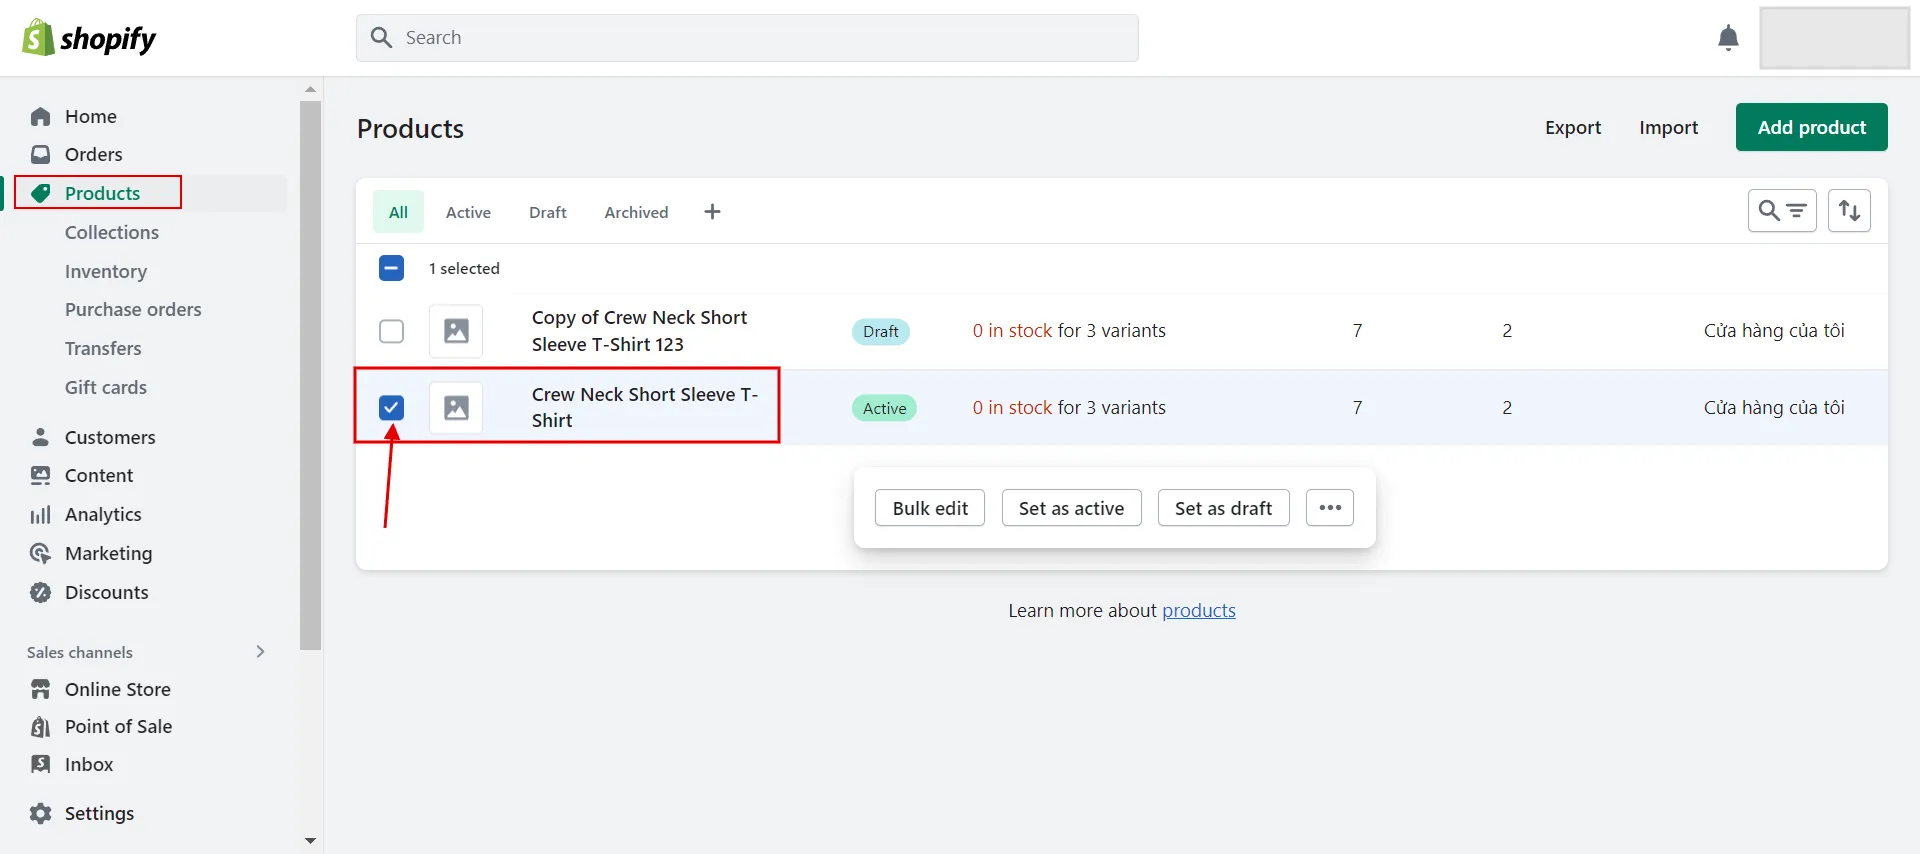
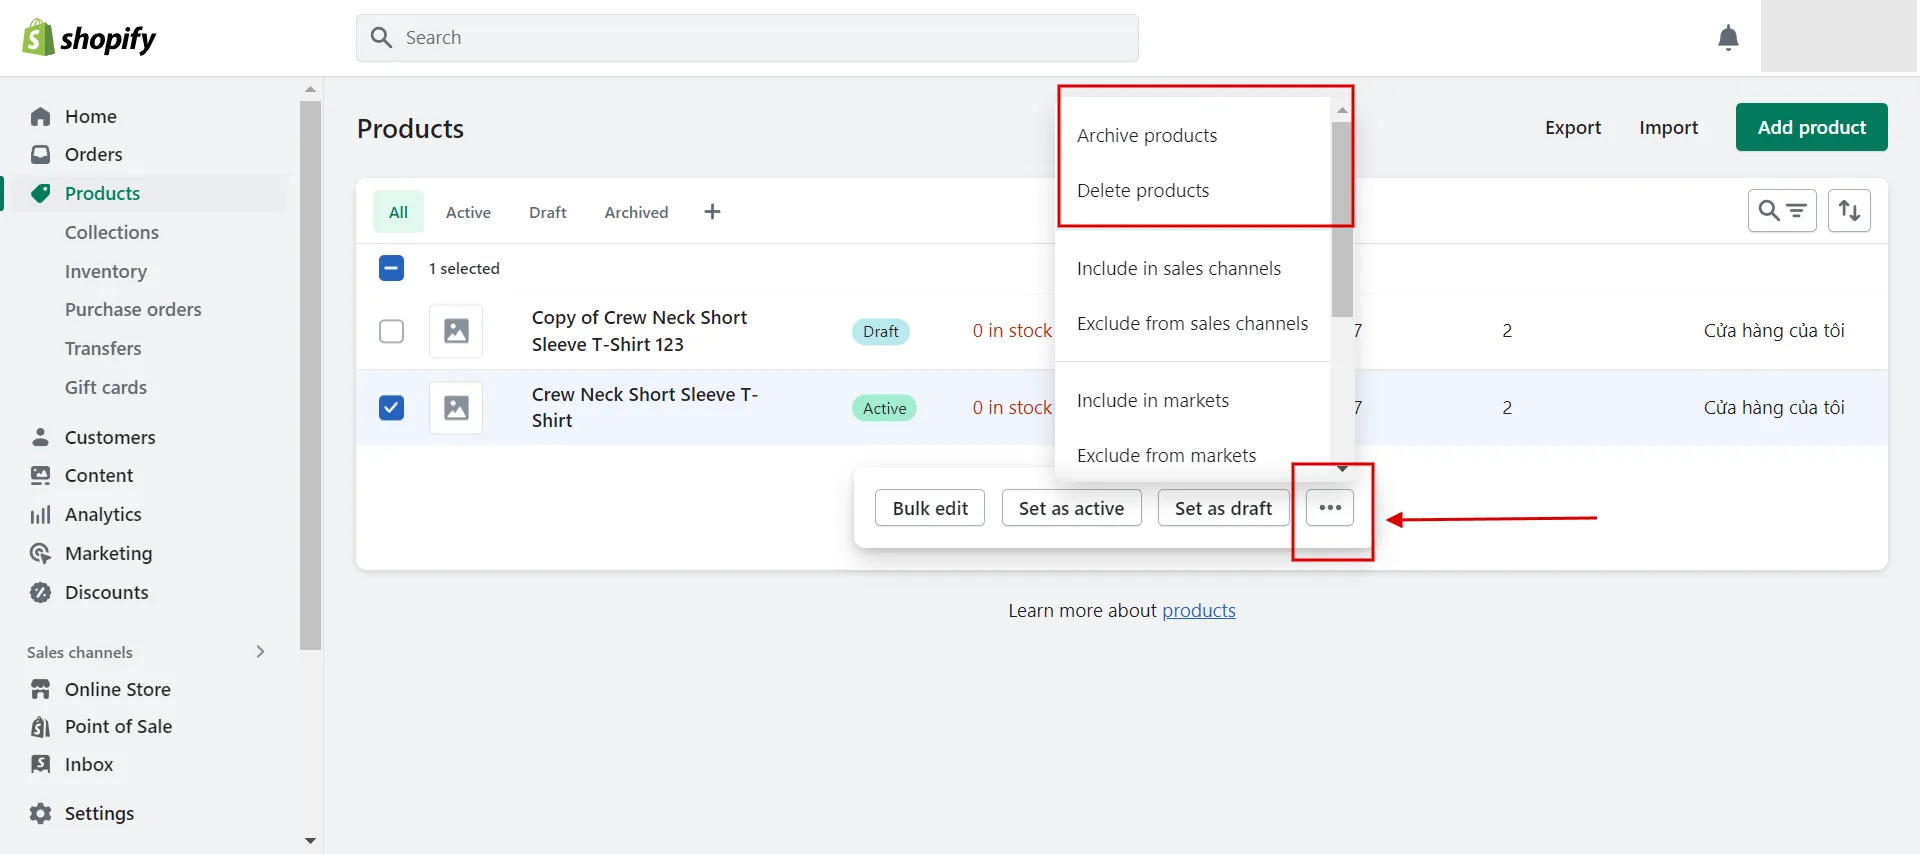
Next, click on the … button and choose one of two options: archive products or delete products.
To locate an archived product in your Shopify admin, click Products and select the Archived tab.
To unarchive a product, click the product in the Archived tab, then click Unarchive product.
Moreover, just check as many boxes as possible to archive or delete multiple products.
#4. Which products are included and excluded from Shopify’s sales channels?
To include or exclude products from a particular sales channel belongs to your decision due to some reasons:
- Some seasonal products are available for only part of the year.
- A product is out of stock, but it will be restocked at a later date.
- Products are not sold anymore on a particular sales channel.
- You don’t want to sell a product but might consider doing so later.
- You want to sell items that are only available online or in-store.
So how do I do that?
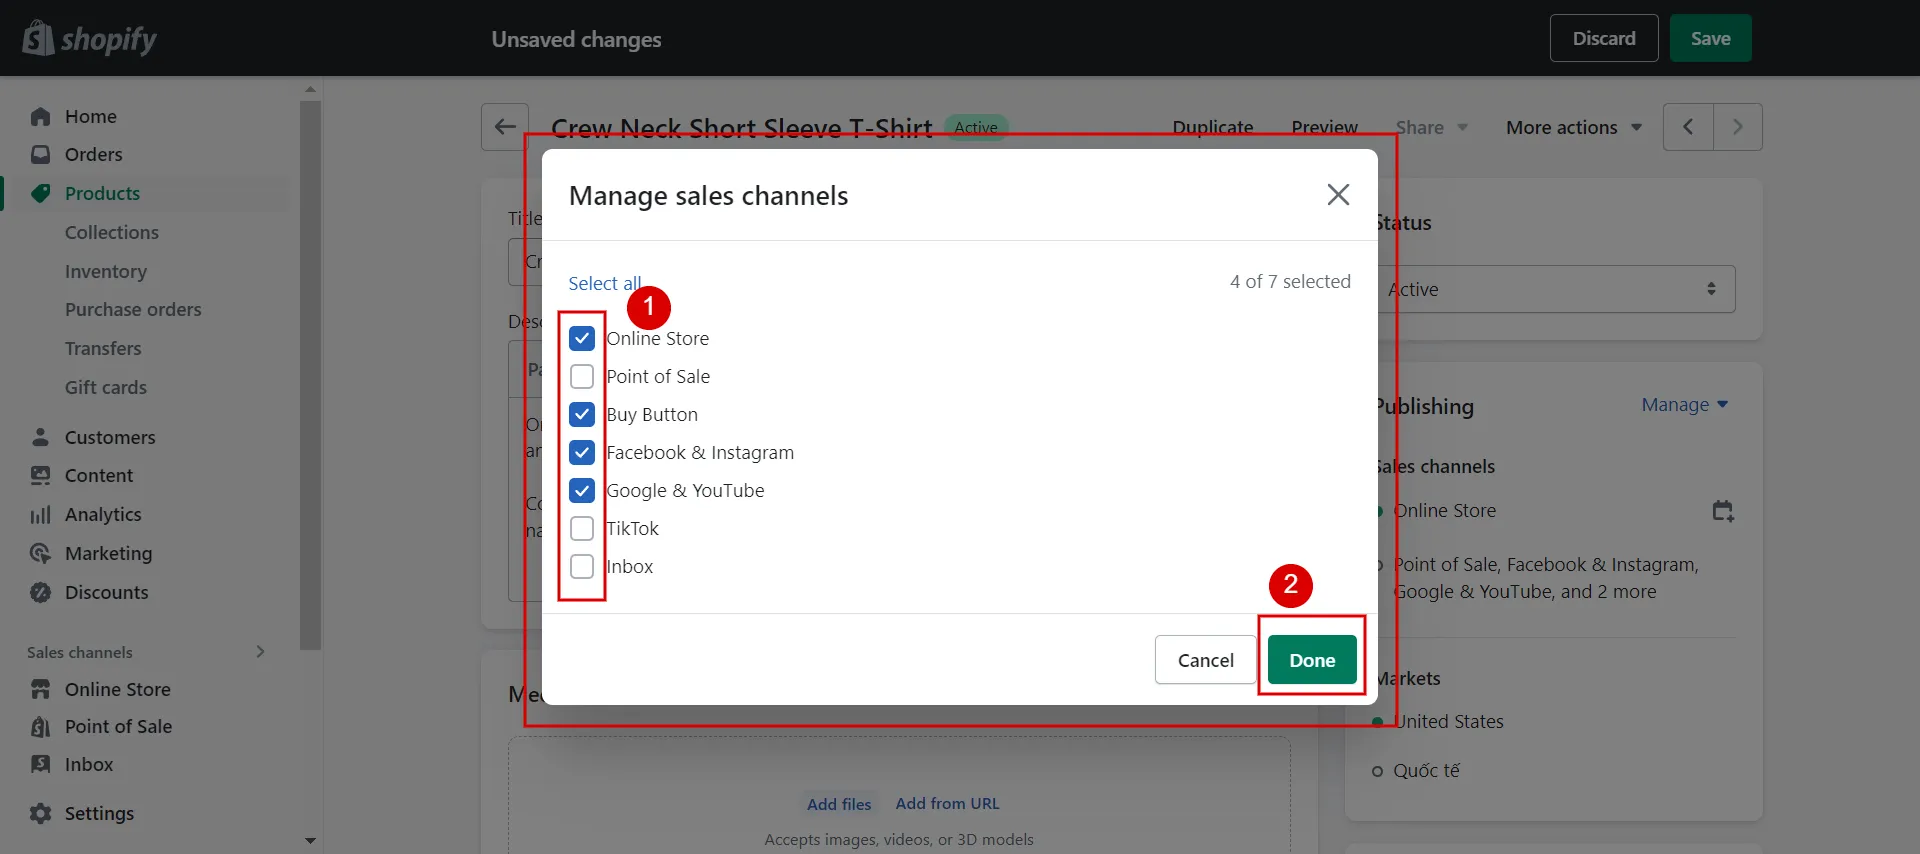
First, go to Shopify admin > Products. Click the product’s name to open its details. The product is included in the sales channels listed in the publishing section.
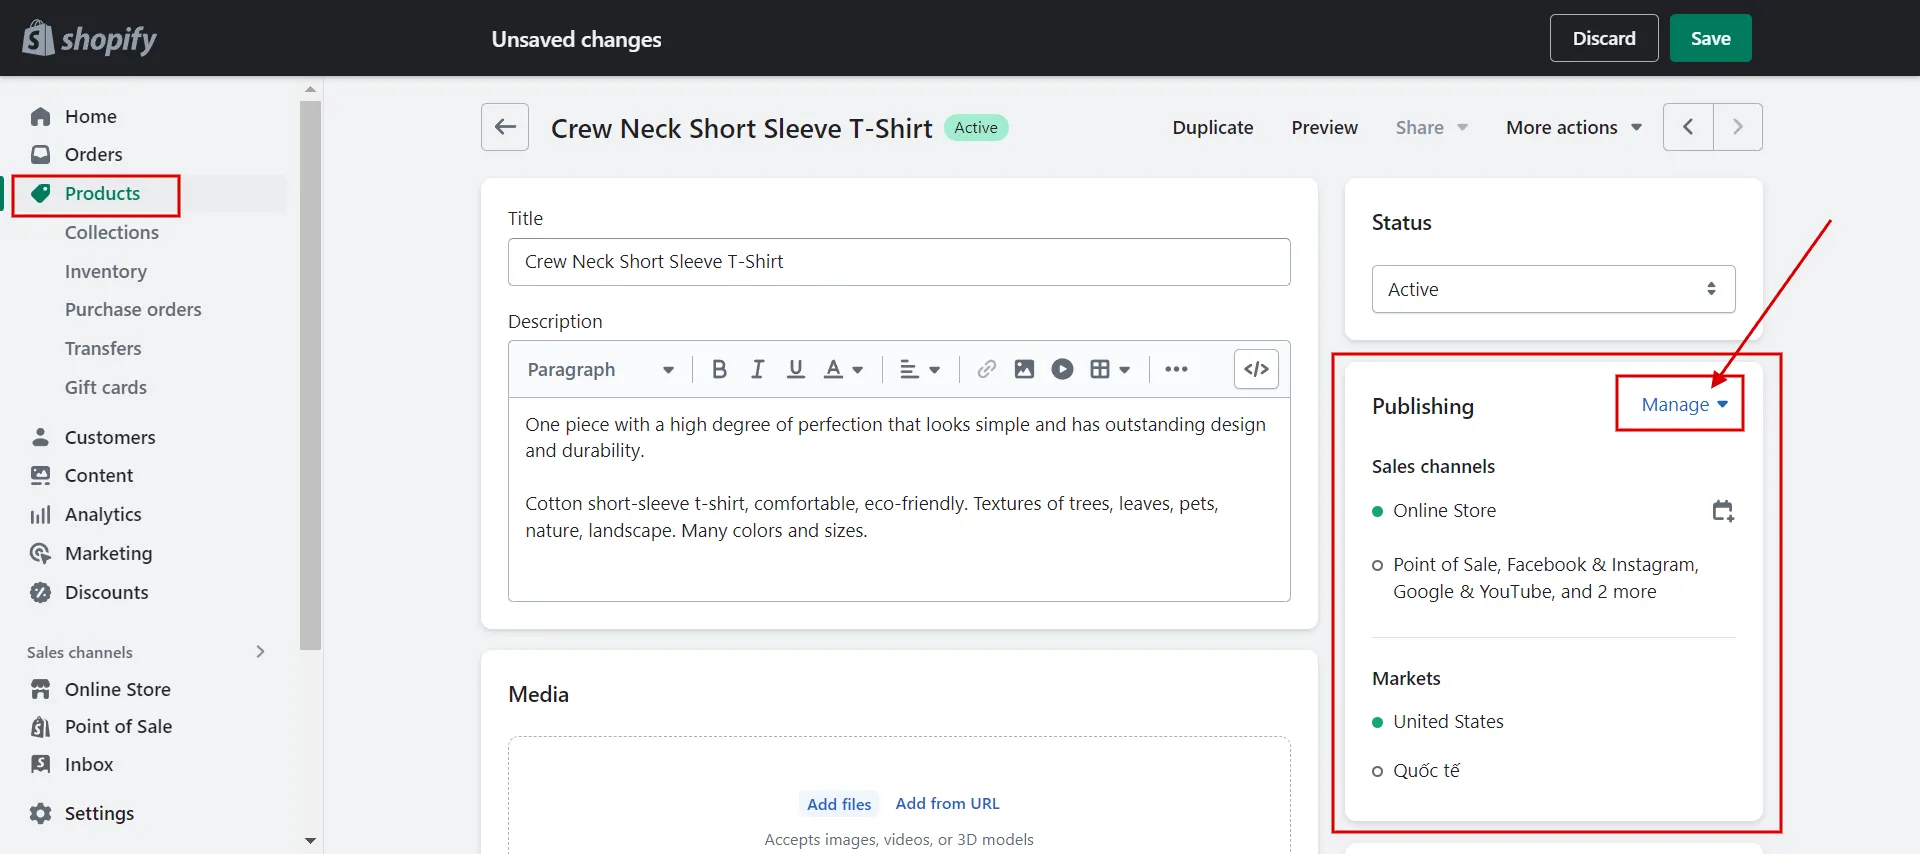
Click Manage > Manage sales channels.
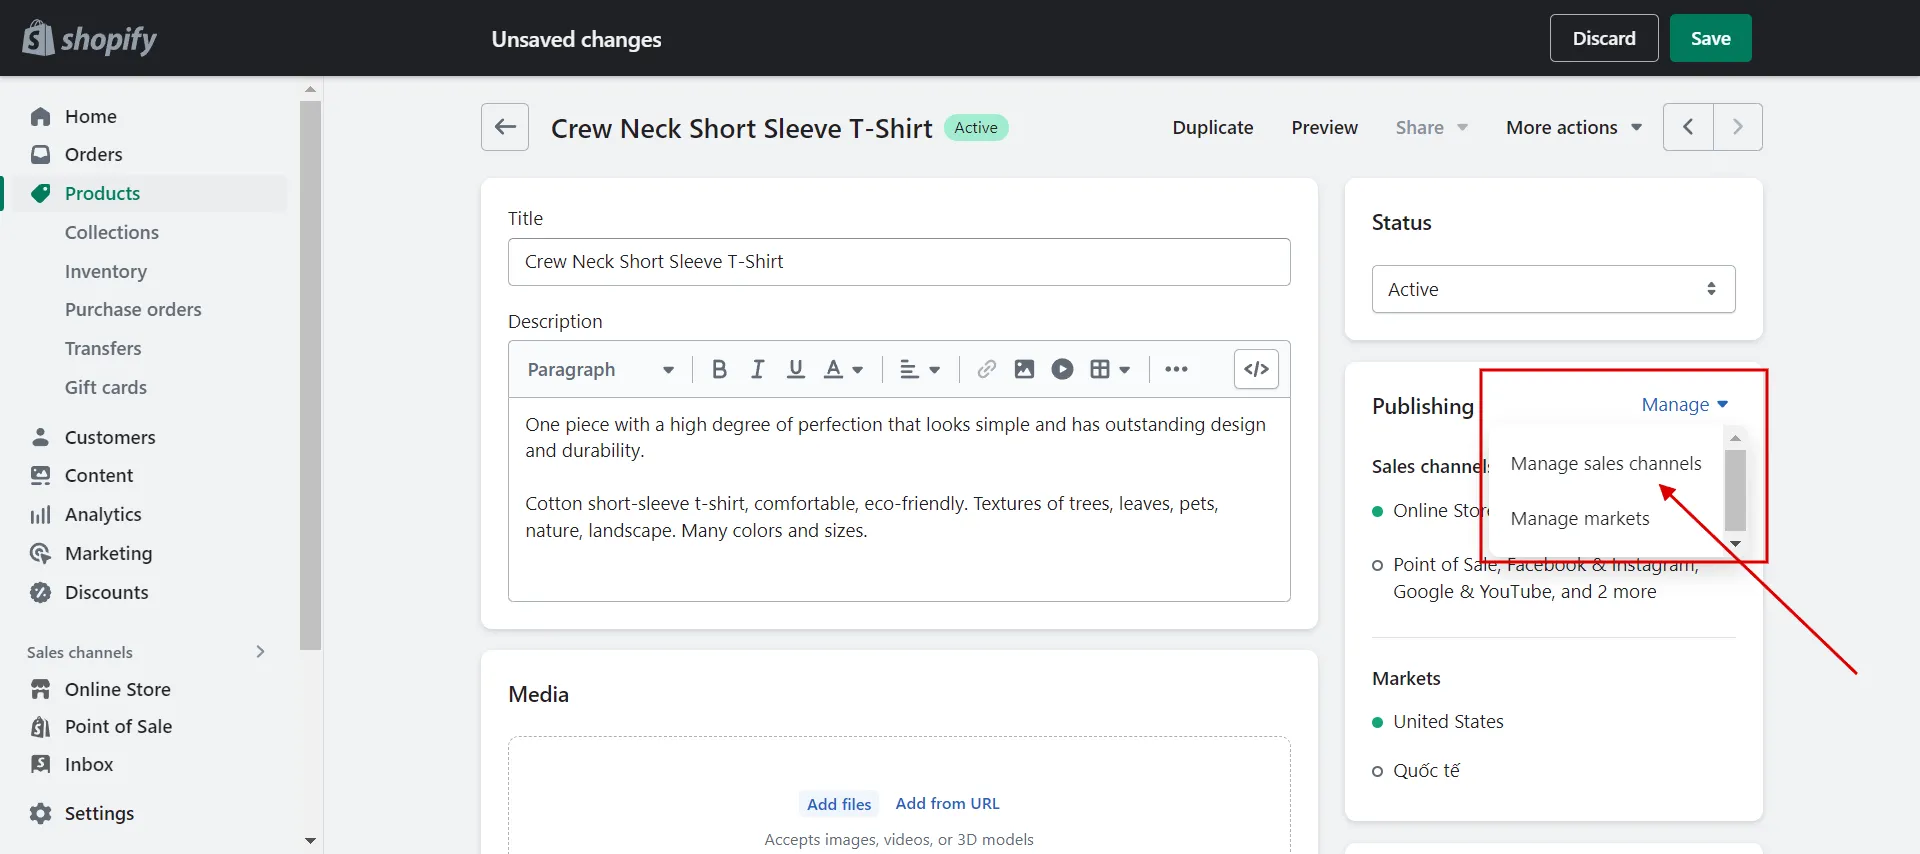
Select the sales channels and apps in which you want to include the product. Click Done > Save.
From now on, you will know how to include or exclude products from Shopify’s sales channels.
Besides how to add products to a page on Shopify, we got you further Shopify resources:
- Shopify review – Is Shopify worth it?
- Shopify tutorial – 9 complete steps to get instant sales.
How to Add Products to a Page on Shopify – FAQs
[sp_easyaccordion id=”59497″]
Final Words
To sum up, this article covers how to add products to a page on Shopify, not only a single product or a similar product but also a collection. It also gives clear instructions for adding or removing tags from products or archiving or deleting them based on merchants’ decisions.
From the above instructions, you can easily enrich your store by adding products to a collection or a catalog on the page. You are now ready to sell.
Visit our LitExtension blog and join our eCommerce community to gain more helpful ideas for your online stores. If you’re considering converting to Shopify, LitExtension – #1 Shopping Cart Migration Expert is here to help you with the quickest and most cost-effective solution!