Are you looking to enhance the customer experience on your Shopify store? One effective way to achieve this is by adding a size chart. A size chart provides valuable information to your customers, helping them make informed purchasing decisions and reducing the likelihood of returns or exchanges due to sizing issues. In this comprehensive guide, we will show you how to add size chart in Shopify in the most effective ways.
In this blog, LitExtension – #1 Shopping Cart Migration Expert will cover some main parts:
- Size chart feature in Shopify: Definition and benefits
- Step-by-step guide: How to add size chart in Shopify
- Tips for optimizing the size chart presentation
So, let’s dive in and discover how to add size chart in Shopify, step by step.
Want to Migrate Your Store and Grow on Shopify?
Having decided that your current platform is no longer the perfect fit? Switch to Shopify now and rocket your online business with powerful eCommerce functionalities, extensive apps, and improved loading speed with this platform.
What Is the Size Chart Feature in Shopify?
The size chart feature in Shopify is a built-in functionality that allows online store owners to provide detailed sizing information to their customers. It is an essential tool for e-commerce businesses that sell clothing, footwear, or any other items that require specific measurements for a proper fit.
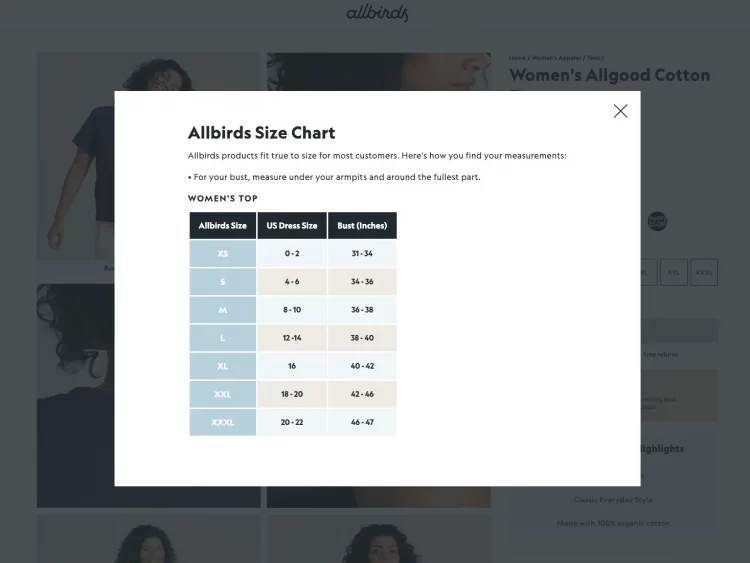
A size chart is a visual representation of measurements and corresponding sizes. It typically includes a range of measures for different body parts, such as bust, waist, hips, inseam, and length. The Shopify size chart is a reference guide for customers to determine their correct size when purchasing.
So, the question is how to add size chart in Shopify. On a Shopify store, you can add size chart to product page, allowing customers to access sizing information while browsing products quickly. Store owners can customize and tailor the size chart to match their branding and product offerings.
The Shopify size chart is typically displayed as a separate tab or section on the product page alongside other product details. When customers click the size chart tab, they are presented with a clear and organized table or graphic that provides measurements and corresponding sizes. This enables customers to compare their measurements with the size ranges provided and make informed decisions about which size to choose.
Shopify provides flexibility regarding how the size chart is presented on the product page. Store owners can display the size chart as a text-based table, an image, or a combination of both. The design and layout can be customized to ensure seamless and visually appealing integration within the overall product page design.
Benefits of Adding a Size Chart in Shopify
Adding a size chart pop-up to your Shopify store offers several benefits that can enhance your customers’ shopping experience and contribute to your business’s success.
-
Easy product identification
The Shopify size chart simplifies the process of product identification for customers. By providing clear and accessible sizing information, customers can easily find the exact size they need, streamlining their shopping experience. This convenience saves them time and helps them make confident purchasing decisions.
For example, imagine a customer looking for jeans in your Shopify store. With a size chart pop-up, they can quickly identify the correct size based on their measurements, ensuring a better fit and reducing the likelihood of returns or exchanges.
-
Improved User Experience
Displaying product sizes and measurements on your website improves the overall user experience. Customers appreciate having easy access to sizing information, as it eliminates guesswork and minimizes the risk of ordering the wrong size.

A size chart pop-up helps build trust and loyalty by providing valuable information that empowers customers to make informed choices. Customers who have a positive experience on your Shopify store are more likely to return and recommend your brand to others.
-
Product Uniqueness and Business Protection
Adding a size chart pop-up can set your business apart from competitors and add a unique touch to your brand. It showcases your attention to detail and commitment to providing a seamless shopping experience.
By offering a size chart pop-up, you demonstrate professionalism and a focus on customer satisfaction. This differentiation can attract customers who value accurate sizing information and appreciate the extra effort you put into meeting their needs.
So, by learning how to add size chart in Shopify, you can increase customer satisfaction, minimize returns, and build long-term customer loyalty. Remember to maximize the benefits of a size chart pop-up and ensure it is well-designed, visually appealing, and easily accessible on your product pages.
If you are new to Shopify, follow these additional articles to master your product page:
- Shopify Products Page – A Complete Guide And Review
- How to Add Products to a Page on Shopify for Your Ideal Store in 2023
- How To Add Products To Shopify? | Shopify Import Products [2023 Update]
Let’s find out how to add a size chart in Shopify in the upcoming part!
Step-by-Step Guide: How to Add Size Chart in Shopify
If you’ve read this far, you probably already know why you must know how to add size chart in Shopify for a better customer experience. Two common ways to add size chart Shopify are using size chart pop-up apps and utilizing Shopify 2.0 Metafields.
Both methods have their advantages. Using size chart pop-up apps simplifies the process. It offers ready-to-use templates while utilizing Shopify 2.0 Metafields provides more flexibility and control over the design and placement of the size chart within your store.
You can choose the method that best suits your needs and technical proficiency to provide a clear and accessible size chart for your customers. However, in this part, we will only show you how to add size chart in Shopify using Shopify 2.0 Metafields. Let’s start with the step-by-step instructions below!
Step 1: Create a Product Metafield
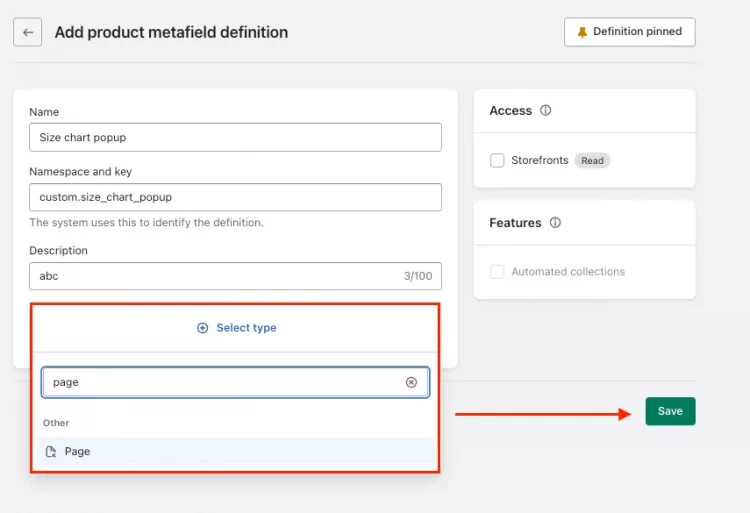
Firstly, please create a new metafield definition for your product and set its type as Page. This metafield will store the URL of the size chart page.
#1 Go to Shopify Admin Settings > Custom Data > Products
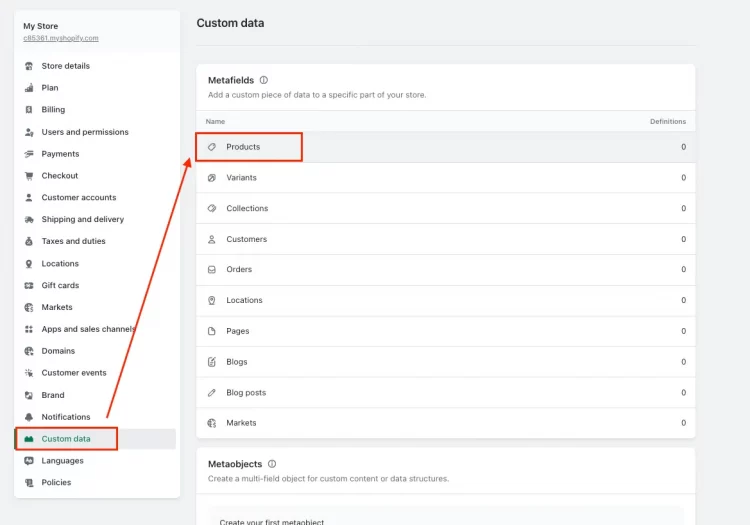
#2 Click “Add definition” and fill in the metafield name and description and then select Page type. Click “Save” to create the new metafield definition for your size chart page.
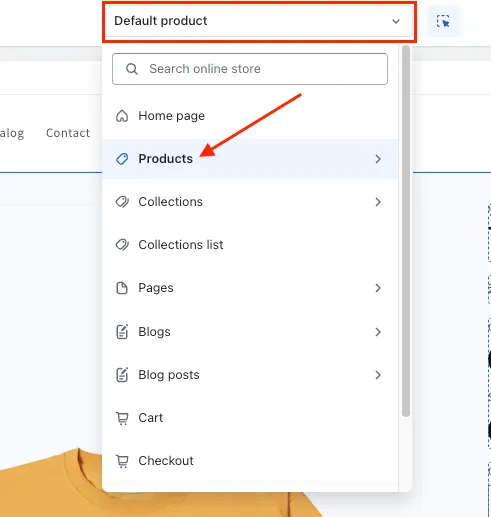
Step 2: Access the Theme Editor
#1 Go to your Shopify admin dashboard and navigate to the Theme editor.
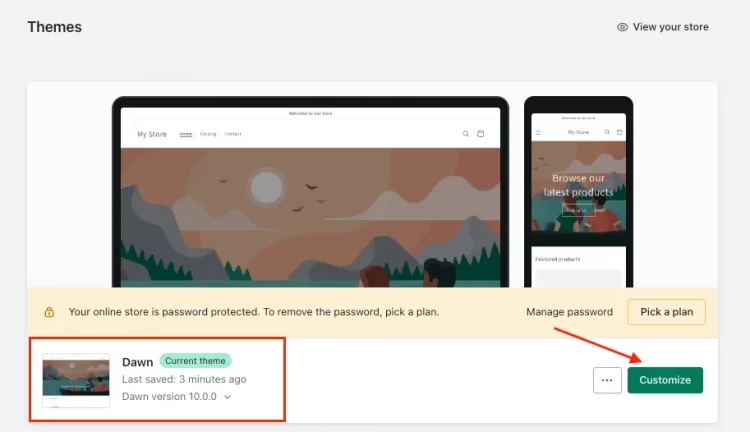
#2 Locate the product page template where you want to add the size chart pop-up.
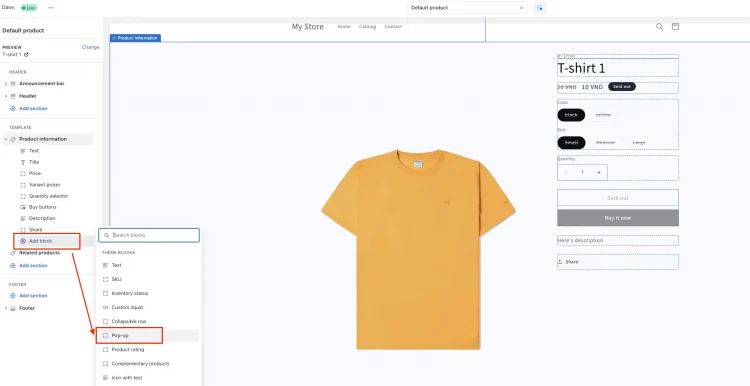
Step 3. Add the Size Chart “Pop-Up” Block
Within the theme editor’s product section, click “Add Block” > “Pop-up”. This block will be responsible for displaying the size chart as a pop-up.
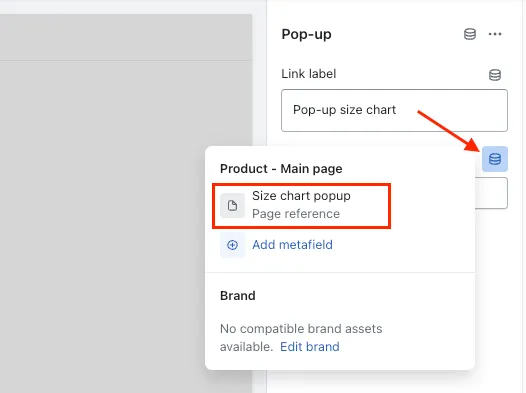
Step 4. Assign the Metafields
In the pop-up block settings, assign the metafield you created in the first step. This will link the size chart URL to the pop-up block.
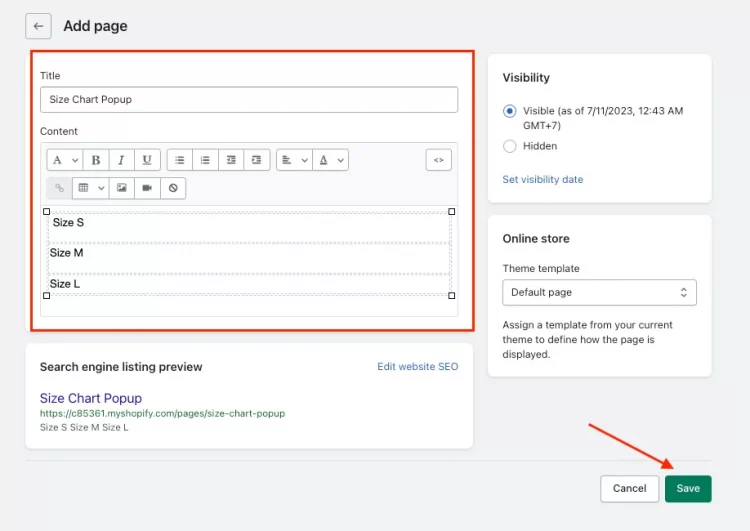
Step 5. Create Size Chart Pages
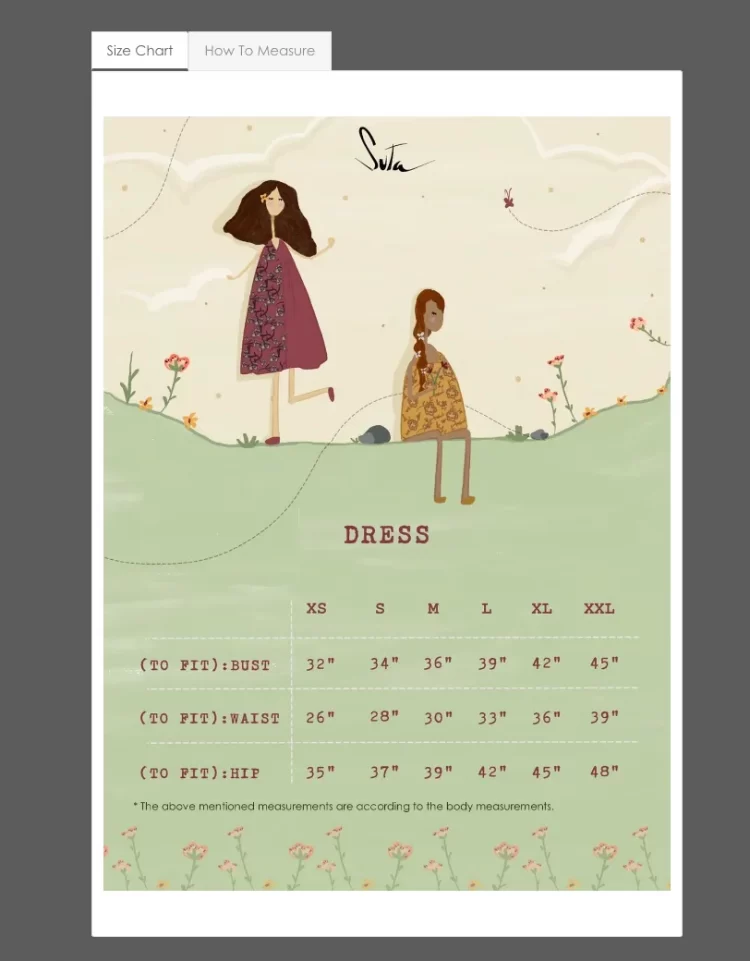
Now, you need to create separate pages for each size chart. From your Shopify online store, go to the “Pages” section > Click “Add page” and customize the size chart page as you want.
Learn how to create a size chart in Shopify for each product if you have multiple products with different size charts. Include the size chart information on each page.
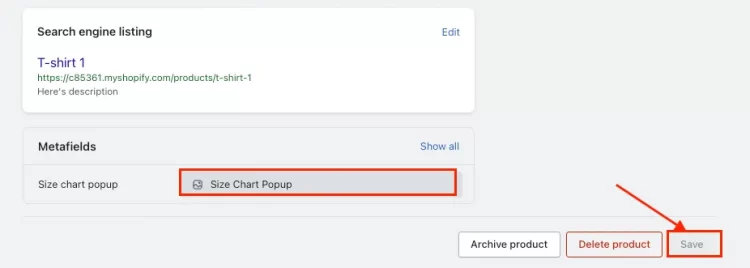
Step 6. Link the Size Chart URLs
Finally, return to your “Product” pages. Scroll down to the “Metafields” section and input the corresponding size chart page into the new metafield you created in step one.
Click “Save” and this will connect the size chart pages to the respective products.
And that’s six simple steps on how to add size chart in Shopify using metafields. Presenting the Shopify size chart as a pop-up window is the best method. But you must ensure that your theme includes the pop-up block as one of the available blocks.
💡 Read more to learn how to show unique Shopify product features to your consumers: How to Add Custom Text Field on Shopify Product Page
Tips for Optimizing the Size Chart Presentation
There needs to be more than just knowing how to add size chart in Shopify. Optimizing the presentation of your size chart is crucial to ensure that customers can easily access and understand the sizing information provided. Here are some valuable tips to help you make the most out of your Shopify size chart:
Make a Clear and Easily Accessible Size Chart
According to my experience, you should design your size chart to be clear, concise, and visually appealing. So, here’s how to add size chart in Shopify most effectively. Use a simple layout that presents sizes in a logical order, such as numerical or alphabetical sequence. Clearly label each size and provide relevant measurements to guide customers in selecting the right fit. Also, consider using icons or symbols to enhance understanding and make the chart more user-friendly.
Organize your size chart by categories like tops, bottoms, and dresses if you sell clothing. Each type can have corresponding measurements, such as chest, waist, hip, inseam, etc. By structuring the Shopify size chart logically and visually pleasingly, customers can quickly find the information they need.
Monitor and Refine the Size Chart Based on Customer Feedback
Regularly monitor customer feedback and reviews regarding your size chart. Take note of any common questions or concerns customers may have. Use this feedback to refine and improve your size chart over time. This iterative process will help ensure that the Shopify size chart remains accurate, informative, and responsive to customer needs.
For instance, if you receive feedback that the measurements for a particular size are inconsistent with the precise fit of a product, you can review and update the size chart accordingly. You demonstrate your commitment to providing accurate and reliable sizing information by actively addressing customer feedback.
Learn how to add size chart in Shopify, and experiment with many ways to optimize your Shopify size chart for the best results. A well-designed and user-friendly size chart can ultimately benefit your Shopify store and your business.
FAQs on How to Add Size Chart in Shopify
[sp_easyaccordion id=”62720″]
Wrapping-Up
By following the steps outlined in this guide, you can upgrade your Shopify store with a clear and easily accessible size chart and help customers to find the perfect fit for their desired products. Now that you understand how to add a size chart in Shopify, it’s time to implement this valuable feature and elevate your customer experience.
To get more helpful advice for your online stores, visit our LitExtension blog and sign up for our eCommerce community. If you’re considering switching to Shopify, LitExtension – the #1 Shopping Cart Migration Expert, is ready to assist you with the fastest and most affordable solution!