Using product variants is an excellent way to make the product page more user-friendly, which can increase conversions. You may already be familiar with adding variants to new products. But the question of how to add variants to existing product on Shopify is a little different and relatively complex.
In this blog post, we – LitExtension, will go over some highlights:
- how to add variants to existing product on Shopify
- how to bulk add variants Shopify and change details
- and delete Shopify product variants
Before diving deep into how to add variants to existing product on Shopify, let’s read a brief introduction to Shopify product variant.
What Is a Product Variant Shopify?
Shopify adds variants to products to assist in product administration. Variants are product options with a different color, size, or feature based on the original product model, and they only appear on products with more than one option.
Store owners can add up to 100 Shopify custom variants and up to three options. For example, another product may give weight, color, and style options; one may let customers choose between sizes, colors, and materials.
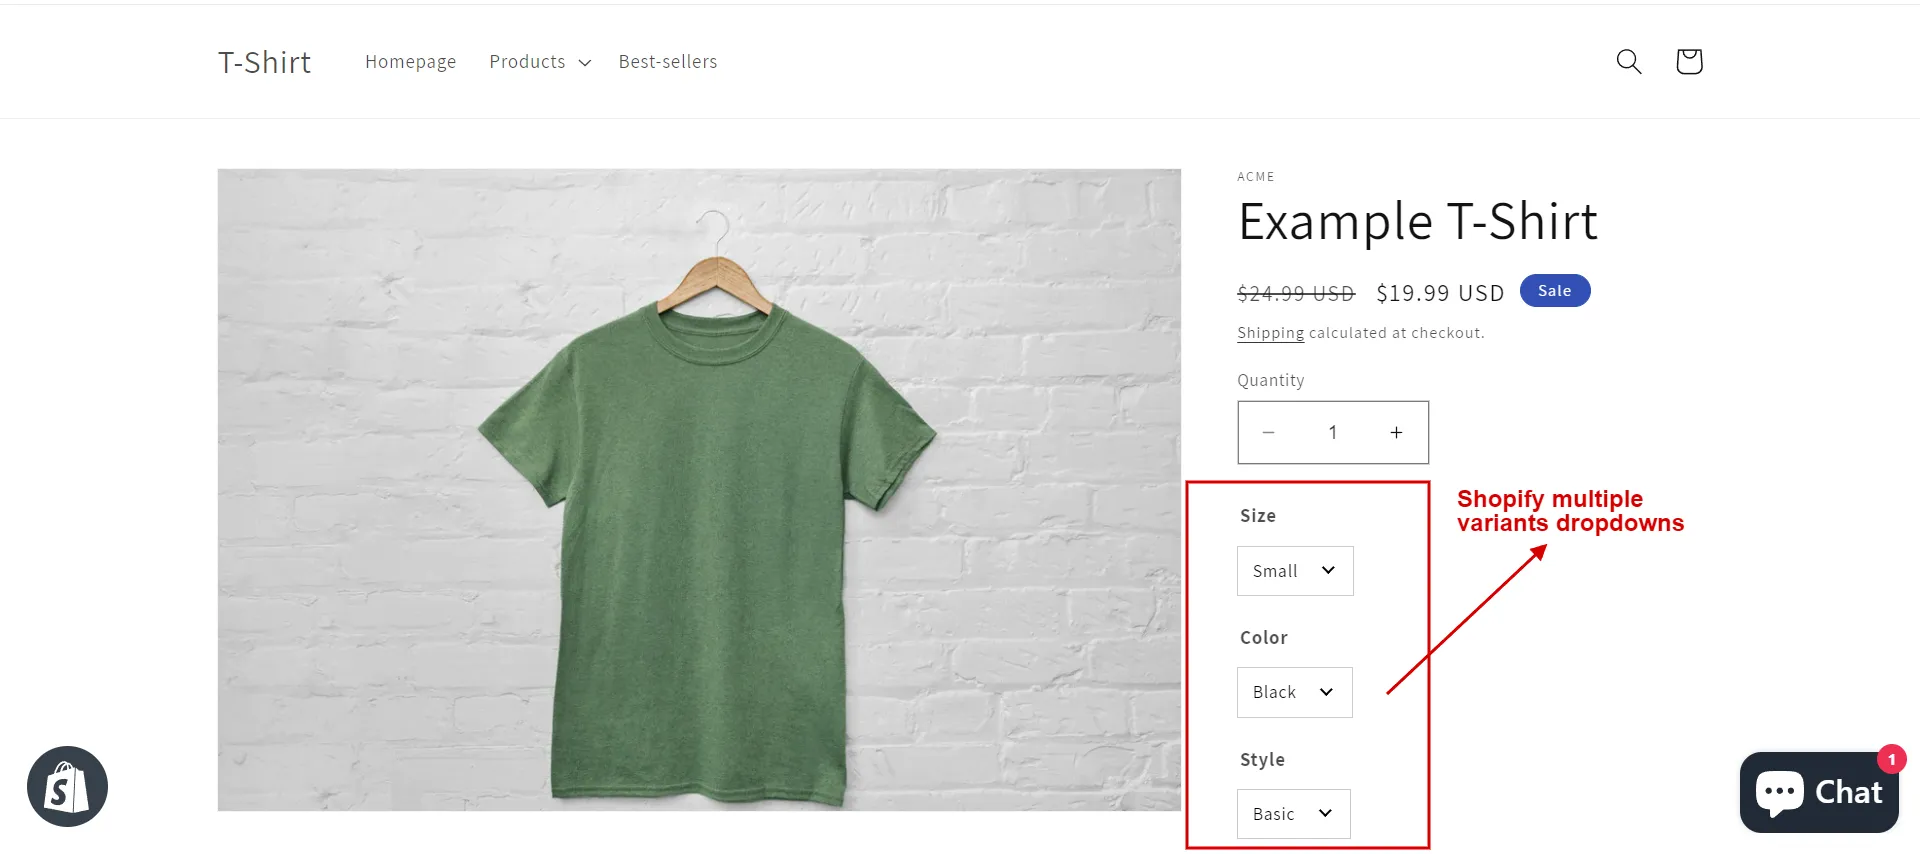
When you add a new variant to your product, you can typically change the pricing to fit each variety and make other changes, such as setting up inventory and shipping choices.
There will be a daily limit on the number of variants imported by CSV files or other programs (including those from third parties), which is 1,000 new variant submissions per day for a basic subscription. Therefore, a Shopify Plus subscription is a prerequisite to getting around this restriction.
How to Add Variants to Existing Product on Shopify
Store owners would find it quicker and simpler to add variants to existing product on Shopify instead of adding new variants while creating new ones. The specific actions needed to complete it are listed below.
#1 Add more options and values
If you ask yourself how to add more than 3 options on Shopify, here are the details for adding more options and values.
- Step 1: Navigate to Products and click the product name.
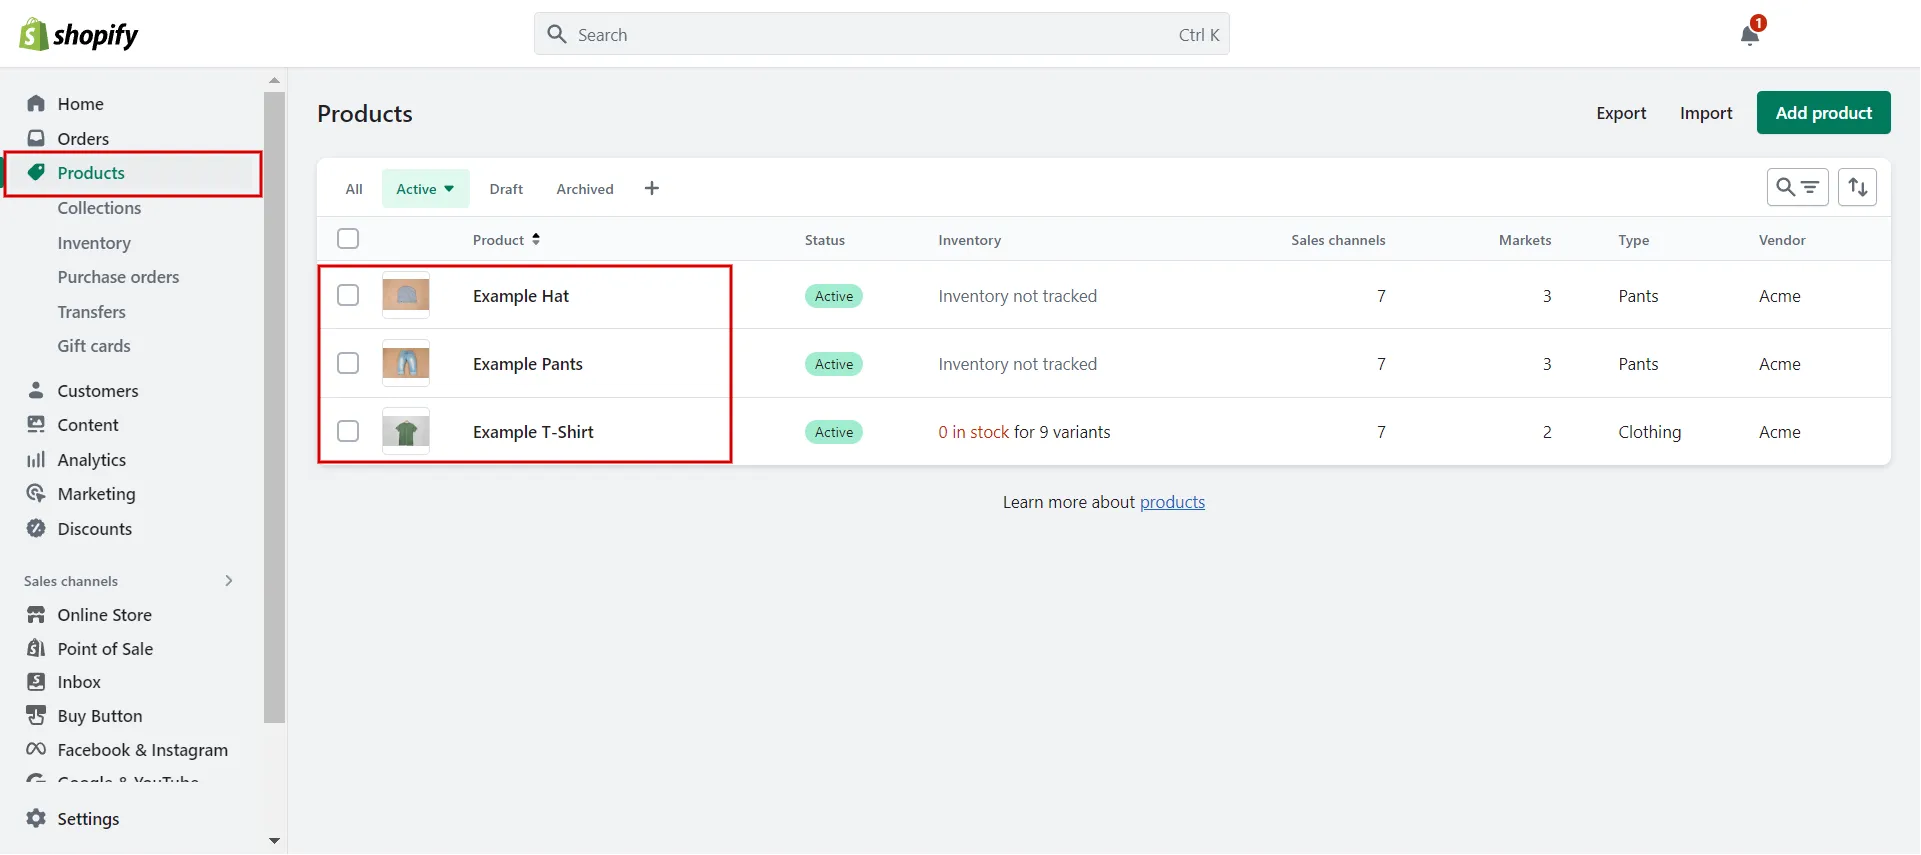
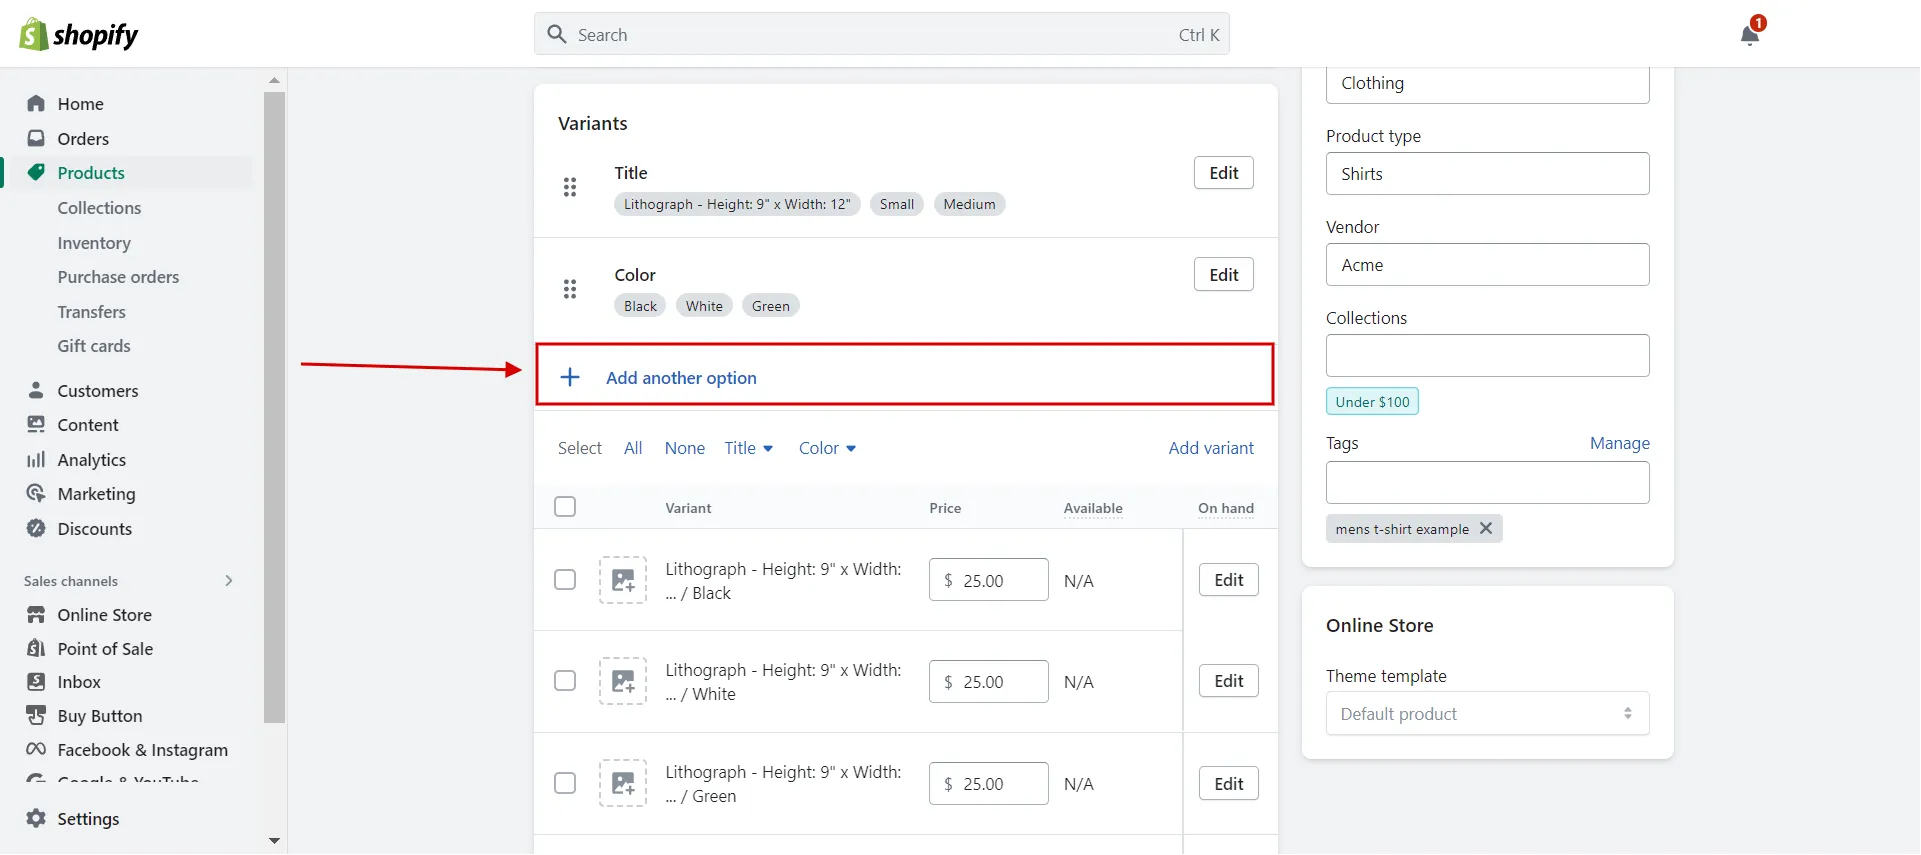
- Step 2: Do one of the following actions in the Shopify Variants section:
- Hit + Add another option to add a new option.
-
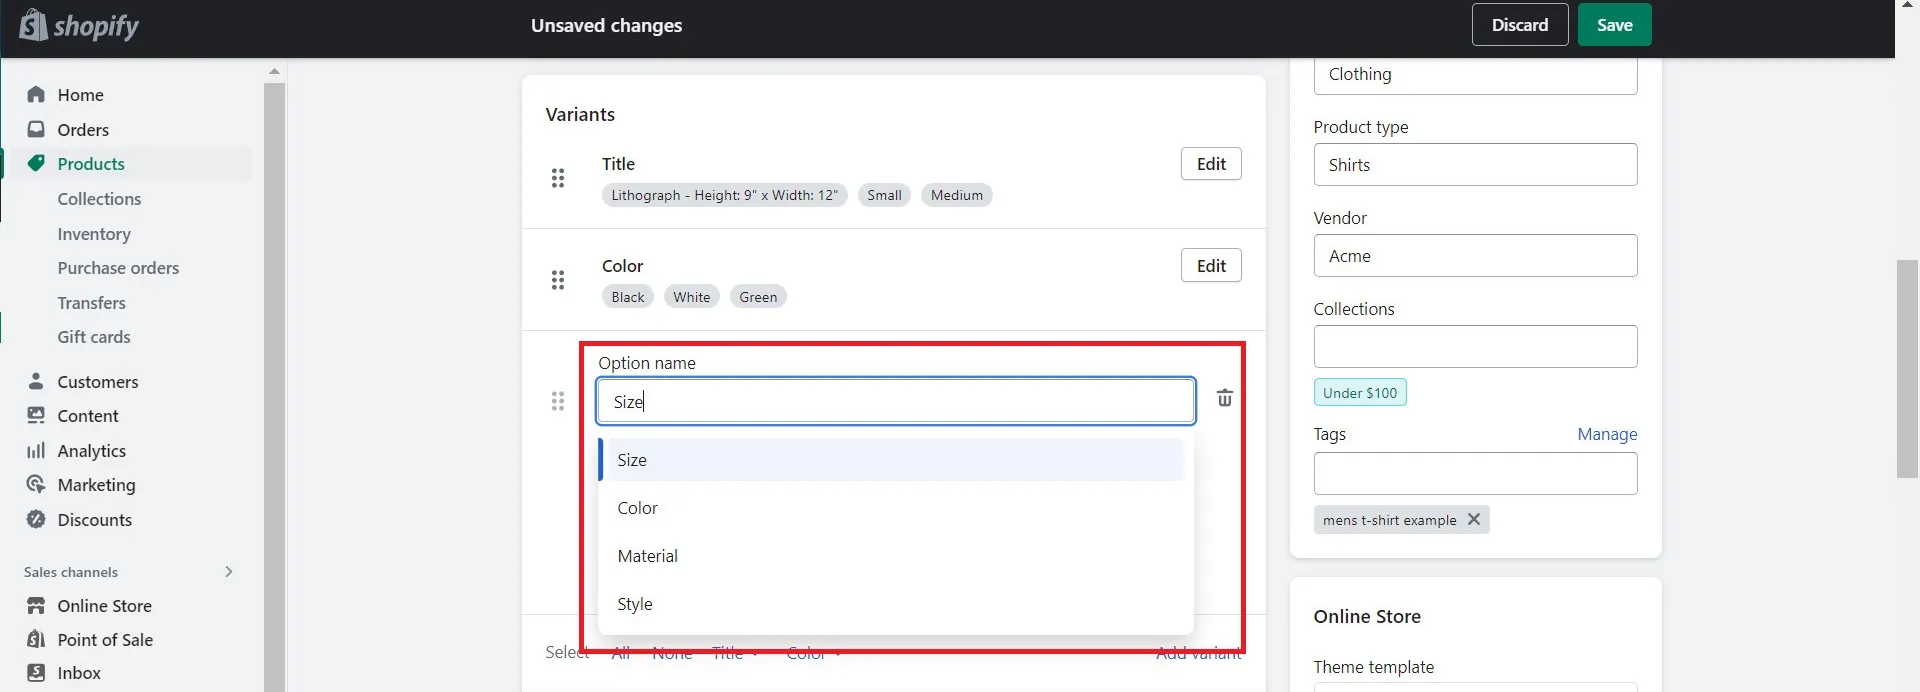
- To change an option name, click Edit and choose 1 of 4 options: color, size, material, style, or enter the new name.
-
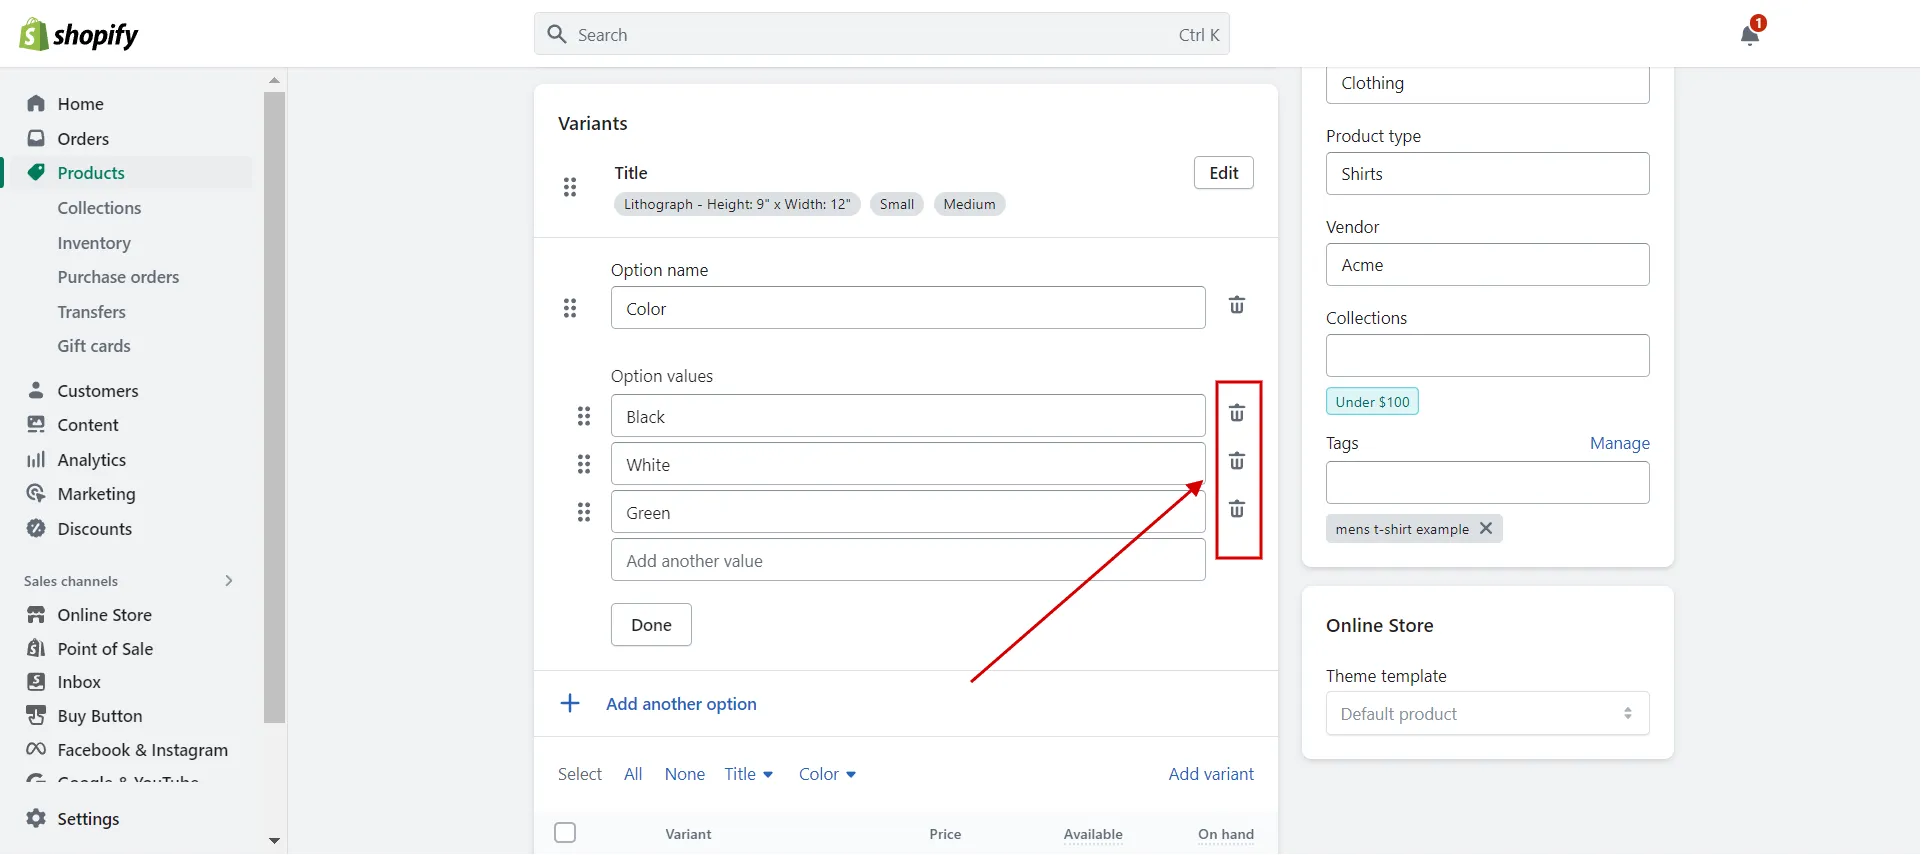
- To delete a Shopify option value, choose Edit, then choose the trash icon next to the value you want to delete.
-
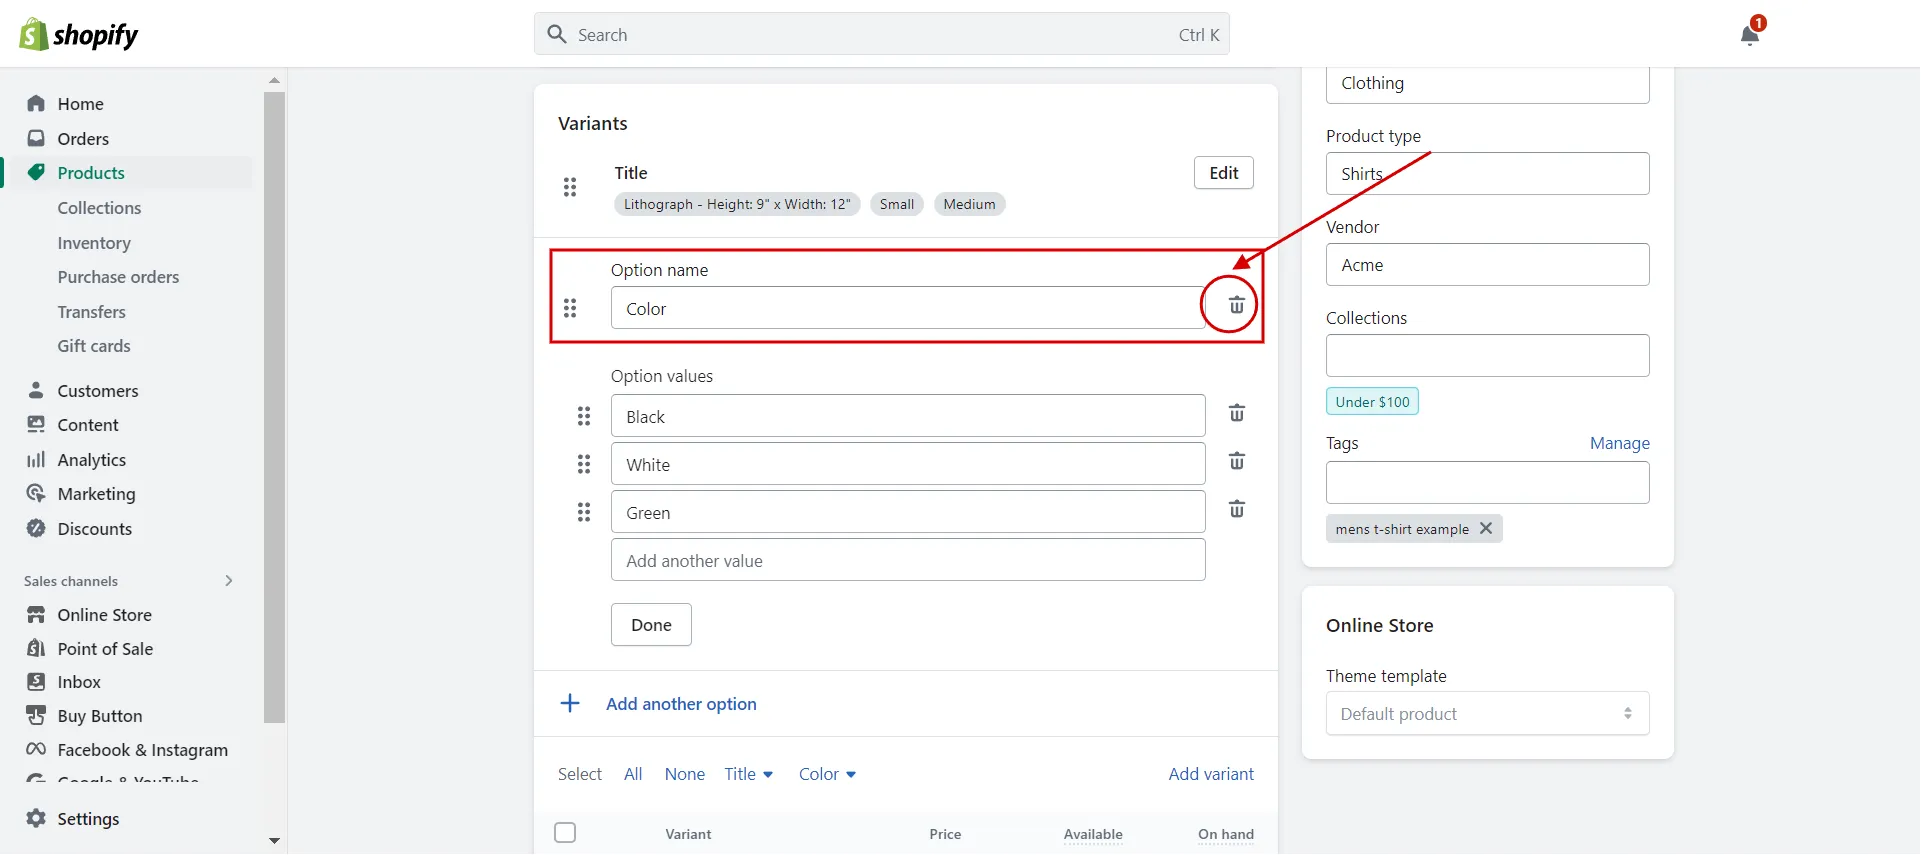
- Click the trash icon beside the option name to delete the option entirely.
- Step 3: Click Save.
#2 Edit variant details with a single location.
Follow our step-by-step to edit product variants Shopify in a one-location store.
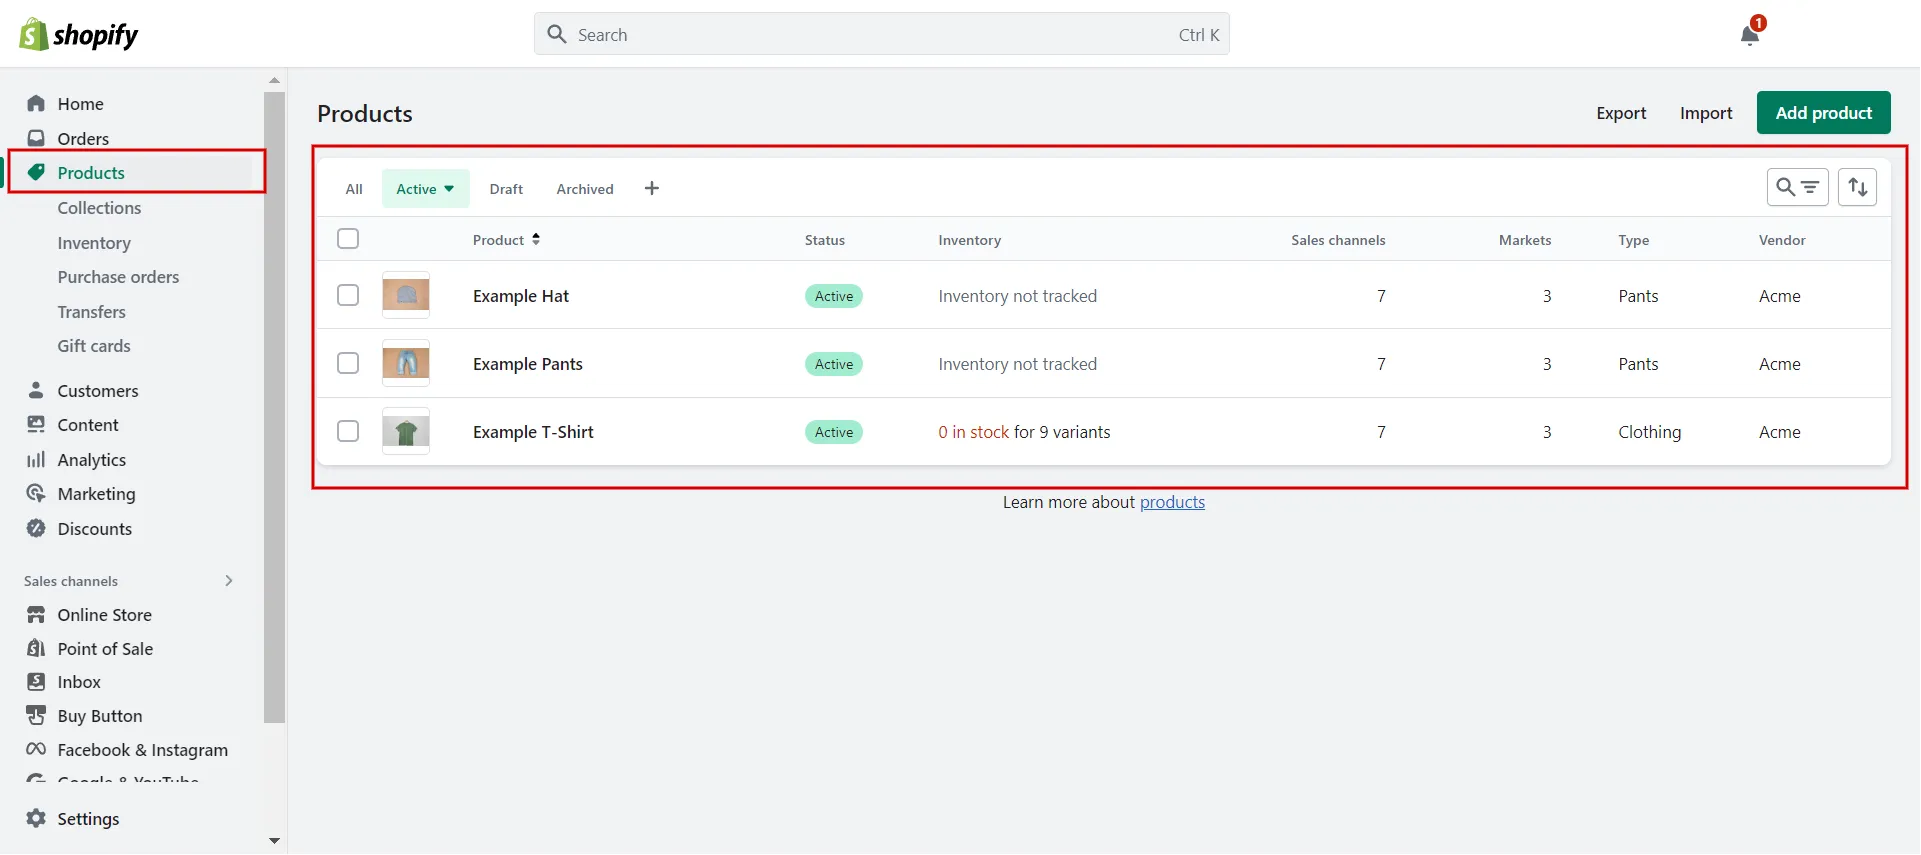
- Step 1: Navigate to Products and choose the product’s name.
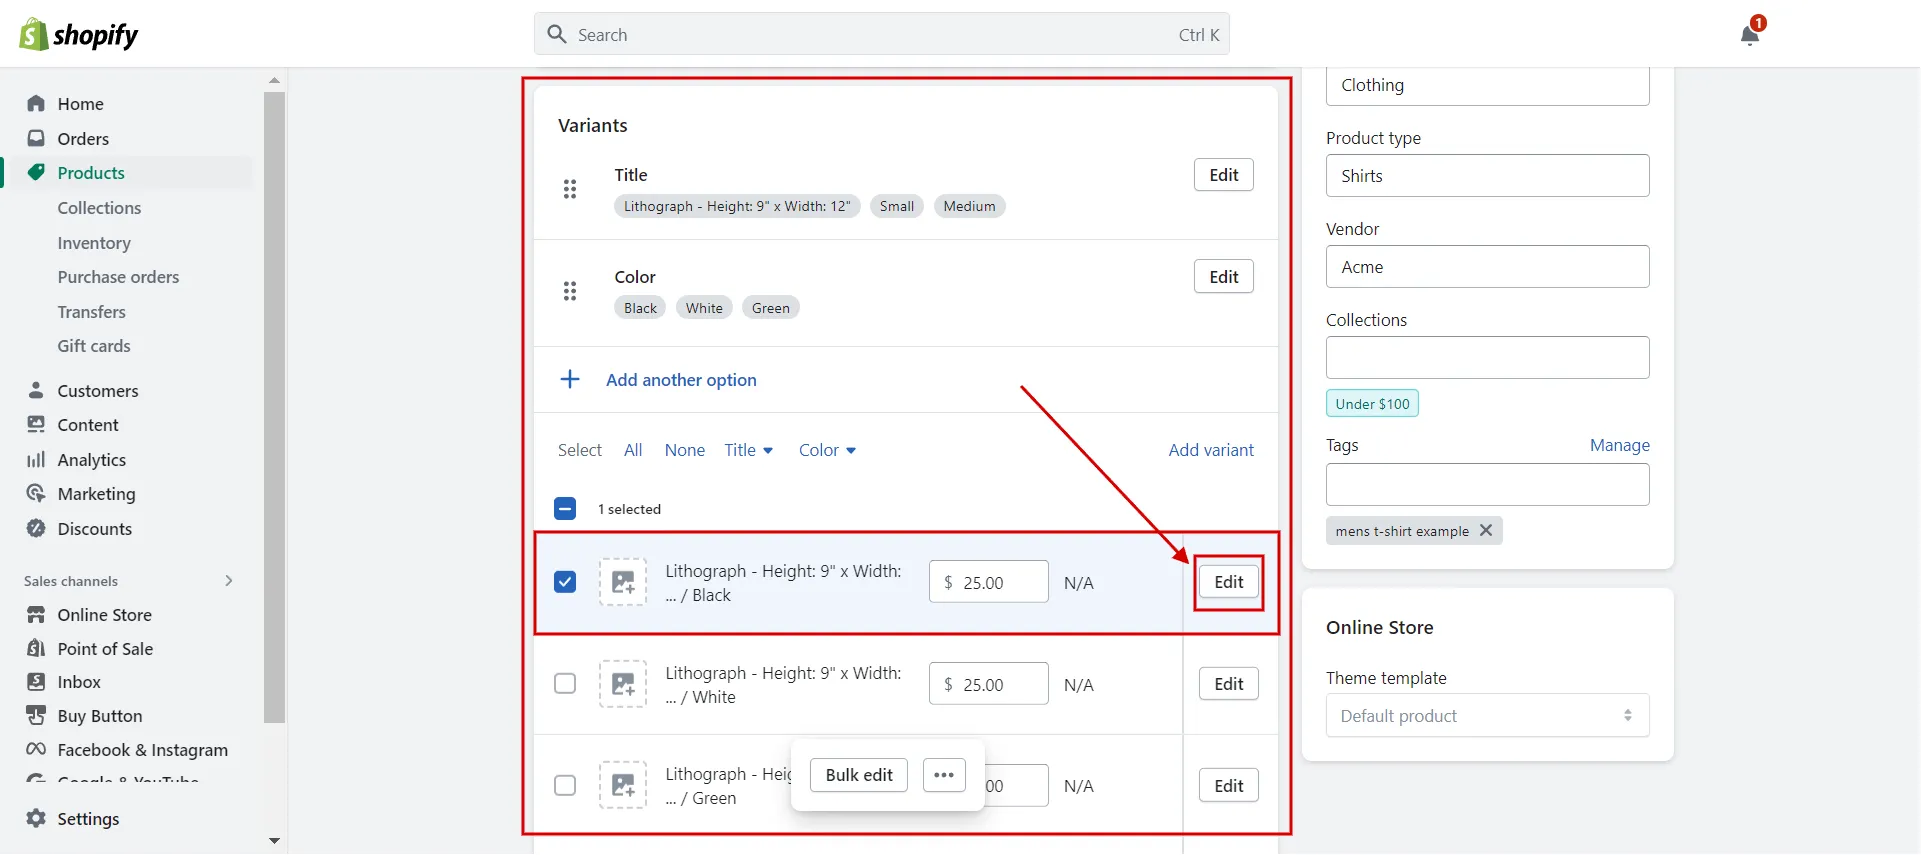
- Step 2: Select the variant you want to alter by clicking Edit next to its name in the Variants section.
- Step 3: Change the variant details: pricing, SKU, barcode, etc.
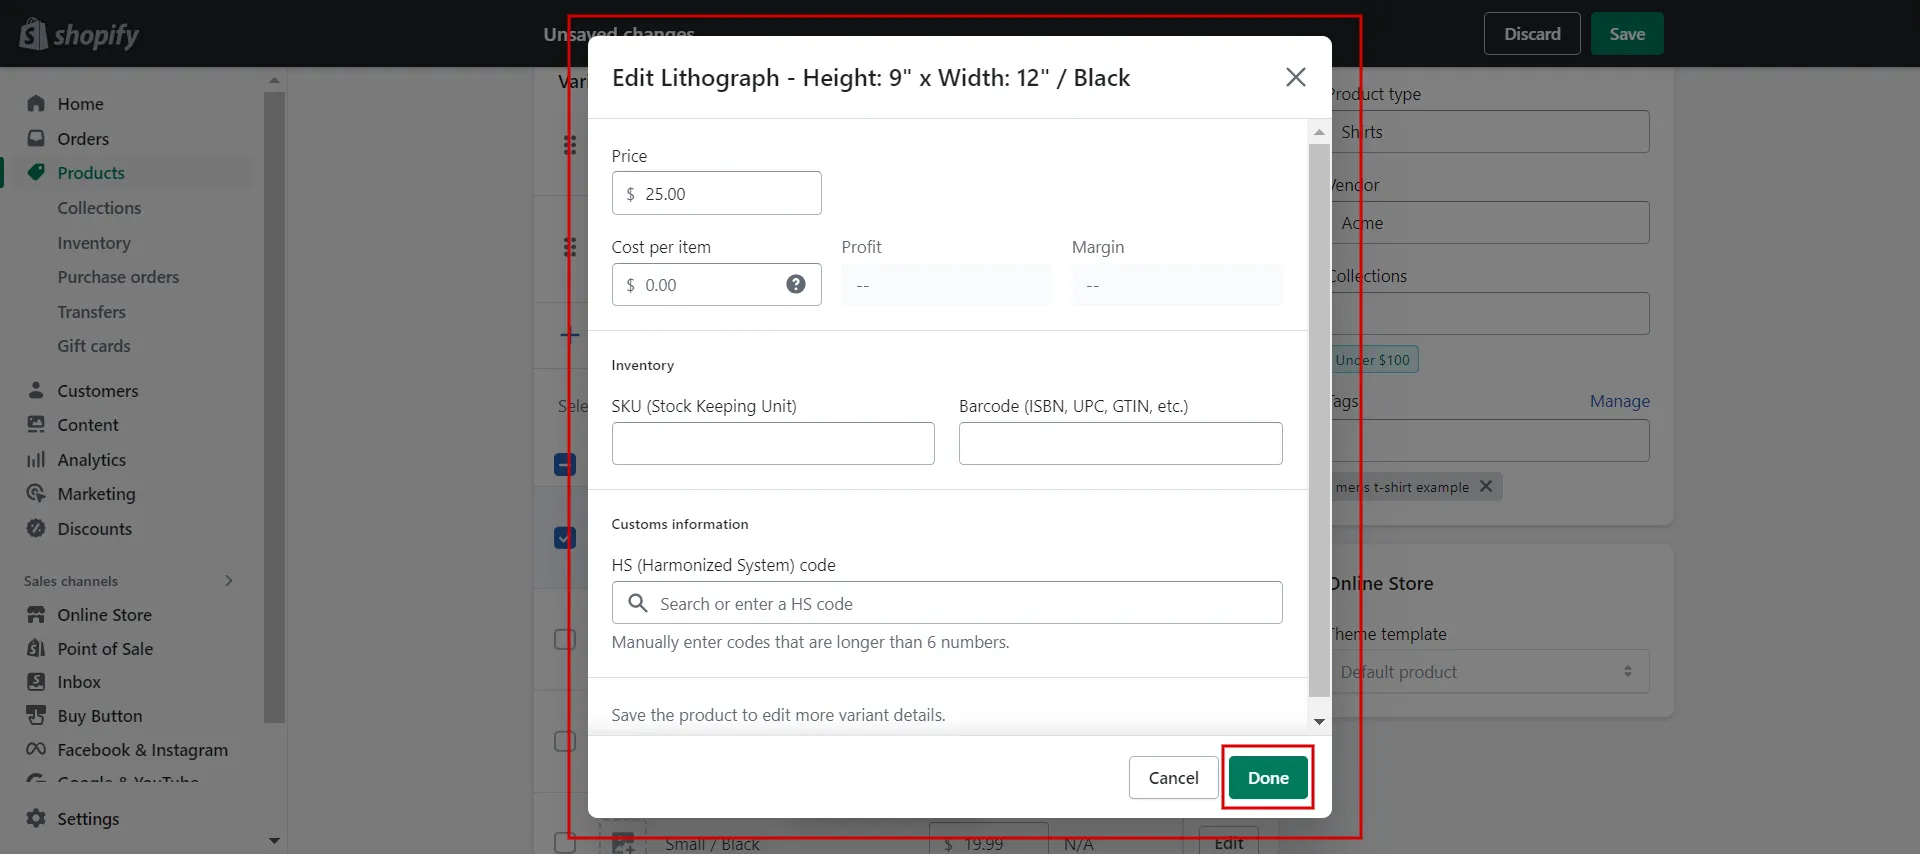
- Step 4: Click Done and Save.
#3 Edit variant details with many locations
The process of changing variants differs for stores with numerous locations than for stores with only one location.
Without previously selecting the product variants, you may rapidly change their quantities, pricing, barcodes, SKUs, weights, HS codes (tariffs), or country or region of origin.
- Step 1: Navigate to Products and choose the product’s name.
- Step 2: In the Variants section, click Edit above the list of variants.
- Step 3: Choose which variant detail to edit and change the relevant details.
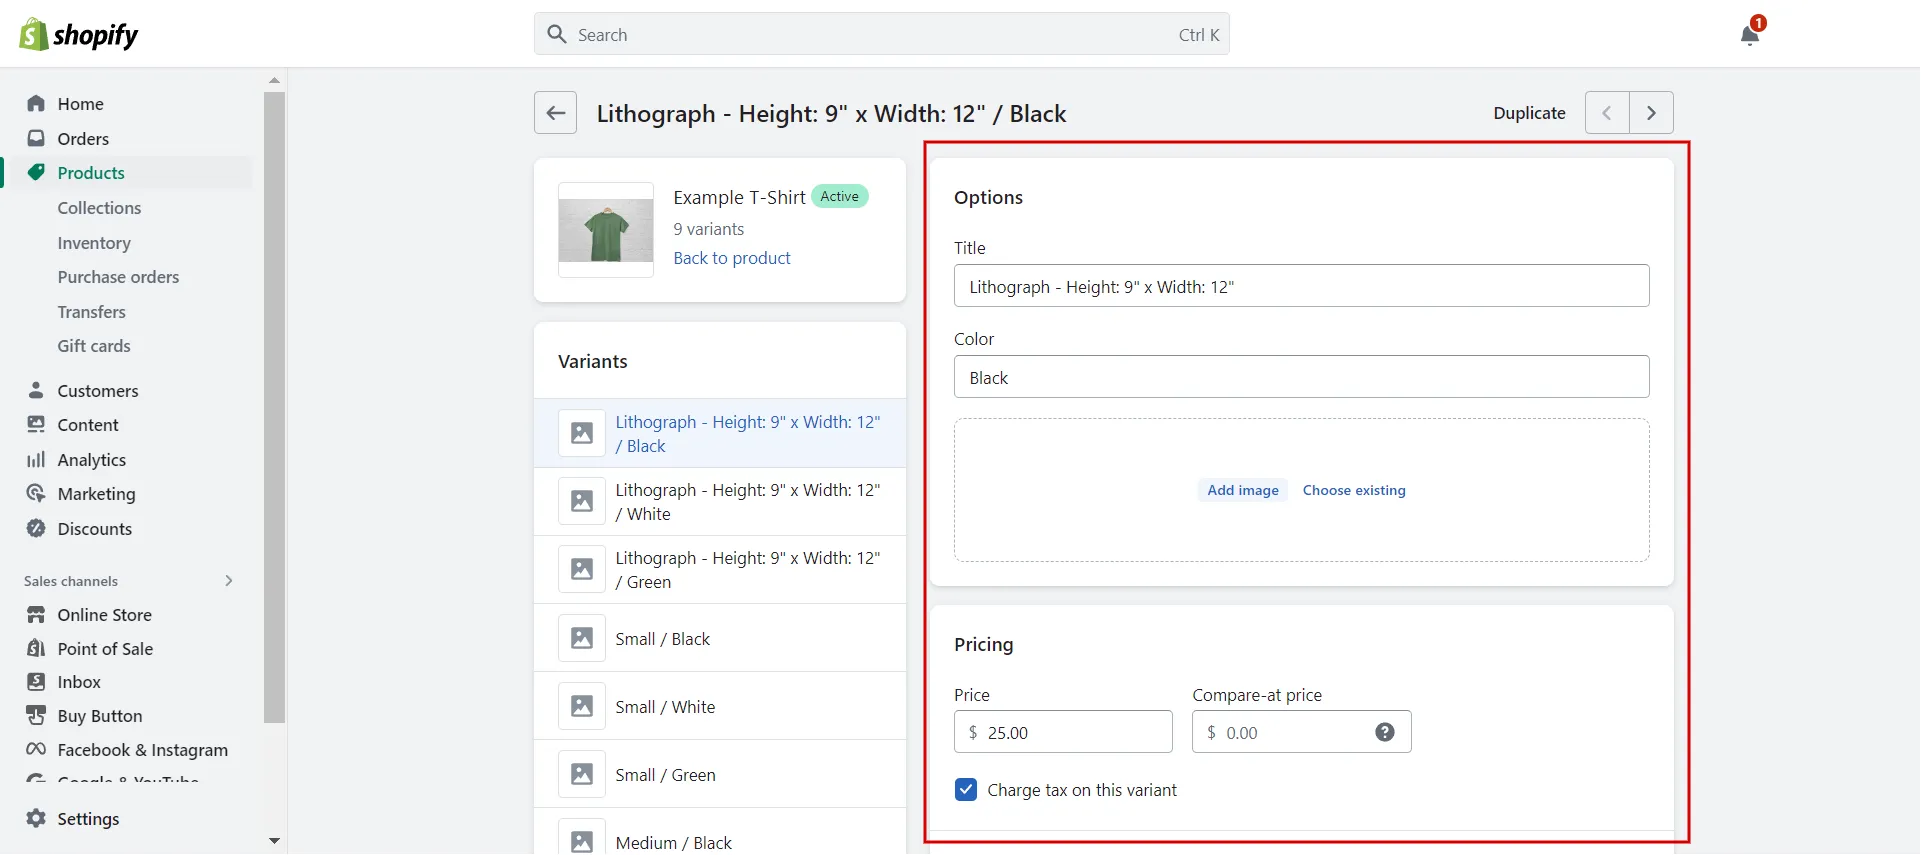
- Step 4: Click Save.
For more information about Shopify’s Add Products to Featured Collection, find out right away!
How to Change Details for Multiple Variants with Bulk Editor
Using the bulk editor, you may simultaneously modify all the details for several variations. Take a look at our instructions.
- Step 1: Go to Products and choose the name of the products.
- Step 2: Use the checkboxes in the Variants section to specify the variants you want to alter. To easily choose all variations of one option, click the choose options button at the top of the variants list.
- Step 3: Choose Bulk Edit.
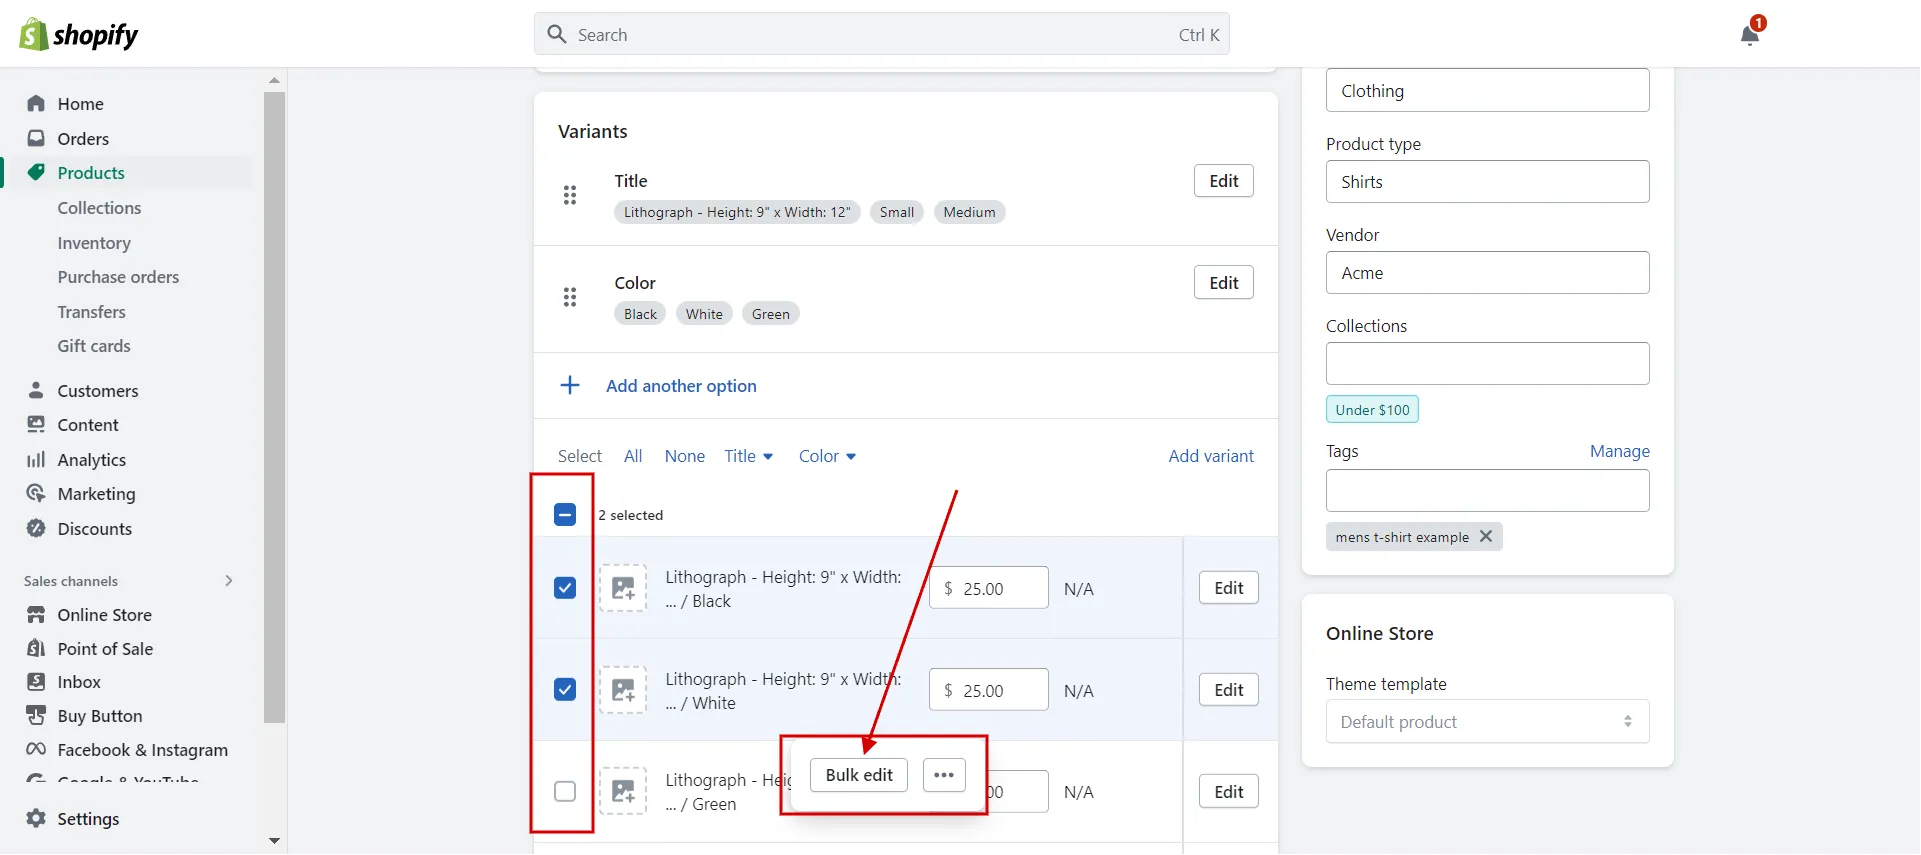
- Step 4: Enter your changes in the appropriate fields on the Bulk editor page.

- Step 5: Click the Save button.
So now you know how to add variants to existing product on Shopify. How about eliminating one of the current variants? Let’s do it together!
Want to migrate to Shopify?
If you are intending to migrate to Shopify, LitExtension offers a great migration service that helps you transfer your data from the current eCommerce platform to a new one accurately and seamlessly with utmost security.
How to Delete a Variant to Existing Product on Shopify
A deleted variant is eliminated forever. If you no longer want to offer a product with variants, remove all the Shopify product variant options and values, including the default. Our guidelines are:
- Step 1: Go to Products and click the product name.
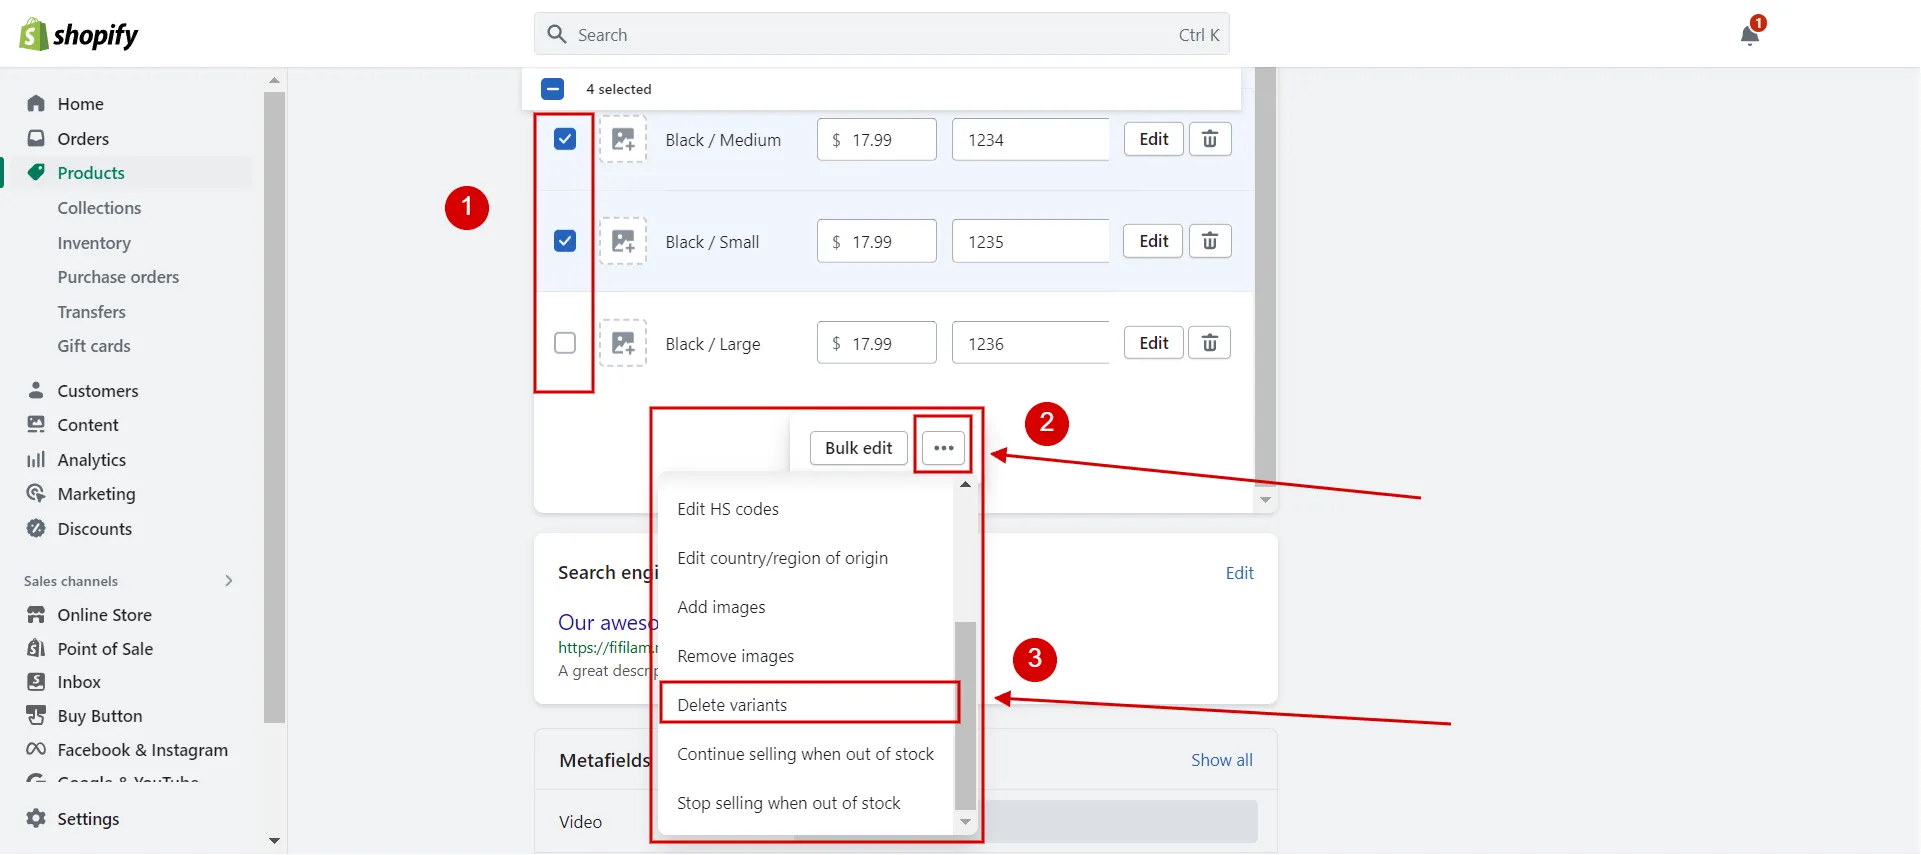
- Step 2: Under Variants, check the boxes next to the variant.
- Step 3: Delete variants in two ways
- Click ‘…’ and then choose Delete Variant.
-
- Click the trash icon beside the edit button.
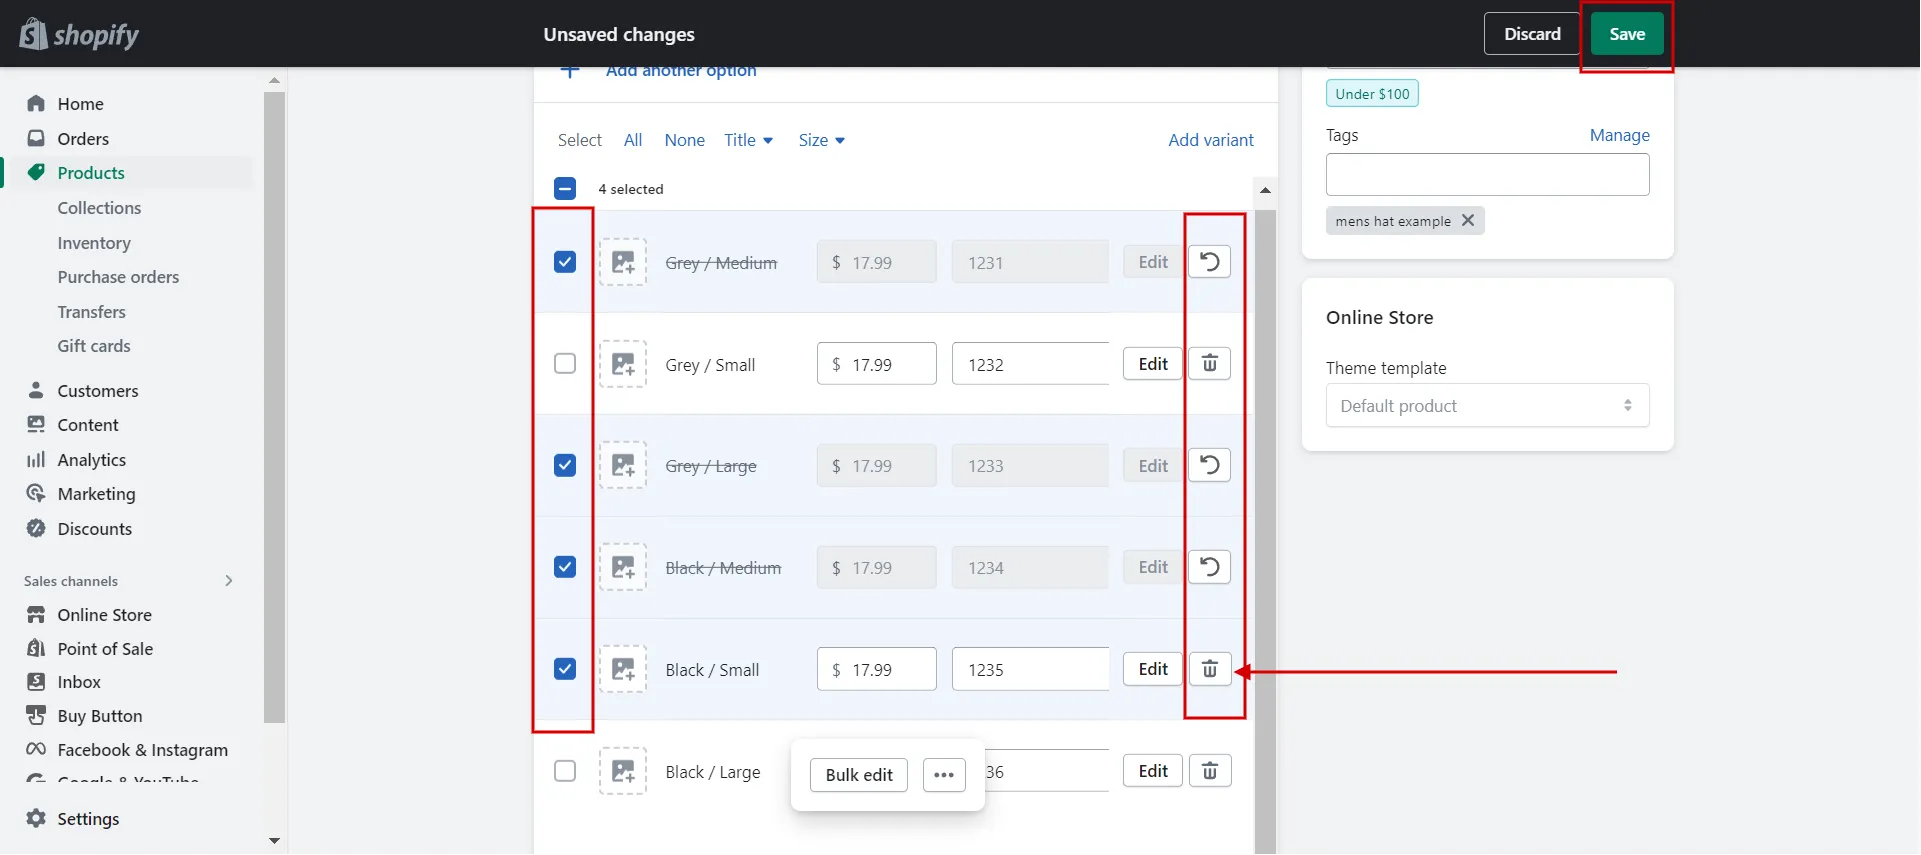
- Step 4: Click Save.
Now you know how to add variants on Shopify for your existing products. Let’s go to the following section to re-arrange the order of Shopify variants.
Are you seeking the best Shopify tips to boost your store’s sales? Check it out now!
How to Reorder Shopify Variants
When customers view your products, Shopify product variant options and values are displayed in a particular order. You can modify the display order on the product details page.
The order in which the Shopify variants appear when you reorder them depends on the product’s variants. If the product doesn’t have a variant that corresponds to the order you specify, the order of variants is changed according to the variants the product has.
- Step 1: Go to Products and click the product name whose options you want to re-order.
- Step 2: In the Variants section, drag the option to move it to a different position. The options for this product appear in the order you choose while a consumer is on the product page.
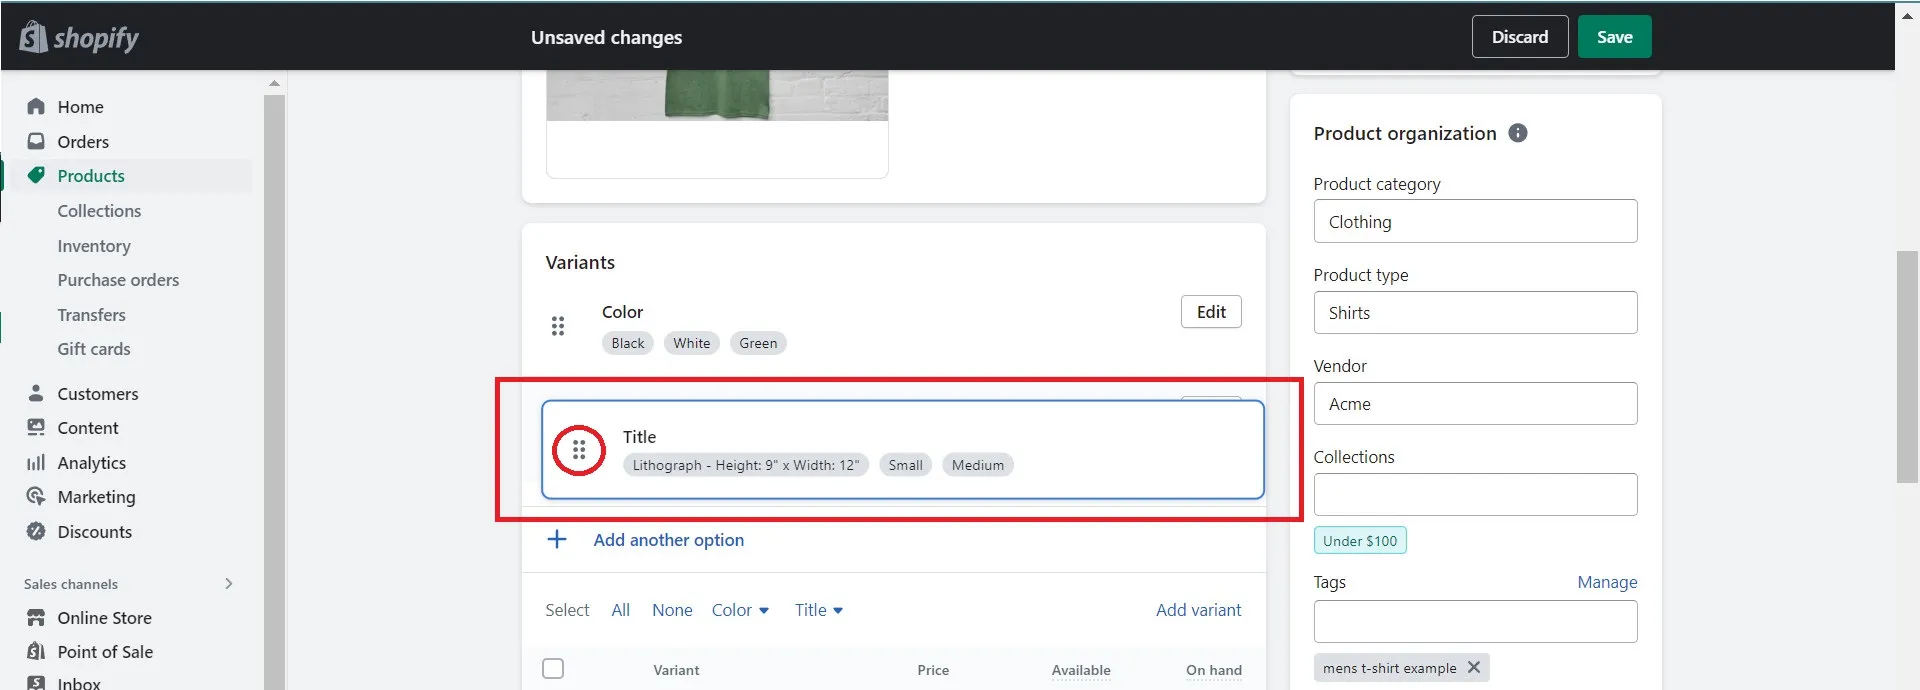
- Step 3: Once you have the options in the order you want, you can alter the display order of the option values. To change the order of an option’s values, click Edit next to it.
- Step 4: After dragging an option value to a new location, click Done. Each option’s values display in the order they should while a consumer is on the product page.
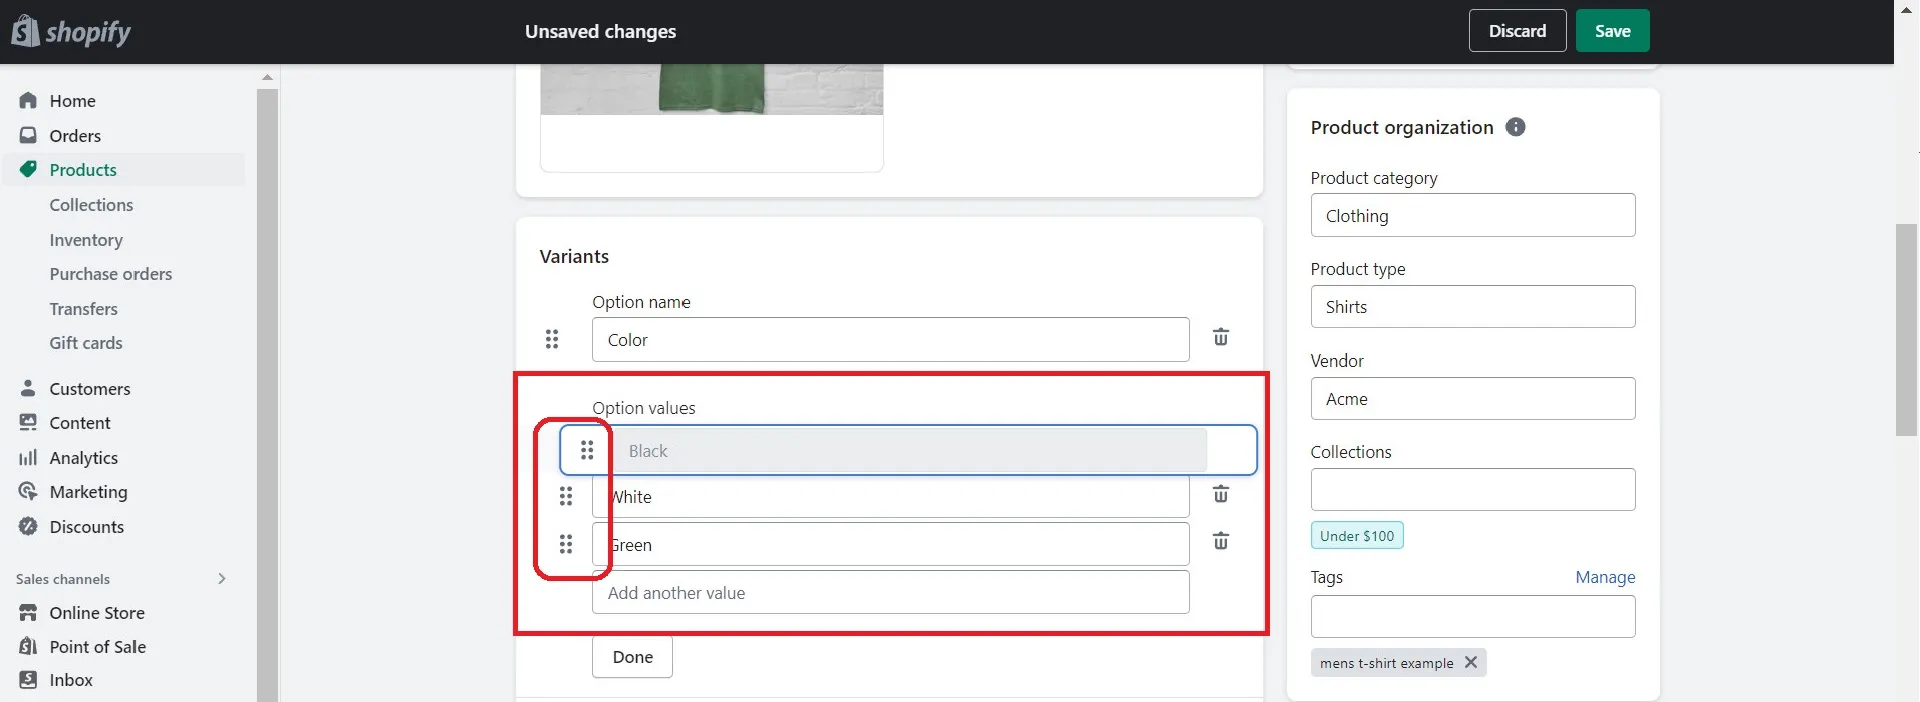
- Step 5: Click Save.
Besides how to add variants to existing product on Shopify, let’s walk through some further Shopify resources:
- Shopify review – Is Shopify truly worth it?
- Shopify tutorial – Detailed guidelines to get instant sales!
Product Variants Shopify – FAQs
[sp_easyaccordion id=”61206″]
Summing Up
In conclusion, adding variants to existing products on Shopify is a great way to provide your shoppers with a unique or more personalized item. If you discontinue carrying a particular size, color, material, or style permanently or only during a specific time of year, you might wish to add or remove variants on Shopify.
LitExtension, the #1 Shopping Cart Migration Expert hopes that our article, “How to Add Variants to Existing Product on Shopify” will assist you in creating a beautiful product page for your Shopify store. Read more blogs on the LitExtension blog and engage with our eCommerce community for more helpful ideas.