Before receiving the first order on your store, you must take some time to set up delivery methods and wonder how to change shipping on Shopify.
In this article, we – LitExtension, assist you in figuring out how to change shipping on Shopify store effortlessly.
Here are some main points we’re going to cover today:
- Different methods of Shopify shipping rates
- How to change shipping price on Shopify
- How to change shipping rates on Shopify
- Best Shopify shipping rules apps
Just keep reading with us!
What Are Different Methods of Setting Shopify Shipping Rates?
Shopify shipping rates are the additional fees you charge your customers and the price of their orders. The cost of any shipping costs is added to a customer’s order at the time of purchase.
Before deep diving into how to change shipping on Shopify, let’s first skim 5 types of Shopify custom shipping rates.
- Flat shipping rates
- Free shipping rates
- Calculated shipping rates
- Local delivery method rates
- Customer experience choosing shipping rates
Each type of shipping will be suitable for different consumer groups.
How to Change Shipping Prices on Shopify in General
How to change the shipping fee on Shopify is easy and quick if you follow these instructions!
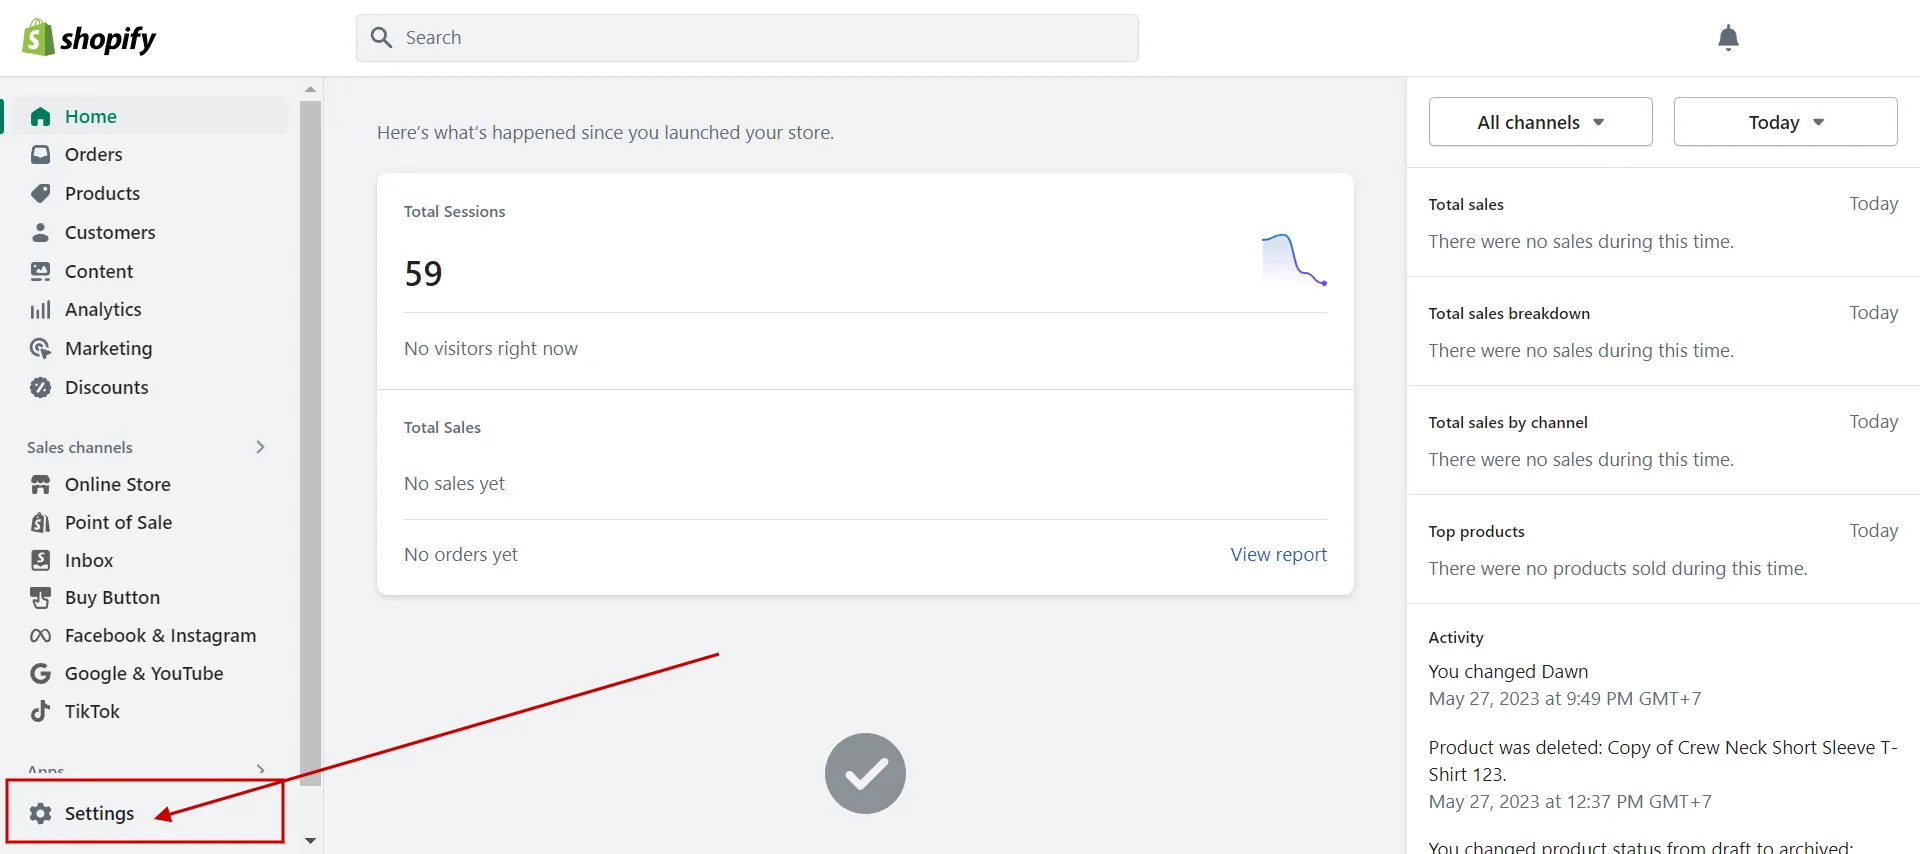
First, in Shopify admin dashboard, navigate to Settings.
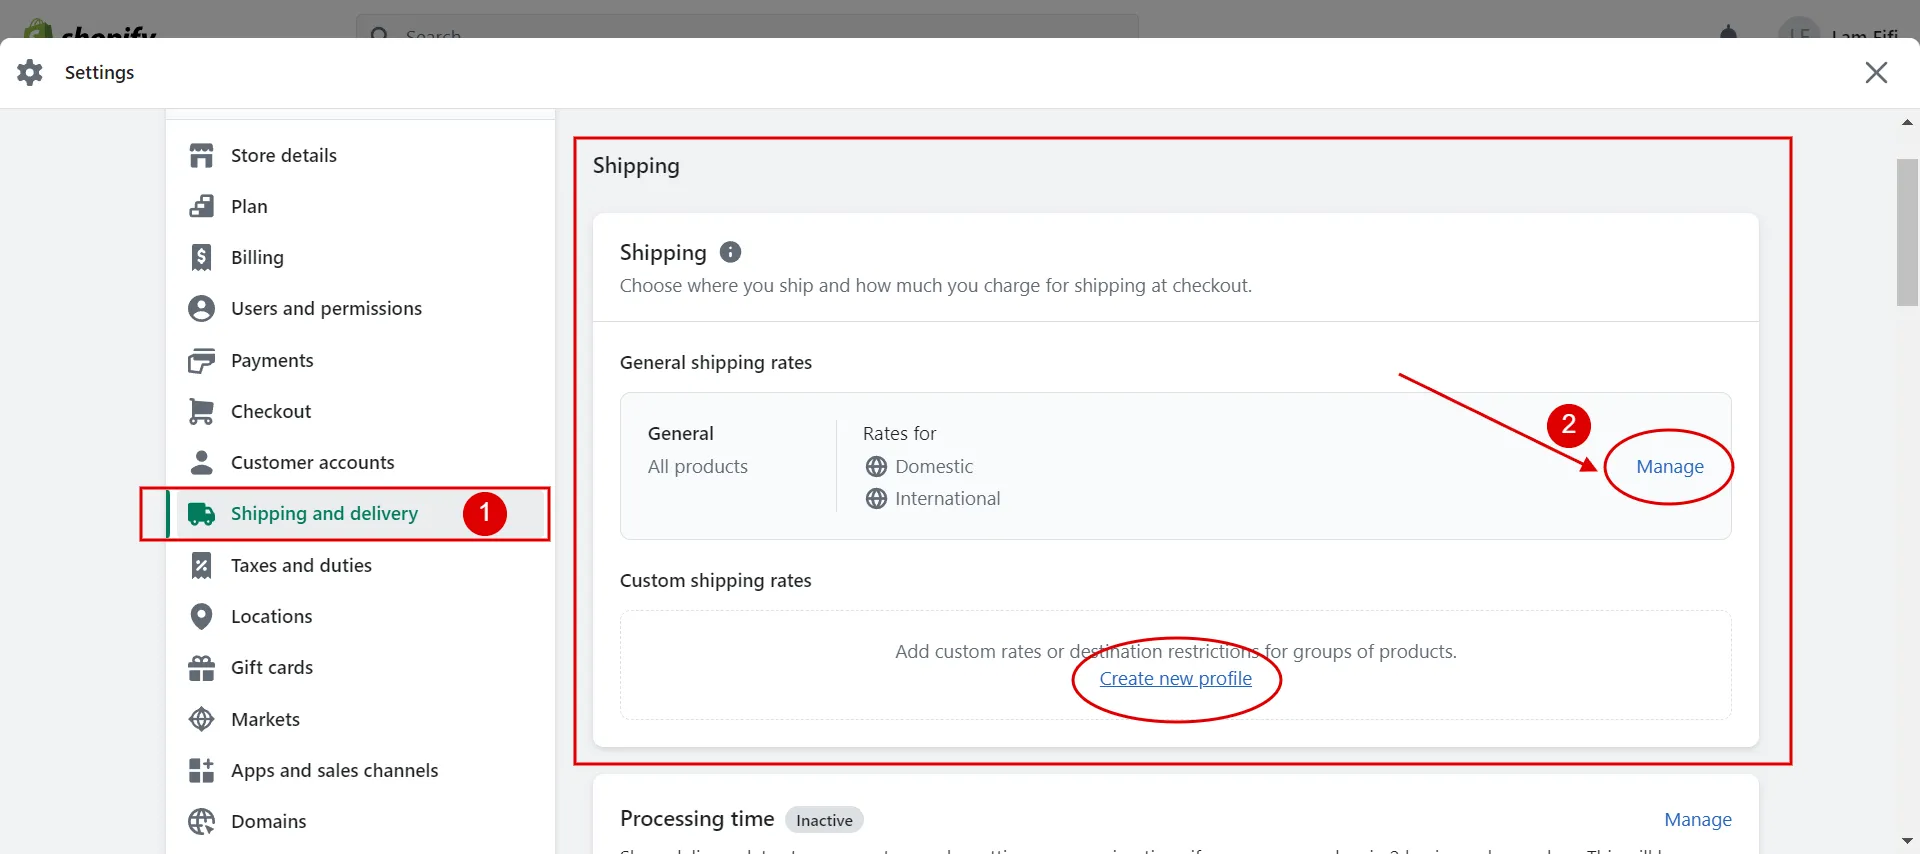
Then, choose the Shipping and Delivery tab and click Manage. Add, remove, or edit your Shopify custom shipping rates from here.
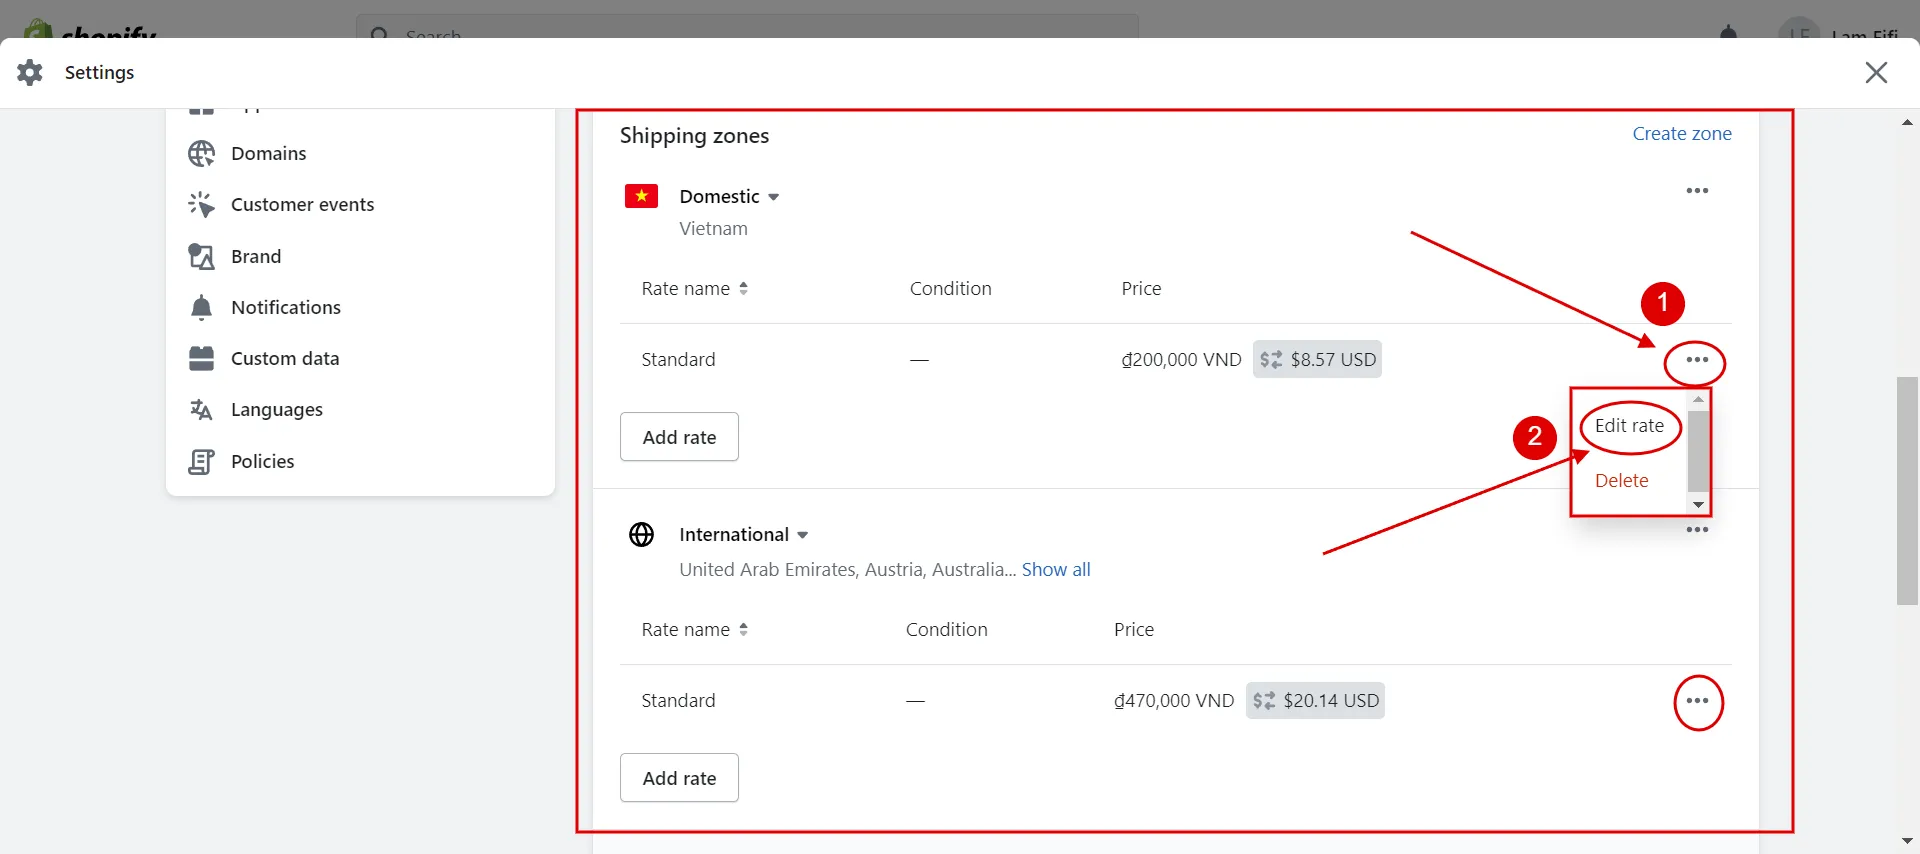
Next, find the Shipping Zones section, choose the rate you want to change, and tap the “…” button. Then, click Edit Rate in the drop-down menu.
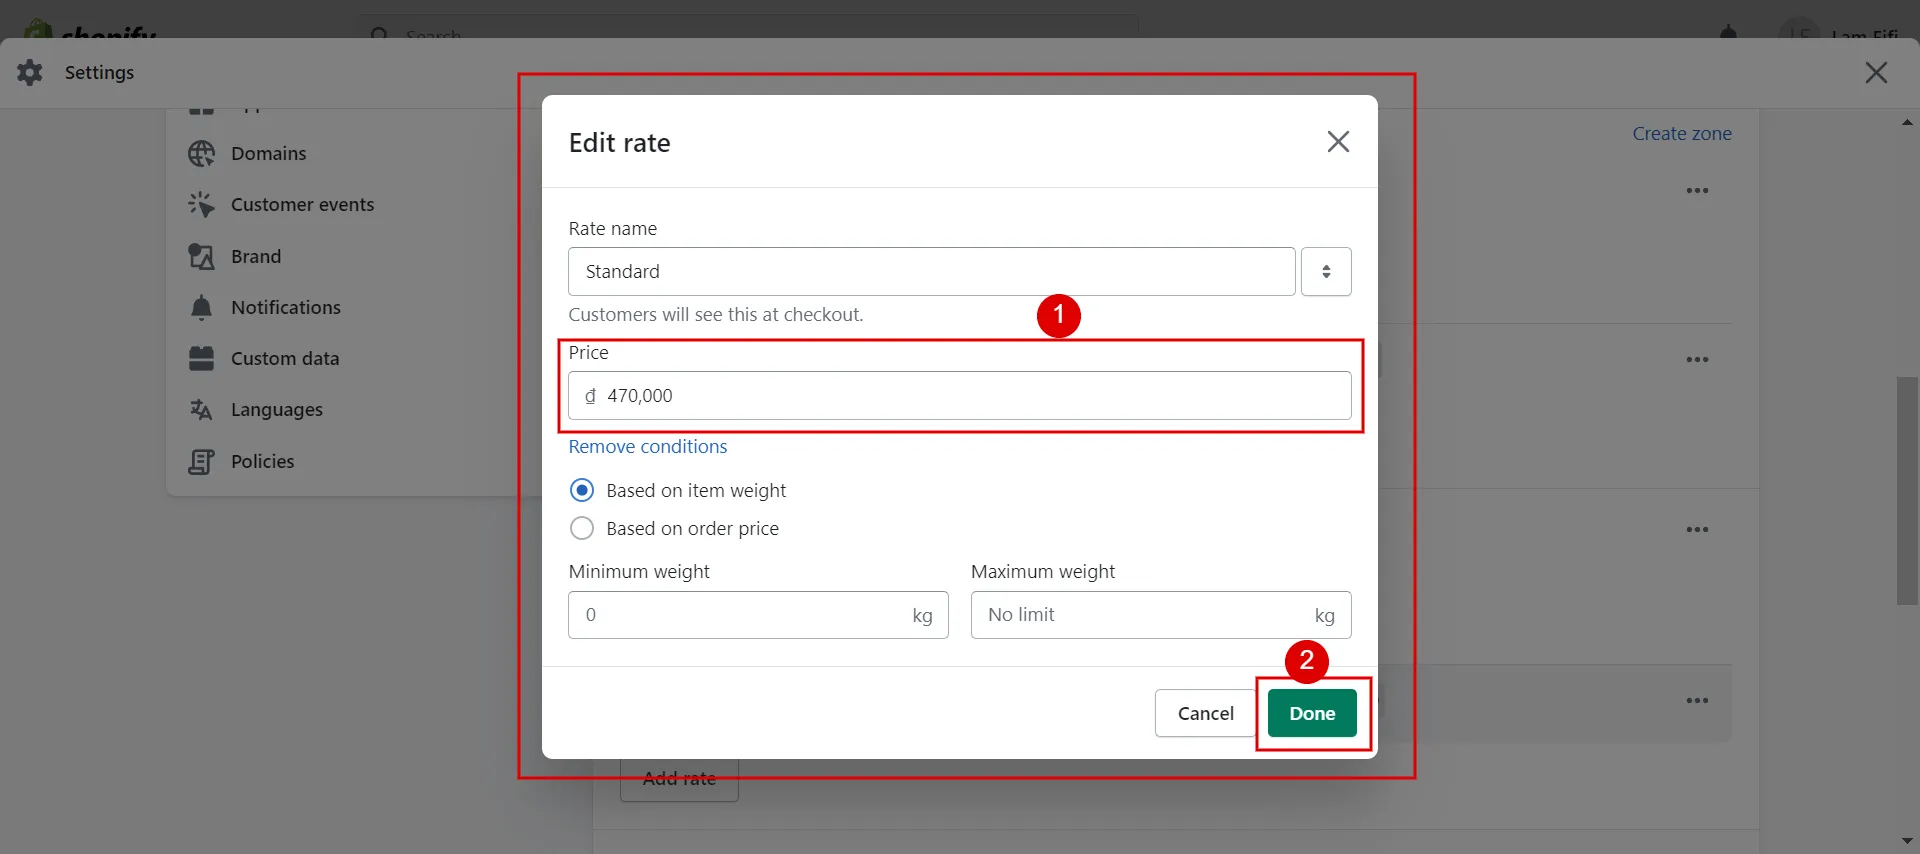
The box for editing rate appears; you just make changes in price and add some conditions (if any). Finally, click Done > Save to finish.
This is how to change shipping on Shopify in general. It’s easy to practice, isn’t it?
To comprehend How does Shopify Shipping work – A complete guide is always ready for you!
How to Change Shipping Rates on Shopify by Types
Let’s go through how to change shipping rates on Shopify by type to give you the most detailed picture!
Some beginning steps are similar; you can simply follow:
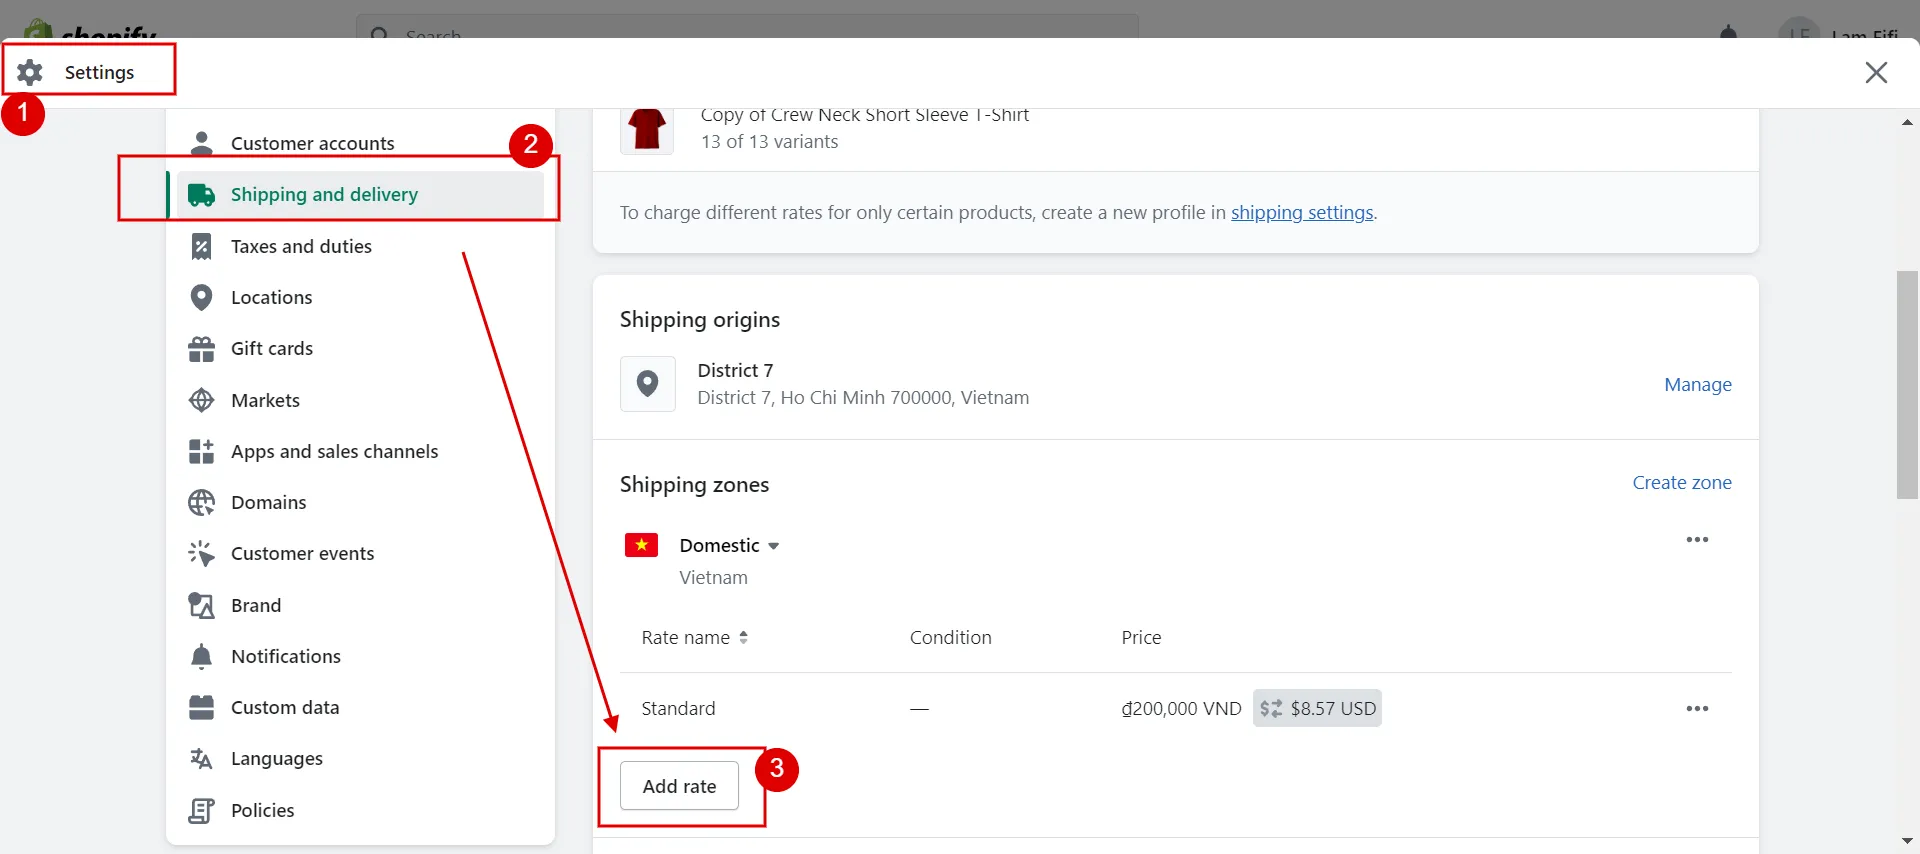
- Go to Settings > Shipping and Delivery.
- Click Manage next to the shipping profile to which you want to add a shipping rate.
- Click Add rate beside the zone to which you want to add a rate.
#1. Set up flat shipping rates
Flat shipping rates mean you charge your customers a specific amount based on their orders. The advantage is that you have complete control over how much a customer is charged at the checkout.
For example, set up a $25 flat shipping rate if you want to charge $25 for shipping each time a consumer places an order.
Thus, how do you edit the flat shipping rate? Here is a quick guide:
- Choose Settings in the admin dashboard
- Select Shipping and Delivery tab > Click Add rate
- Make change
- Optional: select price-based or weight-based conditions
- Click Done and Save.
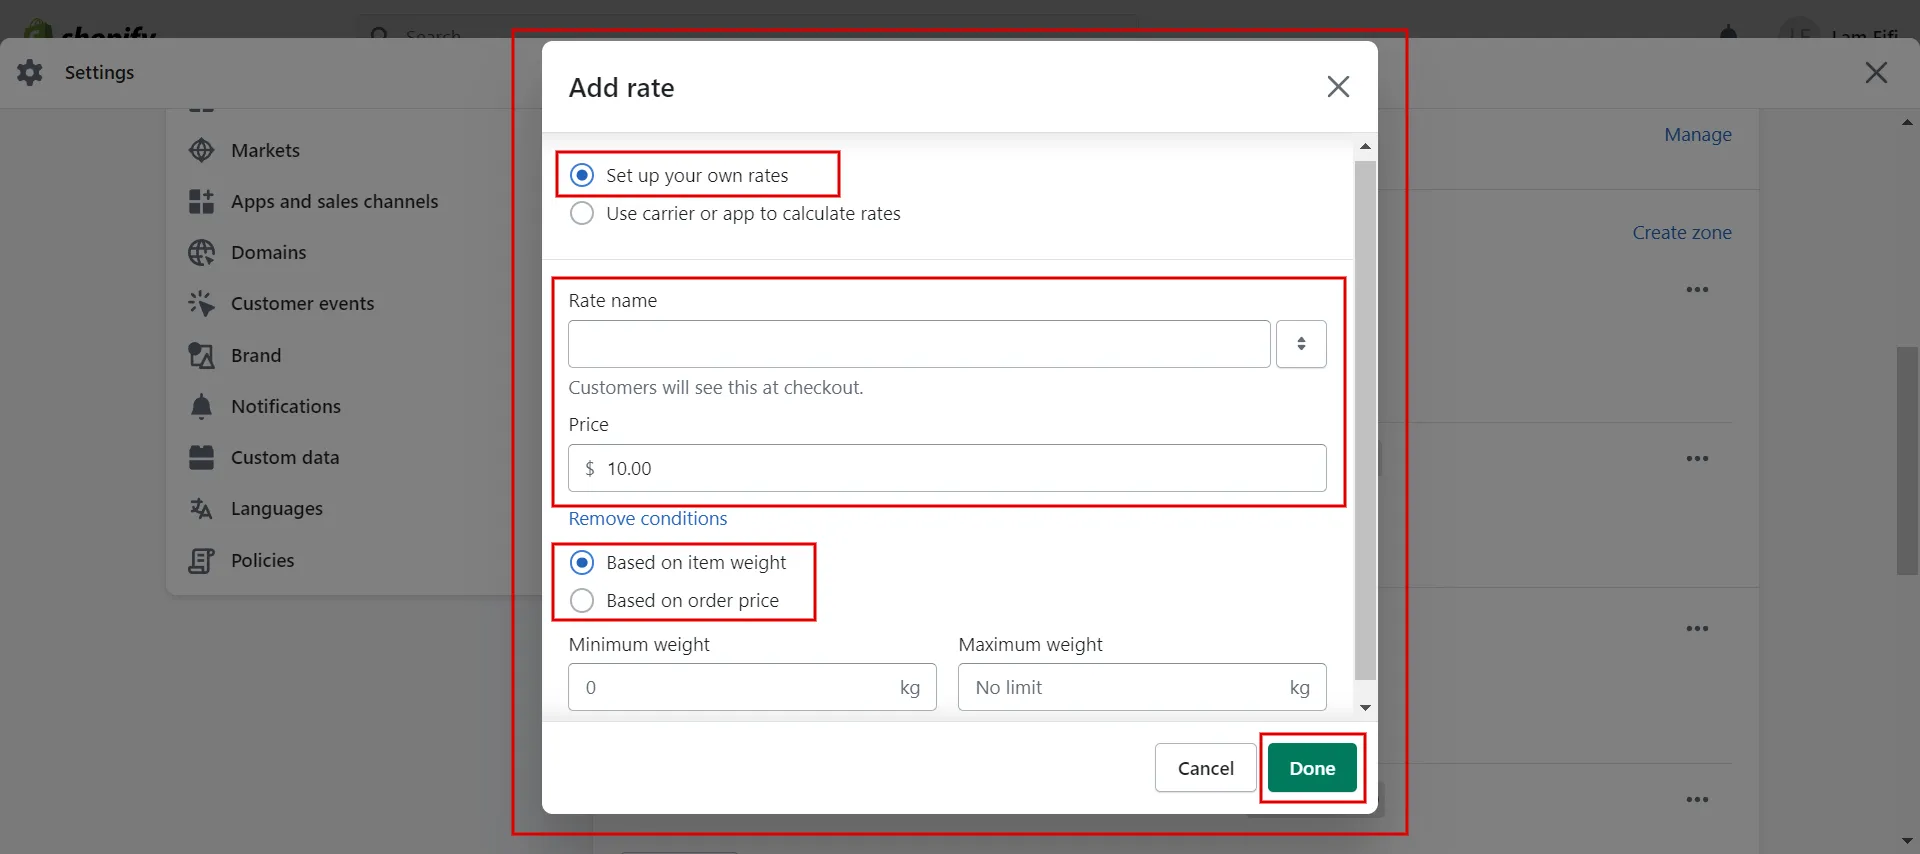
In addition, you can set flat shipping costs for all orders within a delivery zone or just for orders whose weight or price falls within a particular range.
#2. Set up shipping rates in local currencies
You can create flat shipping rates in local currencies for buyers from different markets.
- Choose “Add Rate,”
- Select a transit time or a custom flat rate to name the rate.
- Enter the shipping rate, and then select the local currency for the country or region.
- Press Done and then click Save.
#3. Generate calculated shipping rates
When a customer completes the checkout process, their cart information is submitted to a third-party shipping carrier or app, which returns the amount they should charge for shipping. This is the concept of calculated shipping rates.
The advantage of carrier-calculated shipping rates is that you can directly pass on the cost of shipping an item to the buyer.
Based on the order details, a third-party shipping service determines the calculated shipping rates at checkout. This makes it easier for you to charge your clients the exact price that a shipping company, like FedEx or DHL Express, will charge you when you buy a shipping label.
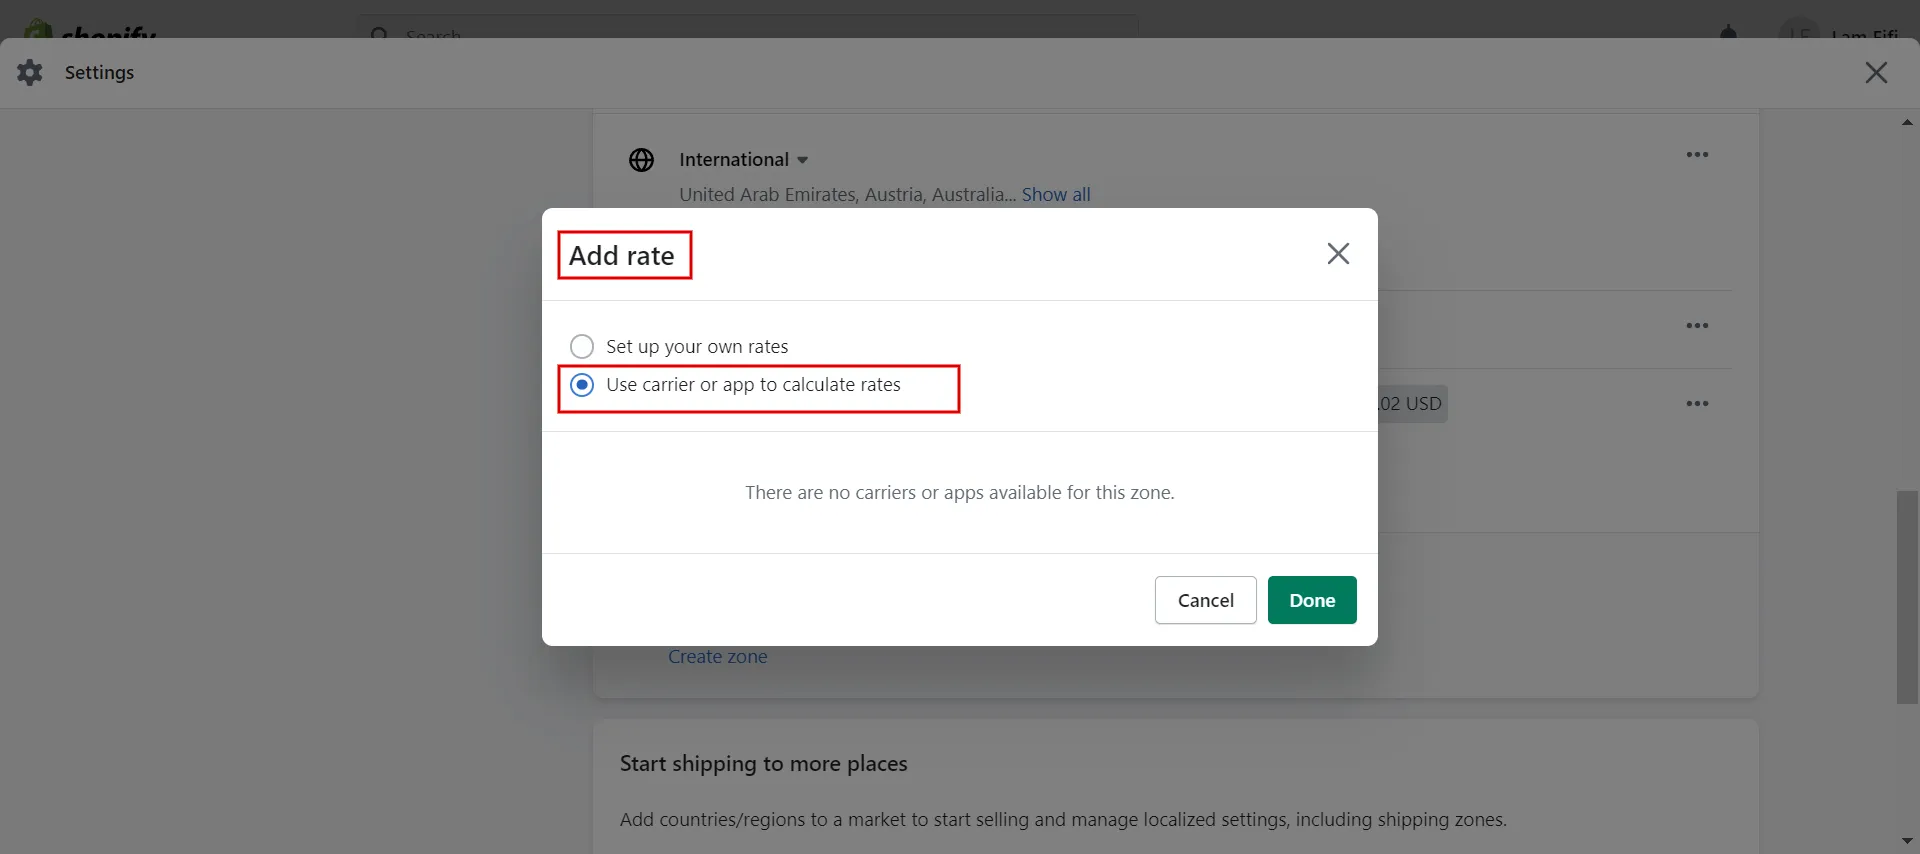
Click Add Rate next to the zone where you want to add a rate, then select “Use carrier or apps to calculate rates”
Notes: If your Shopify account is not premium, you cannot access this shipping method.
In the drop-down menu, choose the shipping service for which you want to add calculated rates.
In the Services section, choose the shipping options for the service you wish to offer your consumers at checkout.
- Future services option: choose whether to make any new services the shipping service makes available automatically.
- Handling fee option: include any handling fees you would like to include in the computed rate.
Finally, click Done, and then click Save.
#4. Mark-up or discount calculated rates
You can adjust the calculated shipping rates to mark up or discount the rates your customers see at checkout.
For instance, you could lower the rate by a particular percentage to boost sales if it is too high to draw clients. Instead, you can raise the rate if, for instance, it is too low to meet your handling and packaging expenses.
At the Edit rate, set the rate adjustments in the handling fee section. Click Done, then click Save.
#5. Create free shipping rates
Any flat shipping rate can be converted to a free shipping rate by setting the shipment cost to zero.
For instance, if you wish to provide free delivery on all orders, you can set a flat shipping charge of $0. Or setting up a price-based flat rate of $0 for orders over $200 if you wish to give free shipping on orders over $200.
You can set up free shipping as the only shipping rate on your store or offer free shipping when specific criteria are met, such as:
- Free shipping over a certain weight
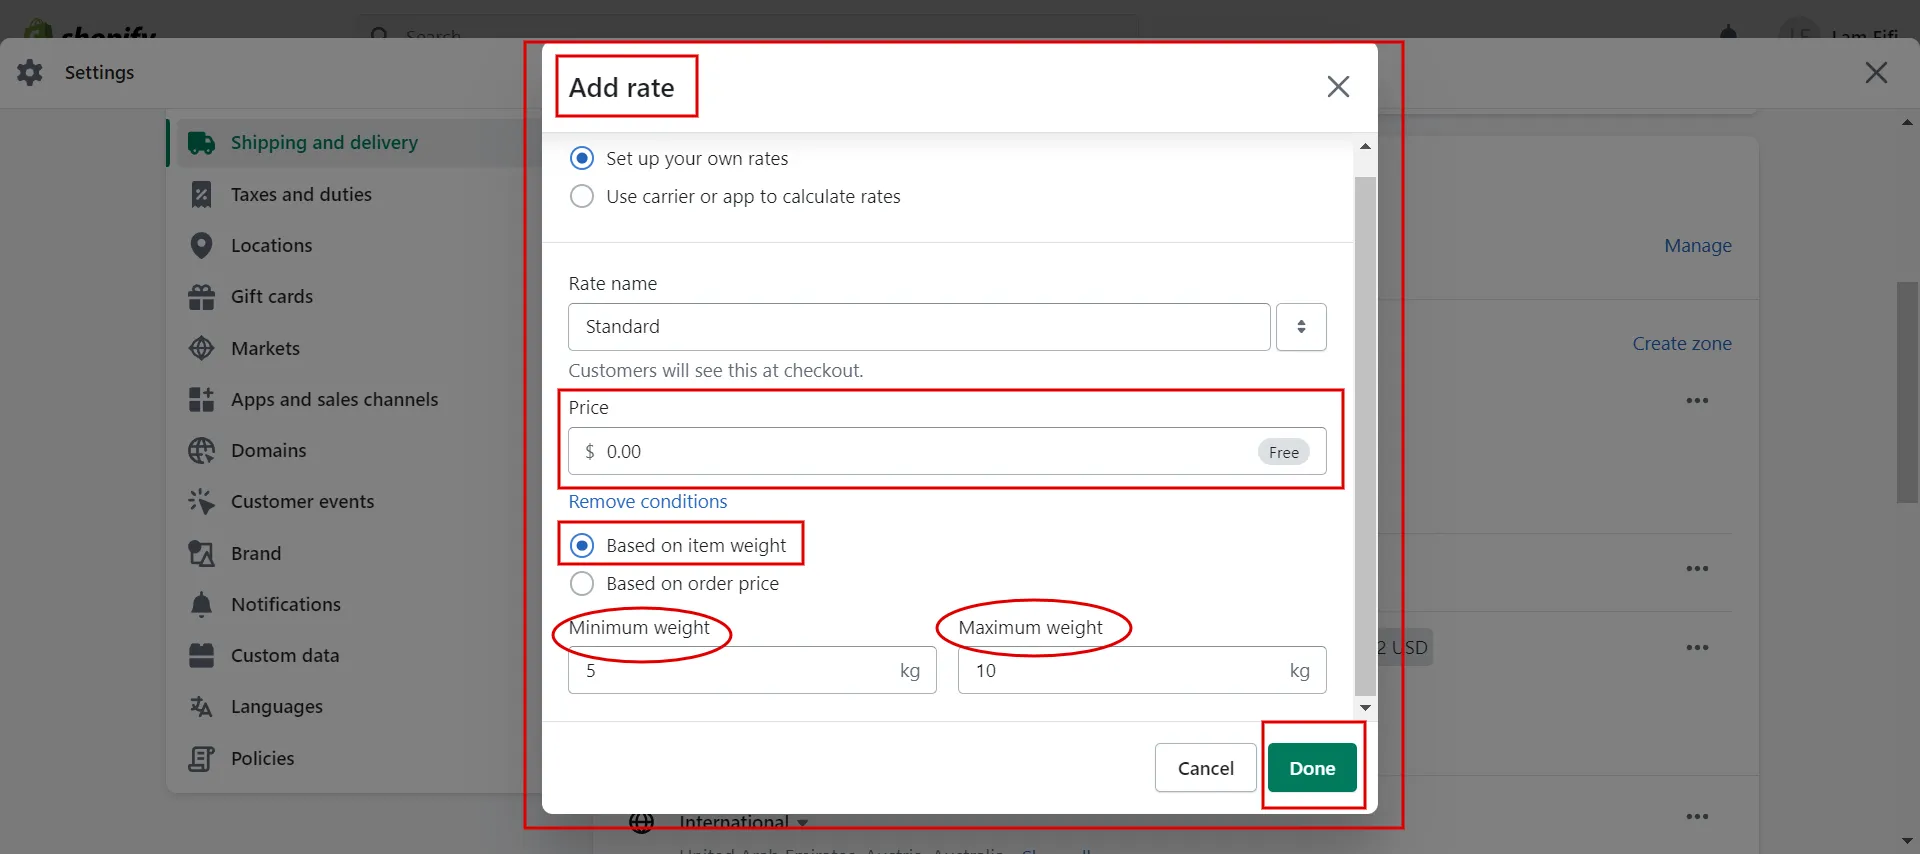
After clicking Add Rate, type the rate’s name. Ensure that the price field has a value of 0.
Choose “Based on item weight” and add values for minimum and maximum weight. Click Done, and then click Save.
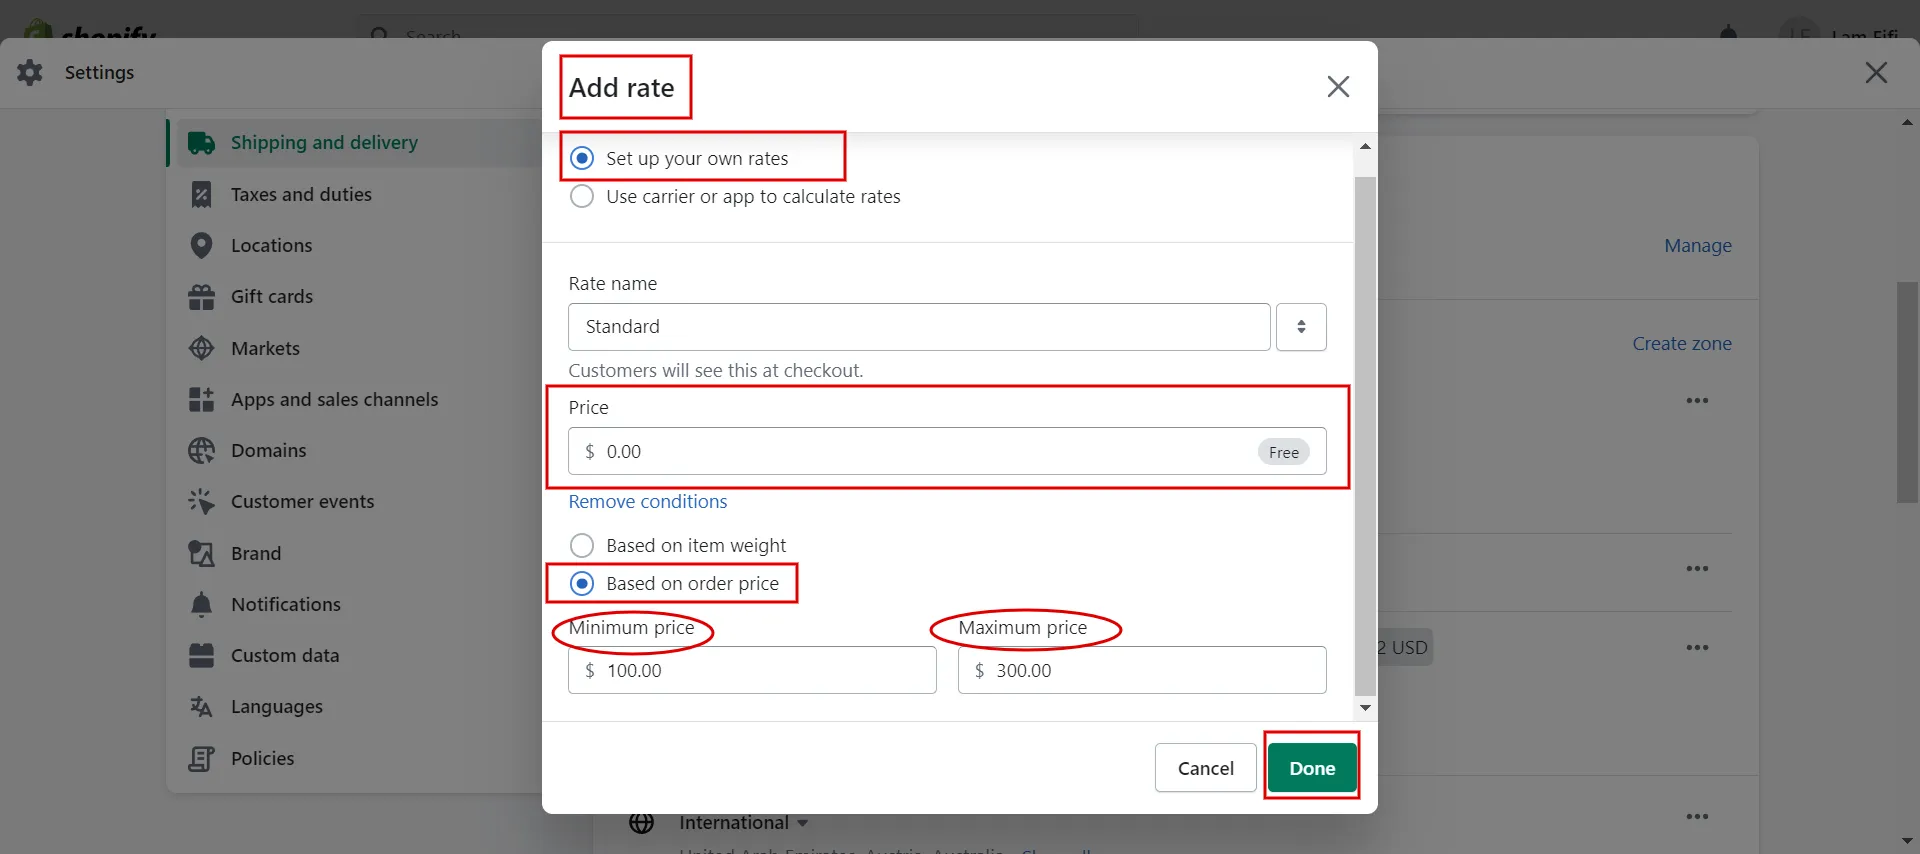
- Free shipping over a certain price
Select Add rate. After that, enter the name of the rate. The price field is 0.
Select the option “Based on item price” and set the values for the minimum and maximum price. Click Done, and then click Save.
- Free shipping for specific products
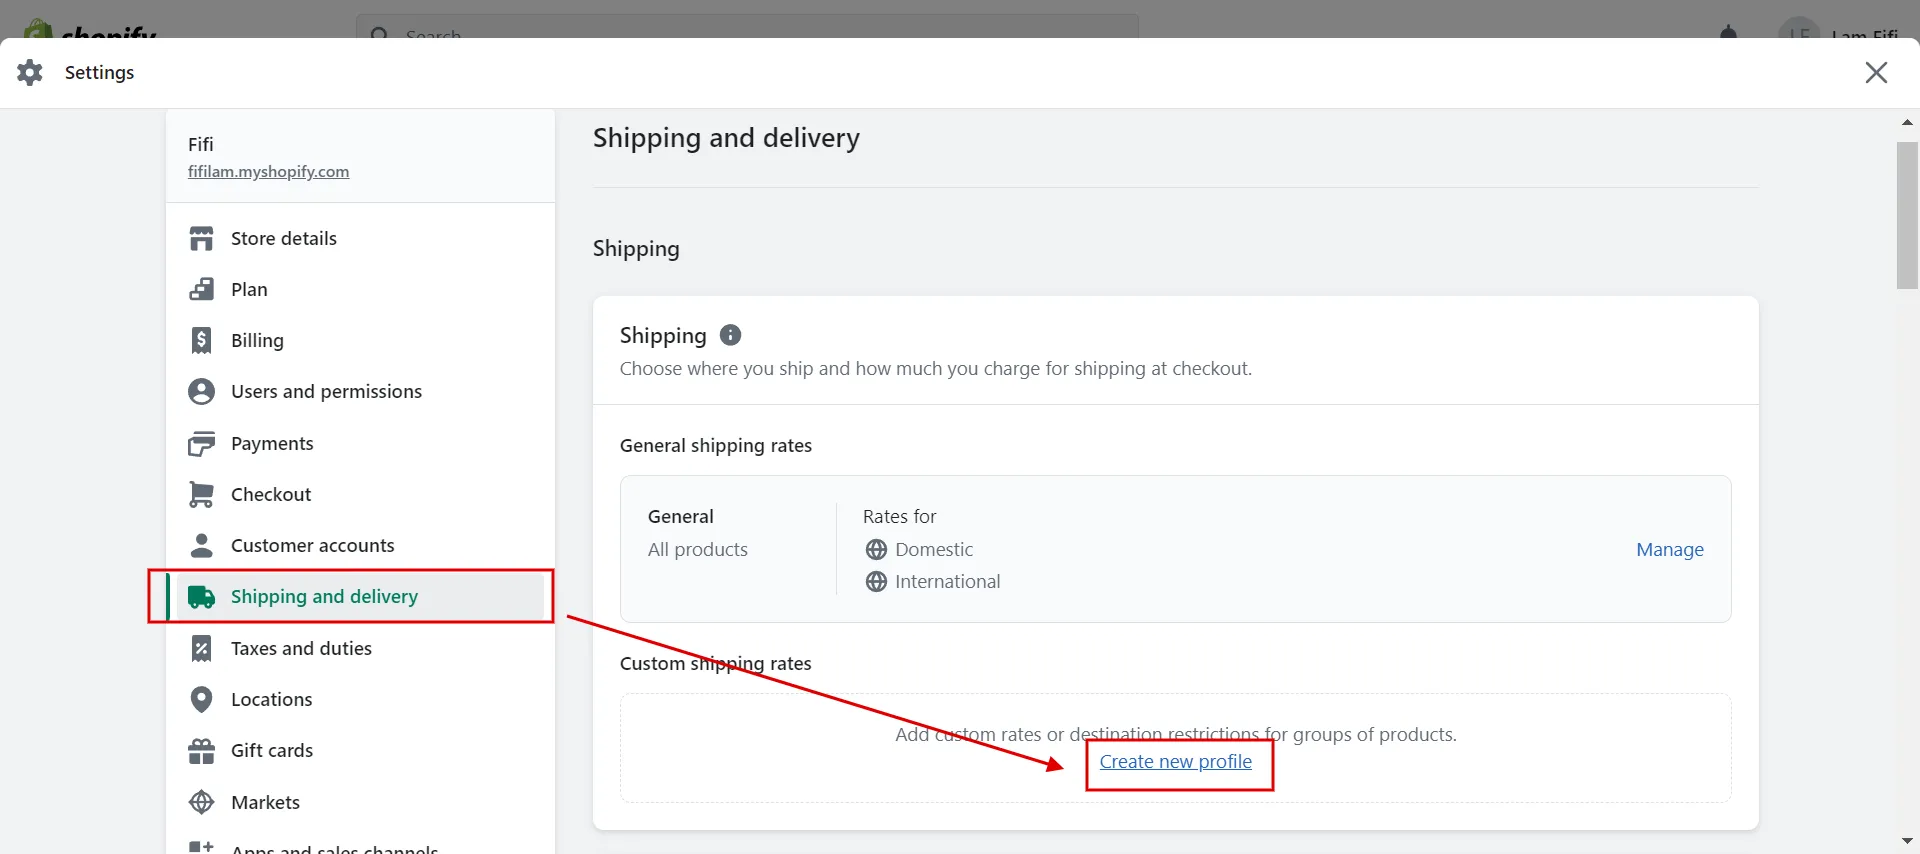
First, click Create new profile in the Shipping and Delivery tab.
Then, you set the name for the new profile. Click Add Products to choose specific products you want to set up a free shipping method.
Next, click Create Zone to choose shipping places.
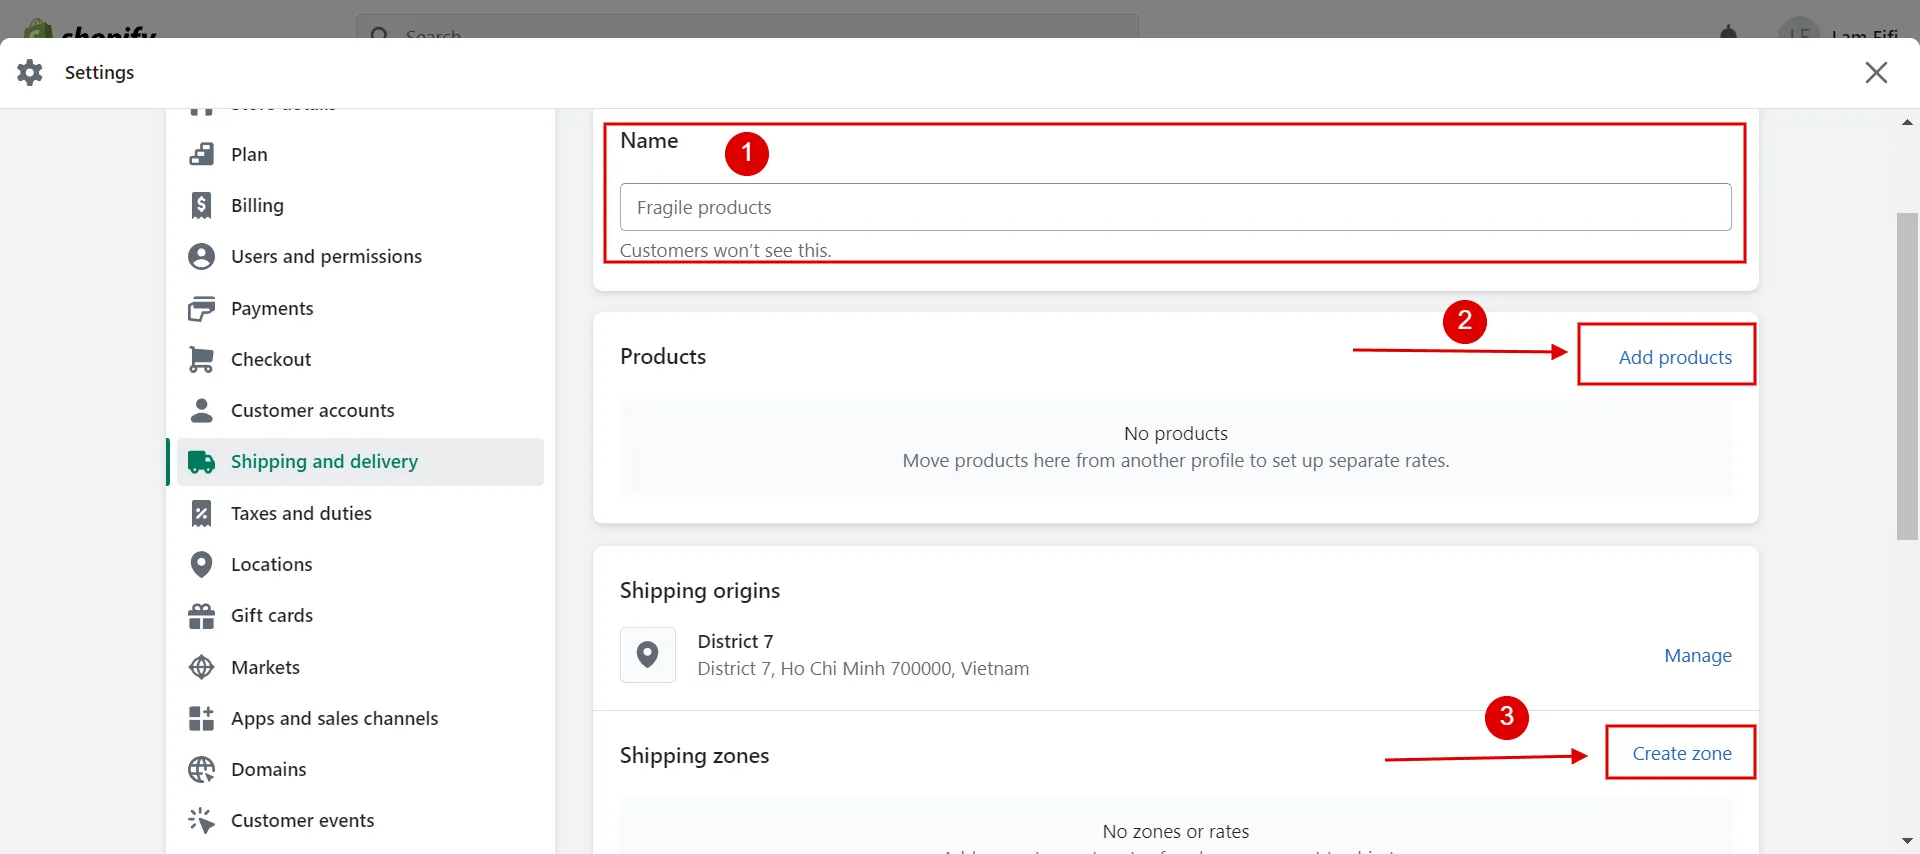
Continue to select Add Rate, and Add 0 in the price field. Lastly, click Done, and then click Save.
For more detailed information, let’s take a closer look at How to add free shipping on Shopify!
#6. Activate local delivery method rates
In Shopify, you can set up local pickup and delivery alternatives for nearby consumers.
- Local delivery: If you provide delivery, you may establish a local delivery option for your consumers to select at checkout. You can specify a shipping fee as well as a minimum order amount.
- Local pickup: Allowing your clients to pick up their orders at your location to save their money on shipping while also providing a more branded experience for your customers.
#7. Delete a rate
Besides modifying a shipping rate, you may want to eliminate a rate by following these steps:
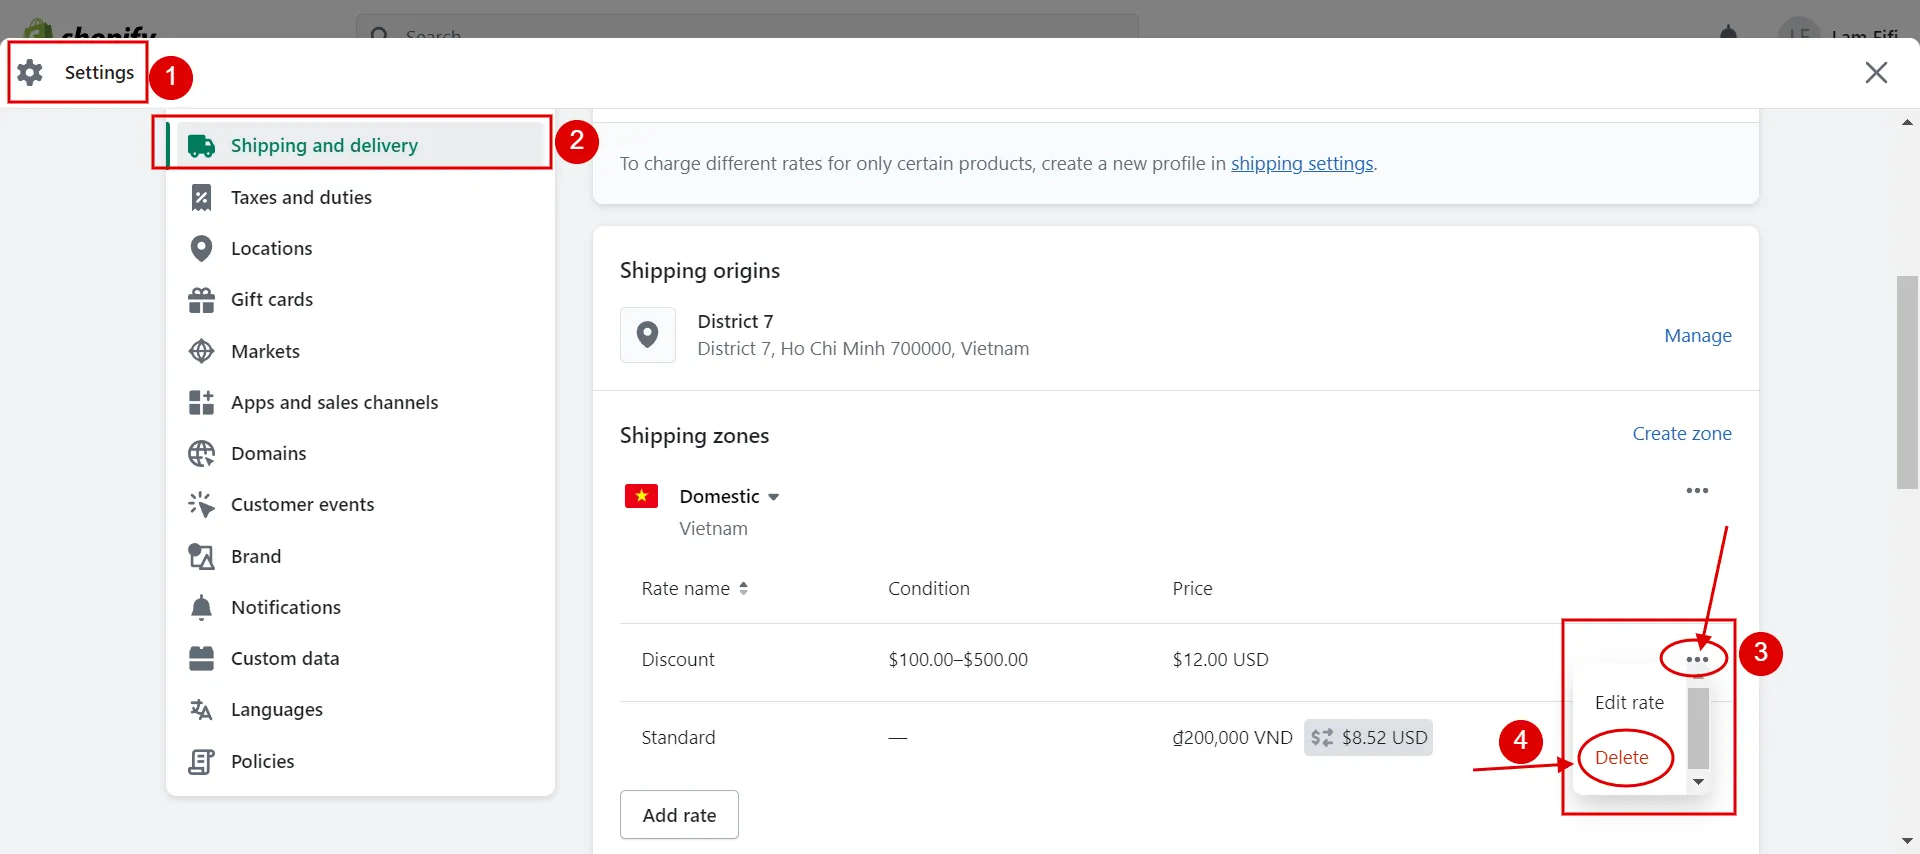
- First, click Manage in the shipping profile you want to delete a rate from.
- Next to the rate you want to delete, click the “…” button.
- When the drop-down menu appears, you click Delete and then Save.
Now you know how to change shipping on Shopify by type!
To give your customers a better shopping experience on your Shopify site, you should set as many delivery methods as possible or utilize the popular Shopify shipping rules apps.
Want to migrate to Shopify?
If you are intending to migrate to Shopify, LitExtension offers a great migration service that helps you transfer your data from the current eCommerce platform to a new one accurately, painlessly with utmost security.
Best Shopify Shipping Rules Apps
Some popular Shopify shipping apps include ShippingEasy, AfterShip, Shippo, Easyship, Advanced Shipping Rules Shopify, and others.
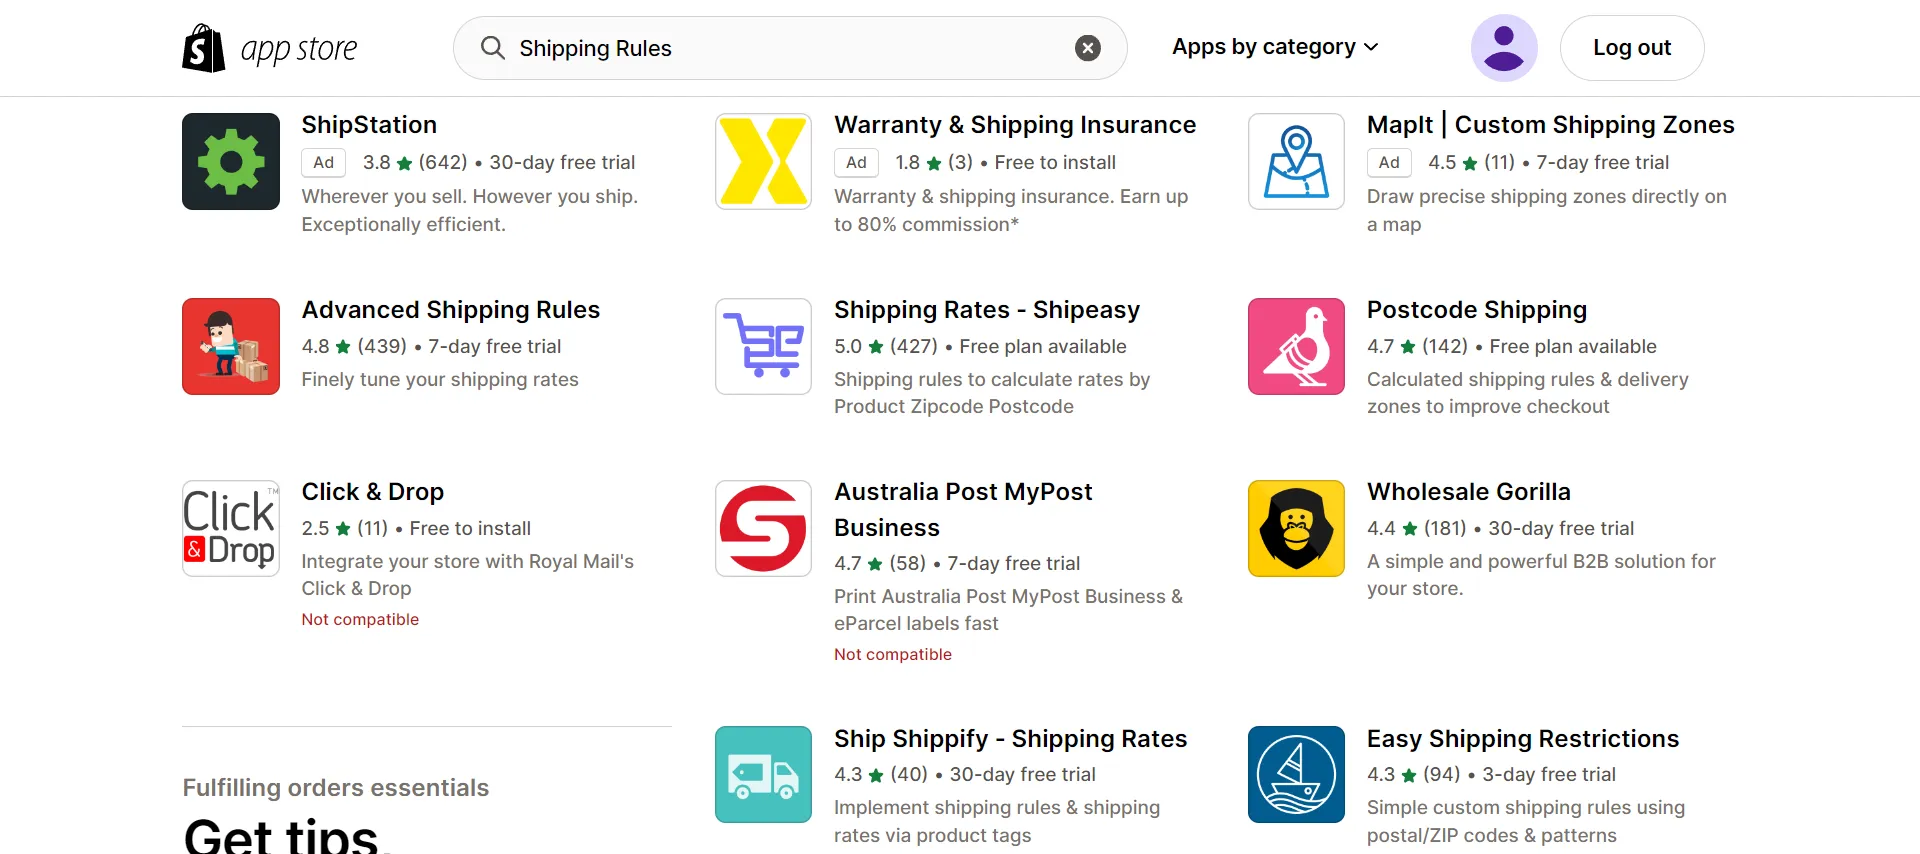
Each app has unique core functionality. It can improve both the speed and cost of shipping. Let’s take a look at them.
#1 ShippingEasy
Price: $19.99 – $49.99/month | Free plan available.
Main features:
- Discounted rates
- Fast label printing
- Automated workflows
- Advanced reporting
#2 AfterShip
Price: $11 – $89/month | Free plan available.
Key features
- Branded tracking page
- Shipment notifications
- Predicted delivery date
- Analytics
#3 Shippo
Price: Free to install | $10/month.
Major features:
- Free and automatic returns label
- Shipping tracking and notifications
- Synced sales channels
- Discounted shipping rates
#4 Easyship
Price: Free to install | $29 – $99/month.
Key features:
- Tax and duty calculator
- Up-front shipping rates for customers
- Label printing
#5 Advanced Shipping Rules Shopify
Price: $9 – $99/month | 7-day free trial.
Key features
- Different rates for different product groups
- Rule-based rates
- Free shipping features
- Granular delivery options
- Customizable shipping zones
How to Change Shipping on Shopify – FAQs
[sp_easyaccordion id=”59666″]
Further reading:
- Shopify review – All pros & cons analysis.
- Shopify pricing – All cost reveal.
Wrap-up
Generally, this article covers how to change shipping on Shopify. You can control your store’s delivery preferences in your Shopify admin’s Shipping and Delivery section. These techniques vary depending on your industry and the kind of tangible things you sell.
For additional suggestions for your online stores, visit our LitExtension blog and eCommerce community. If you’re considering using Shopify, the quickest and most affordable solution is available from LitExtension, the #1 Shopping Cart Migration Expert.