Hey Shopify fellows, are you on the way to create a stunning Shopify website? To do so, the first step is to pick and know how to custom Shopify themes. In this article, we will provide a complete guide (even for beginners) to understand and make the most of the Shopify theme fully.
This article will cover:
- Custom pre-built Shopify themes – A complete guide for beginner
- How to custom Shopify themes using Shopify Liquid
- How to Upload a Custom Theme to Shopify
- Everything you need to know about Shopify Themes
Let’s get in!
How to Custom Shopify Themes – A Complete Guide for Beginner
Before custom Shopify themes, you need to have a Shopify store first. The process of how to start a Shopify store is rather simple.
Go to Shopify homepage > Enter your email address > Click ‘Start free trial’. Here, you’ll need to answer some essential questions about your store. Or else, you can skip them and start your trial within minutes.
We attach a detailed guide on how to create a Shopify store below so don’t worry, you will be able to have a Shopify store within minutes!
Currently, Shopify offers 6 pricing plans: Shopify Starter, Shopify Lite, Basic Shopify, Shopify, Advanced Shopify, and Shopify Plus.
You can start your 3-day free trial and only have to pay $1/month for 3 months when choosing Shopify Basic plan (the most popular Shopify pricing plan). If you want to utilize more functions of Shopify to support your business, you can consider a higher Shopify pricing tier.
💡 Pro tips: Are you new e-merchants from the U.S. or Canada? Don’t miss the chance to get 50% OFF using annual plans in your first year with Shopify. This incentive will apply to yearly Basic, Shopify and Advanced.
Now, you may want to custom Shopify themes? Follow our steps below to grasp how to custom a Shopify theme. Let’s get started!
#1 Pick a Shopify theme
Now, let’s navigate to ‘Online Store’ > Click ‘Themes’
Here, you’ll see Dawn – a free & default theme that Shopify already picks for you.
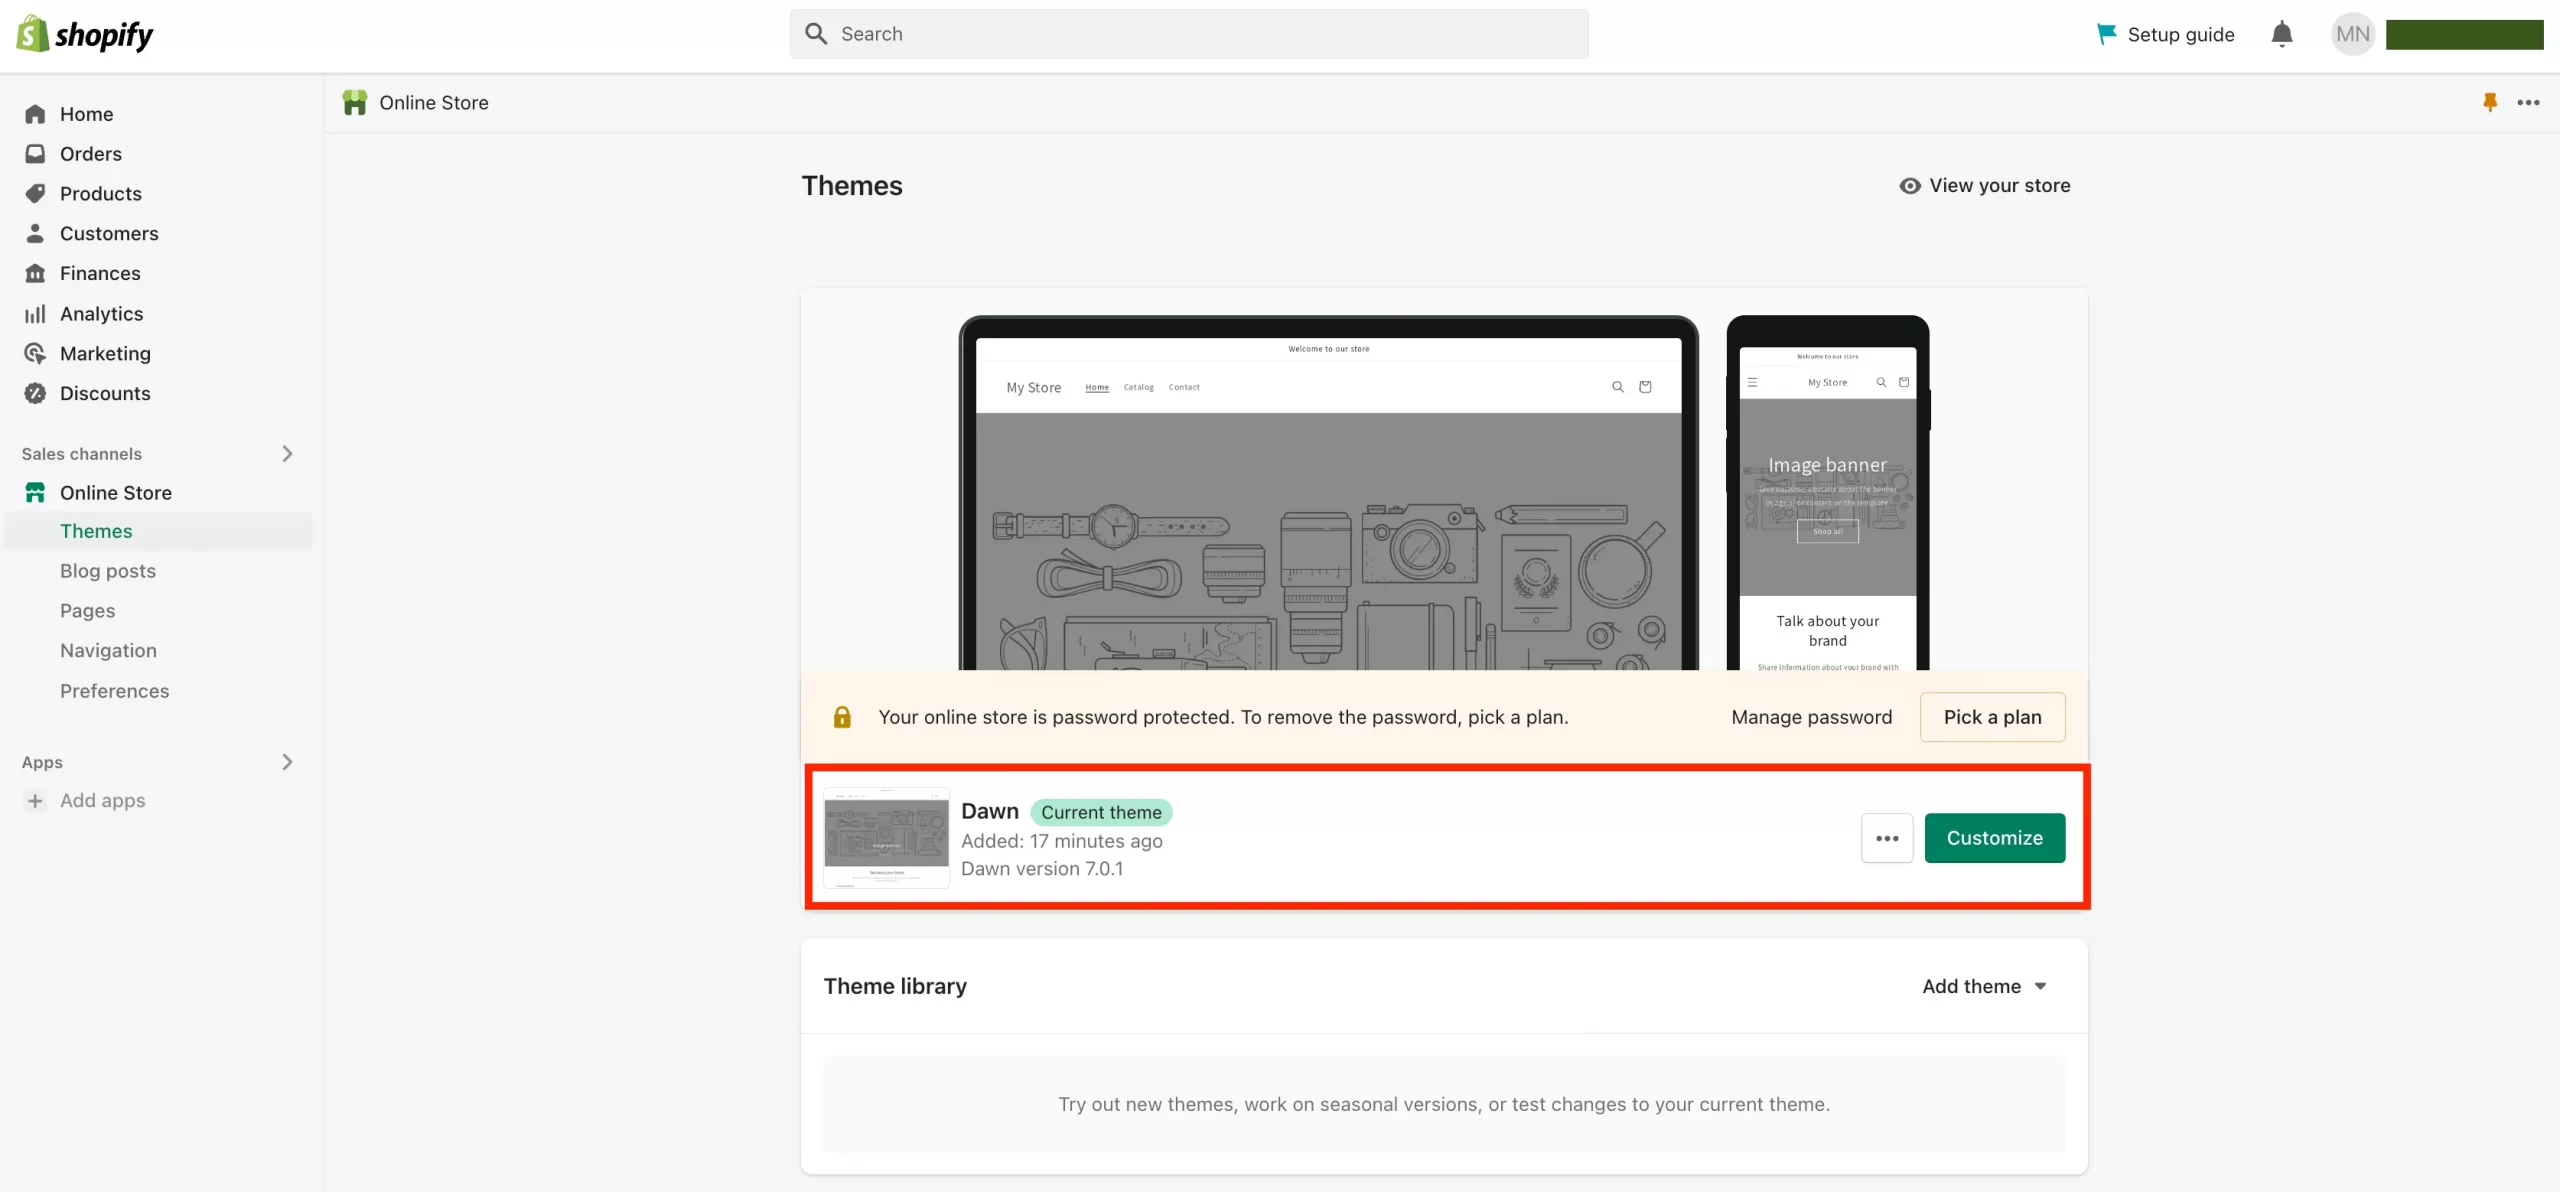
If you don’t feel like going with Dawn theme, feel free to visit Shopify themes store and pick your desired theme among their 100+ options.
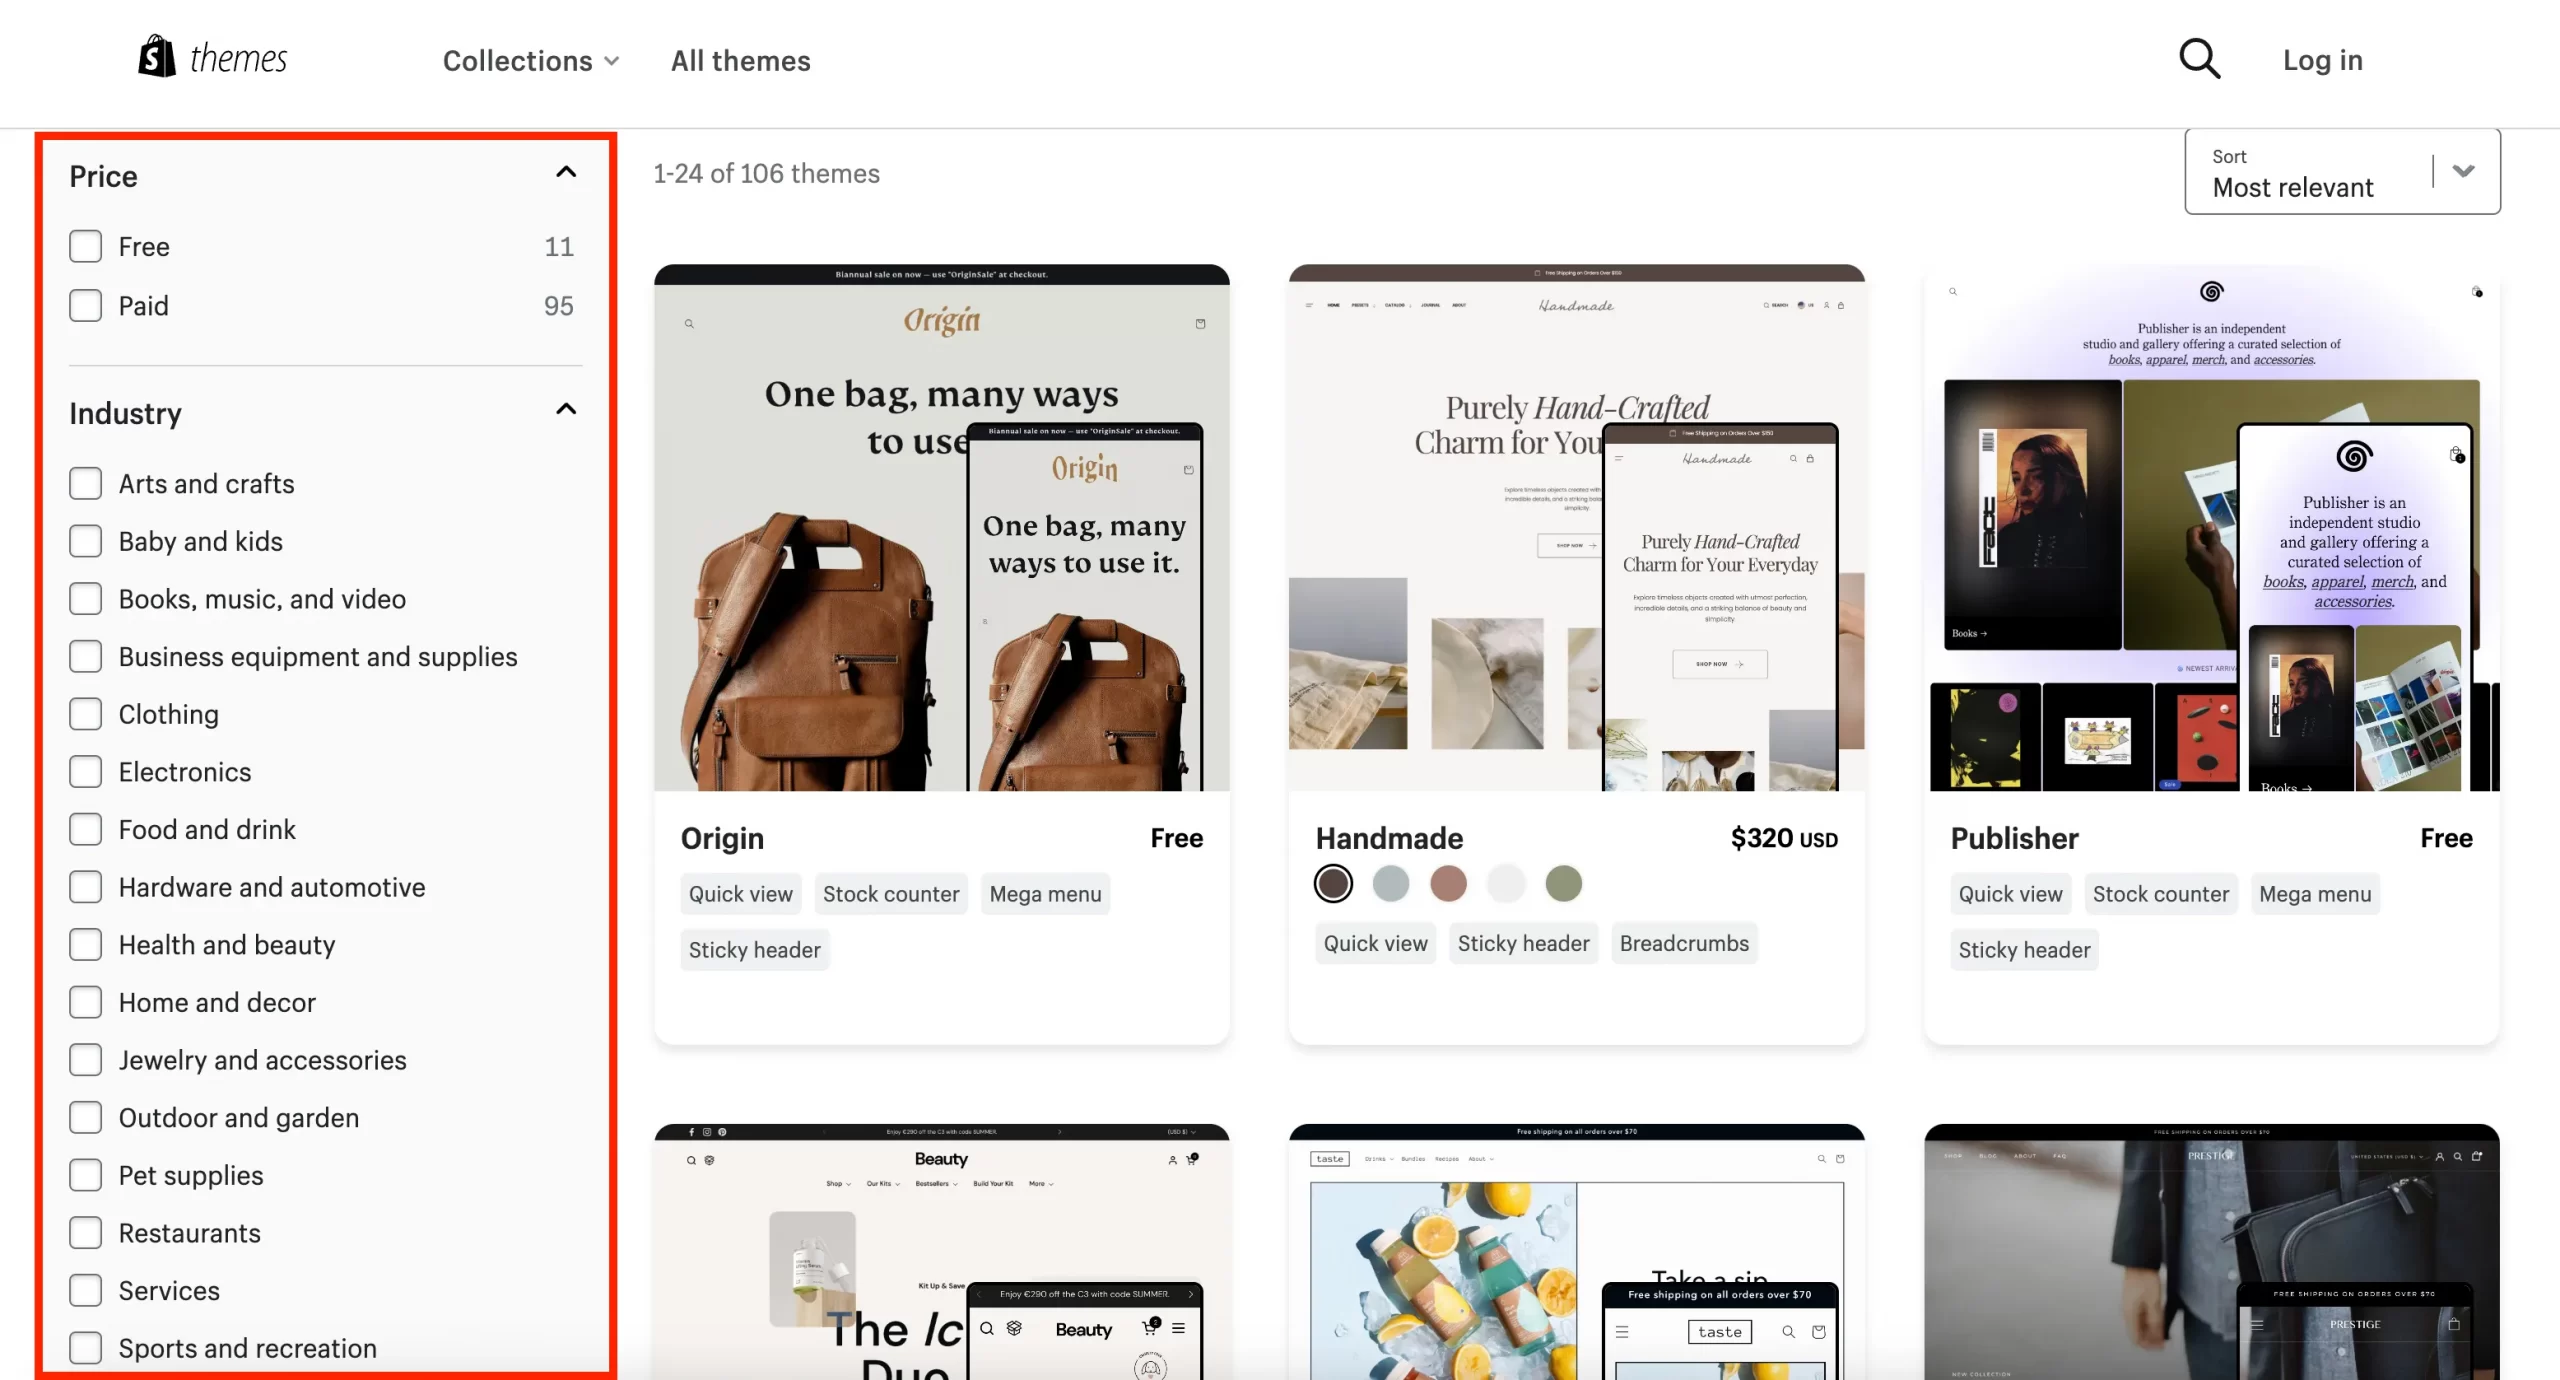
One of the most outstanding opportunities for Shopify or to-be Shopify merchants is that Shopify allows its user to customize every theme, even the paid ones! You can try out, test Shopify themes freely with latest Shopify theme features, and choose a desired one before kicking off your online business.
Access our essential resources for Shopify themes:
Among all hosted eCommerce platform providers, only Shopify allows you to do so! It’s a privilege of Shopify merchants, so don’t miss out on the chance and go for Shopify now!

After selecting the theme of your dream, click ‘Try theme’. It will now appear in your Theme library.
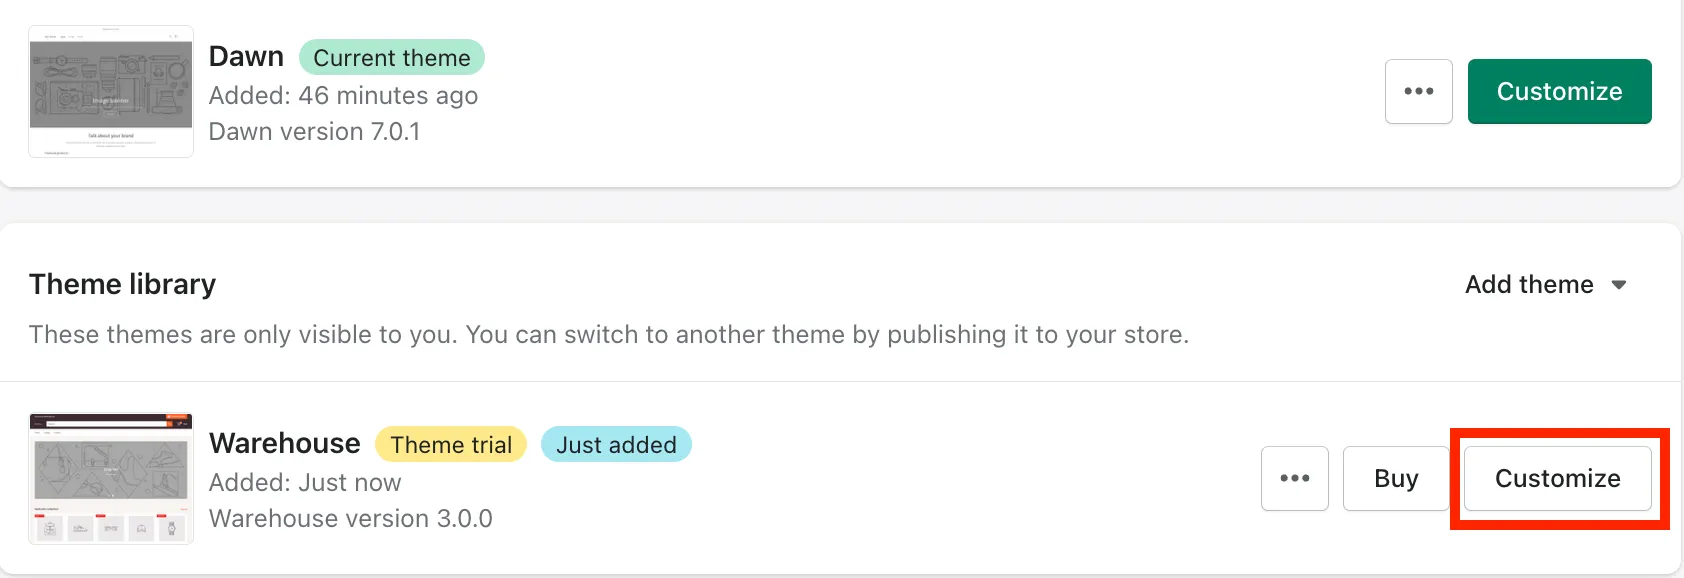
Then, click ‘Customize’ and move on to the next step!
💡 Pro tips: Before you custom Shopify themes, you should do the following tasks:
- Duplicate to make a backup of your theme. This makes it simple to undo your modifications and start again if necessary.
- Make sure you understand the assistance that the theme offers.
- Learn about the image uploading requirements and recommended practices.
#2 Go to navigation bar
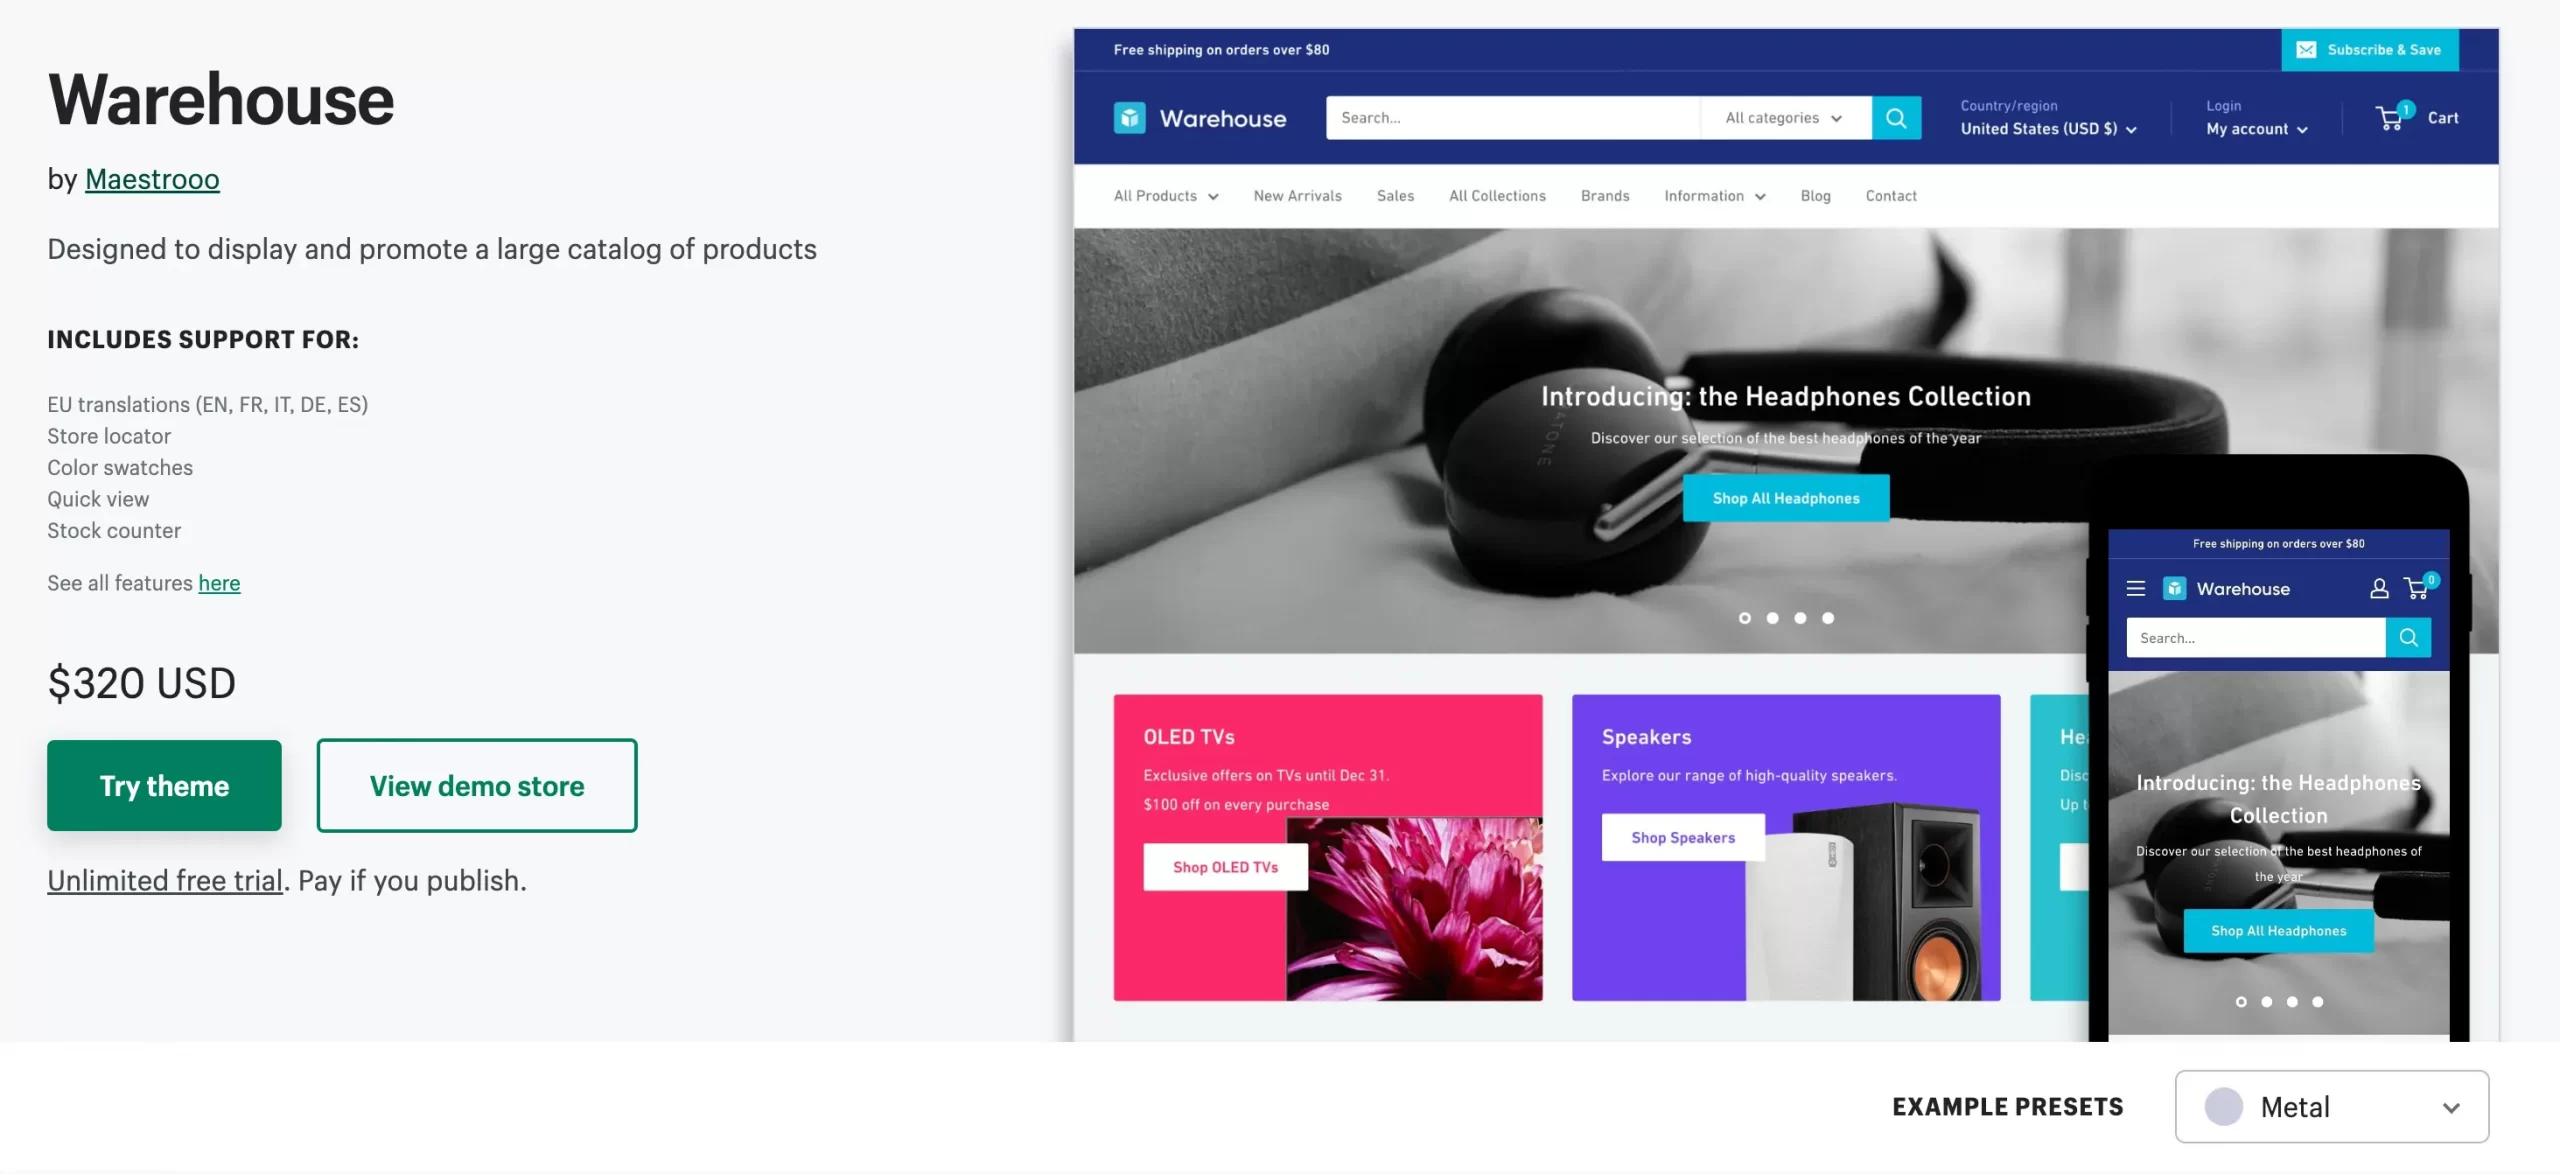
In this section, let’s take ‘Warehouse‘, – a popular paid Shopify theme, as an example. Please note that there might be some minor differences in terms of displaying, but rest assured that the steps remain identical across every website template. In case of confusion, don’t hesitate to contact Shopify to get supported.
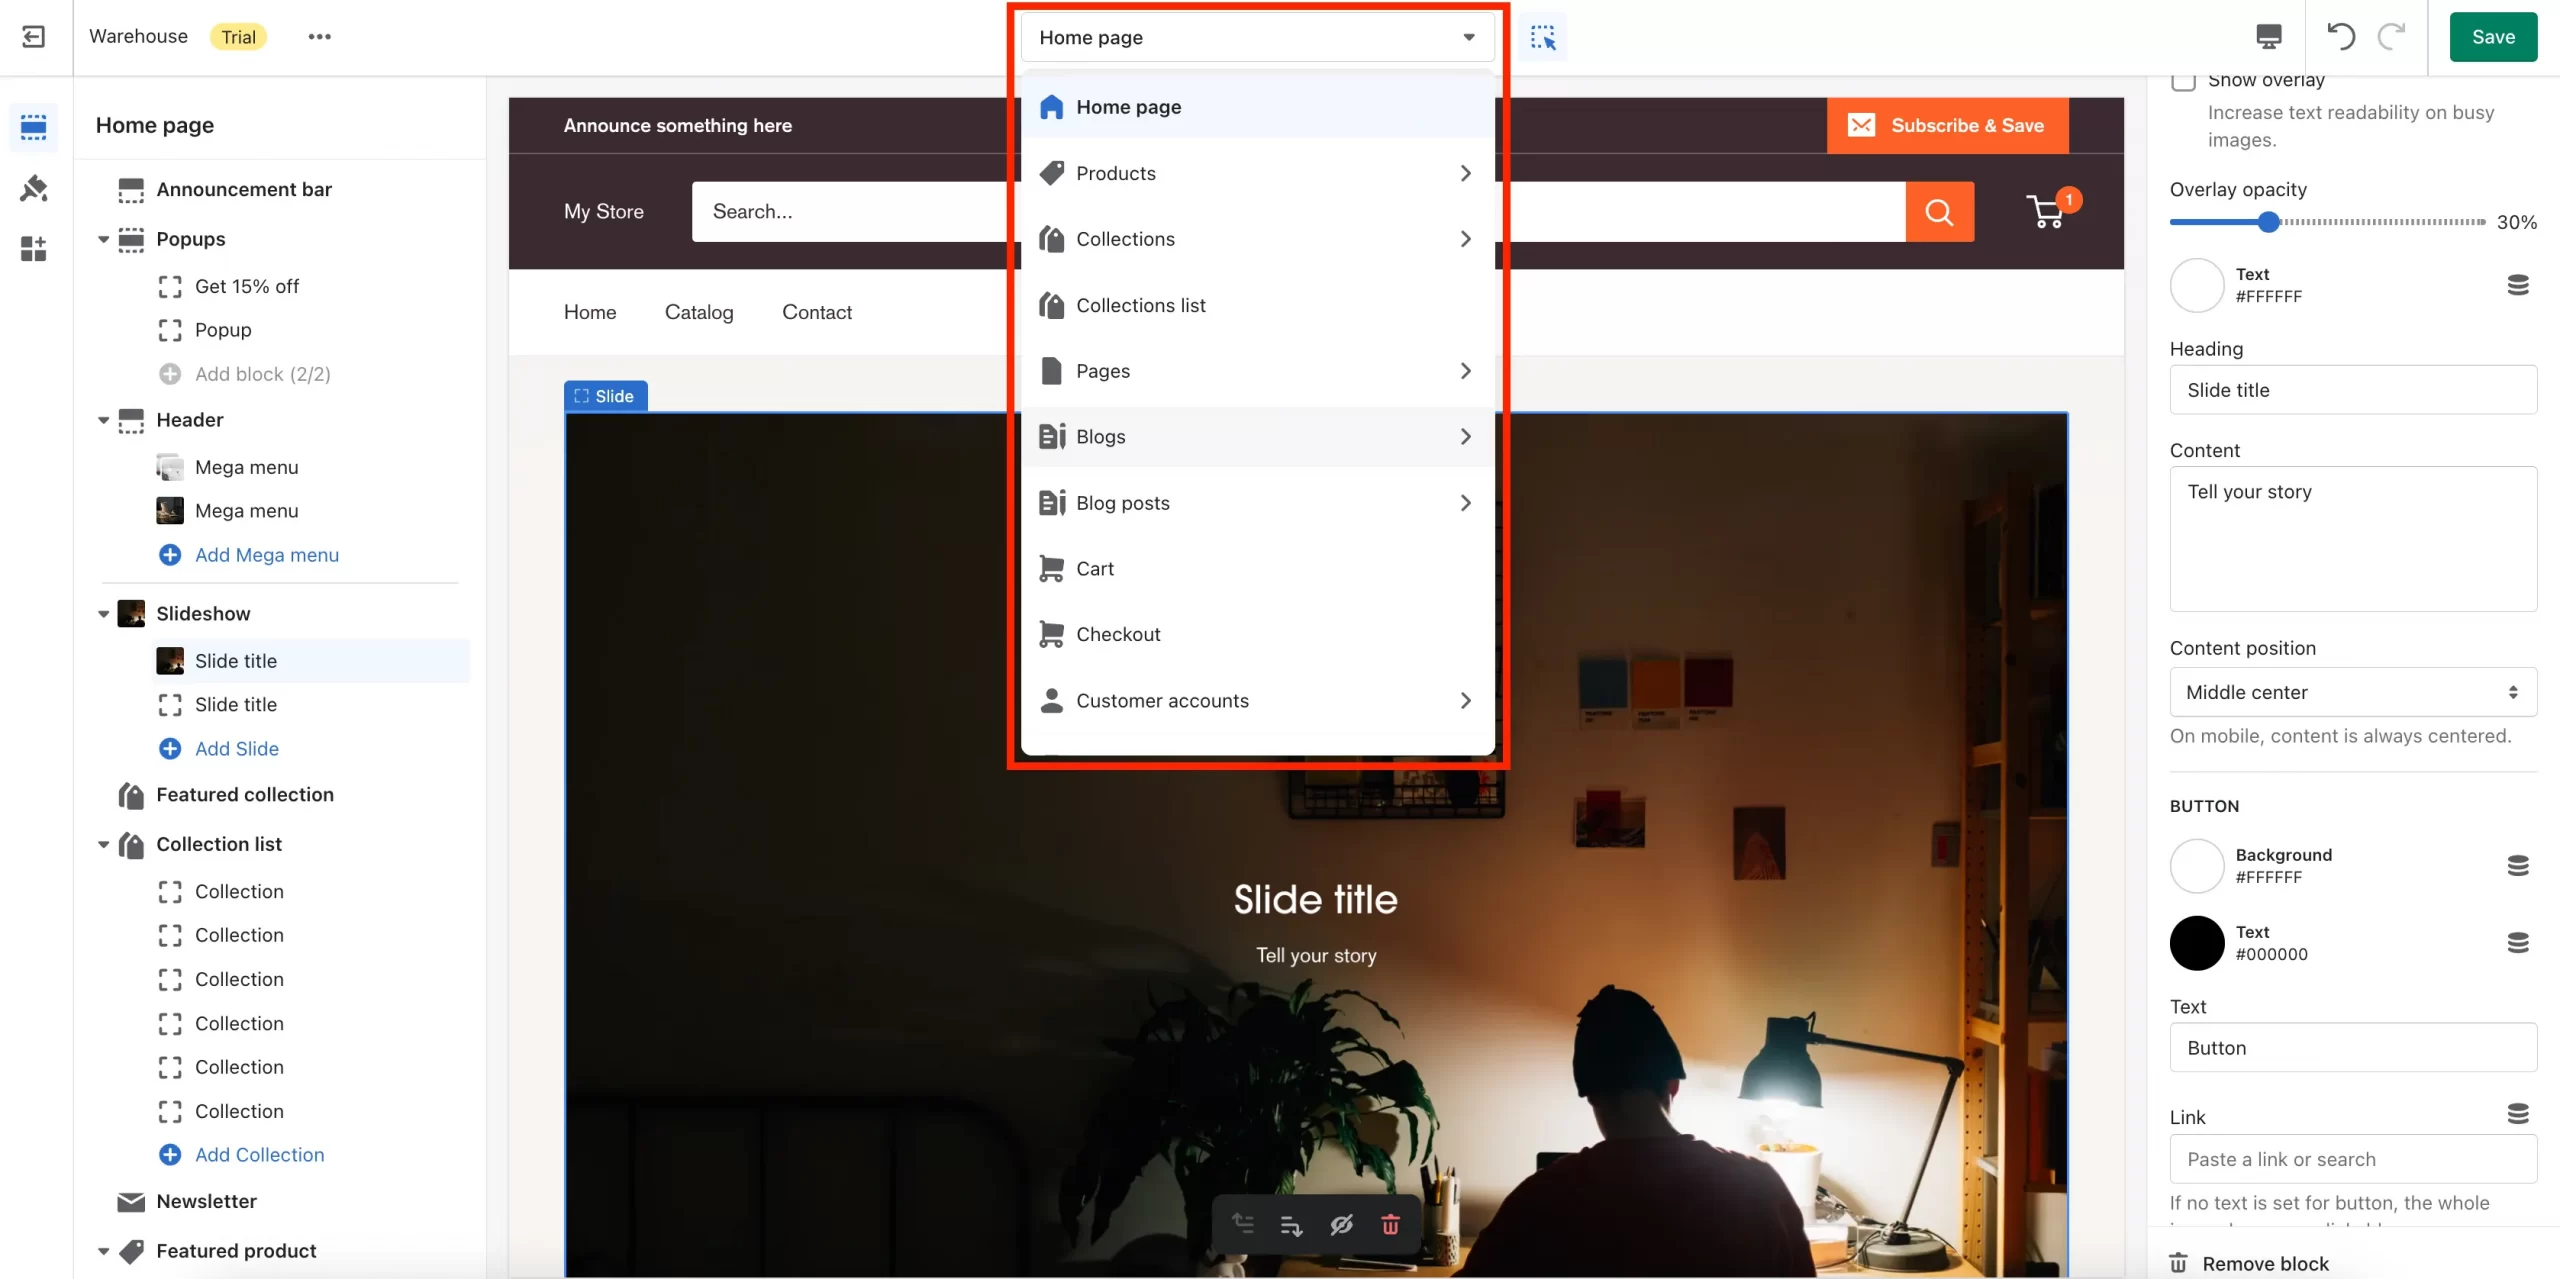
On top, you will see the navigation bar. Here, you can see a bundle of options to edit, including:
- Homepage
- Products page
- Collections & Collection list
- Pages
- Blogs & Blog posts…
Stay tuned! In the next part, we will show you how to customize this Shopify theme in each section.
#3 Edit Home page
Let’s start with editing the Homepage first.
The very first step of custom Shopify themes is to edit the homepage. To start with, navigate to the Home page section.
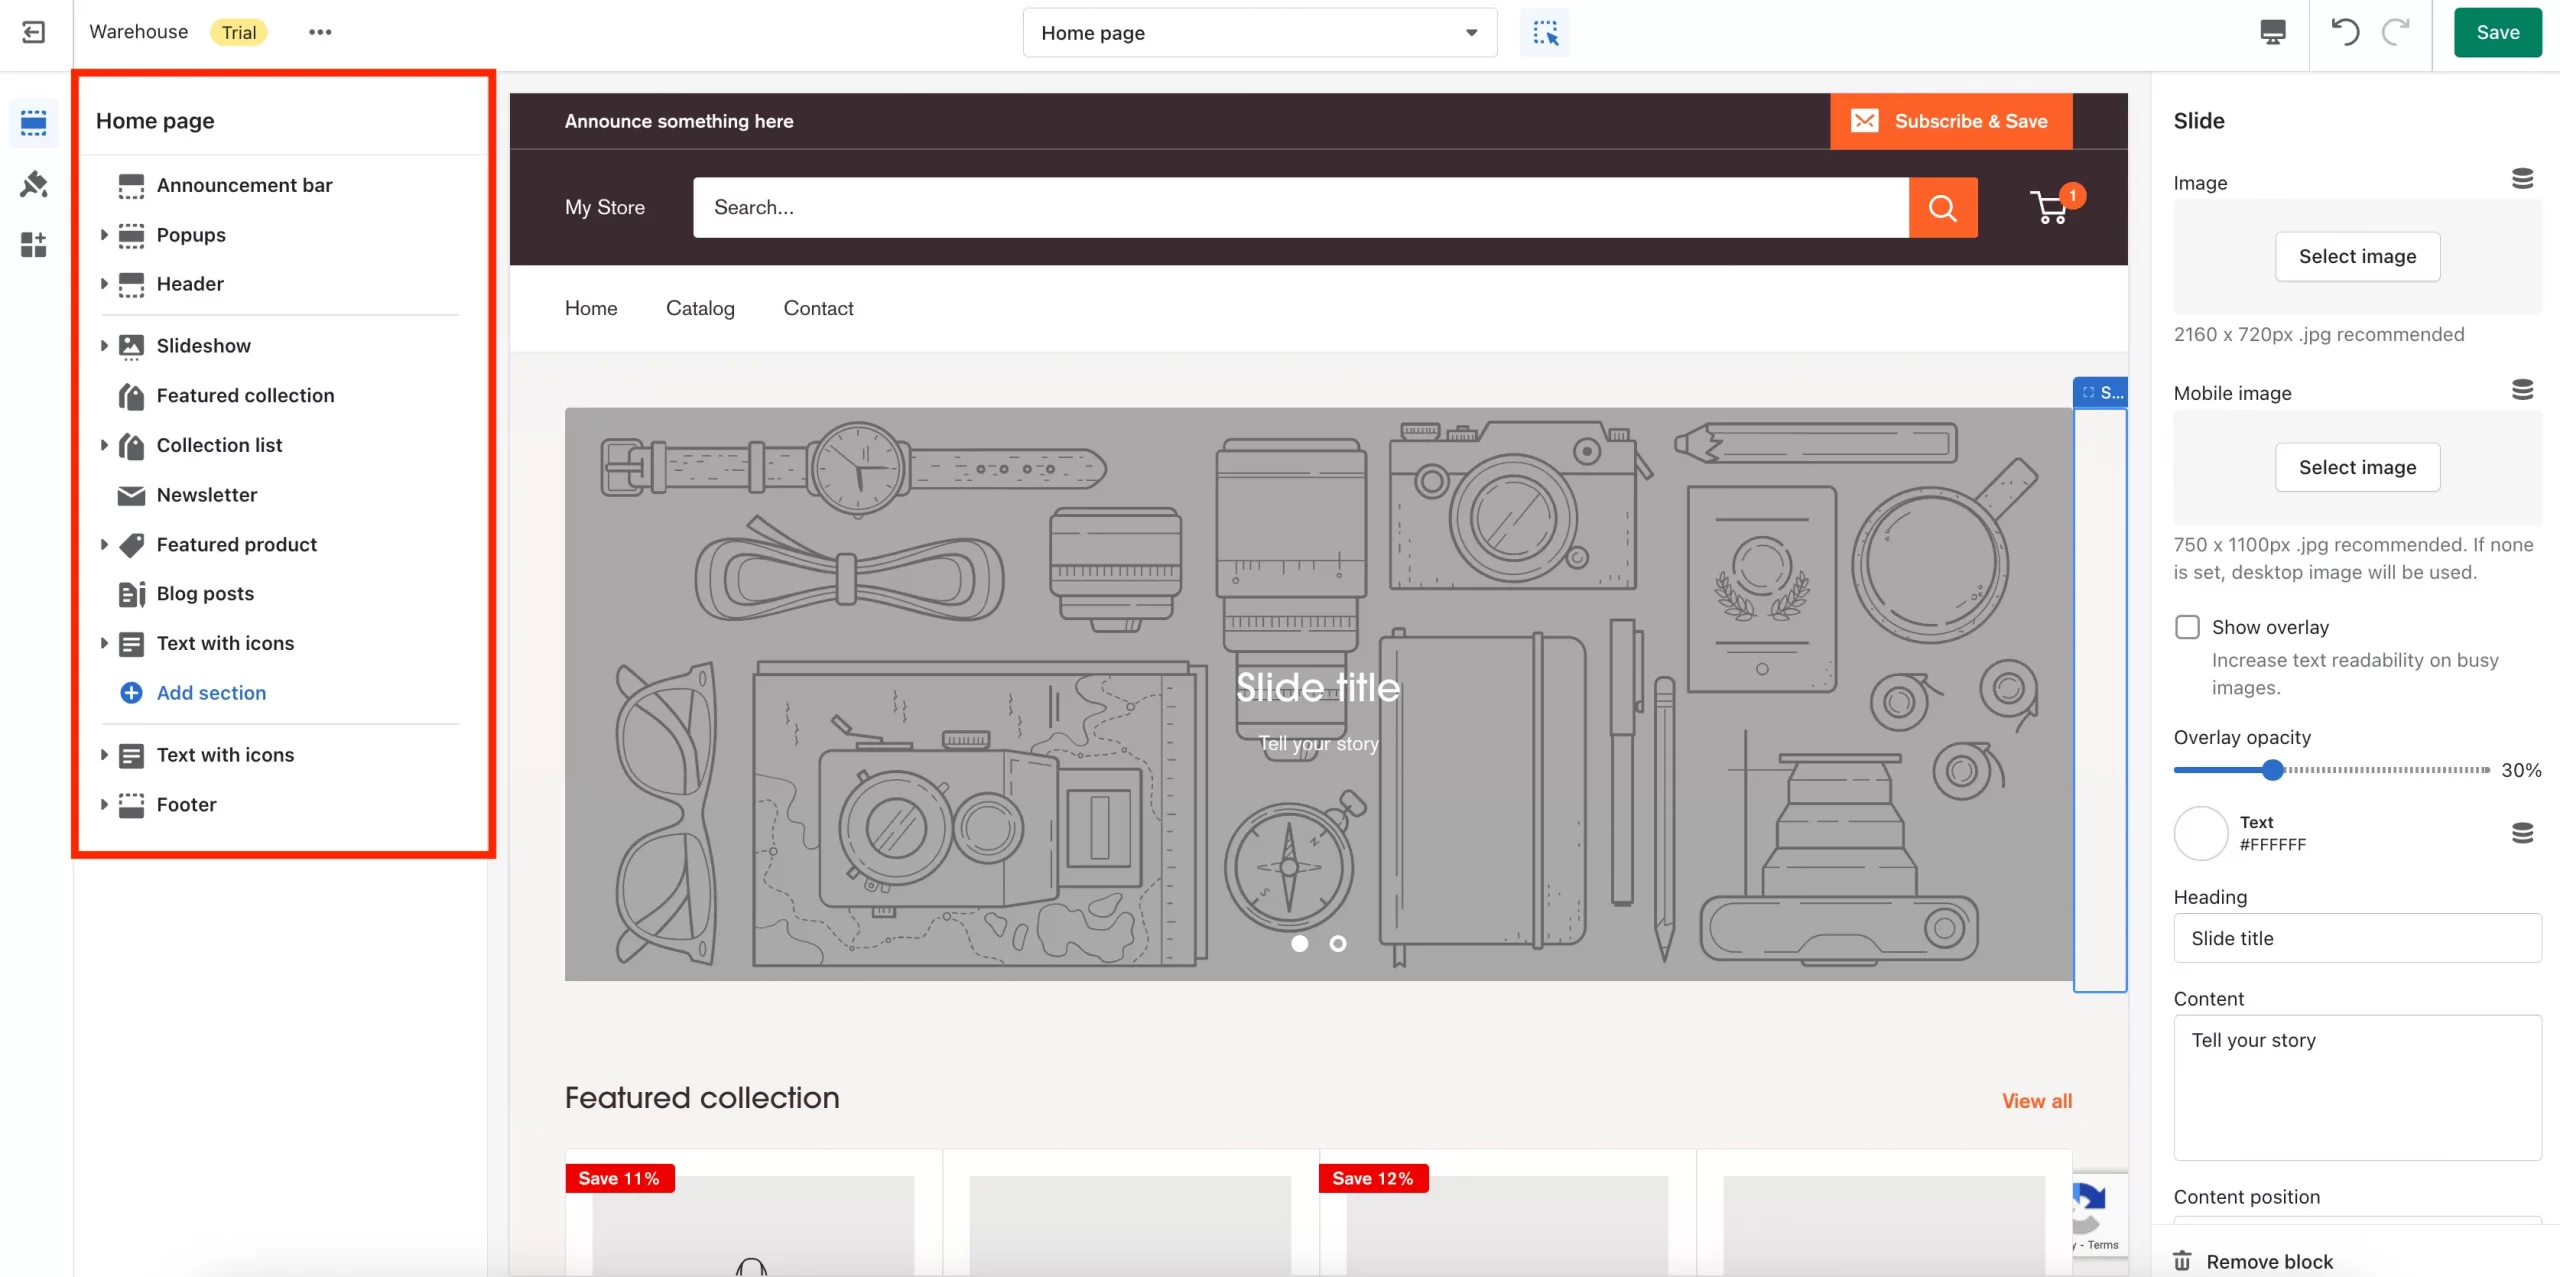
With Warehouse theme, here, you can see the following basic sections:
- Header
- Slideshow
- Feature collection
- Collection list
- Newsletter
- Featured product
- Blog post
- Text with icons
- Footer
Let’s move on one by one to know exactly what and how to custom Shopify homepage from scratch.
1. Announcement bar & Popups
Announcement bar is a great way to display crucial information about your business. You might include it in your Shopify store to highlight:
- any delays in shipping or places that do not accept international shipments
- any new or updated policy pages
- or any current promotions, such as reductions or new gift cards
However, please note that while this section is already included in some themes, others might require you to download an app in order to use this function. In some cases, you’ll be working with ‘Announcement banner’ instead of ‘Announcement bar’.
Let’s move to Popups. As BFCM 2022, the biggest holiday and sales seasons are coming near by, popups for coupons or promotions should be well applied. There are some popular purposes of pop-up:
- Popups show coupon
- Popups that include useful information to get customer emails
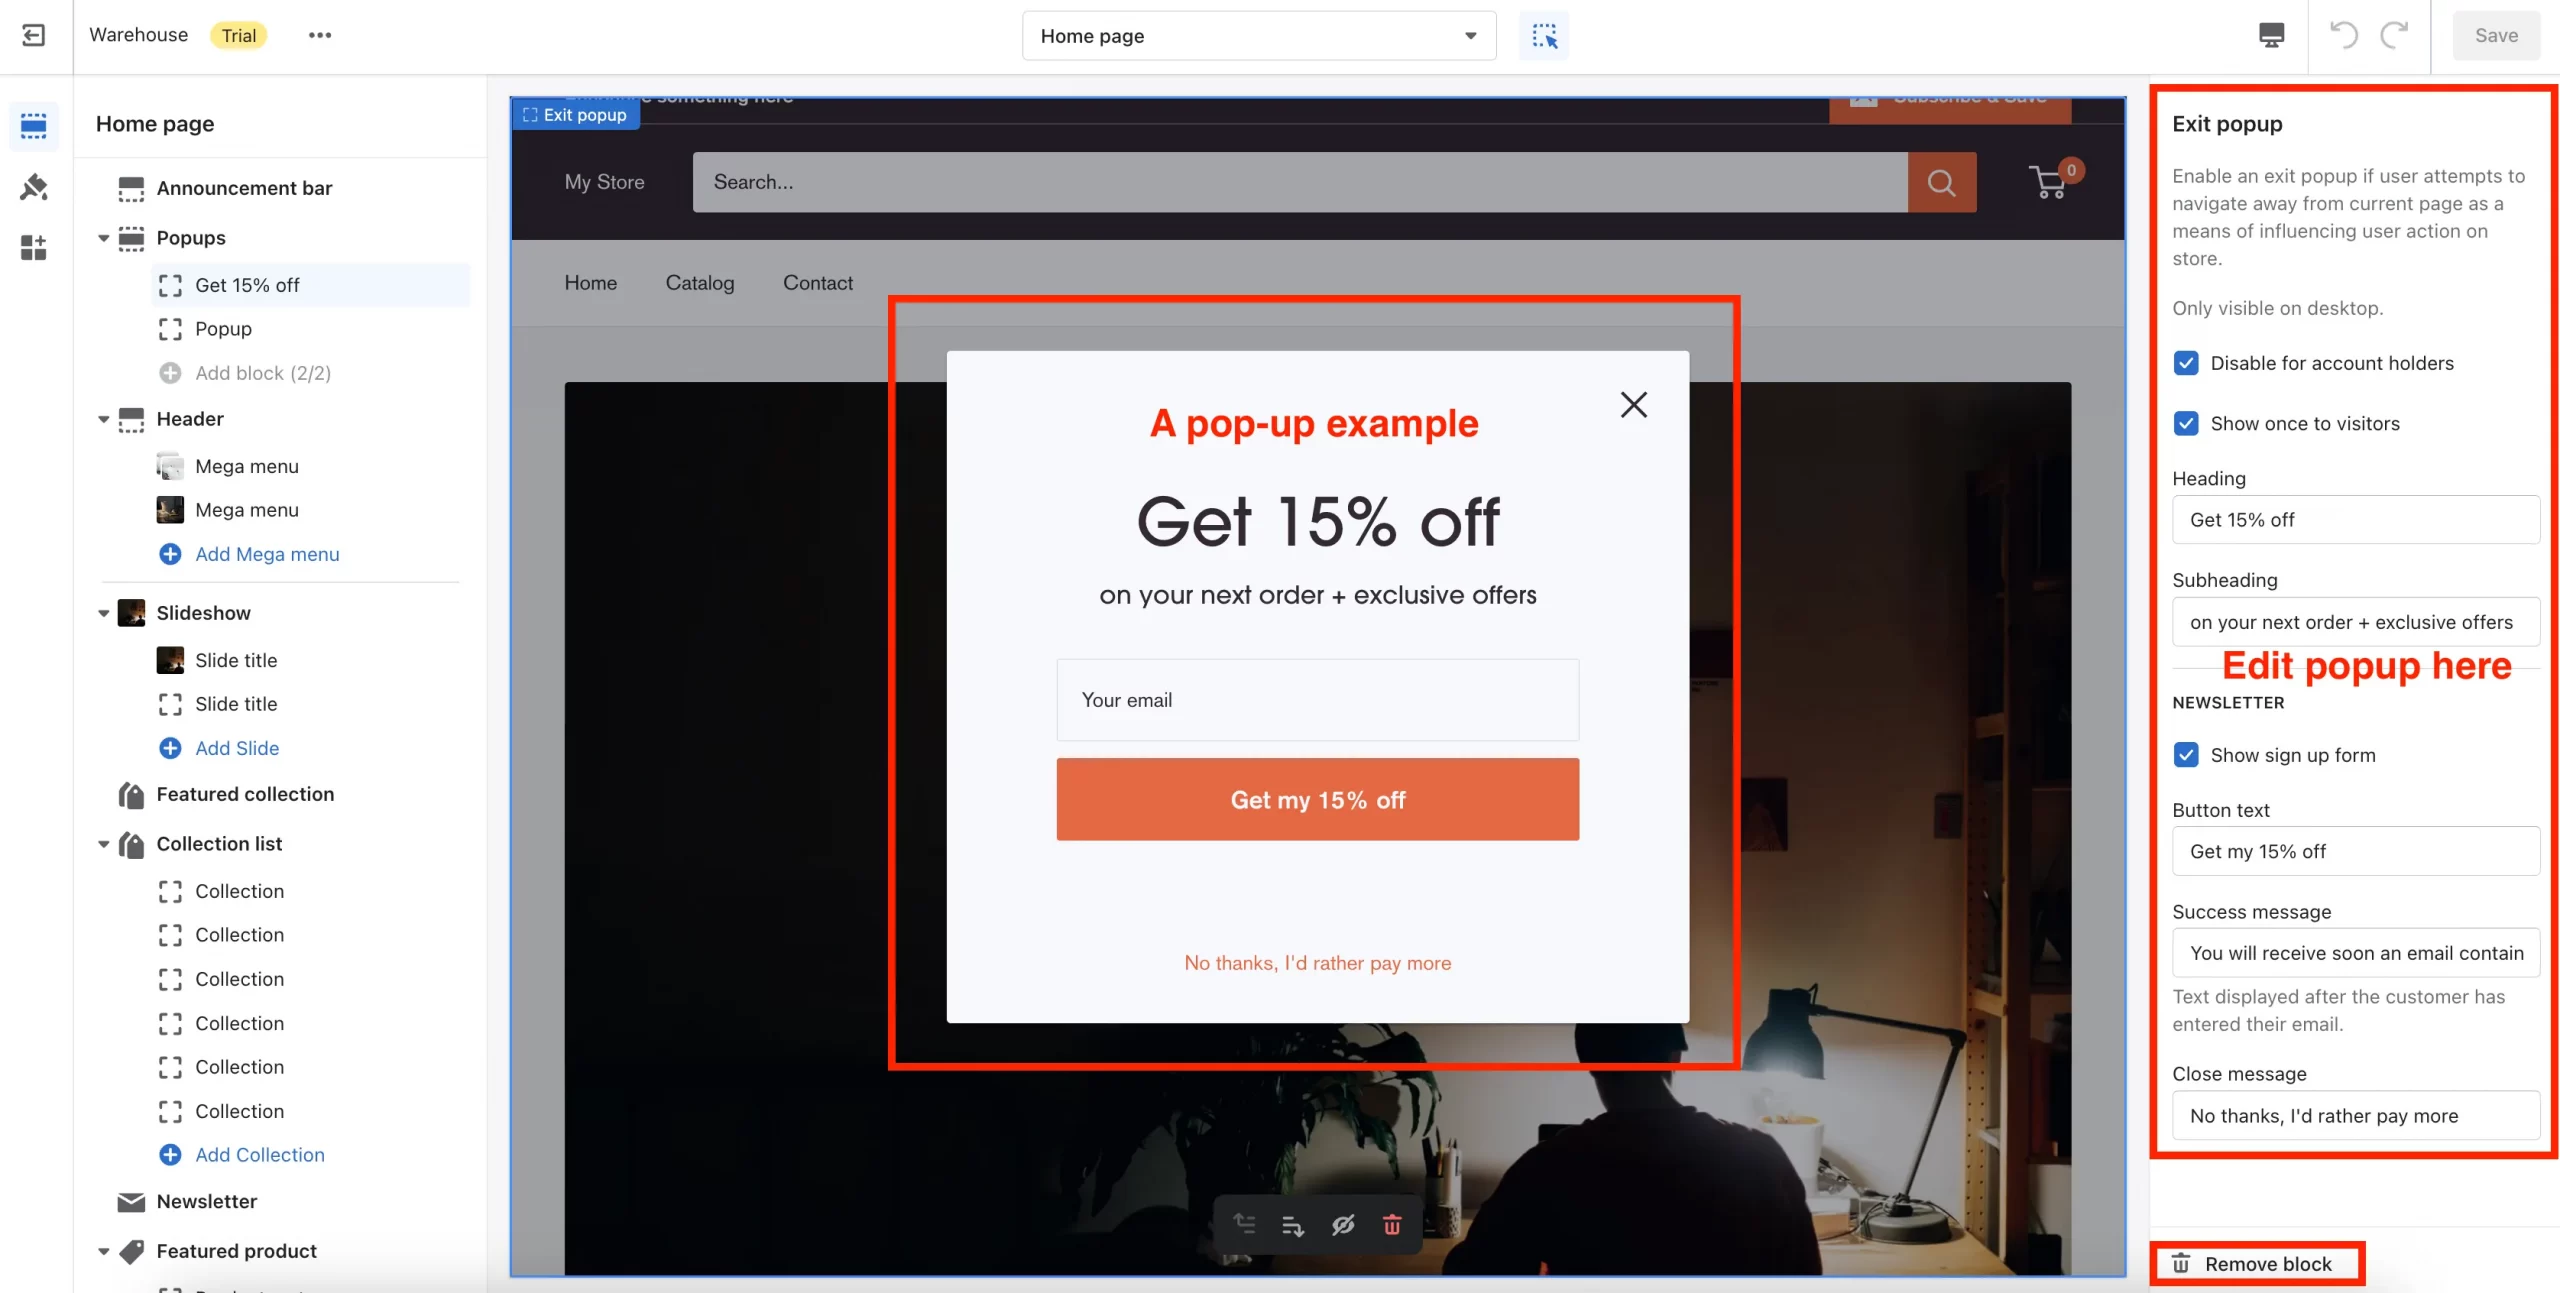
With popup, you can choose to:
- Only show it on the homepage
- Only display once for visitors
- Not to display popup with account holders
If you include a popup that collects customer email addresses, you can utilize the data for further email marketing campaigns. If you have not yet found the email marketing provider, you can consider Shopify Email. It can help you customize, personalize and automatically send emails to customers.
2. Header
Header appears at the top section of your website and it’s the first thing that attracts your visitors’ attention. The goals of Header are to display and convey key elements on your customer journeys.
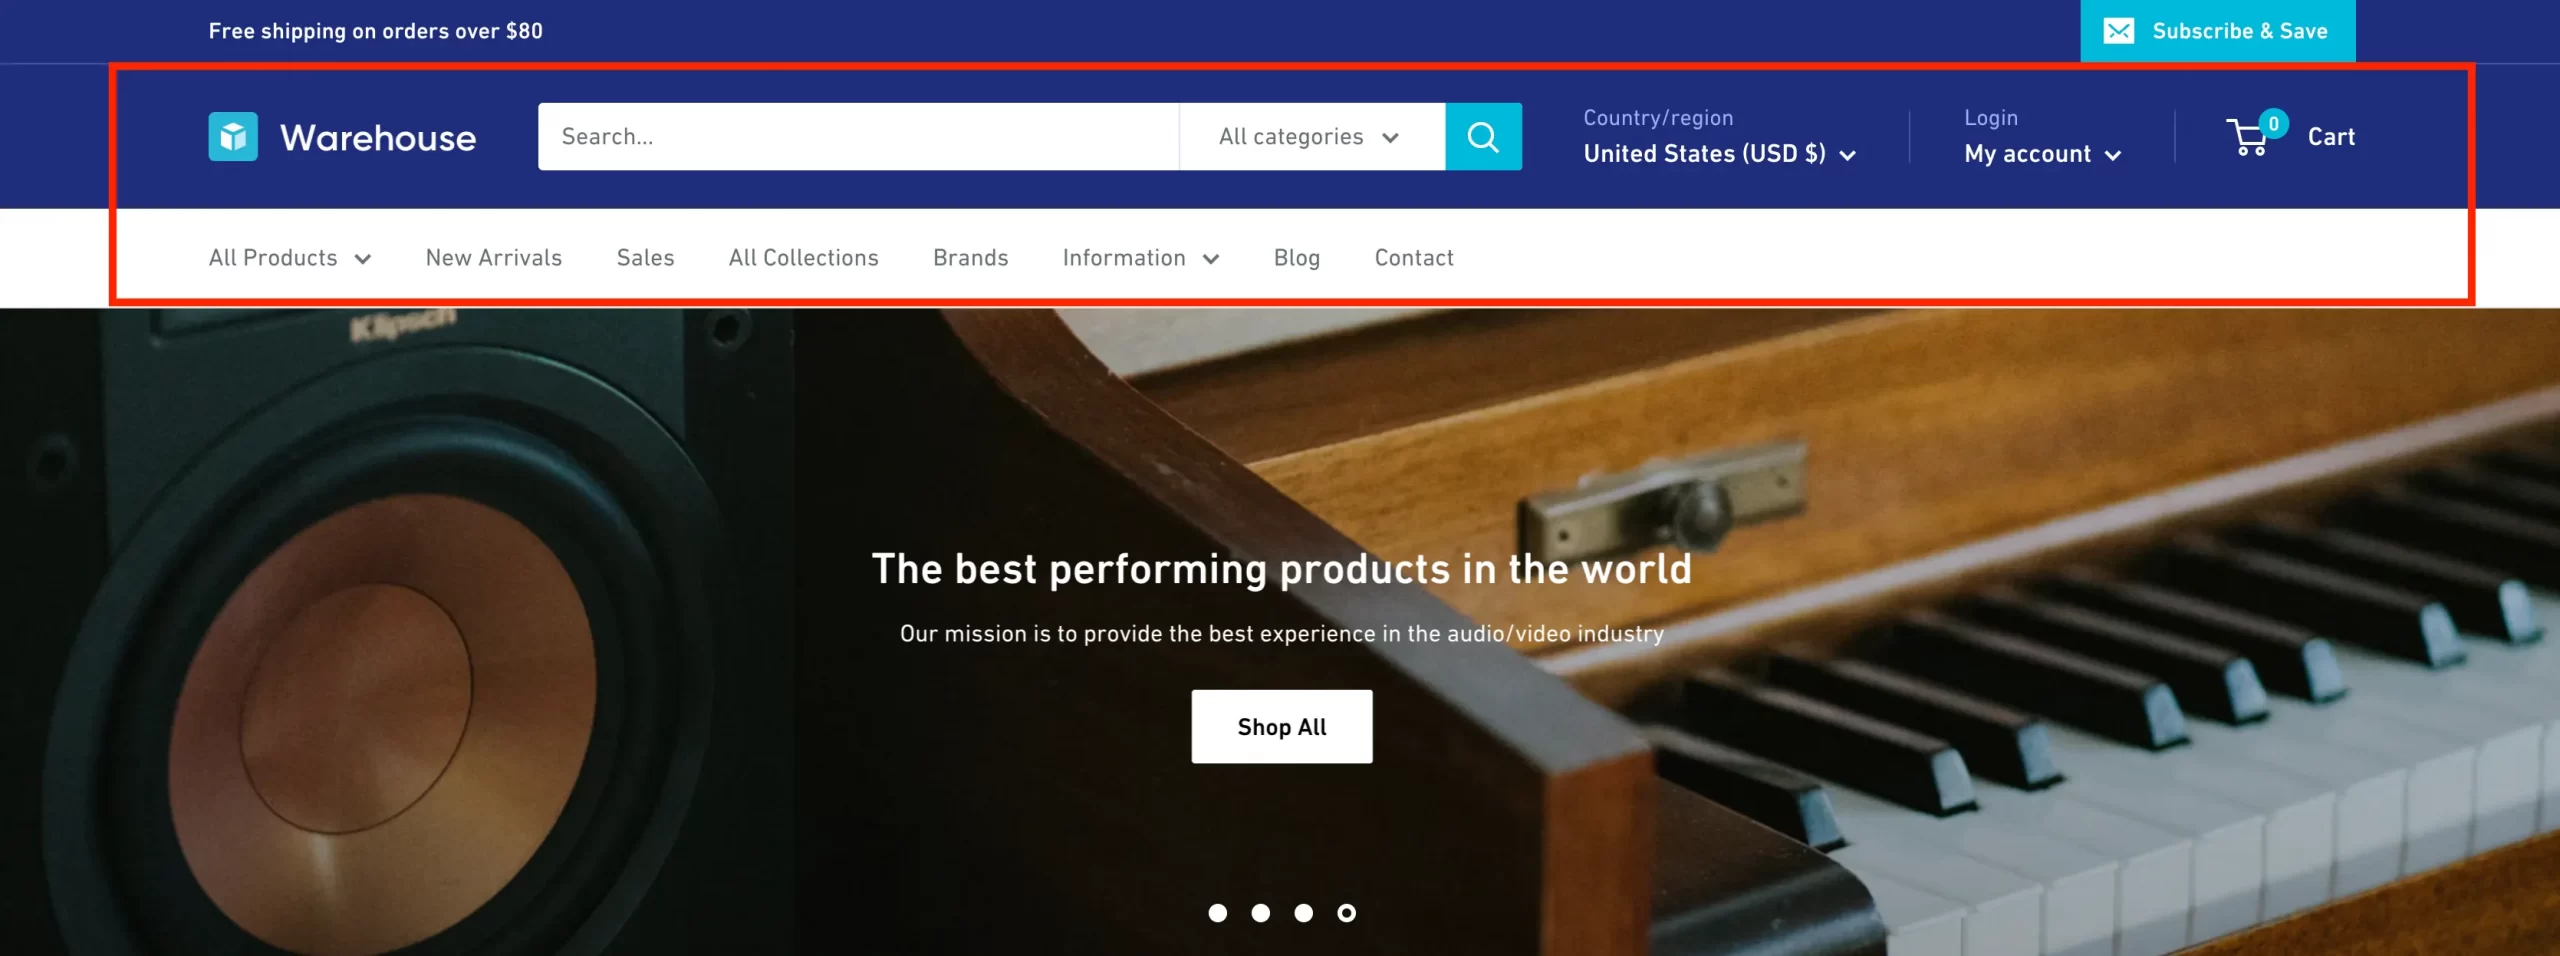
Depending on your business strategies, you’ll have your own ways to display your Header and navigate your visitors. If you’re selling, we recommend these below sections:
- Search bar
- Cart
- Customer account
- Sidebar menu
You can choose whether to enable showing Header on the screen as customers scroll up or not. To do so, on the backend, choose the ‘Enable sticky header’ option (as illustrated on the image below).
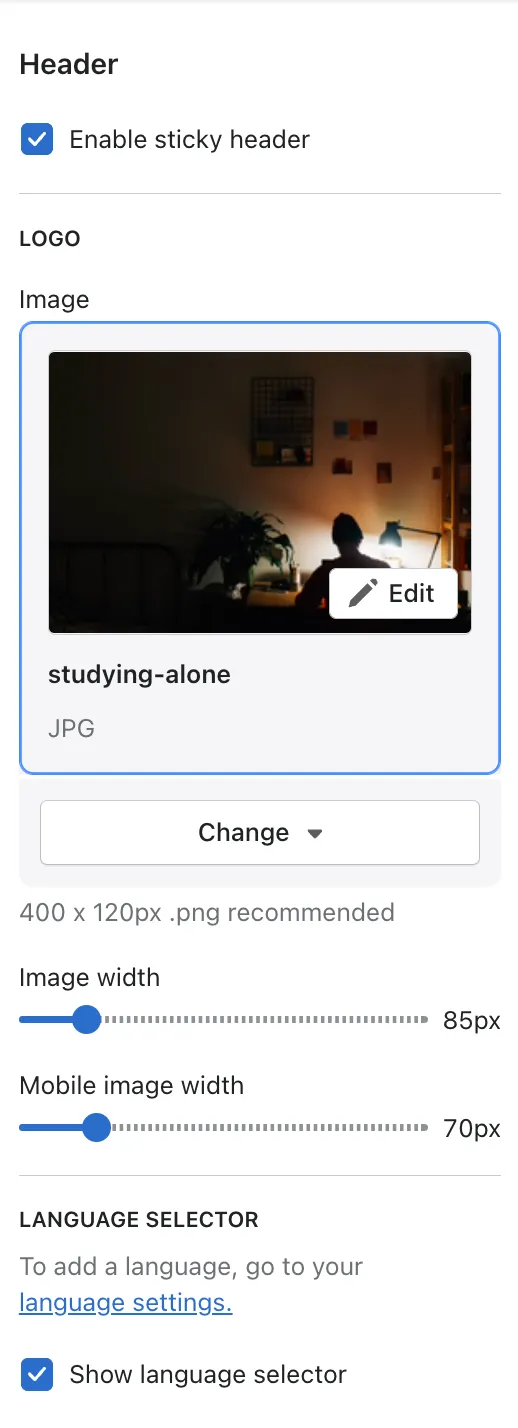
Moving to the website logo. Don’t ever forget to include your business logo because that’s what defines who you are! Here, you can add the image of your business logo, customize the logo’s size for desktop and mobile.
For Sidebar menu navigation, you can customize how it’s displayed on desktop and mobile.
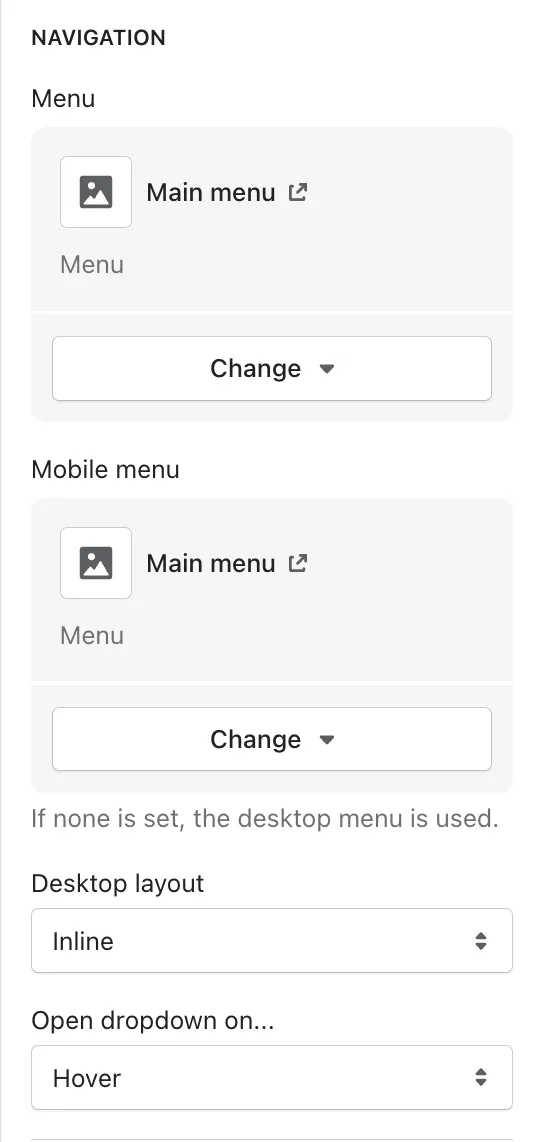
On ‘Main menu‘, we suggest you to include:
- Product categories
- Collections
- Contact page
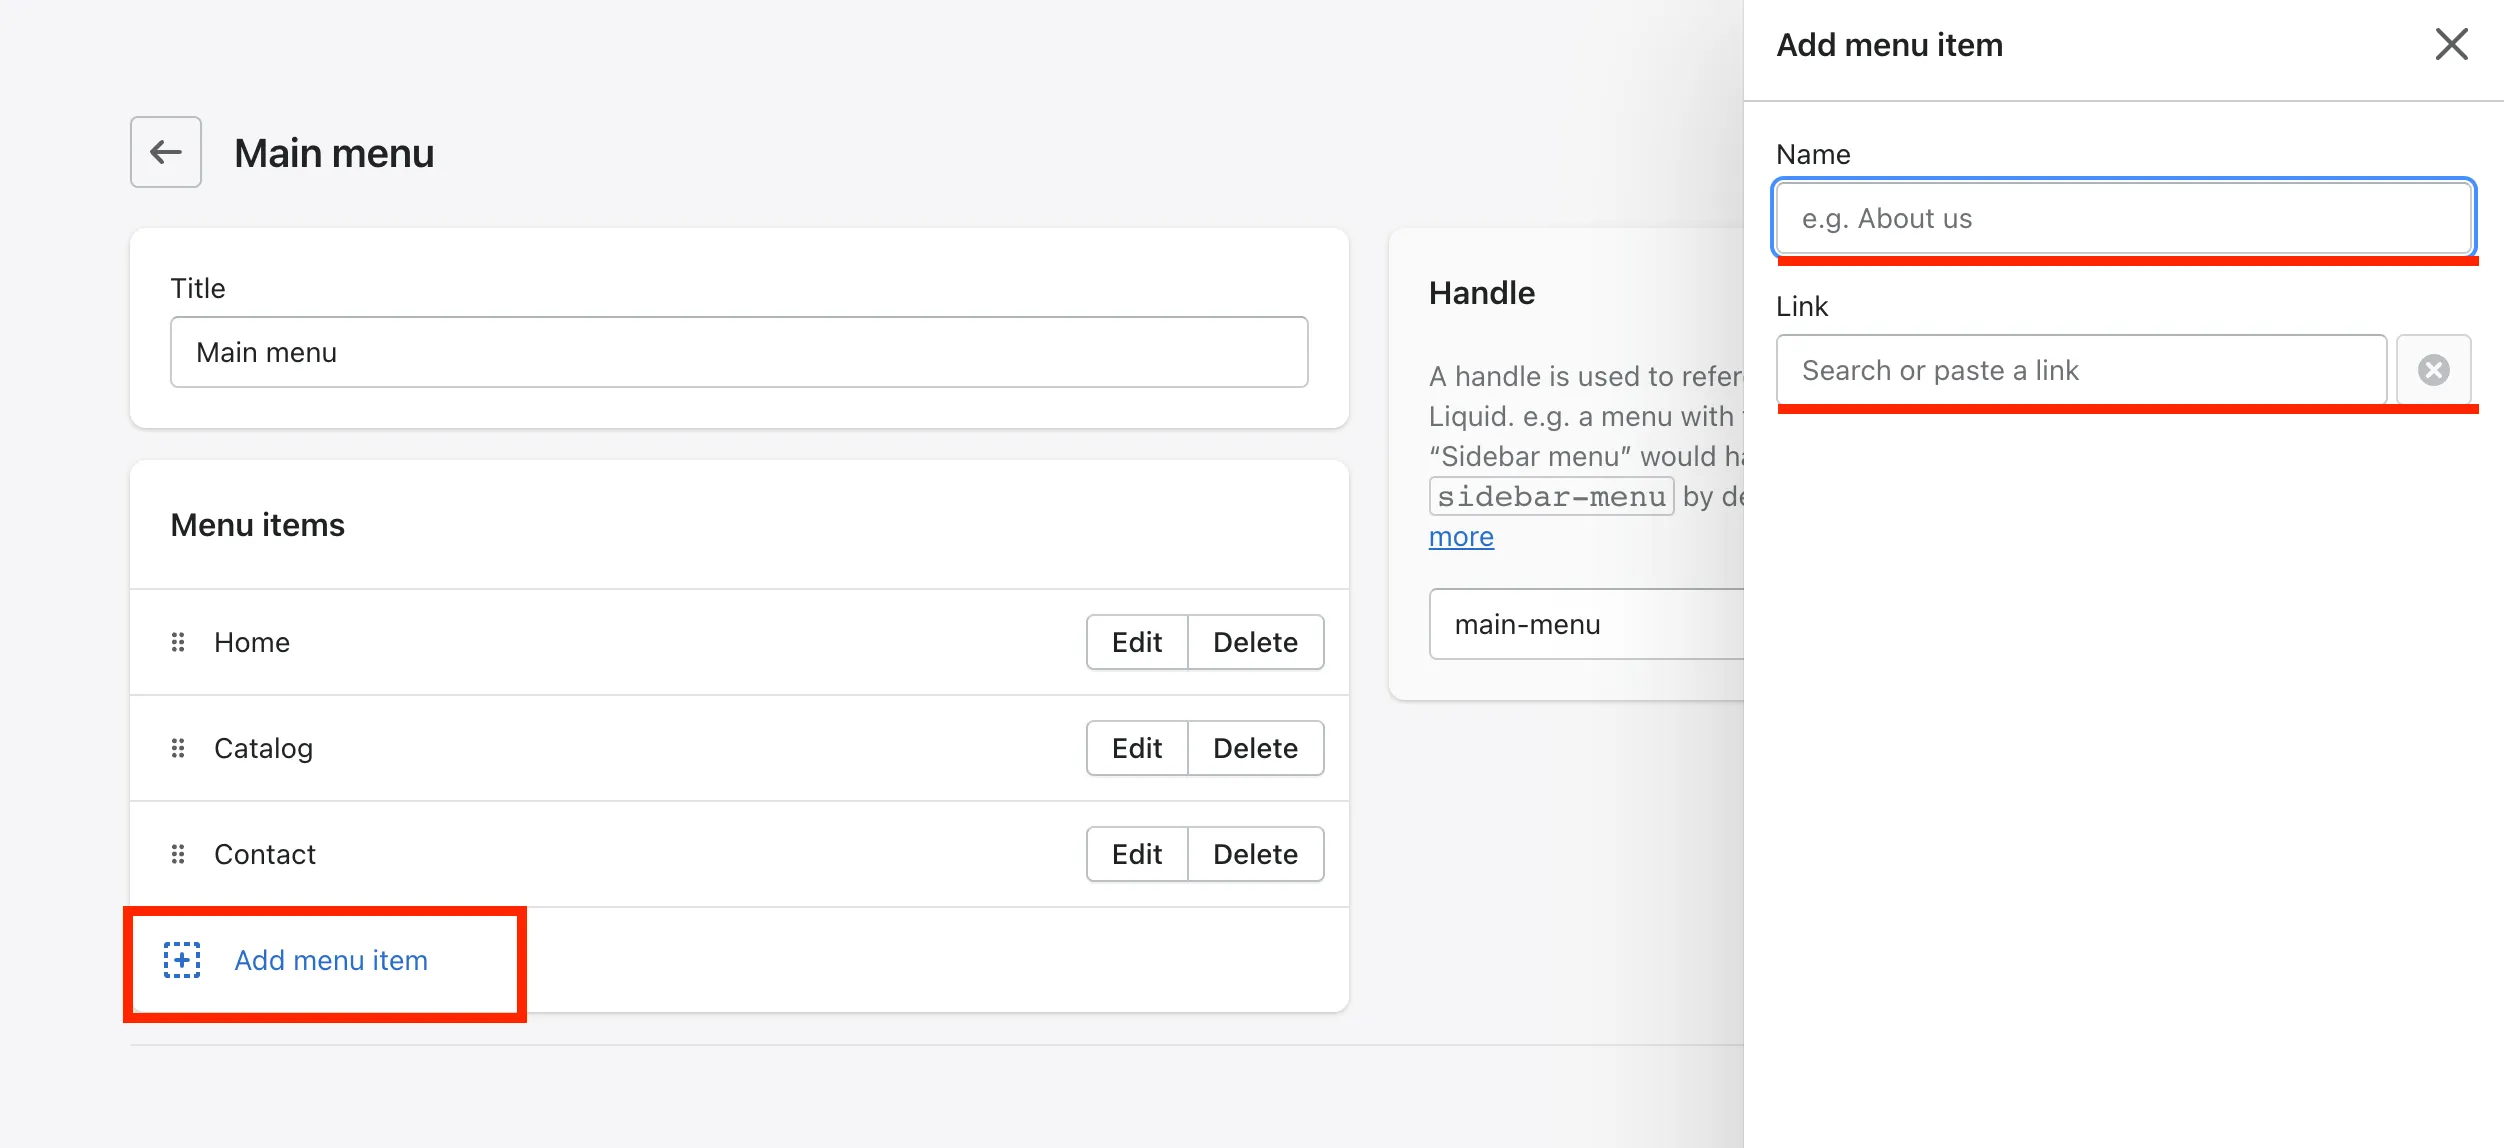
To find the Menu navigation page, follow these steps:
- Step 1: On Shopify dashboard, navigate to Online Store > Navigation.
- Step 2: Find Menu. Here, you can edit the Main menu or create a new menu.
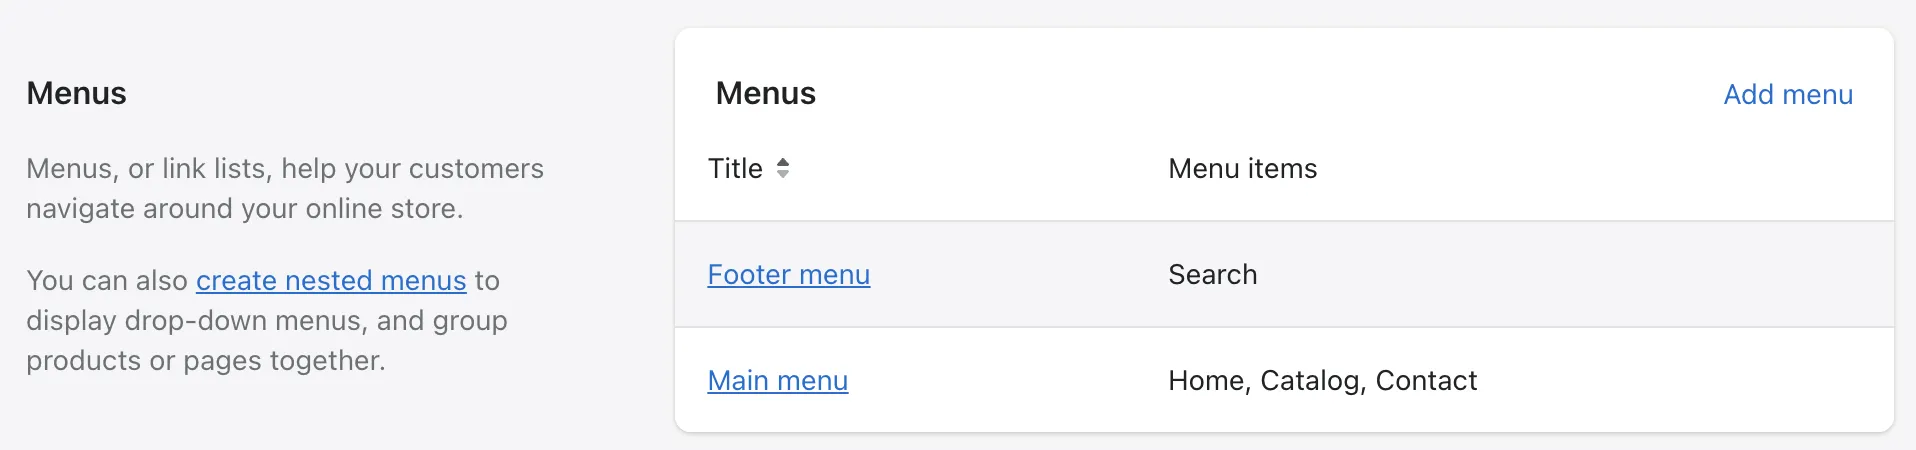
- Step 3: Add menu item.
Originally, Shopify will generate: Home, Catalog and Contact page. Based on your eCommerce strategy, you can add new menus and link to custom pages.
Not only does it navigate your visitors to important pages, it also sends a signal to Google bot of what exactly your website is about. So, you must get the most of your Header!
3. Slideshow
A website slideshow or slider is a function for displaying numerous photographs in a gallery-like format. It shows one image at a time and automatically switches between them after a timeout and/or a user action, like a swipe or button click.
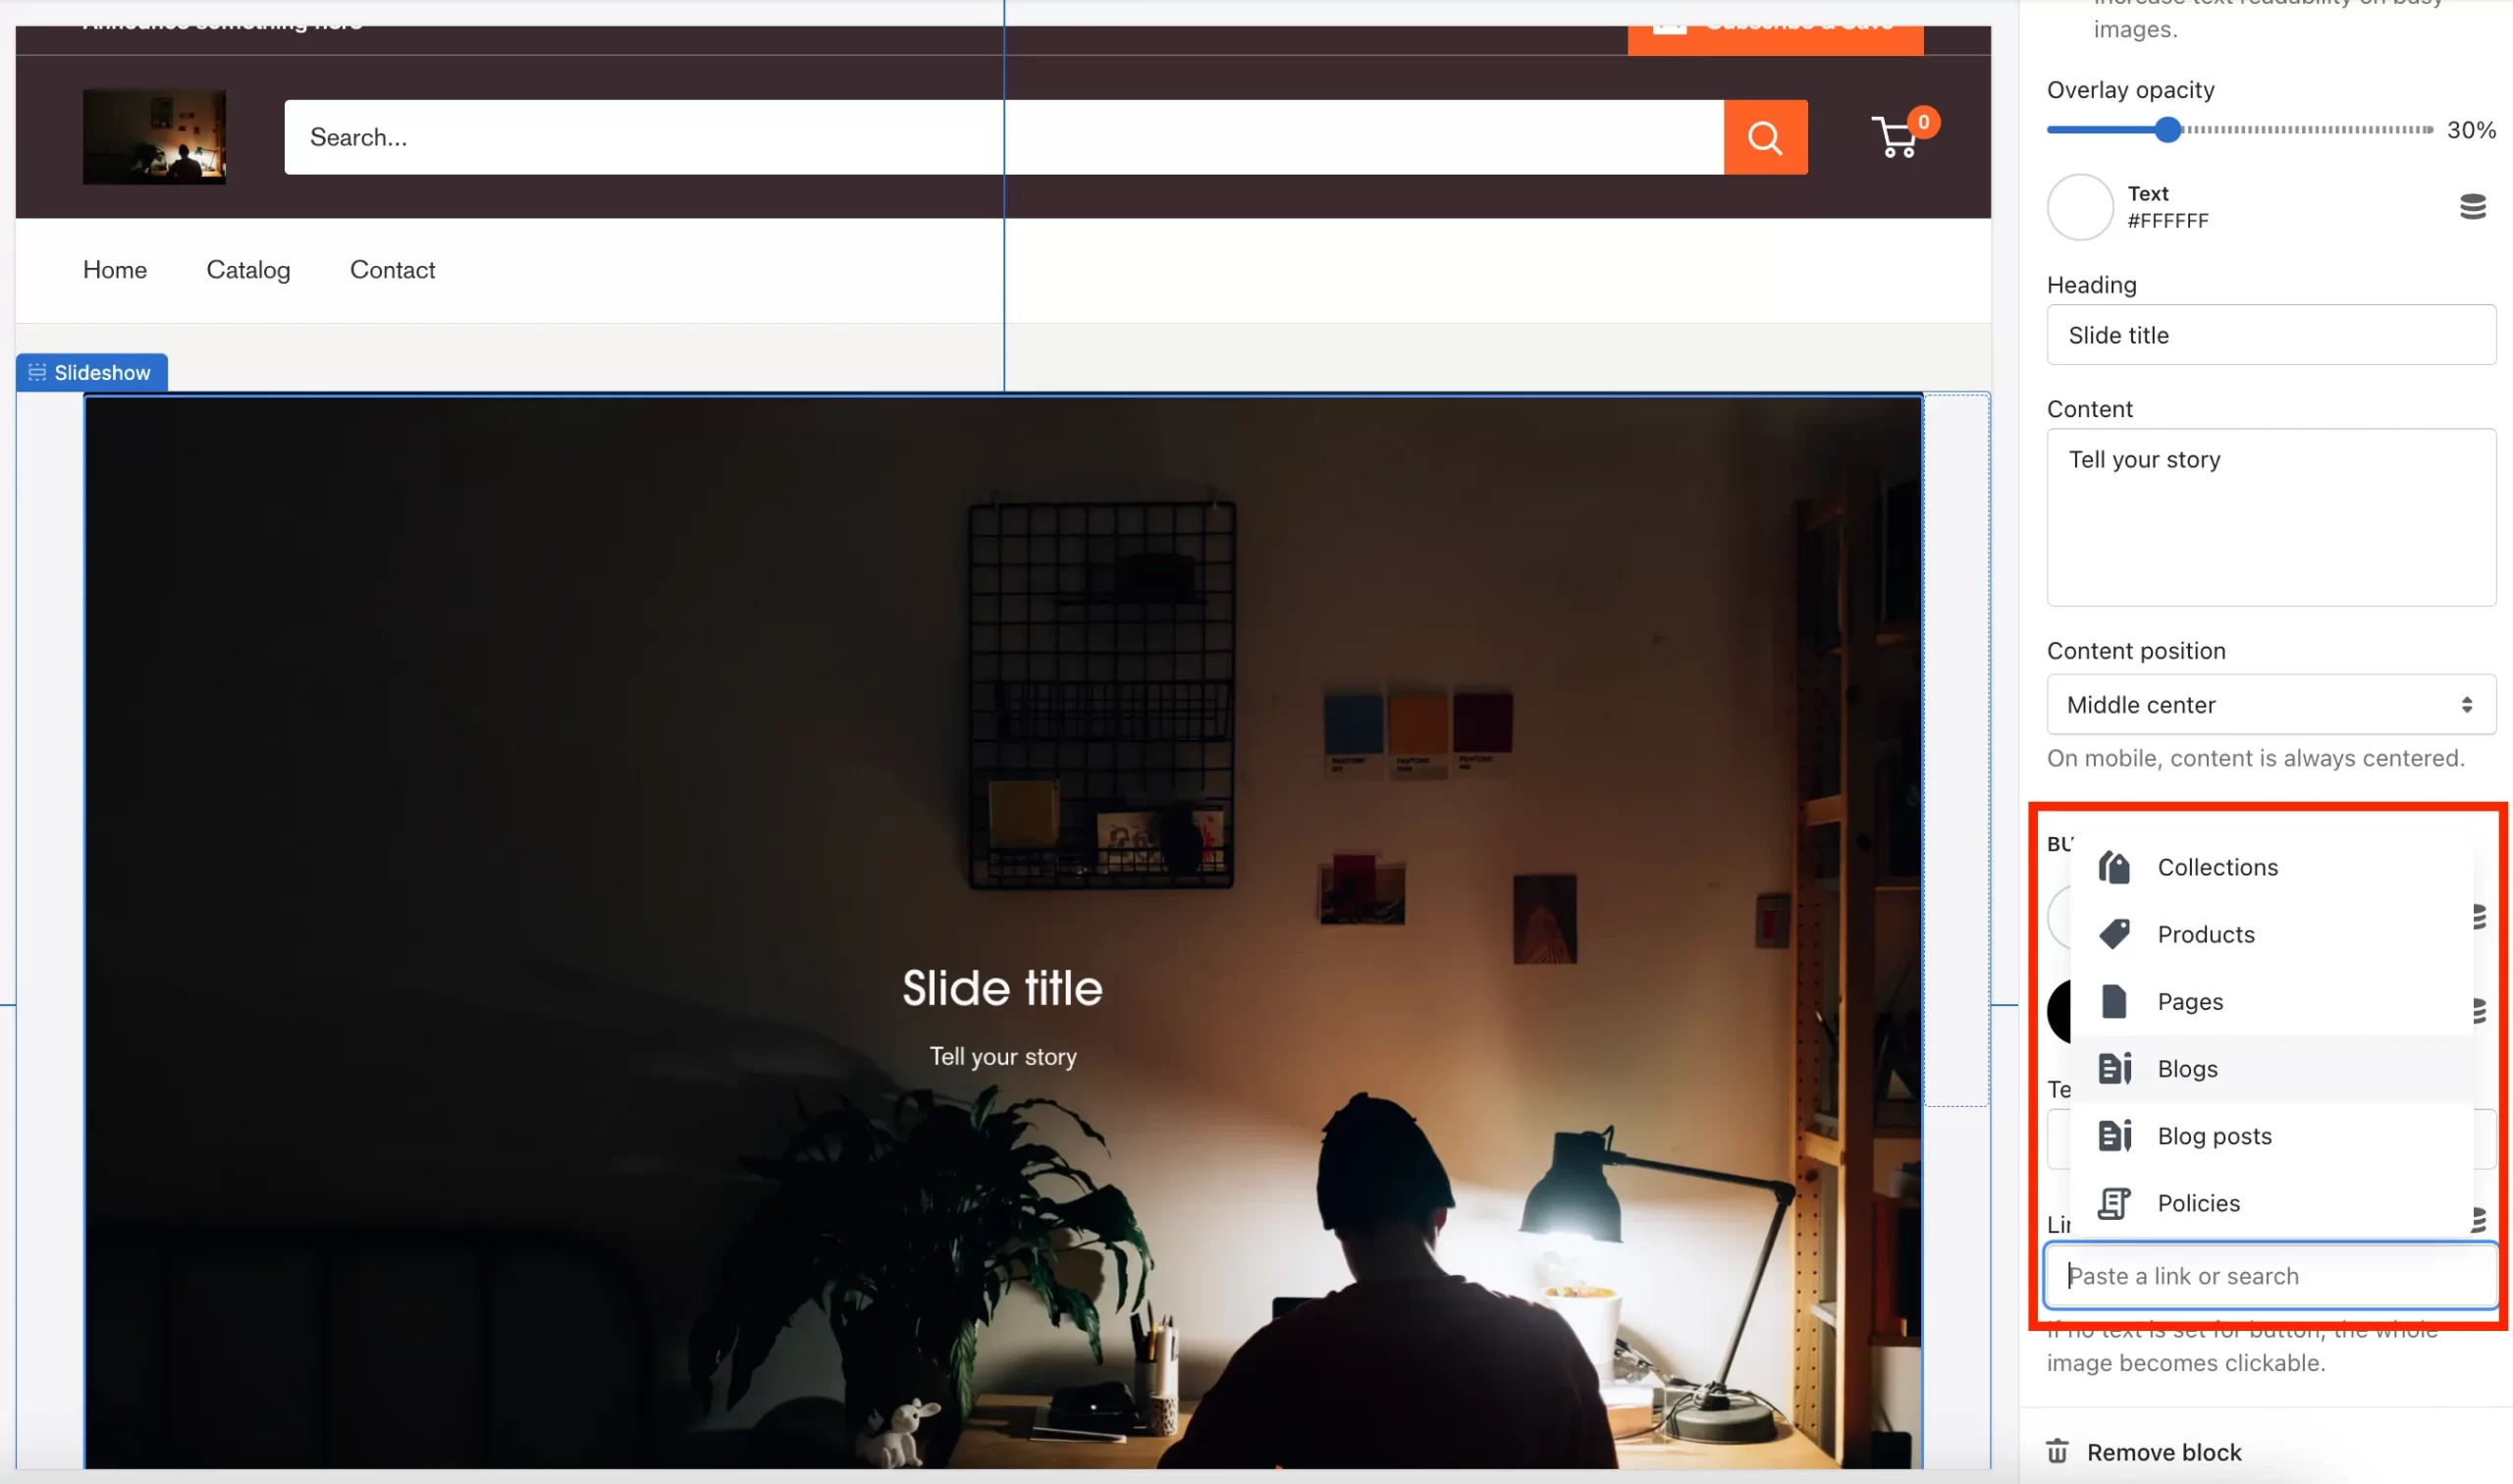
You can choose to include the key pages of your website or provide some of your most noteworthy information, such as your brand insight or business journey. And don’t forget to take advantage of this section by linking your visitors to a landing page and convert them into customers there.
Based on your specific business goals, you can lead them to:
- A particular Shopify collection
- Some products you want to drive sales to
- The policies of your store
- and more.
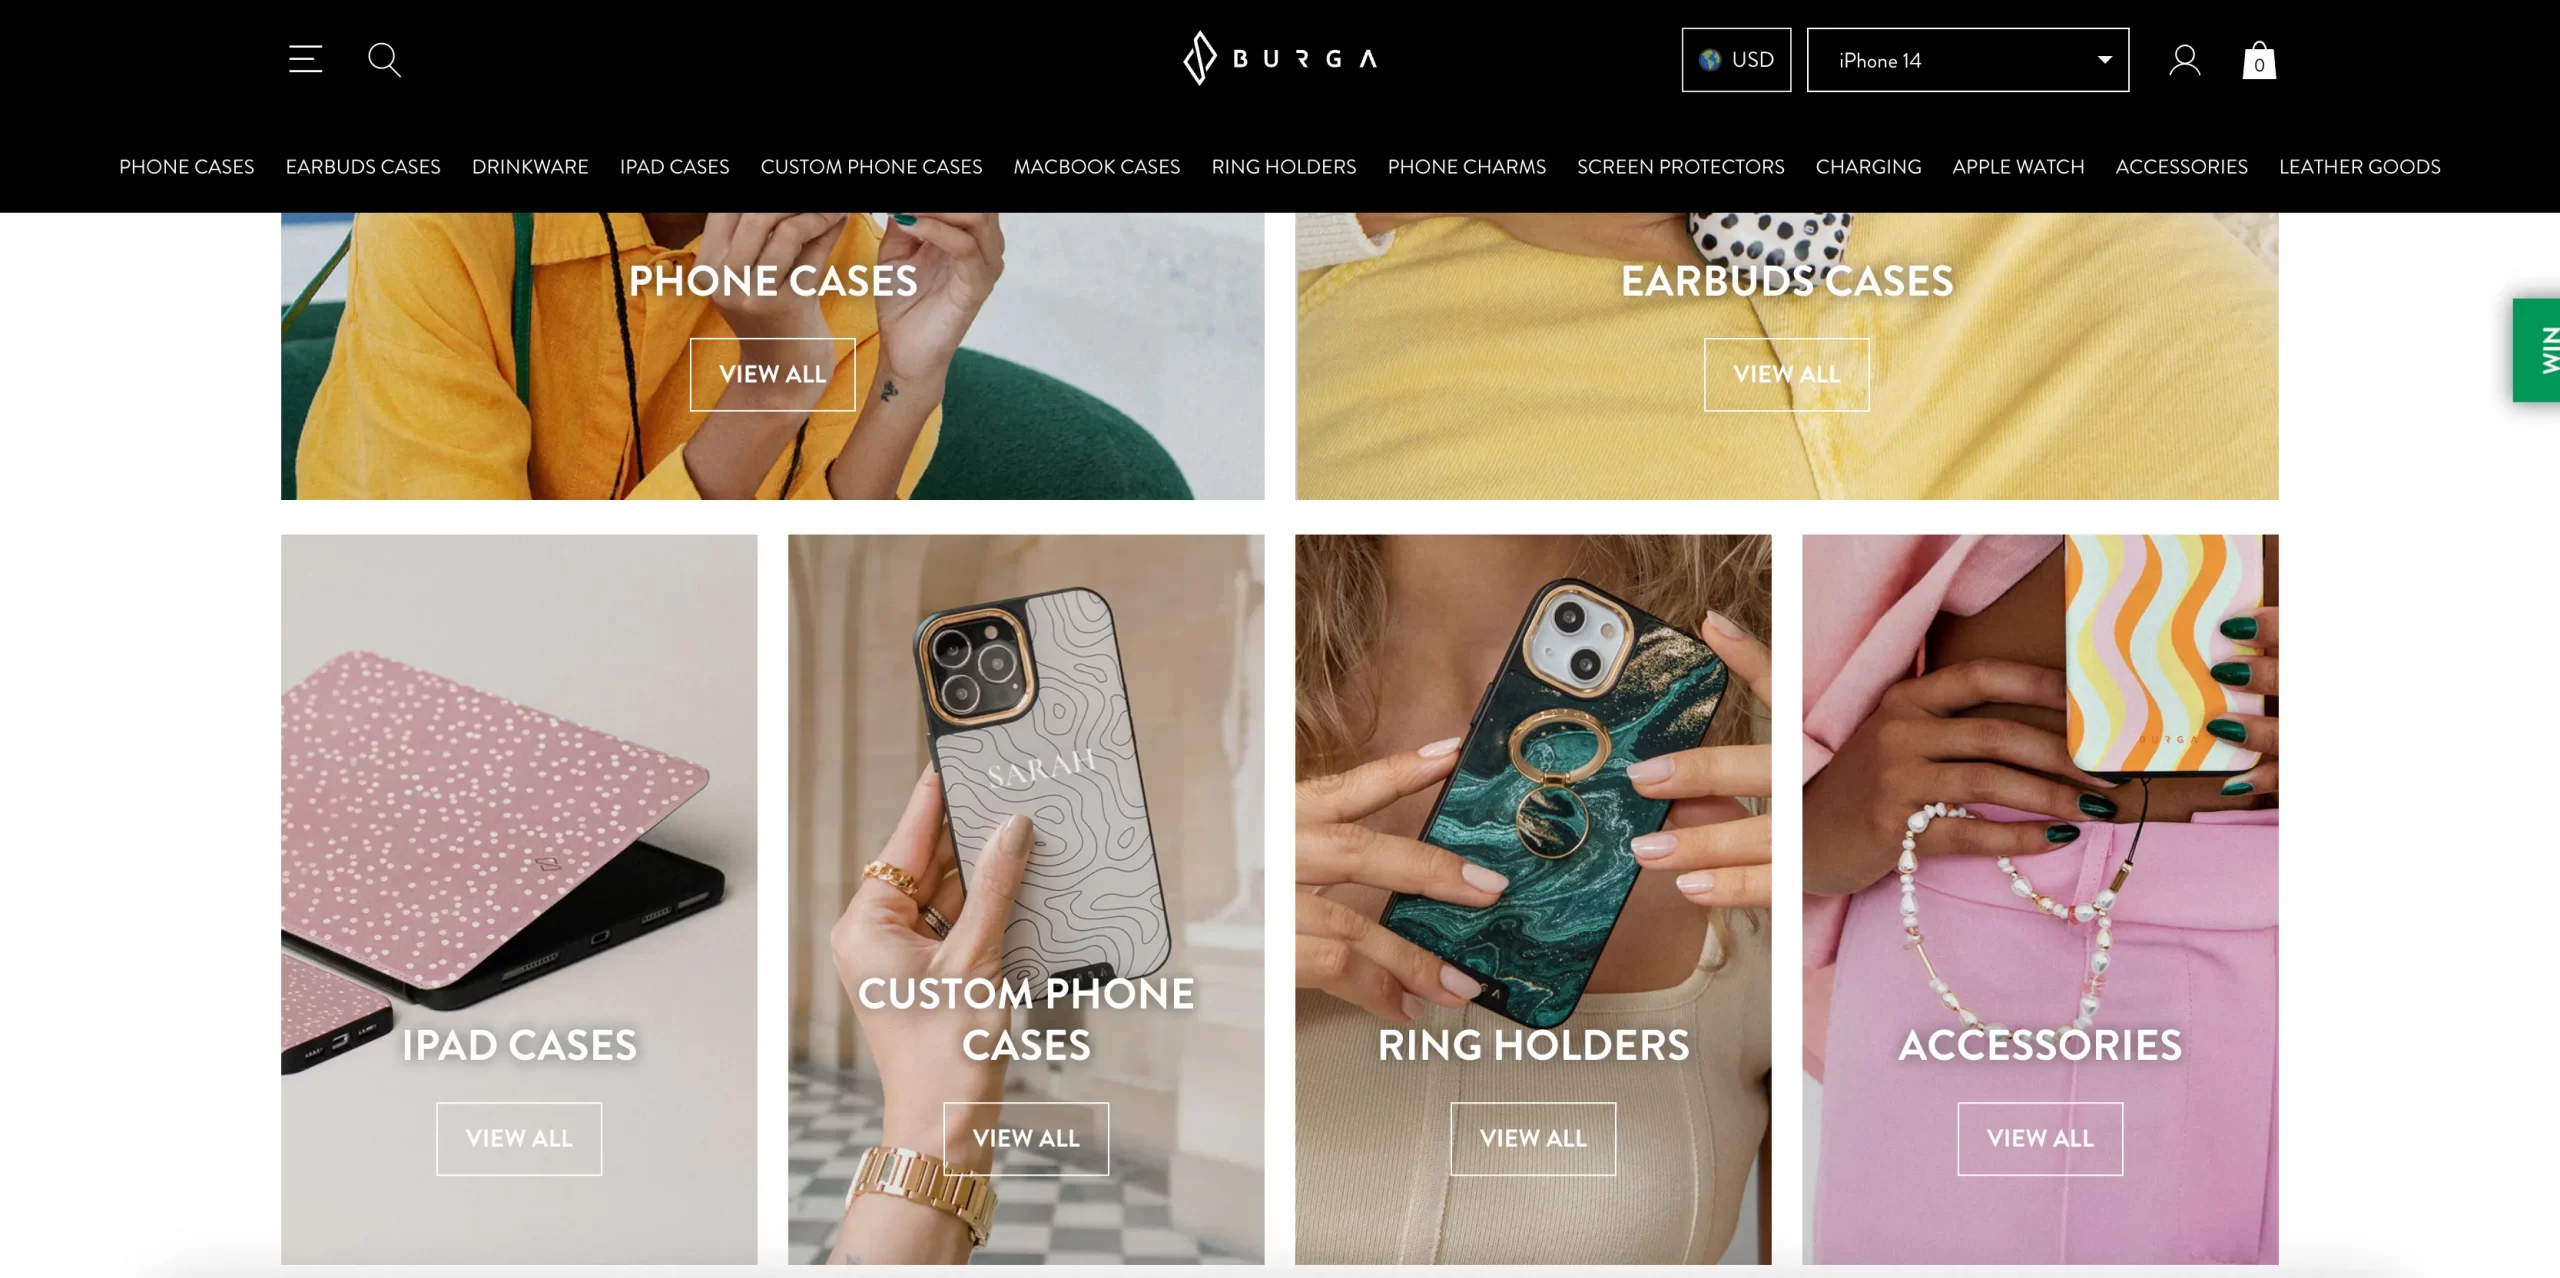
4. Feature collection & Collection list
On Shopify, a featured collection is a group of products that have been specially chosen and shown on your Shopify store’s home page.
To display a featured collection on Homepage, let’s navigate to the ‘Featured collection’ section. In this section, you can:
- Select which collection to include & Decide how many products to show on this section
- Name the collection on ‘Heading’ (Featured collection is not a fixed name, you can always alter it!)
- With ‘Link title’, choose where to link your collection to (if it’s empty, Shopify will automatically uses the collection URL)

Now, let’s move to ‘Collection list’. Collection list is a page that lists every collection in your shop. In this case, on the ‘Homepage’ section, you can:
- Add Collection
- Edit that Collection & Display it in the way you want
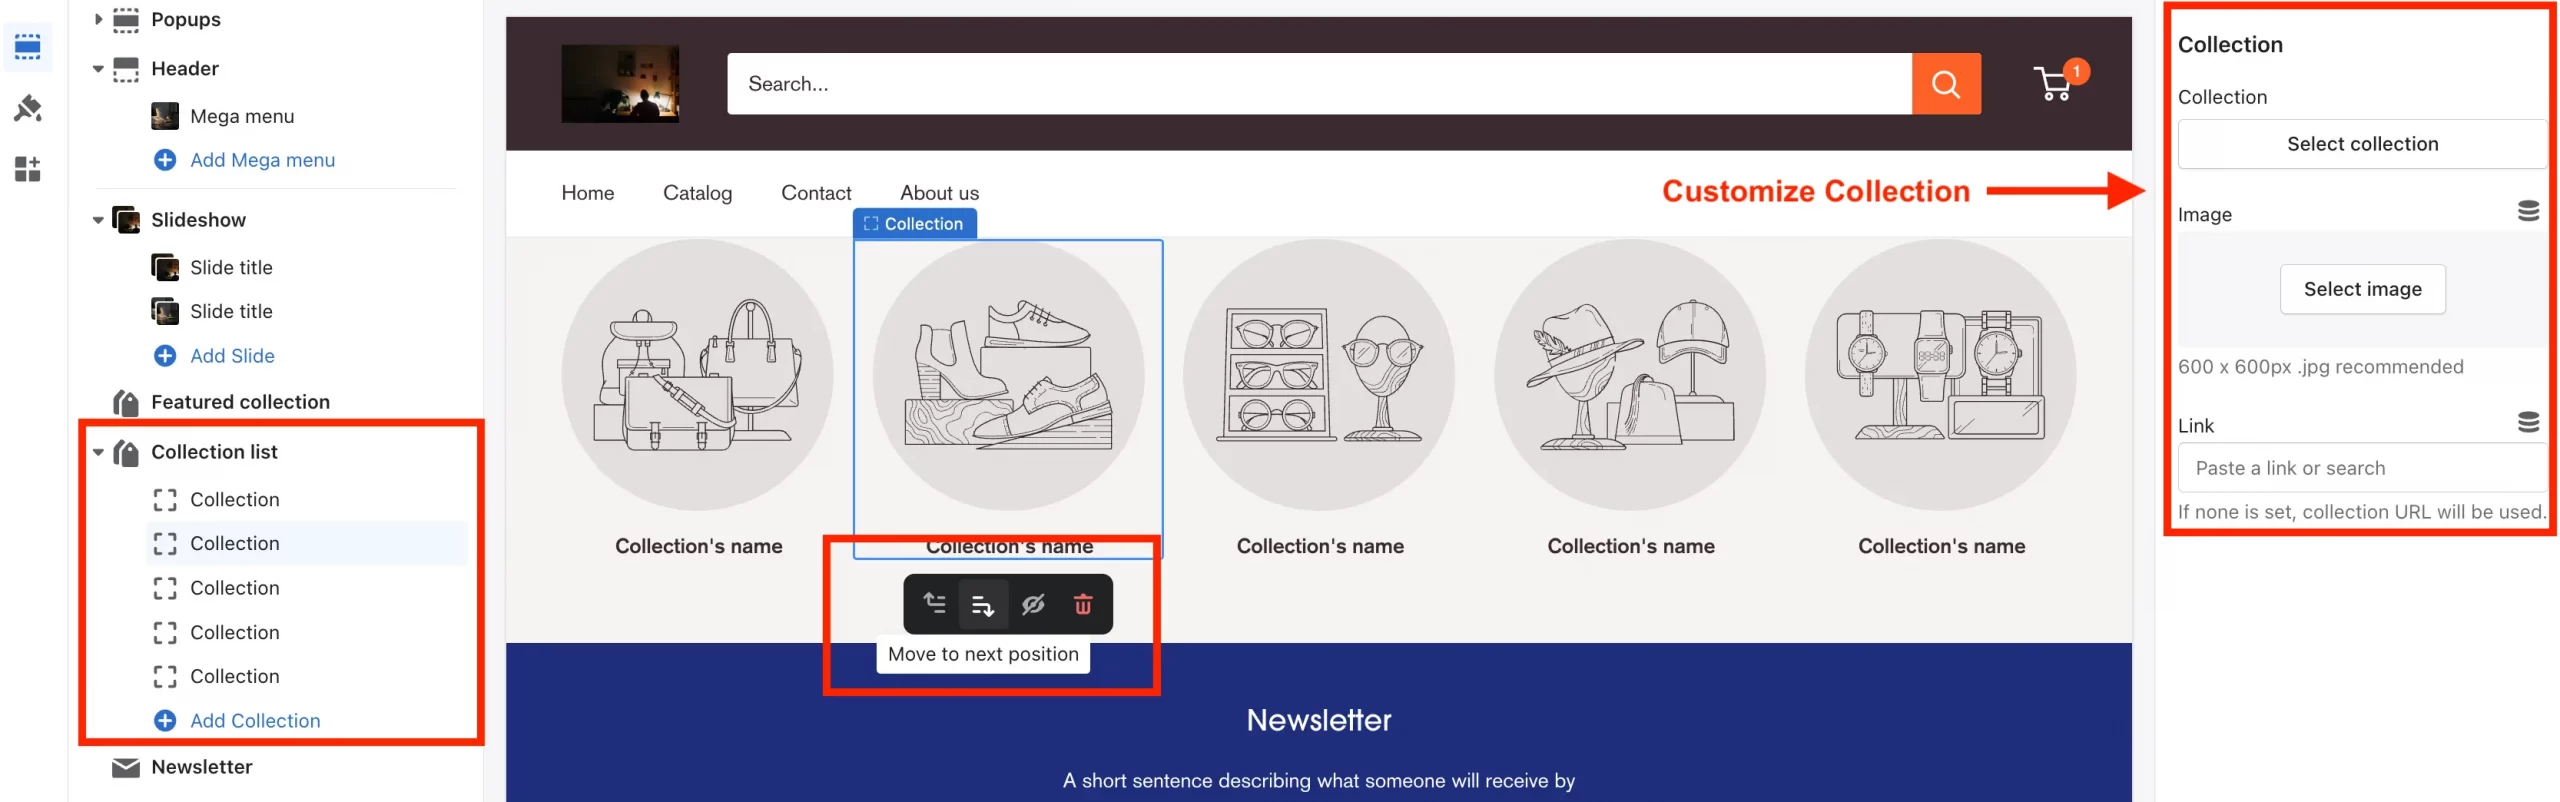
You can edit and link your custom collection to your website’s custom page. The most outstanding collection you have should be put on display, as there is a high chance that it will drive conversions by grabbing visitors’ attention.
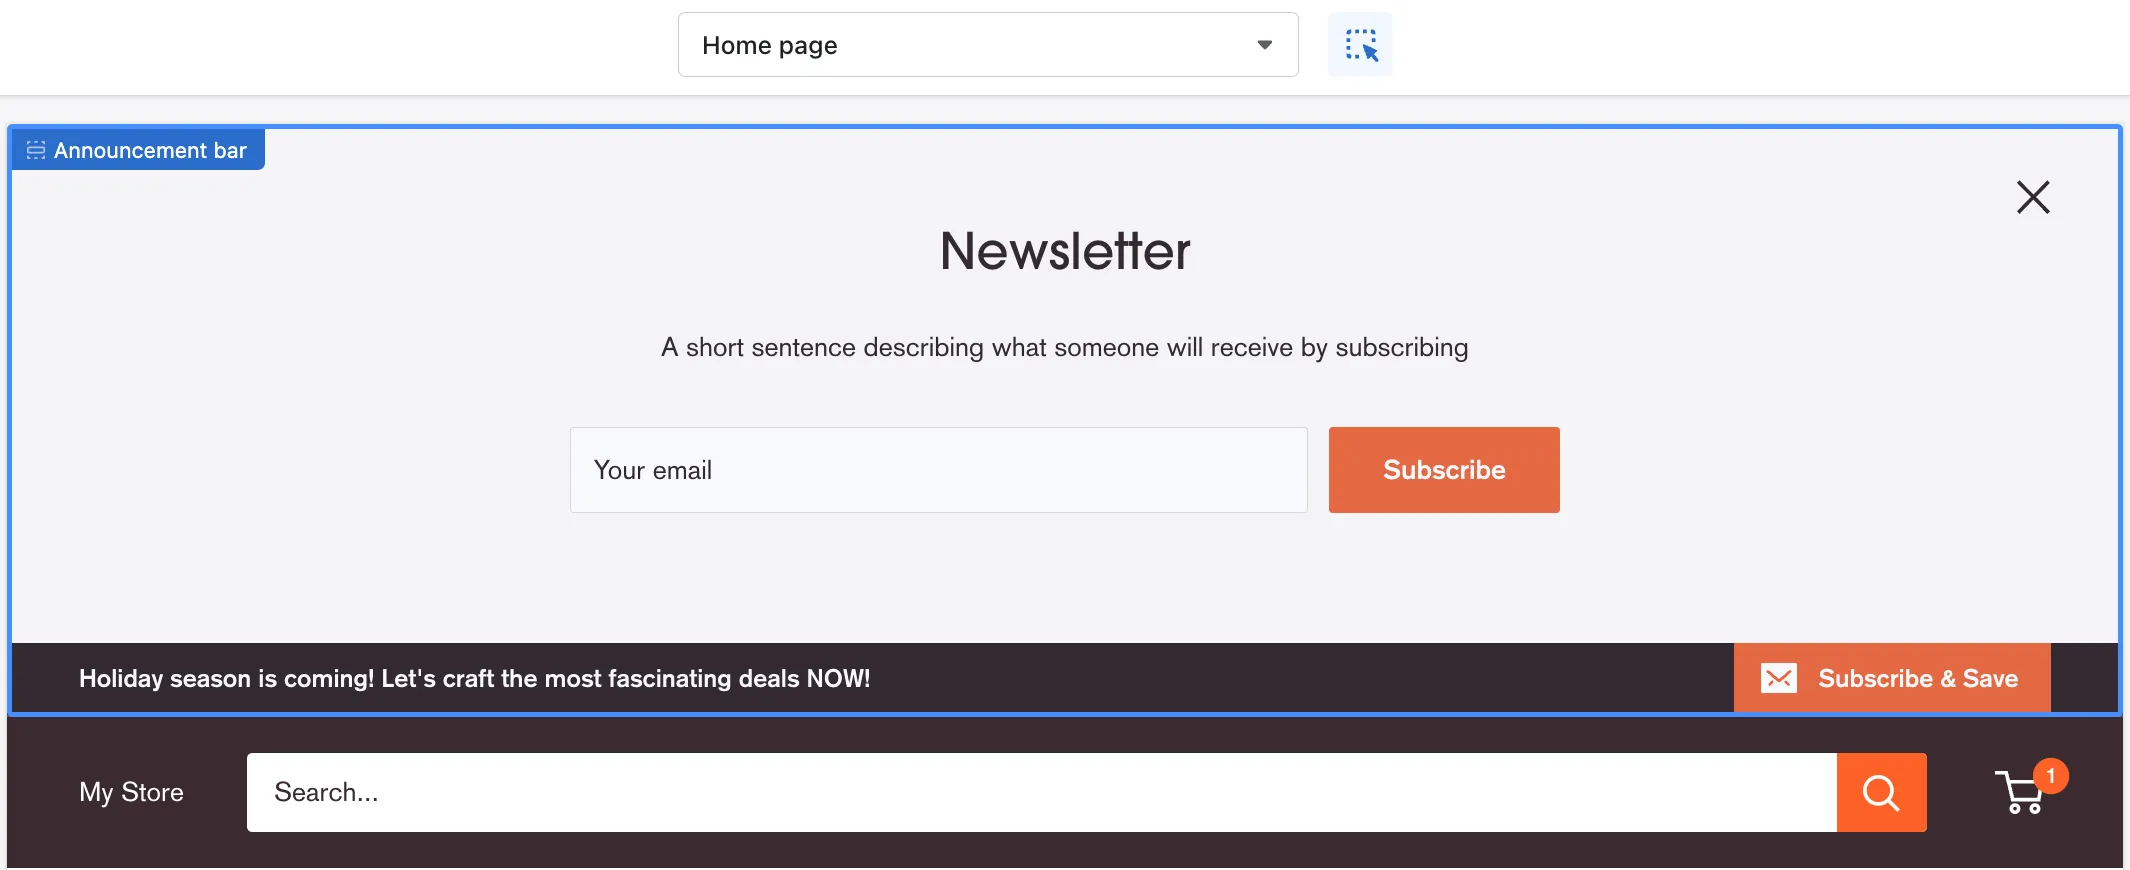
5. Newsletter
Your online store can benefit from adding a newsletter subscription form so that you can gather client email addresses for email marketing campaigns.
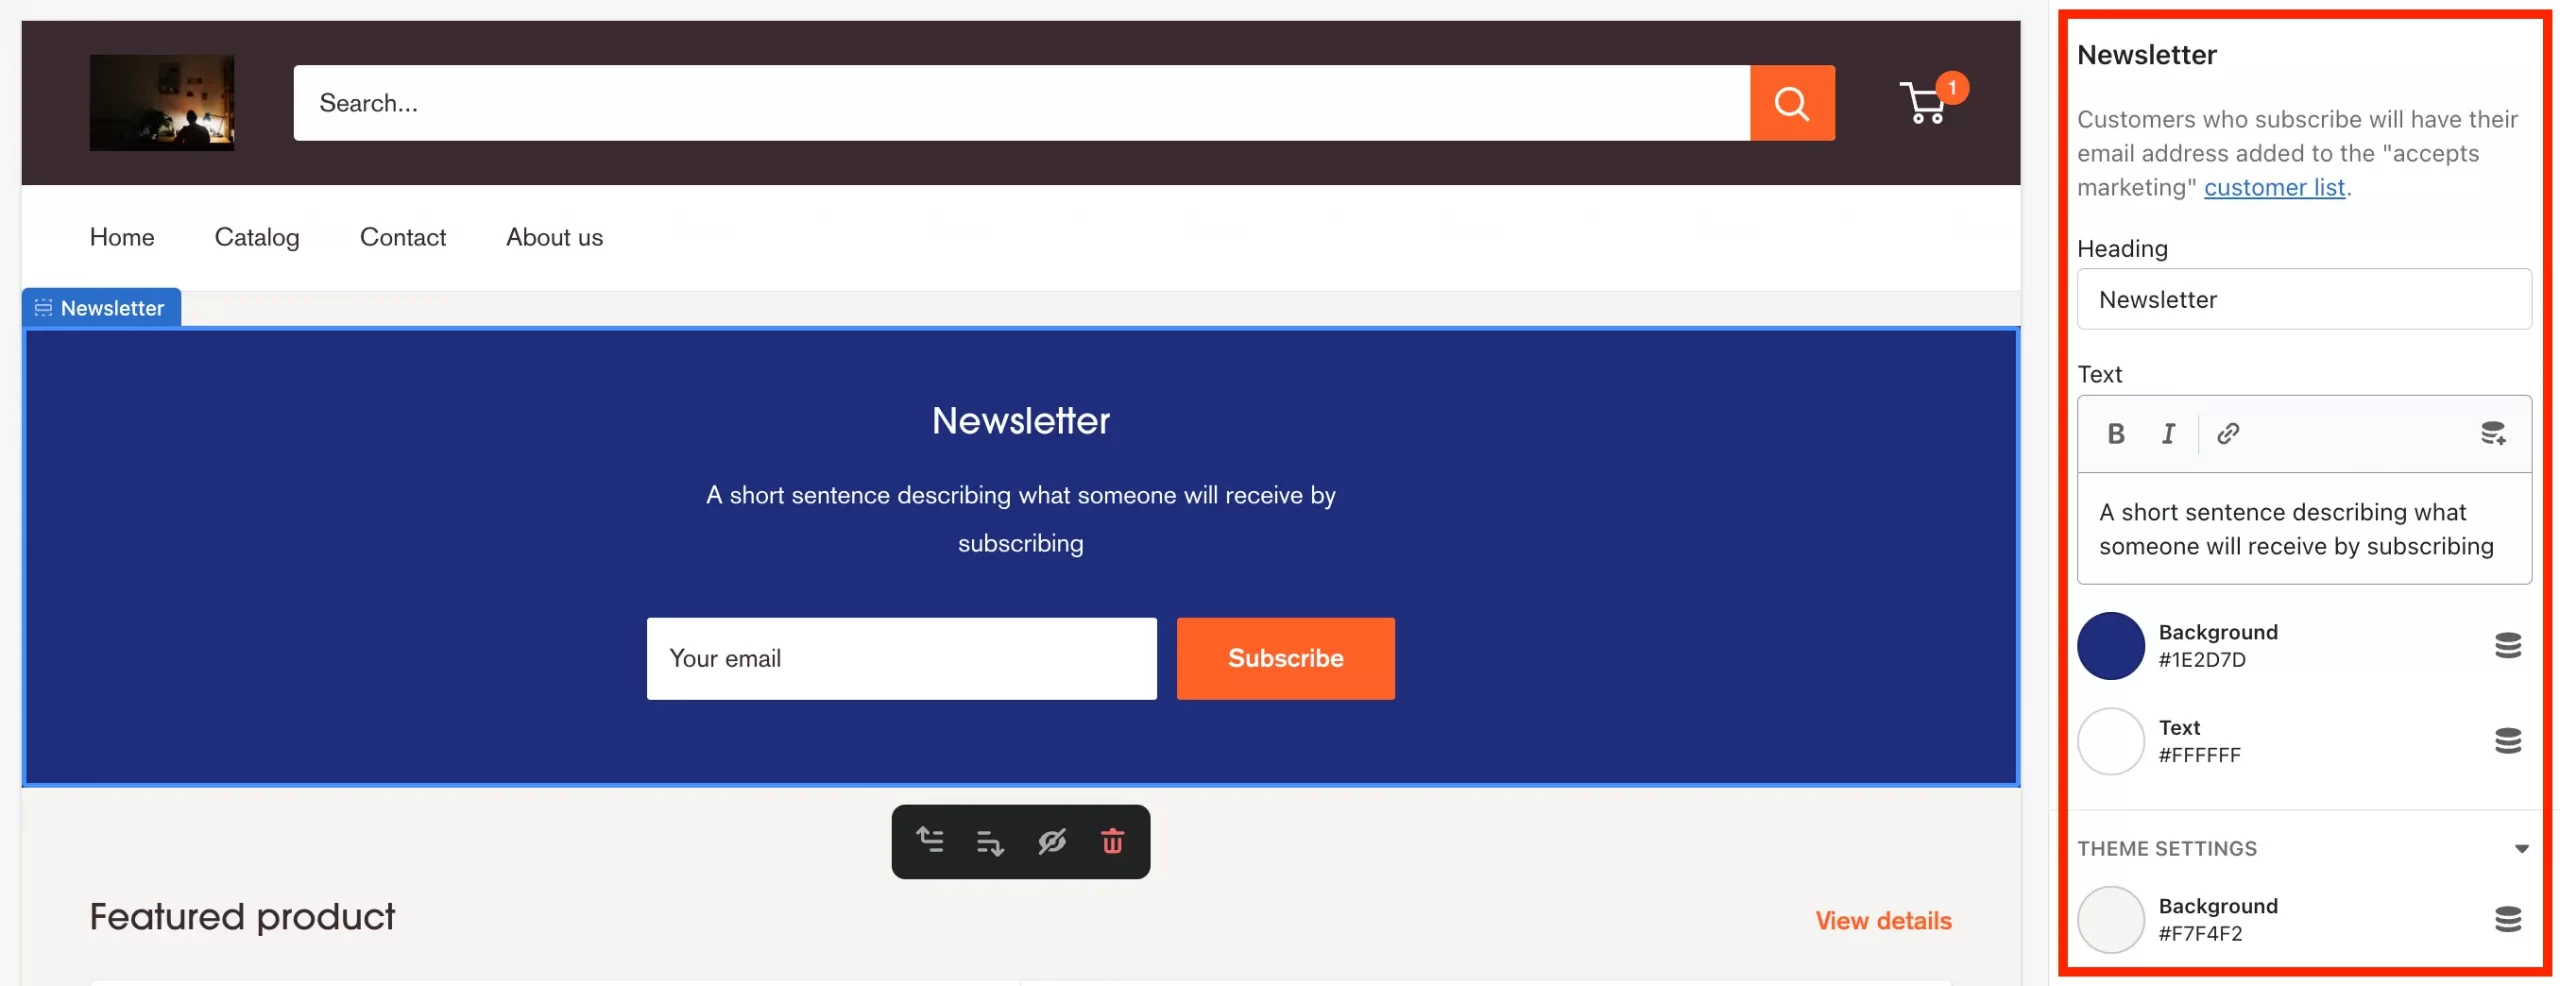
Shopify allows its users to freely customize this section. You can change the heading, the short paragraph that follows it, and even the background and text color. Therefore, feel free to create a Newsletter that is unique yet aligned with your brand guideline.
After collecting email addresses, it’s not an optimal idea to manually send your papers. Let’s optimize the process of sending marketing emails by using a Shopify app. The typical method used by email marketing tools is to sync your Shopify client data with an outside email marketing solution (our suggestion for you is to use Shopify Email or Mailchimp).
Access essential resources on email marketing with:
6. Featured product
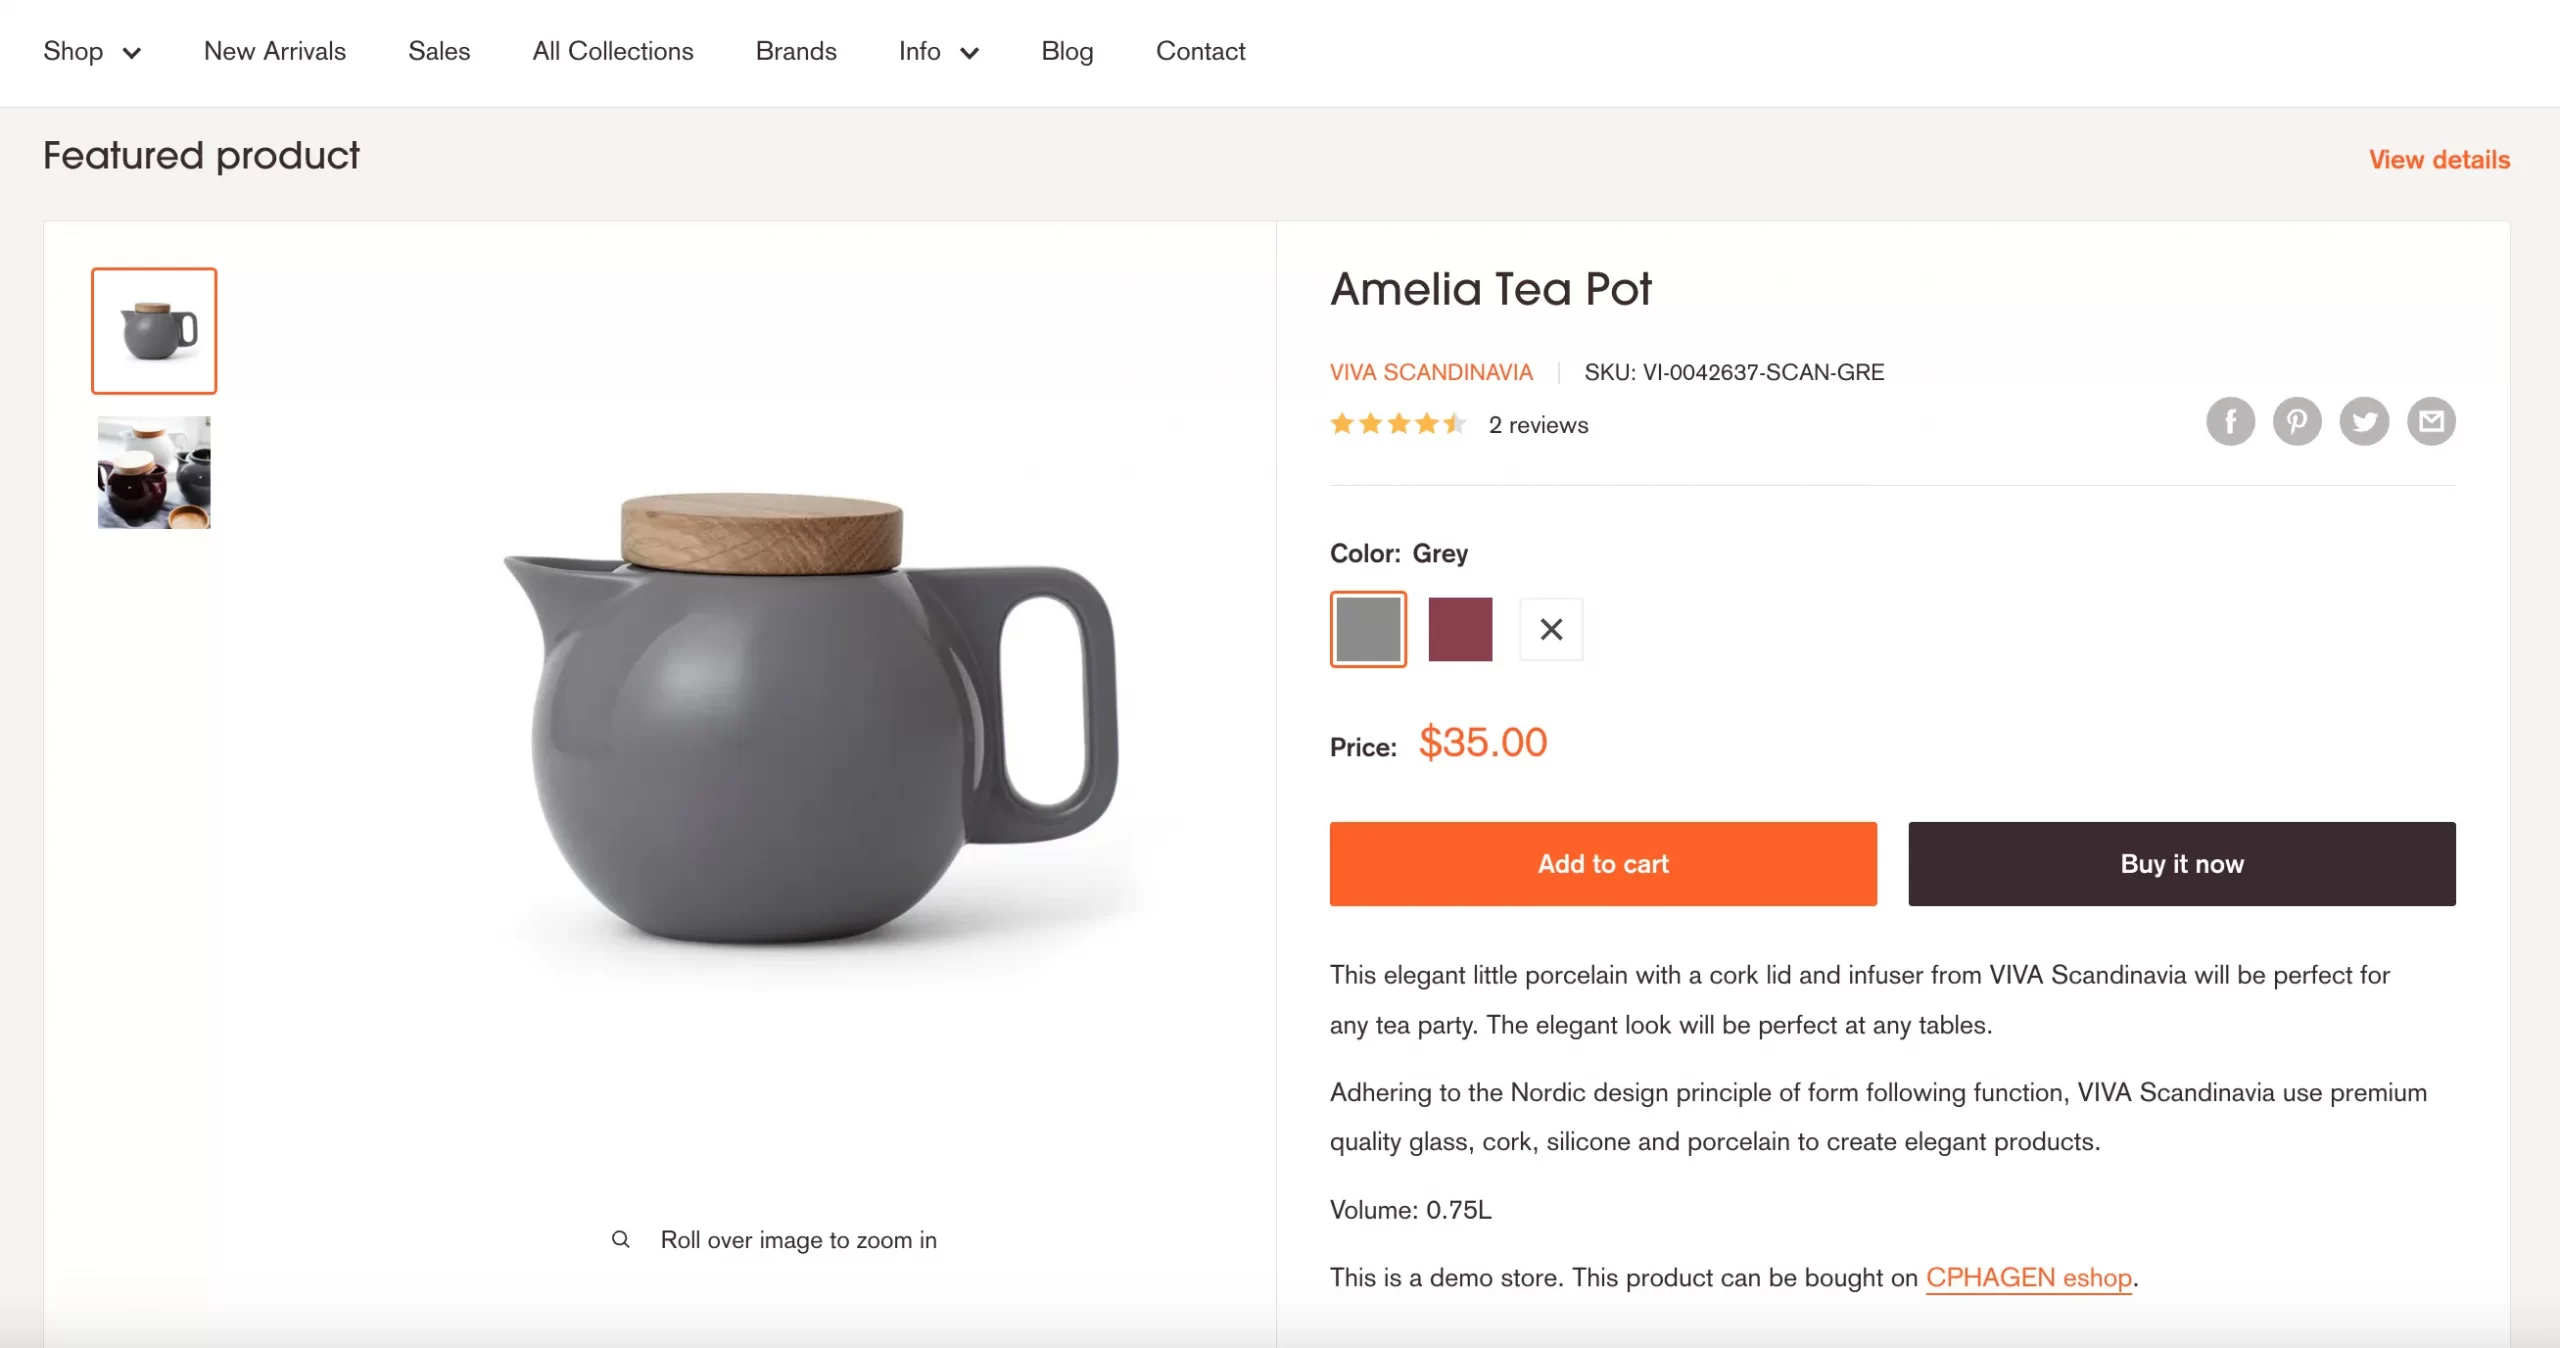
If you are unable to see ‘Featured Product’, you can feature a few products by choosing Add Section > Featured Product in the theme editor. The display of the products you want to have exhibited will be different from that of the featured collection if you choose this option.
For example, with a Warehouse theme, it’s already here for you to customize.
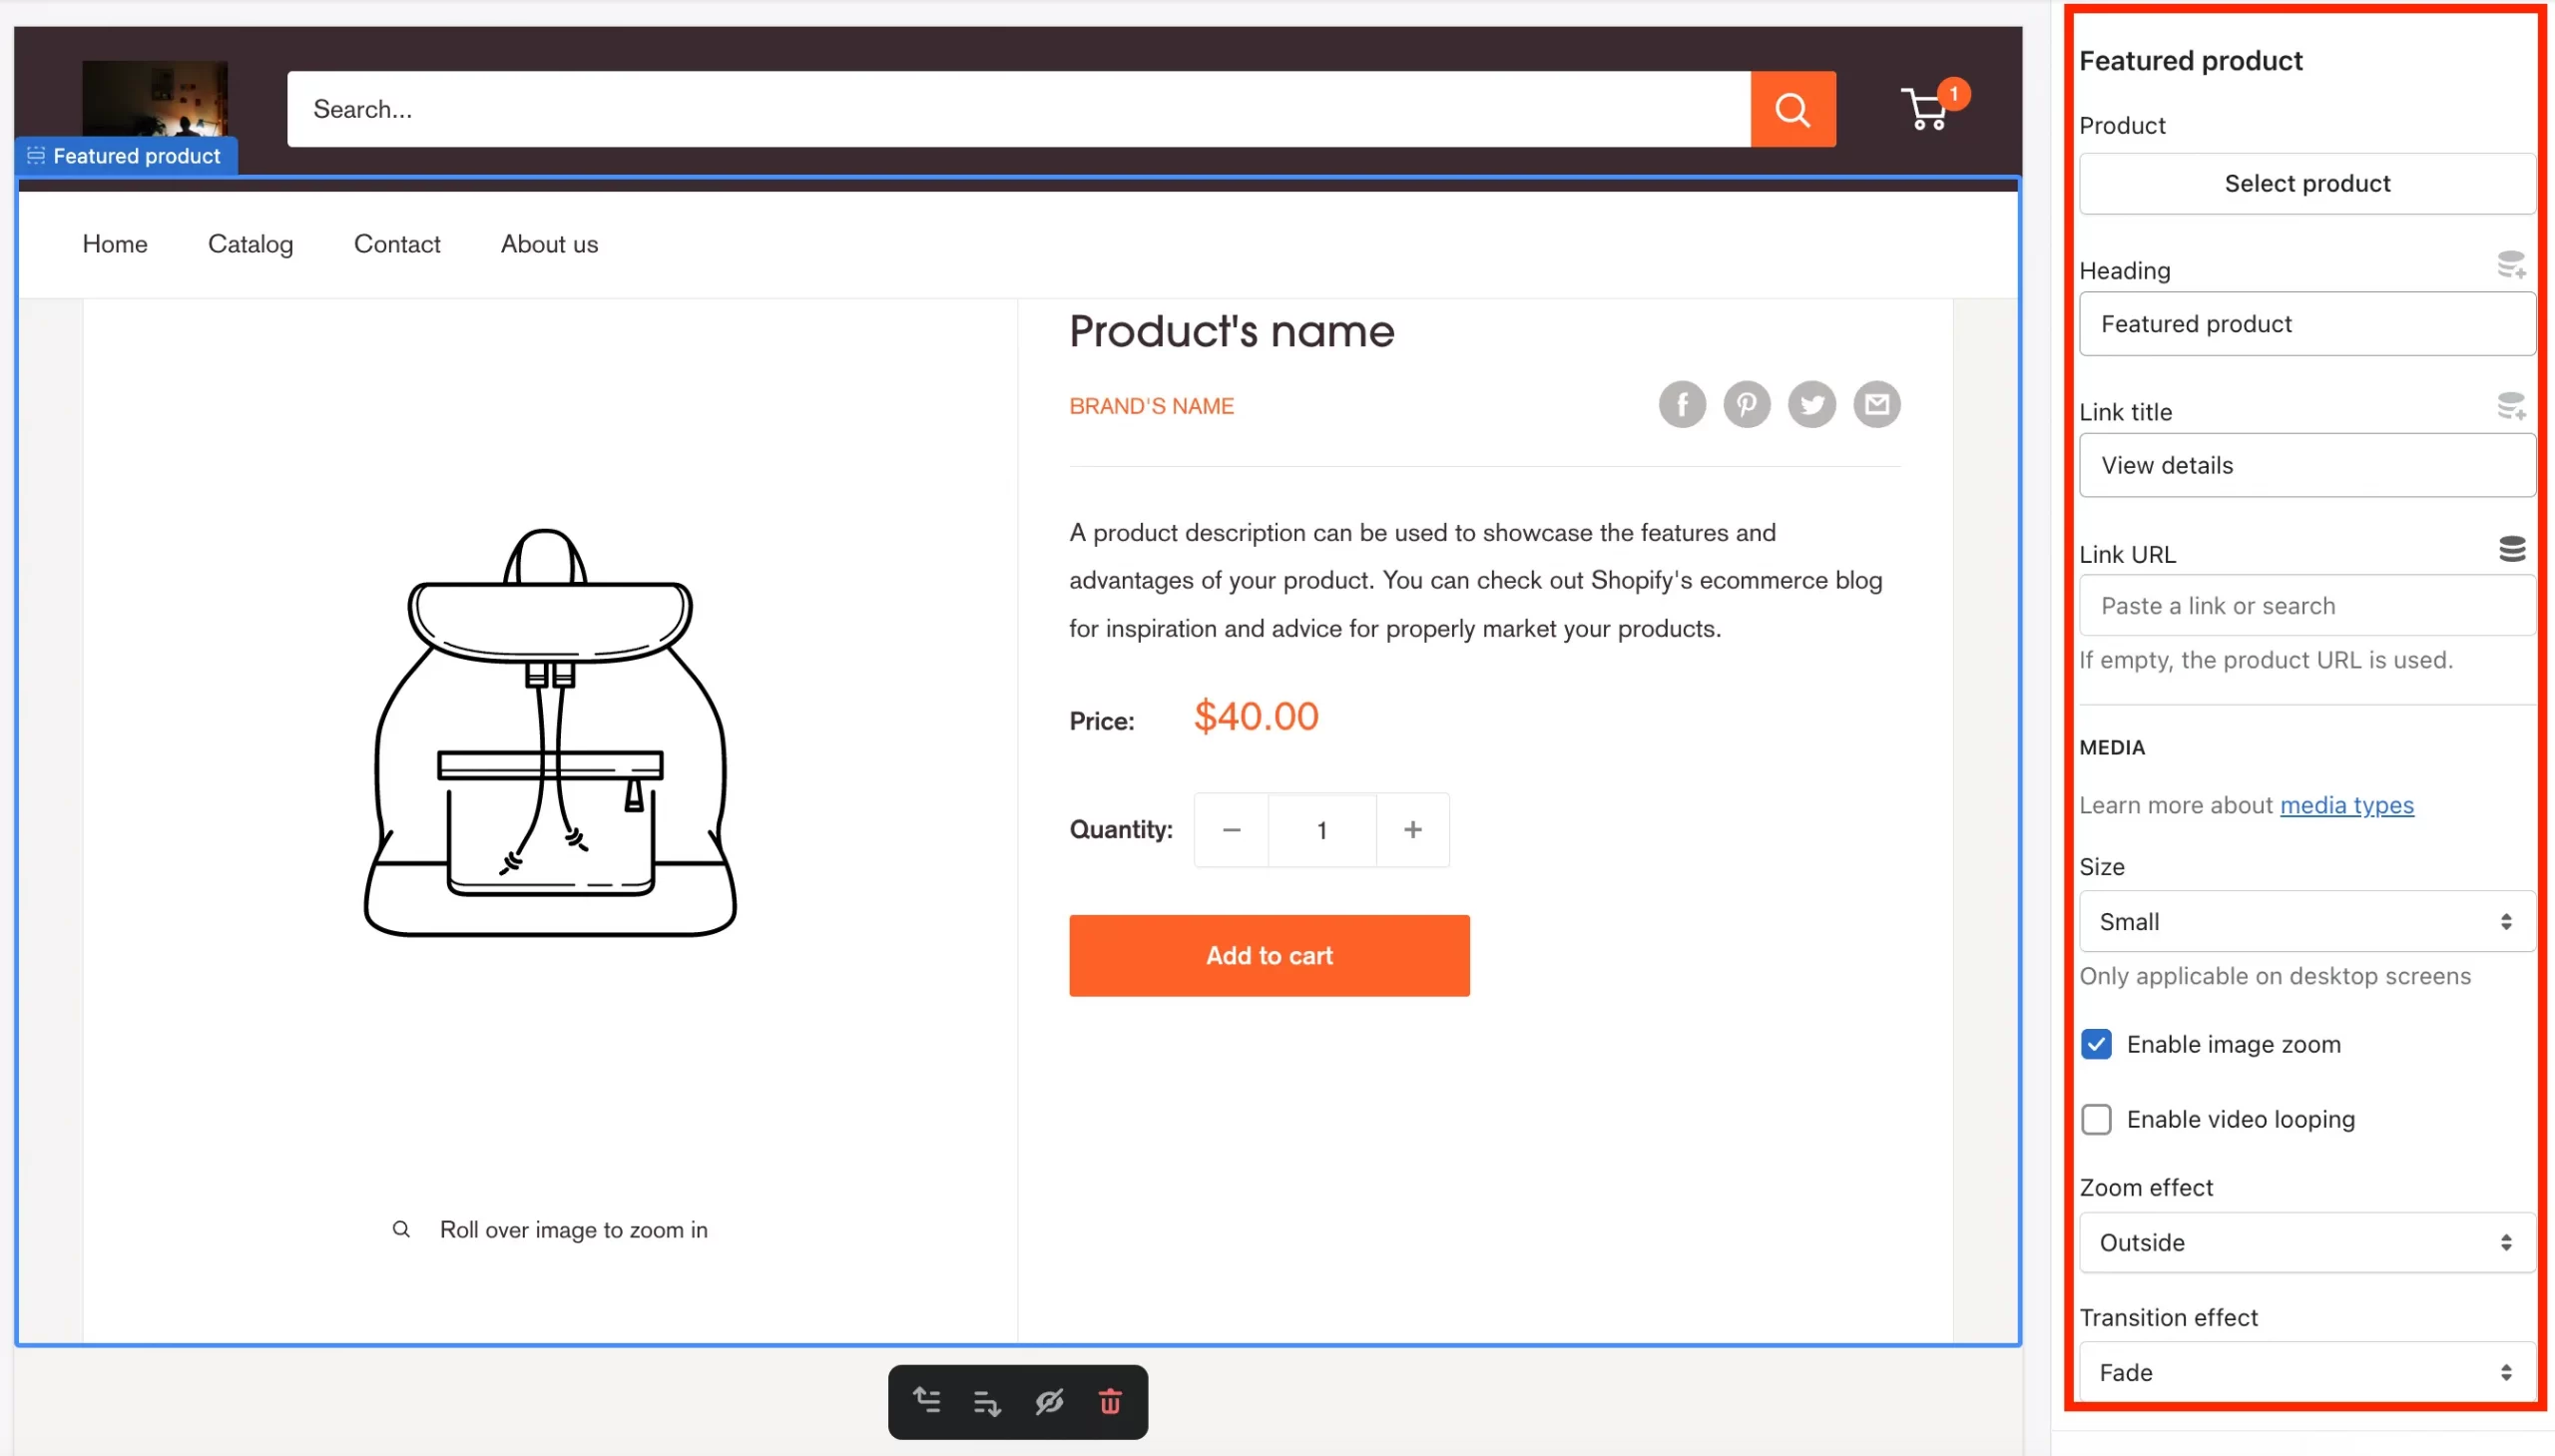
In this section, below are the things you can optimize, including:
- Select, Edit & Link product to the desired page (Media file can be images, 3D models, and videos. Find out more here!)
- Decide how to display & which zoom & transition effect to use
Side note: For other themes, to add the specific products you want to be highlighted, you can build a Manual Collection and choose it from the theme editor (Themes > Customize).
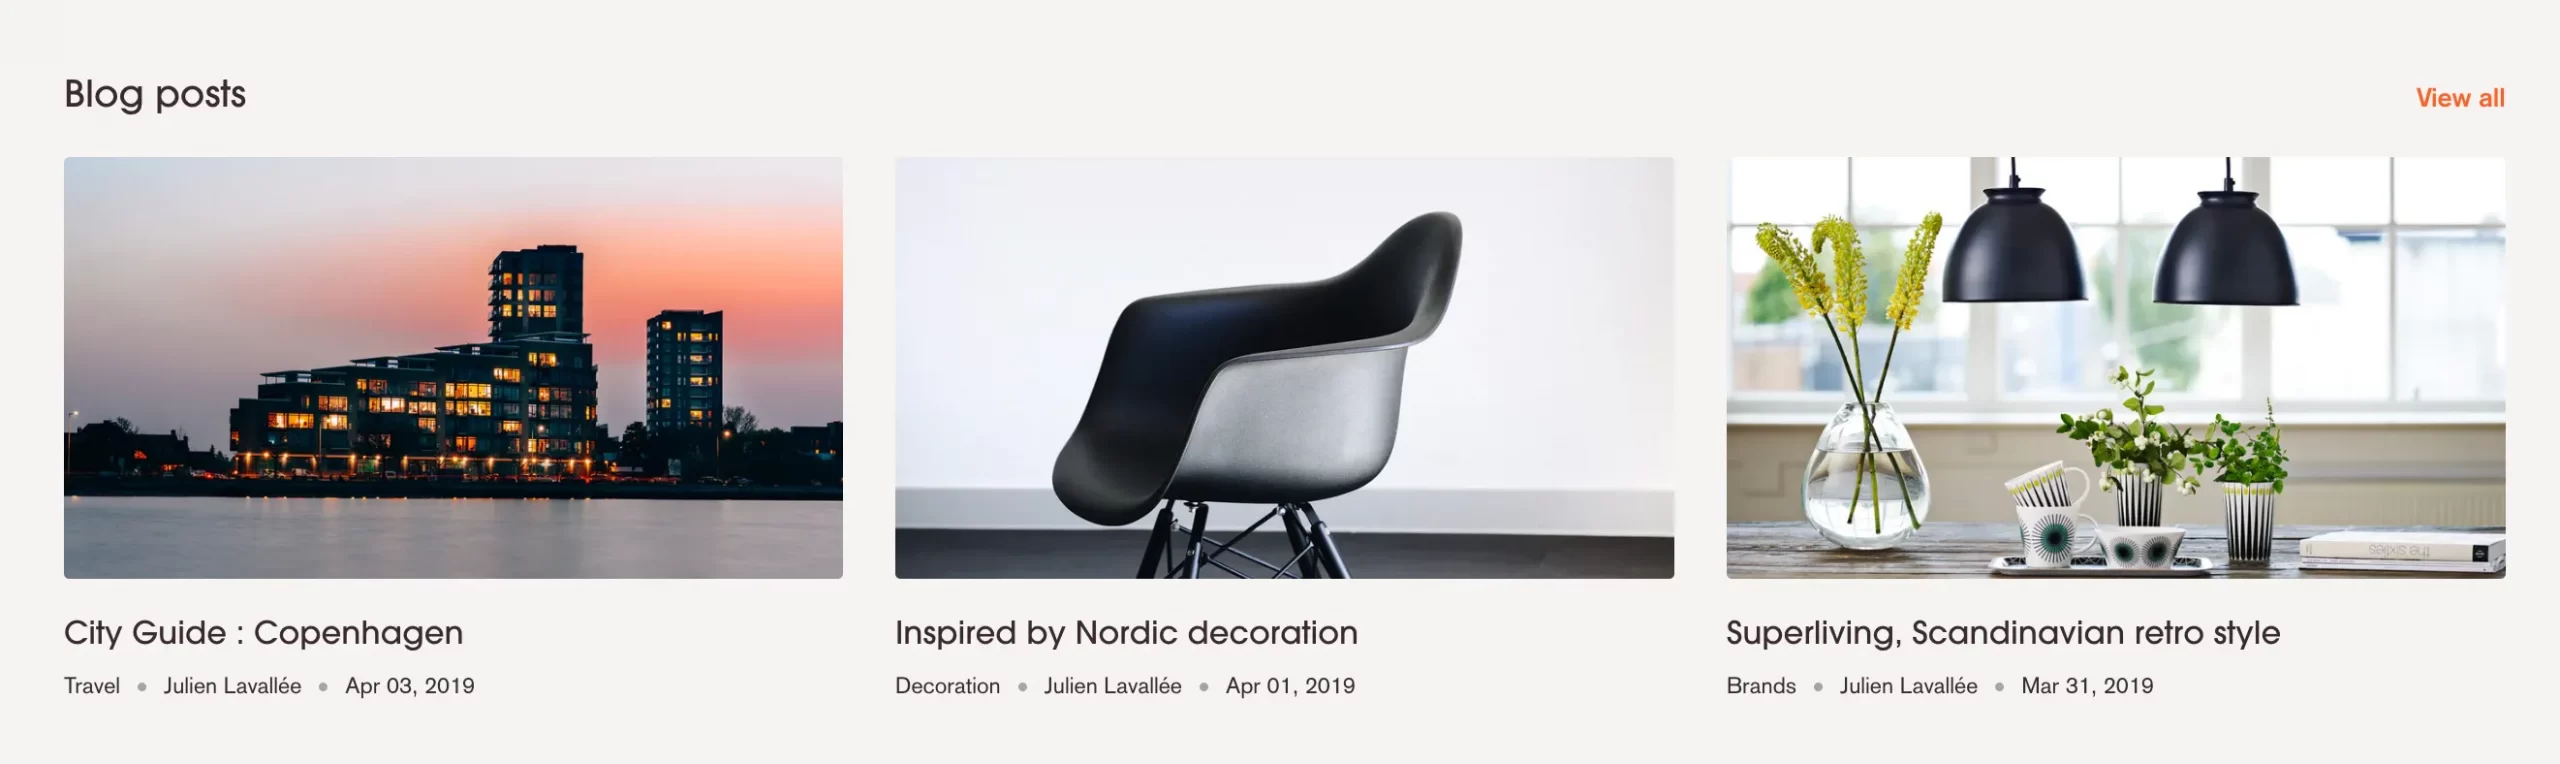
7. Blog posts
This part is where you can suggest some featured blog posts on Homepage. The topics are varied and mostly depending on your brand’s stories.
Now, let’s look at the image below.
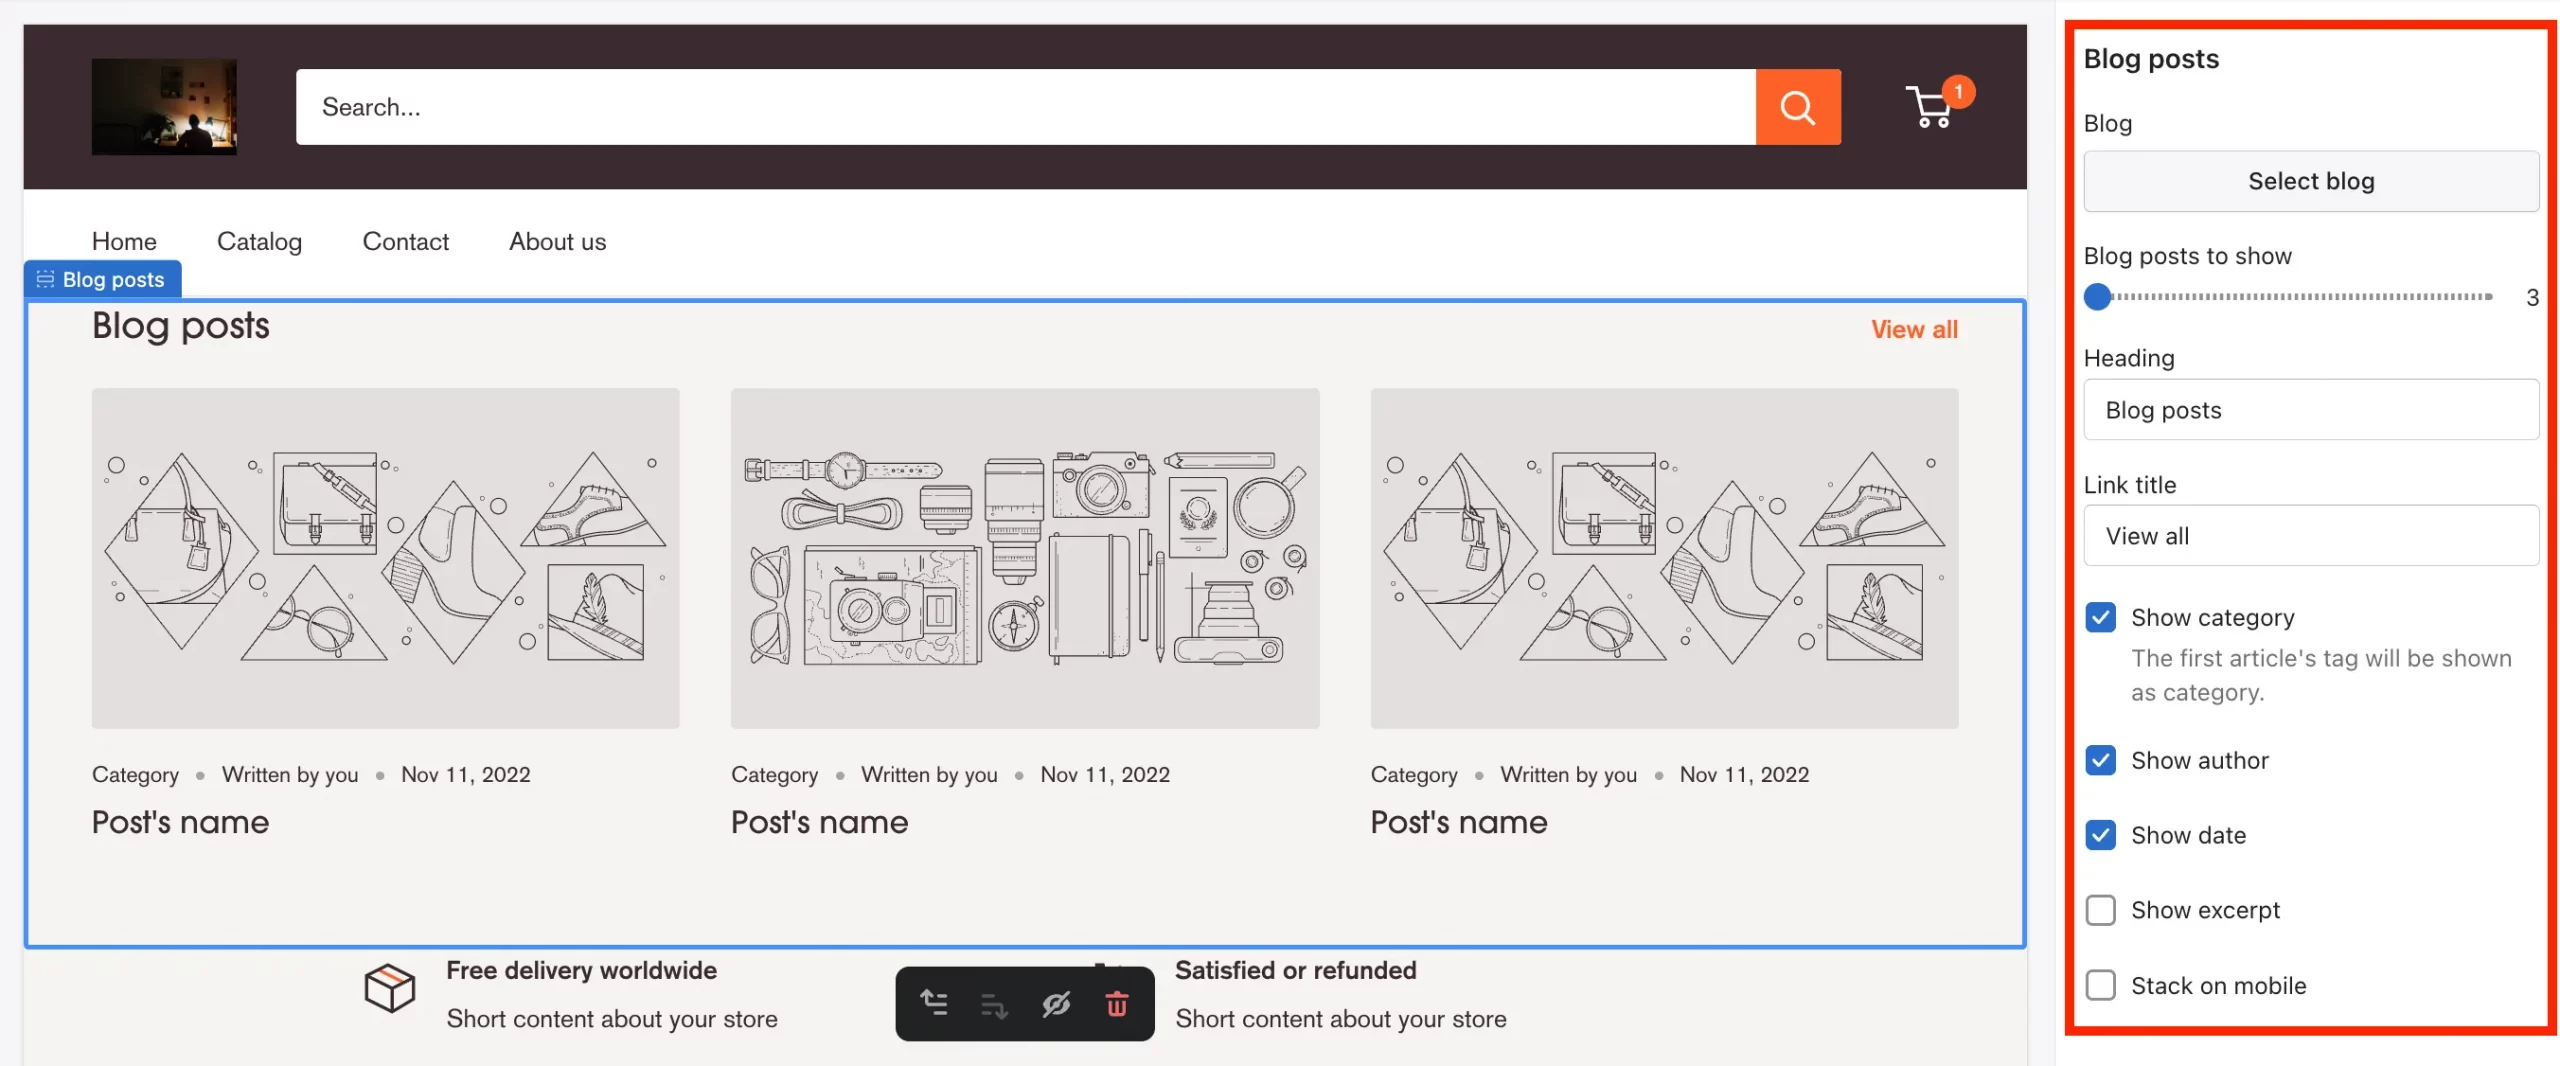
On the left toolbar, you will see the option to ‘Select blog’ (with Warehouse, you’re allowed to add up to 9 blog posts to this section). Next, feel free to customize the other parts, including:
- Edit the ‘Heading’
- Rename the ‘Link title’
- and, decide whether to show the category, author or date of publish
8. Text with icons
In this section, you can add some of your most outstanding features that assure your customers about your products and services. Let’s add an icon with a short content about your store.
You can add as many text with icons as you wish. By default, there are 32 icon options for you to choose to display, divided into four main sections:
- Shop
- Communication
- Delivery
- Security
To customize this section, follow the highlighted part on the image below.
In this section, Shopify allows you to:
- Change icon
- Upload your own custom icon
- Change icon heading name & Customize heading content
💡 Pro tips: Keep in mind that you don’t have to always include all those sections on Homepage. However, when custom Shopify themes, it’s recommended to include:
- Header
- Sliders
- Feature collection
- Feature product
- Footer
#4 Navigate to Products section
‘Products’ section is where you optimize your product pages. Before editing this section, you need to add products to your Shopify store first.
To learn more about how to add products to Shopify, you can follow our guide here.
Keep in mind that editing Products section only lets you customize how your products will display on the front-end of your website. For more well-customized product information, you will have to go to the Shopify Admin panel > Products and edit everything here.
Now, let’s learn how to optimize ‘Products’ section.
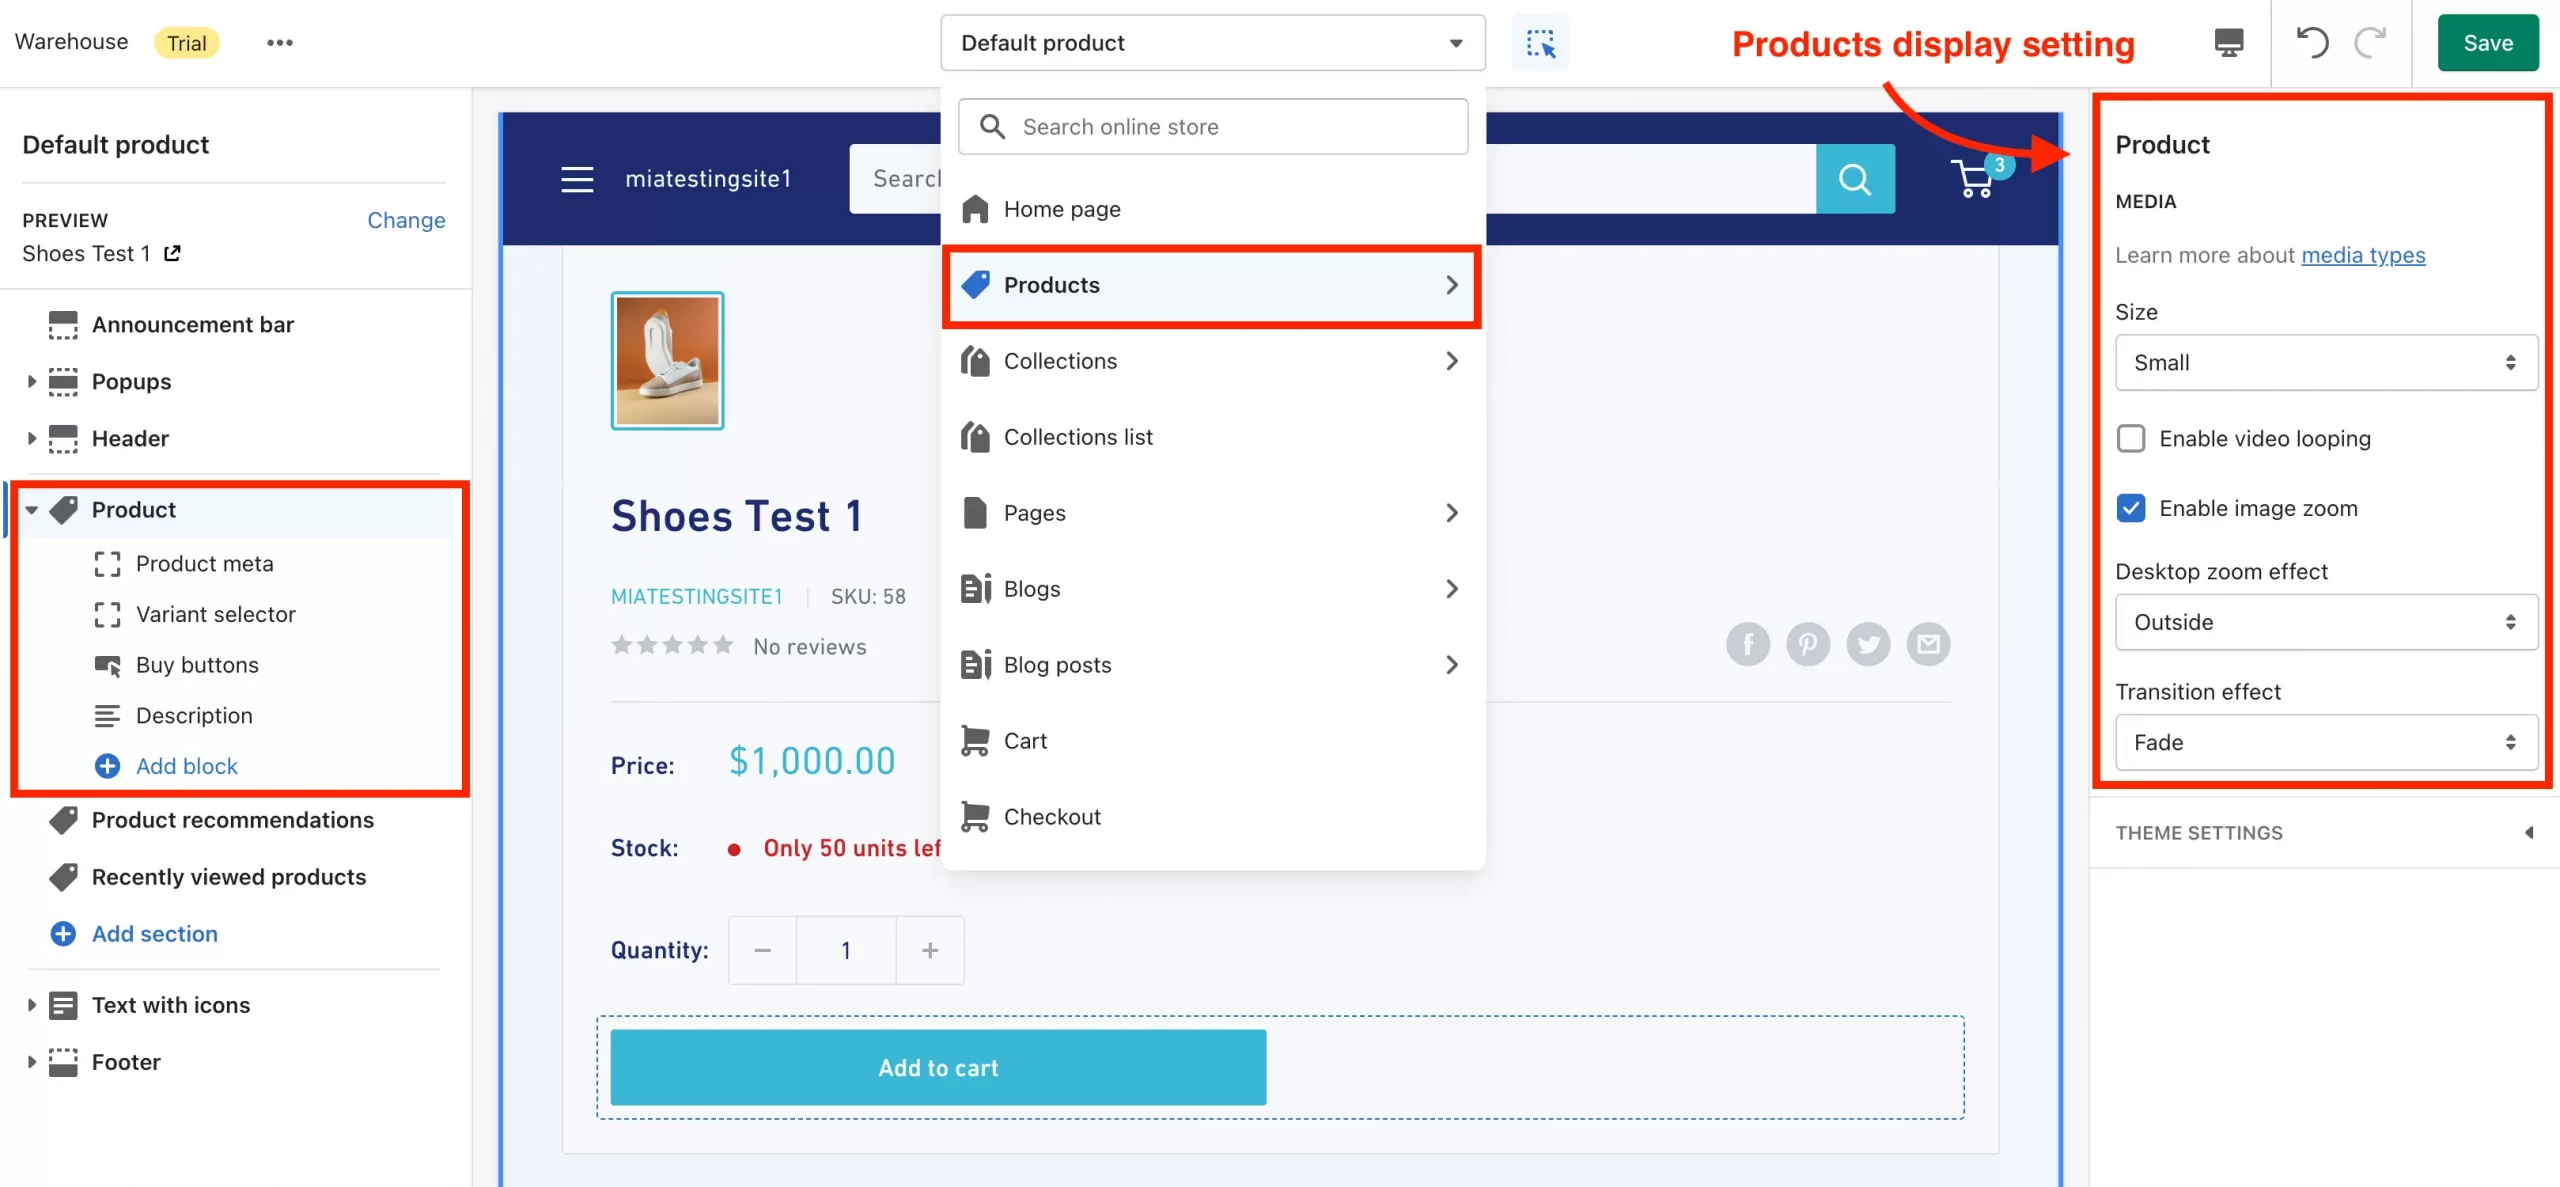
As you can see from the image above, on Product section, you can edit and customize:
- Product meta
- Variant selector
- Buy button
- Description
- and more options like Text, Button, Local pickup availability, Liquid, Reviews, Shipping estimator,…
You can also add some Product recommendations and Recently viewed products to your product page.
In this article, we will mention the most basic product options to edit:
1. Product meta
Let’s go in detail with ‘Product meta’. Shopify lets you ‘show vendor’ (your business’s name), ‘show SKU’, ‘show product rating’ and ‘show share buttons’ via email or social media channels. However, when it comes to displaying product rating, you may need to connect to a product rating app like Product Reviews.
Learn more: How to add meta tag to Shopify – Ultimate guideline.
2. Variant selector
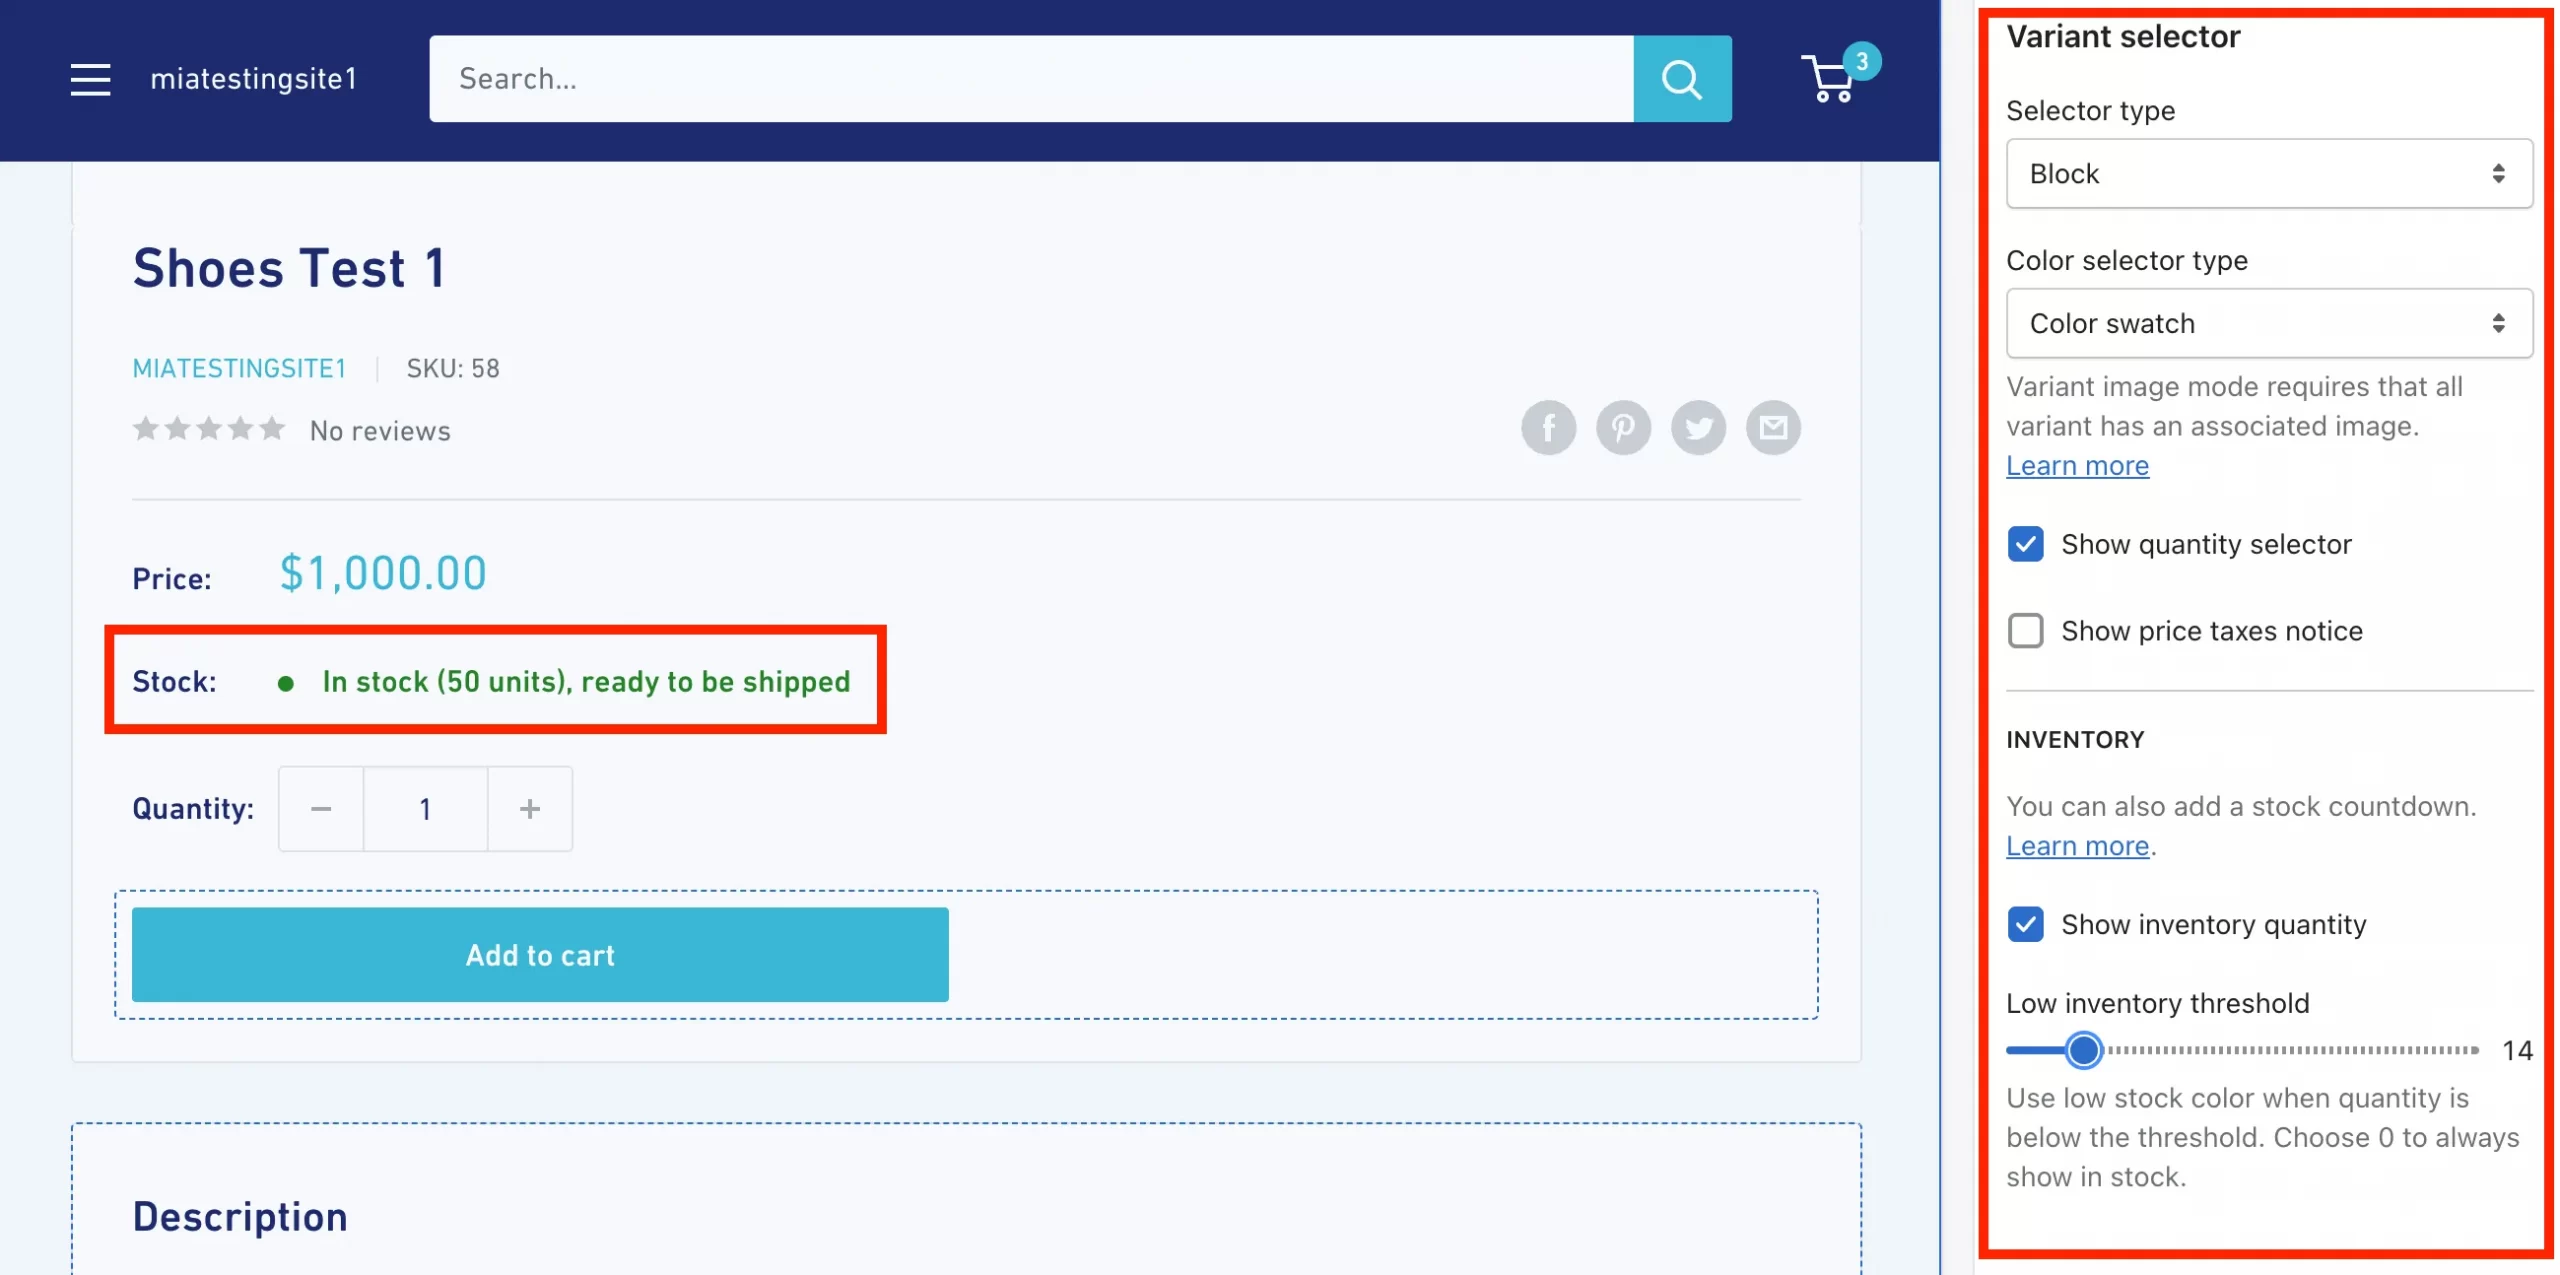
In ‘Variant selector’, you can customize the selector type, color selector. Variant image mode may require all variants to have an associated image.
Come to the ‘Inventory‘ section, you can decide whether to show inventory quantity or not. By adjusting the ‘Low inventory threshold’ section, you deliver a quantity alert to your customer and that may create a sense of urgency.
3. Buy button
Keep in mind that the default ‘Buy button’ we’re mentioning here is completely different from the Buy Button channel by Shopify though they perform similar functions.
On your product pages, add-to-cart buttons are built directly into your Shopify theme and can not be embedded elsewhere. Meanwhile, Shopify Buy Buttons can be embedded into any page or blog post, even on third-party website-building platforms like Wix and Squarespace.
You can custom default add-to-cart buttons by modifying its code. However, it might take some effort with theme editing languages to do so and somehow it can cause errors. If you’re non techies, we recommend you to try Buy Button because of its high flexibility and customizability with little tech knowledge requires.
4. Description
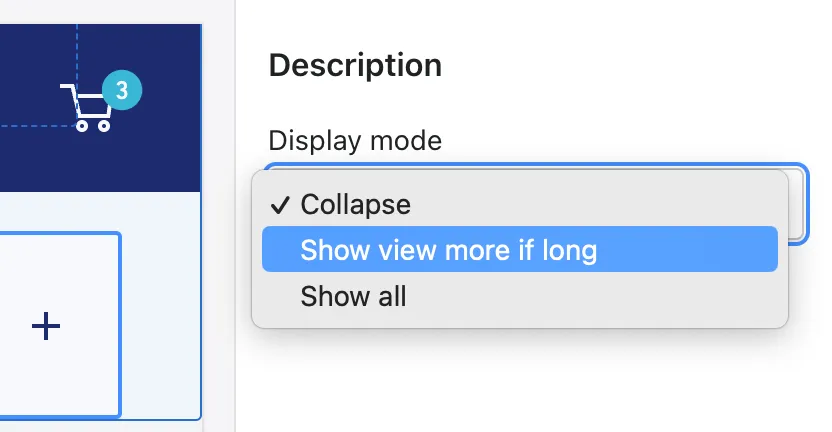
You will have 3 options to display ‘Description’, including:
- Collapse
- Show view more if the description is long
- or Show all the product descriptions.
#5 Optimize Collection & Collection list
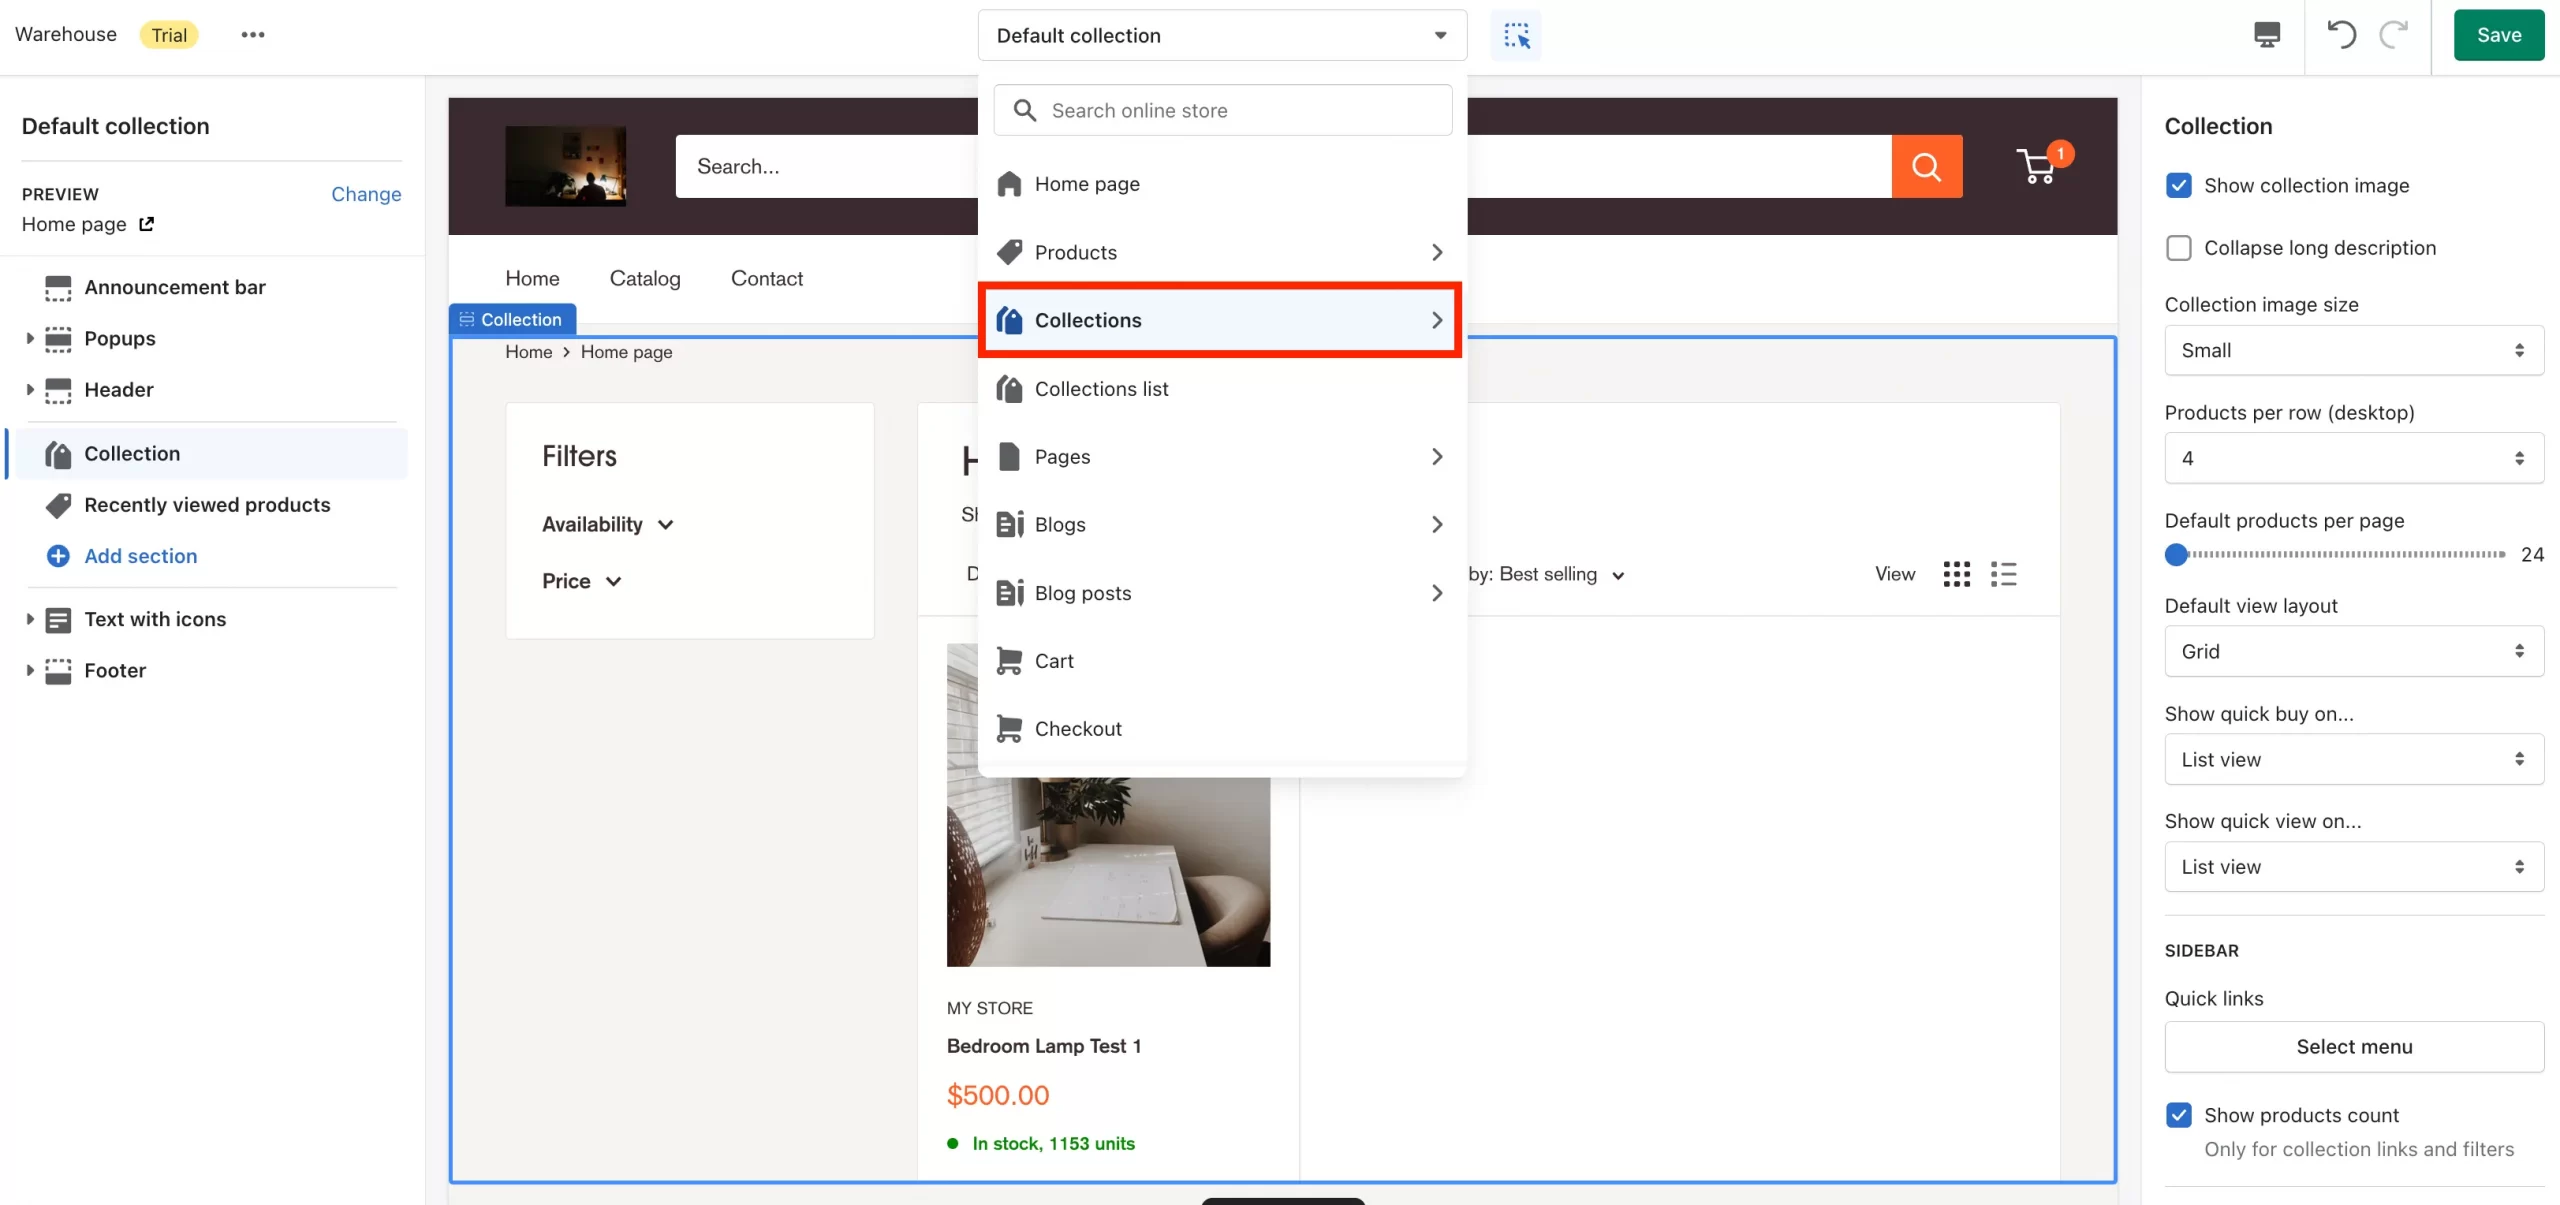
Before customizing this section, you will need to create Shopify Collections first. To do so, on the Shopify Admin panel, go to Products > Collections > Create collection.
On Shopify Collections, include Collections that are related to your campaign or sales promotions. In this part, you can choose to:
- Show collection image
- or Collapse long description
In the image above, you can also customize the image size and how to display your collection or quick link to some of the menu.
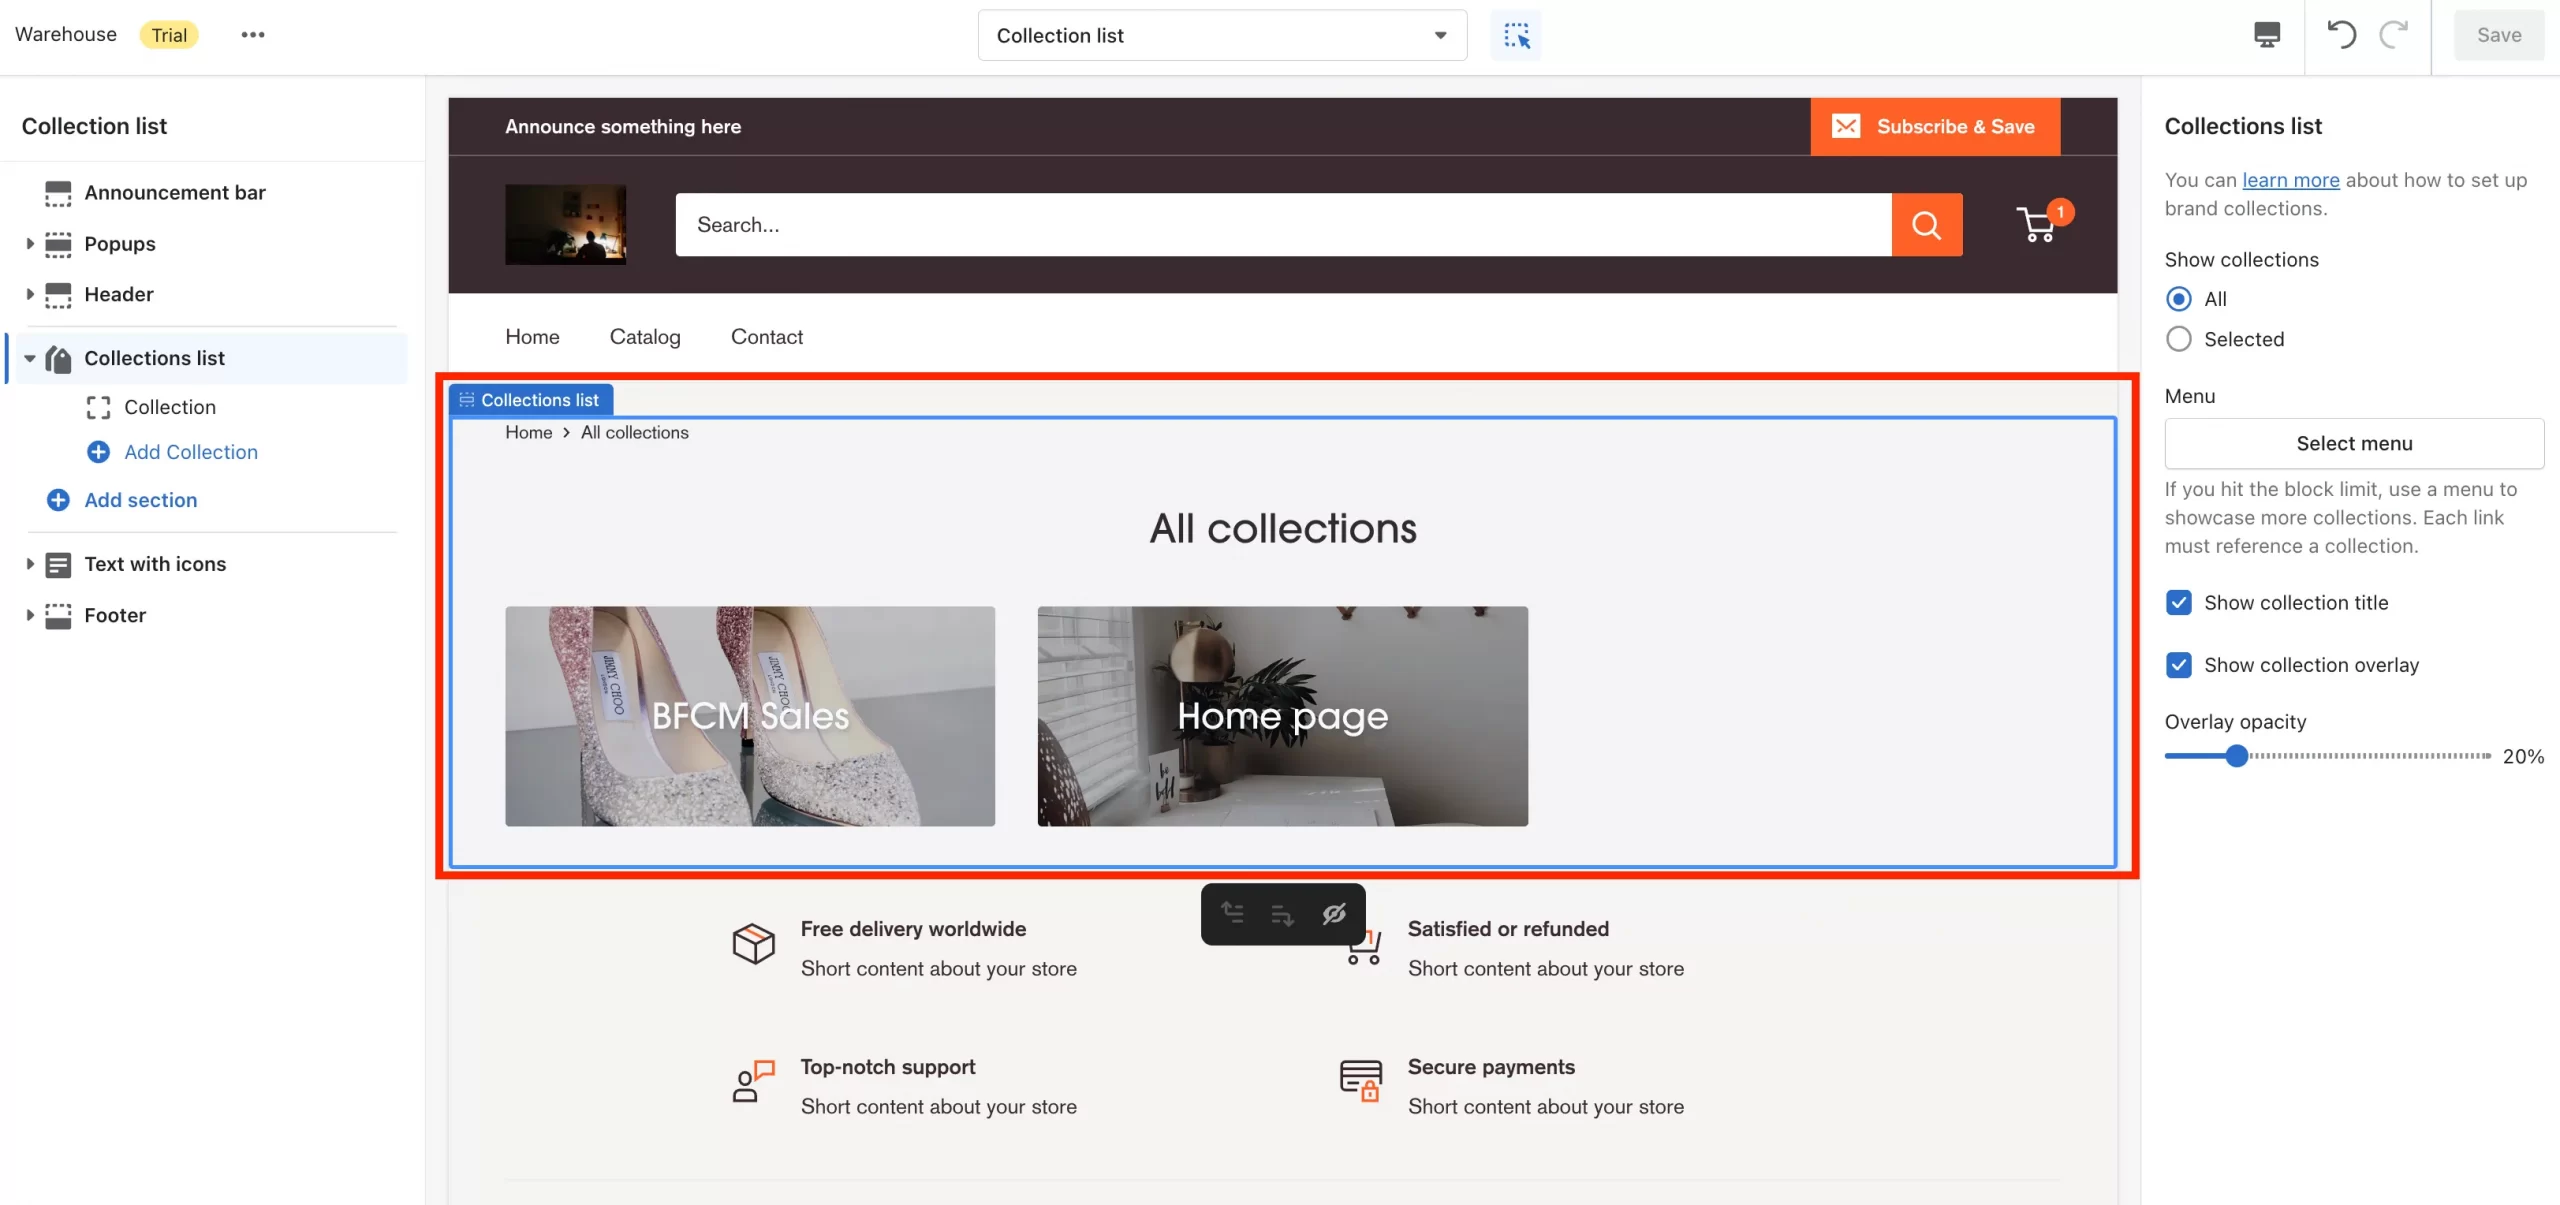
Move to the Collections list. Don’t forget to pick an impressive name with a stunning featured image to each of your collection so that you will not lose any of your visitors’ attention.
#6 Navigate to Pages
Firstly, on your admin panel, navigate to Sales channels > Online Store. Click Pages > ‘Add page’. From here, you can add more pages to your Shopify sites.
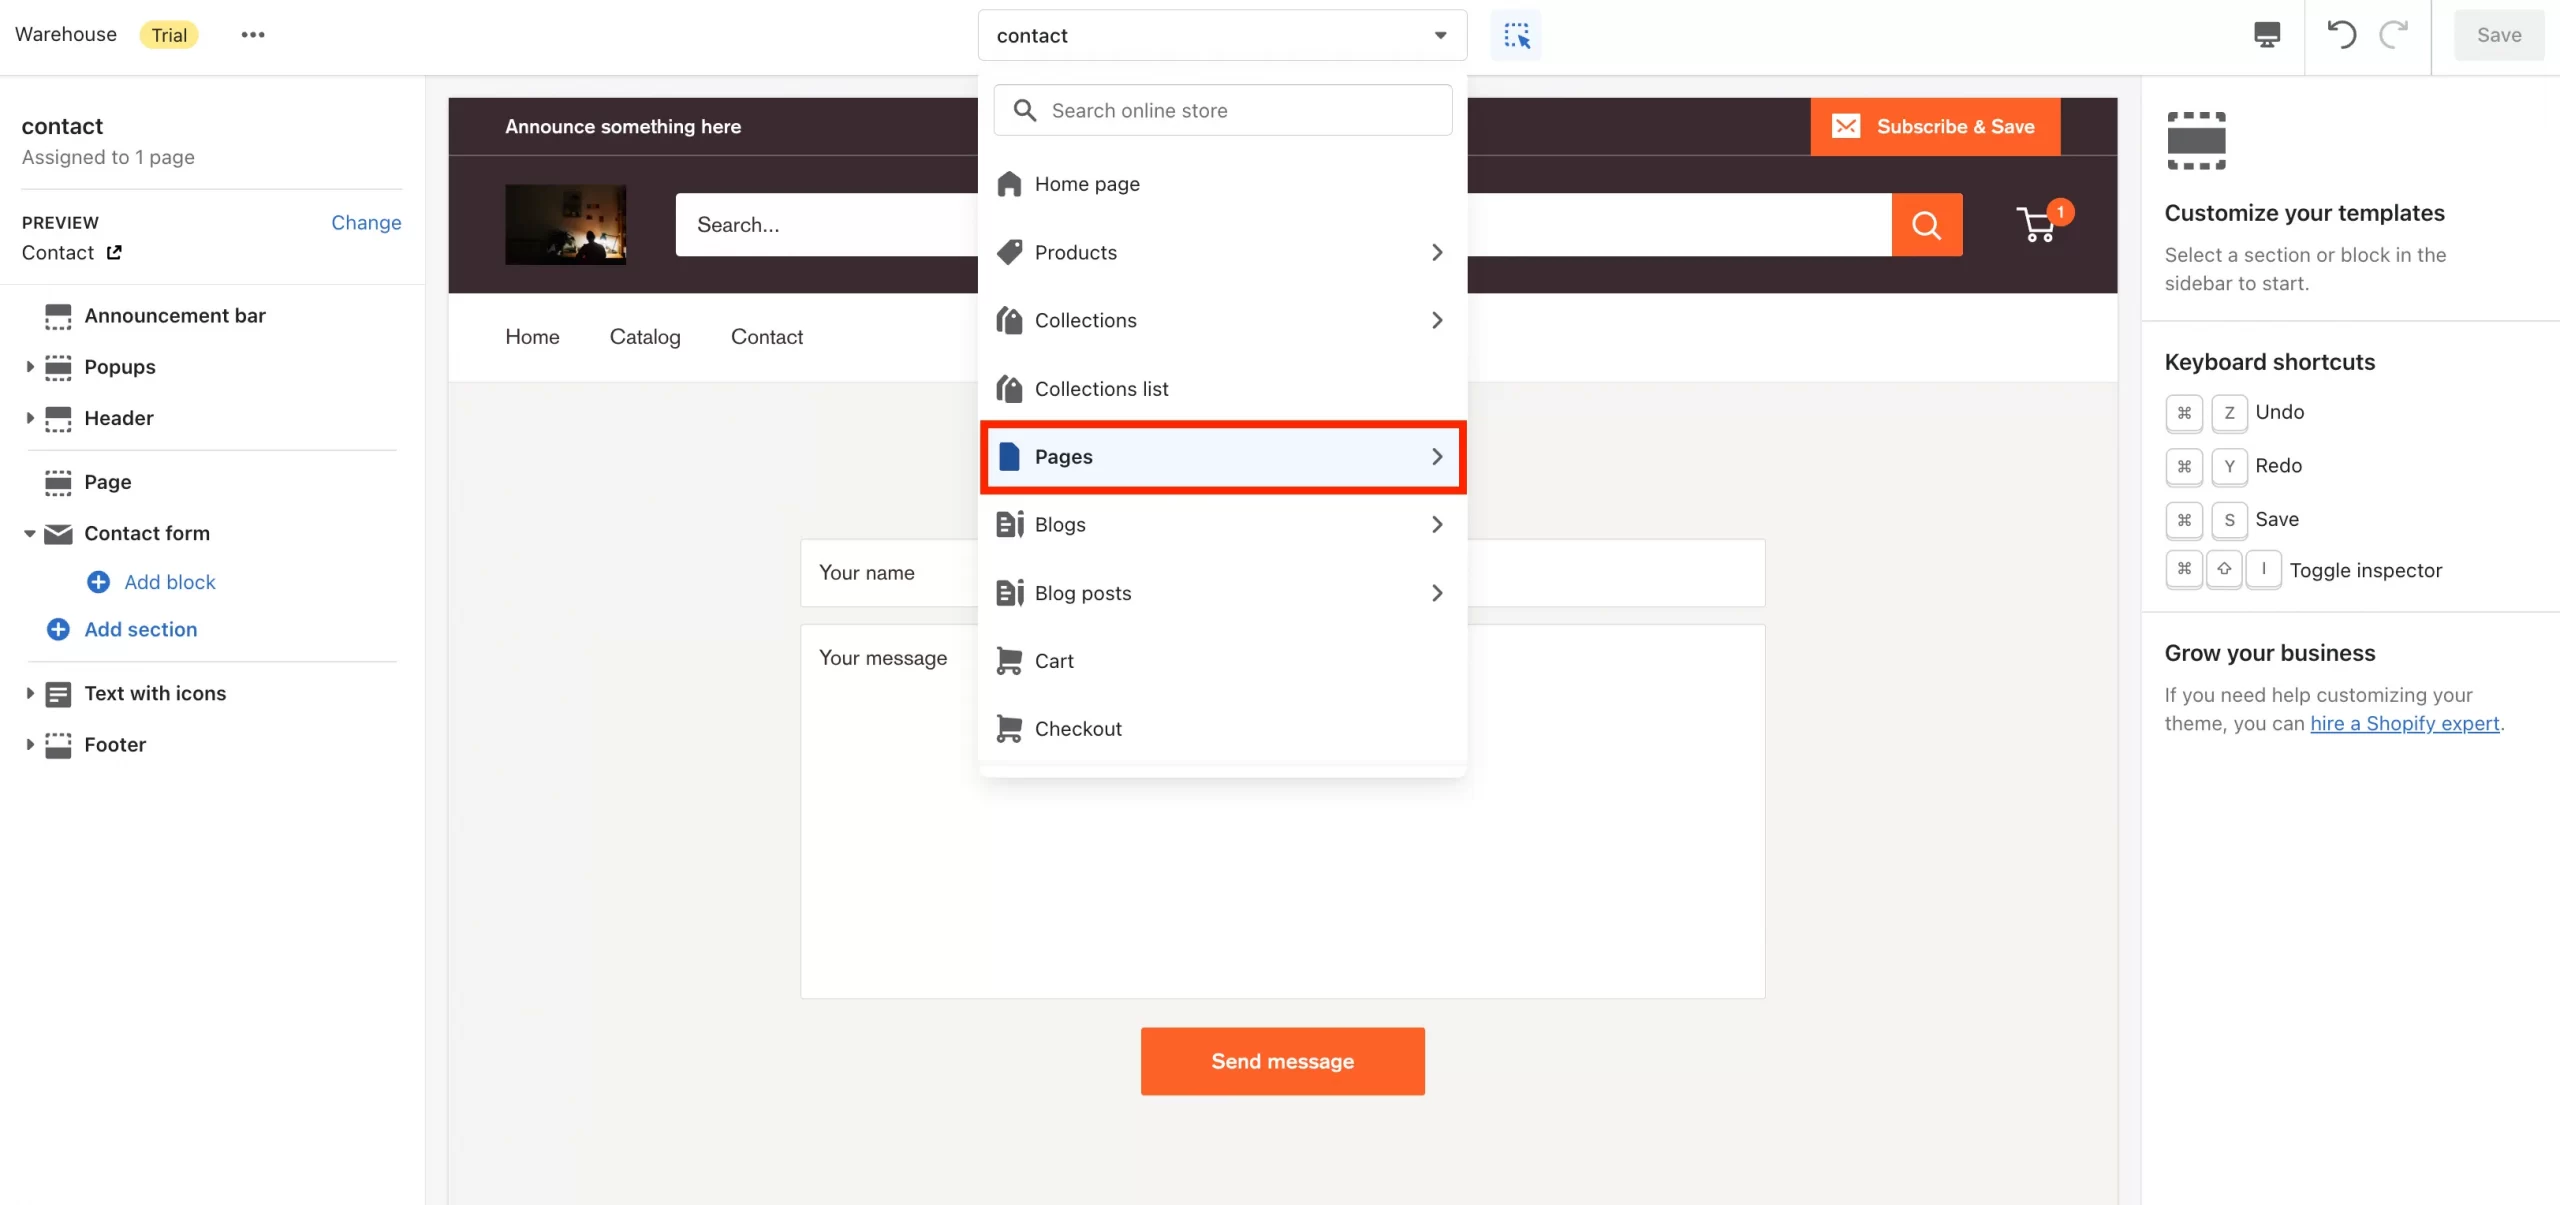
Now, you’ve got pages on your site. There are some kinds of custom pages:
- A default page
- Page link to list-collections
- Page link to faqs
Let’s take ‘default page’ for example. The ‘default page’ normally includes the contact form. You can collect your customer feedback or let them send feedback to your website via this page. Follow the image below to know how to customize this page.

#7 Edit Blogs & Blog posts
On your admin panel, navigate to Sales channels > Online Store. Click Blog posts > ‘Add blog post‘. From here, you can add blog posts to your Shopify sites.
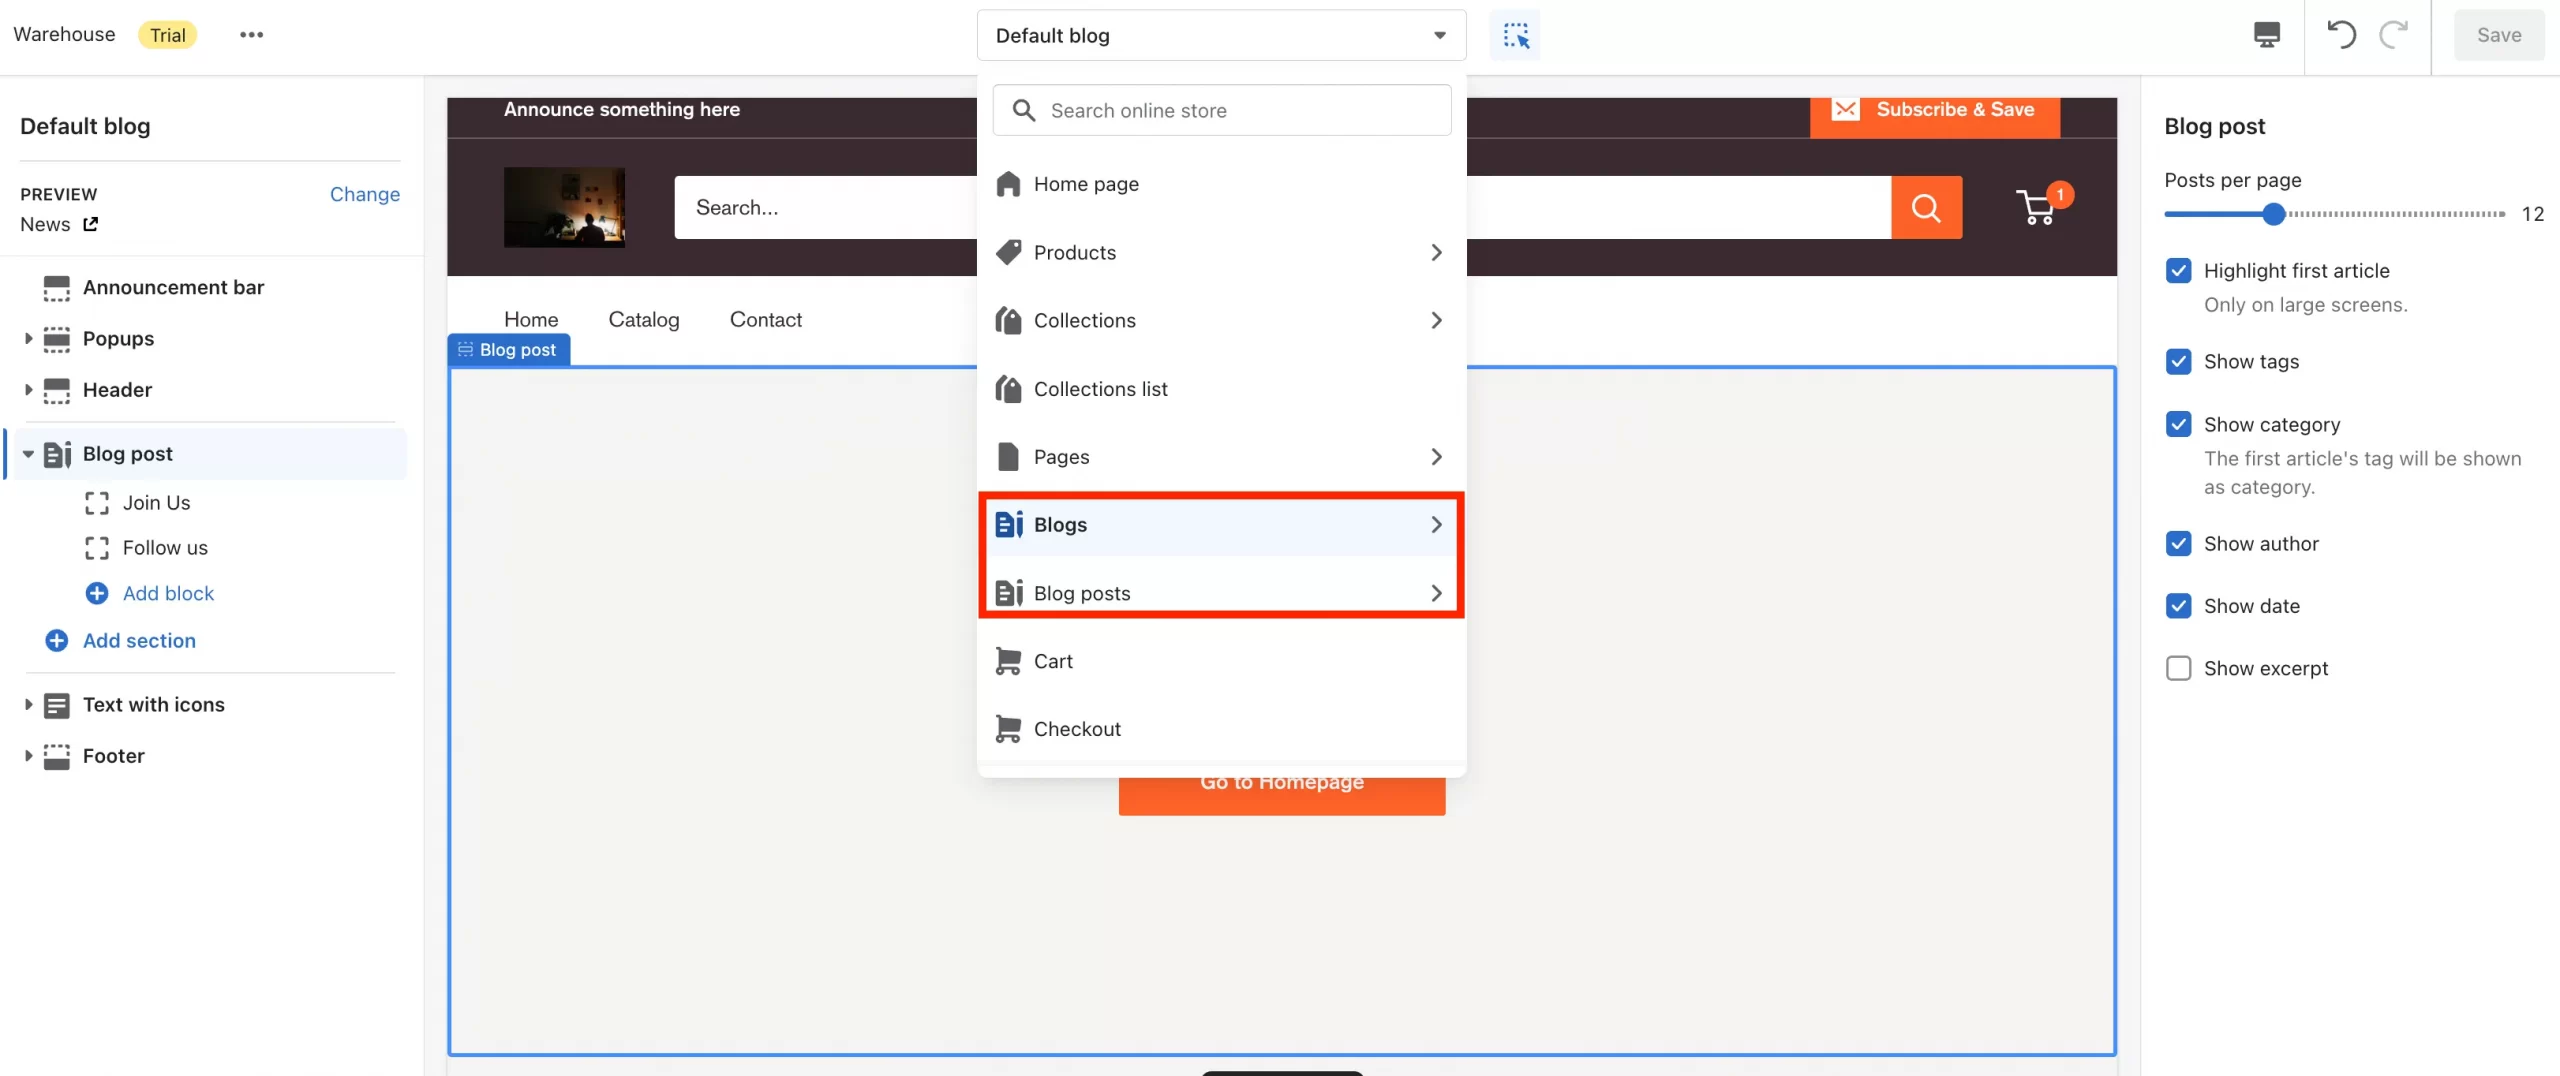
Now, you’ve got blog posts on your Shopify site. ‘Blogs’ and ‘Blog posts’ sections are really important on any website. You can utilize it to tell your brand’s story, to promote your products or services, to provide insightful information about your products or any other related things.
On ‘Blogs’ section you can:
- Choose how many blog post displayed per page (30/page is maximum)
- Highlight first article (only available on large screens)
- Show tags, Show categories (the first article’s tag will be shown as category)
- Show author, date or excerpt
Blog posts are also crucial to your store’s SEO ranking. You can visit our resource on Shopify SEO and learn how to rank your website on SERPs:
#8 Edit Footer
Footer is the content at the very bottom of a website. Briefly said, the information in a footer helps make a website more user-friendly overall. Typically, footer will include:
- Brand’s story
- Contact details
- Website navigation menus & sitemaps
- Copyright notices
- An email registration to receive emails
- Social media channels

Let’s learn how to optimize the website footer on Warehouse theme.
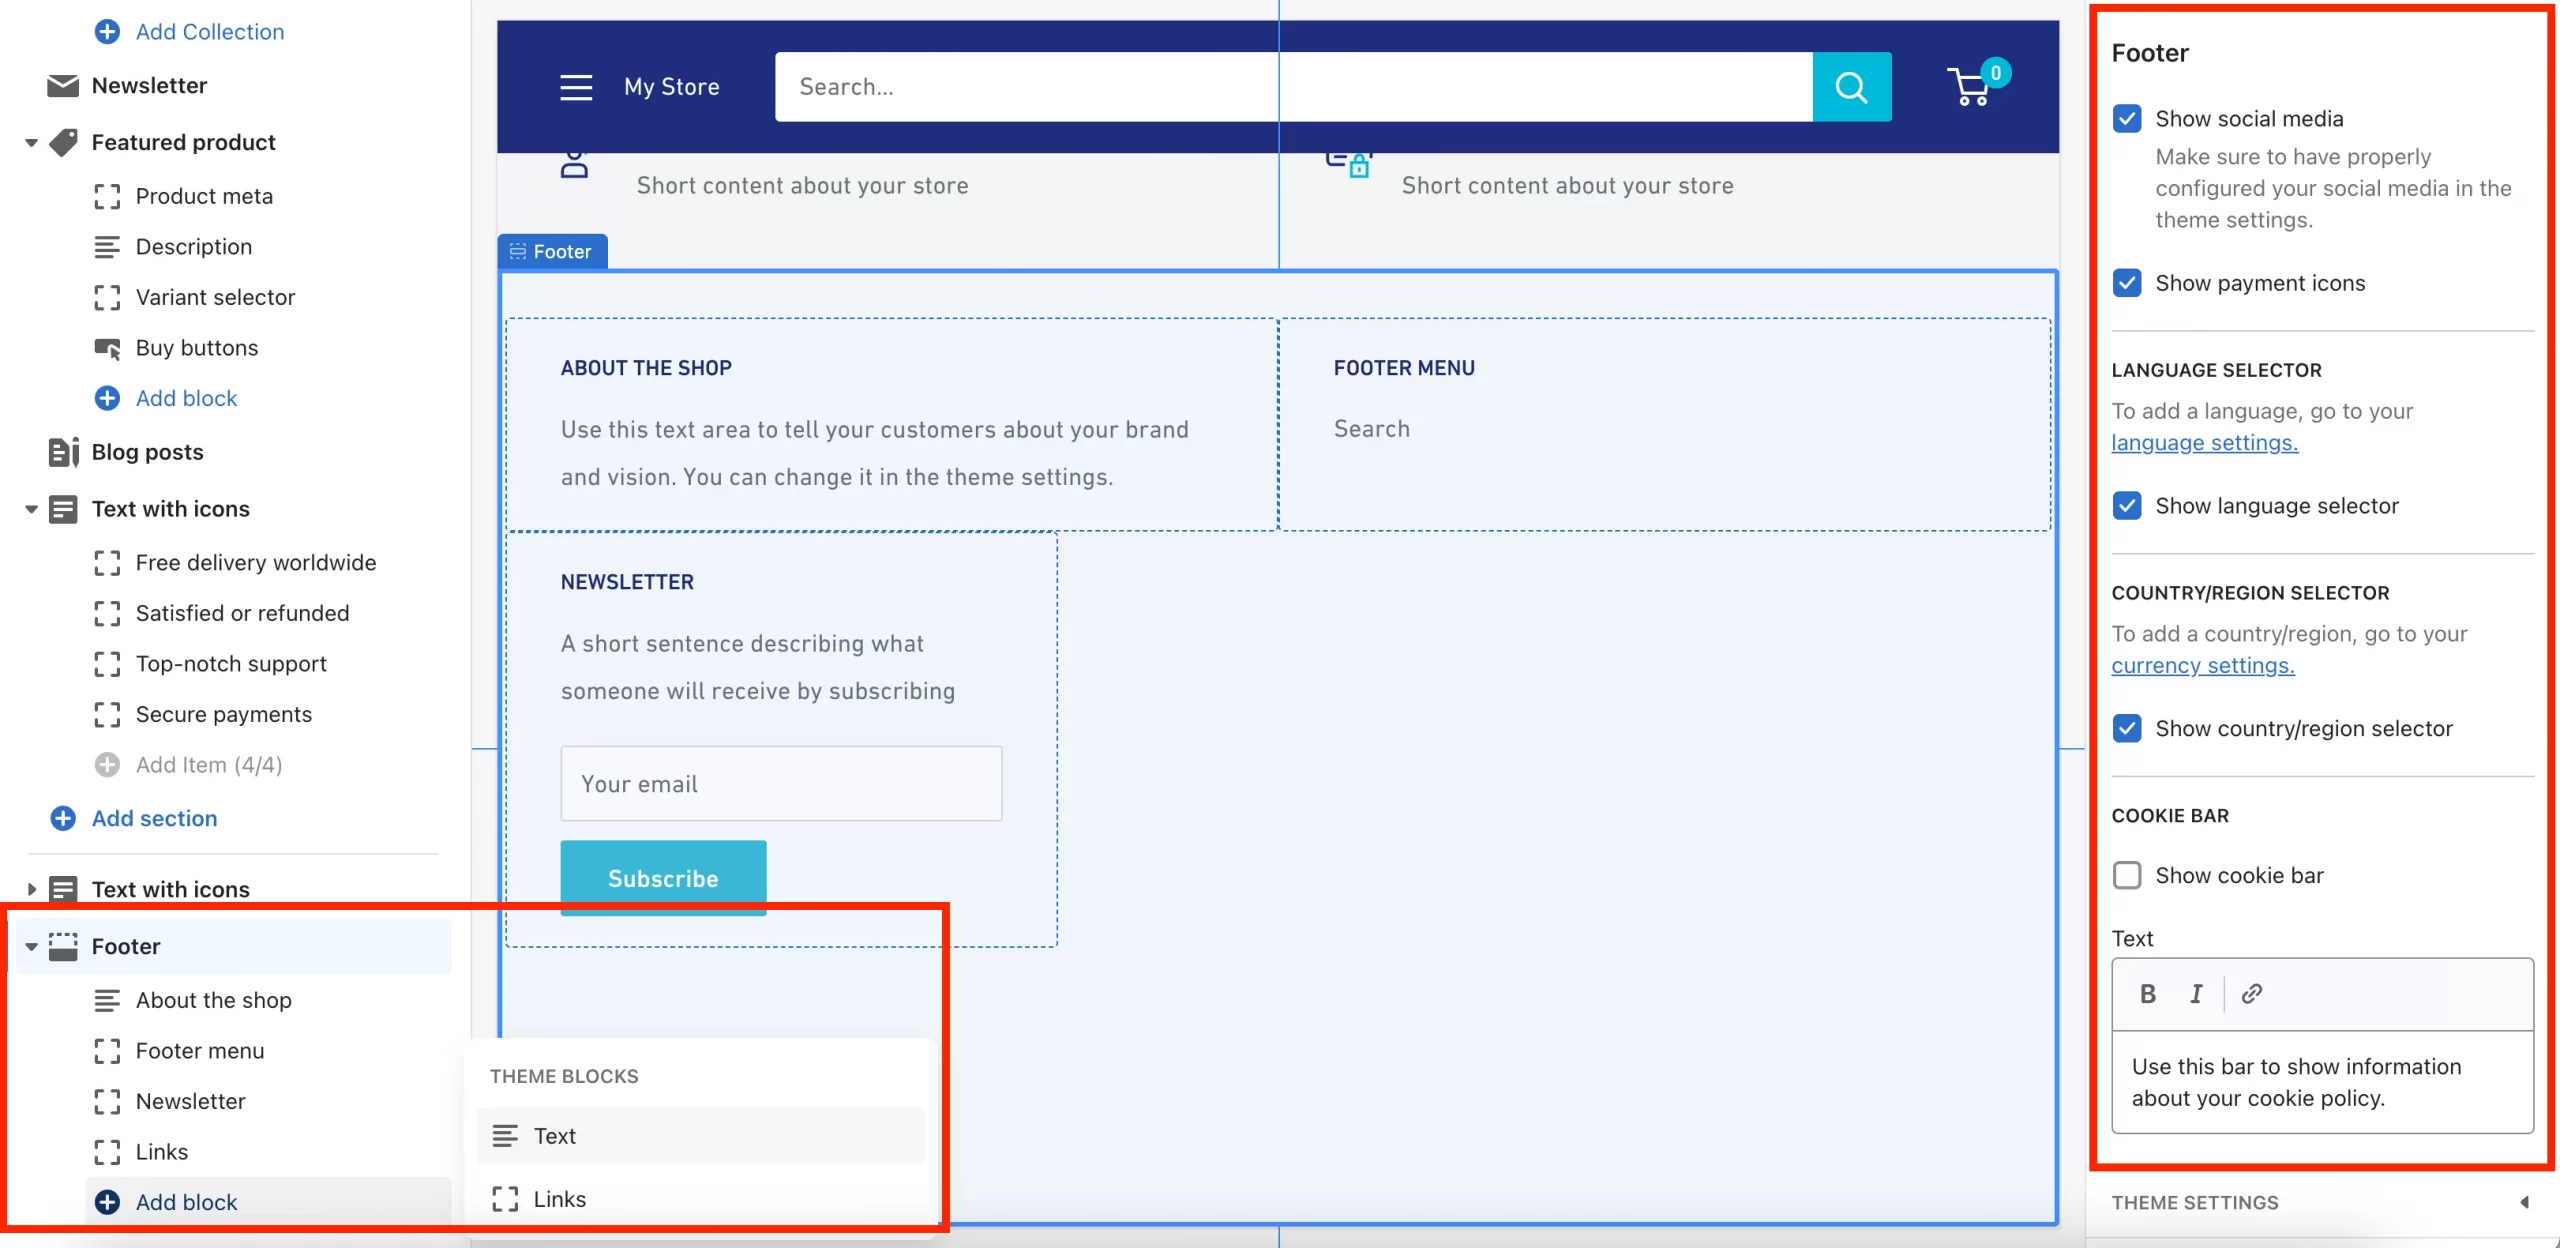
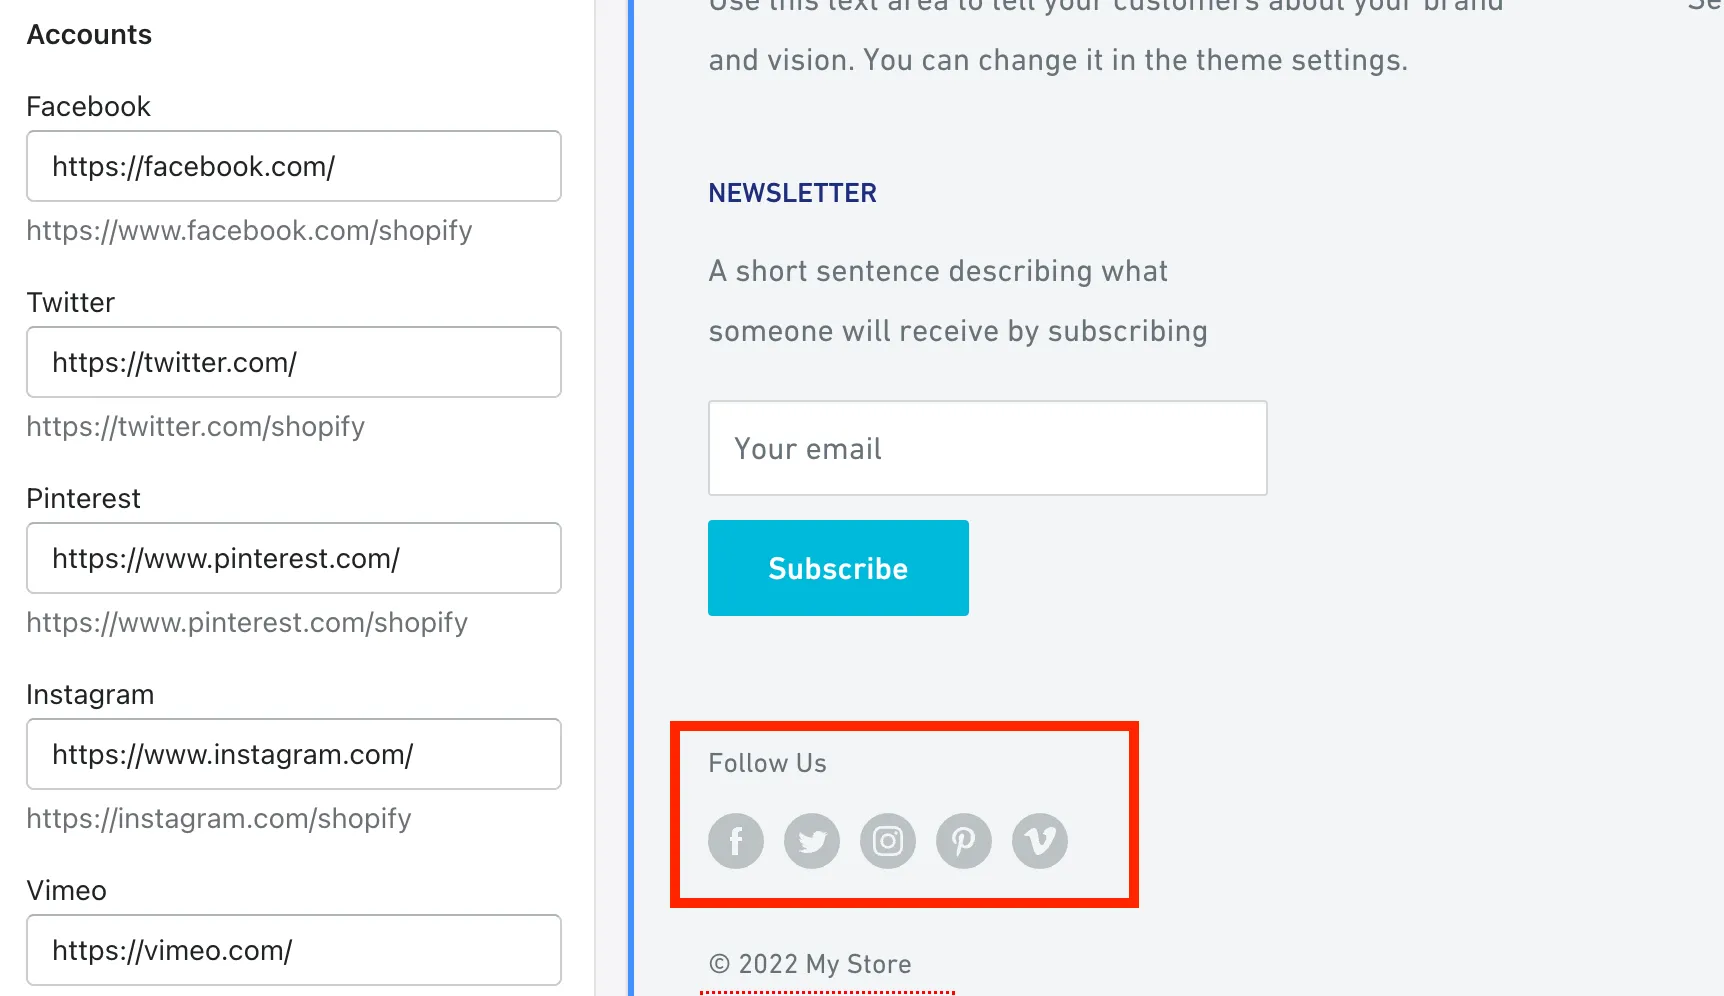
As seen from the image above:
- Navigate to the bottom-left side, you will see what you can include and customize in the footer.
- Navigate to the right toolbar, you may see some options whether or not to show social media channels, payment icons, language selector…
#9 Manage Themes settings
In the previous sections, you’ve got to know the basic parts of your theme customization. Now, navigate to Theme settings to make your theme more stunning and aesthetic.
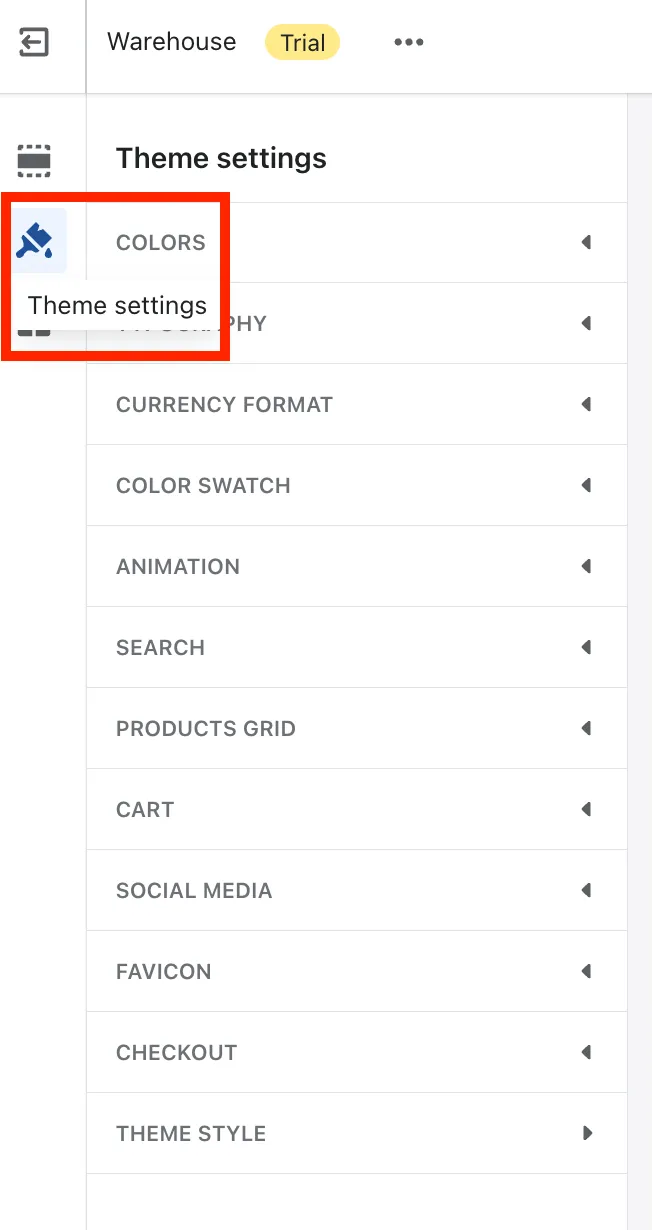
In Themes setting, you may go step-by-step, section-to-section to discover all about these categories below:
- Theme color: General, Primary button, Secondary button, Header, Footer,…
- Typography: Text size, Font size,…
- Currency format (Example: $1.00 USD)
- Color swatch
- Animation: Enable image zoom on hover
- Search
- Products grid
- Cart
- Social media channel
- Favicon (check out How to add favicon to Shopify)
- Check out
- and Theme style
Let’s take Social media for example. Shopify allows you to link almost every popular social media channel like Facebook, Instagram or TikTok. Simply enter your social media links and social media channel icons will appear (as illustrated in the below image).
#10 Remove ‘Powered by Shopify’
Step 1: From your Shopify admin, go to Online Store > Themes.
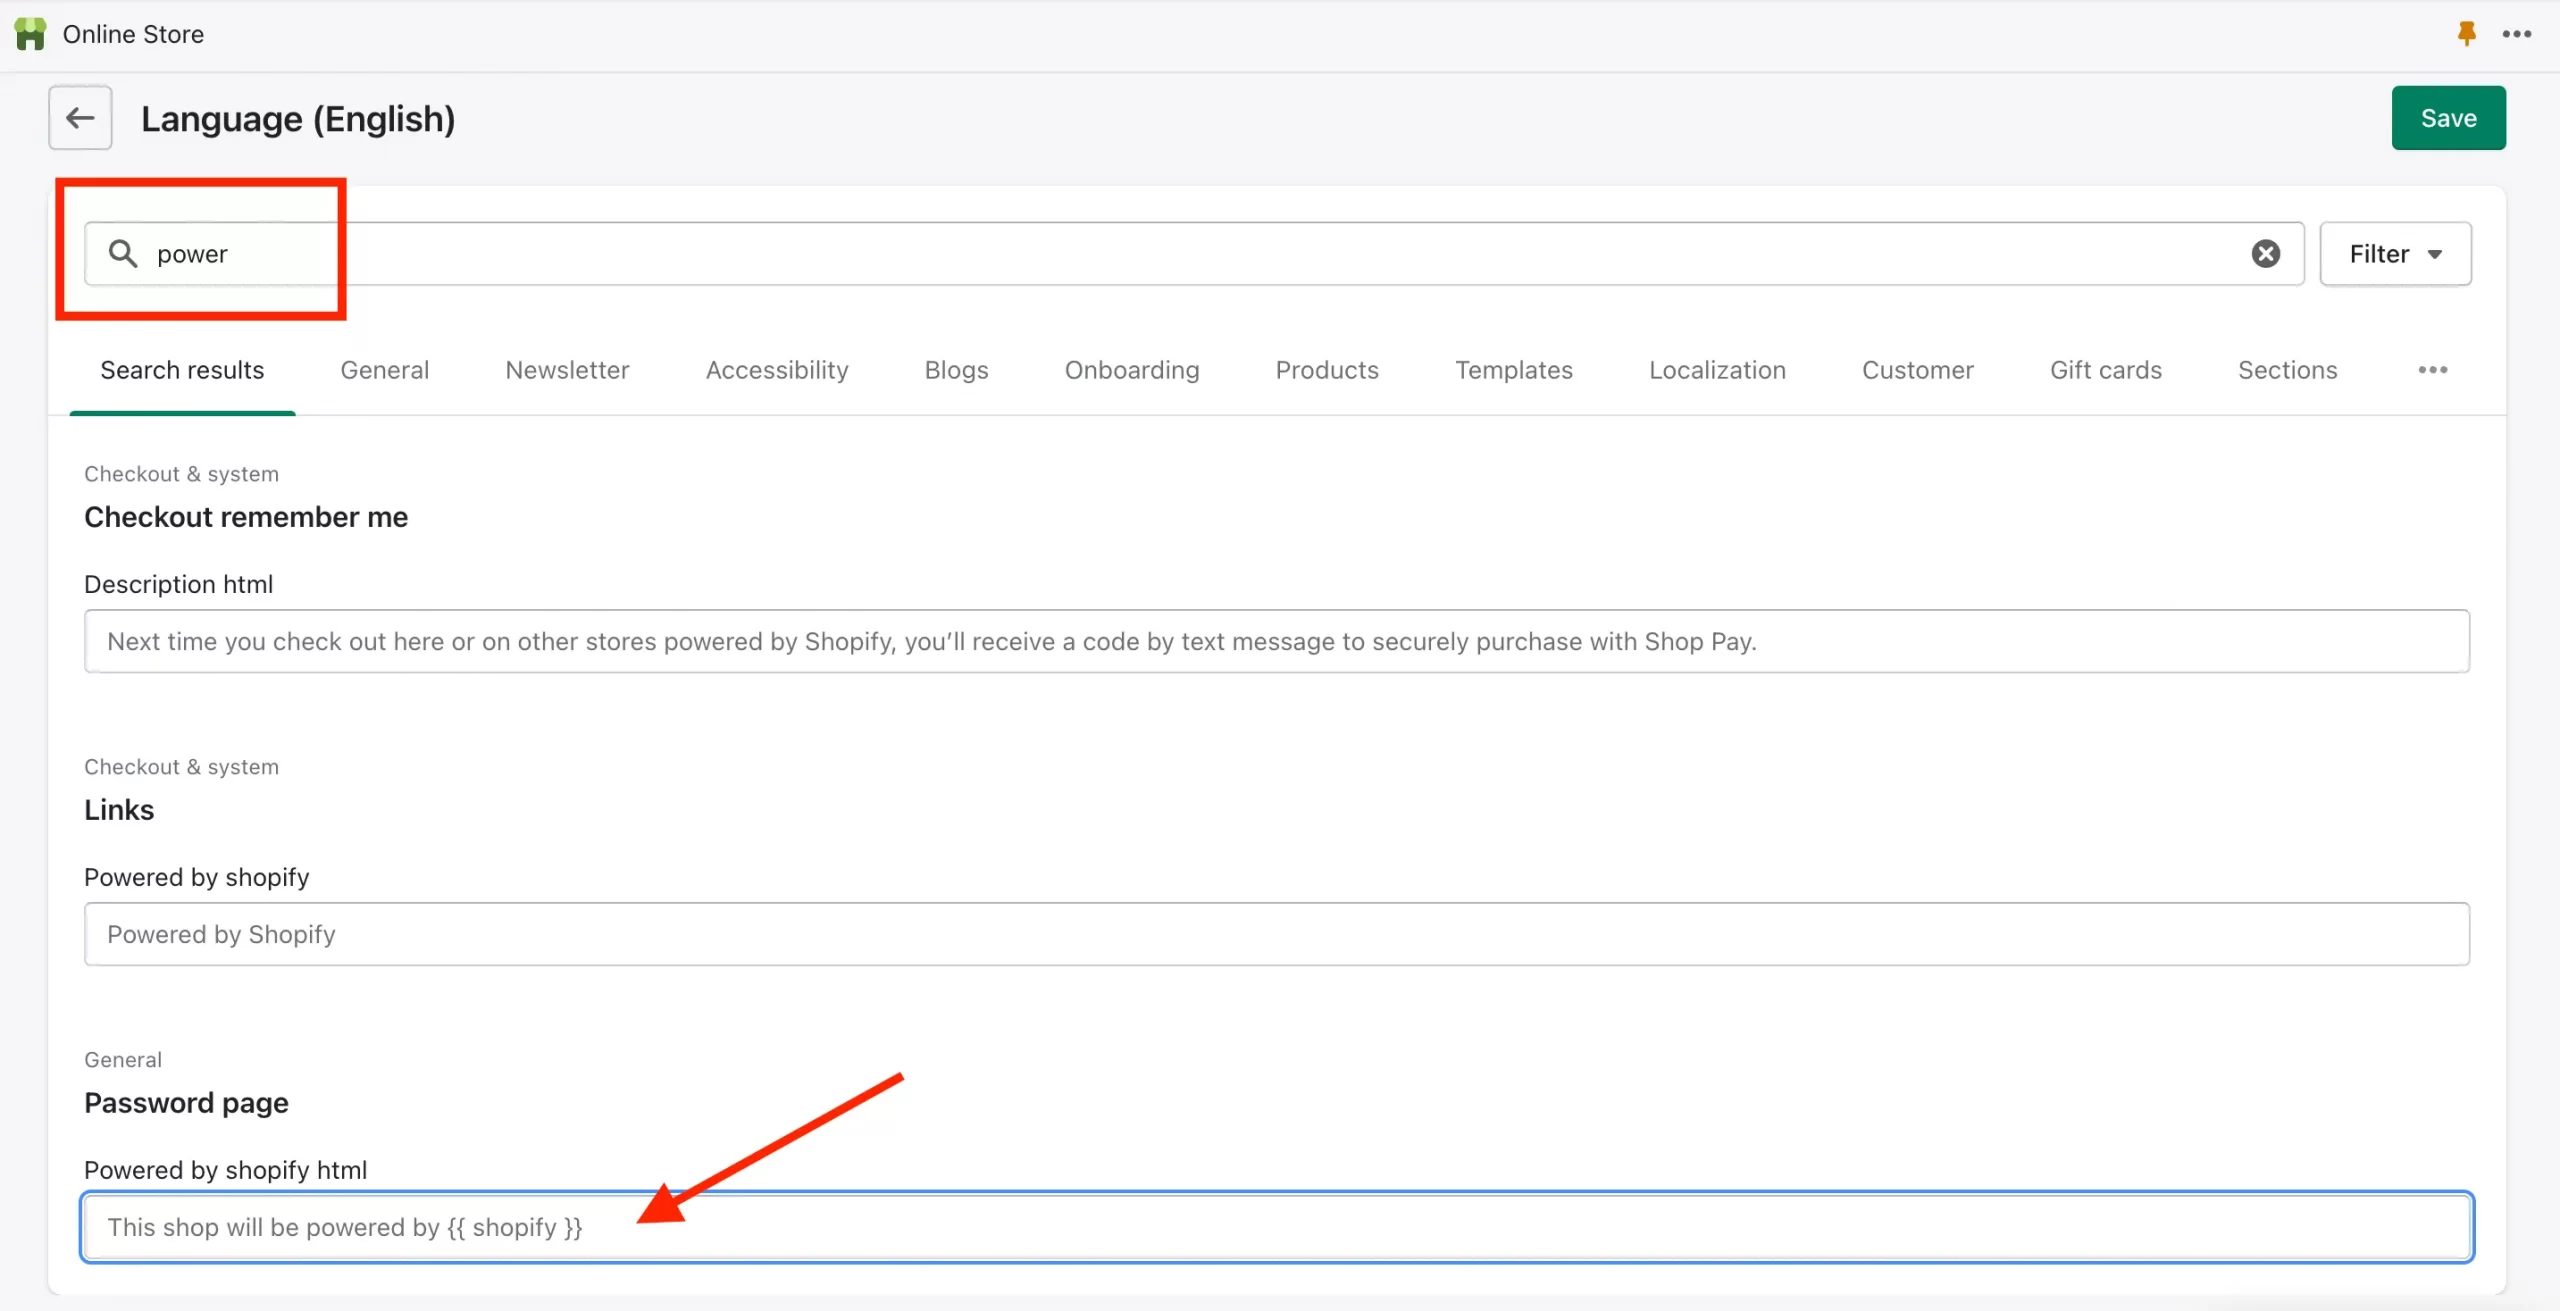
Step 2: Click Actions > Edit languages after locating the theme that needs editing. Next, in “Search translations“, let’s follow:
- Enter ‘powered’ in the search box if this is your first time changing this content.
- If you’ve already modified this content, go straight to the “Powered by Shopify” statement by clicking “…” and choosing Checkout & System.
- The “Powered by Shopify” message may be found in the Checkout & System section under Links.
Step 3: In the ‘Powered by Shopify’ box, use the space bar on your keyboard to enter a single space. If your store is password-protected, you can repeat these steps to add the Powered by Shopify HTML box, which displays on your store’s Opening soon page.
Step 4: Click Save
Side note: If you need with custom Shopify themes, you can always reach out to Shopify’s Support Team for help with this tutorial.
#11 Preview & Showcase Shopify theme
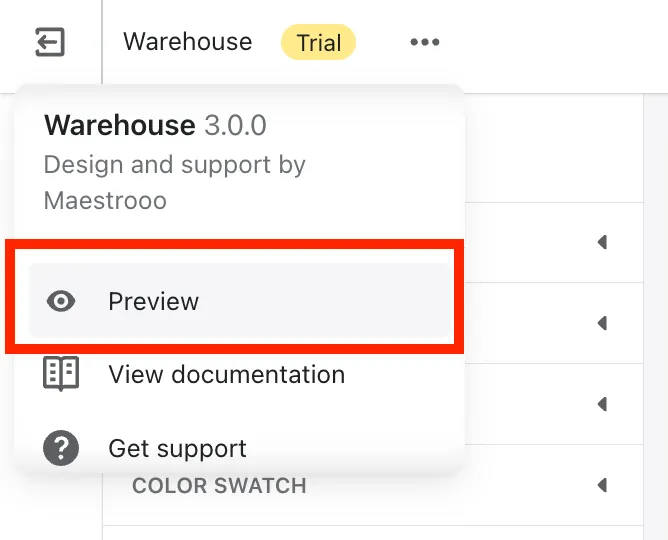
You can view some demo stores by Warehouse below:
[wptb id=47459]
Here is a demo Metal store with a Warehouse theme.
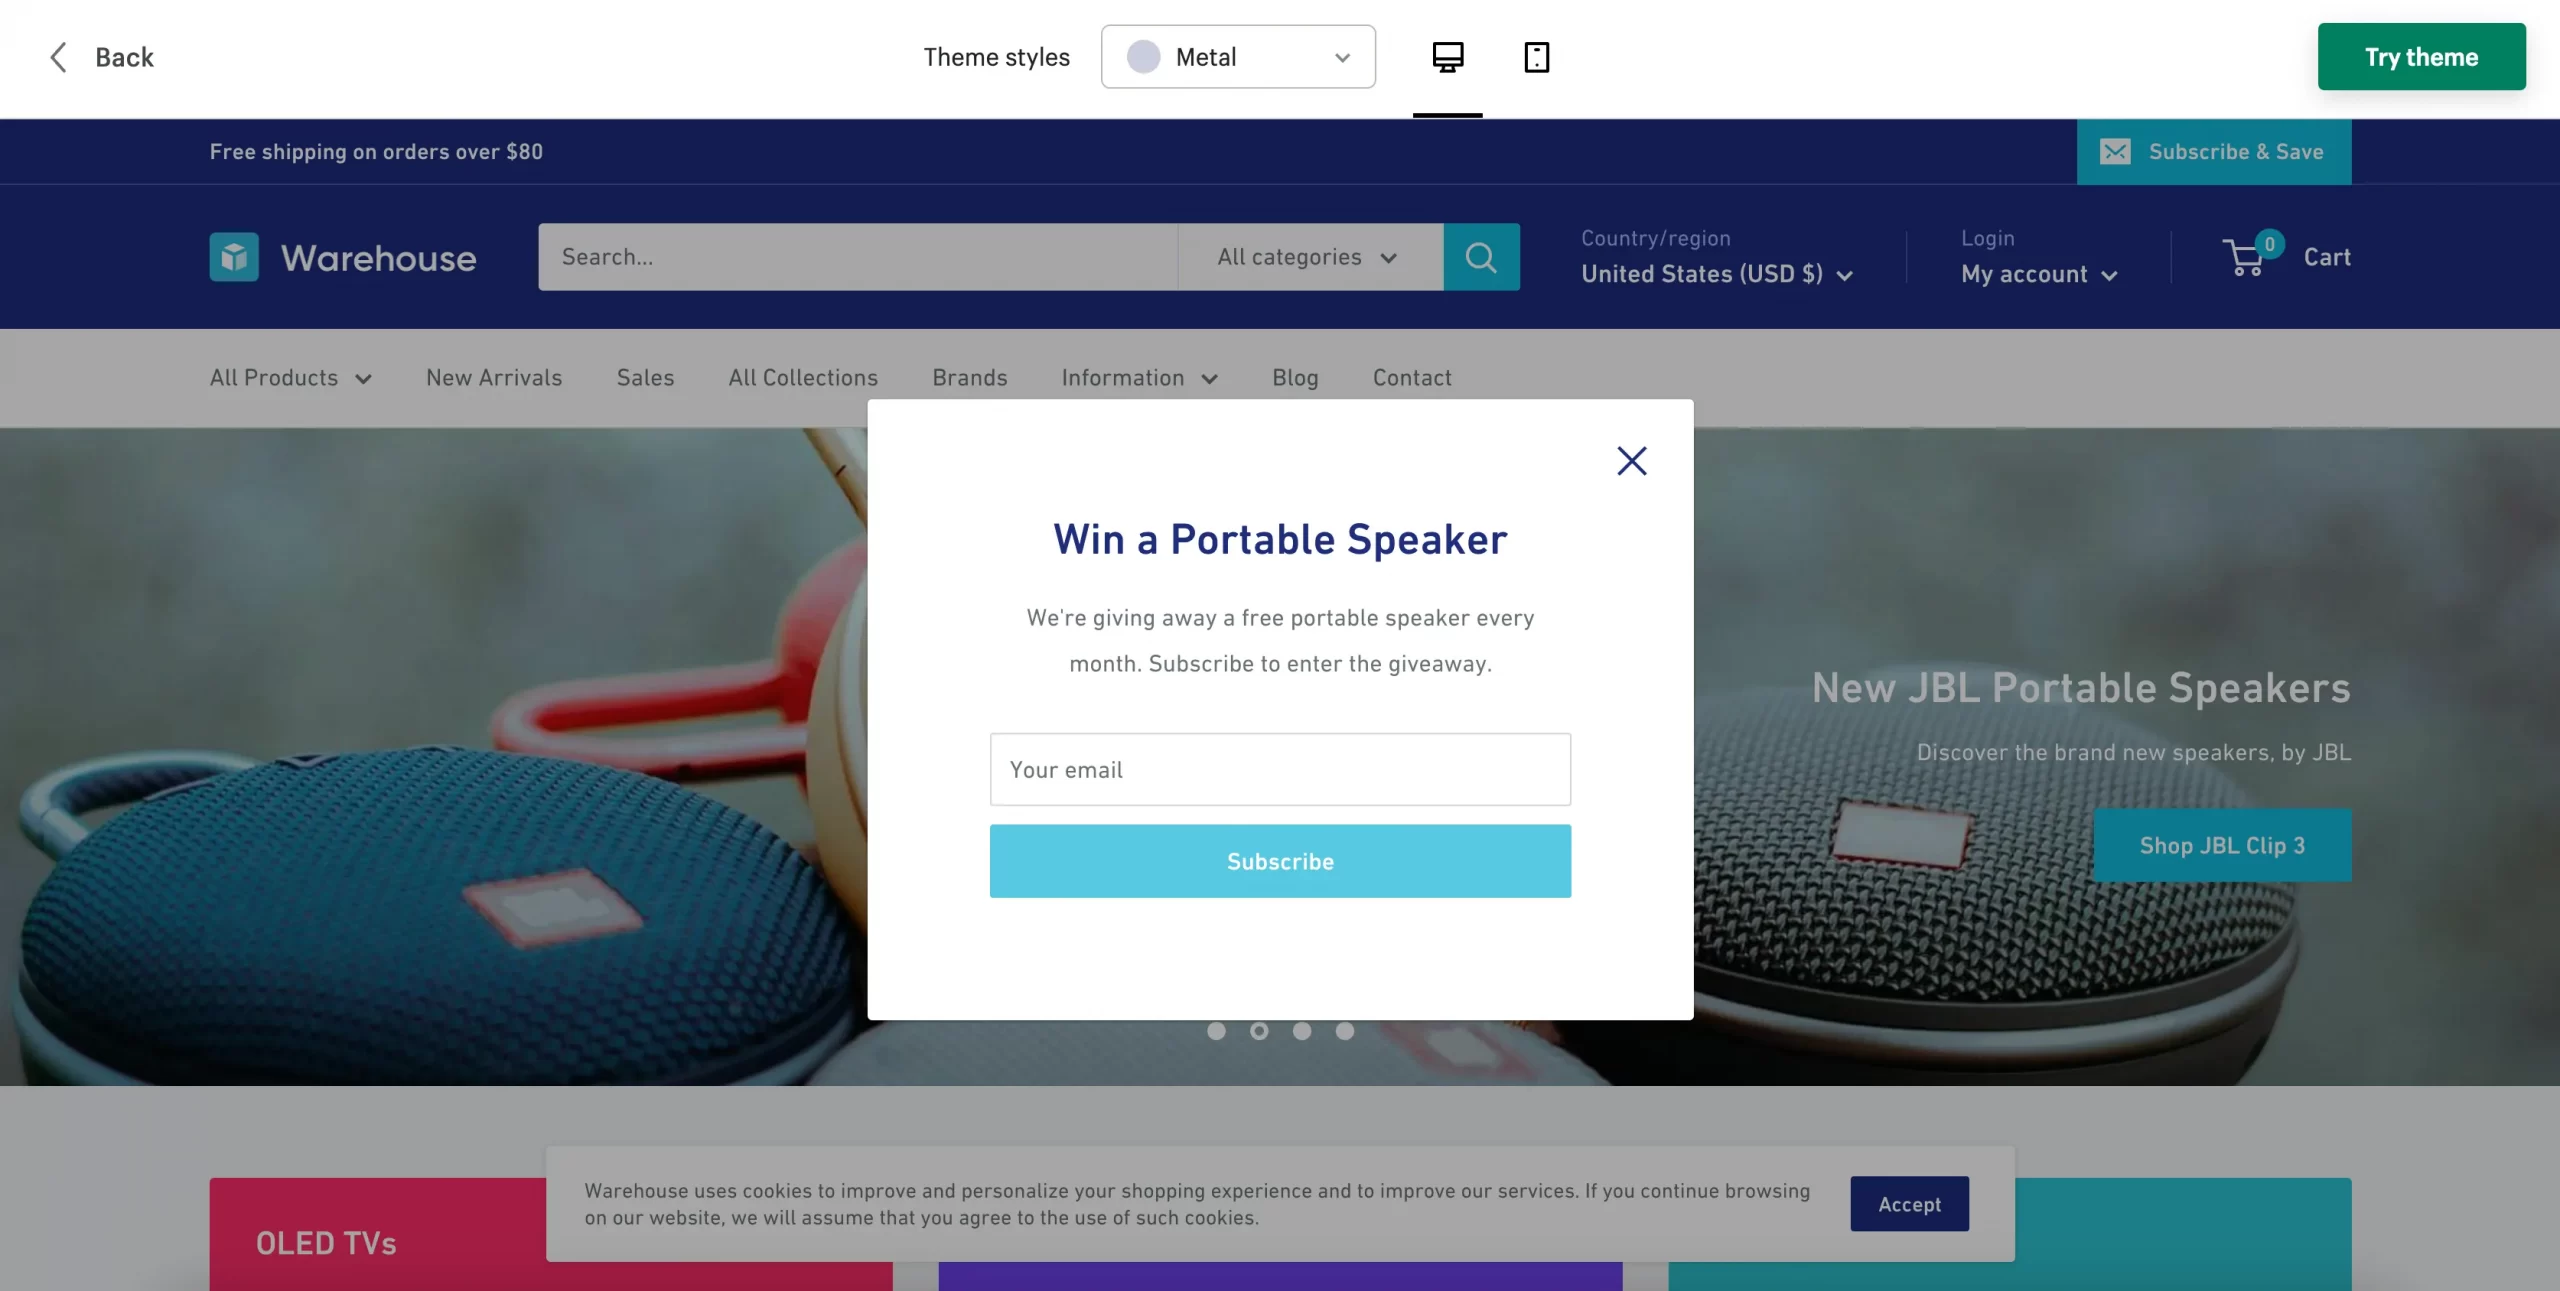
The demo store has a popup for giveaways. You can also see the announcement bar for free shipping. In the ‘Header‘ part that includes all categories ranging from Products, Sales, Collections, Blog & Contact.
How to Custom Shopify Themes Using Shopify Liquid
To make further customization to your online store, you can edit the theme code. Most Shopify themes’ files are composed of Liquid – Shopify’s templating language. Theme files also include JavaScript, JSON, CSS, and HTML. Only those familiar with HTML, CSS, and the fundamentals of Liquid may edit a theme’s source code.
This platform allows its users to custom Shopify themes to all of its 100+ website templates, including both free themes and paid options. Therefore, if you are confident in your coding skill, feel free to custom Shopify themes using Shopify Liquid to personalize your store further.
#1 Duplicate & Create backup of the theme
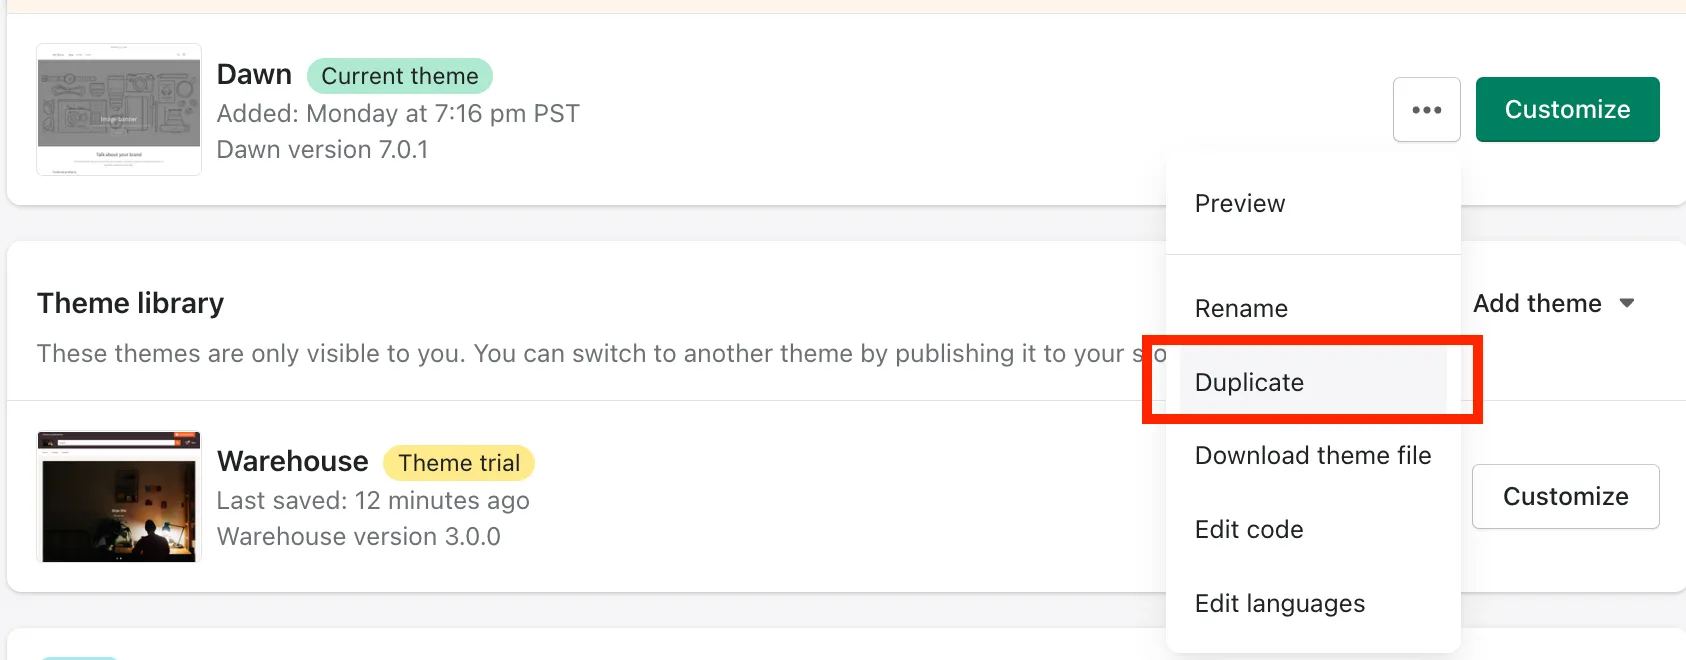
Firstly, in case any unexpected situation happens, Shopify always recommends you to back up or duplicate your current theme. Simply click the three dots next to each theme and select ‘Duplicate’ in the drop-down list. Now, you may continue with the copy of it!

#2 Find ‘Edit code’
There are 2 ways you can find the ‘Edit code’ section.
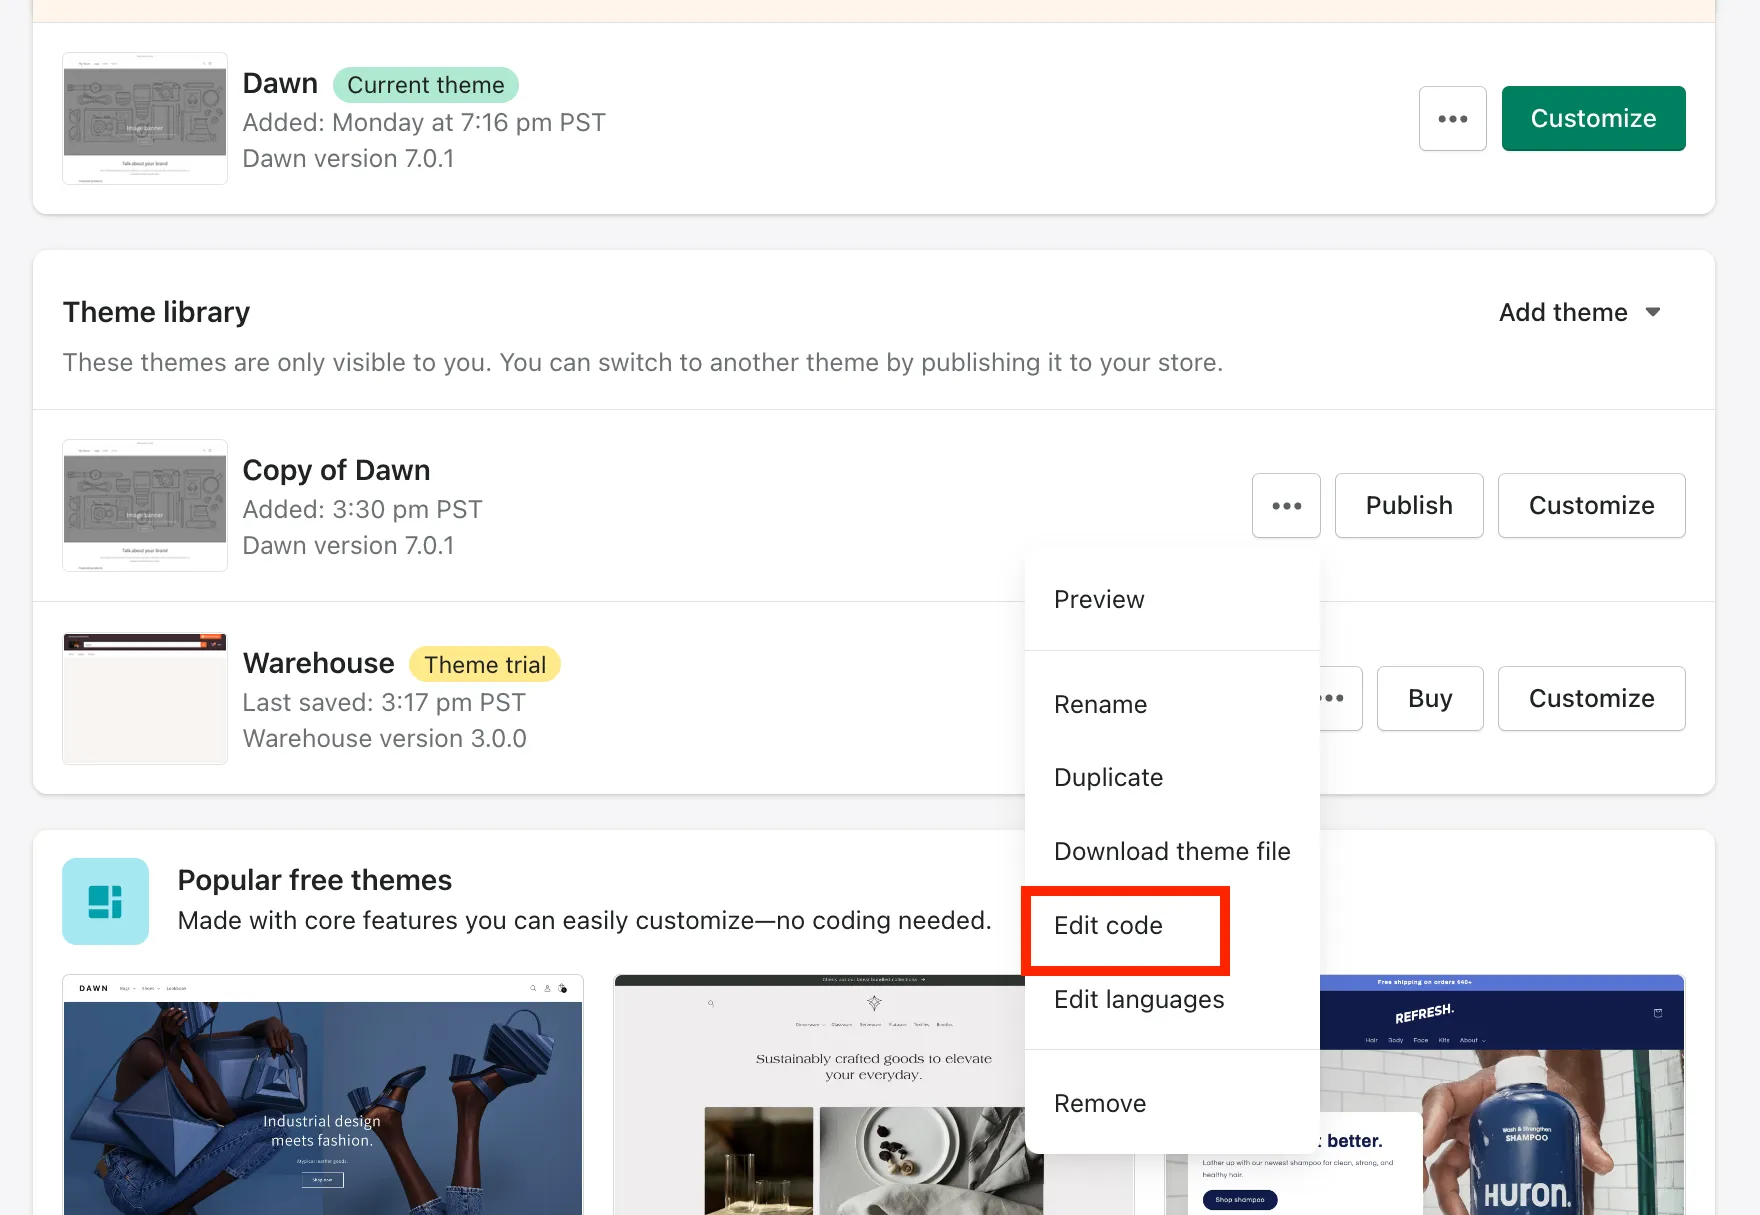
Method 1: Go to ‘Online Store’ > ‘Themes’ > ‘Edit code’
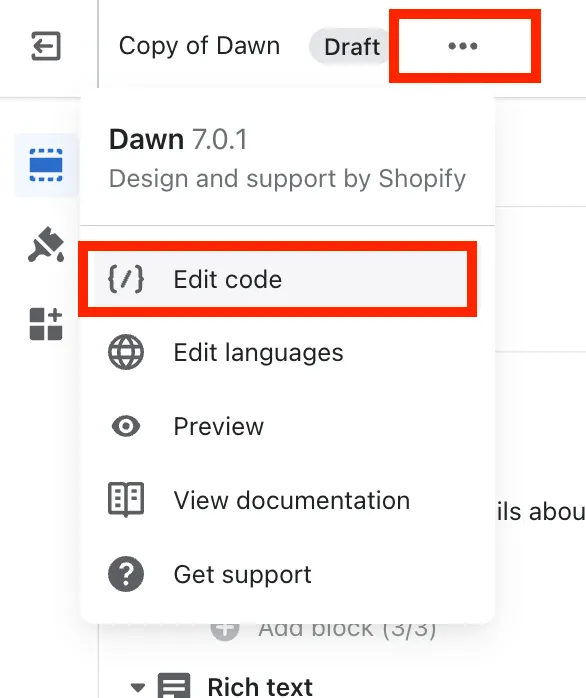
Method 2: On Theme library, select the three dots next to the theme you want to customize, then choose ‘Edit code’. Please refer to the picture below for more details.
#3 Customize theme code with Liquid
Now, on the ‘Layout’ folder, navigate to theme.liquid and customize it. From here, you can add some custom text fields on your Shopify page.
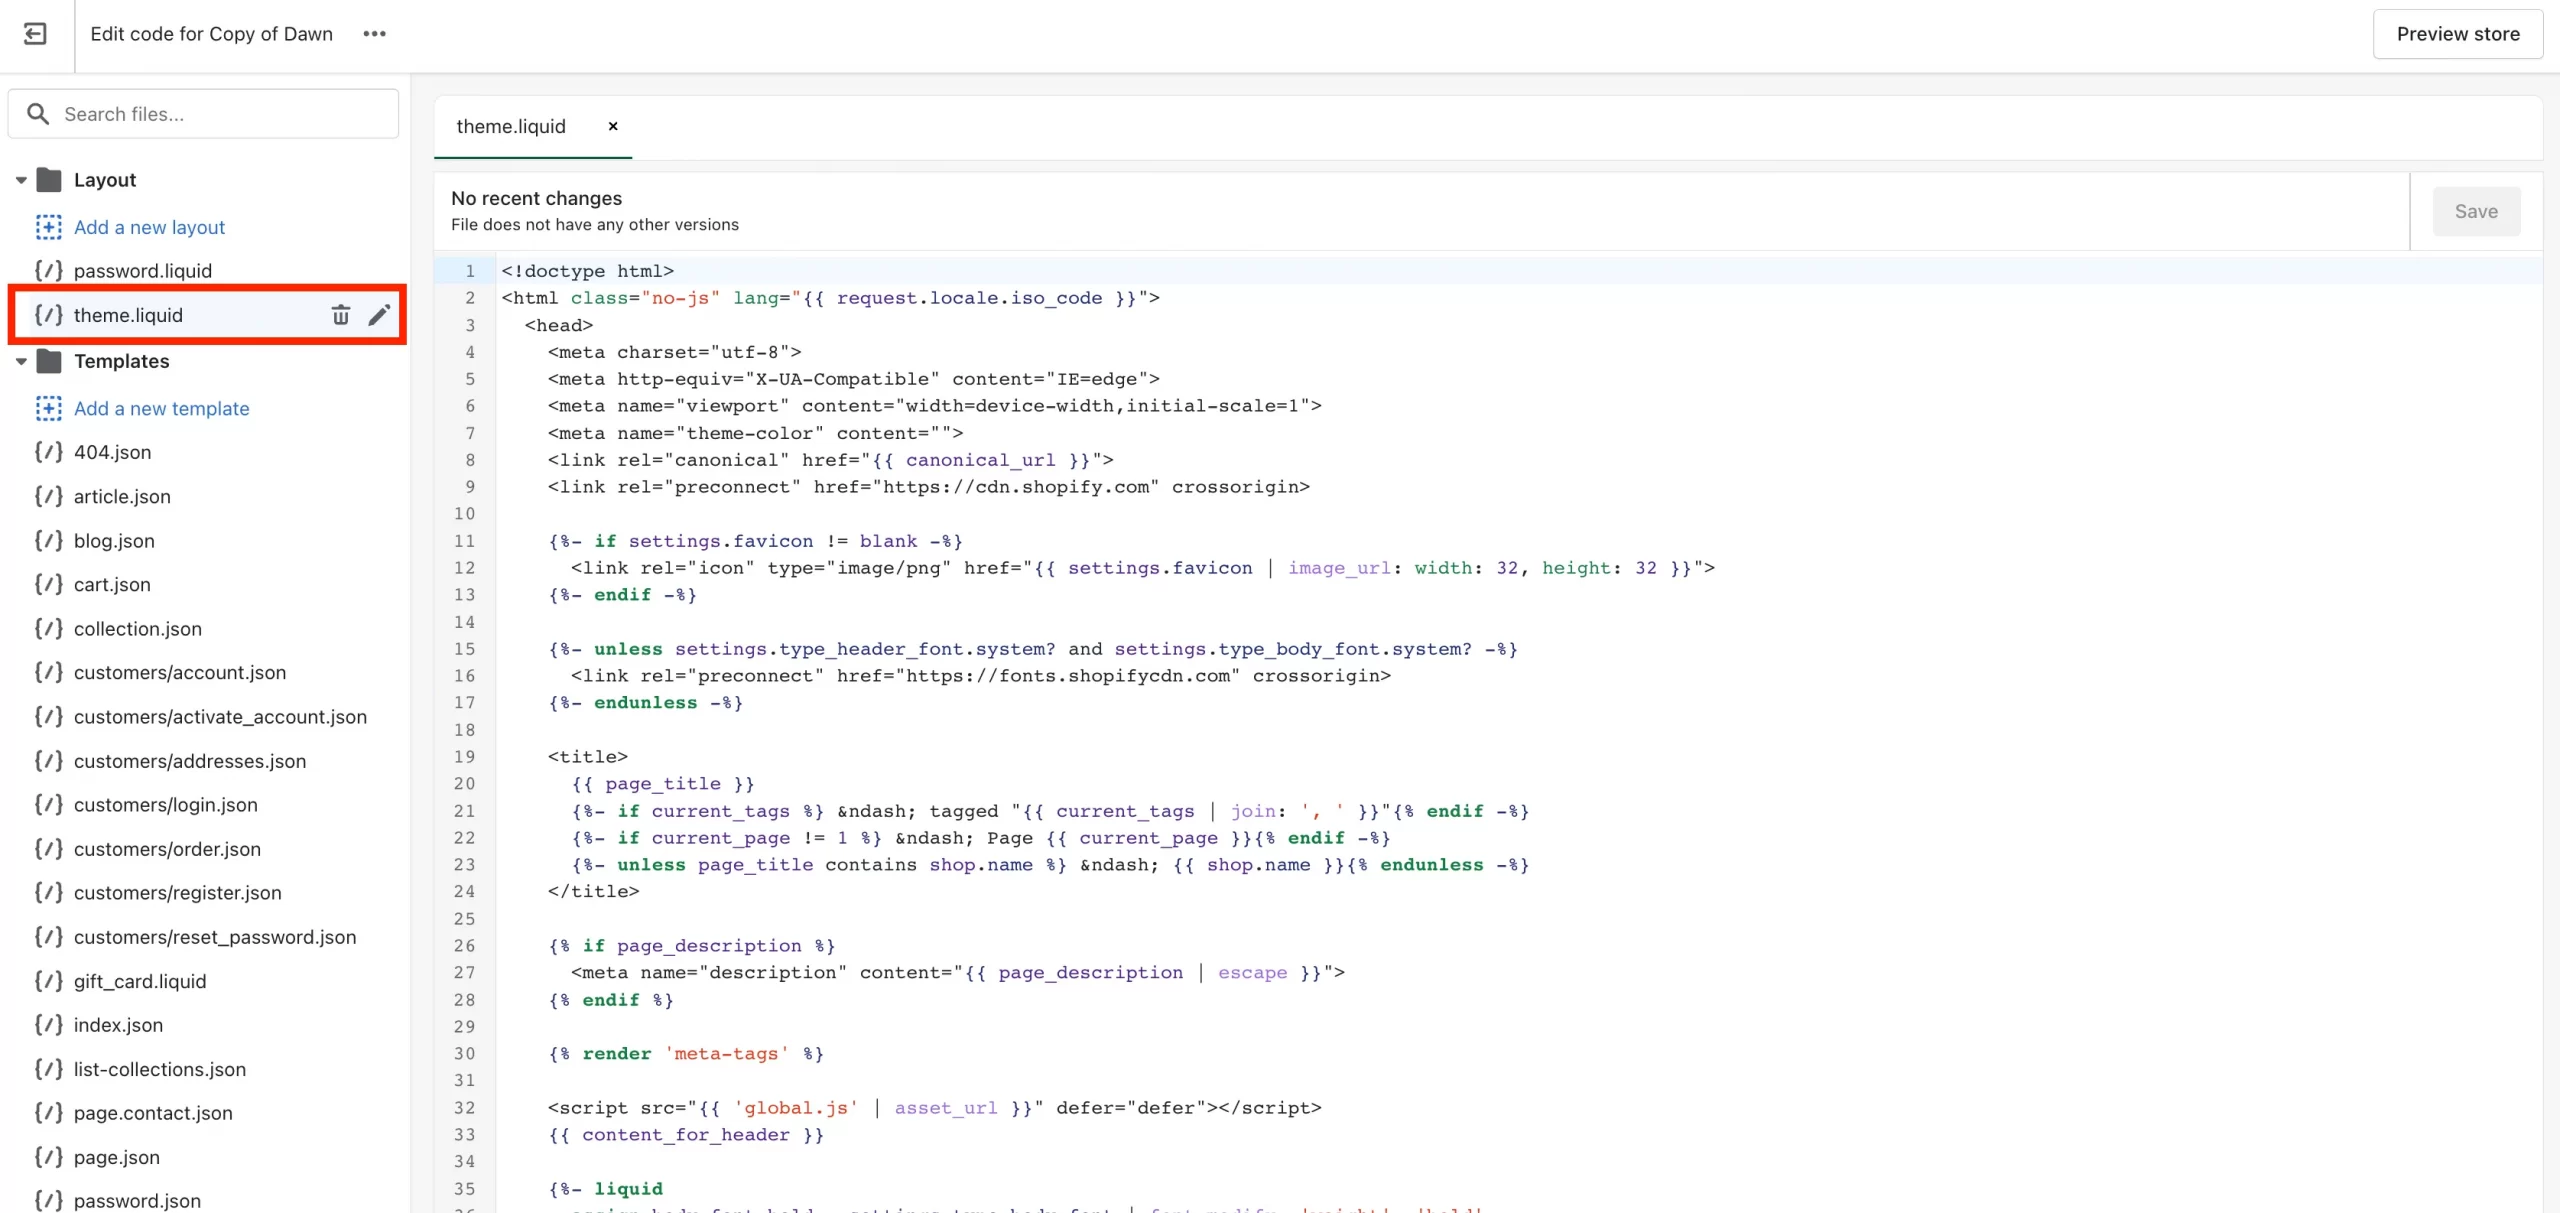
In Shopify, Liquid files allow us to access certain variables without having any difficulty.
Shopify also offers Liquid reference that include everything about custom Shopify themes code with liquid.
How to Upload a Custom Theme to Shopify
You can also upload and customize your own publishing theme. Shopify lets you publish and customize the theme’s code.
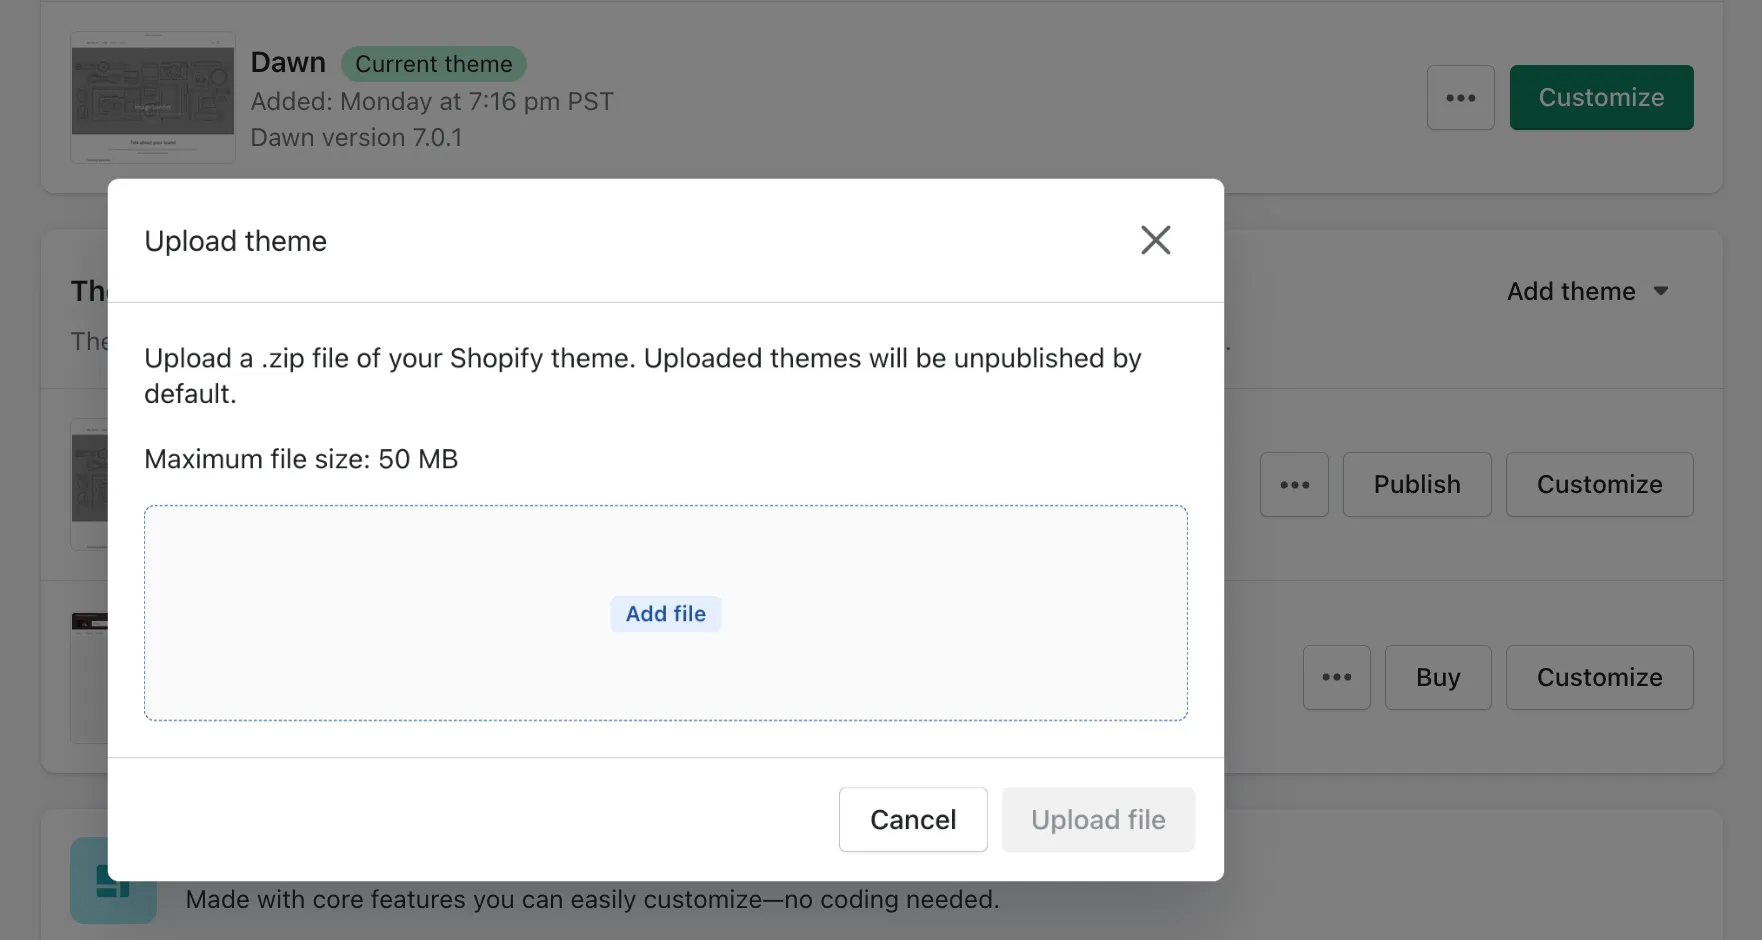
To find this, follow these steps:
- Step 1: On Shopify dashboard > Navigate to ‘Online Store’ > Select ‘Themes’
- Step 2: Find ‘Theme library’
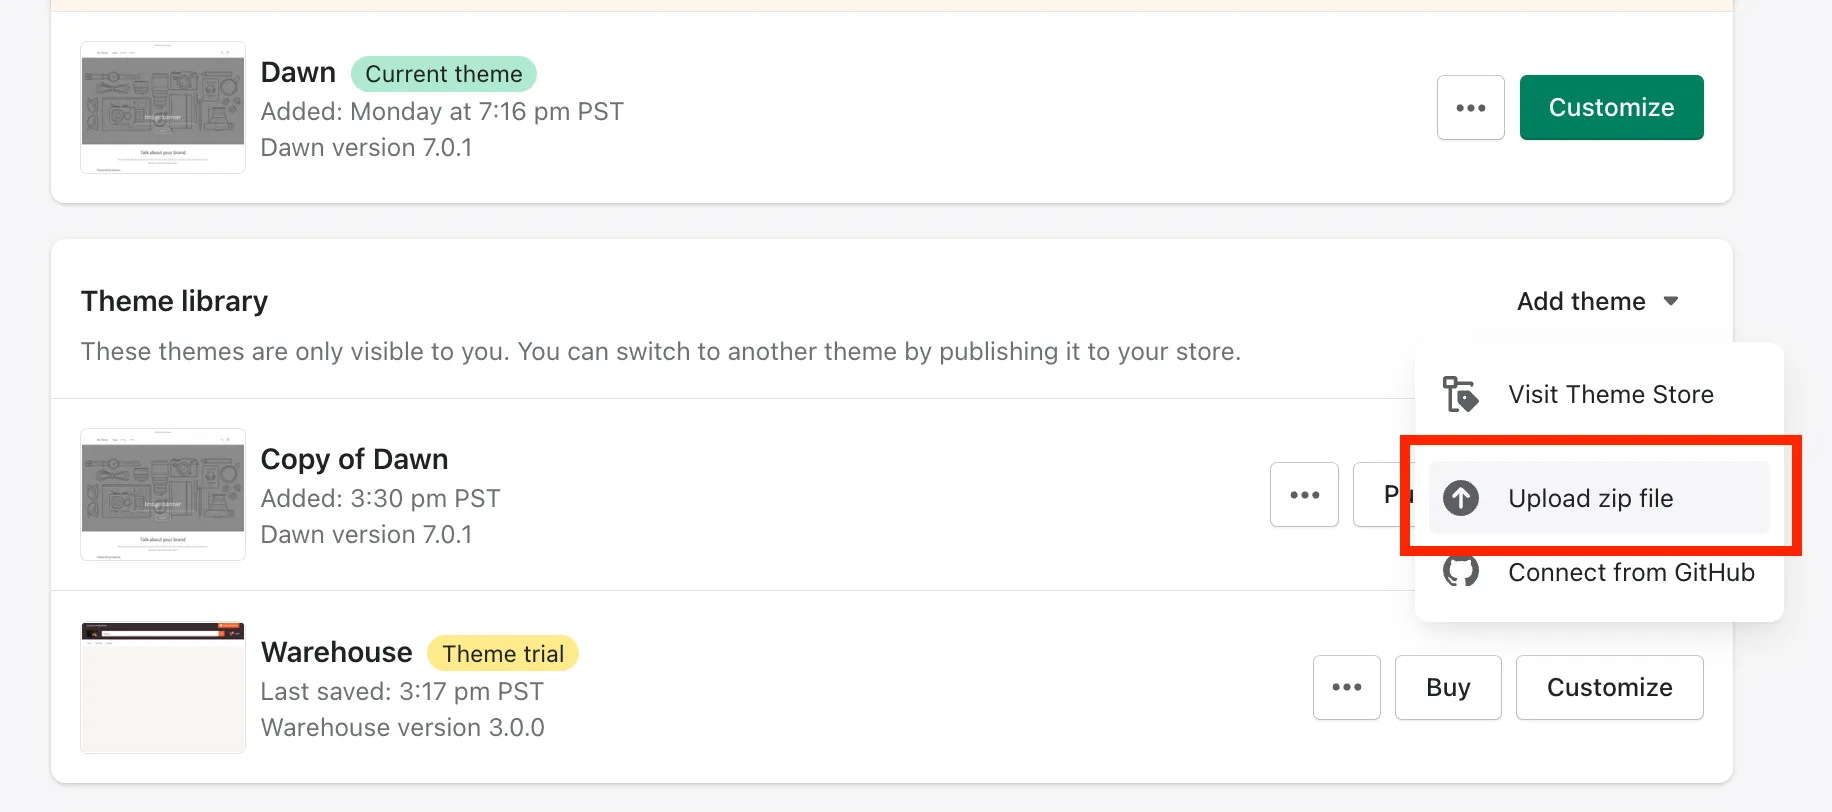
- Step 3: Click ‘Add theme’
- Step 4: Choose ‘Upload zip file’ and customize your theme
Custom Shopify themes can have many benefits when you can customize them in personal, branded ways and offer the most satisfying experience to the visitor. However, custom Shopify themes is normally not a good idea when:
- It’s expensive to build and customize a new theme
- You will have to manually upgrade the theme
- There may be some bugs and issues happened along the way
- You may not focus on business development
- and many more unexpected situations…
So, choosing a pre-built Shopify theme can be a more optimal choice. In the next section, we’ll cover all aspects of Shopify themes & discover some of the best Shopify themes.
💡 Do you need support with your new Shopify store? We recommend the experts from Litos – Shopify Development Service. With 10+ years in the field, Litos can deliver great proficiency & knowledge in custom Shopify themes to get you achieve high conversions and ROI!
Shopify Themes – All You Need to Know
How many Shopify themes & Where to find them?
There are 111 themes (100 paid themes & 11 free themes) on Shopify themes store. Shopify themes are meticulously built for eCommerce, which take your store from launch to scale with themes that make selling easy.
Shopify themes can meet your needs ranging from many industries:
- Arts & Crafts
- Toys & Games
- Outdoor & Garden
- Book, Music & Video …
No matter what you’re selling, Shopify themes can always meet your needs!

Apart from Shopify theme stores, you can also find Shopify themes from many resources like ThemeForest, Envato and other Shopify theme agencies.
Best Shopify themes to get inspiration
In this article, we recommend top-notch choices for your Shopify eCommerce website:
|
✓ Great for dropshippers ✓ Quick theme setup ✓ Suitable for high-volume eCommerce stores ✓ Compatible with latest Shopify features |
||
|
✓ Easy to modify and navigate ✓ Great for brand storytelling ✓ Compatible with latest Shopify features |
||
|
✓ Great for business with in-person selling ✓ Suitable for high-volume eCommerce stores ✓ Compatible with latest Shopify features |
||
|
✓ Great for dropshippers ✓ Modern theme designs ✓ Amazing built in features ✓ Compatible with latest Shopify features |
||
|
To see the full reviews of these stunning themes, you can visit: 10+ Best Shopify Themes for Your eCommerce Stores. |
||
Access more essential resources about Shopify:
Final Words
Now, you’ve got 3 ways on how to custom Shopify themes:
- Customize pre-built Shopify themes
- Customize Shopify themes using Shopify Liquid
- Upload & Custom your own-built Shopify theme
Custom Shopify themes are not a complicated task, but you need to find the right way, and our recommendation is not to miss out on any section that Shopify themes bring to you. We hope that via this article, you can customize your own Shopify theme and start making money on Shopify.
