Shop owners need to learn how to set customer account preferences on Shopify to tackle the problem of customers not wanting to create an account to make a transaction. Customers wishing to establish an account are routed to another page, which may cause customer unhappiness and stop buying instantly.
In this article, we – LitExtension, will show you how to set customer account preferences on Shopify, including.
Let’s first define Shopify customer accounts!
What are Shopify Customer Accounts?
Customers can access their order history and status, profile information, and saved addresses through customer accounts. When a consumer checks in, the information stored in their account is auto-filled during the checkout process, allowing for a speedier checkout experience.
There are 2 types of customer accounts Shopify: classic and new customer accounts.
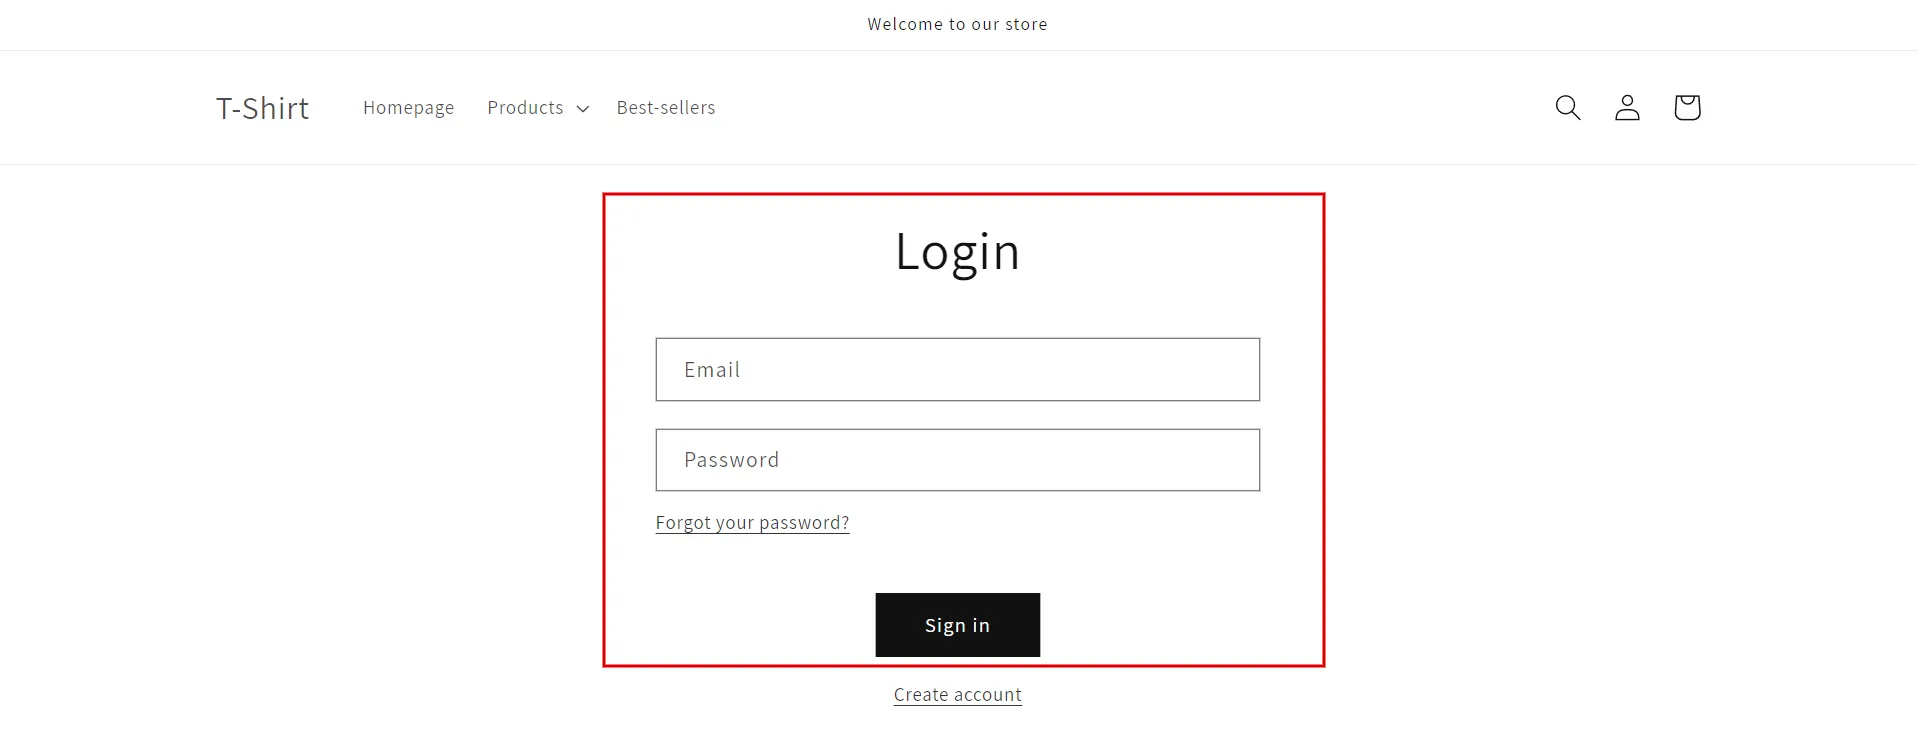
- Classic customer accounts: Sign in or log in with an email and a password from the login page.
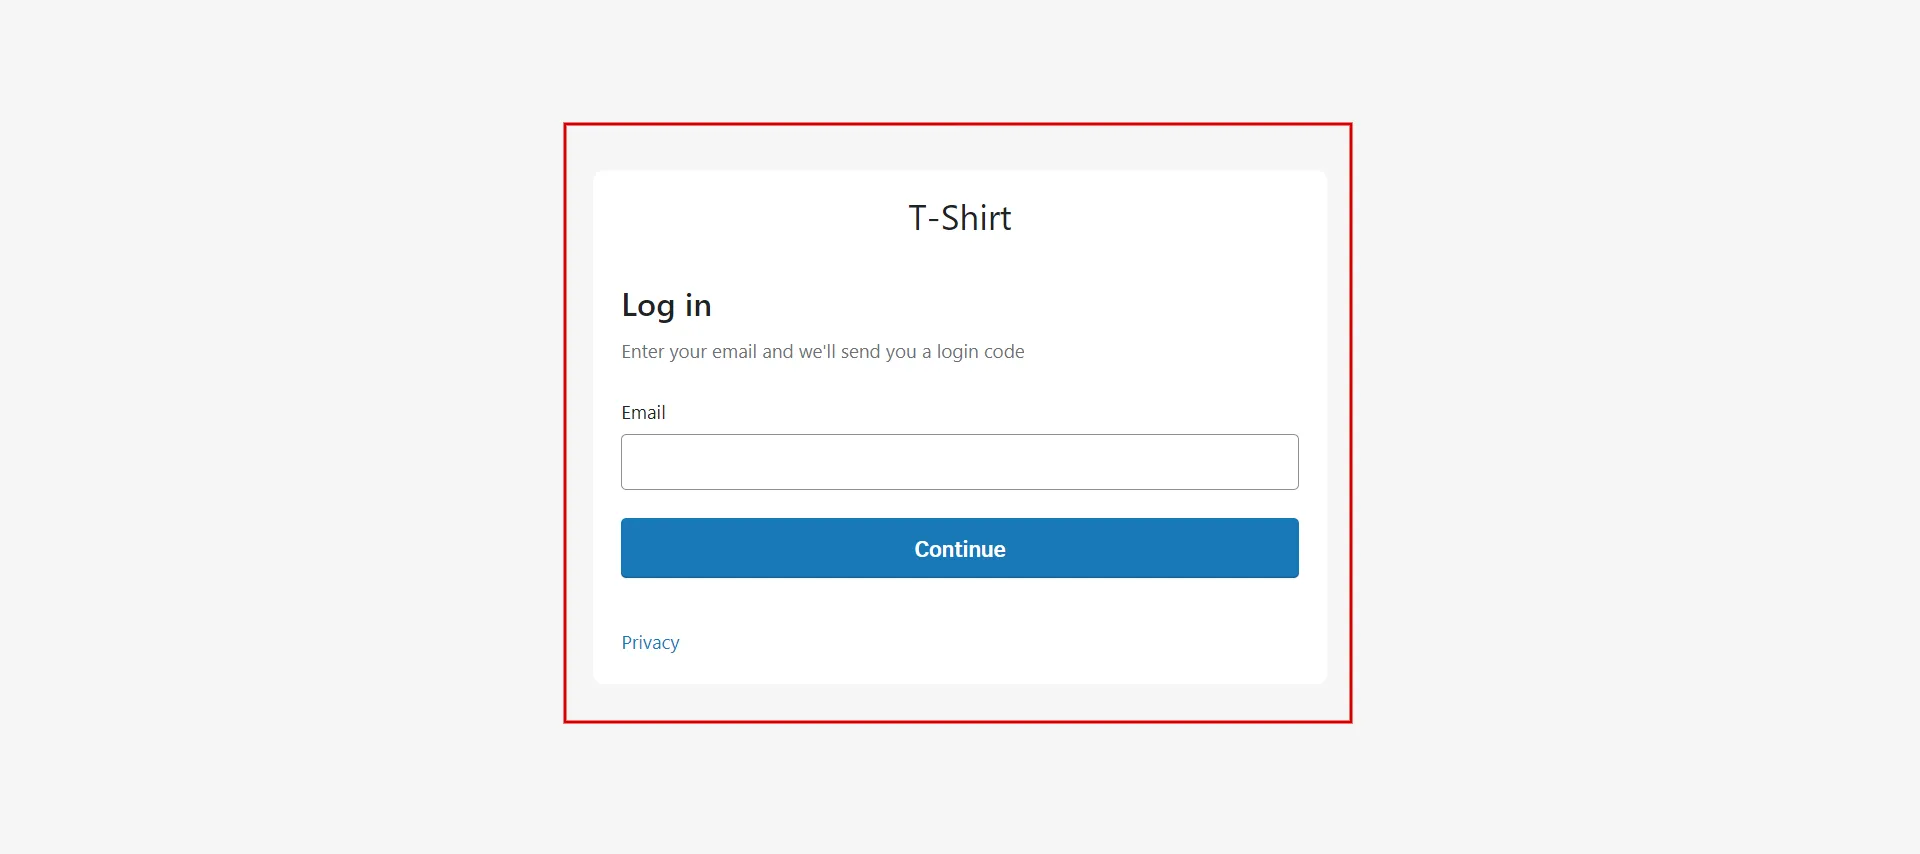
- New customer accounts: Log in with an email address to create an account and enter a one-time six-digit verification code sent to their email address.
How to Set Customer Account Preferences on Shopify
If you’re brand-new to Shopify, you must enable customer accounts because they are disabled by default.
Shopify customer accounts can be optional or required. Users who make an account are taken to a different account creation page: [yourwebsite.com]/account/register.
So how to enable customer accounts in Shopify? Look at these steps:
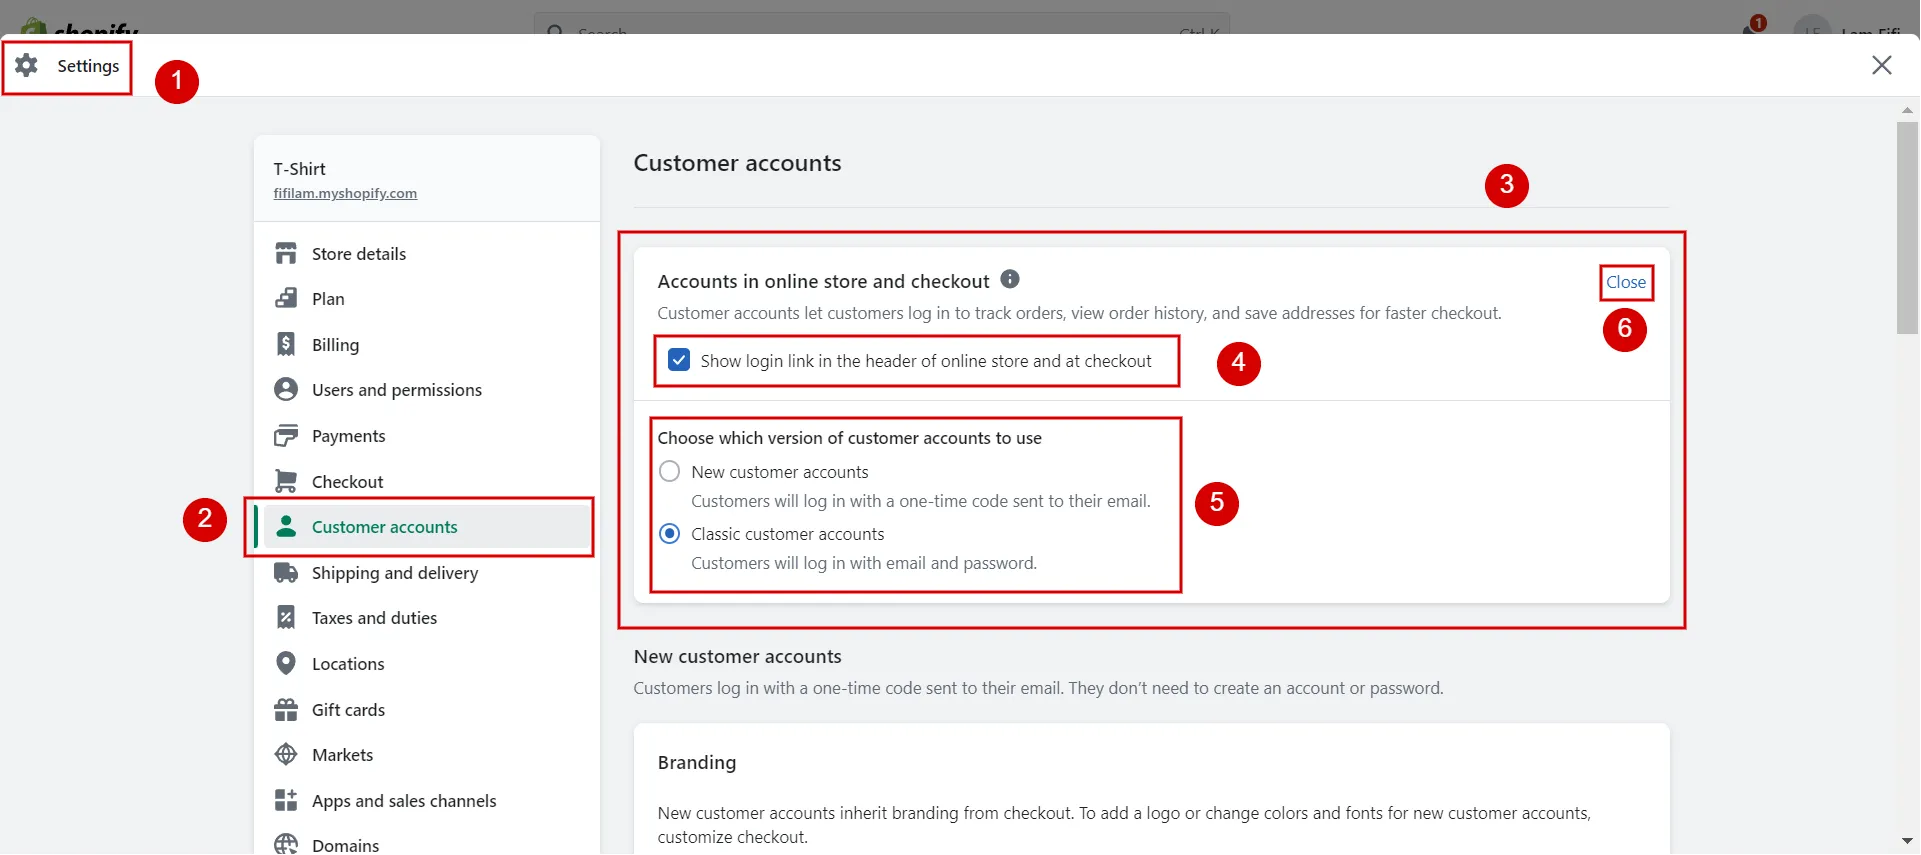
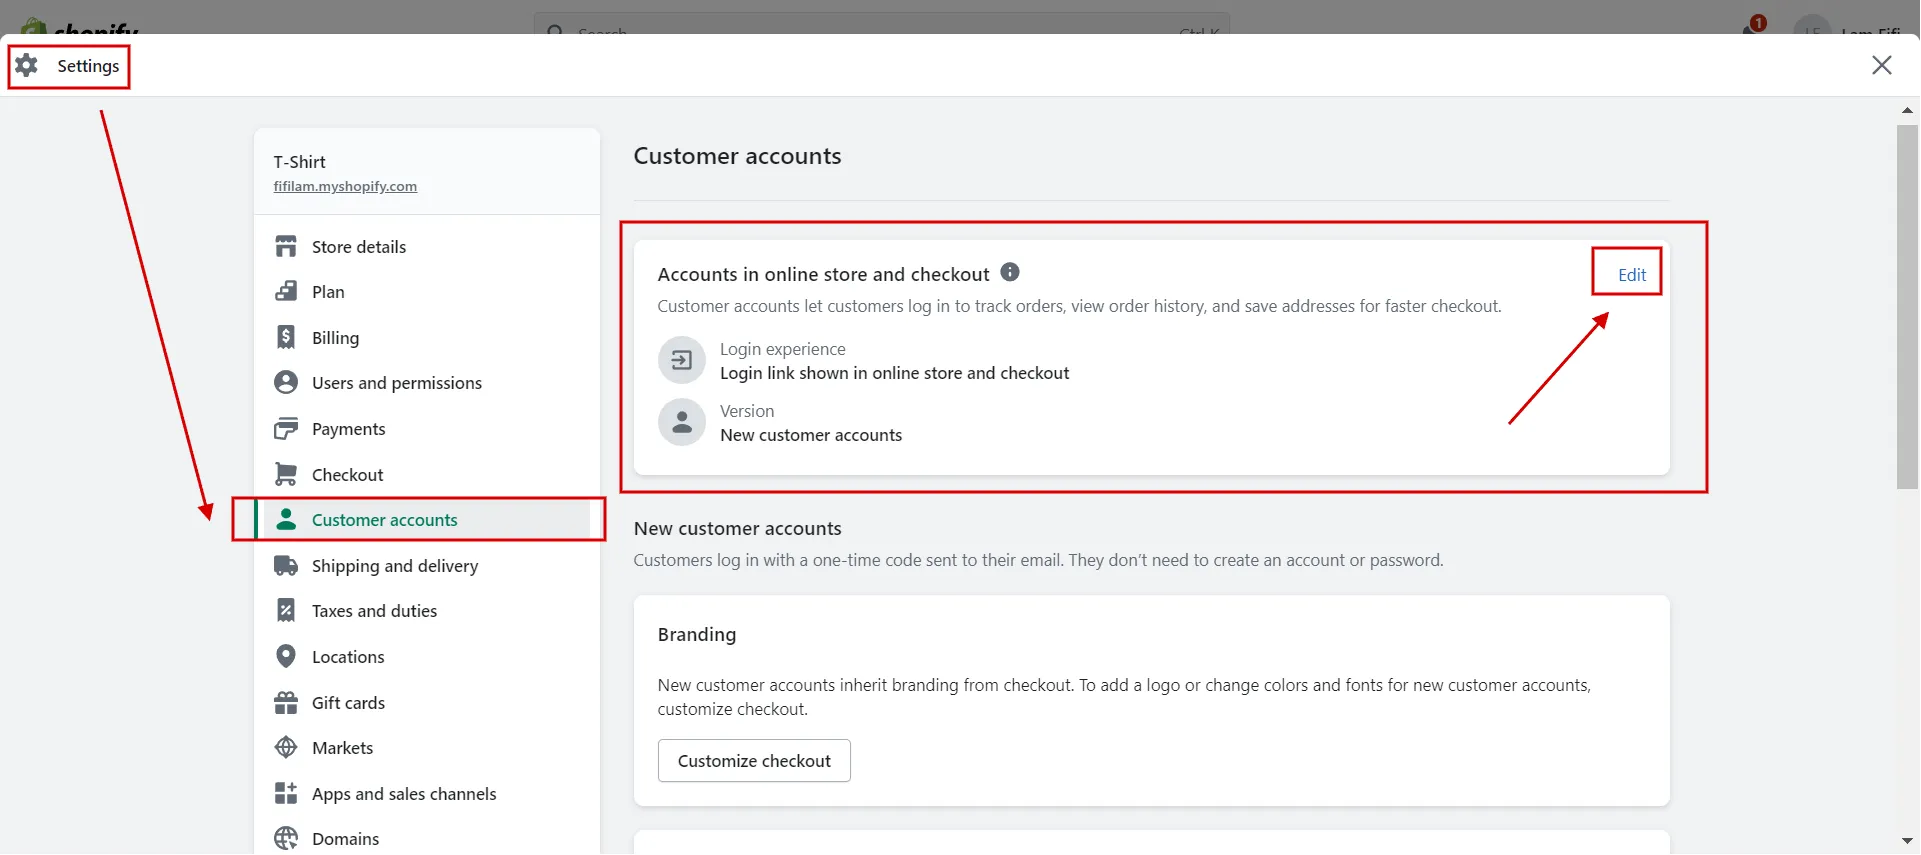
- Step 1: Navigate Settings (1) > Customer Accounts (2).
- Step 2: Click Edit in Accounts in the online store and checkout (3).
- Step 3: Checkbox Show the login link in the online store header and at checkout (4).
- Step 4: Choose 1 of 2 versions of the customer accounts (5).
– New customer: Customers will log in with a one-time code sent to their email.
– Or classic customer accounts: Customers will log in with their email and password. - Step 5: Click Close (6).
Note about required customer accounts.
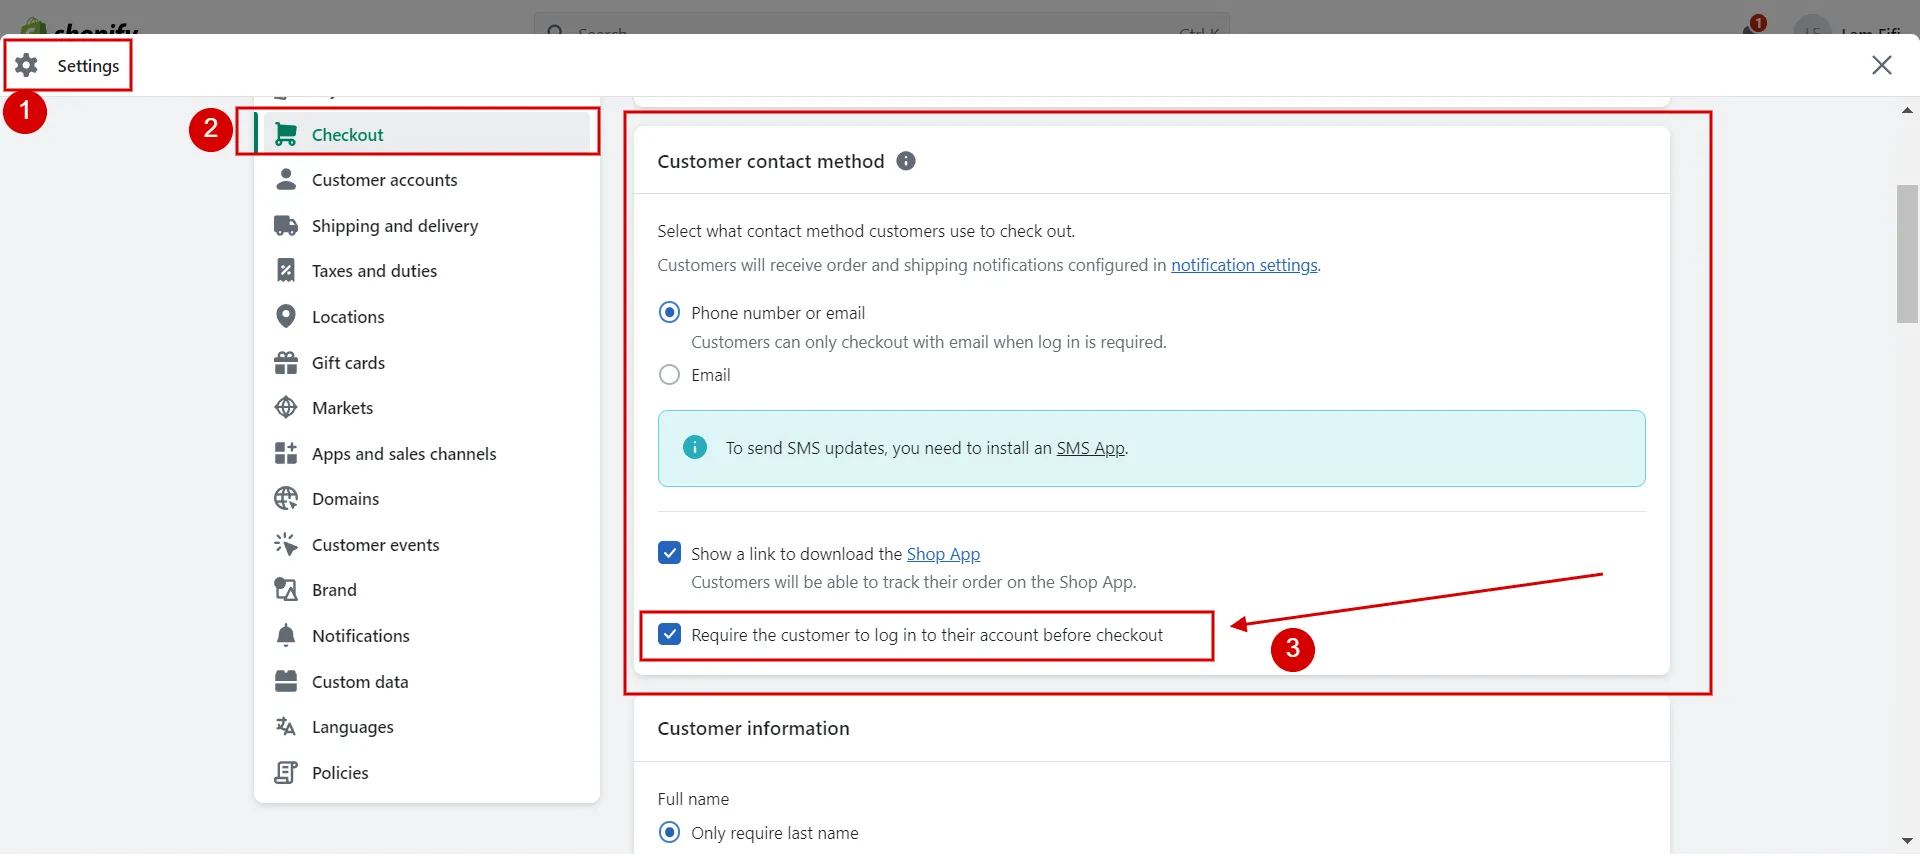
To require all customers to log in before checkout, go to Settings > Checkout > Select Require the customer to log in to their account before checkout from the Customer contact method section.
We recommend that requesting customer accounts be used only when a barrier to entry is required, such as selling to pre-approved wholesale customers, selling age-restricted products, or creating a members-only store.
The question of how to set customer account preferences on Shopify is not your problem anymore. In the following sections, let’s figure out the features of Shopify customer account fields.
Are you seeking the best Shopify tips to boost your store’s sales? Check it out!
How to Set New Customer Account Preferences on Shopify
When you choose the option Shopify New customer account, here are some of its features:
- hide the account
- preview the user experience
- customize branding on the checkout page, etc.
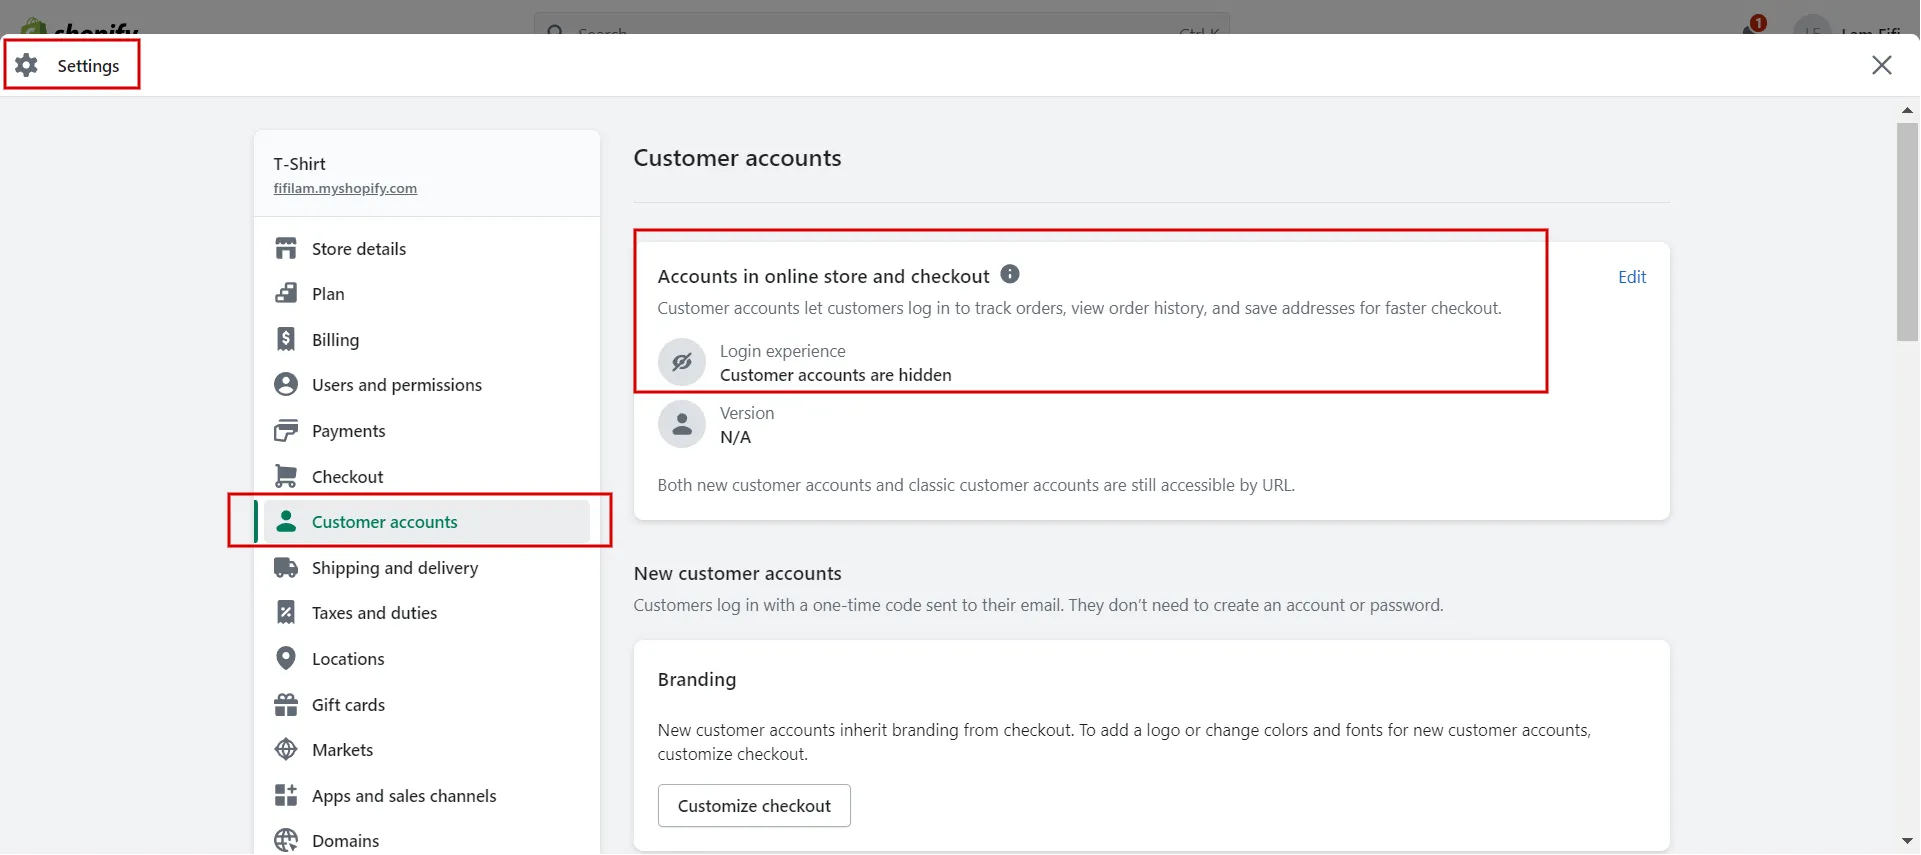
#1 Hide new customer accounts
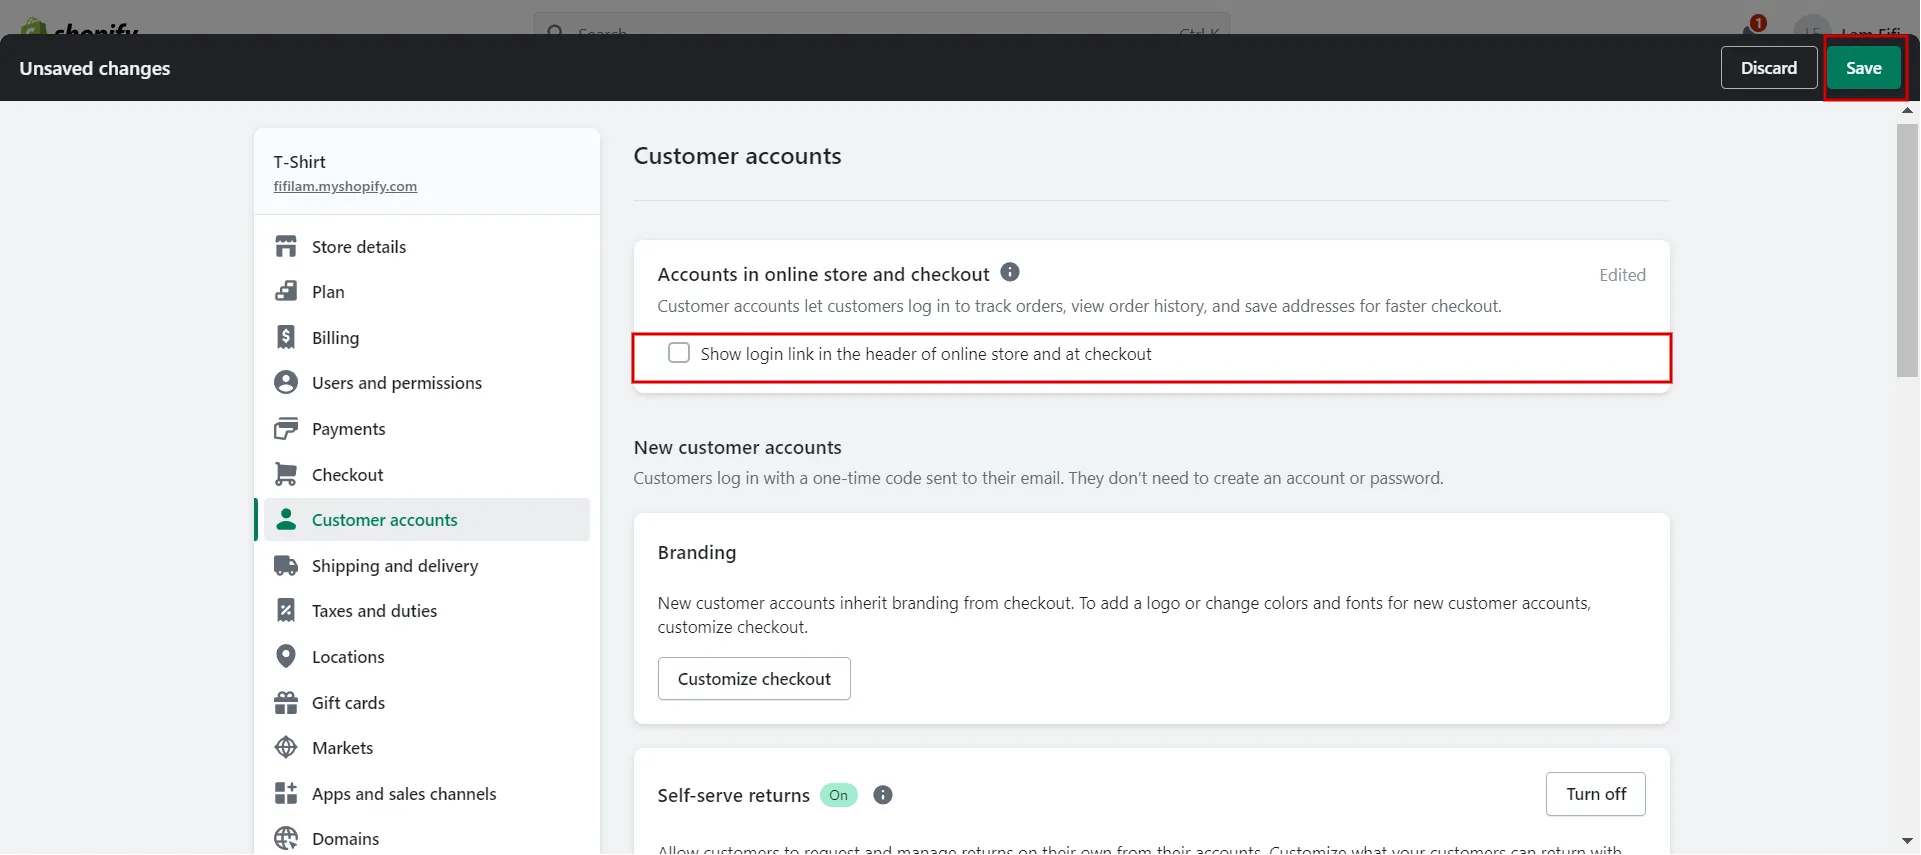
You can hide connections to customer accounts if you no longer want customers to navigate to customer accounts from your online store or checkout. Follow our guidelines to hide new customer accounts:
- Step 1: Navigate to Settings > Customer accounts > click Edit in Accounts in the online store and checkout section.
- Step 2: In the Login Experience section, deselect the checkbox.
- Step 3: Click Save button.
#2 Preview the customer experience
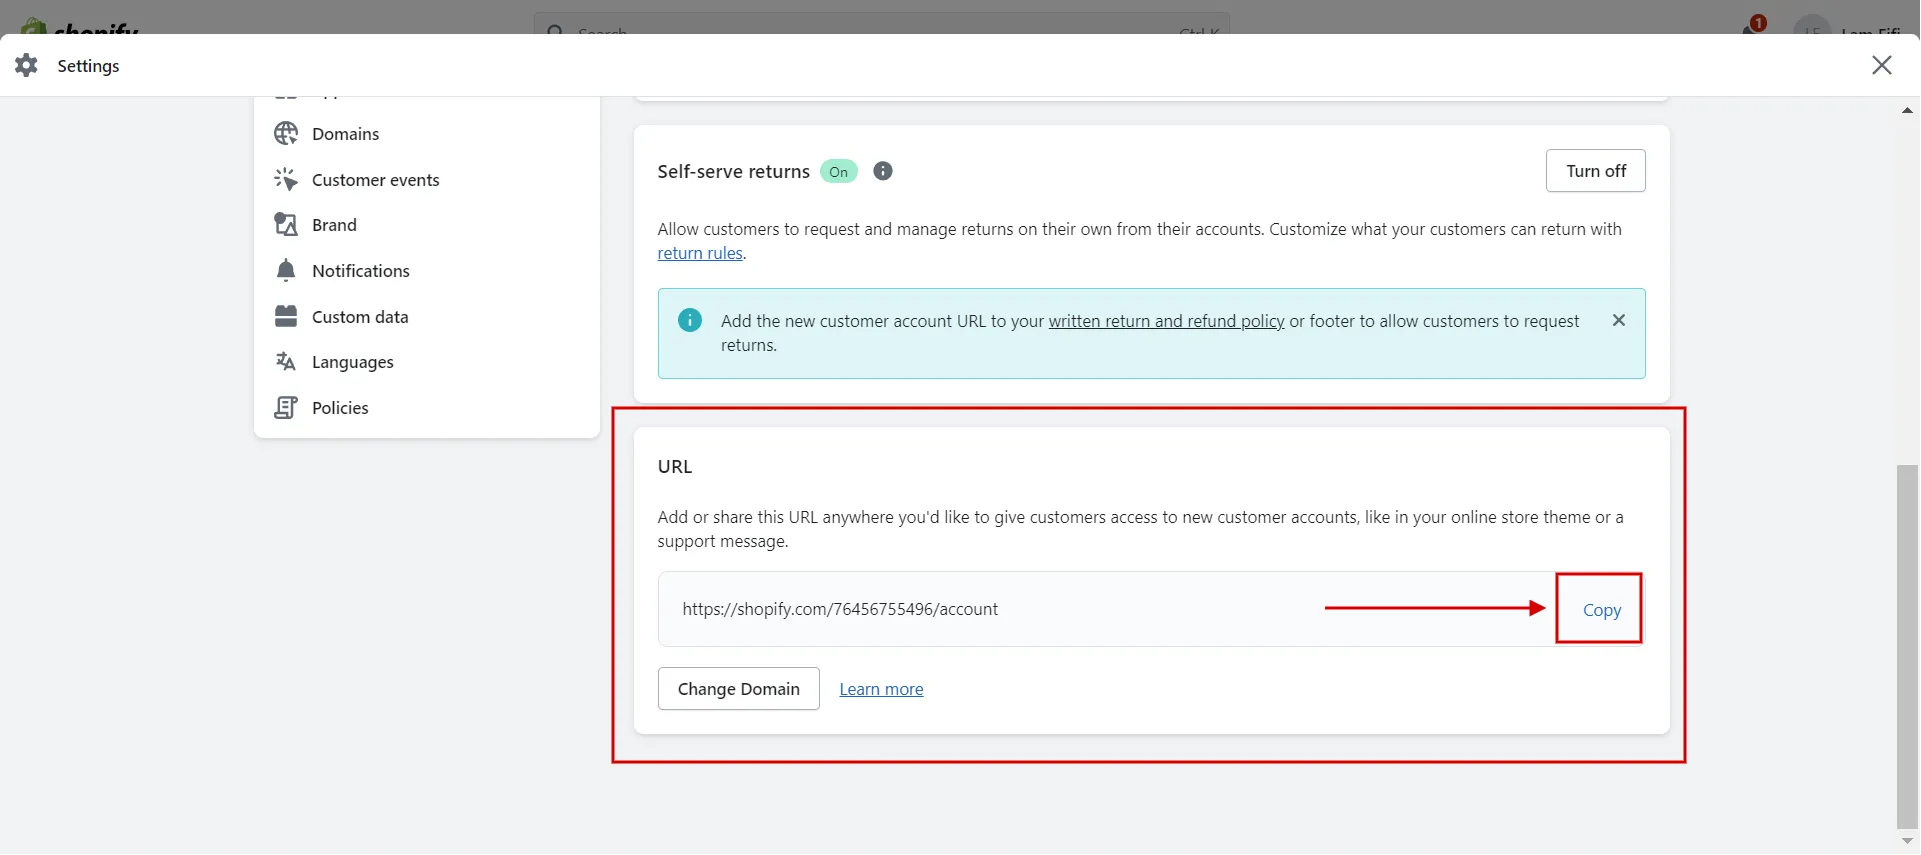
When choosing a new customer account, you can preview and test Shopify customer account page by doing these steps:
- Step 1: Navigate to Settings > Customer accounts.
- Step 2: In the URLs box, hit Copy.
- Step 3: Paste the copied URL into a new browser tab to preview and test Shopify login as customer.
#3 Deactivate Shopify user accounts
Individual accounts cannot be deactivated with new customer accounts. A customer profile can be deleted, but a new one is created if your customer logs in again with that email.
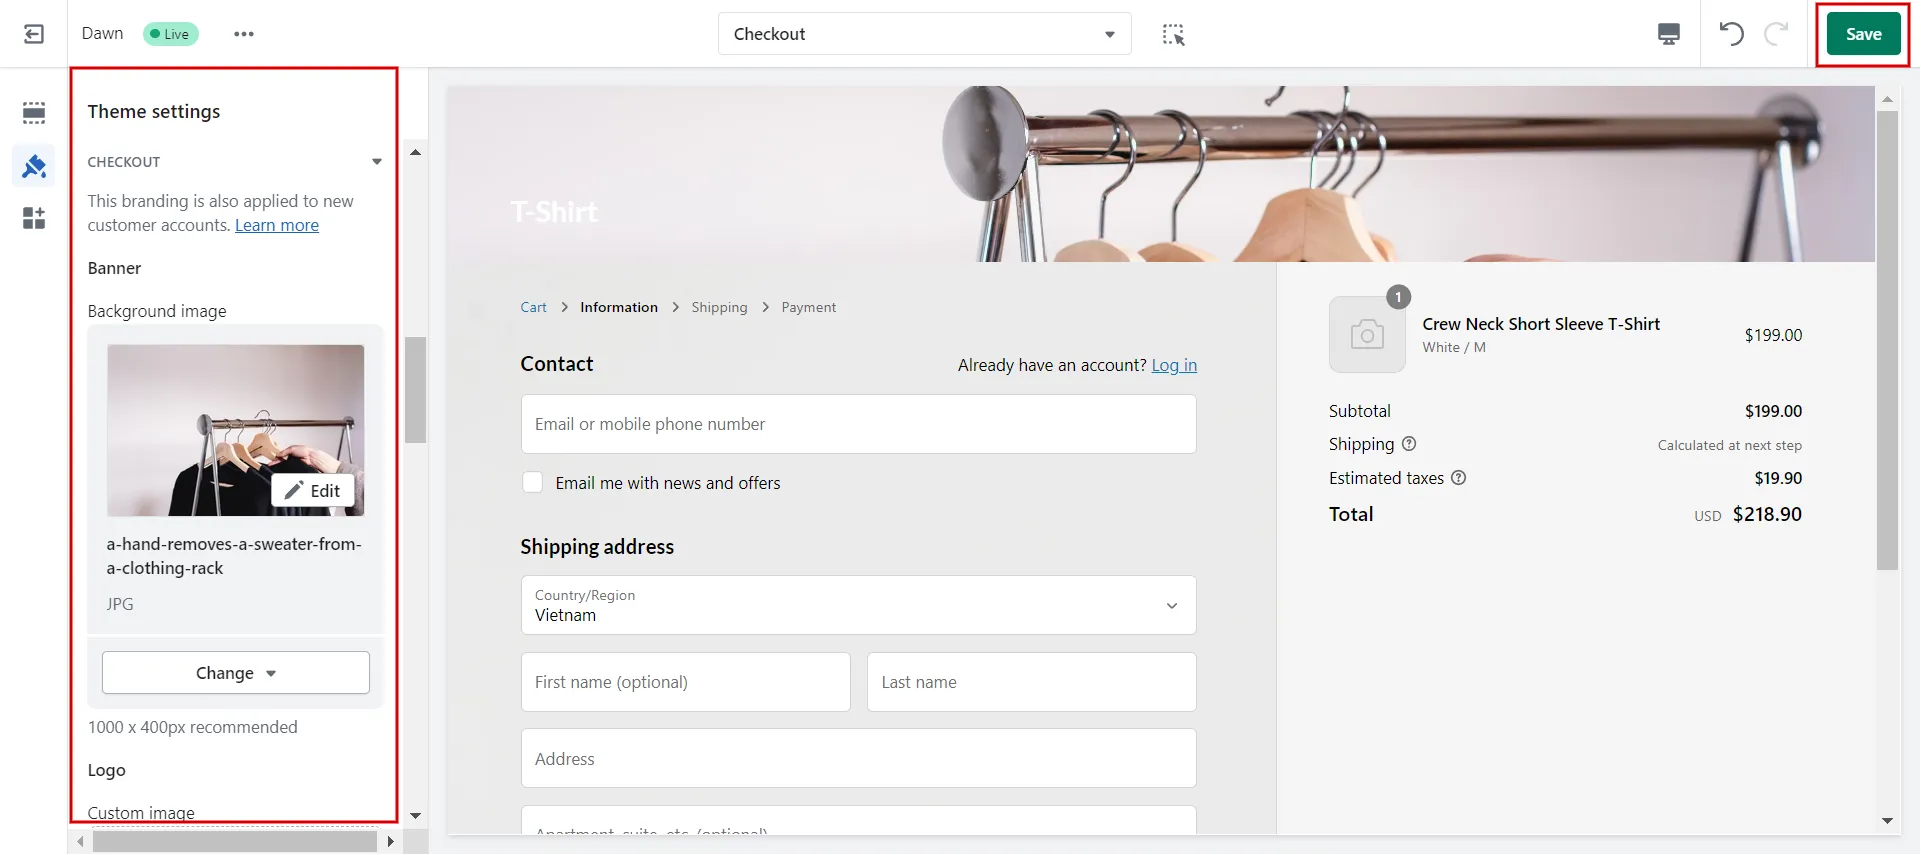
#4 Customize customer account page Shopify
- Step 1: Navigate Settings > Customer Accounts > Click Customize checkout in the Branding tab.
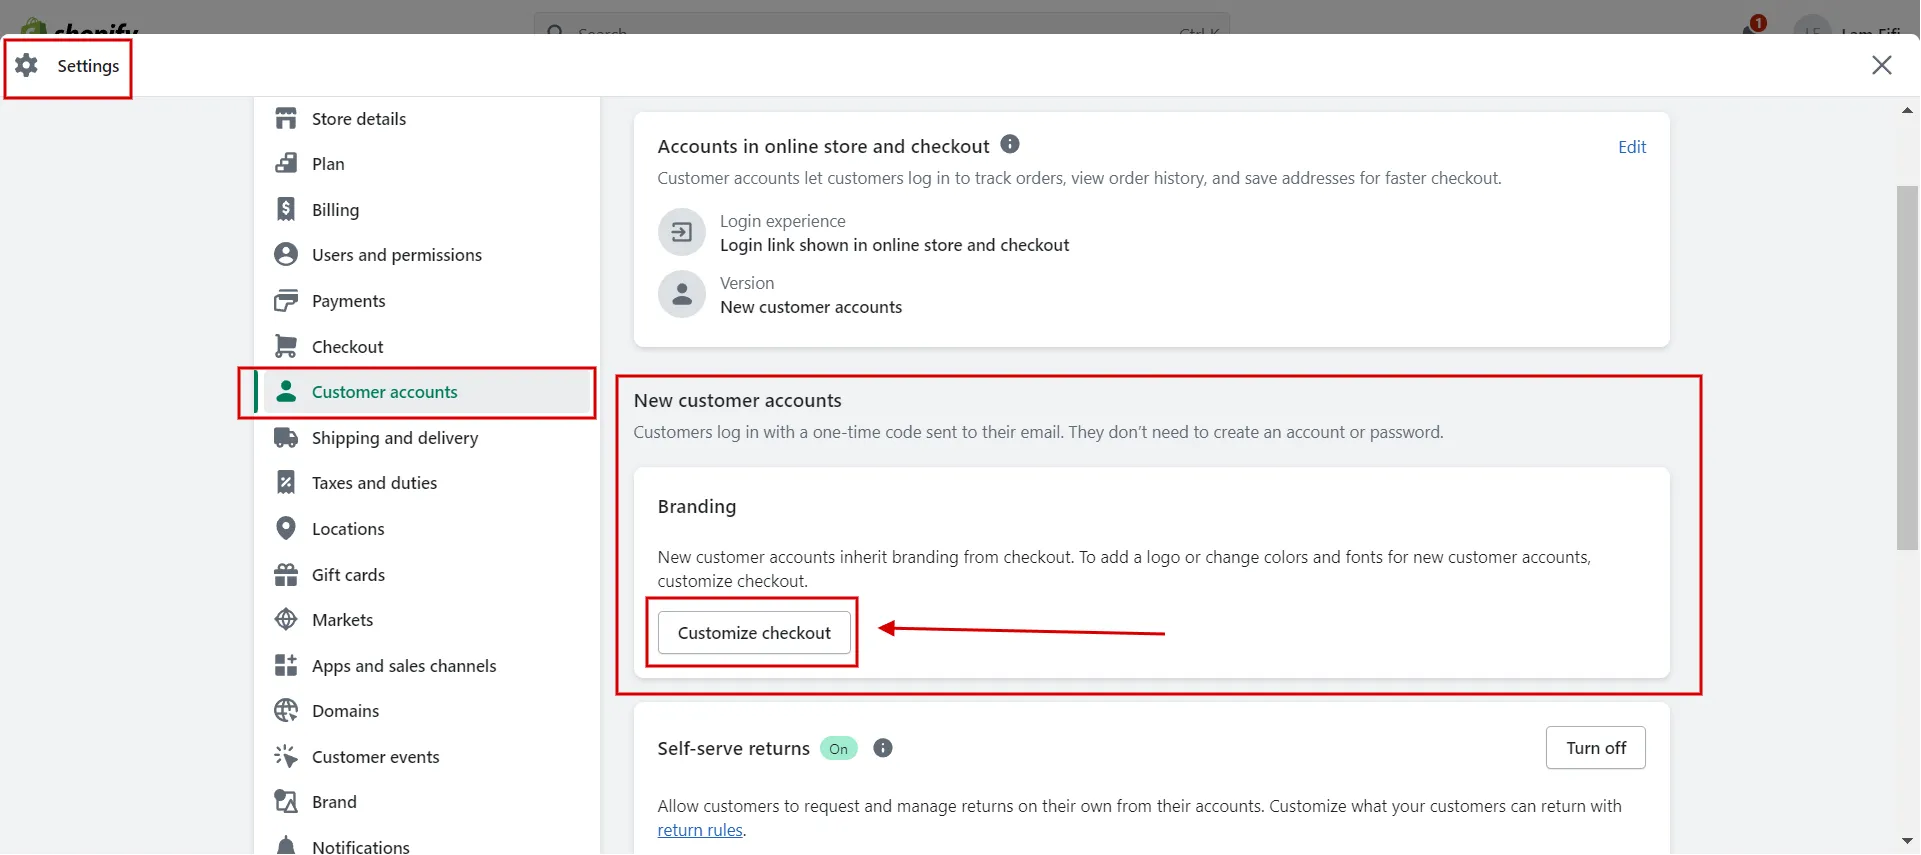
- Step 2: Make any changes in the checkout tab in theme settings and Save.
#5 Switch to a new customer account Shopify
Your store may encounter the following changes while converting to a new customer account Shopify:
- Apps or liquid changes introduced to the Shopify account pages of your theme will not be applied to new customer accounts. Your clients will no longer be able to access such customizations.
- Workflow triggers and automation based on classic customer accounts are not supported in the new ones.
- Except for the client registration page, all links to classic customer accounts will redirect to new ones.
You can revert to classic customer accounts to resume your previous experience.
How to Set Classic Customer Account Preferences on Shopify
When you select a classic customer account, you can hide the accounts, reset customers’ passwords, disable the account, etc.
#1 Hide classic customer accounts Shopify
Just like Shopify new customer accounts, you can hide links to classic customer accounts if you no longer want customers to go to them from your online store or checkout.
- Step 1: Access Settings > Customer accounts > Choose Edit in the Accounts in online store and checkout area.
- Step 2: Deselect the checkbox in the Login Experience section.
- Step 3: Save changes.
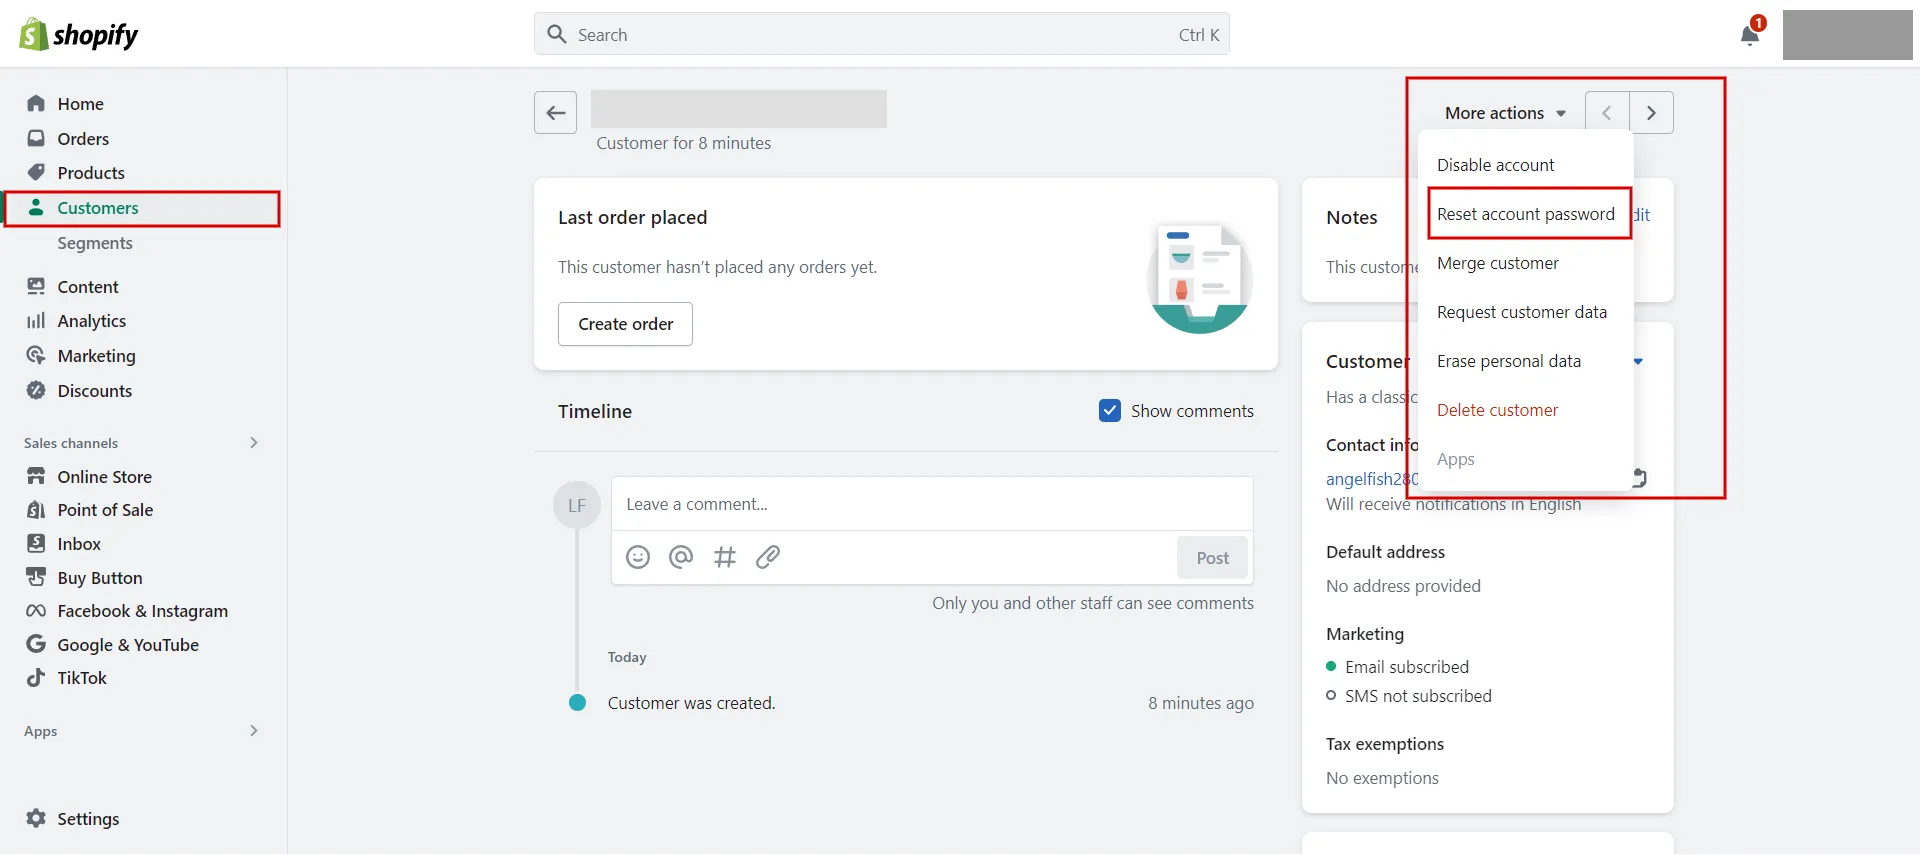
#2 Reset a customer’s password
Your clients can reset their own passwords from the login page, whereas from the Shopify admin, you can also send customers a password reset email by following these steps:
- Step 1: Navigate Customers.
- Step 2: Select the customer to whom you wish to send a password reset email.
- Step 3: Click More Actions, then choose Reset account password.
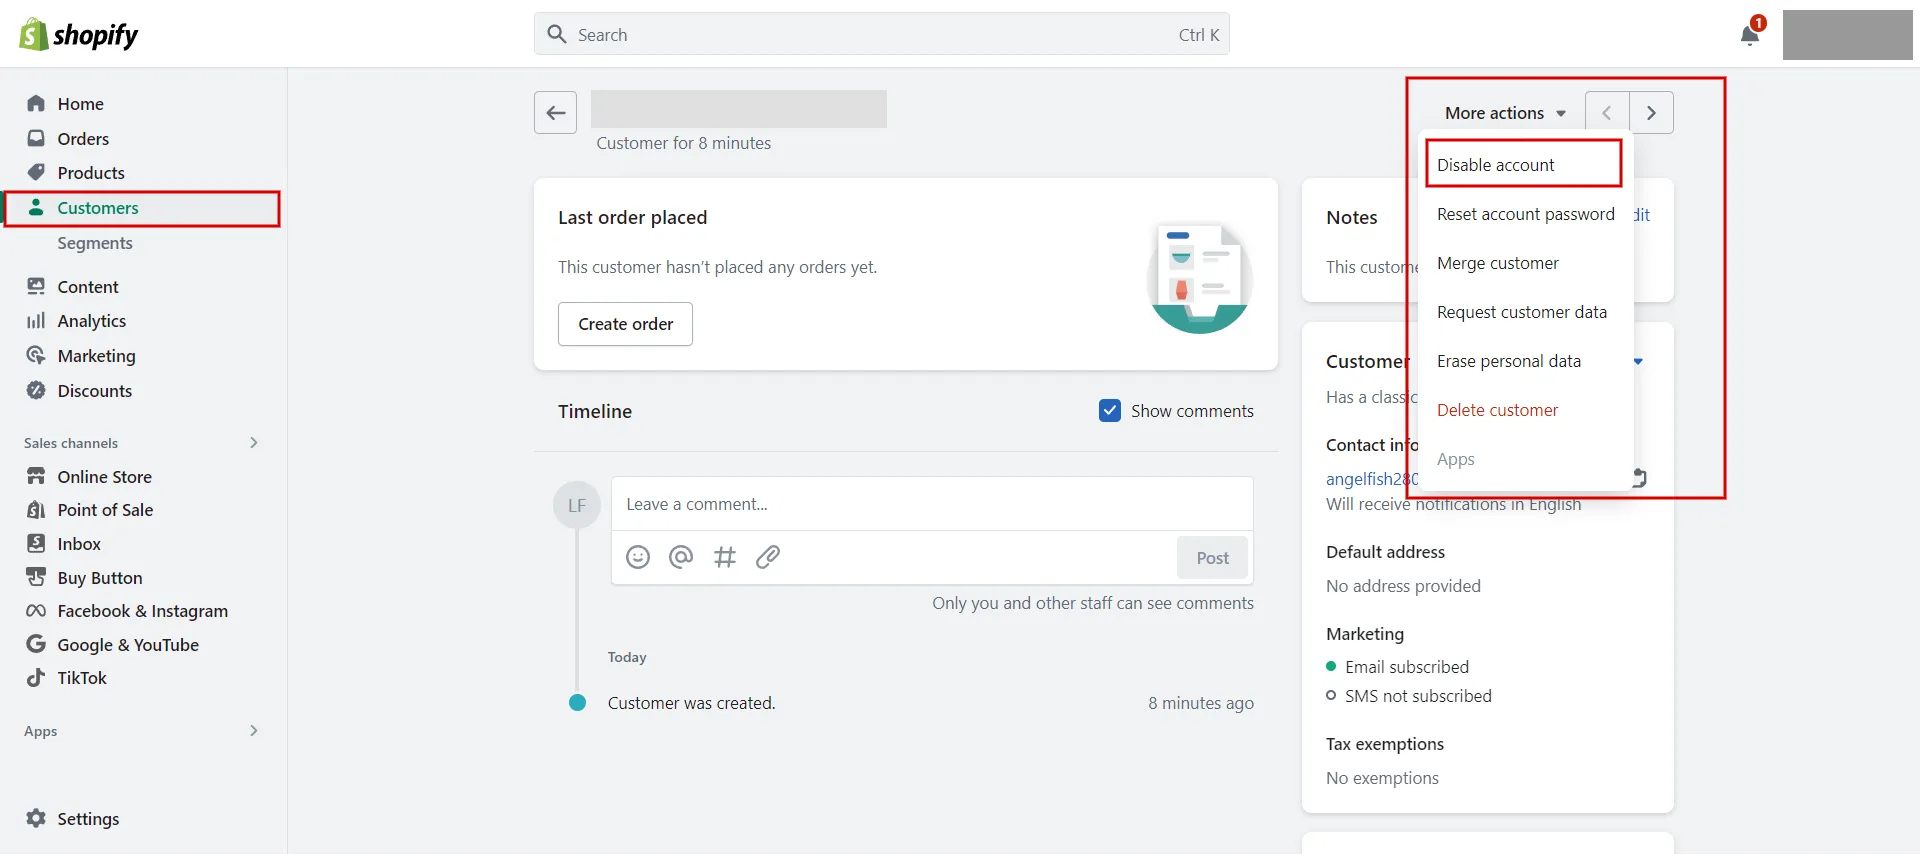
#3 Disable an individual customer account
You can deactivate an individual customer’s account. If your customer account settings require customers to log in before checkout and you deactivate a specific customer’s account, that customer will be unable to place an order with your business.
Follow the steps below to disable a classic customer account:
- Step 1: Navigate to Customers.
- Step 2: Click the name of the customer whose account you want to deactivate.
- Step 3: Click More Actions and choose Disable account.
#4 Send out individual account invitations
You can invite only existing customers to create an account. If you wish to invite a new client to create an account, you must first create this customer in your Shopify admin’s Customers section.
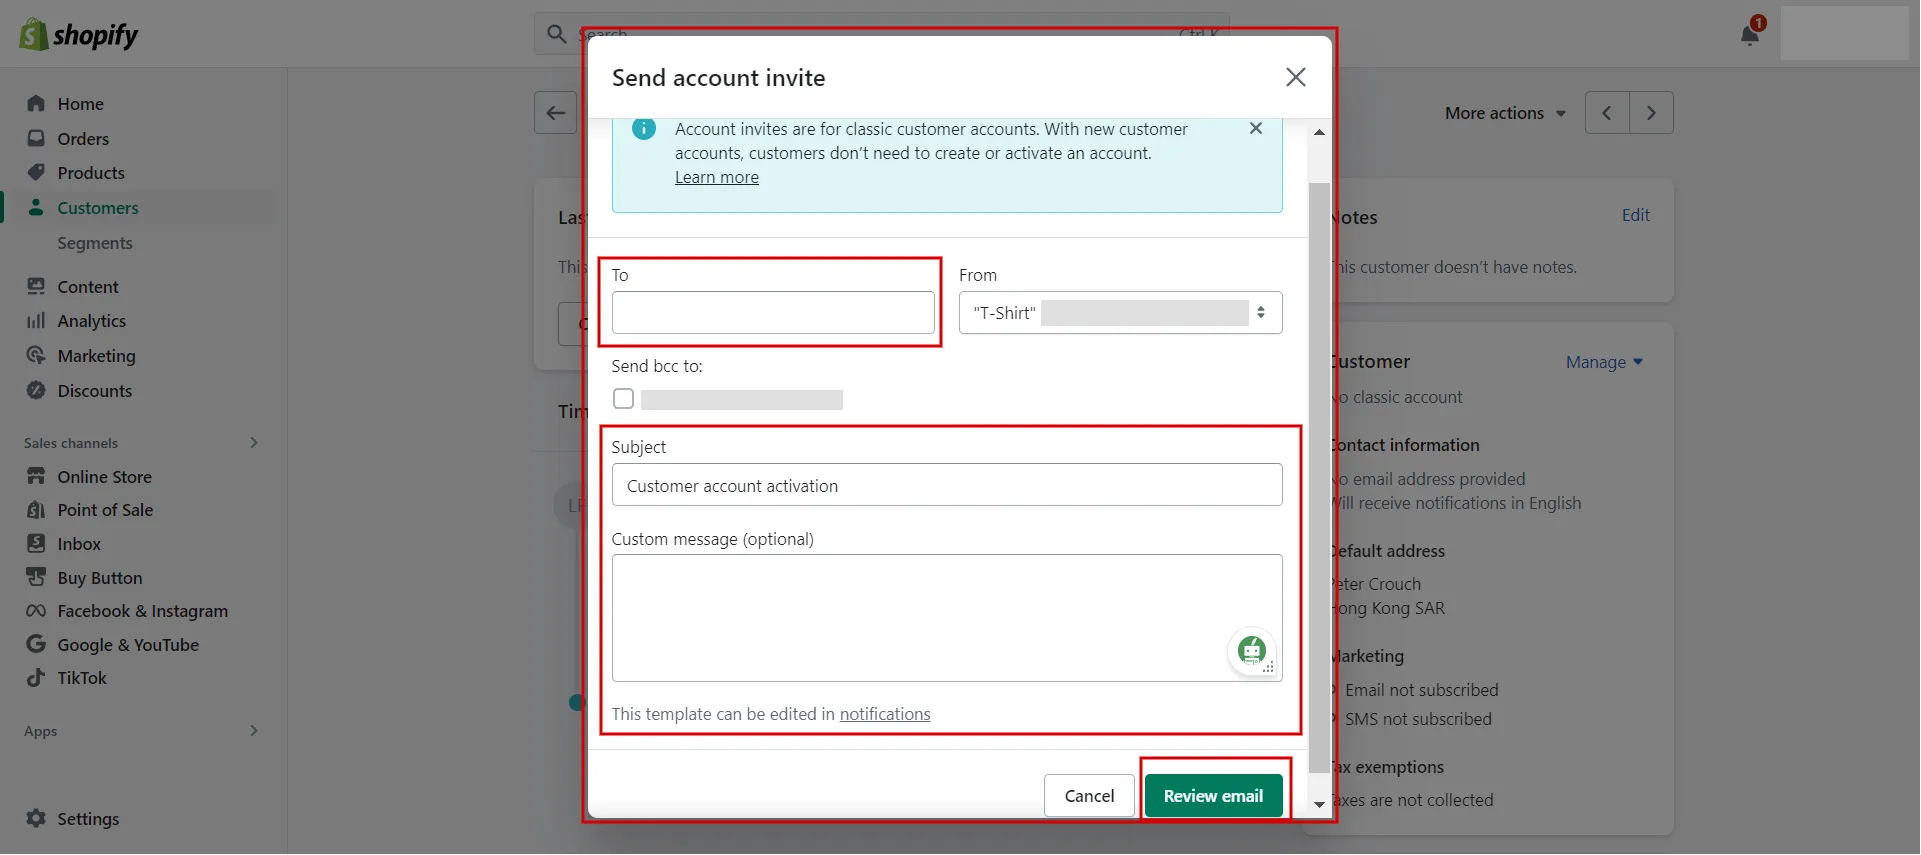
Here are our instructions for sending a Shopify customer account activation email:
- Step 1: Navigate Customers and select the client whose name you want to invite.
- Step 2: Select More Actions drop-down menu and choose Send account invite.
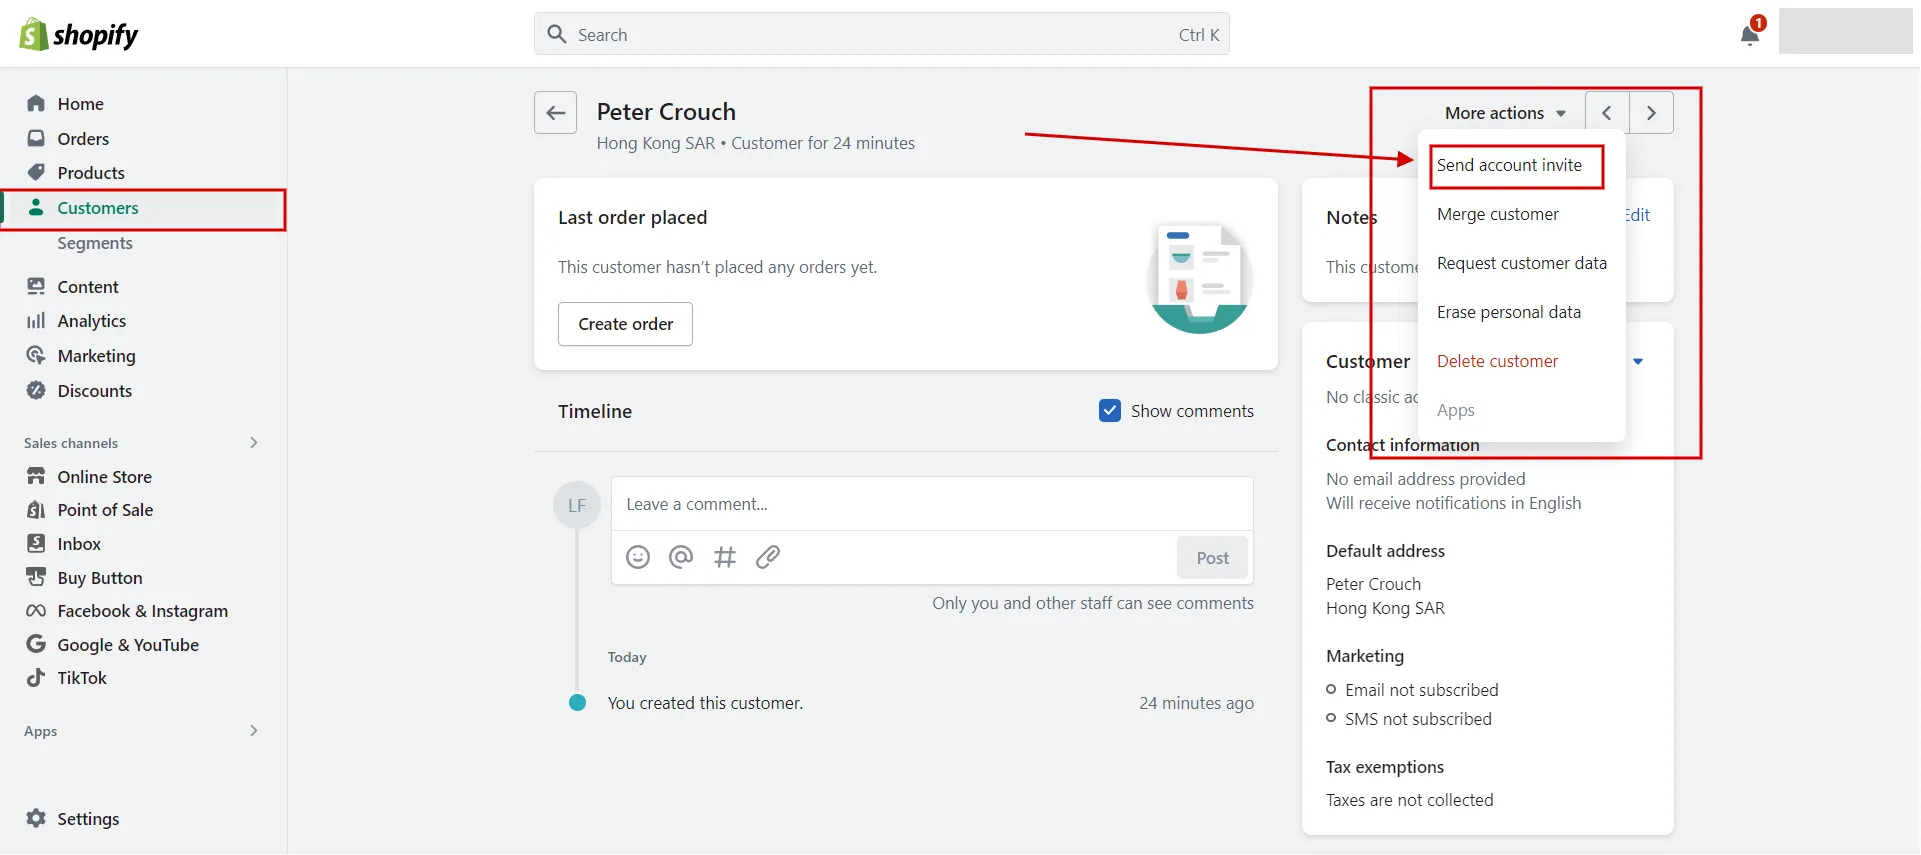
- Step 3: Edit the information in the Subject field if desired.
- Step 4: Enter a message for your customer in the Custom message field. If you leave this field empty, the customer will receive the default message.
- Step 5: Click Review email, then choose Send notification.
If you want to send out client account invites in bulk, check for an app in the Shopify App Store called Bulk Account Invite Sender, which is only available on the Shopify Plus plan.
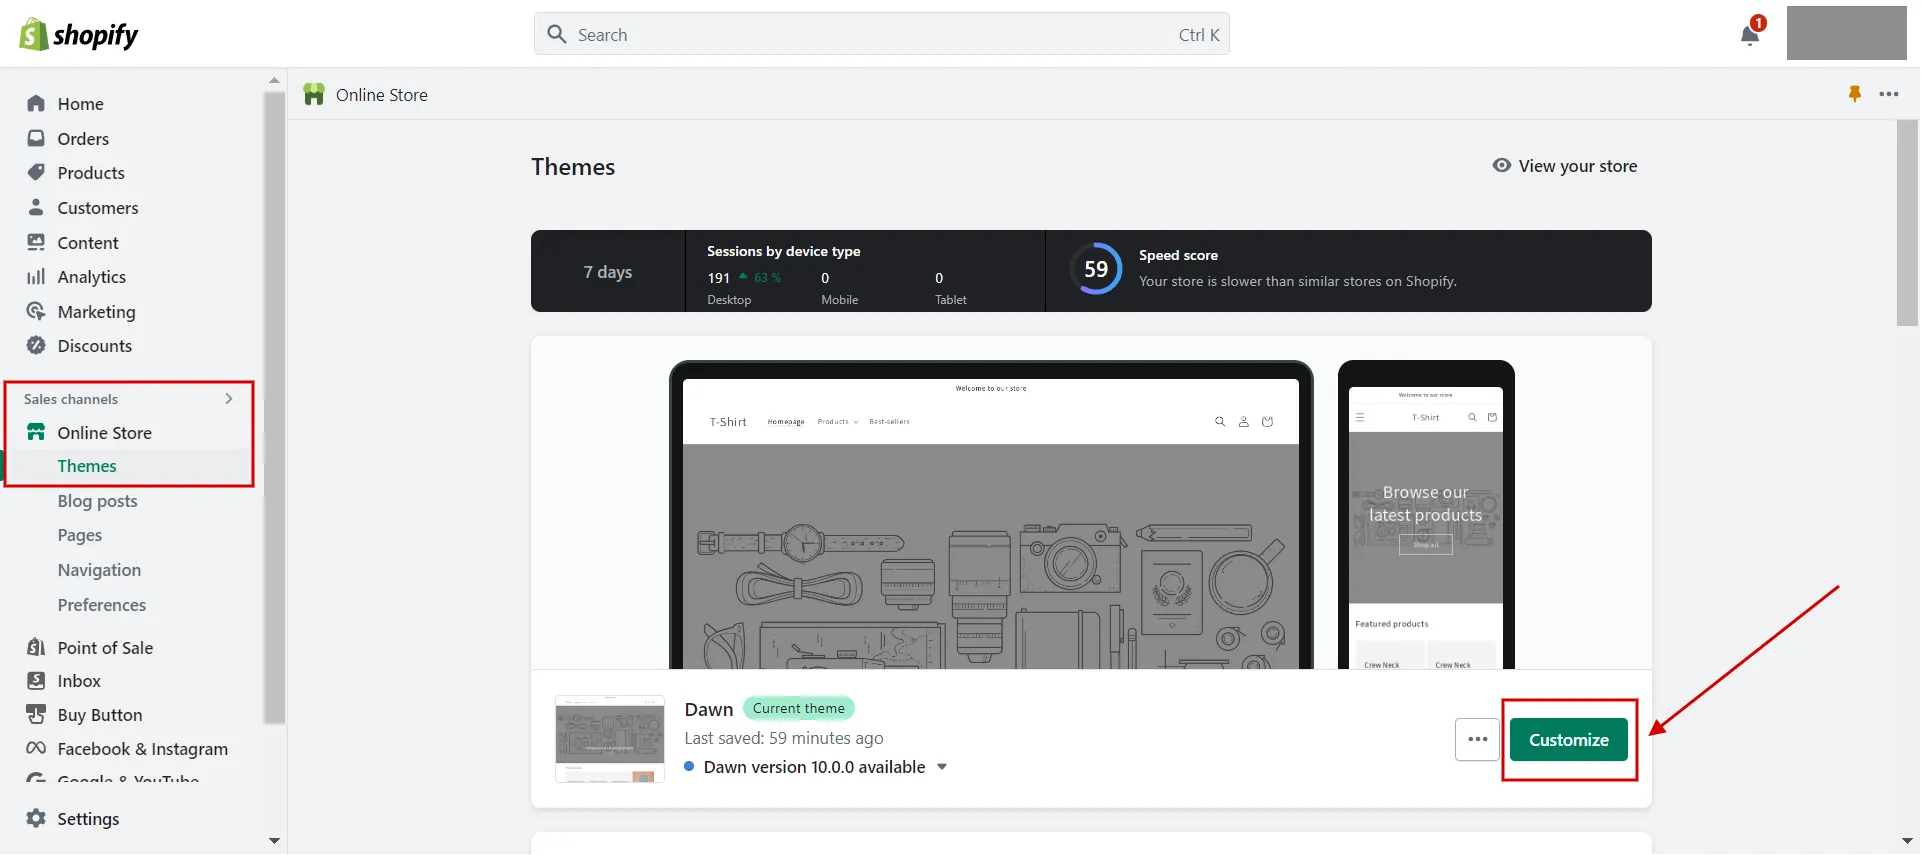
#5 Customize classic customer accounts branding
Using the theme editor, you may alter your classic customer accounts from your online store’s theme settings.
- Step 1: Access Online Store > Themes > Click Customize on the current theme.
- Step 2: Click Classic customer accounts in the header drop-down menu.
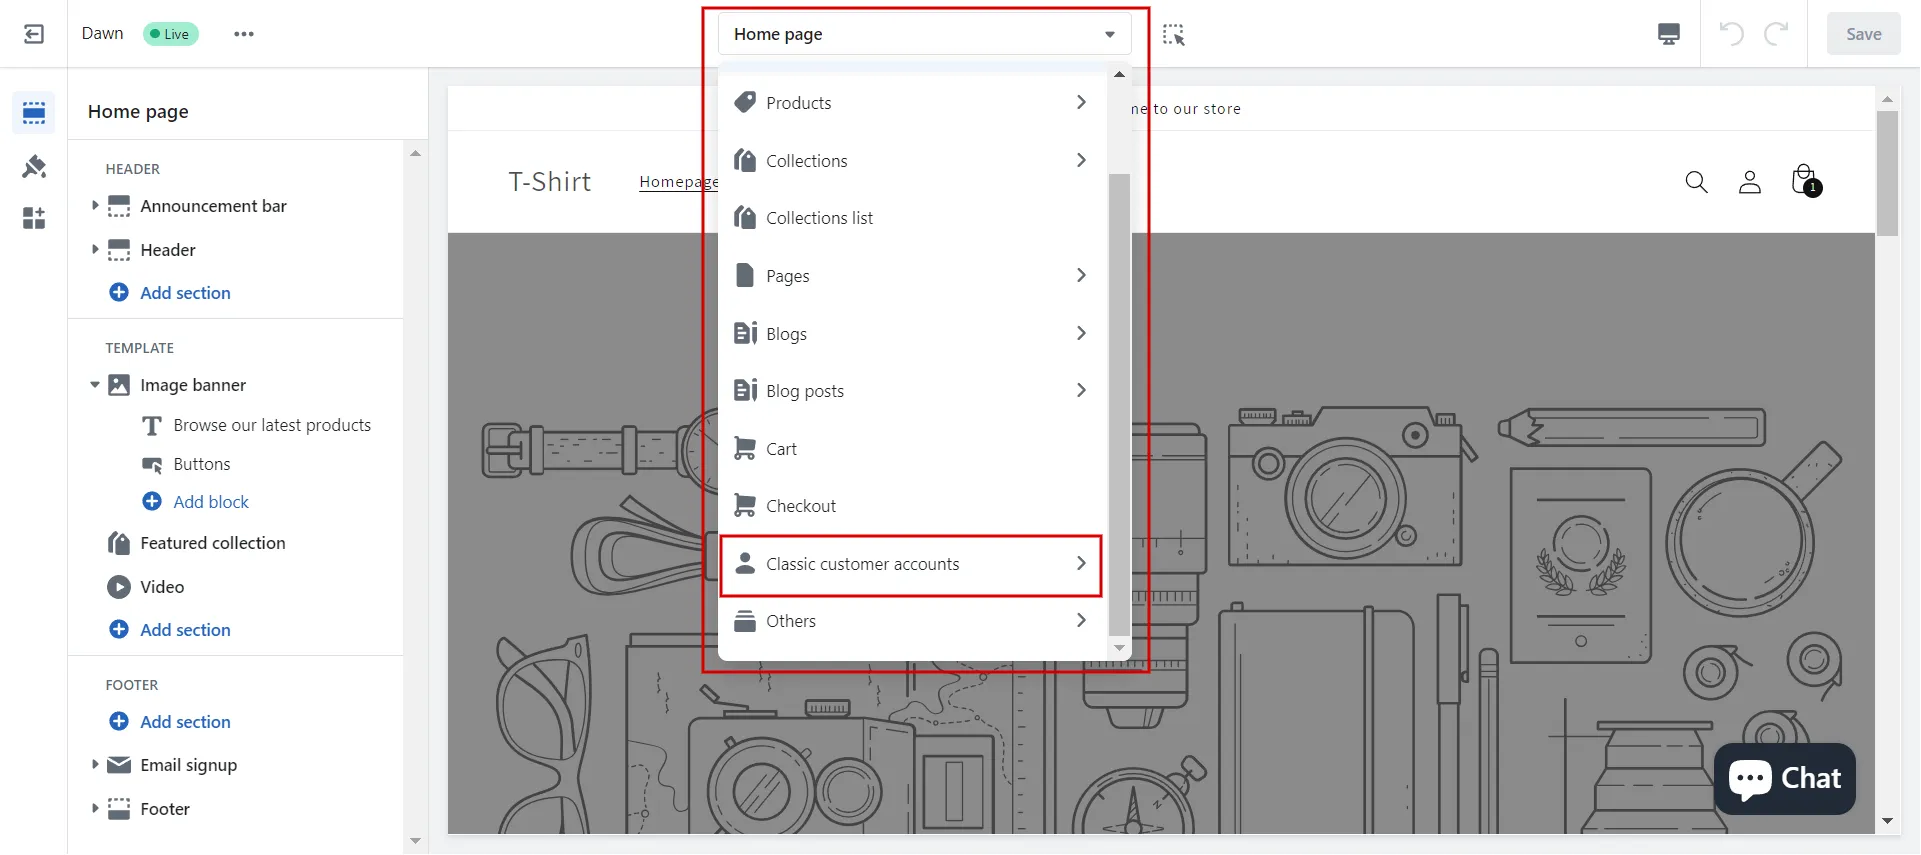
- Step 3: Continue to choose sub-pages such as Customer account, customer activate account, customer addresses, etc.
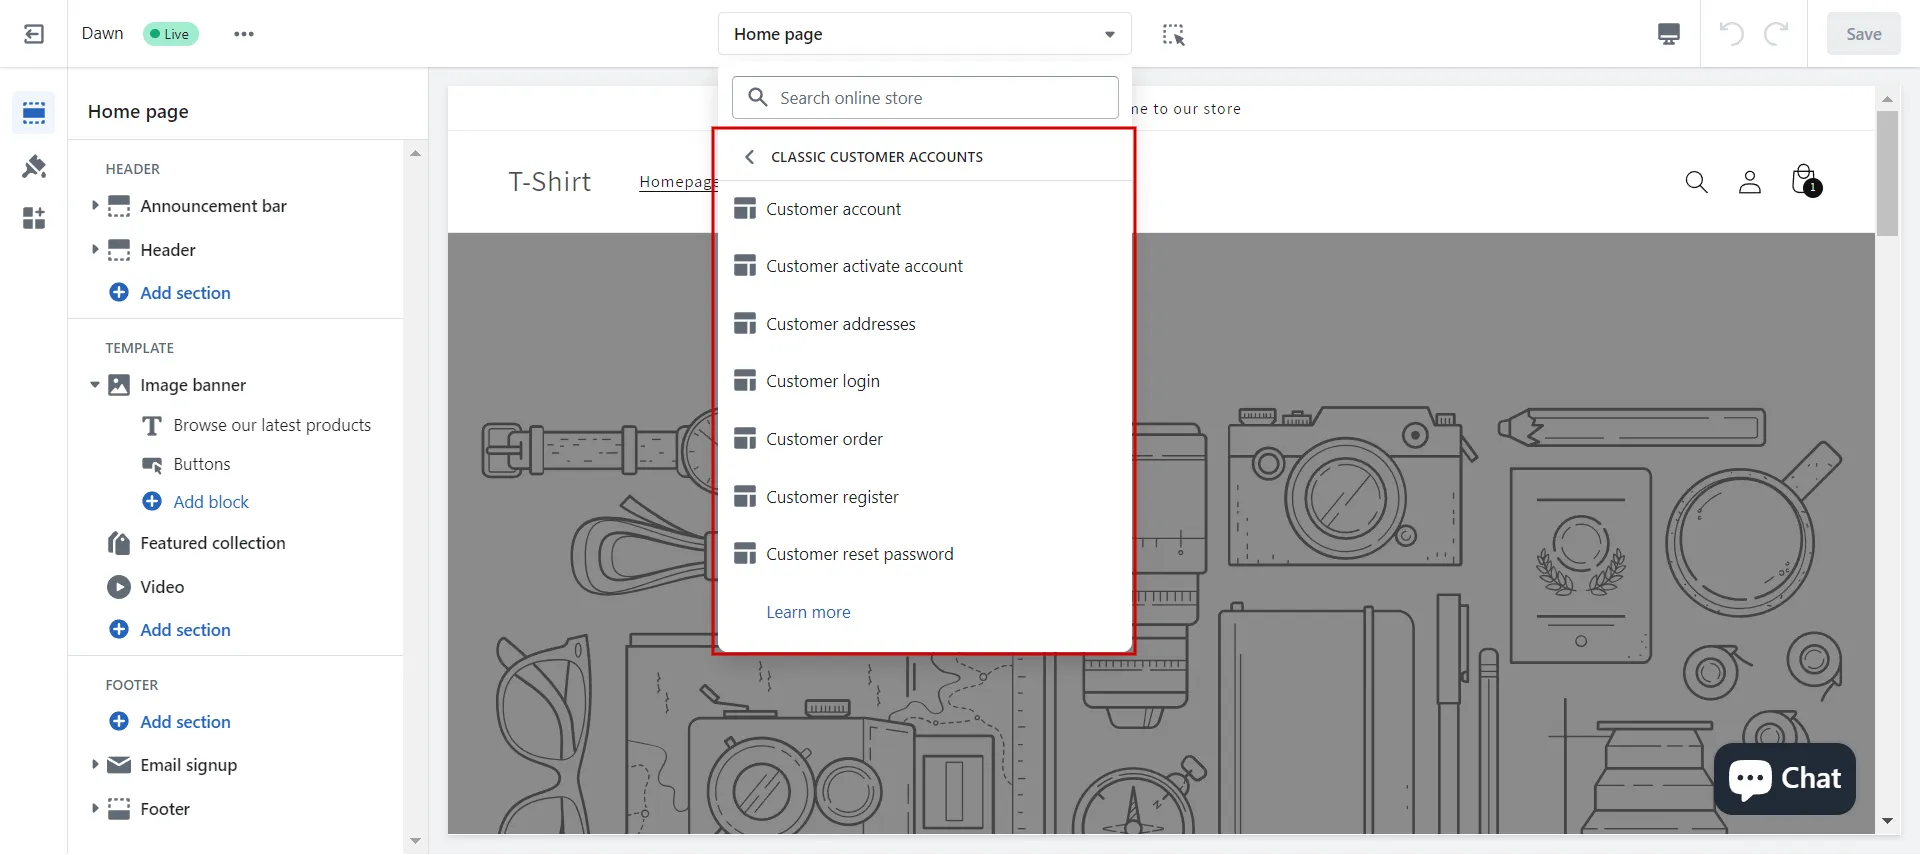
- Step 4: Make changes and Save.
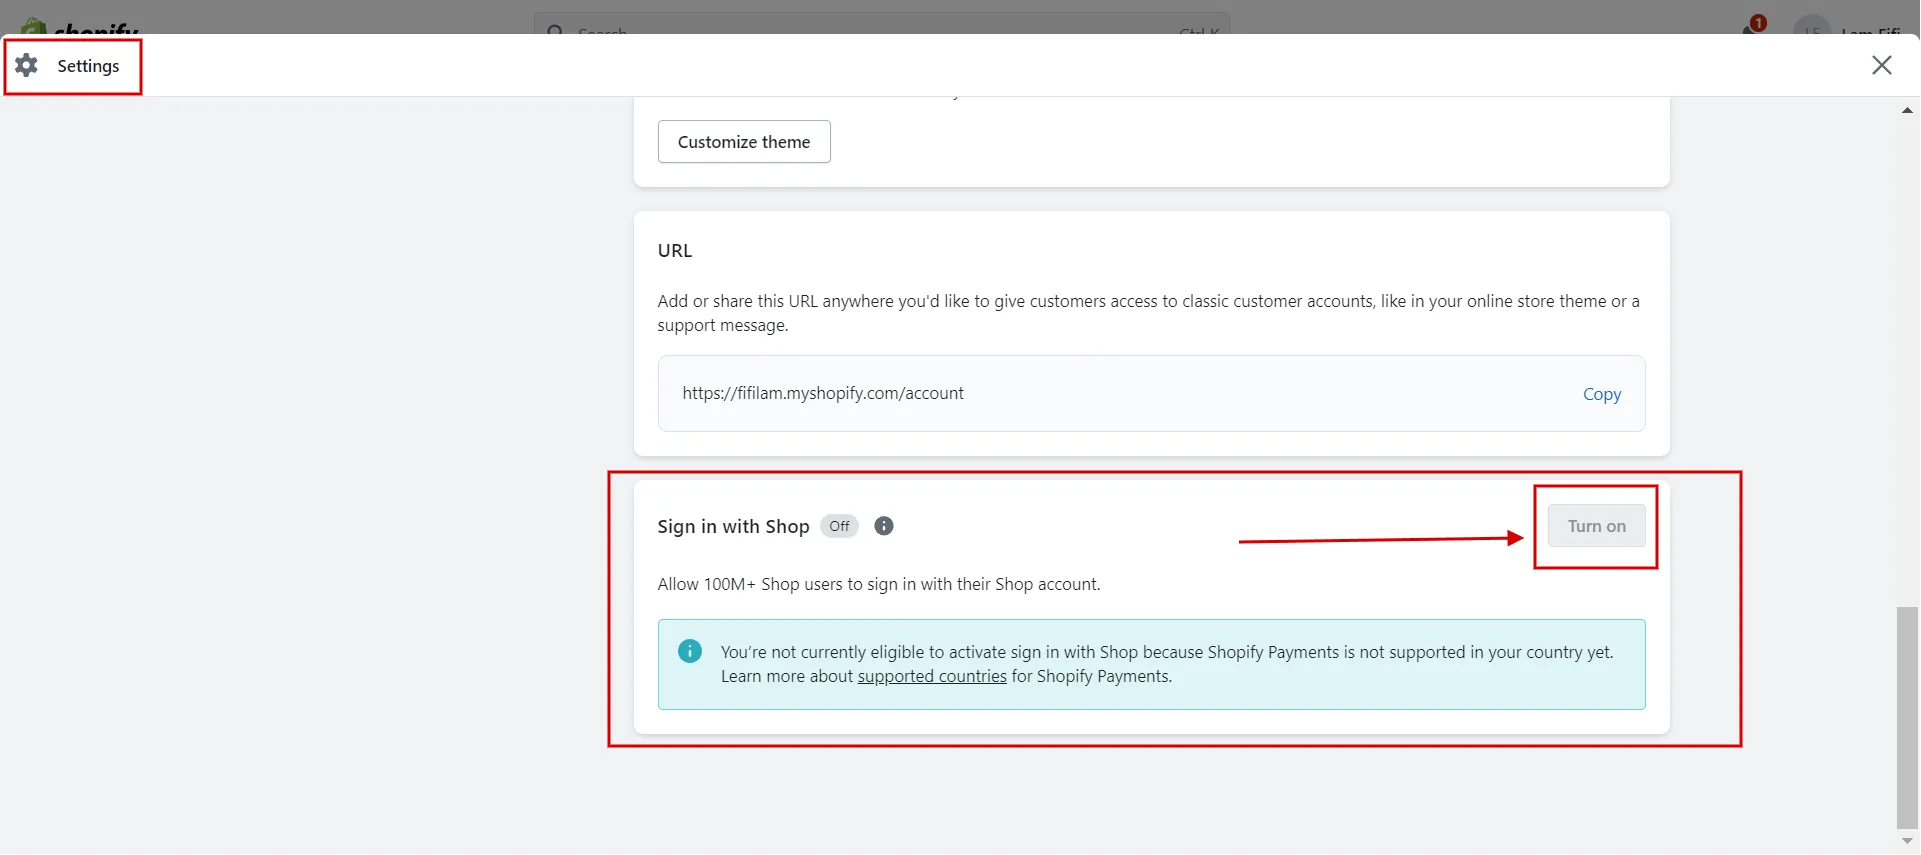
#6 Control sign-in with Shop
Both new and existing customers can sign in with Shop. If a new customer signs in with Shop when they visit your store for the first time, then a customer account is automatically created for them on your store.
- Step 1: Access Settings > Customer accounts.
- Step 2: In the Sign in with Shop section, do either:
- Click Turn on to enable sign-in with Shop.
- Click Turn off to remove sign-in with Shop.
Now you understand how to set customer account preferences on Shopify, both new and classic customer accounts.
Let’s walk through an in-depth Shopify Tutorial – 9 Complete Steps to Get Instant Sales!
Want to migrate to Shopify?
If you are intending to migrate to Shopify, LitExtension offers a great migration service that helps you transfer your data from the current eCommerce platform to a new one accurately and seamlessly with utmost security.
Shopify User Accounts – FAQs
[sp_easyaccordion id=”61274″]
Final Words
To summarize, our instructional article explains how to set customer account preferences on Shopify, including new and classic customer accounts. We hope our article is helpful to you when setting up and managing Shopify customer accounts.
LitExtension, the #1 Shopping Cart Migration Expert will support you in finding the solution for your online store. Read further articles on the LitExtension blog and engage with our eCommerce community for more inspiring concepts.