Introduction
If you are looking for a free eCommerce platform that allows multi-store creation and management, OpenCart might be an optimal choice for you. In this article, LitExtension – #1 Shopping Cart Migration Expert will provide you with a comprehensive OpenCart installation guide to start your online business there.
After reading this post, you will get the ideas of:
- What is OpenCart and
- How to install OpenCart;
Overview
OpenCart is an open-source eCommerce solution for online merchants. It is currently the home for 409,261 websites worldwide, making OpenCart the 5th most used open-source solution on the entire Internet.
OpenCart has gained its unrivaled reputation for the ability to create and manage multi-store within one application.
Once you have an OpenCart software installed, it is possible to add a new store without having to repeat the installation process. Though all the stores in your system run independently, you can effectively manage your products and customers in one OpenCart Admin Panel.
Moreover, despite being an open-source solution, OpenCart is fairly easy to use even for store owners with little technical knowledge.
This platform provides a modern, intuitive, and user-friendly Admin Panel interface. Every element of your store, including products, customers, orders, and other eCommerce features will be laid out nicely.
Besides, OpenCart offers a large collection of additional extensions on its Marketplace. There are 13,000+ OpenCart plugins covering many aspects of your store management. These extensions will help you run your online business more efficiently.
Now that you have a brief overview of OpenCart, let’s get cracking with our detailed OpenCart installation guide with a few simple steps.
Step 1. Download OpenCart (version 3.0)
There are four main sources that you can get OpenCart software. You can choose to
- Clone the latest OpenCart version from GitHub;
- Download this software directly from the OpenCart website;
- Open your OpenCart store on AWS Marketplace. If you choose to install this platform on Amazon Web Service, you’ll need an Amazon Machine Image to perform the OpenCart installation.
- Use the Softaculous – an auto OpenCart installer. In this case, a third-party app will be used to install OpenCart and open your store.
However, in the scope of this article, we will only go through manual OpenCart installation with GitHub and direct installer from the OpenCart website.
Before delving into the installation process, let’s take a look at the minimum system requirements.
Luckily, unlike Shopware, OpenCart can run on every type of hardware, whether Windows or Linux-based. However, your device should meet these specifications to operate OpenCart smoothly and properly.
- Web Server (Apache suggested)
- PHP (at least 5.4)
- Curl enabled
- Database (MySQLi suggested)
1. GitHub version
This installation is for web developers or users with good technical skills. You can download OpenCart’s source code directly from GitHub or open it using GitHub Desktop (if you have one). Besides, you can get OpenCart faster with the command line through Terminal using GitHub CLI.
2. From OpenCart website
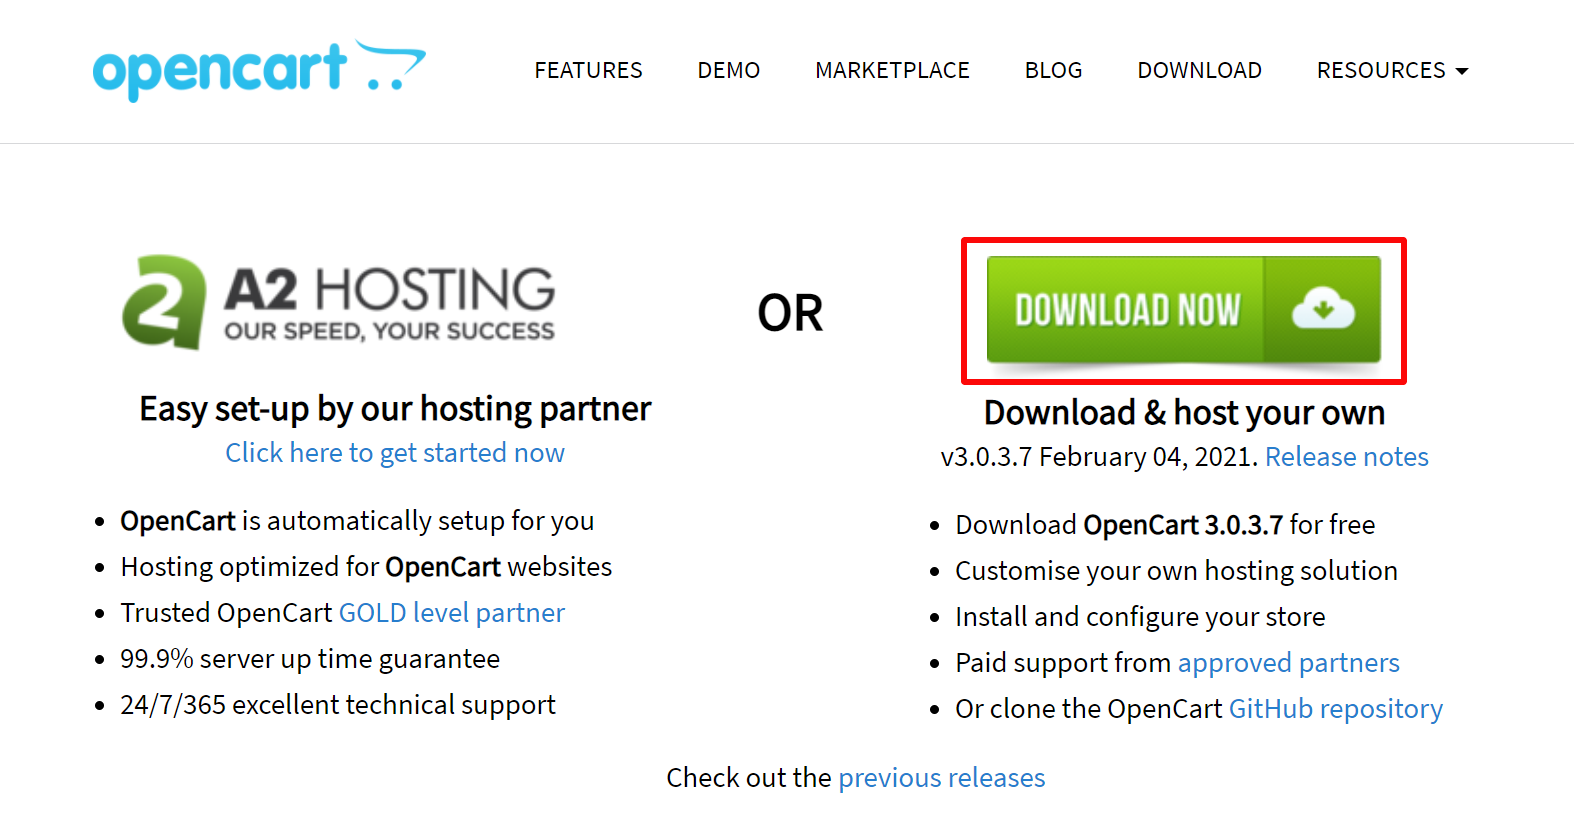
In case you don’t have the Git software and a command-line interface (CLI) available on your computer, here are the steps to download OpenCart directly from their website.
- First, go to the OpenCart website. You can also find the previous OpenCart version here.
- Navigate to the Download section.
- Select Download Now. You will receive a zip folder named “3.0.3.7-compiled.zip”
- Extract the compressed folder you’ve downloaded. Here, you will see three visible files, including the “license.txt”, “readme.txt”, and the “upload” folder. We will mention these files in the latter part of this article.
Step 2. Open your FTP solution
The File Transfer Protocol (FTP) is a “virtue bridge” between your computer and the Internet. FTP is used to transfer computer files to a web hosting provider to supply products and marketing information. There are a plethora of FTP solutions, but in this article, we will solely focus on FileZilla.
1. Configuring FTP Client
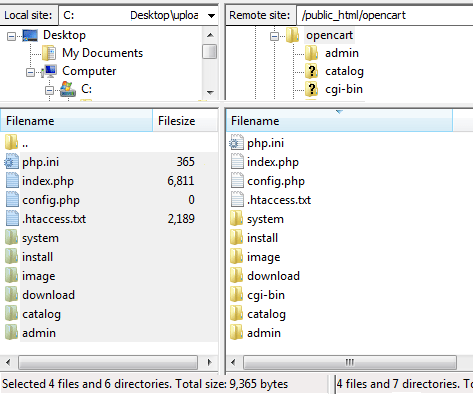
FileZilla’s interface is divided into two separate sections. Your computer’s file directory is on the left while the server’s directory is displayed on the right.

Now, let’s find the “3.0.3.7-compiled” folder that has been downloaded and uncompressed. Select the “upload” folder to open the drop-down list of files under it.
2. Connecting to the Site Manager
Before proceeding to this step, you need to know your website’s hostname, username, and password. It is advised to ask your hosting provider this information in case you are unclear about it.
Here are the steps you could follow to connect to the Site Manager:
- In the menu bar, select File > Site Manager.
- A pop-up window will appear on the screen. You need to fill in the required information as shown below.
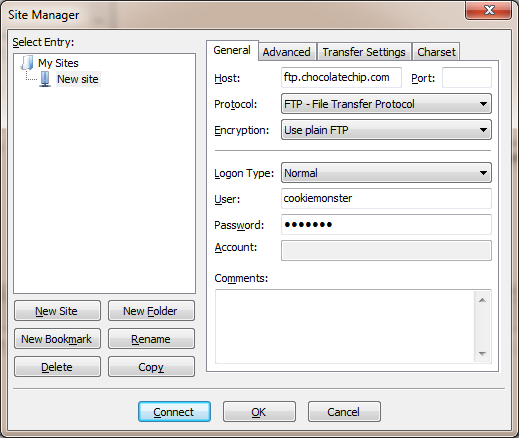
- Press Connect.
The connection process might take a few seconds to complete. After it’s done, the server’s file directory will appear on the right side of your screen.
Step 3. Upload OpenCart to your server
- In the “Remote site” section (the right side of your screen), open the folder containing the OpenCart store.
- Select all the files under the “upload” folder on the left side of FileZilla.
- Right-click them, then choose Upload
Please wait a few minutes for the process to finish. Once it’s done, the content in both your computer (Local site) and the server (Remote site) will be exactly the same.
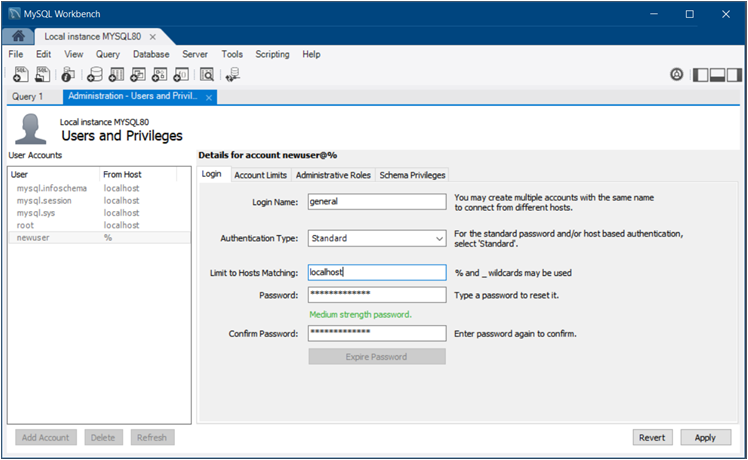
Step 4. Create a database
Before proceeding to install OpenCart, you need to create a database to store your business’s data.
Here are the simple steps to create a database for OpenCart using MySQL.
- Log in to your site’s control panel
- Locate MySQL Database then enter your database name and username/password
- Enable all the necessary permission for your store.
Step 5. Install OpenCart
Now that the database is successfully created, let’s move on to install the OpenCart store. First, you need to enter your site’s domain into a web browser. This will automatically open the auto-installer setup beginning with the licensing.
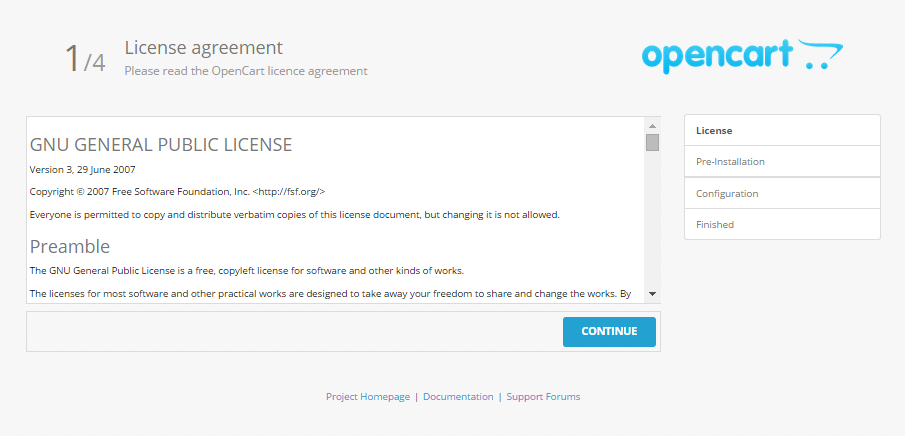
1. License
The very first step of your installation is licensing. After checking through all the terms, scroll down to the bottom of the page, then put a tick on “I agree to the license”. Click Continue to proceed to the next step.
2. Pre-Installation
The purpose of this step is to check whether your device and server are able to install OpenCart properly. If all the requirements are fulfilled, click Continue to move on to the configuration process below.
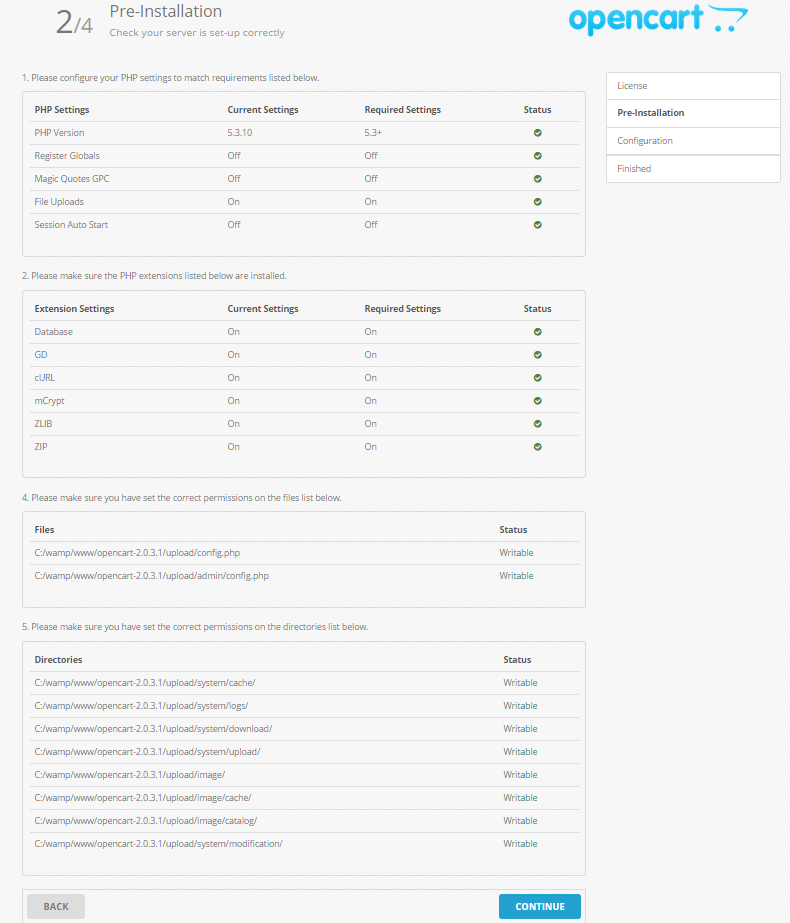
However, there might be some cases that you should configure your device again before proceeding.
- If there are red marks on section 1 or 2, you should double-check your server to ensure the proper installation of these settings.
- On the other hand, if red marks are on section 4 or 5, it signals a problem when uploading the files. In this case, please make sure to check your FTP solution to address and tackle the issue.
3. Configuration
In this step, you need to fill in the required information about your database connection details. Then, create a new username and password for administration to access your OpenCart store.
After finishing, select Continue and proceed to the final step of the installation.
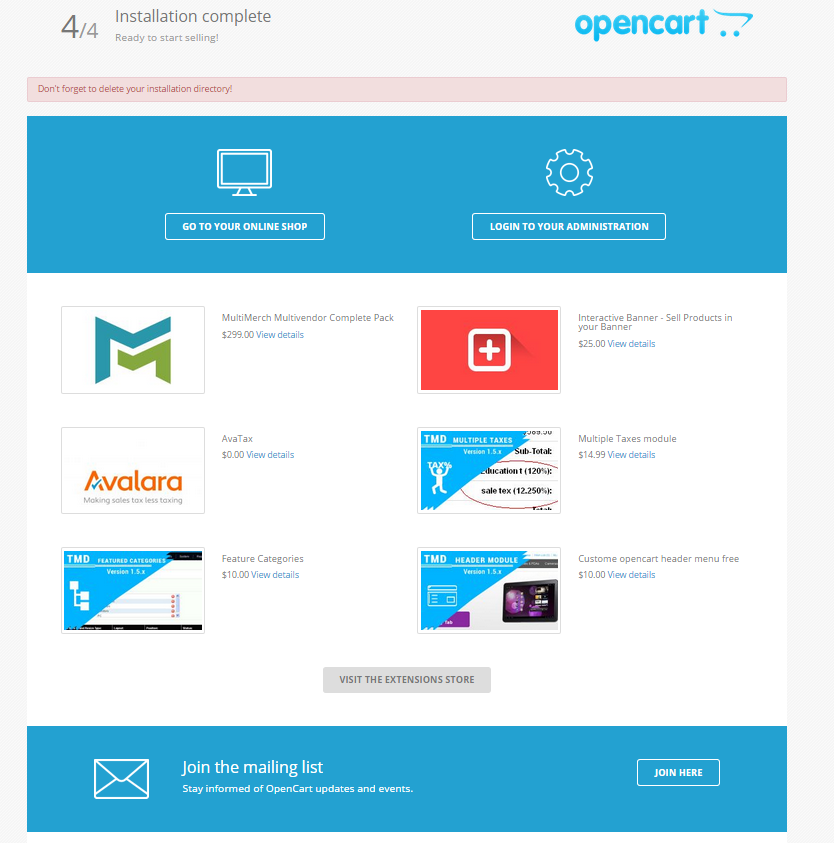
4. Complete the installation
Your OpenCart store has been installed successfully. You can start selling now or make further adjustments, such as selecting the best OpenCart themes for your store or adding extensions to enhance your store’s capabilities.
Now that the OpenCart installation is finished, there’s no need to keep the “install” folder in your remote site’s directory. It is better to eradicate this folder for security reasons.
Please follow these simple steps to delete this folder and complete the installation process.
- Open FileZilla.
- Locate the “install” folder in your “Remote site” area (on the right side of your screen).
- Right-click on that folder, then select Delete. Or simply press the Delete button on your keyboard.
Conclusion
OpenCart is a robust platform with tons of eCommerce features and supports to kickstart your online business. If you want to open your store, here is the simplest OpenCart installation guide for you to set up your store. We hope that this article has provided clear instructions to help you create your OpenCart store easily.
If you already had an online store on another platform and would like to migrate to OpenCart, consider using LitExtension automated tool. Proudly announced as OpenCart’s recommended solution, we will perform your OpenCart Migration project accurately and securely with no technical skills required. Furthermore, we also offer an All-in-one Migration Service. With this package, our Personal Assistant will handle your migration process to save your time and minimize manual efforts.
If you have any questions or inquiries, don’t hesitate to contact LitExtension via live chat, email, or Ticket System.
Last but not least, please join our Facebook Community to get more eCommerce tips and news.