According to several Magento reviews, some Magento issues are tricky to fix. While many problems might not seem like a big deal at first, they can grow into bigger troubles over time if you ignore them. Don’t sweat it! In this article, we will show noteworthy points to fix the problems and keep your Magento store running smoothly:
Let’s dive in without delay!
Need Help Migrating Your Online Store?
Our team of experts can safely transfer your business data, products, customers, and orders to unlock more growth on a more robust platform. Let us provide a customized migration for you!
20+ Magento Issues & How to Solve Them
#1. Configure Magento with a new domain
On top of the most common Magento issues, there are still many people struggling to configure Magento stores with new domains. If you want to switch your Magento website from www.yourcurrentdomain.com to www.anewdomain.com, follow these steps:
- Open PHPMyAdmin or MySQL Manager.
- In your database, locate the table called core_config_data. Inside this table, you’ll find entries for web/unsecure/base_url and web/secure/base_url. Update the old domain name to the new one.
- Click the Go button to save your changes.
That’s it! Your Magento website will now use the new domain.
#2. Speed up Magento 2 store
Next on the list of top Magento issues is your store’s slow speed, which may negatively affect your customers’ buying experience. To make your Magento 2 store run faster and more effectively, focus on these tips and consider incorporating insights from a Magento 2 review to optimize performance further.
- Keep Magento updated: Always install the latest Magento updates. They make your store run smoother, fix Magento issues, and protect your site better.
- Simplify JavaScript and CSS: These can slow things down. If you’re not using some features, they might still be working in the background. Combine your JavaScript and CSS files into one to make things neater and quicker.
- Turn on Varnish Cache: This tool helps your store load faster by remembering some of the data. So it doesn’t have to ask for it again and again.
- Turn on Magento Compilation: By doing so, your pages can load up to half as fast. Here’s how to do it:
- In your Magento Admin area, navigate to System > Tools, then click on Compilation.
- Press the button that says Run Compilation Process.
- Don’t forget to hit Save when you’re done.
#3. Enable the Magento contact form
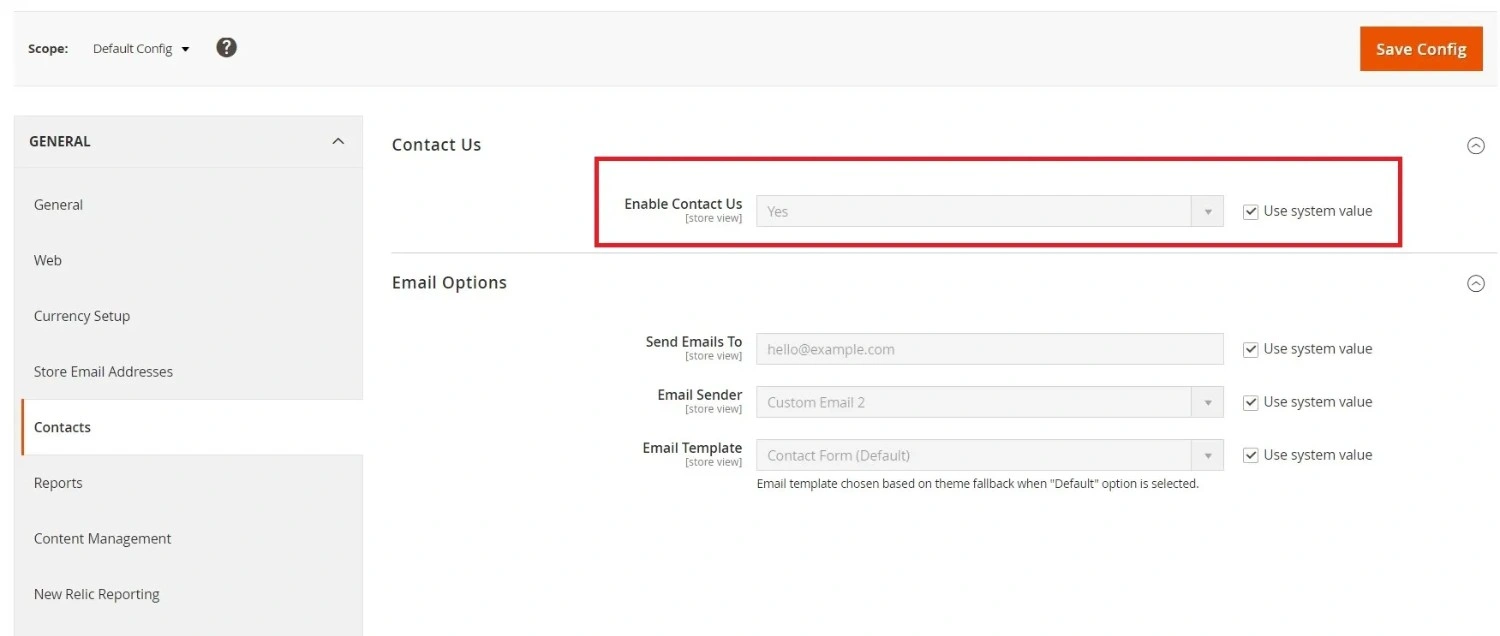
Just like a shop has a counter where customers can ask questions, your online store needs a contact form. It’s an easy way for your customers to reach out to you anytime. Follow the steps below to resolve this Magento issue in steps:
- Log in to your Magento Admin dashboard.
- Navigate to Store > Settings > Configuration.
- On the left panel, find General > Contact.
- Under Enable Contact Us, select Yes to enable or No to disable, then click Save.
- Switch to the Email Option, fill in the required information, and click Save Config.
Now, your Magento store has managed to solve one of the Magento 2.3.1 issues. Ready to connect with your customers?
#4. Set up sample data post Magento 2 installation
Sample data fills your store with fictitious merchandise, customers, and orders. It’s like a test run before you officially and effectively open for business. Here’s how you install sample data:
- After installing Magento 2, use a special command in your computer’s terminal or command prompt: sudo php bin/magento sampledata:deploy
- You might need to enter your password because the “sudo” part asks for administrative permissions.
- Now that you have the sample data, use another command: sudo php bin/magento setup:upgrade
This ensures that all the sample data, including the product catalog and demo customer accounts, is properly organized on your website. After running these commands, take a tour around your Magento 2 store. It’s the right time to browse as if you were a customer, explore product pages, and place test orders— which helps you a lot in enhancing your customer buying experience.
#5. Enable Magento developer mode
When you’re working on your Magento store—whether upgrading, maintaining, or adding new features—you want to make sure everything runs smoothly. To avoid common Magento issues like interruptions and keep your customers informed, it’s advisable to switch your Magento 2 store to Developer Mode. Enter the command below into your terminal or command prompt: bin/magento deploy:mode:set developer.
And ta-da, your Magento store is now ready for development!
#6. Create 301 redirects
Implementing 301 redirects in Magento 2 is essential for maintaining a user-friendly website and preserving your SEO initiatives. Think of it like leaving a forwarding address when you move homes—301 redirects tell everyone where your pages have moved to, keeping your website organized and accessible.
Have yet to figure out how to solve this Magento issue? Follow the steps below, and you’ll be able to create 301 redirects easily:
- Using Magento’s built-in function:
- Log into your Magento 2 admin panel.
- In the sidebar, click on Marketing.
- Under Marketing, find SEO & Search, then click on URL Rewrites.
- Click Add URL Rewrite. You can create new URLs for different types of pages (products, categories, custom pages).
- Fill in the details: specify the old URL you’re redirecting from and the new URL you’re redirecting to. Click Save.
- Using the .htaccess File:
- Locate your .htaccess file (usually in the root directory of your Magento installation).
- Locate the section in the file beginning with <IfModule mod_rewrite.c>. This is where you can add your redirects.
- To redirect from an old URL to a new one, add a line like this: redirect 301 /oldpage.html /newpage.html. Substitute /oldpage.html with your specific old page’s URL and /newpage.html with the new URL.
- Save the file and test to ensure that the old URLs correctly redirect to the new ones.
#7. Fix “Access Denied” Magento issues
Sometimes, you might get the “Access Denied” message from your Magento store. It’s because the platform doesn’t recognize your permission to enter certain parts of the application. This issue typically arises due to two primary factors:
- You gave a new user the wrong job title;
- New add-ons need permission.
Below, we outline the solutions for each of these Magento issues:
When you gave the wrong job title
If you’ve just added a new person to your Magento Admin but accidentally gave them the wrong title, you’ll need to fix it.
- Go to System > Permissions > Users in your Magento account.
- Click on Users, then User Roles, and make sure the job titles and permissions are correct.
- Hit Save to keep the changes.
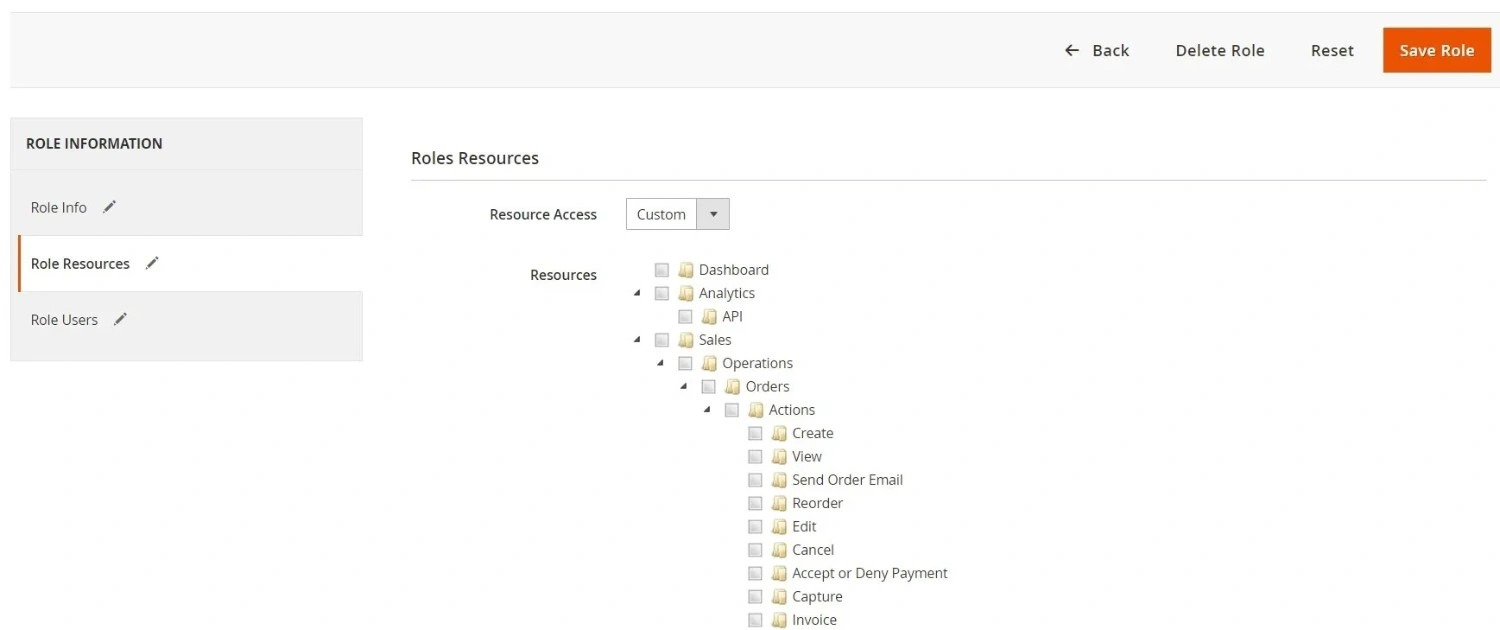
When new add-ons require permissions
When you add new features (extensions) to Magento, it doesn’t automatically know they’re allowed. This can cause an “Access Denied” error. To fix it, follow the steps below:
- In your Magento dashboard, head to System > Permissions > Roles.
- Click on Admin Roles, then Role Resources, and choose Set to All.
- Hit Save to save this setting.
And you’re done!
#8. Reset Magento 2 admin password
Forgetting your Magento admin password is also one of the most common Magento 2.3 issues. Worry not—you can reset it anytime! Here are the easy steps to reset your password:
- Open phpMyAdmin or MySQL Manager.
- Next, choose your Magento database and look for the admin_user table.
- From here, find your username and replace the old password with a new one in the password field.
- Make sure to use the MD5 function to encrypt your new password.
#9. Create Magento customer groups
Magento lets you sort customers into groups and manage them differently. For example, you can decide on different tax rates or labels for each group, such as ‘Regular,’ ‘Guest,’ or ‘Bulk Buyer.’ Here is how you can look up different groups:
- Go to the Admin sidebar, click on Customers, then Customer Groups.
- Use Filters to search for groups by ID numbers, group names, or tax types.
In case you want to make a new group, follow these steps:
- In the main menu, navigate to Customers > Customer Groups, and select Add New Customer Group.
- Next, type in the name of your new group.
- Pick the Tax Class for this group.
- Choose if there’s a site you don’t want this group to use.
- Finally, click Save Customer Group to finish.
#10. Set backend session timeout
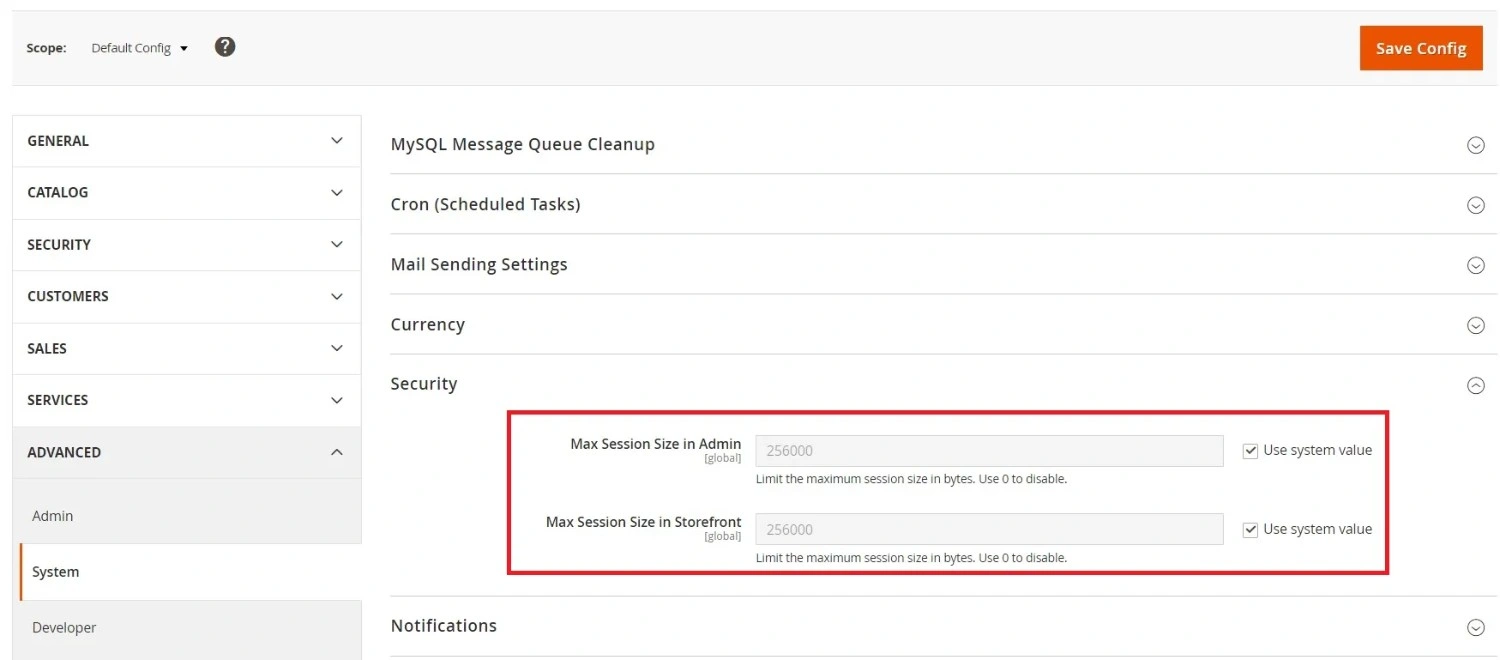
Magento 2 decides how long you can stay logged in before automatically logging you out. The default time is 215000 seconds. If you’re in the middle of something and don’t want to be logged out too soon, you can simply fix this Magento issue by changing the time. Below are some of the proper ways to deal with one of the most burdensome Magento issues. For Magento 2:
- Log into the admin panel and go to Stores > Settings > Configuration, then click on Advanced.
- After that, click on Admin > Security.
- From here, type in the new time limit in seconds at Max Session Size in Admin.
- Click Save Config to apply the changes.
For Magento 2.1 or newer:
- Log into the admin panel, go to Stores > Settings > Configuration, then click on Advanced.
- Click on Admin > Security.
- From here, enter the new time limit in seconds at Admin Session Lifetime.
- Finally, click Save to make it official.
And you’re all set! Now, you have more control over how long you can work without being interrupted by a timeout and other associated Magento problems.
#11. Enable search engine-friendly URLs in Magento
Moving forward with our list of the most common Magento issues, we will talk about unfriendly URLs. Indeed, they can lead to poor user experience, decreased click-through rates, and hinder SEO efforts. They may also result in broken links, difficulty in sharing content, and reduced brand recognition. So, how do we fix this Magento issue? By removing unnecessary words, you can create URLs that are better for both search engines and customers. Here’s how to enable SEO-friendly URLs in Magento:
- Log in to the Magento dashboard and navigate to Magento Admin > Configuration.
- Next, click on System > Configuration.
- From here, go to Access Search Engines Optimization and click on Web.
- In the Search Engines Optimization section, turn on Web Server Rewrites and set Use Web Server Rewrites to Yes.
- Click Save Config.
#12. Fix SEO-friendly Magento issues
Besides ensuring that your URLs are search-engine friendly, it’s also vital that your site is SEO-friendly! To do this, you should focus on two main points:
- Choose one main version for your website
Decide if you want your website to use HTTP or HTTPS. Stick to one, and make sure the other redirects to your chosen version. This helps avoid confusion for search engines and people visiting your site.
- Be careful with layered navigation
Layered navigation can make it hard for search engines to understand your site. It’s best not to let search engines index these pages. If you want to use layered navigation, pick an extension that helps turn these pages into SEO-friendly landing pages. Just make sure it works well with your version of Magento and fix any issues that come up.
#13. Magento redirect to open via www
If you want people to visit your Magento store with ‘www’ in the address (like http://www.yourdomain.com), here’s what you do:
- Find the .htaccess File. This file is in the main folder where Magento is installed on your website.
- Look for the line that says RewriteEngine in the file.
- Right after that line, put in this code:
RewriteCond %{HTTP_HOST} ^yourcurrentdomain.com$ [NC]
RewriteRule ^(.*)$ http://www.yourcurrentdomain.com/$1 [R=301,L]
- At this stage, you’ll have to save and update Magento settings:
- Save the changes to the .htaccess file.
- Log into your Magento Admin.
- Go to Stores > Configuration > Web.
- Click on the Unsecure tab.
- Change the Base URL from http://yourcurrentdomain.com to http://www.yourcurrentdomain.com.
- Click Save Config.
- Next, clear your website’s cache then check if the store now opens with ‘www’ using a new incognito window in your browser.
#14. Set up a blog for your Magento

Blogs connect with customers, share brand stories, and boost website traffic. But here’s the thing: Magento doesn’t come with a built-in blog feature, which is another Magento problem. So, you’ll need to add a special extension from the Magento Marketplace. Here are some suitable extensions you can consider:
- Magento Blog Extension by Amasty: This extension allows you to create a blog directly within your Magento store, offering a WYSIWYG editor for posts and various layout options. It also supports sharing posts on Facebook.
- Advanced Blog by Magesolution: It brings blogging to your e-commerce store without the need for an external platform. With it, you can share store updates, products, and promotions and gather customer feedback.
- Magento 2 Blog Extension by Magefan: This extension allows you to manage blog posts, categories, tags, and authors’ pages on your Magento store. It offers related product integration and supports manual or automatic placement of related products.
#15. Clear cache
When you make changes to settings or add new extensions, it’s essential to clear the cache. This ensures that your website uses fresh data instead of old files. Here’s how you can do it:
- Using the admin panel:
- Log in to your Magento Admin.
- Go to System > Cache Management.
- Click the Flush Static Files Cache button.
- Using the command line:
- Open your terminal.
- Navigate to your Magento 2 root directory.
- Run the following commands:
sudo php bin/magento cache:flush sudo php bin/magento cache:clean Remember:
Clearing the cache can resolve numerous problems with Magento 2.
#16. Reset the files/folder permissions
When you add new stuff to Magento, sometimes the security settings for files and folders need a reset. This keeps your data safe. Here’s how to set things right:
- For Files:
- Your files should only let the right people (you and your team) make changes.
- Use this command to fix file permissions: find. -type f -exec chmod 644 {} \;
- For folders:
- Your folders should also only let the right people in.
- Use this command to fix folder permissions: find. -type d -exec chmod 755 {} \;
- Reset everything:
If you need to start fresh, here’s what you do in the terminal:
cd <your Magento root directory> find. -type f -exec chmod 644 {} \;
# 644 permission for files find . -type d -exec chmod 755 {} \;
# 755 permission for folders chmod 644 ./app/etc/*.xml chown -R:<web server group> chmod u+x bin/magento
Do this, and you’ll keep your Magento site running smoothly and securely!
#17. Login as a Customer
Sometimes, customers need help with their orders or accounts. When these Magento issues happen, it’s super helpful if the store’s helpers (admins) can sign into customer accounts to lend a hand. This is especially true for customers who might not be too familiar with buying things online. Thus, the platform has a handy feature called Login as a Customer to solve the Magento issues. It’s there for both the free and paid versions of Magento. How to turn on Login as a Customer:
- From the Magento Admin area, navigate to Stores > Settings > Configuration.
- Next, open the Customers section and choose Login As a Customer.
- Flip the switch to turn on Enable Login as Customer.
- Hit Save Config to finish.
Now, you can jump into customer accounts to help out.
#18. Magento 2 product out-of-stock issue
It’s important for an online shop to let shoppers know if something’s not available. If you’re running a Magento 2 store and you’ve got items that are all sold out, you’ll want to make sure your customers see an “Out of Stock” message. Here is how to fix the Magento issues by turning on “Out of Stock” messages:
- Sign into your Magento Admin area.
- Next, click on Stores > Settings > Configuration > Catalog > Inventory, and finally Stock Options.
- Look for the section that says Display Out of Stock Products and choose Yes.
- Then, go back to Stores > Configuration > Catalog > Inventory again.
- Open the Product Stock Options and select No Backorder.
- Finally, click Save Config to make sure the changes are saved.
#19. Use Elasticsearch on catalog pages and search results
Elasticsearch makes your store’s search super fast, which is great for keeping everything running smoothly. If you’re using Magento version 2.4.x or newer, good news—Elasticsearch is already set up for you! If you’re using an older version of Magento:
- Go to Stores > Settings > Configuration in your Magento Admin.
- Next, click on Catalog > Catalog Search.
- Pick Elasticsearch as your search engine.
Just remember, if you’re using Magento 2.1, you won’t be able to choose Elasticsearch 5.0 or newer.
#20. Choose a suitable hosting solution
Magento is a tool for creating online stores. But how well your store works depends on where it’s hosted. So, pick the fastest hosting for Magento. When choosing hosting for Magento 2, consider what you need. Look for a service that’s easy to use, super fast, secure, and not too expensive. Most importantly, it should make your store run smoothly. So, go for a provider that gives you everything you need without breaking the bank.
#21. Indexing – Magento 2 issues
When you run a store and need to update prices often, it can slow down your website. To fix this, tell Magento to update its indexes on a schedule. Here are Magento’s two ways to update indexes:
- Update on Save: This updates indexes every time you save something, but it can make your website slower.
- Update by Schedule: It updates indexes automatically at a time you choose, like when your store isn’t busy.
You can also follow the steps below to check and change indexing modes:
- To see how your Magento is set up, type this in the command line: php bin/magento indexer:show-mode
- If you wish to change to Update by Schedule, type: php bin/magento indexer:set-mode schedule
- To change to Update on Save, type: php bin/magento indexer:set-mode realtime
If you want to update indexes from the admin panel, follow the below steps:
- Log into your Magento admin > System > Tools.
- From here, click on Index Management. Next, pick all indexers and choose Update by Schedule.
In case you wish to set up scheduled tasks in the admin panel, here’s how:
- From the admin panel, go to Store > Settings > Configuration.
- Next, navigate to Advanced > System > Cron (Scheduled Tasks).
- Finally, find the section for Cron configuration options for group:index and set it up as you wish.
Top Magento Alternatives To Consider in 2024
With its open-source nature, Magento can be complex and challenging to use, especially for non-tech merchants and small to medium-sized businesses. On the other hand, some of the best Magento alternatives like Shopify, WooCommerce, and BigCommerce offer user-friendly interfaces, robust features, and scalability. By opting for these options, you can stay away from some aforementioned Magento issues.
Shopify

Our analysis of eCommerce platforms positions Shopify as a premier solution currently available in the market. In contrast to Magento, Shopify offers a user-friendly interface that simplifies launching your online store in a few straightforward steps. As a fully managed shopping cart service, Shopify eliminates the need for technical expertise, providing a seamless experience for those new to eCommerce. Moreover, Shopify streamlines the process of initiating sales.
BigCommerce

BigCommerce stands out as an ideal choice for merchants seeking a robust yet user-friendly eCommerce platform that allows for effortless management and personalization. The platform’s intuitive drag-and-drop page builder empowers you to tailor your store’s aesthetics or delve into CSS and HTML for more complex theme modifications. Mirroring Magento’s approach, BigCommerce is a hosted solution that boasts an extensive array of native features and exceptional site performance. For an in-depth comparison between BigCommerce and Magento, check here.
WooCommerce
WooCommerce emerges as a leading open-source eCommerce platform, with over 5 million users worldwide (Source: BuiltWith). If your preference leans towards a self-hosted solution akin to Magento but with greater user-friendliness, WooCommerce presents itself as a judicious choice for your enterprise. This WordPress plugin enables the creation of a robust and scalable website with minimal effort. WooCommerce’s forte lies in its extensive customization options and compatibility with a myriad of extensions.
>> Read more: WooCommerce vs Magento Comparison: 9 Comprehensive Features Analyzed!
Magento Issues: FAQs
[sp_easyaccordion id=”72777″]
Final Words
Just like any other app, Magento has its problems. But don’t worry, you can fix them if you know how. We’ve written about the top 21 Magento issues and how to solve them so you can have a smooth online store.
Thinking about migrating to Magento 2 or moving your shop from Magento to a stronger online selling platform? LitExtension will help you switch without any Magento 2 migration issues. The result is a smooth, problem-free website that means happy customers, great feedback, and more sales for you. Just send an email, chat with us live, or set up a one-on-one call. Our support team is available and prepared to help you. Finally, don’t forget to check out the LitExtension blog and the Facebook community for the latest news and tips on running an online store!