Assume you have over a thousand products in your Shopify store and must organize them in menus and submenus. How to make a submenu in Shopify store? The more carefully these menus and submenus are classified, the easier it is for customers to find the products.
In this article, we – LitExtension show you how to make a submenu in Shopify and other relevant matters:
- What are Shopify submenus and their benefits?
- How to make a submenu in Shopify store?
- Pro tips for creating a Shopify drop-down menu quickly
- Best custom menu in Shopify apps
It sounds excellent. Here we go!
What Is a Submenu & Why Is It Important?
A submenu is a menu housed within another menu, similar to how a menu is accessed from a more extensive general menu. Shopify navigation has three menu types: drop-down, mega, and drawer.
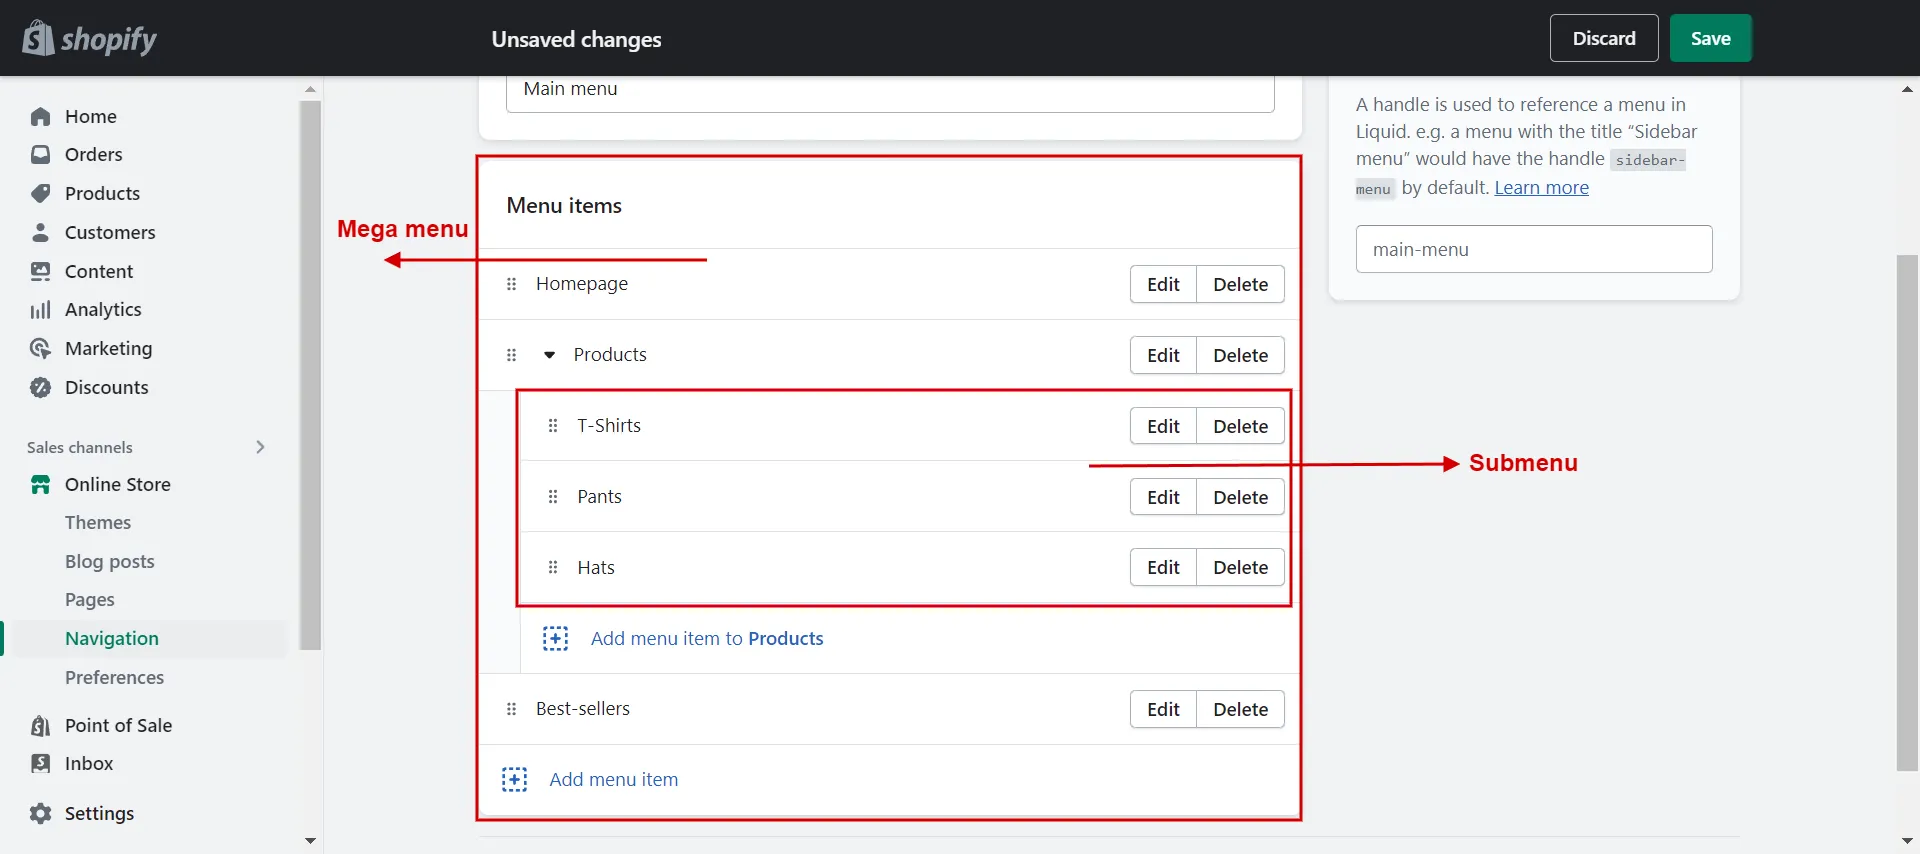
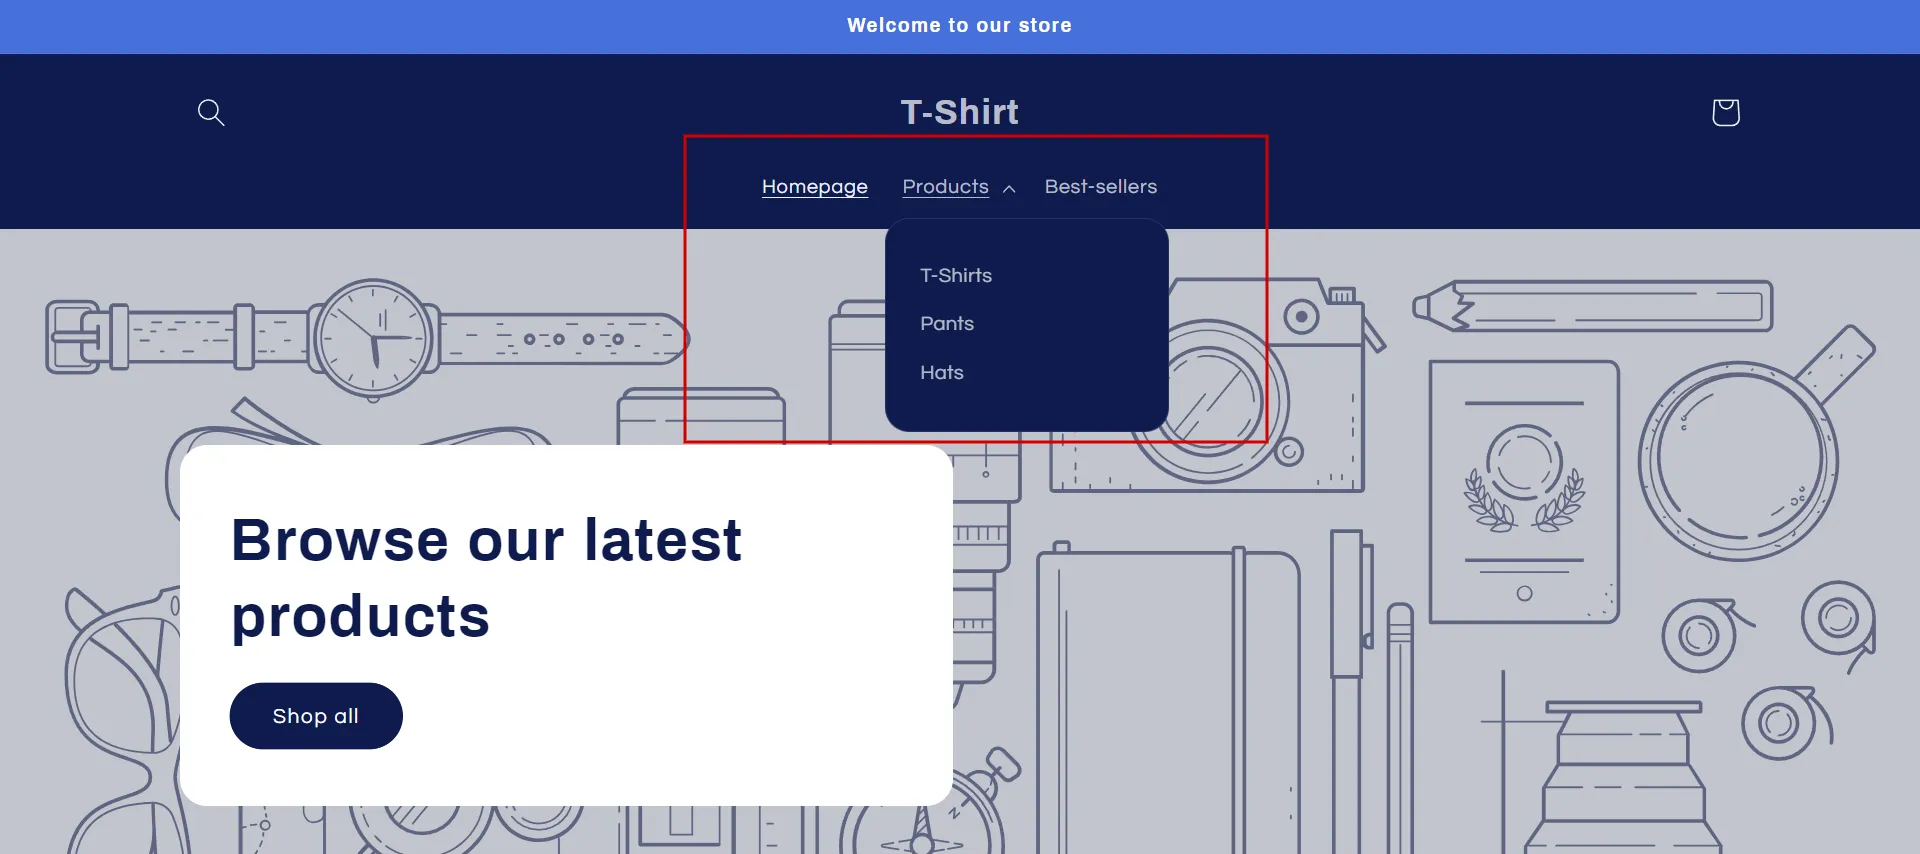
This is an example of a sub-menu on a website built with the Shopify theme.
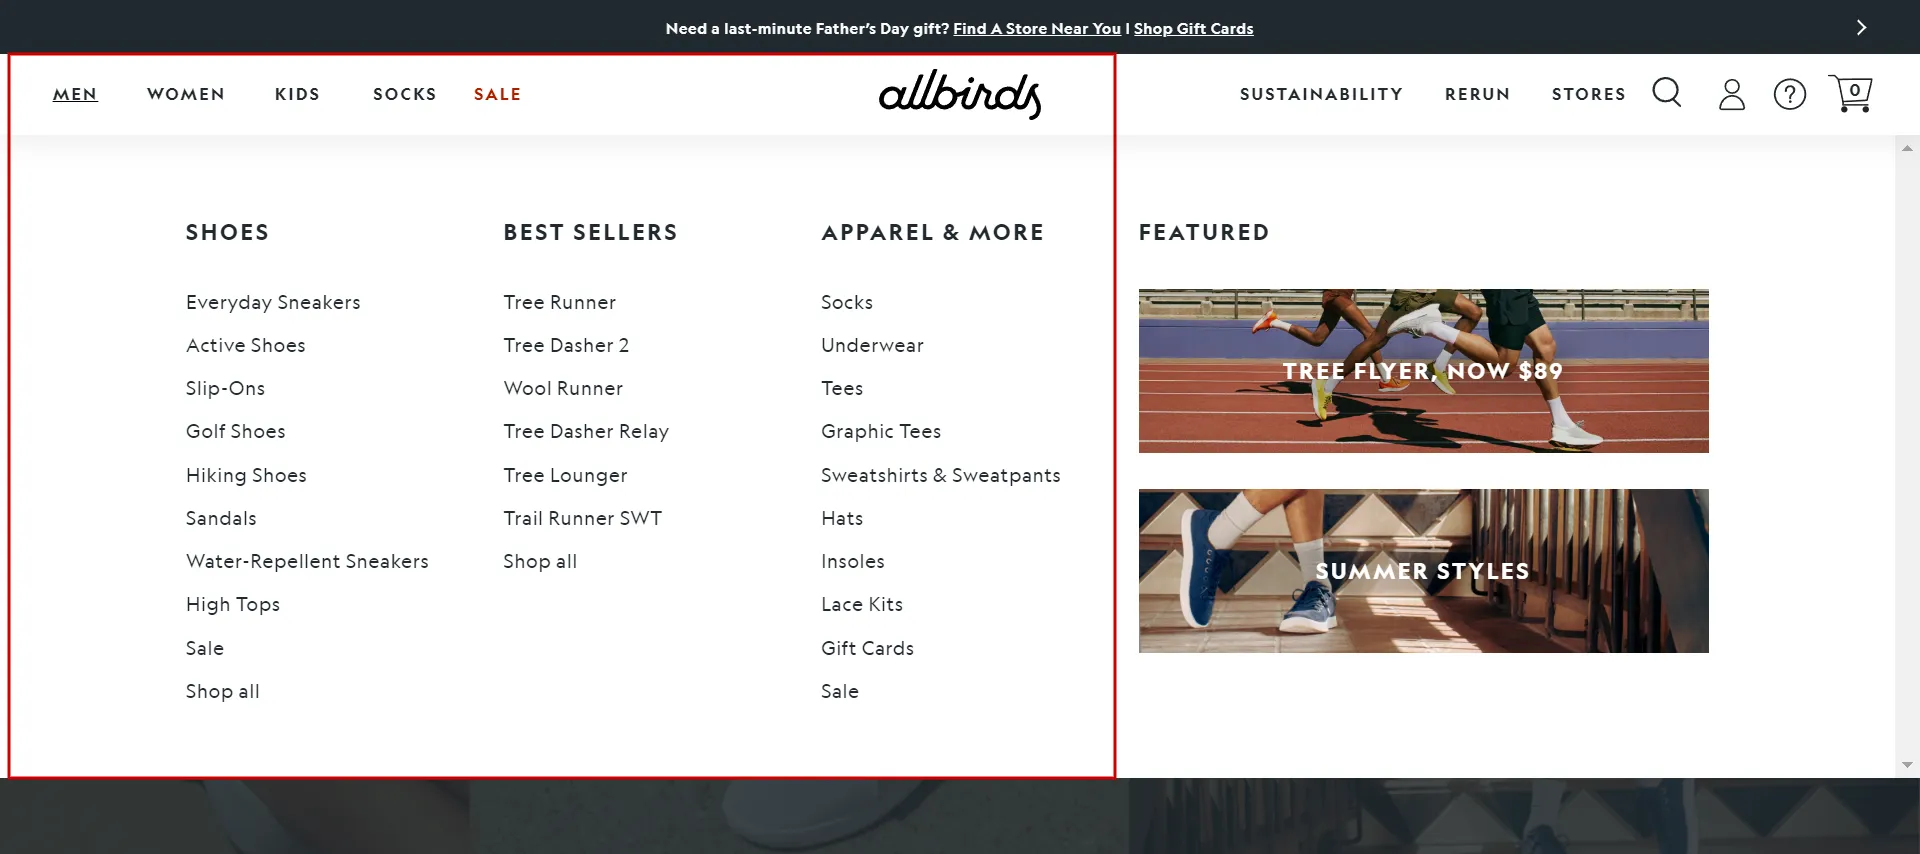
When you hover on the main menu, top menu items appear in the main navigation menu code, and nested menu items appear in the drop-down menu. It can help customers locate the products they are looking for when various products are grouped into many categories.
For example, if your products in a menu include t-shirts, shoes, and jeans, you can divide this menu into more sub-categories, such as
- female t-shirts, female shoes, and female jeans.
- male t-shirts, male shoes, and male jeans.
What benefits does the Shopify sub menu provide?
- Nest one product under many Shopify sub-menu categories.
- Merchandise certain products by categorizing them as “Best-sellers” or “Newest Products” at the top of Shopify’s multi-level menu.
- Easily set up or change the Shopify drop-down menu without a technician.
- Organize the layout clearly with the Shopify sidebar menu and horizontal navigation bars.
How to Make a Submenu in Shopify Store?
In this part, we will discover:
- how to create multi-level menus in Shopify;
- how to add nested drop-down menu in Shopify’s homepage;
- and, how to make a submenu with more than 2 columns.
#1 Add a submenu in Shopify store
Follow our fundamental tutorial to add menu Shopify categorizes products based on functions, quality, purpose, and brand for the convenience of customers:
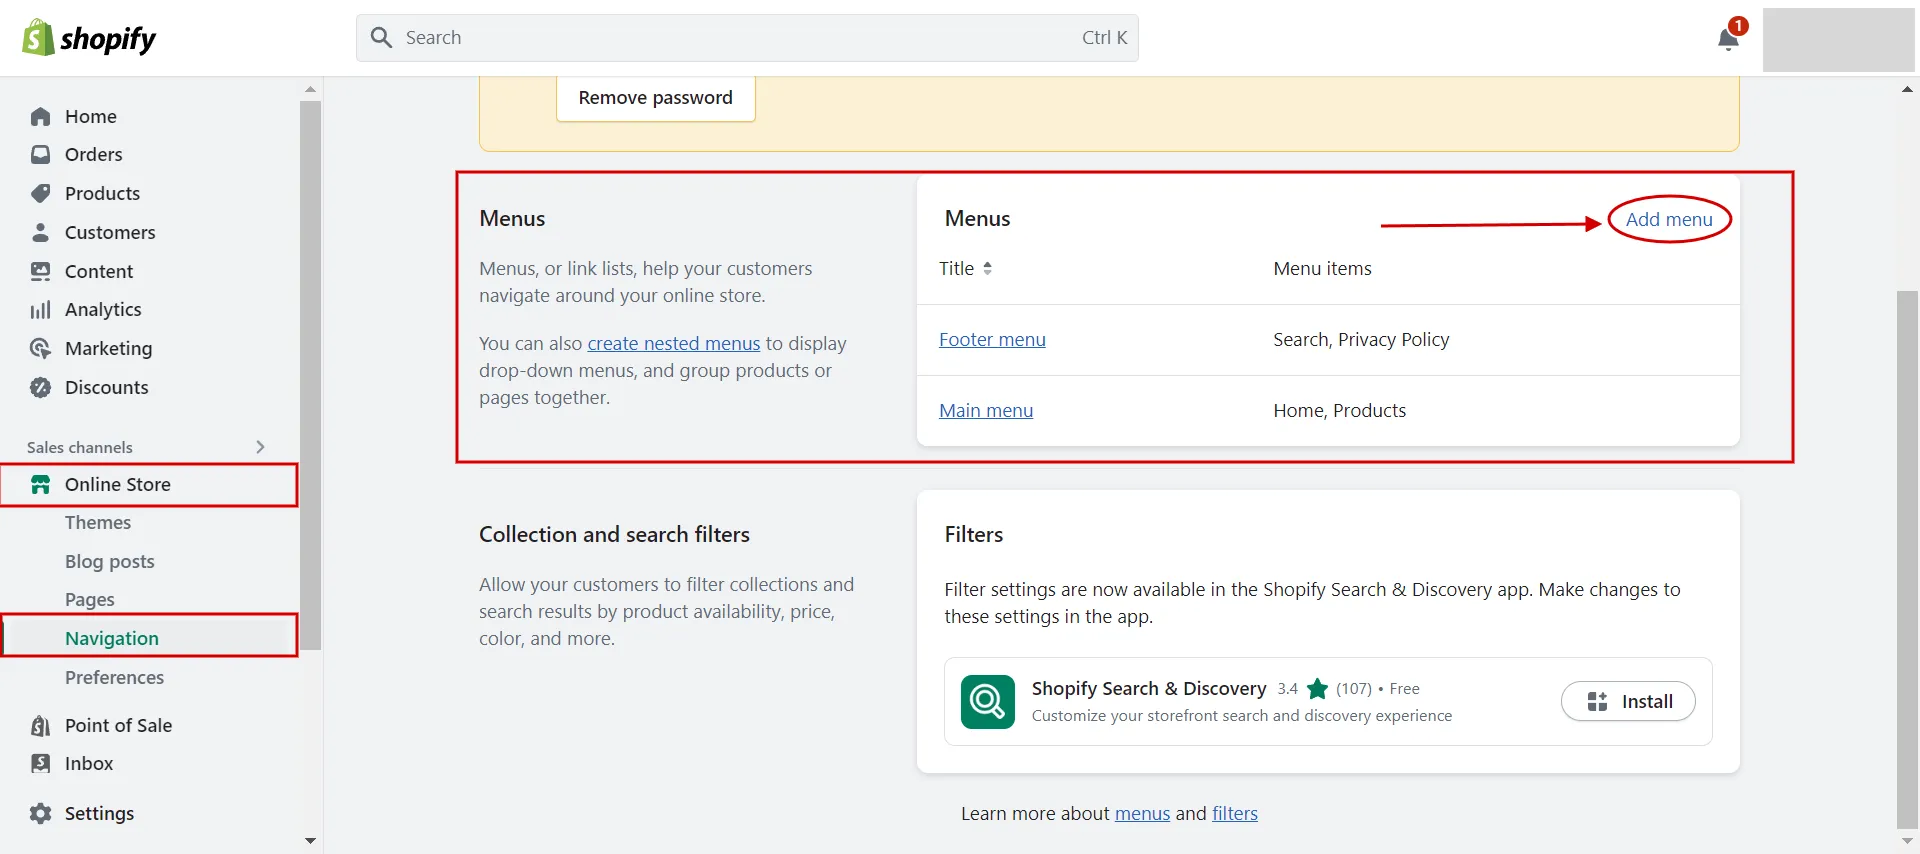
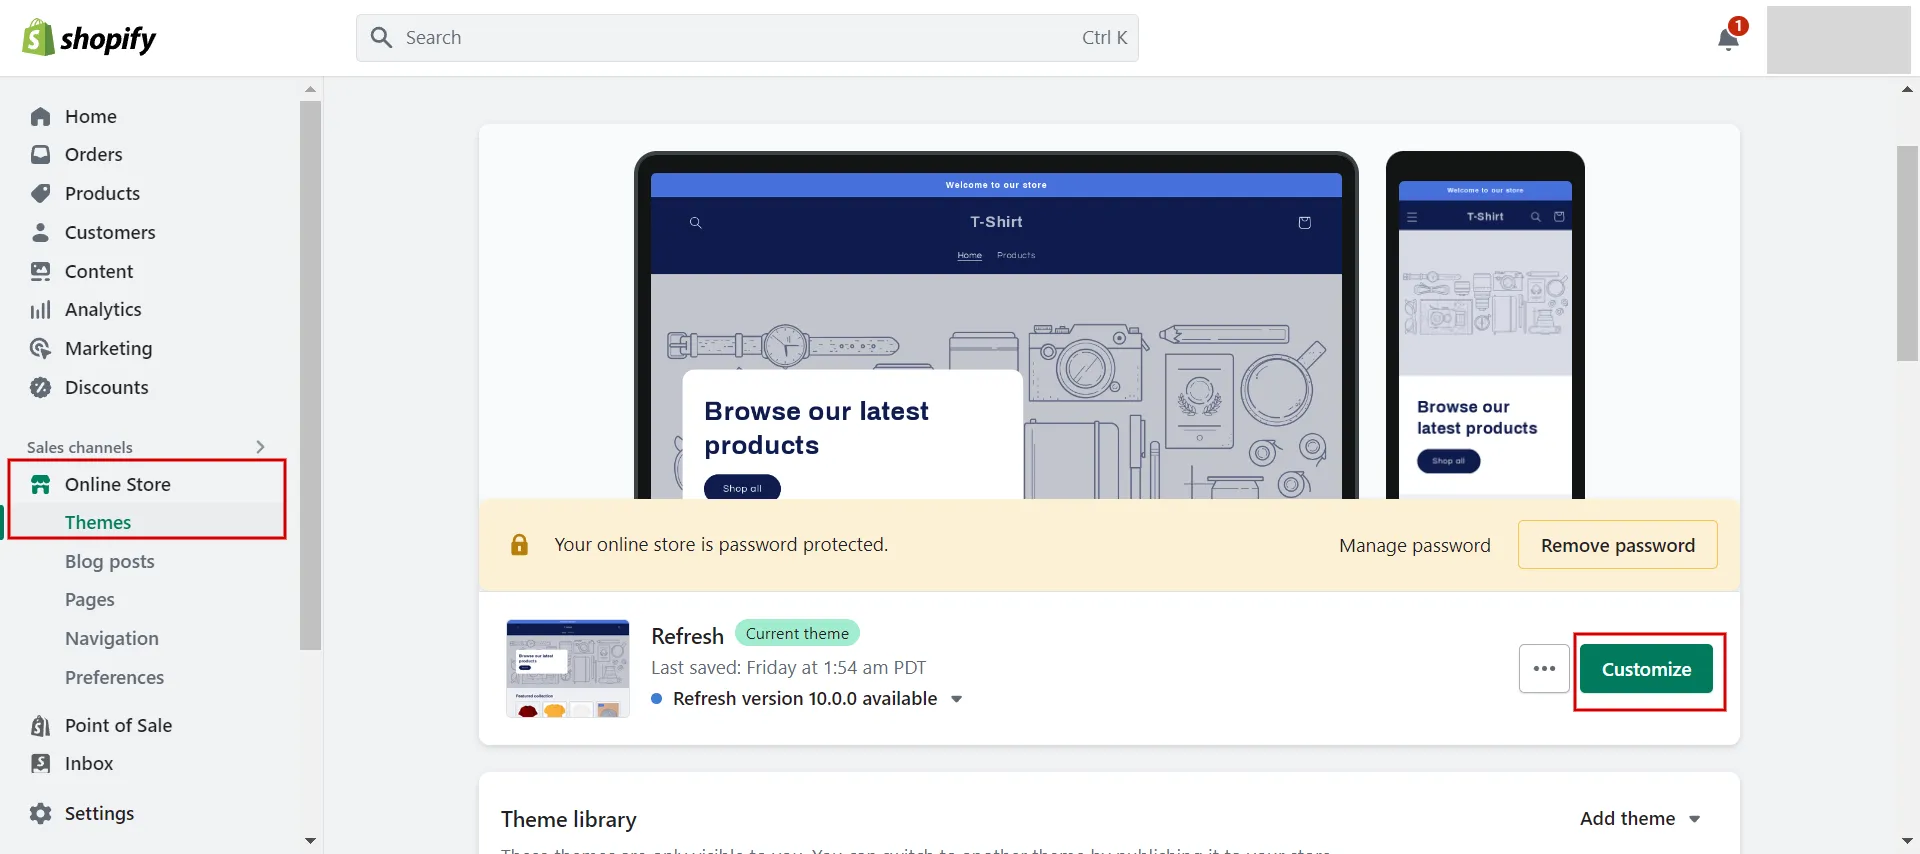
- Step 1: Access Shopify Navigation from Online Store.
When you log in your Shopify account, click on Online Store and choose Navigation.
- Step 2: Hit Add Menu button.
In the Menu tab, click the Add menu button.
- Step 3: Enter title menu name.
Then, type the name of the submenu in the title box, and click Save.
* Note: Make sure you get the name exactly the same as what you have in the main menu.
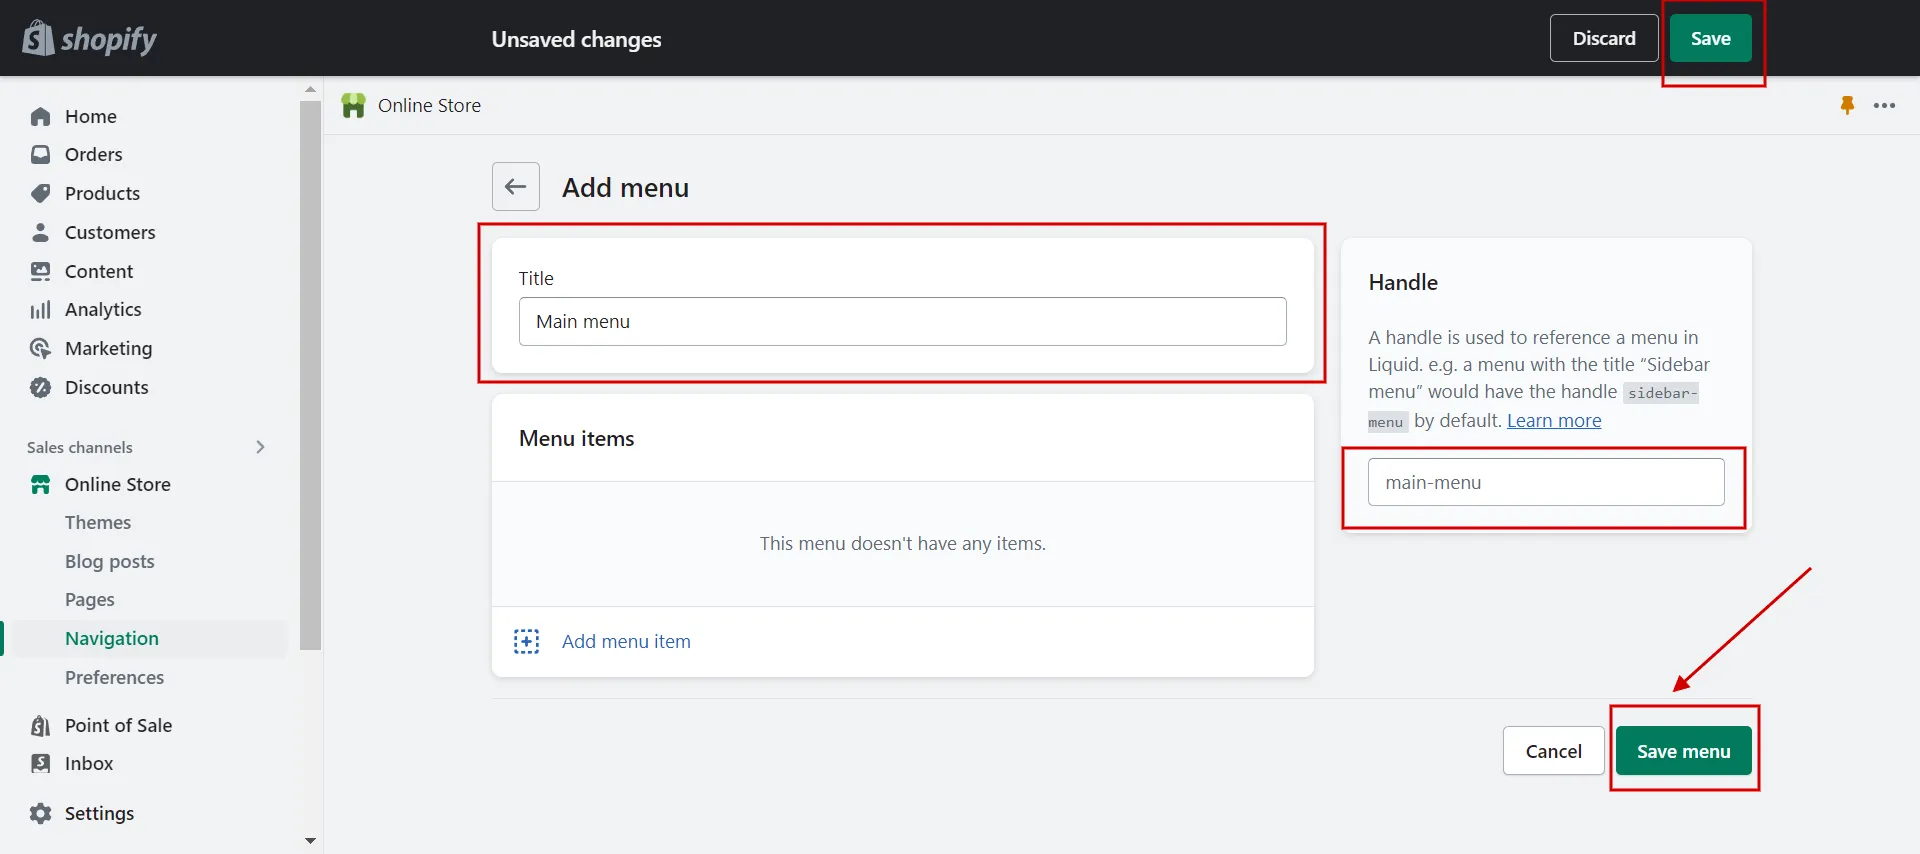
Following that, Shopify will generate an automatic handle, also known as a unique web address, to be used in the menu link.
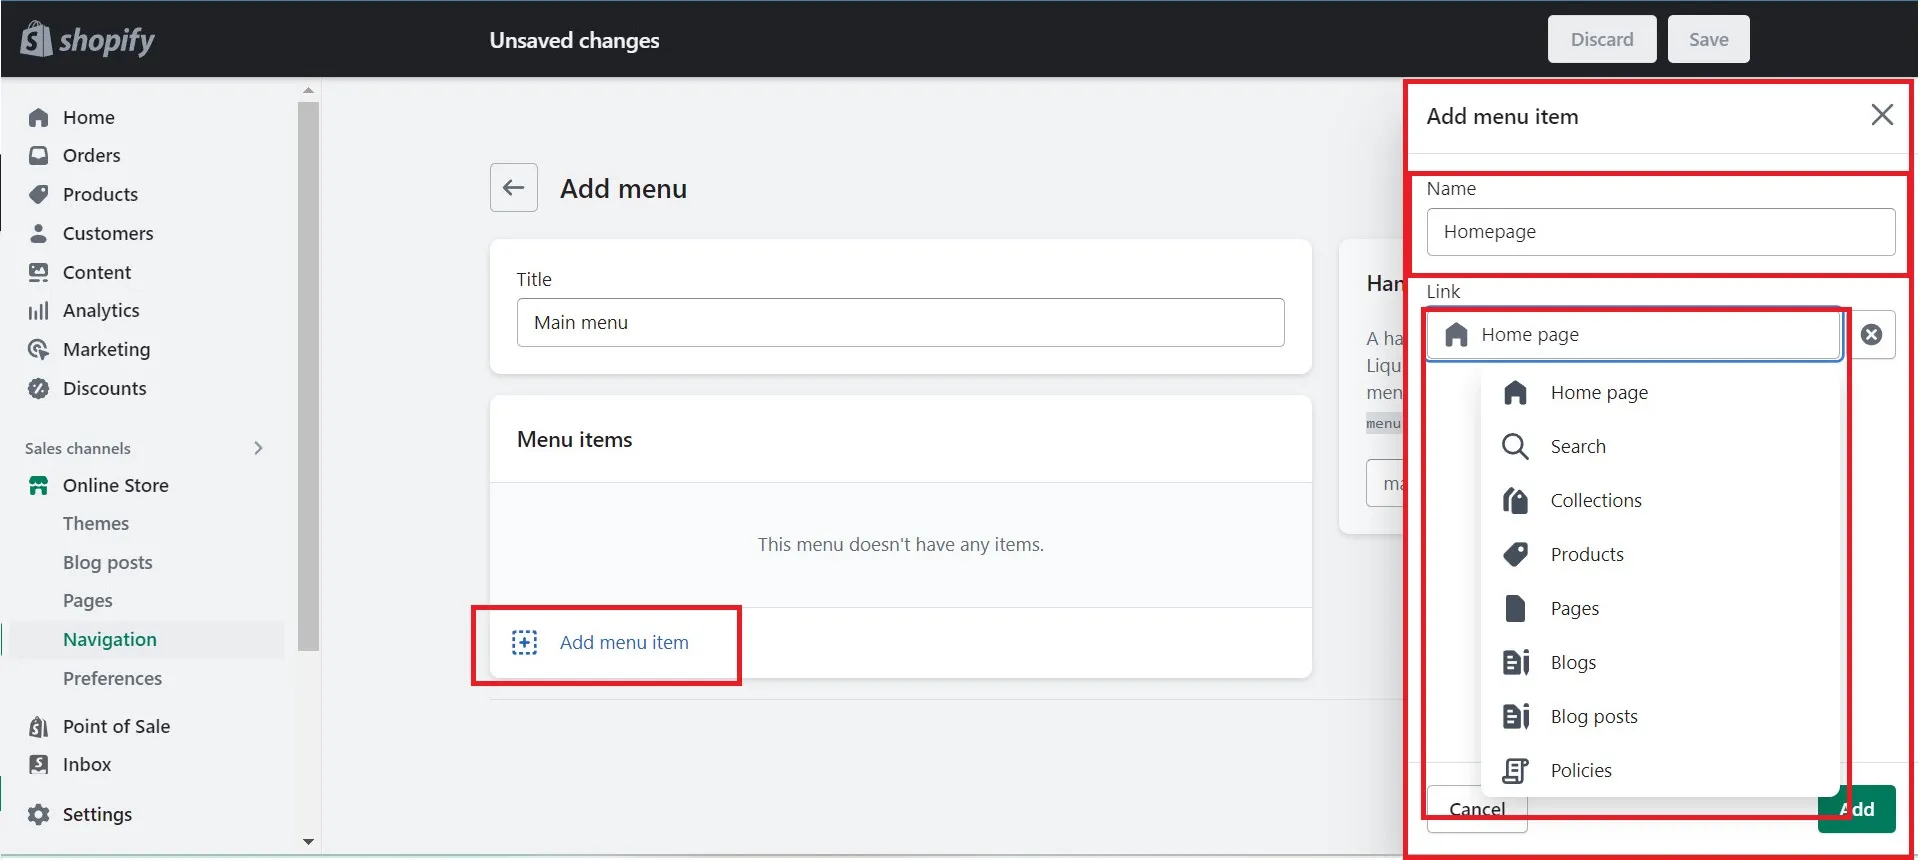
- Step 4: Choose Add menu item.
Click Add menu item, enter a name for the item, and then type or select a destination for the link. Then click Save.
From now on, you can rearrange the links in your new menu by dragging and dropping them into the desired order. Here is an example of a nested menu Shopify.
So this is how to create mega menus in Shopify! When you are done creating, you need to check if it shows up on your homepage.
#2 Create a simple submenu with title on Homepage
Follow the steps outlined below to make the menu appear on the homepage:
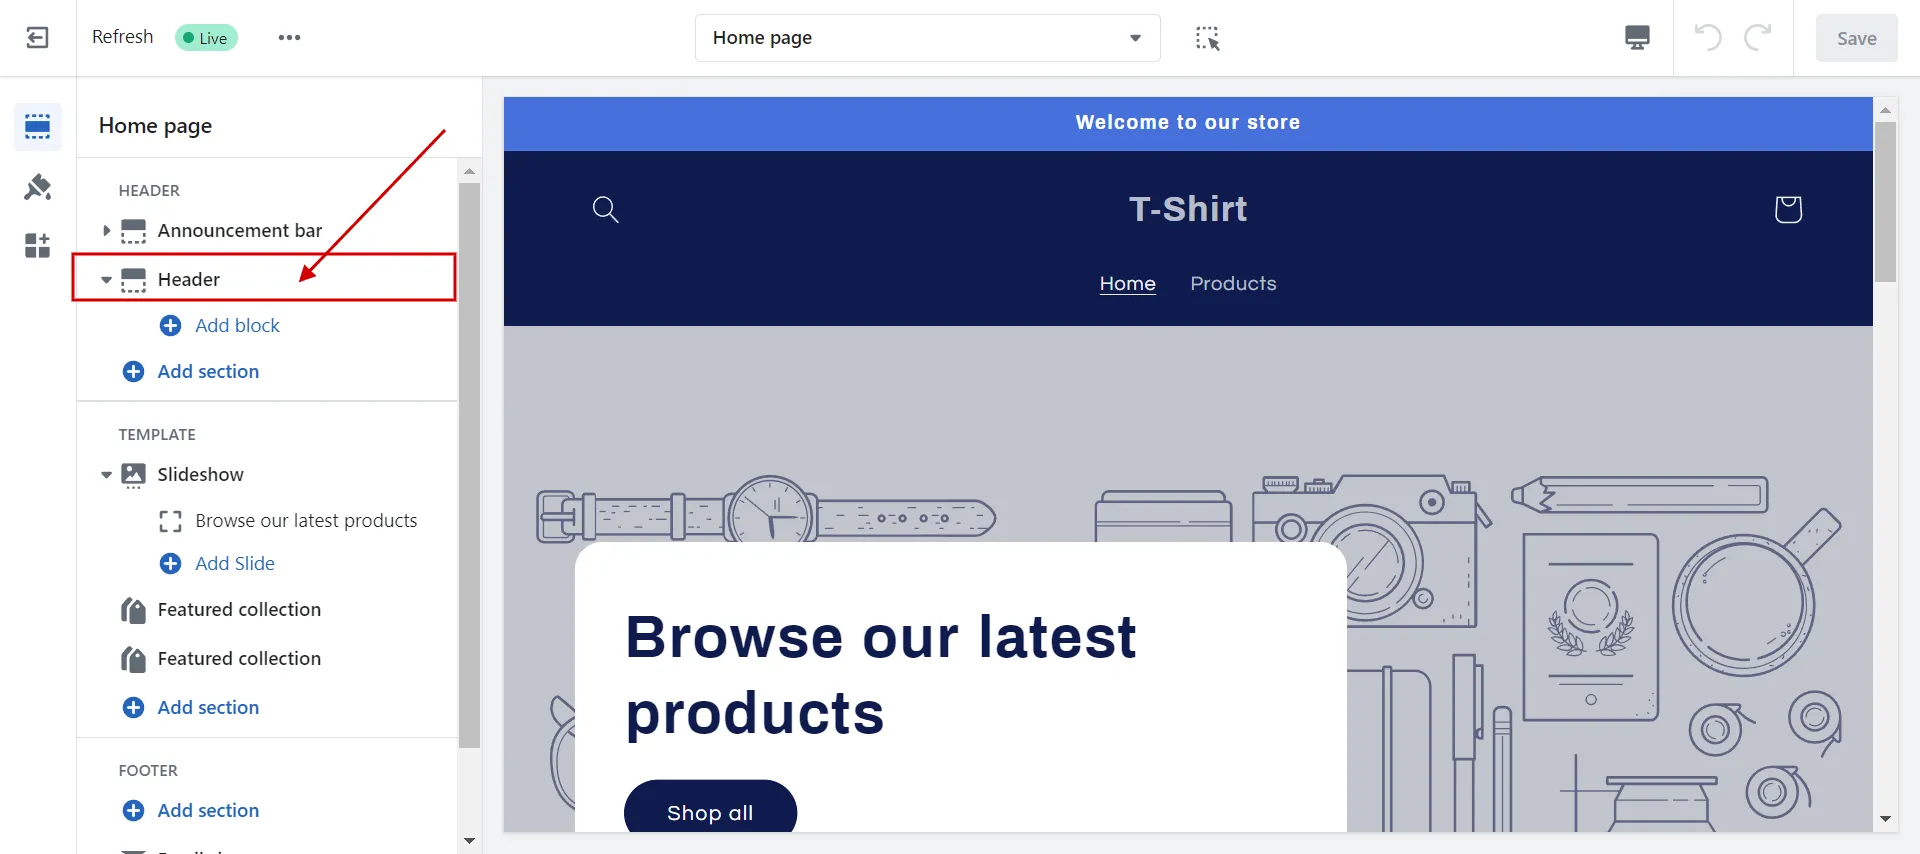
- Step 1: Navigate to the Customize theme.
First, go to the Theme area and click on the Customize button.
- Step 2: Select Header tab.
Next, on the left side of the screen, select the Header option.
- Step 3: Add menu and choose menu type.
In the menu section, click the button Select menu and choose the name of the menu that you already created.
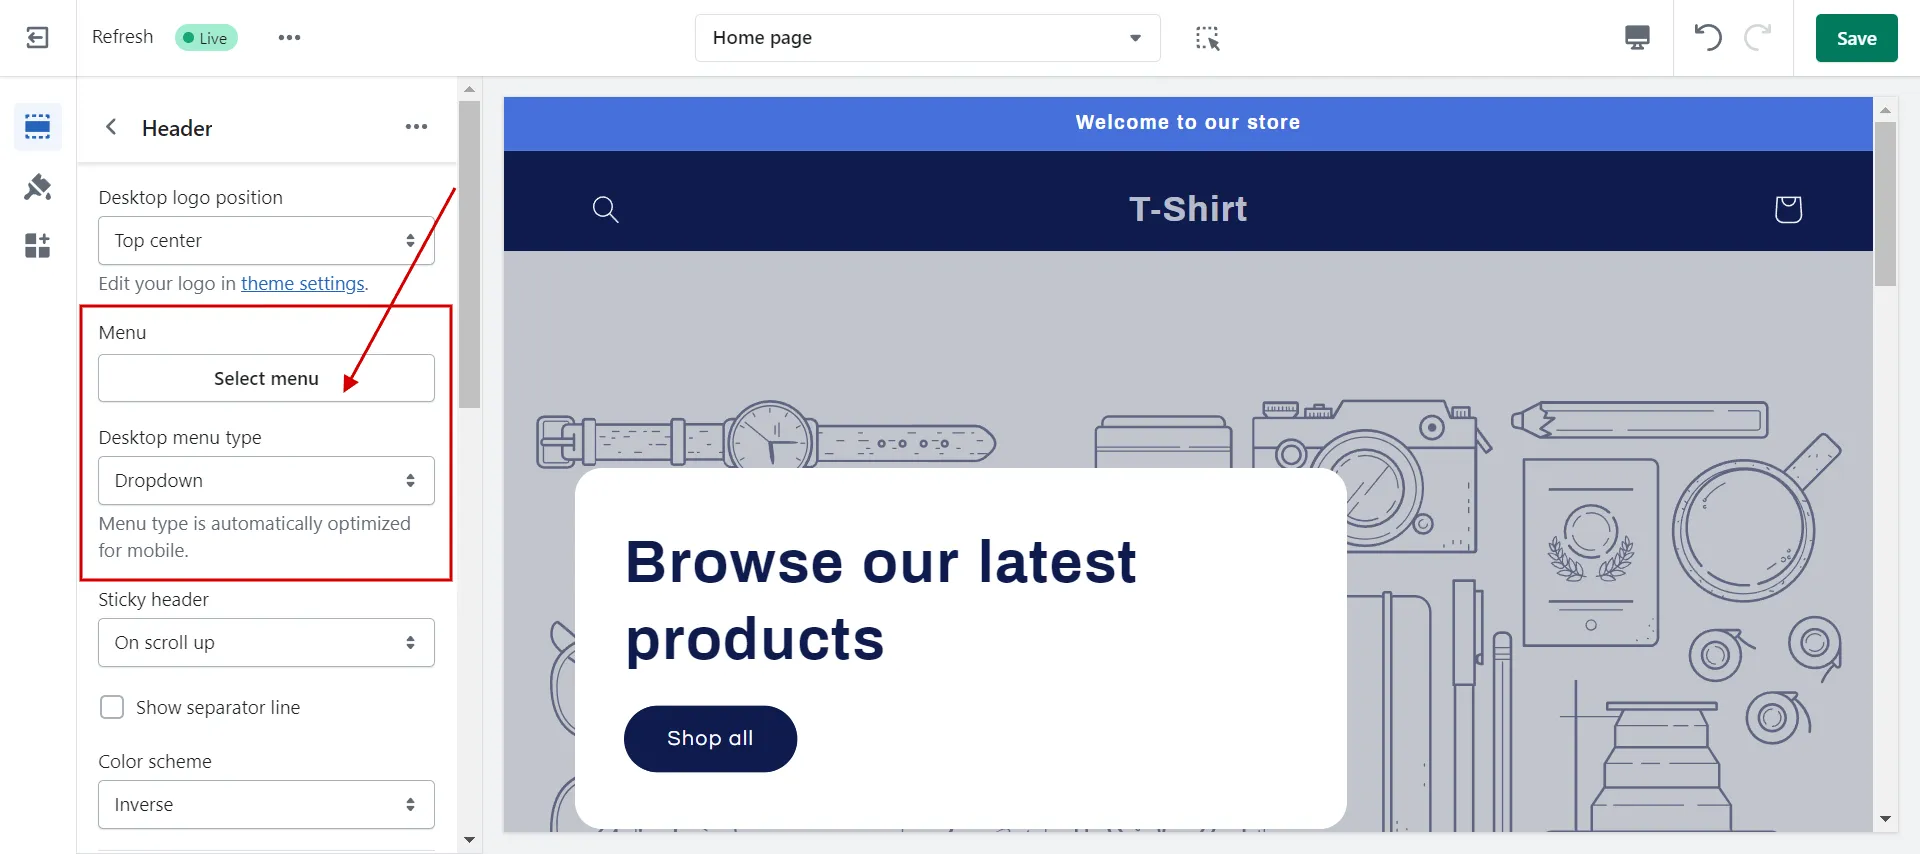
Or if you want to change the menu, just click the button Change and select the other menu you want.
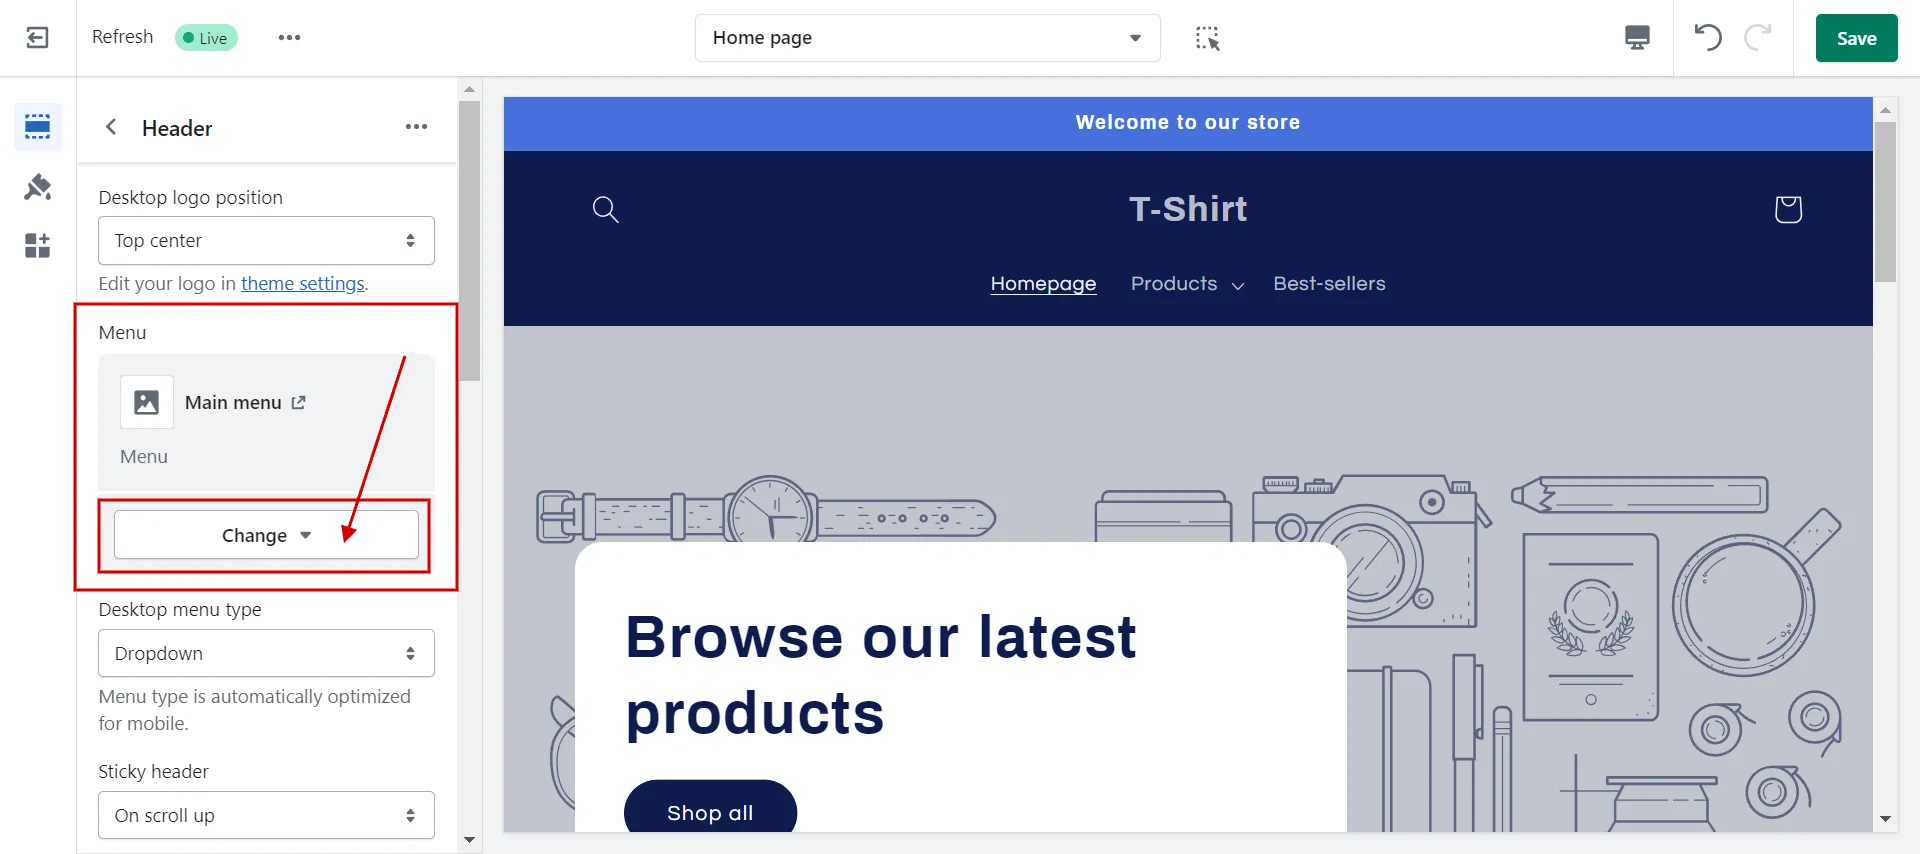
- Step 4: Click Save.
Finally, save your work to avoid losing it, and check your final outcome on the front end. And that’s how to make a submenu in Shopify store homepage.
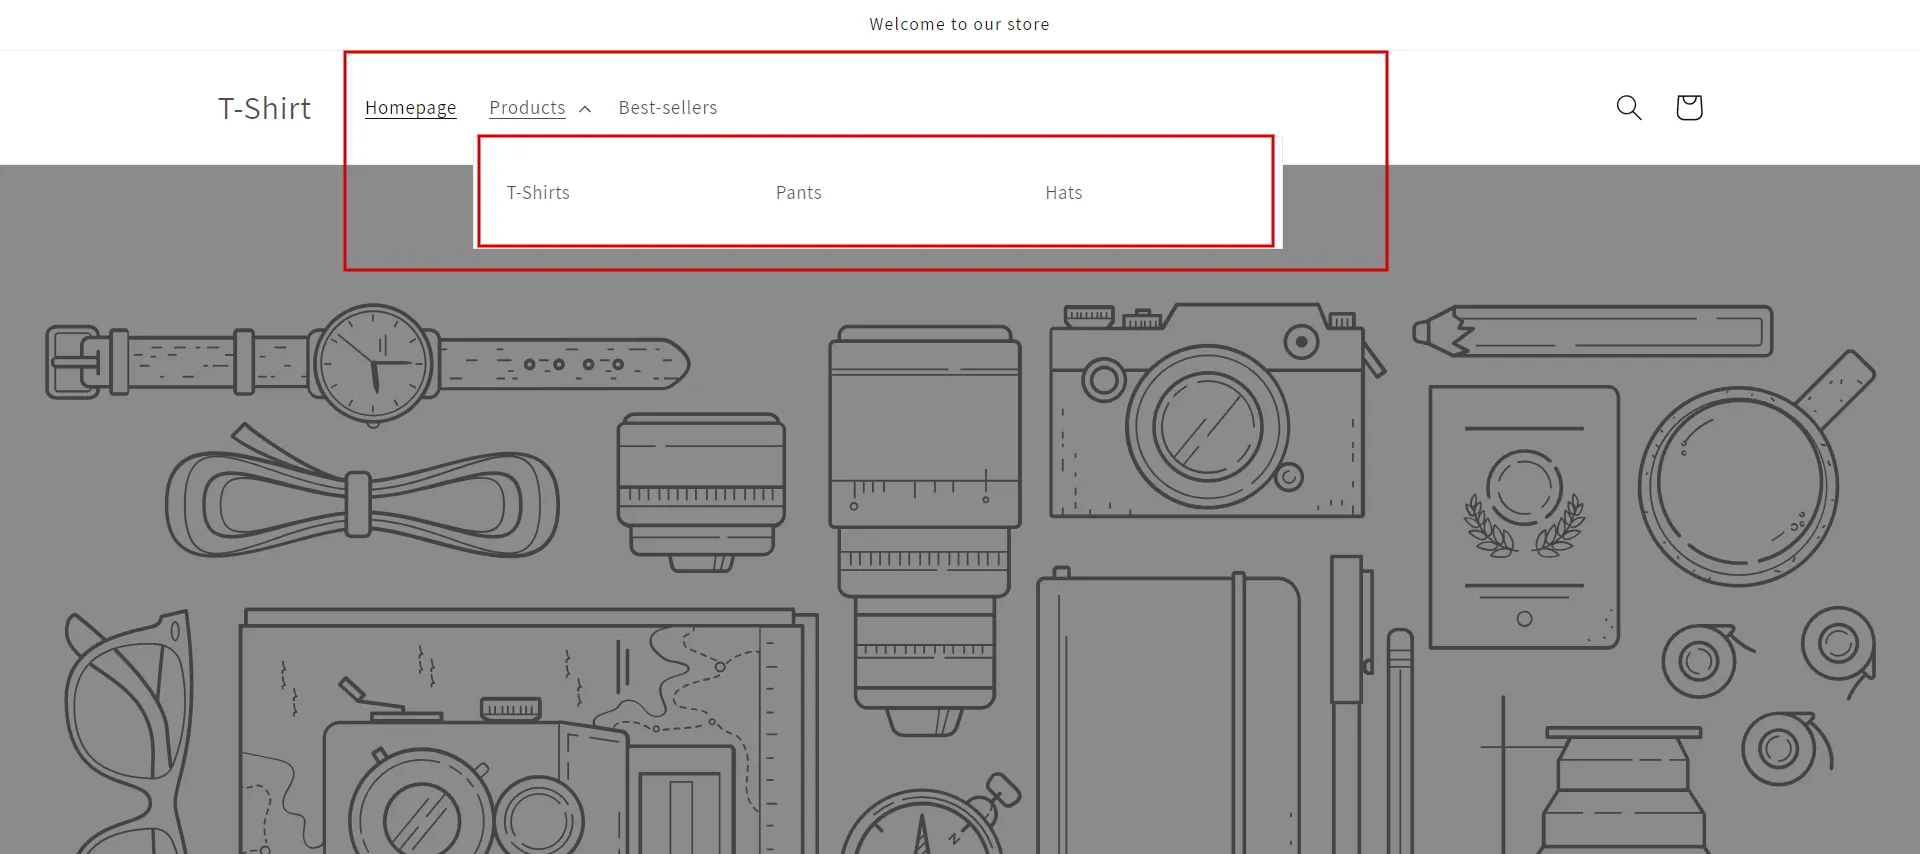
#3 Make a submenu in Shopify store with columns
In case you have various categories and want to make 2 or 3 columns for your submenu, adhere to our steps to make a submenu in the Shopify store with more than 2 columns by using the Code Editor.
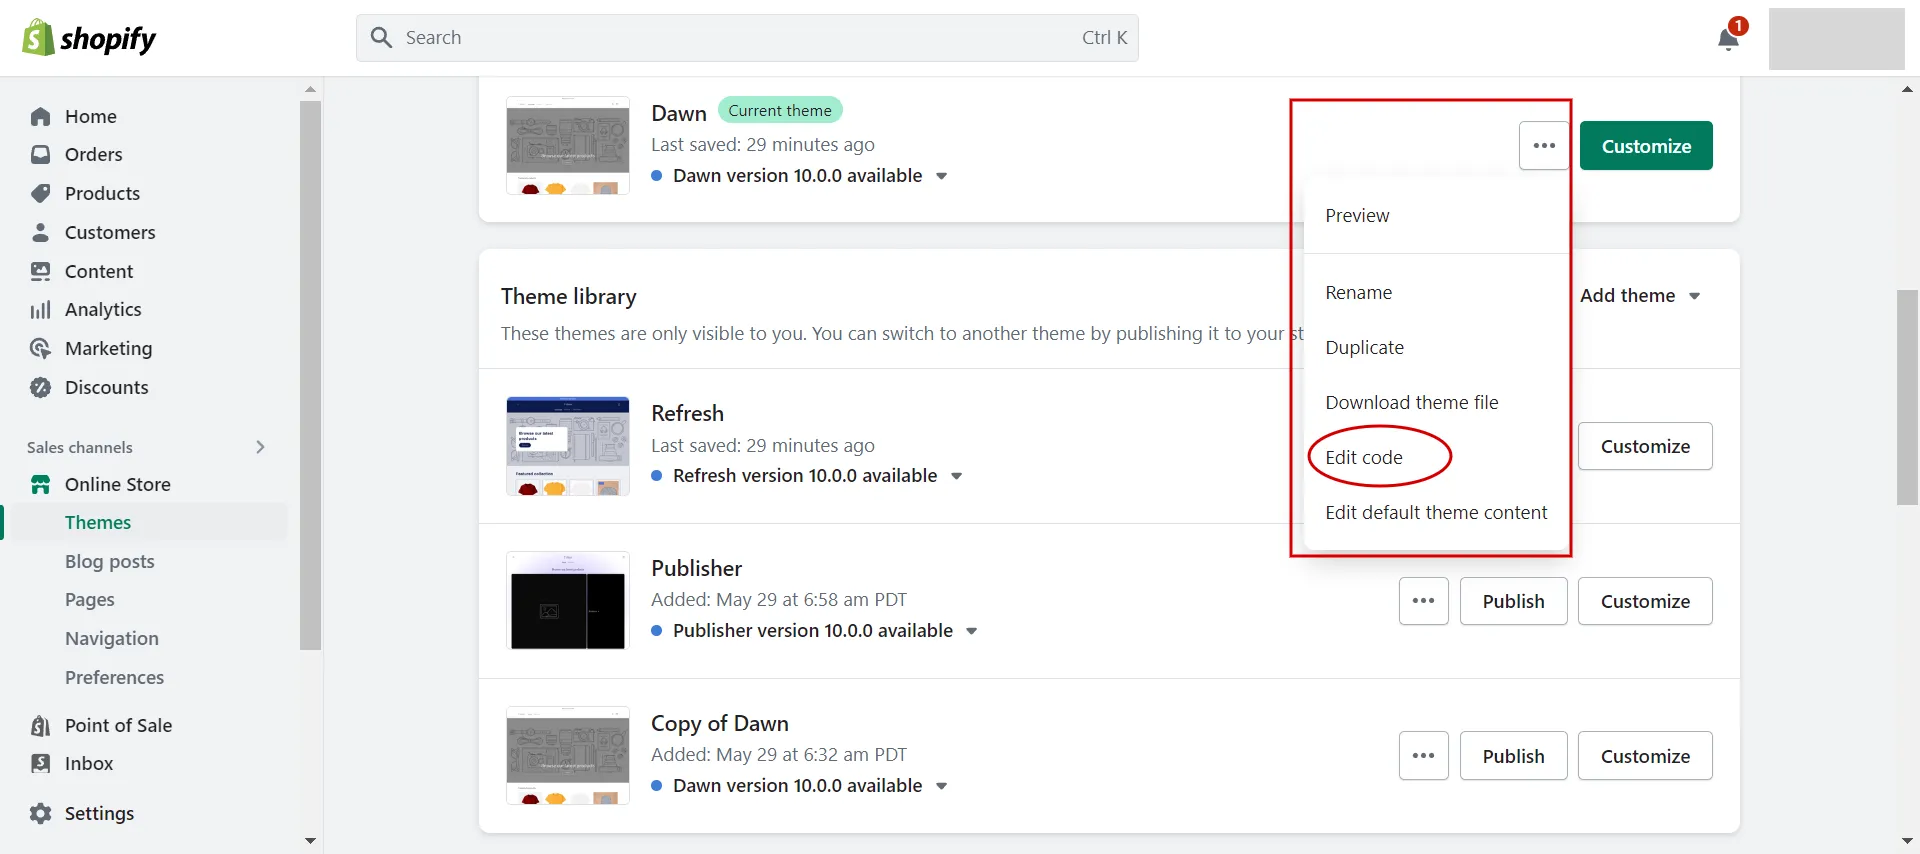
- Step 1: Access Online Store > Themes.

- Step 2: Click to ‘…’ > Choose Edit code to the current theme.
- Step 3: Find and choose Assests folder.
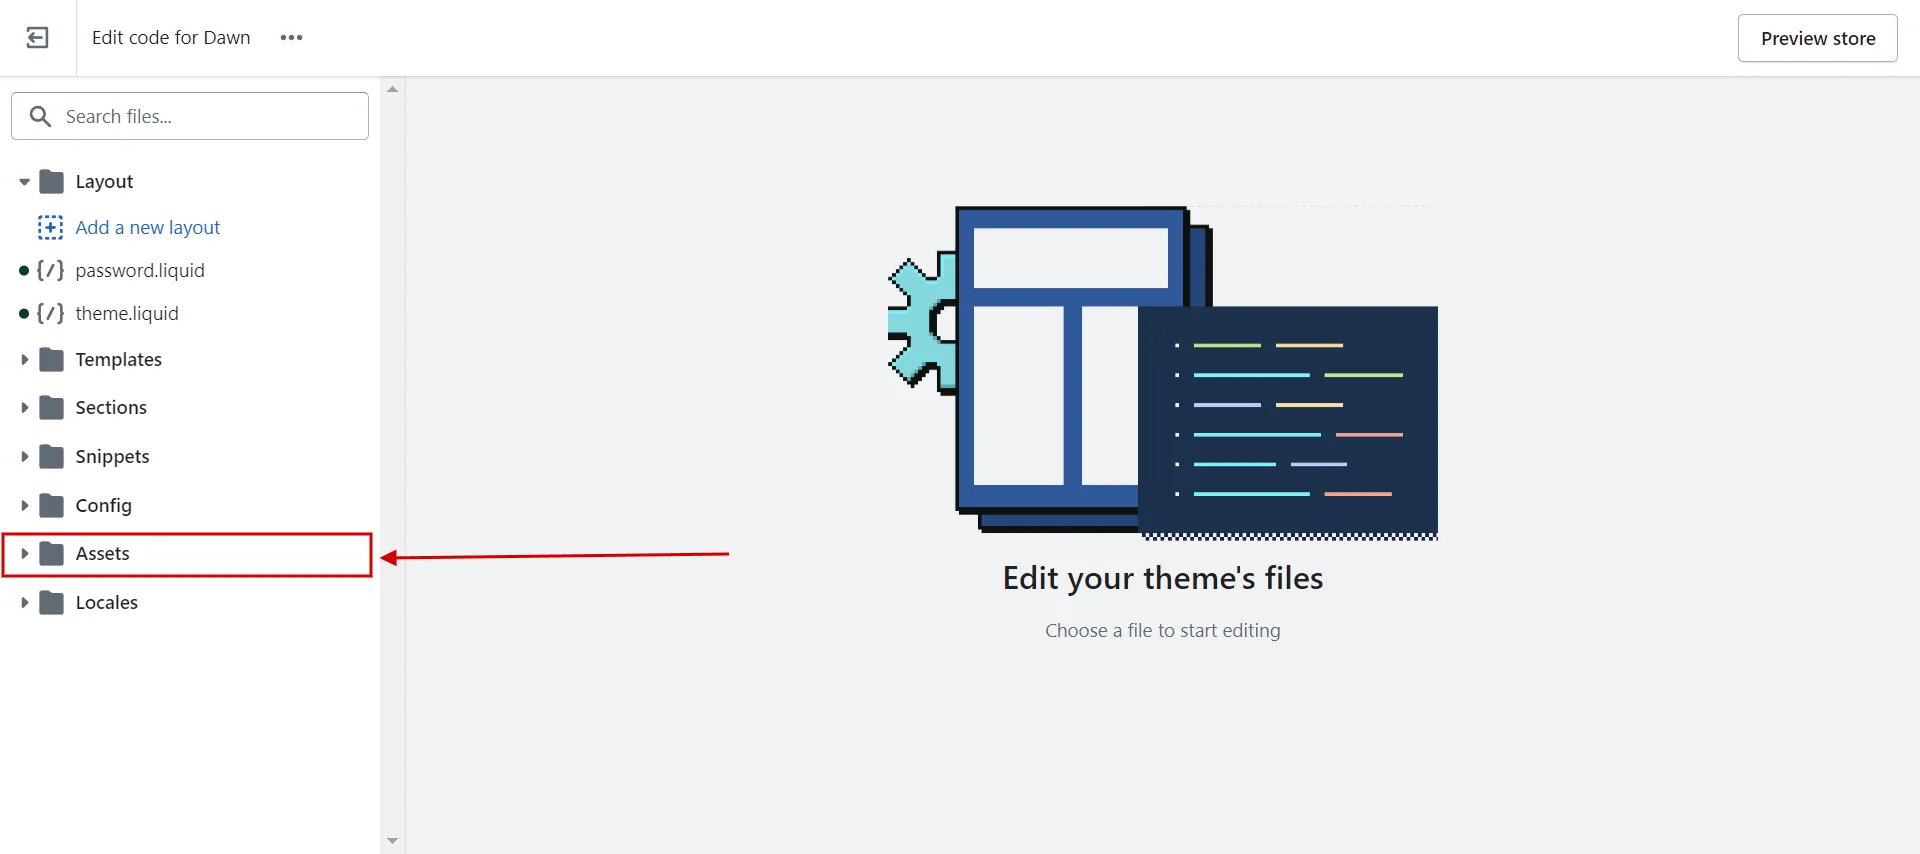
- Step 4: Find component-list-menu.css.
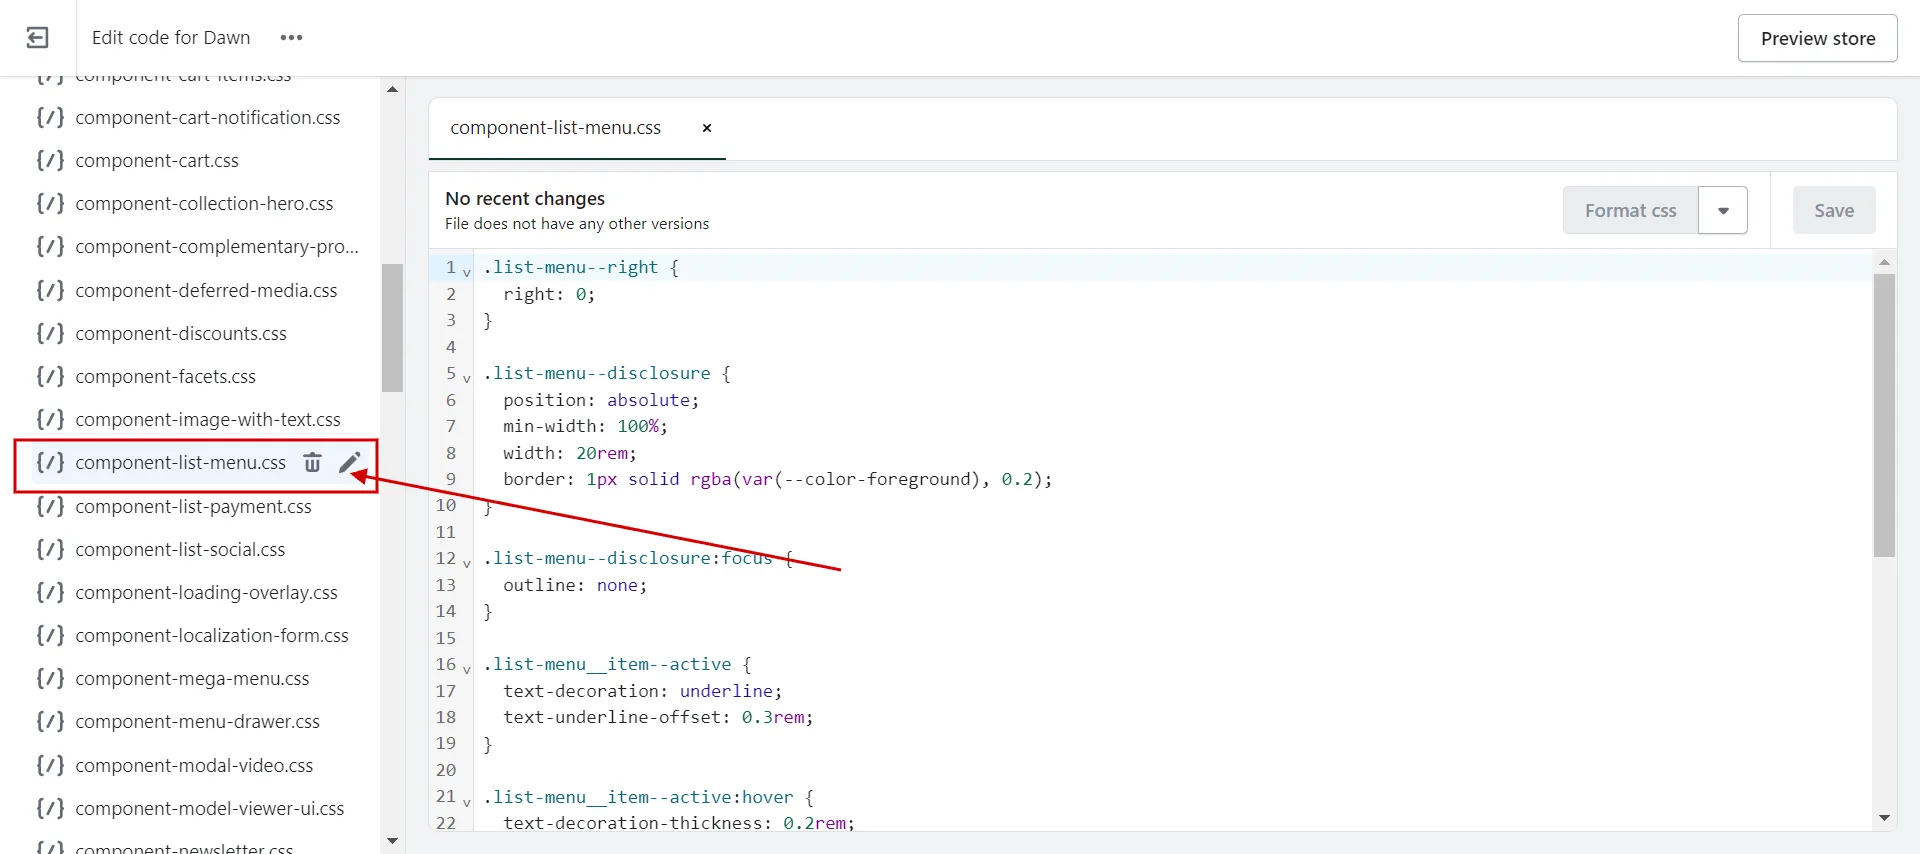
- Step 5: Add code.
On the right screen, copy and paste the below code:
| @media only screen and (min-width: 750px){
.header__submenu.list-menu{ width: 60rem !important; } .header__submenu.list-menu li { width: calc(100%/2); display: inline-block; } } |
* Note: Replace this code “(100%/2)” with “(100%/3)” if you want the submenu divided into 3 columns.
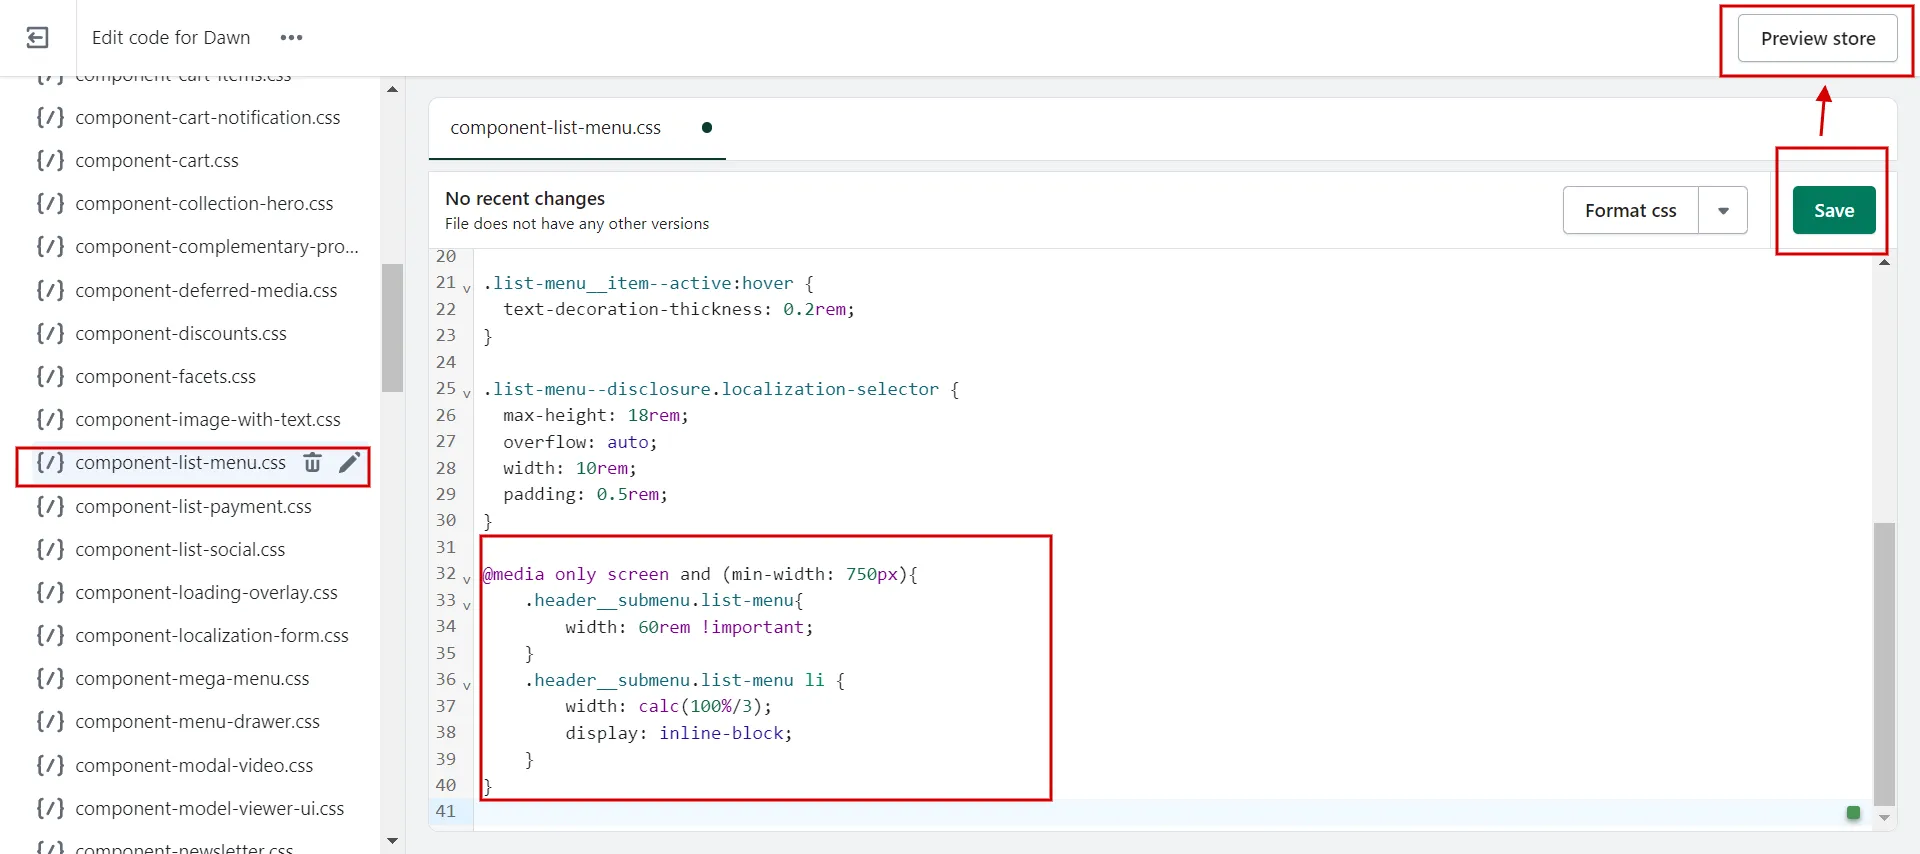
- Step 6: Save and check the front view.
Remember to save the change and recheck the outcome on the live page by clicking Preview Store.
Now we cover all the ways to make submenu in a Shopify store. We have some tips to help you create a dropdown menu quickly and efficiently in the next section.
Read more about Shopify Review – Shopify The Crown Jewel of The eCommerce World now!
Pro-Tips to Create a Shopify Sub-Menu Quickly
#1 Choose a suitable theme
Distinct themes have distinct styles, each with its own settings for how the menu will look. Some themes provide more support in terms of intuitiveness and multi-menus. You may also notice limitations, particularly on devices like phones and tablets. Thus, before you make a submenu in Shopify store, we encourage you to try out a theme before committing to it completely.
#2 Name your menu items correctly
The names of your top-level items serve as the starting point, acting as a title for a subset of additional items. This is why it is best to keep it generic and easy to grasp. Make sure your category names are clear and succinct, and avoid redundancies to prevent confusing consumers.
#3 Keep Shopify drop-down menu short
Because some browsers, such as those on mobile and tablets, do not fully support drop-down menus, it is best to keep it short and simple with as few selections as possible. Customers will be confused and overwhelmed if there are too many.
Want to migrate to Shopify?
If you are intending to migrate to Shopify, LitExtension offers a great migration service that helps you transfer your data from the current eCommerce platform to a new one accurately, painlessly with utmost security.
Best Custom Menu in Shopify Apps
It is also a wise decision to use Shopify Menu Apps to help you accomplish your work with menus in general and submenus in particular on Shopify.
Here are some of the most popular menu apps on the Shopify App Store.
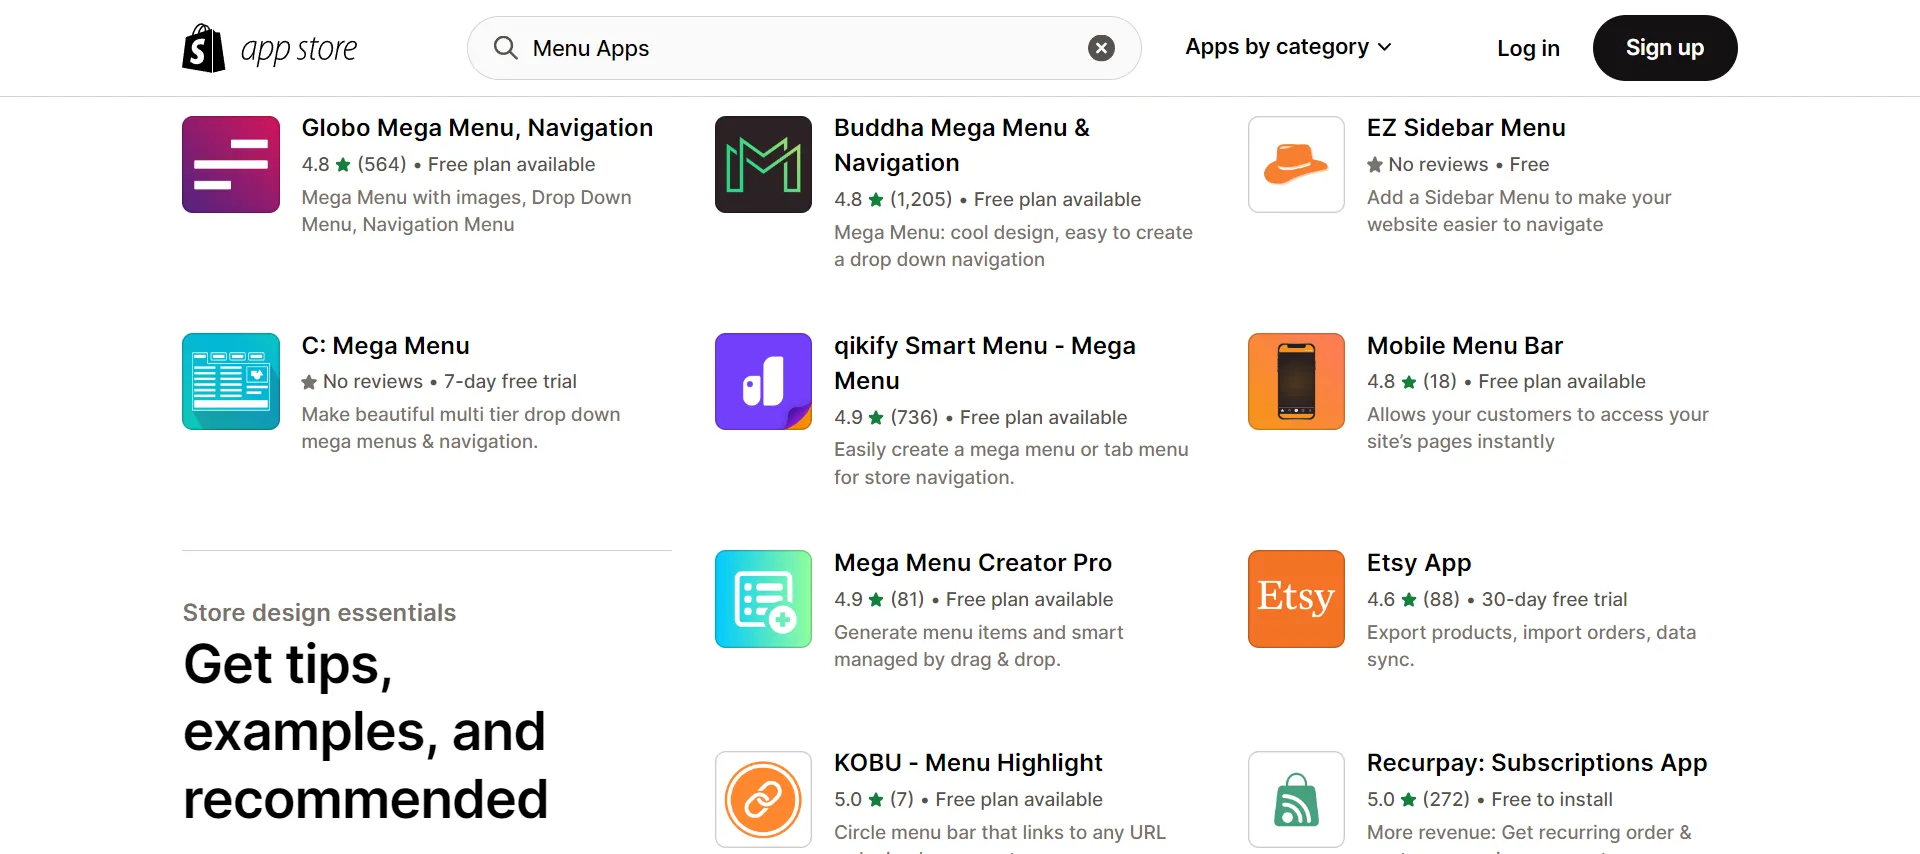
#1. Buddha Mega Menu
Price: Free version | Mega Zen $9.95/month
Highlight features:
- Offer easy Dashboard and design menu in a few seconds
- Provide users with a countdown feature
- Support submenu types to integrate with Shopify themes
Price: 14-day free trial | Basic $4.99/month | Professional $9.99/month
Highlight features
- To assist customers in finding their way around, use filters as custom navigation menus.
- Display or hide out-of-stock variations.
- Using the auto-tag feature, the app will sort and tag products for you.
Price: 7-day free trial | Pro $8/month
Highlight features
- Link any Shopify resource: items, collections, blogs, or pages.
- Display photos of products or collections immediately in your store’s main navigation.
- A user-friendly UX allows users to navigate across multiple menu tiers effortlessly.
#4. Globo Mega Menu
Price: Free version | Professional $9.90/month
Highlight features
- Dropdown menu with several levels, Tabs, Block links, and menu graphics are all available.
- “HOT, NEW” badge, Highlighted menu item Completely mobile-friendly and responsive
- It is simple to create your main menu, filter menu, smart menu, and food menu.
Besides menu apps, the Shopify App Store has a variety of apps with a variety of fascinating features.
More information may be found at Best Shopify Apps for Any Website | 2023 Update. Discovering right now!
Shopify Submenu Tutorial – FAQs
[sp_easyaccordion id=”60588″]
Final Words
Shopify navigation menus and submenus are essential components of your Shopify theme since they assist in orienting and guiding the user through your store. When you make a submenu in your Shopify store, you help customers discover your product offerings and other relevant information.
LitExtension, the #1 Shopping Cart Migration Expert hopes that our article, “How to Make a Submenu in Shopify Store”, will help your online store look better. For other excellent ideas, read more blogs on the LitExtension blog and interact with our eCommerce community.