Basically, there are 6 steps you need to embark on to migrate Magento to Shopify (or now Adobe Commerce to Shopify migration):
- Step 1. Back up your Magento website
- Step 2. Create a new Shopify store
- Step 3. Set up Source Cart and Target Cart
- Step 4. Select entities you want to migrate
- Step 5. Migrate Magento to Shopify
- Step 6. Perform essential post-migration activities
In this blog, we will show a detailed guide on how to migrate Magento to Shopify and the reasons why to choose Magento to Shopify migration.
Shopify Migration Made Easy With LitExtension
Our team of experts can safely transfer your business data, products, customers, and orders to unlock more growth in this promising eCommerce platform. Let us provide a customized migration for you!
How to Migrate Magento to Shopify with LitExtension
Magento to Shopify Migration Checklist: What to Prepare
Now, let’s delve into the details of a complete Magento to Shopify migration.
1. Run Magento backup
Before performing the Magento to Shopify migration, don’t forget to back up all your data on Magento. Though LitExtension guarantees to transfer all your data from Magento to Shopify accurately and securely, we suggest that you should keep a backup file in case of unexpected errors occur when importing products from any website to Shopify.
Despite the complexity, the Magento restoration process is not too hard to follow. Therefore, no matter if you are using Magento 1 or Magento 2, you can easily figure out how to backup Magento database before migrating Magento to Shopify.
Please follow these simple steps below:
- Log in to your Magento admin panel.
- Navigate to System -> Tools -> Backups.
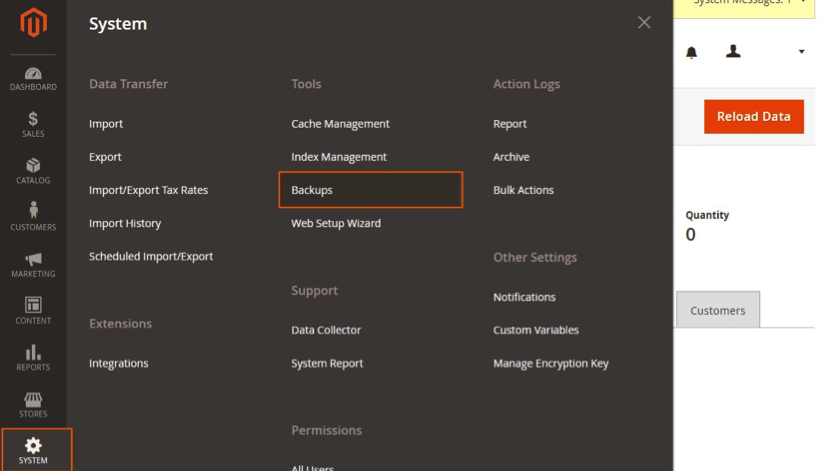
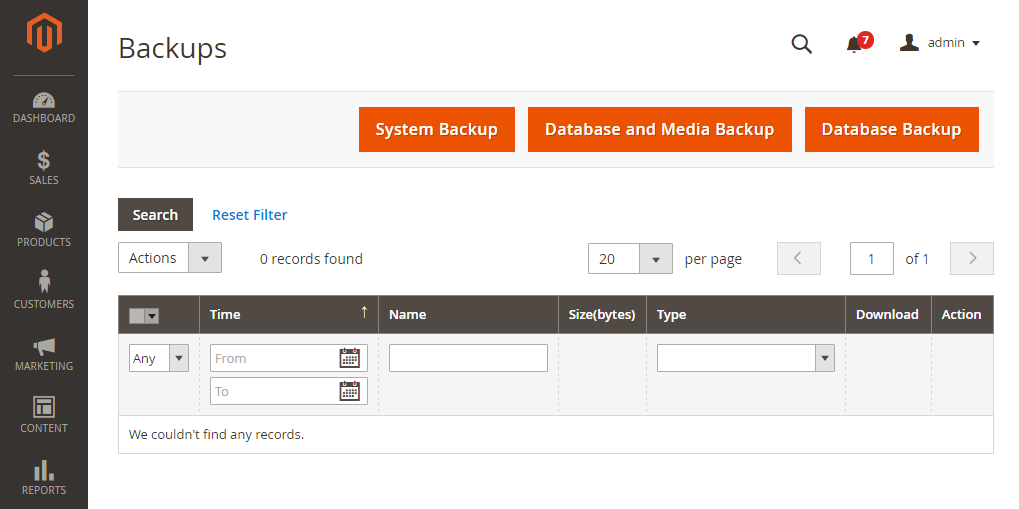
Here, you will see three options – System Backup; Database and Media Backup; and Database Backup. Here are the main differences between them:
- System Backup is the most comprehensive one – it combines your entire source code and database into a single tar archive.
- Database and Media Backup saves the content of your database and media folder, excluding entities such as themes and website designs.
- Finally, Database Backup specifically focuses on capturing the data dump of your Magento store.
Next, choose a name for the backup file that will make it easy to be found in the future. Following that, it is necessary to activate Maintenance mode on your Magento site, which notifies visitors that the site is temporarily unavailable during the backup process. Once the backup is completed, the maintenance mode will be automatically deactivated.
Please wait for some time so the backup can run fully. Then, click “OK” to proceed.
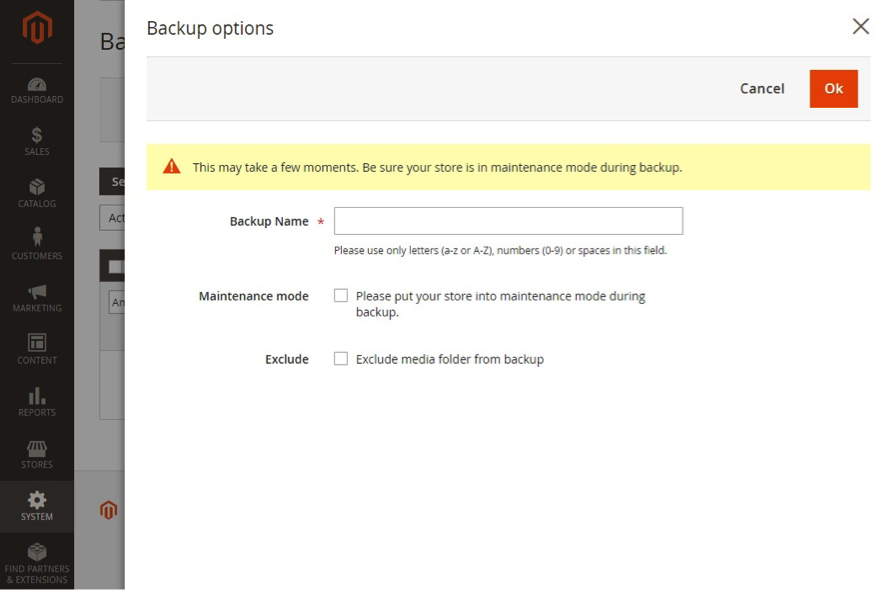
Moreover, don’t forget to tick the “Exclude media folder” checkbox under System Backup if you don’t want to include the media folder during the backup process. When everything is ready, confirm the action.
2. Create a new Shopify store
Before you can migrate Magento to Shopify, create a Shopify store first. You can either go for the 3-day free trial or go straight to the paid plans.

Here’s how to build a Shopify store in a few simple steps.
- First, go to the Shopify website and select “Start Free Trial”. Then, Shopify will ask you to provide your email address, password, and store name.
- After that, click “Create your store” and answer a few questions about your business.
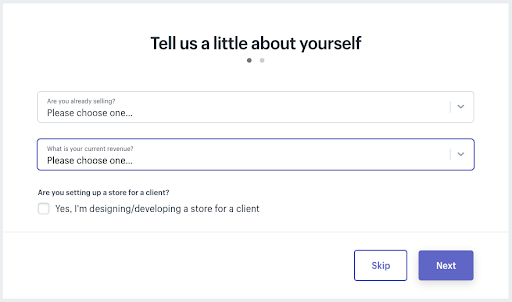
- Hit “Next” when you finish and fill in your personal information as below:
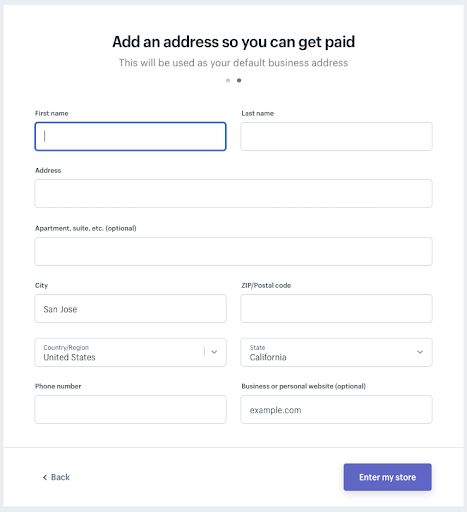
- Lastly, click “Enter my store”, and you will be moved to the admin dashboard. Here, you can customize your new Shopify website.
- Then, select a Shopify pricing plan and publish.
Looking for a quick tutorial that can guide you through all the primary steps to set up a Shopify website from scratch? Check out this video below or navigate to the detailed Shopify Tutorial.
Now that everything is ready, let’s move on to the detailed steps on how to migrate Magento to Shopify with LitExtension.
How to Migrate from Magento to Shopify in 3 Steps
LitExtension – #1 Shopping Cart Migration Expert is proud to be the most advanced method in eCommerce migration services. With 10 years of experience, we guarantee to migrate all your data from Magento to Shopify automatically, seamlessly, and accurately in 3 steps.
First, go to the LitExtension site and log in using your mail and password. Or, you can sign in with your Google/Facebook account. Additionally, we also offer the LitExtension Store Migration app on the Shopify App Store to perform the Magento to Shopify data migration as well.
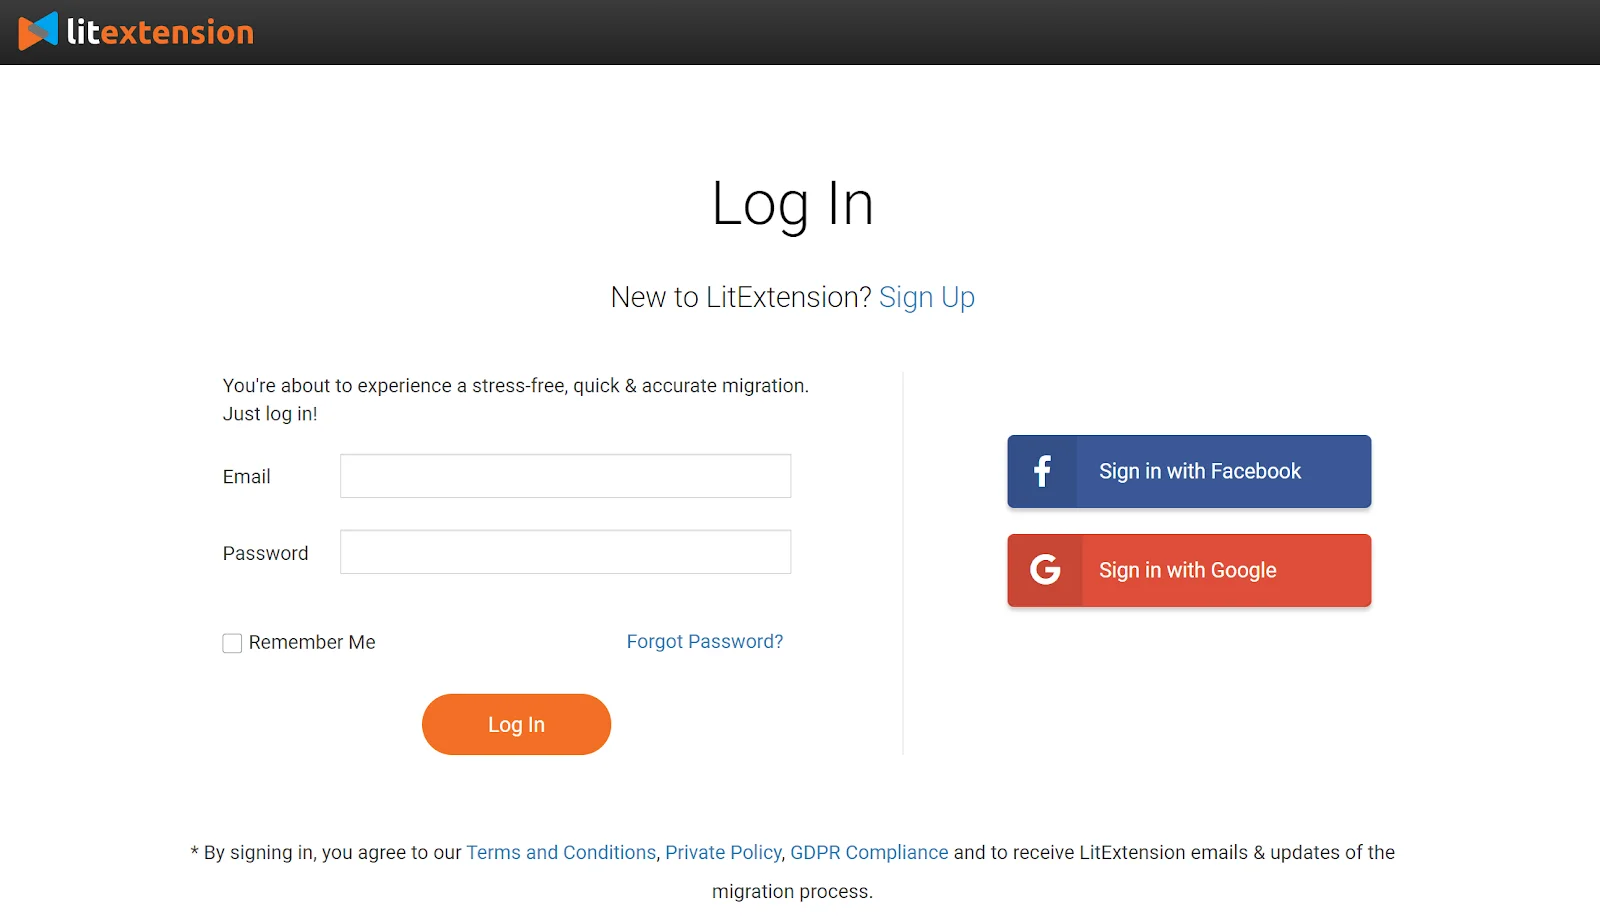
After successfully registering, click on the “Create new migration” button. You will be navigated to the main Dashboard, where you will find four distinct stages that make up the migration process: Setup, Demo Migration, Full Migration, and Completed.
#Step 1: Set up Source Cart and Target Cart
Now, you will need to enter the information of your Source and Target Cart.
From the drop-down menu, choose Magento as your Source Cart. Then, fill in the URL associated with your store.
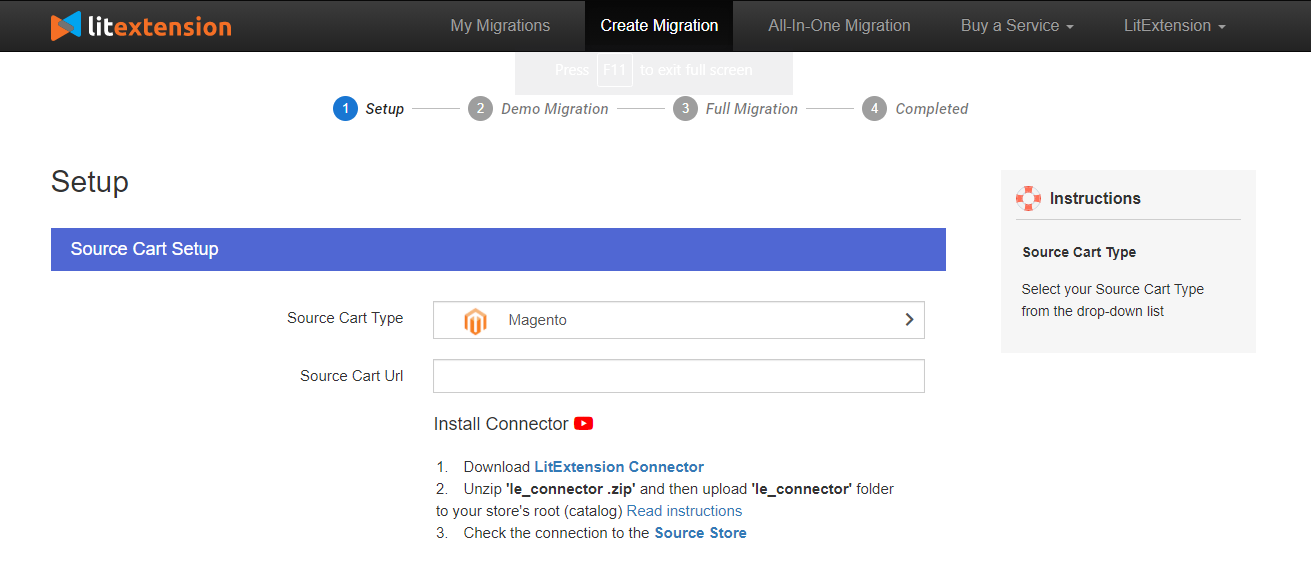
Next, download the “LitExtension Connector“. It acts as a virtual bridge between your Magento database (Adobe Commerce database) with LitExtension. Extract the zip file, then upload the Connector folder to Magento’s root folder on your server.
If successfully installed, you will see a notification “Connection was successfully installed“ on your screen.
Here’s a visualization of how to set up LitExtension Connector.
Now, let’s head on to the Target Cart setup. Choose Shopify as your Target Cart Type, and provide your URL as well as the API password. Please follow this guide to get your Shopify API password if you get lost.
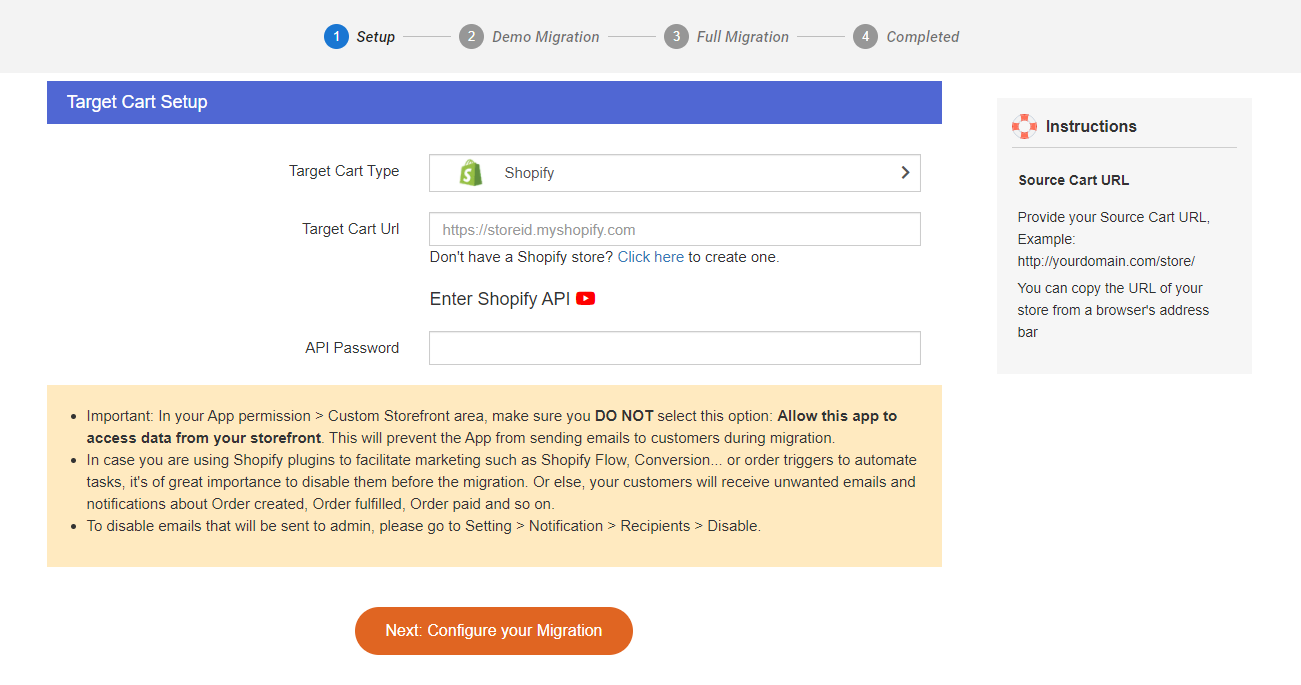
P/S: If you use the LitExtension Store Migration app to perform the Magento to Shopify migration, there’s no need to manually set up your target cart. All your Shopify information will be filled out automatically. Therefore, you won’t need to spend more time here and can move to the next step right away.
Once you have finished, click “Next: Configure your Migration”.
#Step 2: Select entities to migrate
Now, it’s time to choose which entities that you want to move from Magento to Shopify. LitExtension supports almost all types of essential data for your business; therefore, none of your data will be left behind. Make sure to read and tick on the chosen entities (products, product categories, customers, orders, etc.) or click “Select All” to migrate all of them.
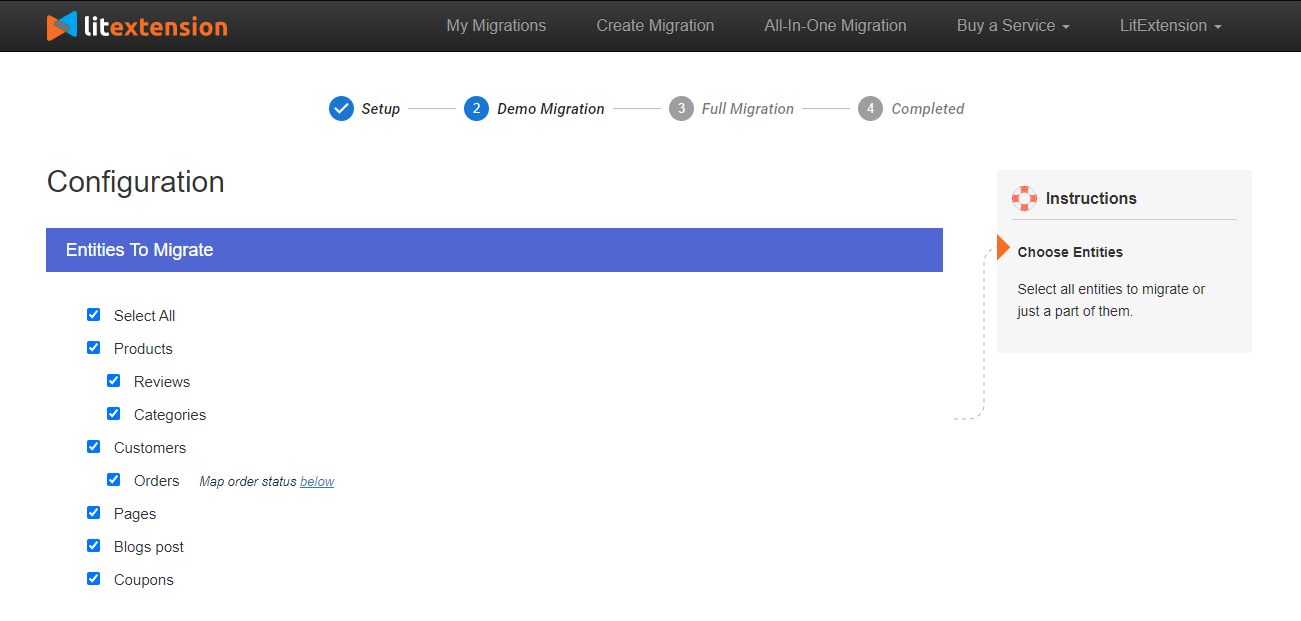
To help you extend your migration possibilities, LitExtension also offers Additional Options such as:
- The “Preserve Order IDs on Target Store” function ensures that your order numbers remain intact even after the Magento to Shopify migration. This option allows you to effectively organize and manage your new store, preventing any potential confusion that could arise from altered order IDs.
- The “Create 301 redirects on your target store after migration” option allows you to redirect all URLs from your old store to the new one. Therefore, your store won’t suffer from any loss of links after the migration process.

Don’t forget to choose the Language Mapping option to ensure they will be displayed correspondingly on the Shopify store.
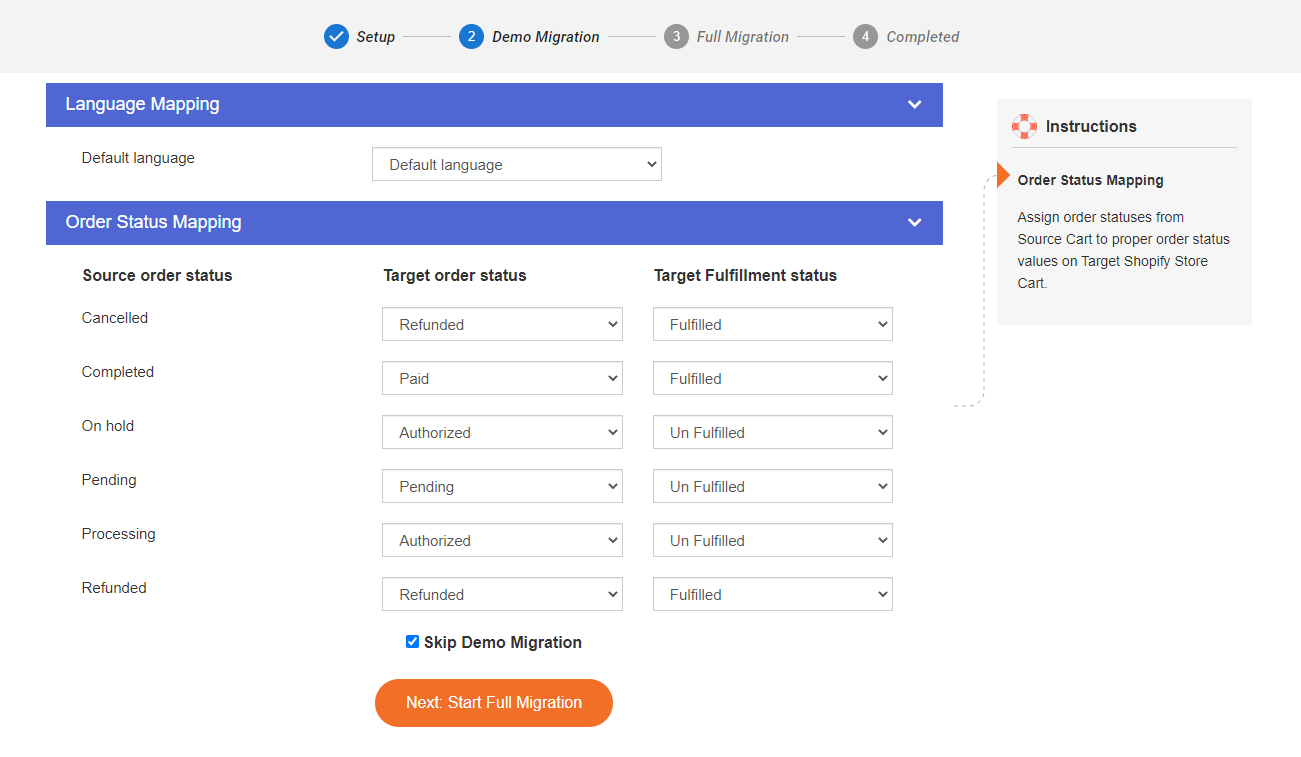
If you need any assistance, don’t hesitate to contact our support team so that we can help you resolve any problem you may have.
#Step 3: Run full Magento to Shopify migration
LitExtension highly recommends you run the Free Demo Migration first to catch a glimpse of how the process looks like. Alternatively, you can skip the demo process and jump straight into Full Migration.
The dashboard should look like this:
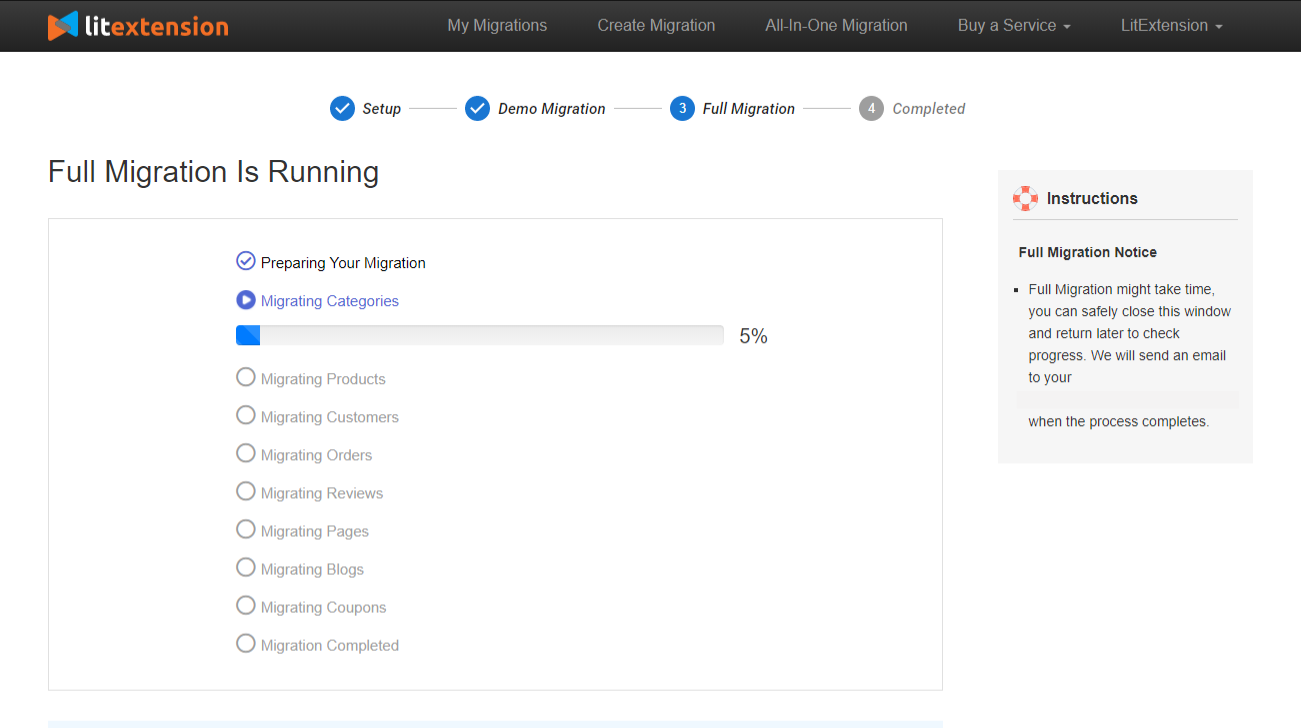
Once the migration starts, the LitExtension solution will run seamlessly on the server without a browser connection. Therefore, feel free to have a cup of coffee and get back when you receive the email notification if the process is complete.
Additionally, your current Magento website can still be up and running during the full migration. Our system limits the least human intervention to help users save time. So, there will be no loss in revenue, and it is completely automatic!
For a hands-on experience, you can watch this tutorial video of the full migration process:
Other Shopify migration pairs that LitExtension supports:
Migrate Magento to Shopify: Post-migration Checklist
The hardest part has passed, but don’t forget to take extensive tests to ensure a solid experience for online shoppers by following these steps:
1. Check Magento to Shopify migration results
After you completely migrated from Magento to Shopify, you should check migration results to make sure that everything still works well.
First, you need to check product data, both in the Shopify front end and back end. The product migrated will appear right in the catalog or through an onsite search. Especially you should take all product details into consideration, including product descriptions, images, variants, and meta descriptions.
In Shopify, the categories and subcategories will be placed in the collections and product tags sections.

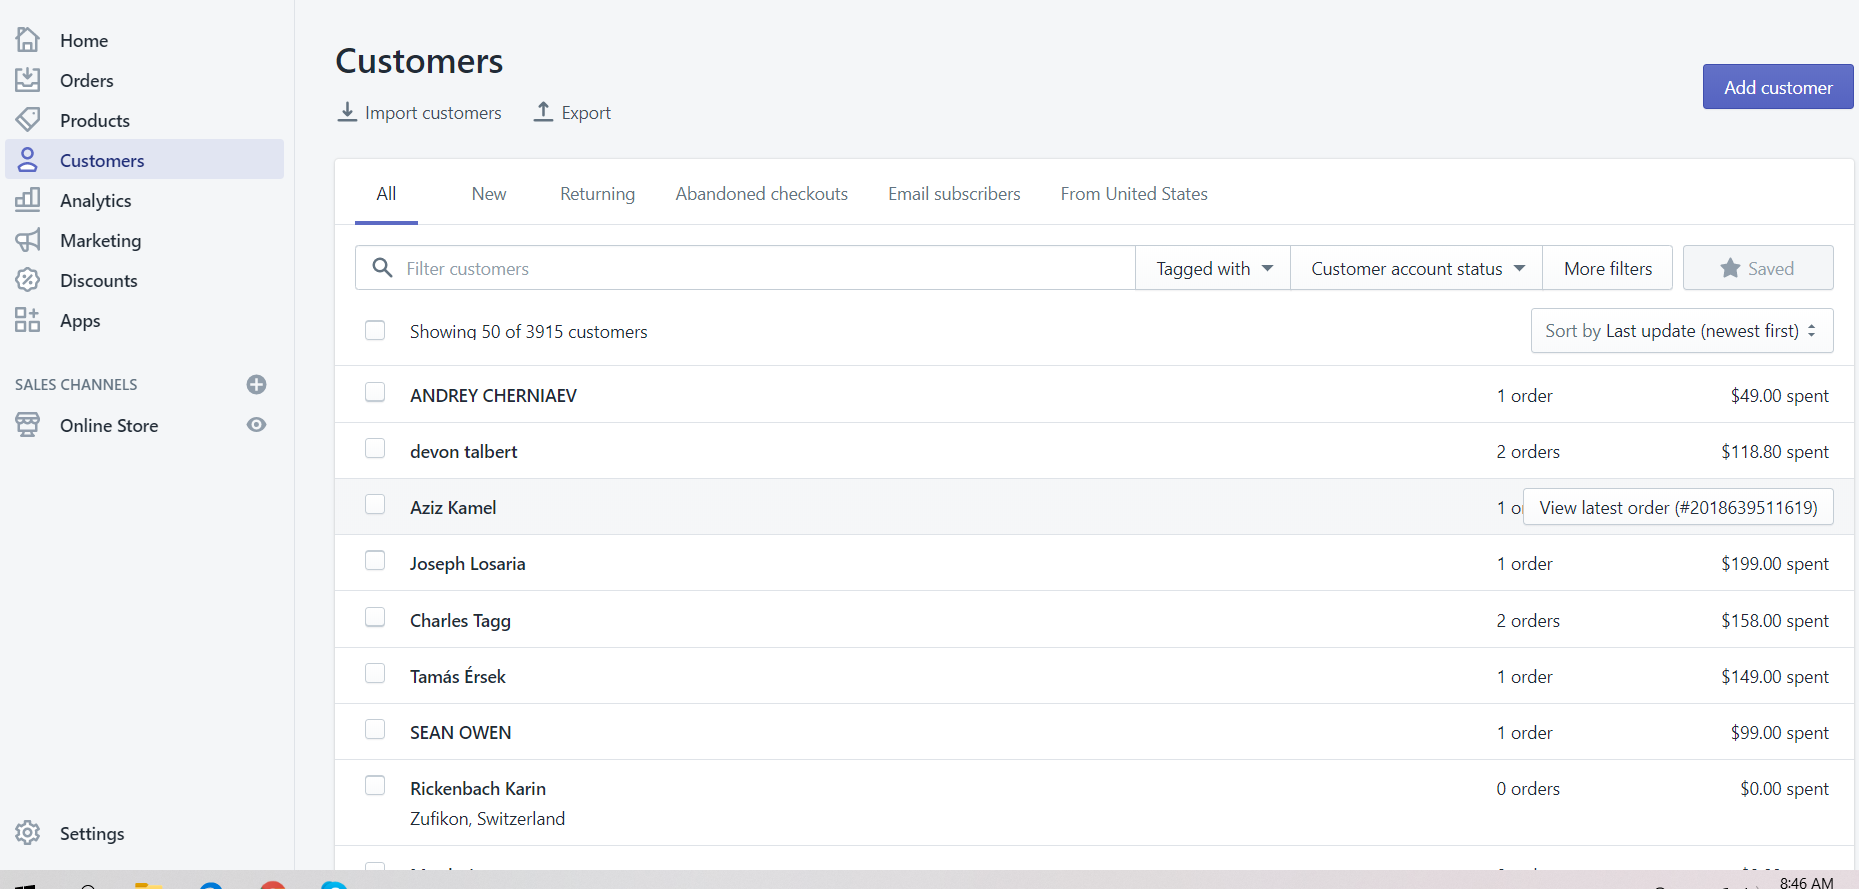
Go to your back end to check customers’ and order data.
2. Set up your Shopify store
After verifying successfully your cart to cart migration, you can personalize the store by choosing a Shopify theme, and setting up the payment options or shipping methods.
To successfully launch your Shopify business, take a moment to read our comprehensive articles:
3. Run Recent Data Migration
During and after the Magento to Shopify migration, LitExtension still keeps your Magento website active normally to ensure the service doesn’t affect your sales or business performance. So, your old website can still receive new orders, customers, and new products throughout the data transfer or when you’re configuring your new store after the migration.
For more detail, our Recent Data Migration service helps you to transfer all the newly arising entities in your source cart to the target one. If you have any questions, feel free to contact our support team to help securely import to Shopify or with any eCommerce re-platforming project.
Please take a look at the video below to see how LitExtension perform the Recent Data Migration.
4. Change DNS and switch domain
As your website successfully migrate Magento to Shopify, the existing Magento domain may be invalid, and any links to your website under the previous domain will no longer work.
In fact, DNS helps to link your domain name with the IP address of the network where the server is hosting your site. In addition, your DNS settings provide the link between your custom domain name and the IP address of the network where the server is hosting your site. When you set up a new eCommerce website, you will need to change DNS to point to the new IP address.
5. Try placing some orders
Lastly, this step is to make sure the transaction proceeds smoothly after the migration. Therefore, you could know whether your new platform works as you expect. If not, you know what to adjust to facilitate your sale and comfort your customers.
What’s more, look at our detailed recommendations on a Shopify launch checklist to kick off your business more effectively.
Save Time Import Store Data to Shopify
Trusted specialists streamline migrations that actualize ambitions.
Which Data Can Be Migrated from Magento to Shopify?
Here’s the full list of entities that LitExtension can help you migrate from Magento to Shopify:
[wptb id=59931]How Much Does It Cost to Migrate Magento to Shopify?
If you choose to transfer from Magento to Shopify using the LitExtension migration service, the price might range from $79 per project.
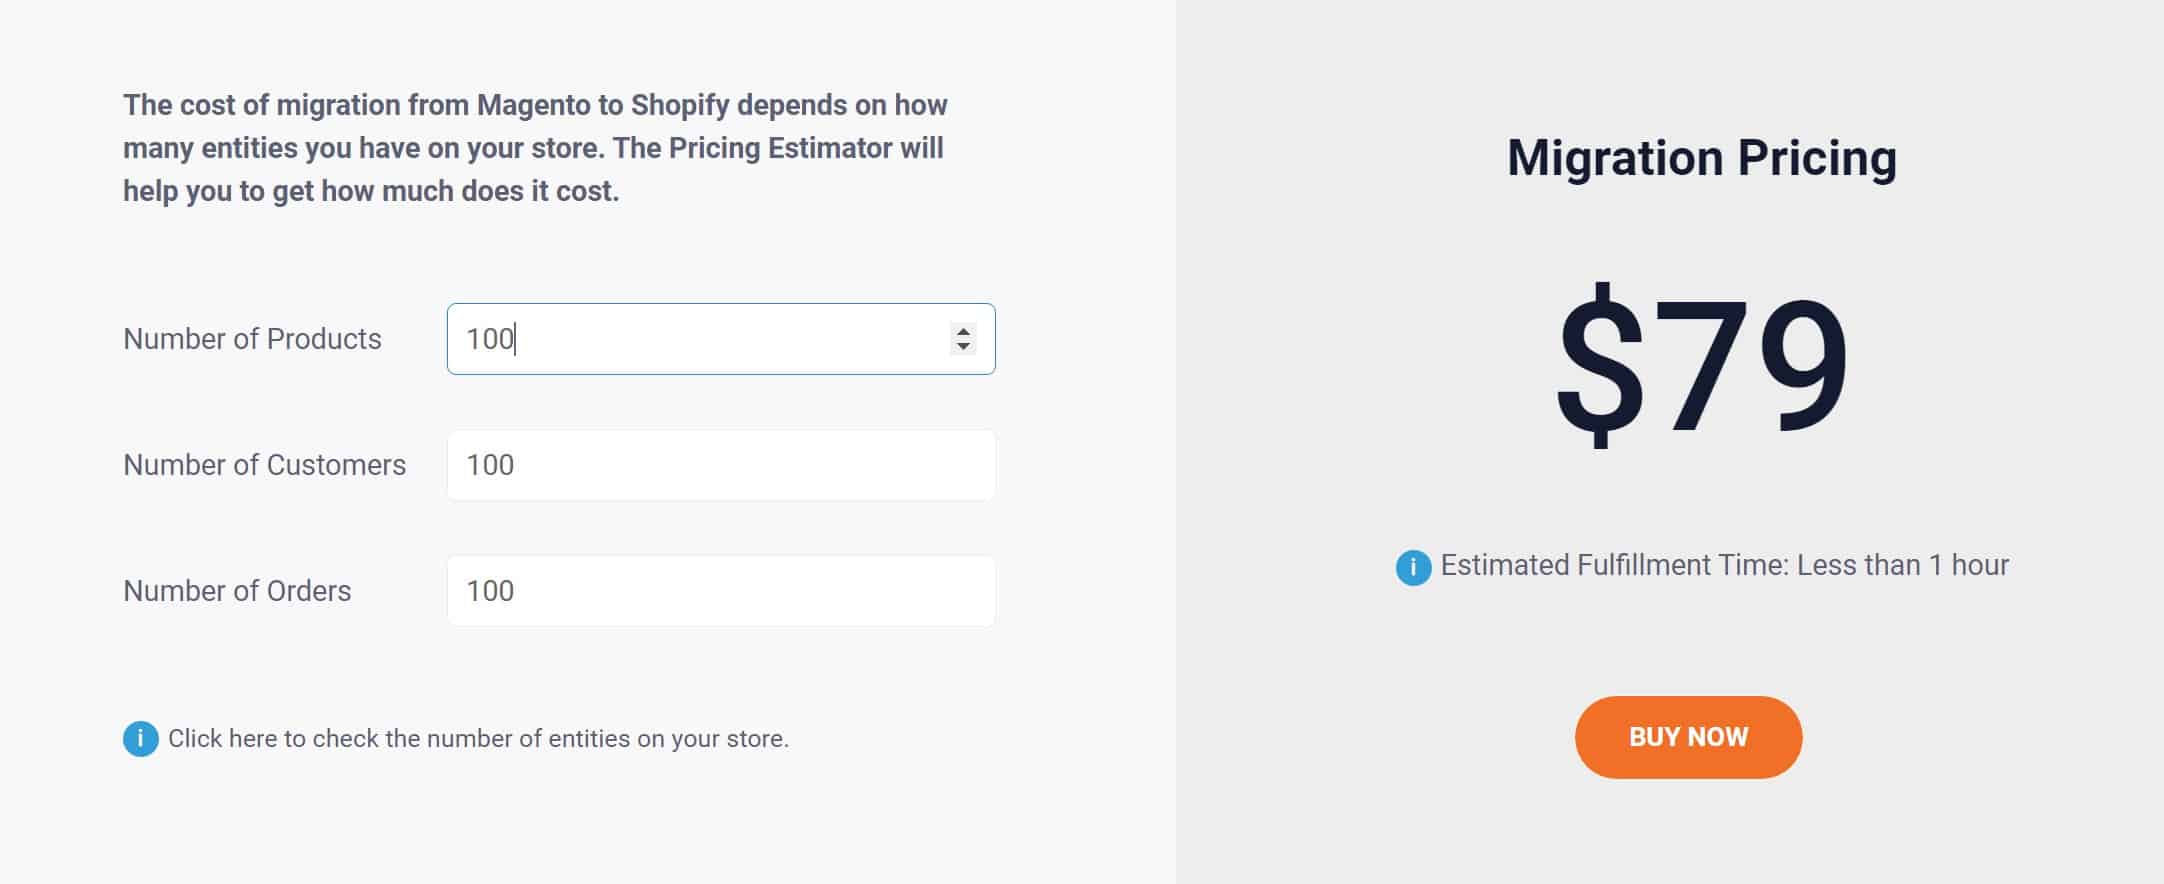
With that being said, in case you want to minimize the manual effort of setting up your store, why don’t you use LitExtension All-in-One Migration Package? By opting for this service, you’ll get a dedicated personal assistant to handle your migration process from A-Z. Rest assured that everything is in good hands, so you can focus on generating more sales and bringing your business to the next level.
The price for this special package starts from $139, based on the number of entities and the complexity of your migration project.
Make Your Migration Project A Breeze with LitExtension
Don’t have time to switch from Magento to Shopify? Opt-in for our All-in-One Migration Service to have an exclusive Personal Assistant carry out the Shopify Migration for you without having to lift a finger.
5 Tips to Optimize Your Store After the Magento to Shopify Migration
Now that the migration is completed, you have successfully transferred all your data from Magento to Shopify. But that’s not all. It’s time we optimized your Shopify store to make sure that it performs smoothly after the migration.
Below are 5 things you need to do to optimize your eCommerce website and ensure that it’s ready for business.
#1. Improve the site loading speed by optimizing images, minimizing unnecessary scripts, and leveraging caching techniques.
#2. Use high-quality product images and provide detailed product descriptions to enhance the overall user experience
#3. Test your store on various screen sizes and resolutions to ensure it looks and functions well on mobile devices like mobile phones or tablets
#4. Optimize your product pages for SEO by using unique and descriptive meta tags
#5. Customize your URL structure to be search engine-friendly by including relevant keywords
Why Migrating from Magento to Shopify Is Optimal?
There’s no doubt that Shopify and Magento are among the best eCommerce platforms. However, during our ten years of experience working in this industry, we noticed that the Magento to Shopify migration trend has steadily increased. This indicates that many merchants believe Shopify is a better destination for their businesses.
Here are six reasons why Shopify migration is what online sellers need, based on our analysis and interviews with over 1,000 merchants:
#1. Shopify offers a more intuitive and user-friendly interface, making it easier for everyone to set up and manage their online stores.
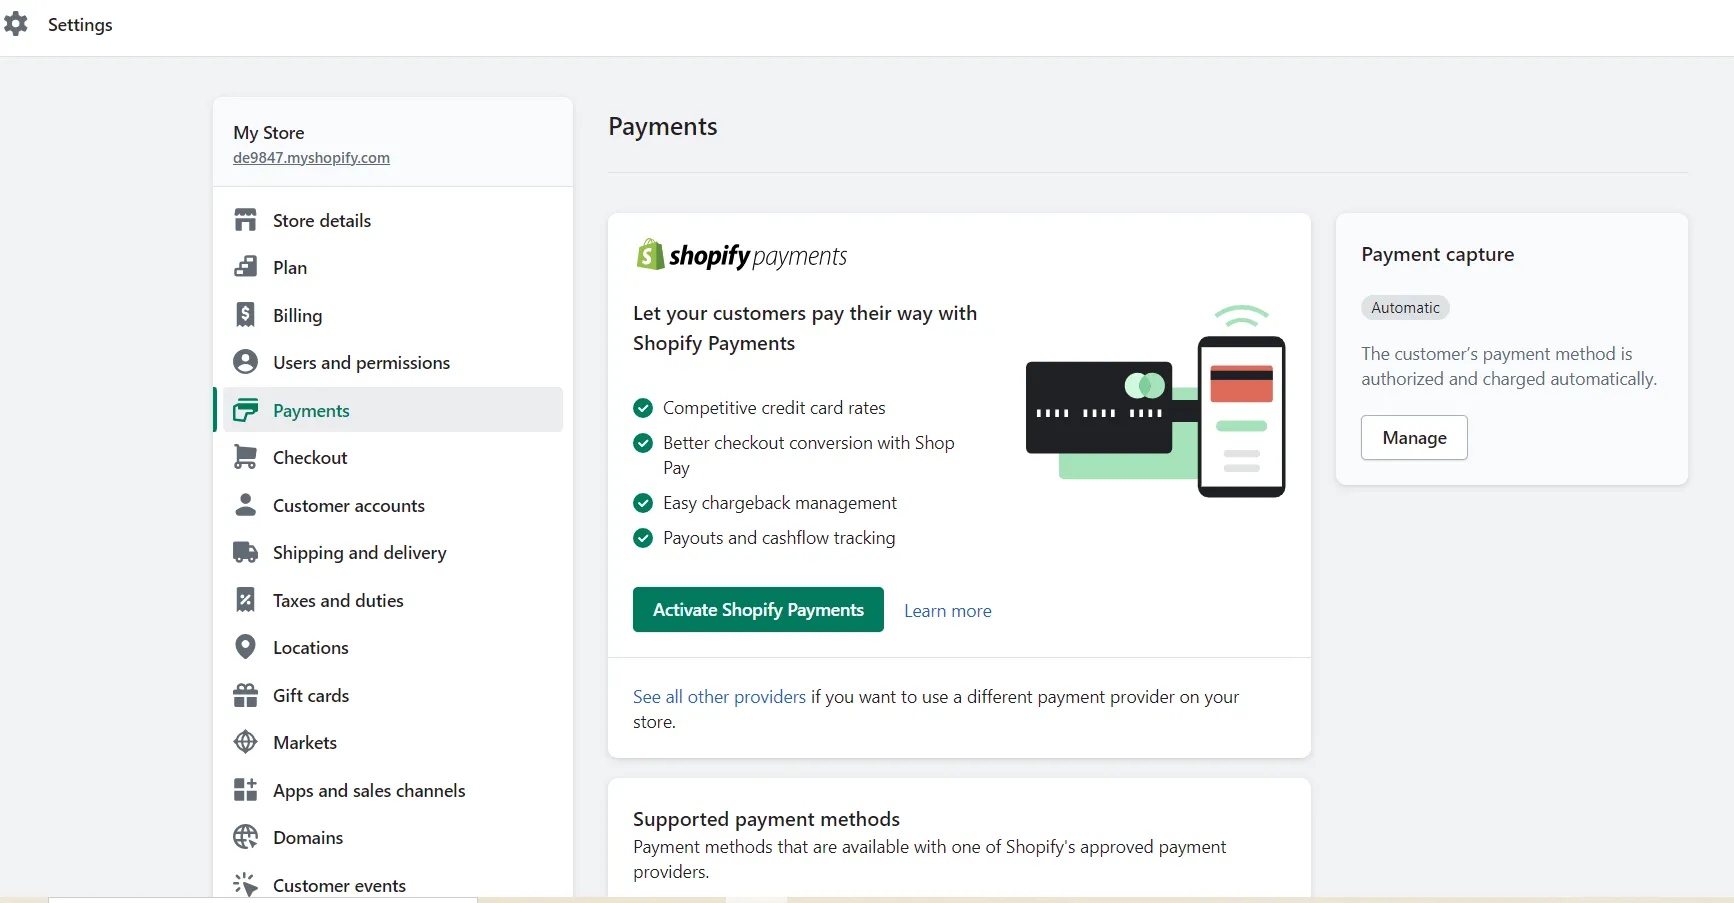
#2. Shopify eliminates the burden of setting up hosting and other technical aspects by yourself.
#3. Shopify is packed with a wide range of apps and themes. They can integrate easily into your store, providing greater customization options without getting the code involved.

#4. Shopify scales seamlessly as your business grows. It allows you to handle increased traffic and sales without the need for extensive development work.
#5. Shopify takes care of performance optimization and security updates. This platform ensures a reliable and secure shopping experience for your customers.
#6. Shopify offers 24/7 customer support through various channels, providing timely assistance whenever you encounter issues.

How to Migrate Magento to Shopify – Recap
In conclusion, you can easily migrate from Magento to Shopify in 6 simple steps:
#1. Back up data on your Magento website: Export your Magento information to avoid data lost
#2. Create a new Shopify store: Don’t forget to get your new website up and running before moving from Magento to Shopify
#3. Set up Source Cart and Target Cart: Fill in the essential information about your Source Cart and Target Cart
#4. Select entities to migrate: Choose all the data you want to transfer from Magento to Shopify. Feel free to further enhance your migration capabilities with Additional Options.
#5. Migrate from Magento to Shopify: Now that everything is ready, it’s time to import to Magento to Shopify.
#6. Perform necessary after-migration activities: Last but no least, remember to check the result after migration and perform some essential tasks to ensure your WooCommerce site works smoothly.
Migrate Magento to Shopify – FAQs
[sp_easyaccordion id=”55916″]
Conclusion
In conclusion, there is an upward trend among e-merchants that migrate from Magento to Shopify. Therefore, if you are planning to move away from Magento, Shopify would be a viable alternative.
To ensure your data to migrate Magento to Shopify is error-free, LitExtension would be a trusted Magento to Shopify migration service that you should consider. You can easily walk through moving from Magento to Shopify, as we have set detailed instructions for every step you make.
Let’s check out other articles in our LitExtension blog and join our community to get more eCommerce knowledge. Good luck with your future migration!
