If you are looking for a way to migrate Squarespace to Shopify, welcome to the right place!
In this article, LitExtension – #1 Shopping Cart Migration Expert will provide you with optimal methods and step-by-step instructions on how to migrate Squarespace to Shopify. But first, it’s important to acknowledge that not all data migrates flawlessly, and sometimes you might need to recreate elements like customer accounts manually.
That’s why we have created 3 stages to help you migrate Squarespace to Shopify seamlessly:
- Stage 1: Preparation
- Stage 2: Kickstart the migration process
- Stage 3: Follow after migration checklist
Let’s start right away!
Seamlessly Migrate Your Store from Squarespace to Shopify
Our team of experts can safely transfer your business data, products, customers, and orders to unlock more growth on Shopify’s robust platform. Let us provide a customized migration proposal.
Benefits of Moving from Squarespace to Shopify
#1. You can focus more on eCommerce
Shopify is built to handle growing businesses and is equipped with various tools for online selling. Here are some outstanding features you can get when migrate Squarespace to Shopify:
- Features like abandoned cart recovery and advanced discount options help you increase sales and optimize promotions.
- You get in-depth inventory tracking, stock level alerts, and features to handle complex product variations.
- Shopify seamlessly integrates with various sales channels, allowing you to sell across different platforms.
#2. You get more customization and control
Though being a hosted solution, Shopify still excels in offering ways to tailor your store to your exact needs:
- You can explore a vast library of apps to extend functionality in marketing, customer service, design,…
- Shopify themes often provide deeper customization options than Squarespace templates, letting you adjust your store’s appearance.
- API of Shopify unlocks the ability to create highly bespoke solutions and integrations, ideal for businesses with unique requirements.
#3. Shopify offers robust marketing features
Shopify’s built-in marketing toolkit provides a solid foundation, and you can significantly expand your capabilities for more tremendous success:
- The Email Marketing tool lets you create newsletters, abandoned cart emails, and promotions.
- You can easily promote and set up various discount types (percentage, fixed amount, free shipping) to drive sales.
- Shopify grants a clear overview of your store’s performance by reporting on traffic, sales, and customer behavior.
Besides, the Shopify App Store offers a wealth of specialized marketing apps for advanced email campaigns, loyalty programs, SMS marketing, and so much more.
#4. Shopify offers more payment options
Shopify integrates with over 100 payment gateways worldwide. This means you can offer a wide range of popular and localized payment options to ensure a smooth checkout experience tailored to your customers’ preferences.

What’s more, this platform has its in-house payment gateway, called Shopify Payments. Shopify Payments delivers a streamlined experience with no external transaction fees (within supported countries).
But wait! Before going to the migration steps, we want to highlight some reasons why someone might choose NOT to migrate Squarespace to Shopify:
- If you focus on content rather than on commerce, Squarespace’s design ease and all-in-one structure may be preferable.
- You may face a learning curve if you are not familiar with website management concepts.
- Shopify’s advanced features and higher-volume sales come at a higher cost than Squarespace equivalents.
- You can embed a “Buy Button” to use Shopify with Squarespace to enjoy a taste of Shopify’s selling power without a full migration.
The decision ultimately is on your business needs and priorities. It’s essential to weigh the value that Shopify’s features would bring against the effort and potential drawbacks of migration.
Stage 1: Prepare Migration Process from Squarespace to Shopify
Before you migrate Squarespace to Shopify, it’s crucial to export and have a backup of your Squarespace site. Migration can be complex, and having a backup ensures you won’t lose any data.
#1. Audit Squarespace data
When preparing to move your website from Squarespace to Shopify, it’s important to review your Squarespace site’s content and data thoroughly. This will help you identify exactly what needs to be migrated.
Next, you can analyze Squarespace features to see if they have direct equivalents in Shopify, which will help you select the right apps and customization requirements. Lastly, the audit can help you clean up and identify outdated or unnecessary data that can be excluded from the migration.
This review should cover various aspects, such as:
- Products (number, variations, inventory levels);
- Pages (basic content pages you want to migrate);
- Orders;
- Customers;
- Any custom code or specific features.
#2. Export Squarespace data
Store Database is extremely important because it contains all the information about your product, price, customer, and order. Therefore, backing up your data before switching from Squarespace to Shopify is the first thing you have to do to avoid unexpected malfunctions and conflicts.
Follow the steps below to create a backup version for your Squarespace store.
Export content
Let’s start with your content first. There are 8 steps to export certain content from your Squarespace site into a .xml file.
- In the Home Menu, choose Settings.
- Select Advanced, and then click Import / Export.
- Click Export.
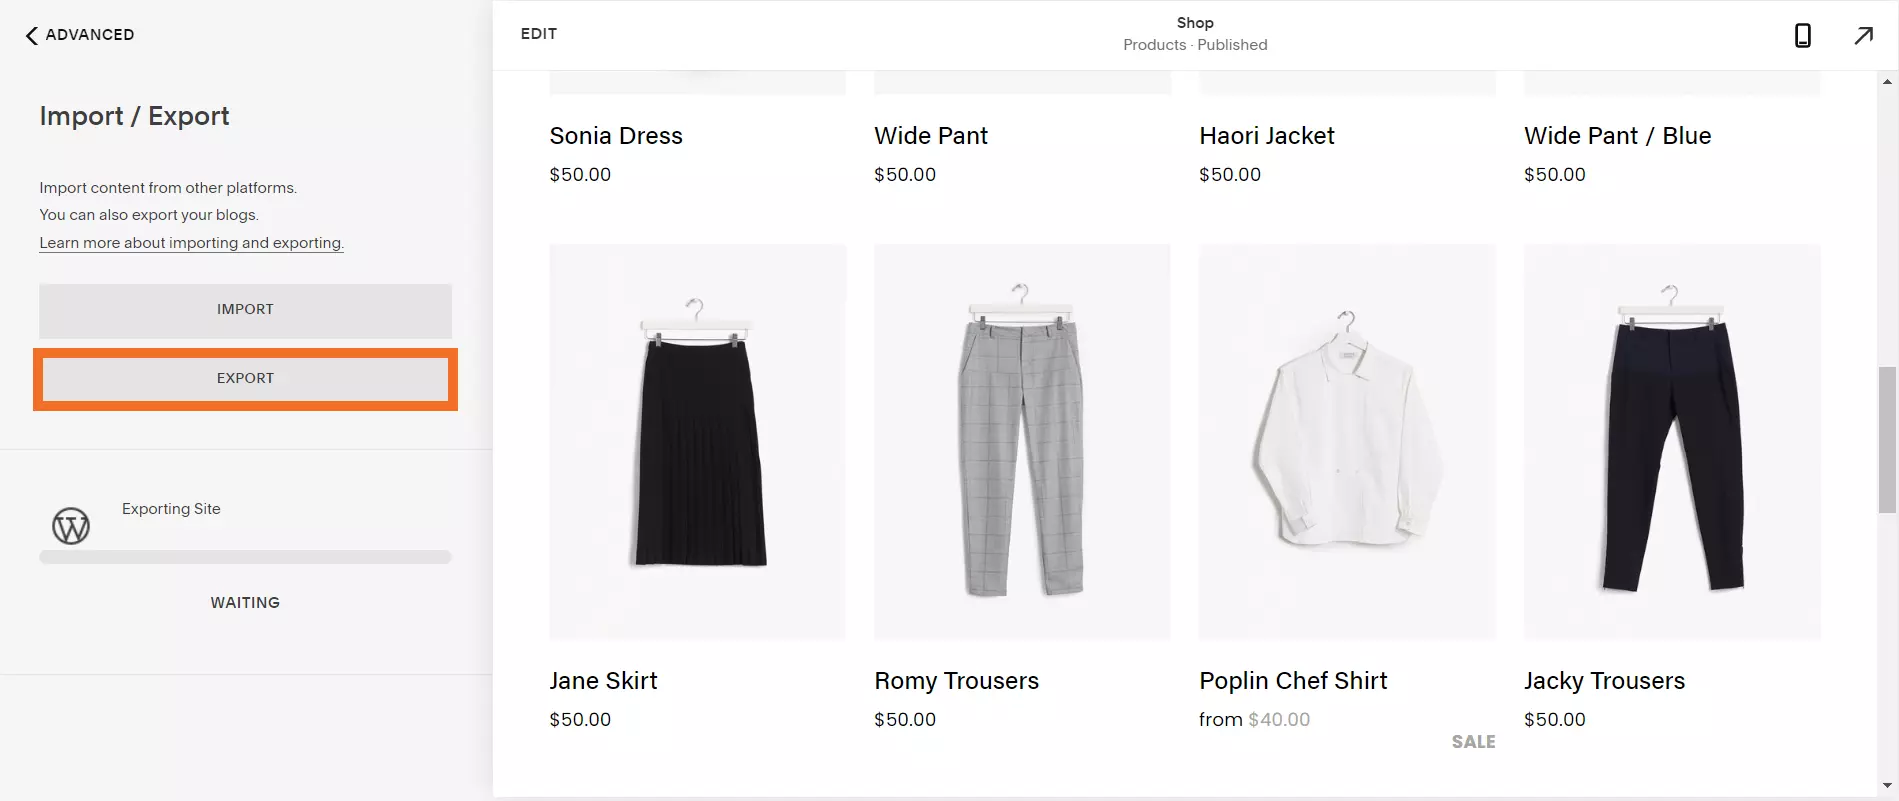
- Click the WordPress> icon.
- Select a blog to export from the drop-down menu on Select Primary Blog message
- Click Export.
- Wait a few minutes for the export process.
- Click Download to save the .xml file to your computer.

Export orders or products
Next, export your products into a CSV file. This can be done with just a few clicks.
- In the Home Menu, click Commerce, then select Orders/ Inventory.
- Click Export all.
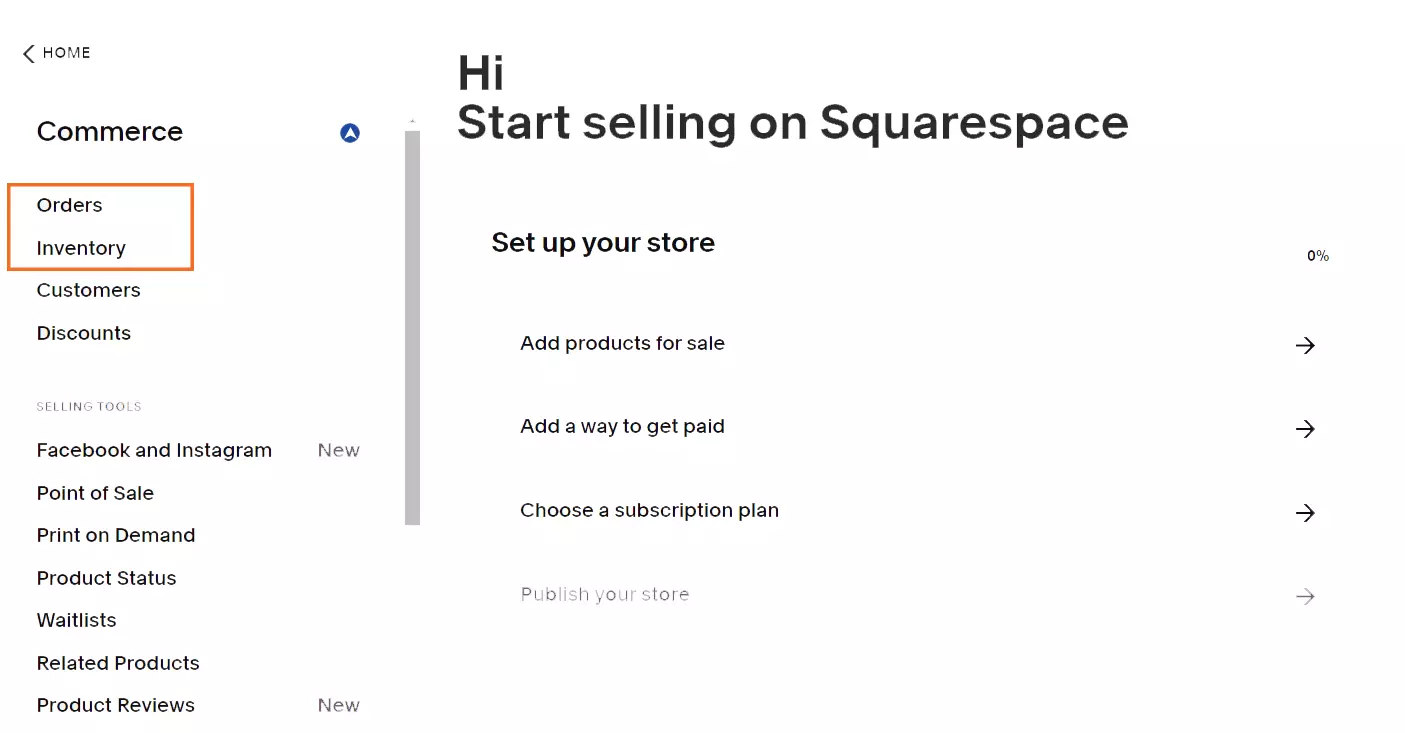
Besides, you can export specific products in the Inventory Panel.
Export customer

Finally, on the Customers view, click the “…” icon in the top right corner. Select Export all profiles, then click Confirm. This can help you create a CSV file that includes customers’ information, total orders, total spend,…
#3. Create a new Shopify store
After backing up your old website, it’s time to set up a new Shopify store so that you have a place to transfer your data.
Here are a few simple steps you should follow to build and kick off your business on Shopify.
1. Go to the Shopify homepage and create a new account. If this is the first time you register to Shopify, you’ll be able to claim the “$1/month for 1 month” deal and $50 app store credit after the free trial.
For further details, please check out our Shopify tutorial or watch the video below!
2. After gaining access to the Shopify Dashboard, choose the best Shopify theme for your store. Here, you can freely customize and personalize your website to align with your brand image.
And now, you should ask yourself “How closely can a theme replicate the design of your Squarespace store?” and be prepared for some differences.
3. Set up crucial eCommerce features that help you manage your business effectively. At this stage, in case you want to further enhance your store’s functionalities, feel free to install third-party plugins on the Shopify App Store.
4. Purchase a Shopify pricing plan and publish.
Great tips for you!
Do you know that you can save 25% when opting for Shopify annual plan?
Yes, you are not misreading. Shopify offers a much lower subscription fee exclusively for long-term users. Let’s take the “Shopify” plan as an example. The monthly price for this plan is $105, in the meanwhile, you’ll only be charged $79 per month when paying for the whole year in advance.
Therefore, our advice is to go for an annual Shopify plan to save a big fortune.
#4. Choose a migration method
Your decision here will greatly affect the ease, cost, and complexity of your migration process. Here’s a guide to help you carefully consider your options to migrate Squarespace to Shopify.
#4.1. Manual migration
You will need to manually import your products and customers from Squarespace CSV files to Shopify. For orders, you might need to use third-party apps for support.
- Pros: Free (aside from the time investment), full control over the process.
- Cons: Time-consuming and technically demanding since the Squarespace CSV needs to align with the Shopify data structure.
Ideal for: Store owners on a budget with technical skills and a relatively simple product catalog.
#4.2. Third-party app/service
Normally, this option will ease your effort to migrate Squarespace to Shopify automatically.
- Pros: Automates much of the process, handles complex data, and potentially migrates more elements than the manual method.
- Cons: Cost (though some apps offer free trials or basic plans), less hands-on control.
Ideal for: Store owners who want a streamlined approach have a larger or more complex store, or value saving time.
Currently, LitExtension is the #1 eCommerce migration service and an official Shopify Partner.
#4.3. Hire a Shopify Expert
You can visit the Shopify Expert directory to find an expert who can handle the whole migration process for you.
- Pros: Stress-free, handles technical details, experts can customize the process to your needs.
- Cons: Most expensive option.
Ideal for: Businesses undergoing significant store redesign or those desiring an entirely hands-off migration.
Stage 2: Kickstart Squarespace to Shopify Migration
Now that your Squarespace database is backed up and the new Shopify store is ready, let’s migrate Squarespace to Shopify. Now you have 2 options:
- Import data to Shopify manually
- Choose a migration service
#Method 1. Manually import
If you choose to import manually, as mentioned earlier, you will need to import products and customer data to Shopify individually. Your CSV file must align with the Shopify format.
To import products
#1: Download a sample CSV file
The sample dataset includes a field example with its related information. Before generating your import file, ensure that you delete the sample to avoid mixing it up with your actual items.

#2: Format your Squarespace CSV file to align with the Shopify template
While Shopify provides a template for product CSV imports, the key point is to match your exported Squarespace data to this template.
- The first line of your product import file must contain the column headings for each field.
- Then, specify your data sets by adding value to the columns.
When uploading your products to the Shopify import file, the “Title” and “Handle” columns are required.
#3: Upload CSV file to Shopify
Once you have finished creating or editing the Shopify import products file, let’s upload it to the system.
Note: The size limit for your product CSV is 15 MB.
Here’s the process:
- Start by navigating to “Products” > “Import“

- Select the Squarespace CSV file and click “Upload and preview”

- Review your file once more and then click “Import products”
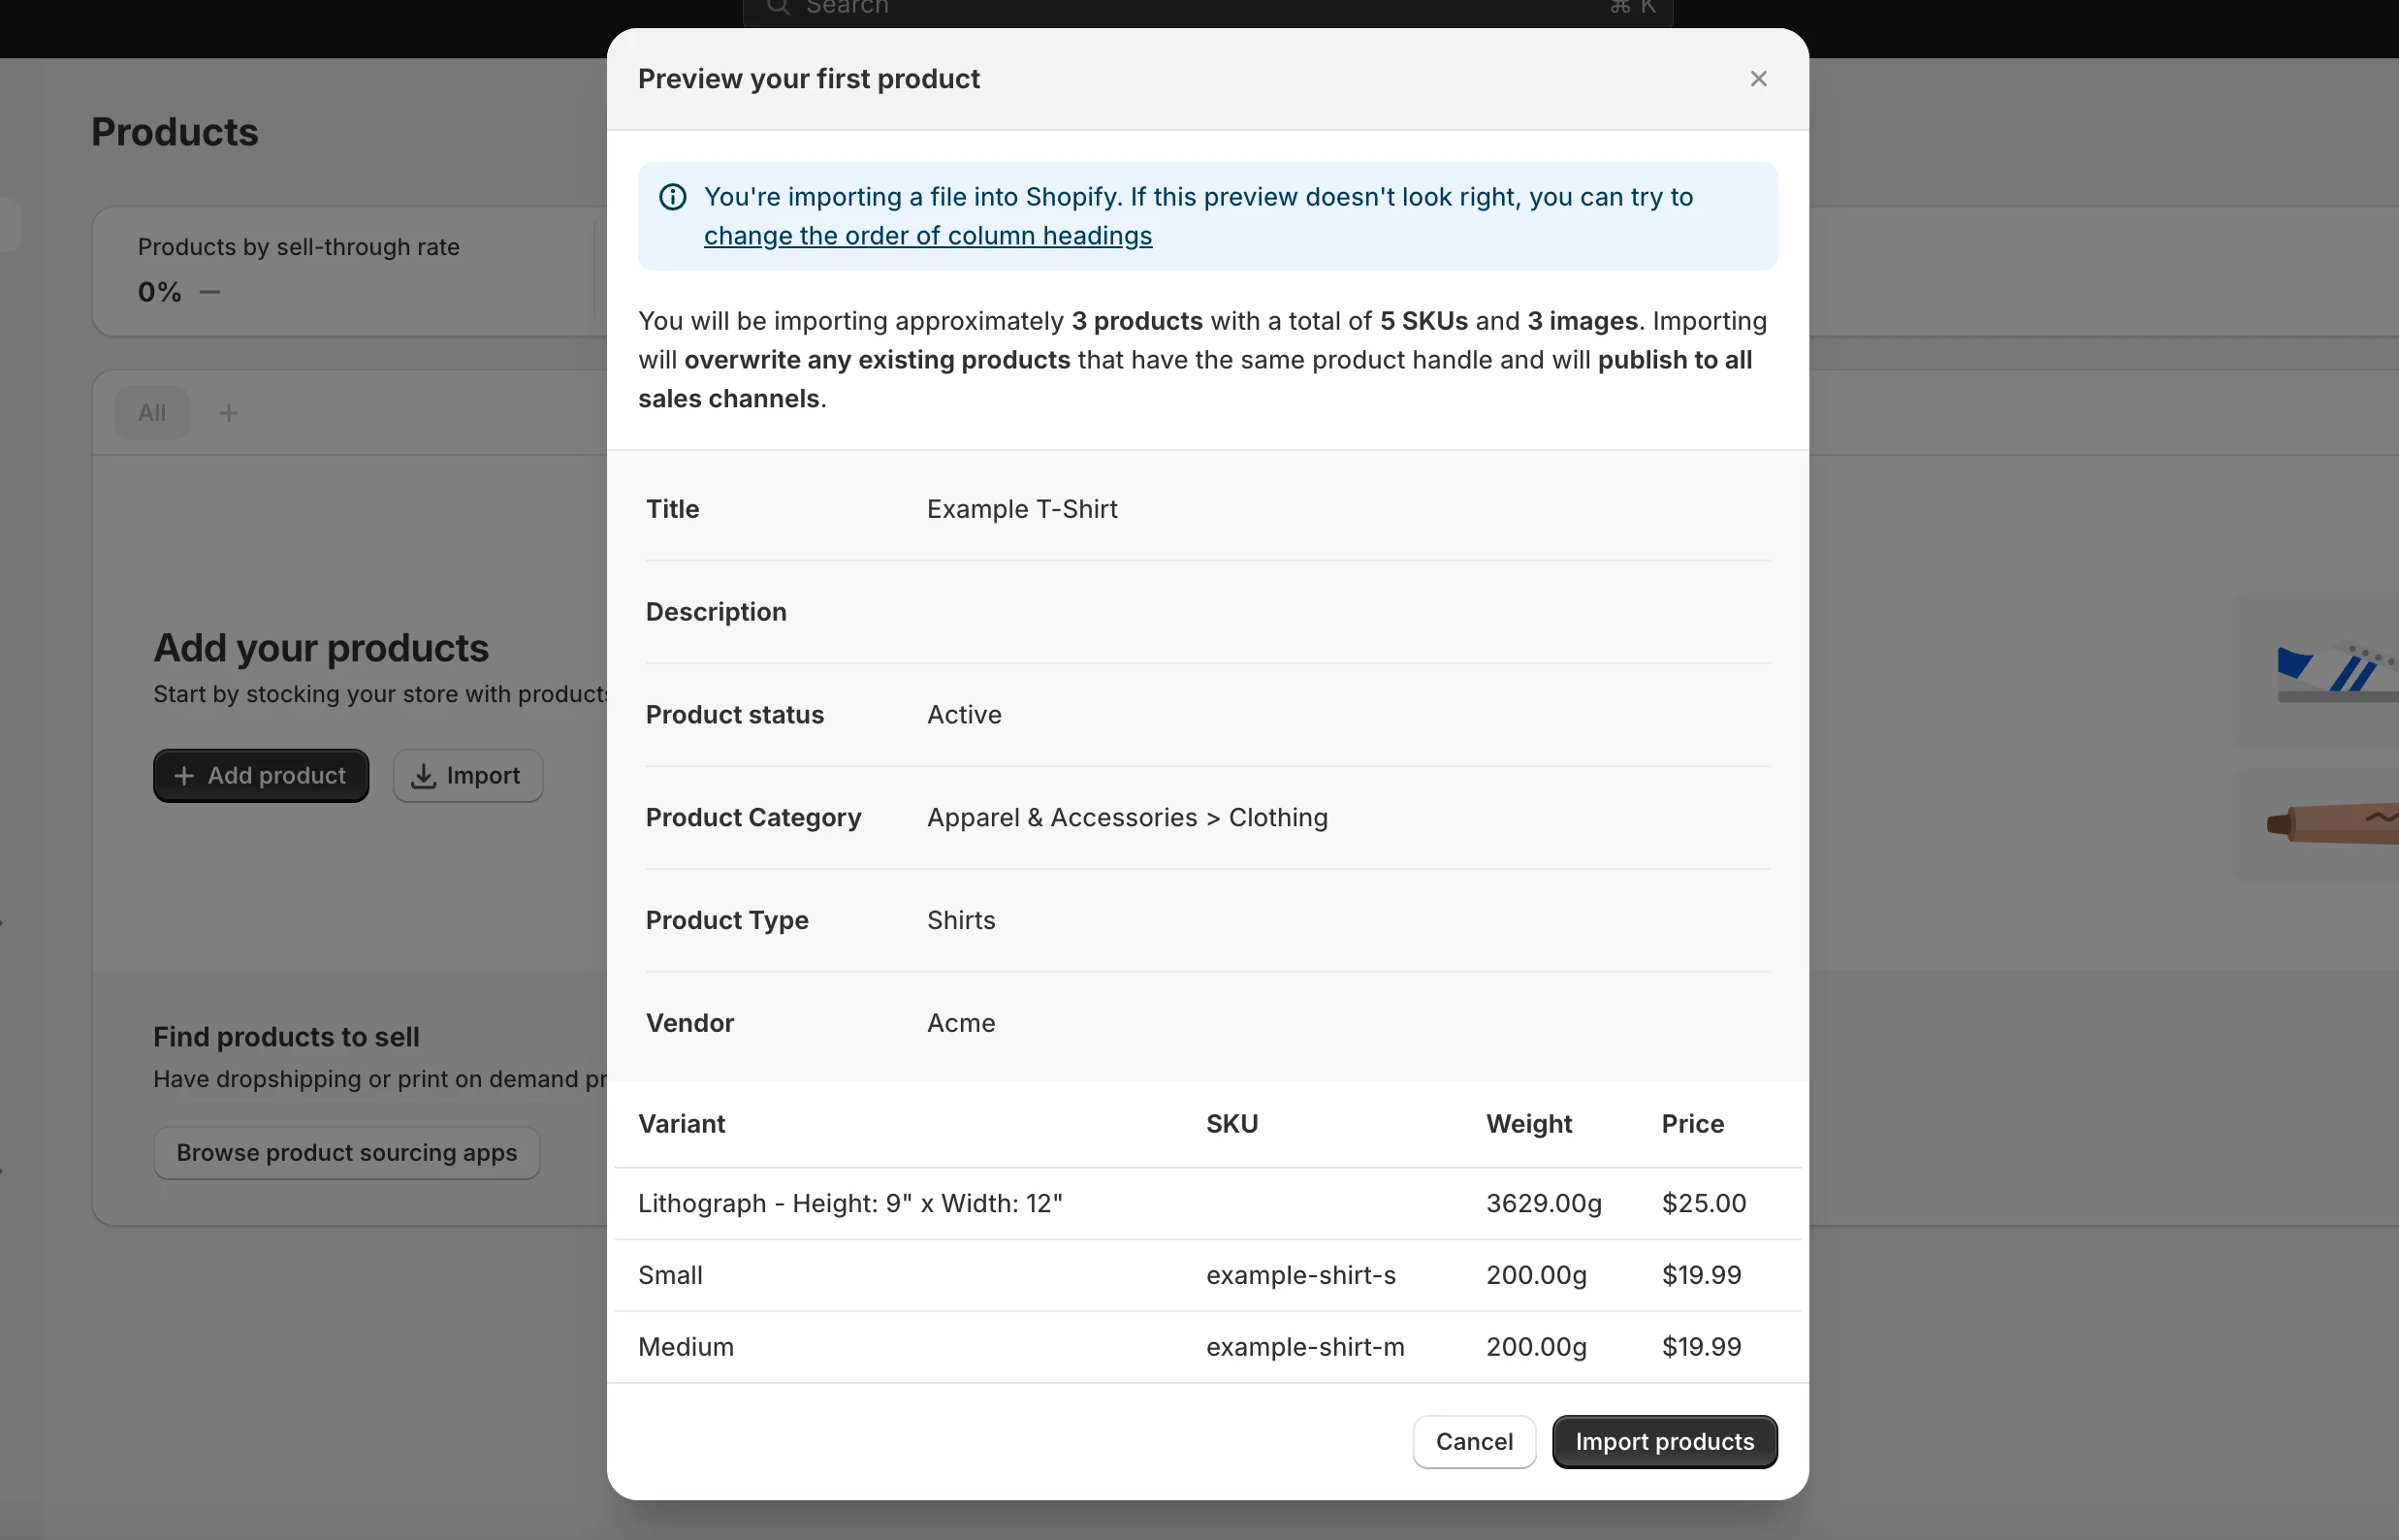
This is how you import Squarespace products to Shopify.
To import customers
You can follow the exact steps like products.
Note: Your Squarespace customer CSV files must be less than 1 MB in size to be imported.
#1: Download Shopify customer template

#2: Customize Squarespace customer file to align with the Shoifpy data structure
#3: Import Squarespace CSV file to Shopify
Once you have finished creating or editing the Shopify import customers file, let’s upload it to the system. Here’s the process:
- Navigate to the “Customers” tab on the left side of your dashboard after logging in > “Import“
- Select “Add file” > “Import customers” to import your CSV files from your computer
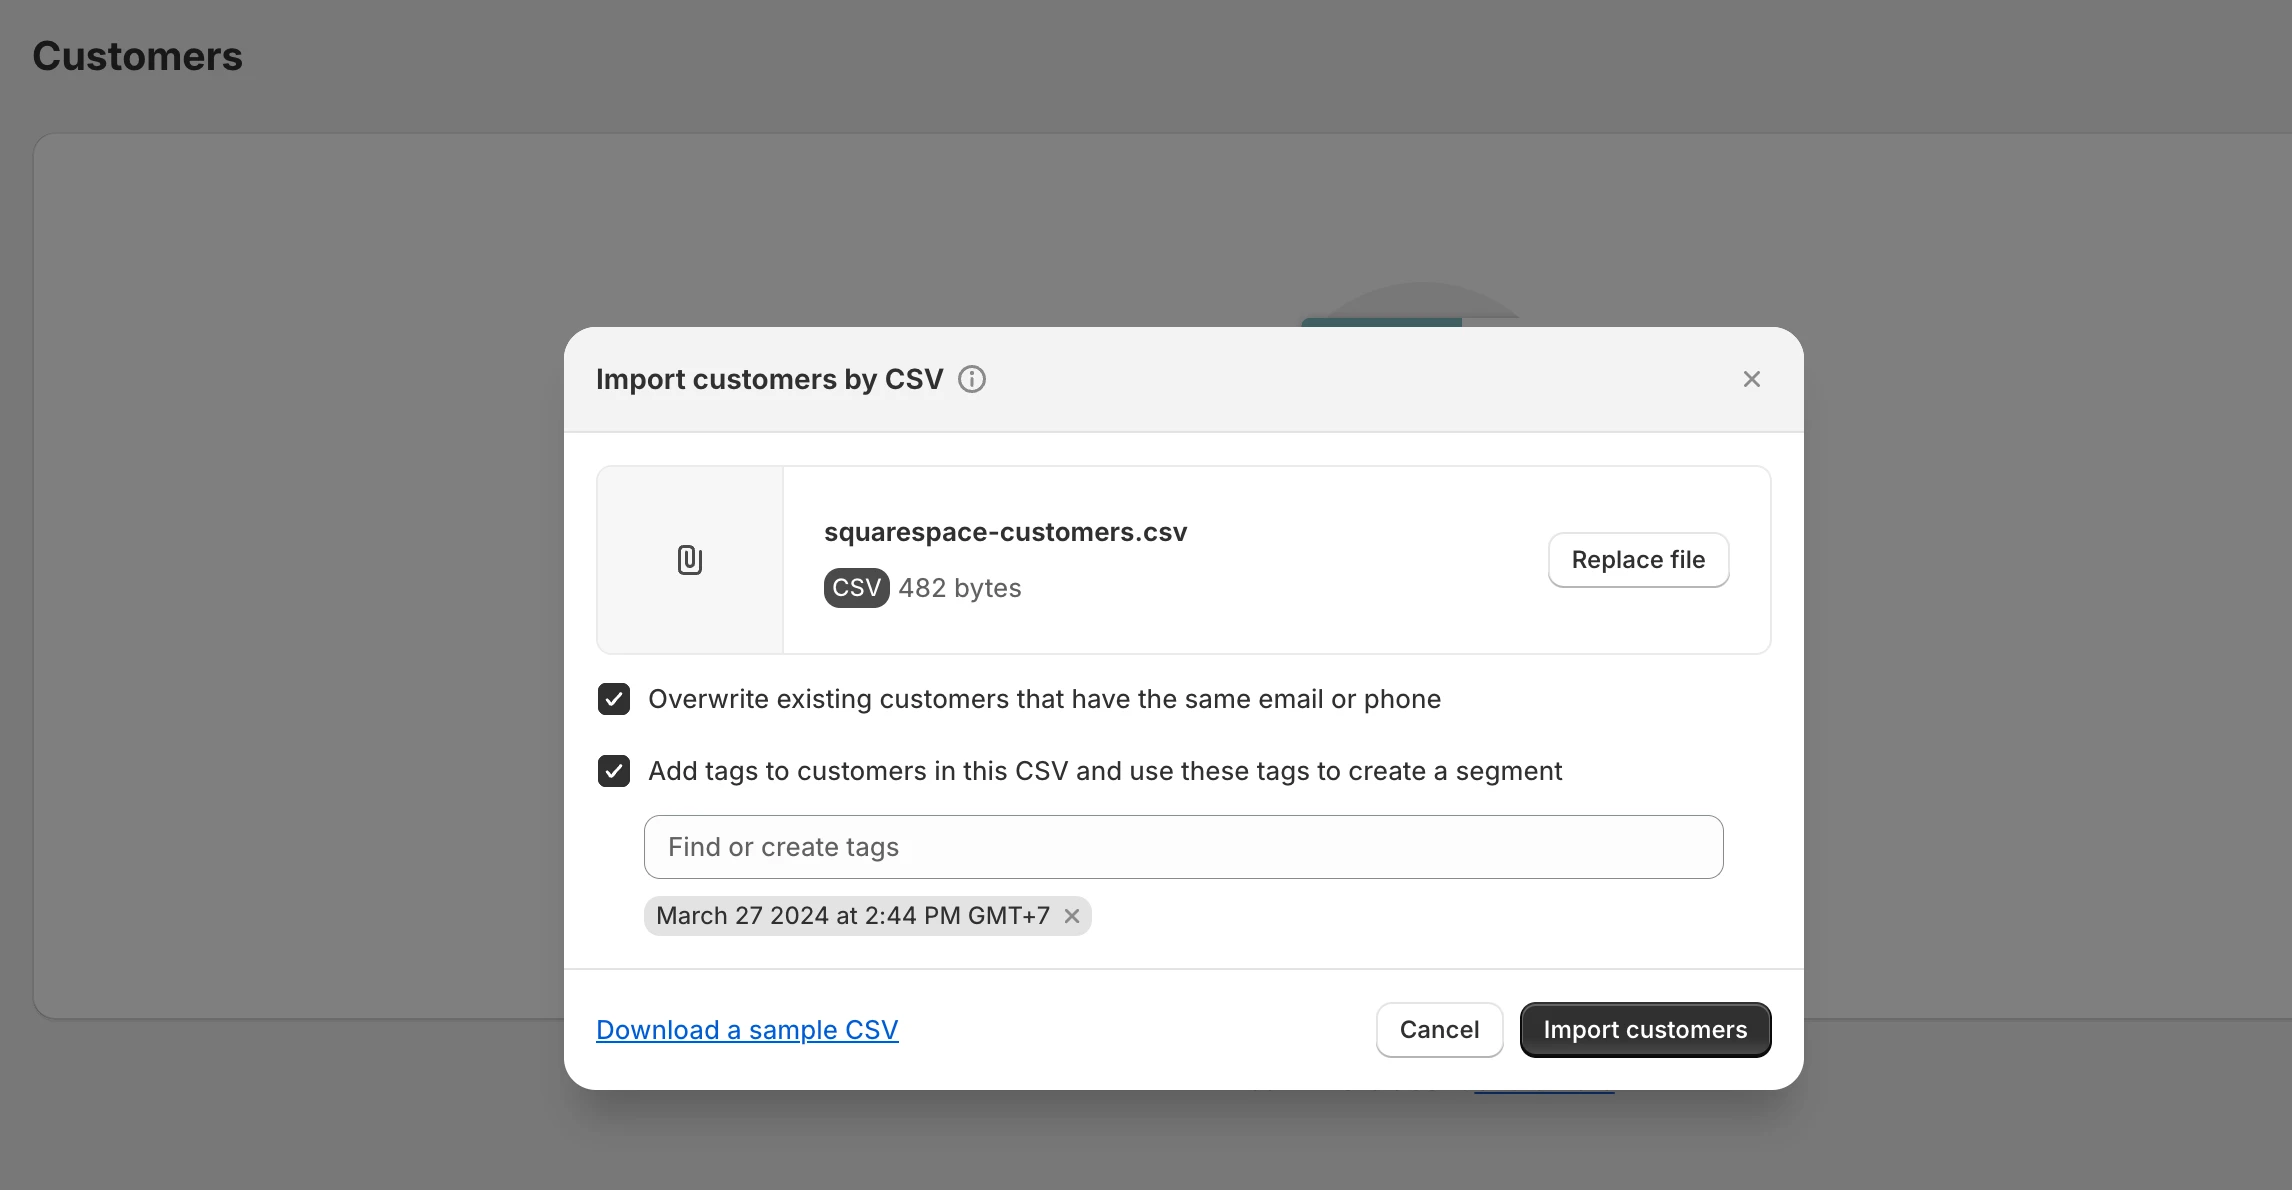
- Review your file once more and then click “Import customers”
For orders, you might need to use third-party apps for support. That’s why using a migration service would be a better solution.
#Method 2. Use a service to migrate Squarespace to Shopify
⚠️ Important alert!
Please note that when transferring data from Squarespace, you might be prone to unexpected errors and conflicts due to the instability of Squarespace. Therefore, our advice is that if you want to migrate Squarespace to Shopify, go for the LitExtension All-in-One package instead of modifying all your data manually.
LitExtension is an official Shopify partner and is listed on the Shopify replatforming guide. With 13+ years of experience, we offer an all-in-one service that supports your Squarespace to Shopify migration.
When opting for this premium service, LitExtension’s personal assistant will handle your whole migration project. You won’t have to lift a finger since our expert will carry out the process for you. This will minimize the time and manual effort of transferring data and avoid any conflicts and data loss that may occur.
Save Time Migrating Your Store to Shopify
Trusted specialists streamline migrations that actualize ambitions.
Stage 3: Follow Post Migration Checklist
After the migration is completed, your work is not done yet. Don’t forget to double-check your new Shopify store to ensure that everything runs perfectly.
#1. Check results after migration
Now, let’s make sure that all data has been transferred successfully from Squarespace to Shopify. Contact the LitExtension support team as soon as possible if it has any errors or problems.
You also need to check the data on the Shopify front end. Your products will be displayed on the storefront except for those that are out of stock. After that, you should carefully check all information related to your products, such as product descriptions, images, variants, and meta descriptions. It is quite easy, as you can find them from the catalog or by doing an on-site search.
Note: Shopify has collections and product tags instead of categories and subcategories so you can find your categories and subcategories on your Source store now located in collections and tags on Shopify.
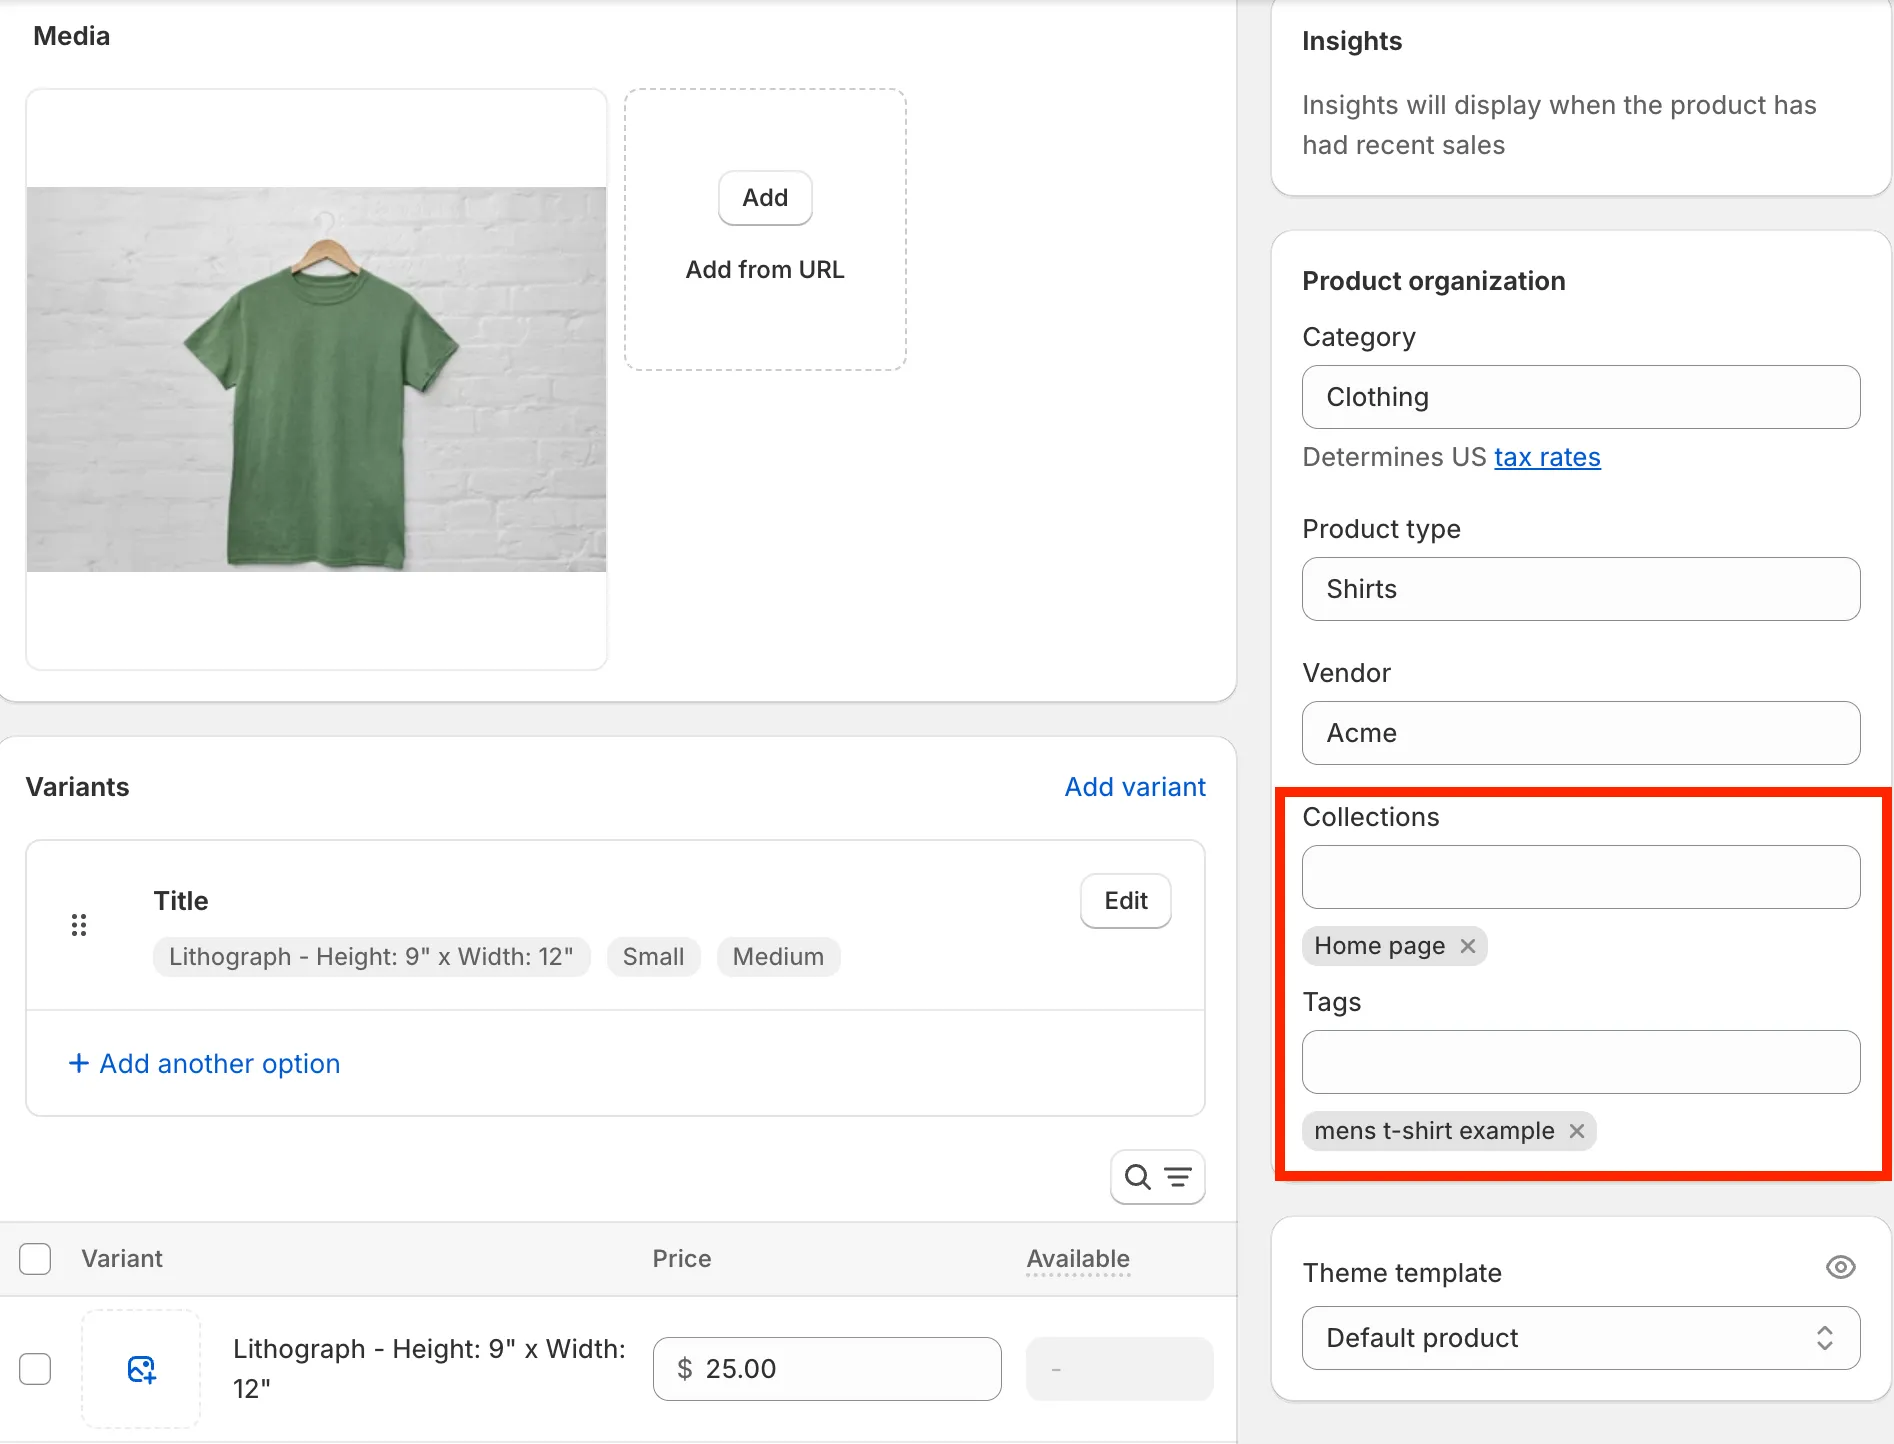
Next, in the back end, check your customer and order data in the admin area.
#2. Run Recent Data Migration
Since the LitExtension service is cloud-based, you won’t have to close or put your store under “Maintenance” mode. Your business can run normally and keep earning profit during the data transferring process.
Therefore, it’s important to run a Recent Data Migration to ensure that all your new entities (including new orders, customers, or changes in the inventory) are transferred to your new Shopify store as well.
#3. Place a test order
Now that all your data has been successfully transferred from Squarespace to Shopify, it’s essential to place a test order to make sure that everything works as you expected.
To learn more about how to place a test order on Shopify, please check out this detailed guide.
We still have more migration tutorials with LitExtension for moving to Shopify awaiting you:
#4. Transfer Squarespace domain to Shopify
Transferring your domain from Squarespace to Shopify ensures a smooth transition for your customers and search engines.
First, you need to unlock your domain in Squarespace:
- Log in to your Squarespace account
- Navigate to the “Domains” section
- Find the domain you want to transfer and click on it
- Locate the “Lock Domain” setting and disable it. You might need to request an authorization code to start the transfer from Squarespace.
Now, log in to Shopify and follow the below steps:
- Go to “Settings” and then “Domains“
- Click on “Connect existing domain“
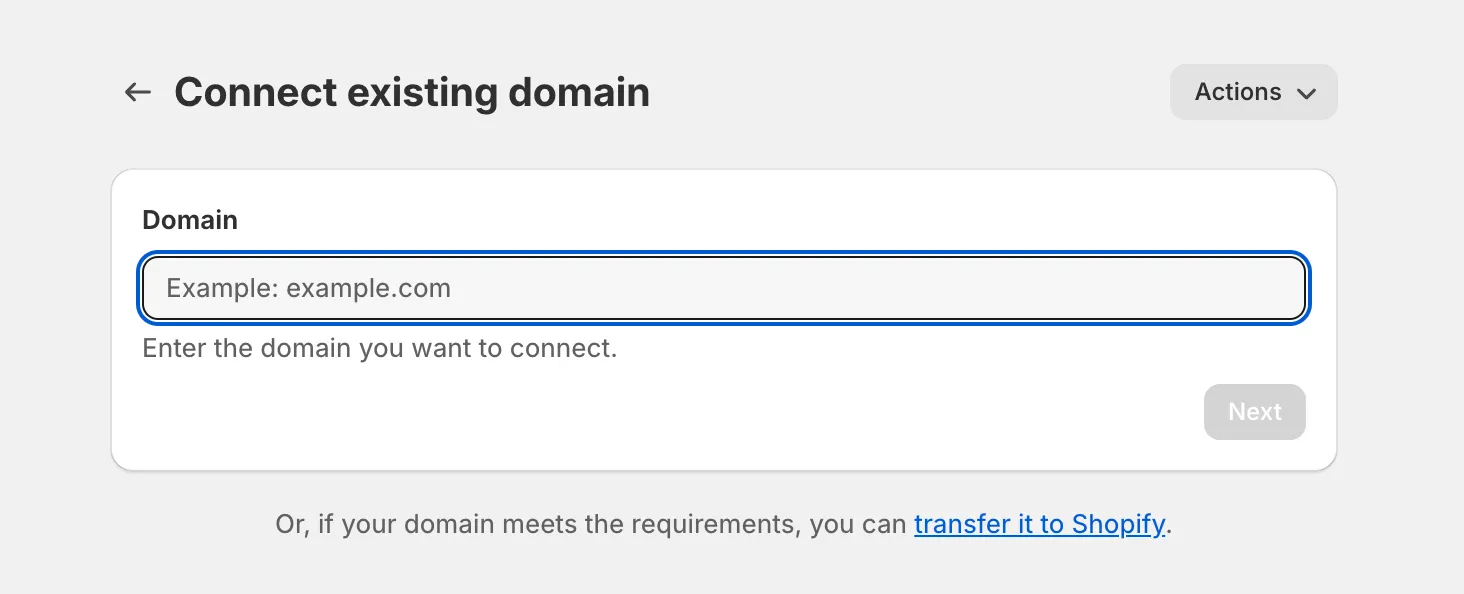
- Enter your domain name and click “Next“. Shopify will verify if the domain is unlocked and ready for transfer.
There’s one small note. In some cases, your domain registrar (the company you purchased your domain from) might be different from Squarespace or Shopify. If so, you’ll need to update your domain’s DNS settings at your registrar to point to Shopify’s servers.
#5. Go live with your new Shopify store!
Once everything is set, you can officially launch your store! Now, let’s announce your new Shopify store to your customers:
- Email Newsletter: Send an exciting announcement to your existing email list.
- Social Media Posts: Share the news across your social platforms.
- Updates on Your Old Squarespace Site: Briefly notify visitors on your old site, guiding them to your new Shopify store.
And that’s all on our guide to migrate Squarespace to Shopify.
Migrate Squarespace to Shopify – FAQs
[sp_easyaccordion id=”55407″]
Final Words
In conclusion, I’ve just shown you very detailed instructions to migrate Squarespace to Shopify using LitExtension’s service.
For more information, you can contact our support agent, we support you 24/7 and help you solve the problem as soon as possible. Let’s join our community to get more eCommerce knowledge. And last but not least, don’t forget to check out our LitExtension blog to find more articles like this.
Other popular Shopify migration pairs:
