What is multistore?
Multistore refers to a set of different shopping stores. Having multiple eCommerce stores is necessary for you in several scenarios. For example, when you sell internationally, you should have different websites serving in different languages so that your stores can get better acceptance in the markets thanks to their ability to speak local language. Or when your product range is significantly diverse, you can sell them in different stores to make it easier for customers to find what they want.
To reduce your management effort and enhance the performance of your stores, multistore eCommerce platform allows online merchants to manage their multiple stores under a single admin page. Therefore, instead of logging into several accounts, you only need one account to manage and set up anything you want for each of your stores.
WooCommerce multistore and how to create
1. About WooCommerce multistore
WooCommerce is one of the most popular eCommerce platforms in the world. It is built on WordPress, a management system used by over 31% of all websites online. WordPress and WooCommerce together offer you a superb ability to scale quickly through a variety of powerful features including creating multistore and multistore management plugins such as WooCommerce Multistore Plugin, WordPress Multisite Plugin for WooCommerce, WooCommerce Global Cart, etc. These plugins enable you to manage unlimited WooCommerce stores from one single WordPress multisite admin better.
2. How to create WooCommerce multistore
Step 1: Download and install WordPress
Obviously, the first step is to download WordPress from WordPress.org.
If you already have a WordPress site, you can switch it to a multisite easily. In this case, you can skip Step 1 and continue with the following steps.
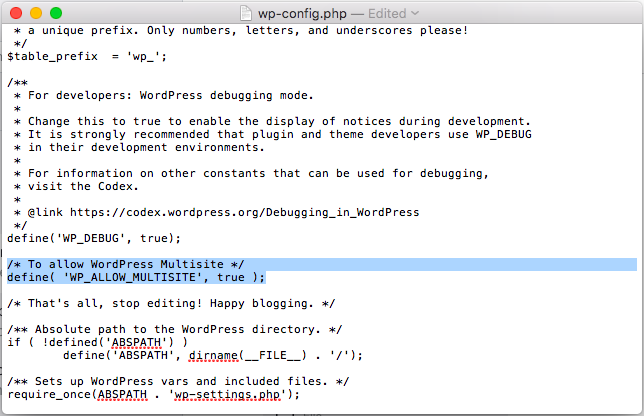
Step 2: Add code snippet in wp-config.php file to allow Multisite.
Open the wp-config.php file which is located on your website’s home folder.
Just before the line /* That’s all, stop editing! Happy blogging. */, add the below code snippet
/* To allow WordPress Multisite */

define( 'WP_ALLOW_MULTISITE', true );
Here is the screenshot showing how the code snippet is added to the file:
Step 3: Configuring WordPress network Settings
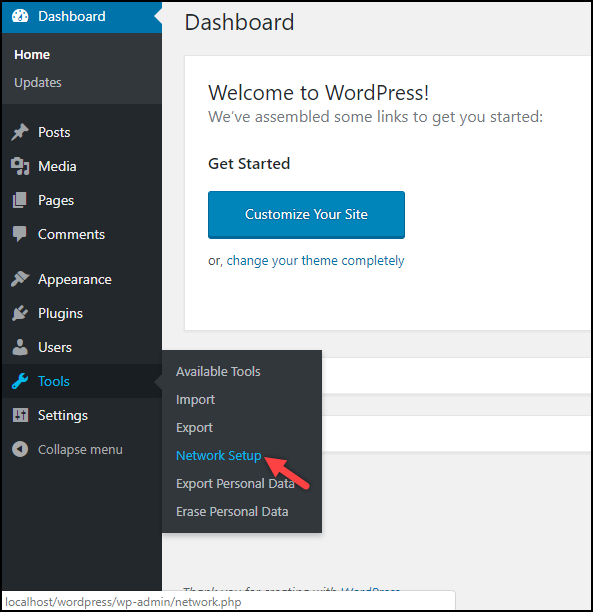
Navigate to Tools > Network Setup from the WordPress sidebar menu. This setup option will only show up in the Tools menu after you’ve inserted the code snippet in step 2.
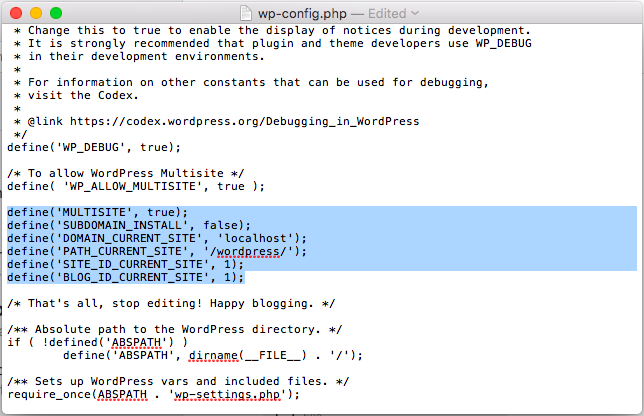
Then, add the below code snippet right above the line /* That’s all, stop editing! Happy publishing. */ to the wp-config.php file that you used in the previous step.
define('MULTISITE', true);

define('SUBDOMAIN_INSTALL', false);

define('DOMAIN_CURRENT_SITE', 'localhost');

define('PATH_CURRENT_SITE', '/wordpress/');

define('SITE_ID_CURRENT_SITE', 1);

define('BLOG_ID_CURRENT_SITE', 1);
Here is the screenshot showing how the code snippet is added to the file:
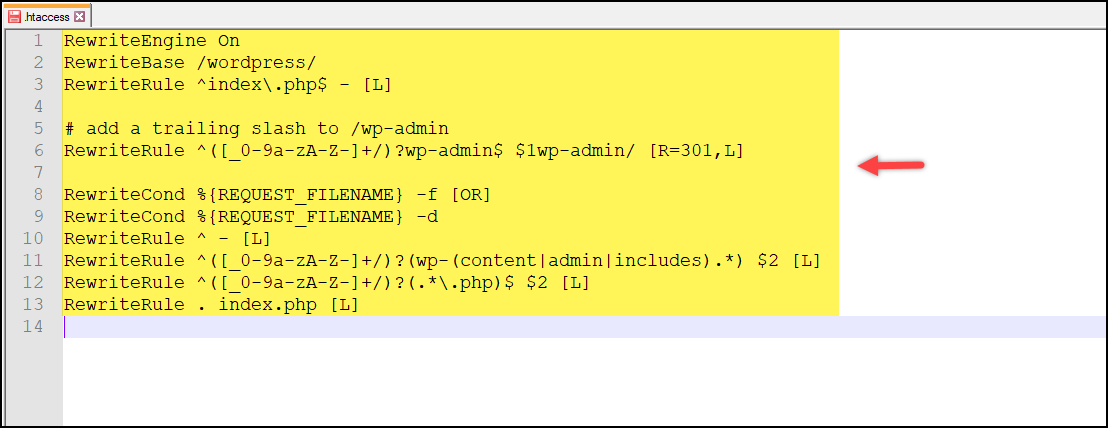
Then replace the below code snippet with the entire content of the .htaccess file which resides on your WordPress site folder.
RewriteEngine On

RewriteBase /wordpress/

RewriteRule ^index\.php$ - [L]


# add a trailing slash to /wp-admin

RewriteRule ^([_0-9a-zA-Z-]+/)?wp-admin$ $1wp-admin/ [R=301,L]


RewriteCond %{REQUEST_FILENAME} -f [OR]

RewriteCond %{REQUEST_FILENAME} -d

RewriteRule ^ - [L]

RewriteRule ^([_0-9a-zA-Z-]+/)?(wp-(content|admin|includes).*) $2 [L]

RewriteRule ^([_0-9a-zA-Z-]+/)?(.*\.php)$ $2 [L]

RewriteRule . index.php [L]
Here is the screenshot showing how the code snippet is added to the file:
Once you’ve finished editing and saving both the files, log in again to activate your multisite.
Step 4: Configuring network administrator settings
After logging in, a new My Sites logo will appear on the top left corner of your page. Hover your mouse over here and there will be a dropdown list showing Network Admin site and all the child sites that you have created. This permanent feature is to help super admins access all the sites easily.
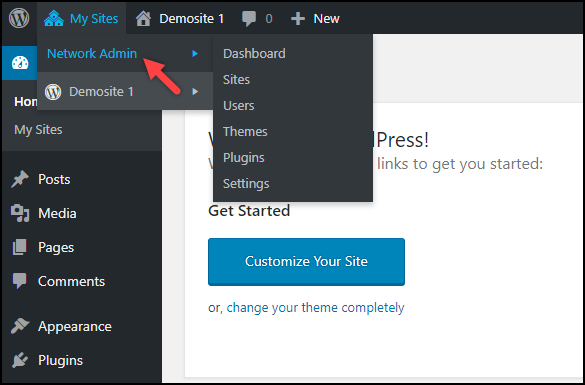
Super admin is the only one who can access the Network Admin settings where they can install plugins, themes, and configure other main settings of all the sites.
Step 5: Install WooCommerce on WordPress multisite
Installing WooCommerce on WordPress multisite is totally different from that on normal WordPress site.
As I explained above, the super admin is the one with the highest control over the site. Therefore, only he/she can install plugin and it can only be installed from the Network Admin dashboard. Nevertheless, you can activate or deactivate the plugins at each site level.
Likewise, to install WooCommerce, go to Network Admin > Plugins, click on “Add New” and follow the regular installation procedure until the installation completes. Click on “Network Activate” to activate WooCommerce in all the child sites.
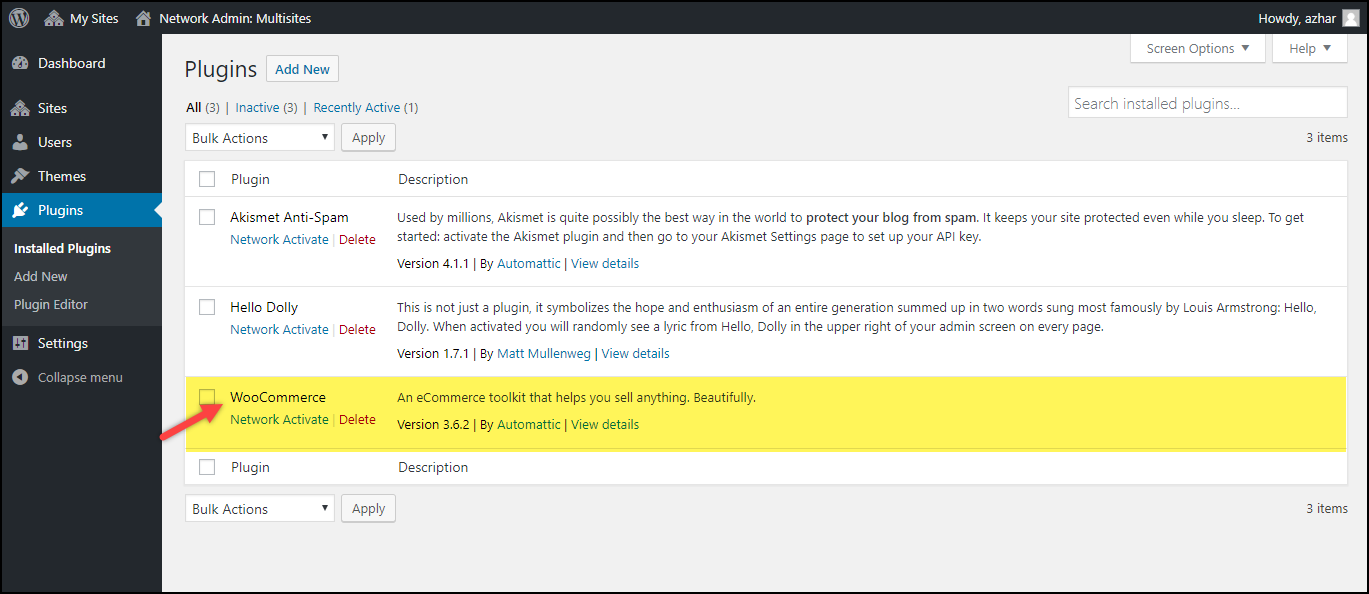
Or else, you can activate the plugin in only one site by going to the corresponding site’s dashboard, click on the Plugins option and click on the Activate button for WooCommerce.
After that, follow the quick store setup process that WooCommerce will show you to set up your WooCommerce store.
How to migrate to WooCommerce multistore
If you are in need of a powerful system for your multistore, WordPress and WooCommerce is definitely a first-rate solution which allows you to manage your stores simply and efficiently.
You can easily switch your existing multistore to WordPress with LitExtension by migrating data sequentially from each of your current stores to the corresponding ones in WordPress. Our connector which enables the data exchange between two stores can detect exactly the store you want to migrate from/to by the URL you provided. This is the most advanced method to migrate multistore currently.
We provide you with two options to perform the migration as follows:
- Basic migration: You can migrate to WooCommerce multistore by your own with the help of our technical support agents.
- All-in-one migration: Hire our experts to take care of the migration for you from top to bottom and perform every necessary customization.
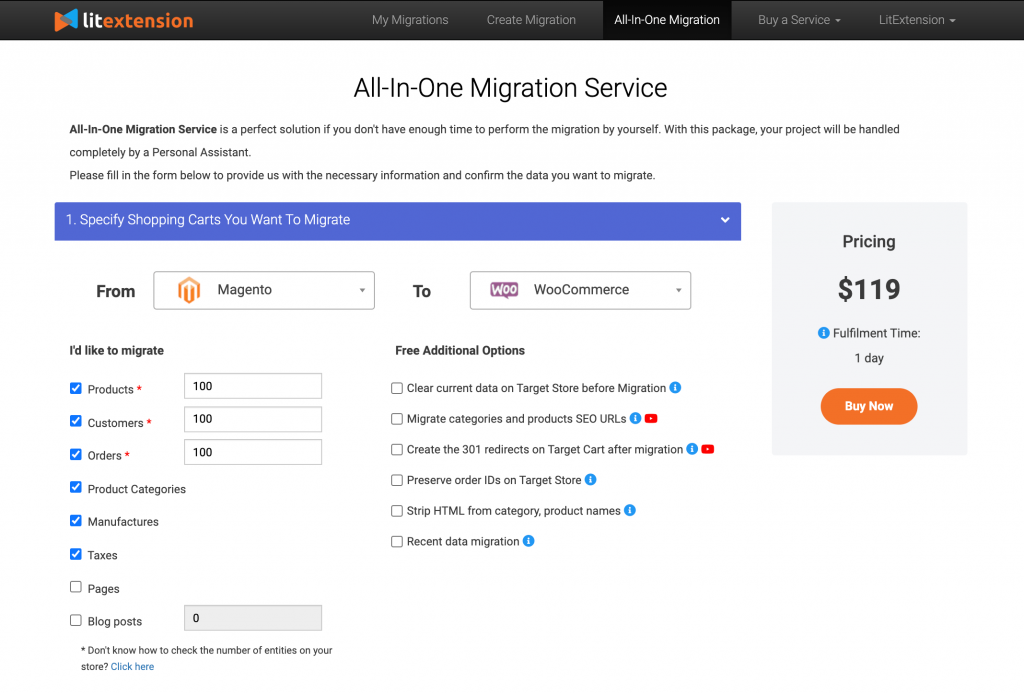
To be more specific, let me walk you through 6 steps and a few notes when you migrate to WooCommerce multistore with LitExtension:
- First of all, you need to set up WordPress multisite and install WooCommerce for your stores following the before-mentioned steps.
- Register a new account or log in to LitExtension website.
- Go to your account, click on “Create New Migration” to begin.
- Set up your Source and Target Cart types: Enter the URL of the store you want to migrate from and to, then fill in the blanks with the requested information and set up LitExtension connector following the wizard instruction.
Note: Please make sure the URL you provide is exactly the URL of the store you want to migrate.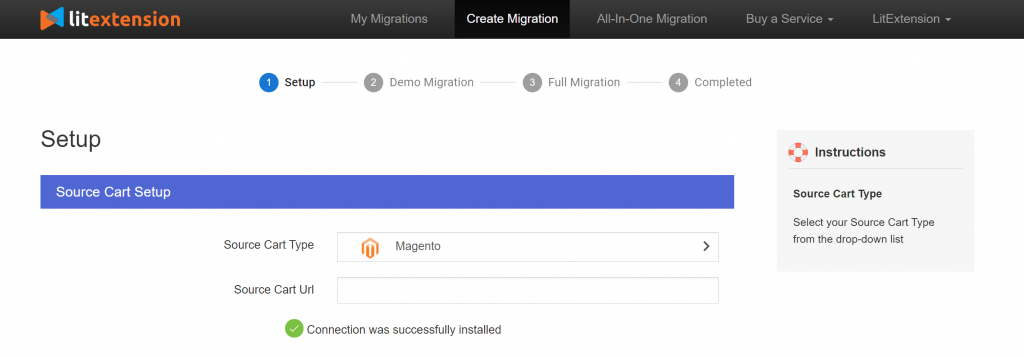
Source Cart Setup 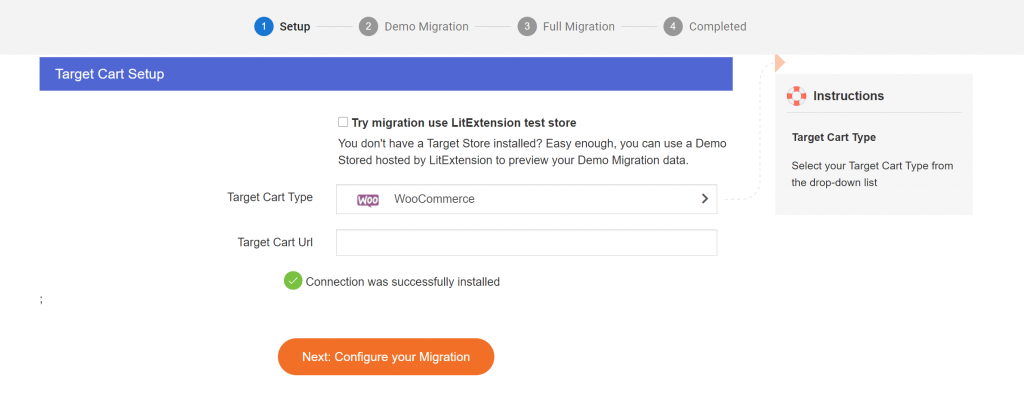
Target Cart Setup - Select the entities need transferring. LitExtension also provides some additional options which will expand your migration possibility. Therefore, choose the one you need also.
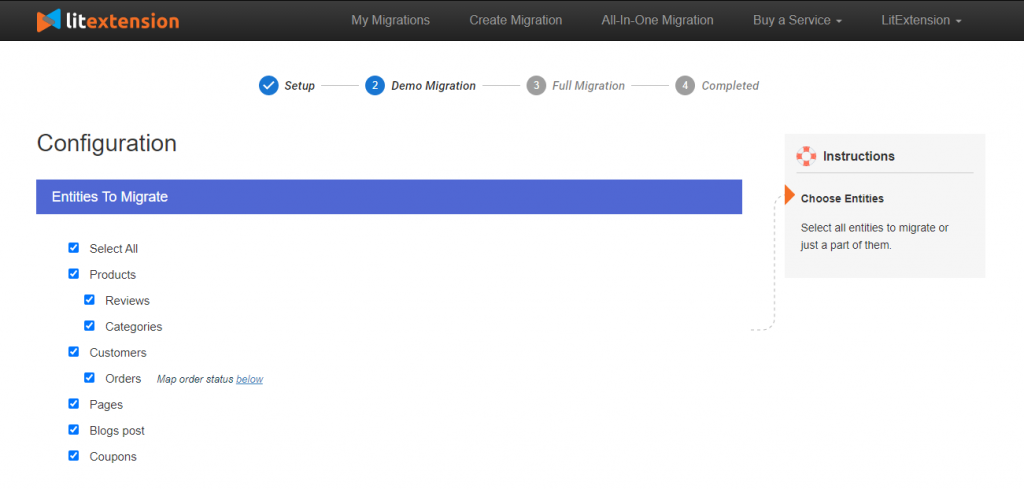
Select entities to migrate 
Additional Options Note: Please be very careful when choosing this additional option “Clear current data on Target Store on migration”.All of your stores’ customer data is in the same table in WordPress database, therefore, if you choose this option after having finished one or some of your stores’ migration, you may lose all of the customer data which have been migrated previously.In case you want to re-run the migration of a store and clear only the data which have been transferred to that specific store, LitExtension team can still custom to do it for you and this will require a small extra fee. However, if you purchase our All-in-one package, you don’t need to pay any extra fee.
- Click Next to kick off the process: During the migration, it’s unnecessary to keep your browser or internet active as it is already triggered and monitored in our Cloud System. Once the process completes, you will get notified by email.
How to migrate from WooCommerce multistore
On the other hand, you may want to move your multistore away from WordPress to another platform. LitExtension can also help you with this by two options described above.
When you migrate from WooCommerce multistore, follow the same steps as to migrate to WooCommerce multistore and remember all the notes that have been cited respectively with each step.
Basically, you will still need to perform the following 6 steps:
- Set up your multistore on the platform you want to move to.
- Register a new account or log in to LitExtension website.
- Then go to your account, click on “Create New Migration” and start to migrate from WooCommerce.
- Set up your Source and Target Cart types.
Note: The same as when migrate to WooCommerce multistore. - Select the entities need transferring and additional options you need to expand your migration possibility.
Note: The same as when migrate to WooCommerce multistore. - Click Next to kick off the process.
For details instructions, please scroll up to see steps to migrate to WooCommerce multistore, you can apply them easily when migrate from WooCommerce as well.
Conclusion
Multistore is a super robust feature and can help you boost your online business in several ways such as: get access to a larger customer base, appeal to diverse tastes, better page ranking opportunities and so on. WooCommerce multistore is a top-notch solution that most merchants should rely on. However, when you decide to migrate to WooCommerce multistore or migrate from WooCommerce multistore, it can be a highly complex and tiring process.
But don’t worry yet because LitExtension is here to help you out with our powerful and state-of-the-art migration tool and service. With LitExtension, you can reduce the risks when migrating data to a minimum.
If you are still fret about whether or not to choose us as a partner in this journey, then take a look at the reasons why you should here and chat live with our support agents on website for further information.
On the other hand, the quickest way to find out how we work is to TRY FREE DEMO! Let’s join our community to get more eCommerce knowledge.