PrestaShop is a shopping cart solution with more than 700,000 users all around the world. Unlike WooCommerce or OpenCart, PrestaShop is quite famous for the ease of use regardless of its Open-source nature. Though, the setup process required some technical skills.
In this PrestaShop tutorial, we will include:
- A brief introduction to PrestaShop
- How to install PrestaShop?
- How to set up a PrestaShop and get ready for selling?
Let the Experts Help You Move to PrestaShop!
Focus on growing your business and leave your PrestaShop migration in good hands with LitExtension All-in-One Migration Package. Let our Personal Assistant lift the weight of manual tasks off your shoulder and provide regular updates on how your project is going.
PrestaShop Overview
1. What is PrestaShop?
“We’ve developed over 50 e-commerce websites with PrestaShop over the years, complex multi-boutiques, in different languages, in different countries using different currencies … we’re pretty happy with our overall experience with the software and the company.” – Caroline P – Information Technology and Services
Founded in Paris in 2011, PrestaShop claims it is the leading eCommerce platform in Europe and Latin America. As an open-source content management system, it handles all the basic infrastructure yet still allows you to freely customize nearly everything for your website.
Here’s a quick summary of PrestaShop’s main strengths:
- A collection of more than 3,200 templates that are highly customizable, fully responsive, and SEO optimized.
- An inventory management system that helps you to manage products, orders, stocks, and customers.
- Over 3000 modules are available on the PrestaShop marketplace that helps merchants customize online shops, increase traffic, improve conversion rates, build customer loyalty, and much more.
- Amazing marketing features such as SEO optimization, coupons, special offers, email marketing.
- A set of 250 options for payment gateways from third-party providers such as Discover Global, Amazon Pay, Authorize.Net…
2. PrestaShop Features
Ease of use
PrestaShop provides users with amazing tools to simplify the daily operating procedure for you. For example, the main dashboard is quite straightforward and easy to navigate. You can easily monitor everything from your sales, orders, profits… Additionally, you can navigate to any parts of your store using the main menu on the left.
Payment gateway
Apart from third-party providers, PrestaShop also provides PrestaShop Checkout. This Checkout solution is built with PayPal and integrates with various checkout options, including American Express, Mastercard, and many others. With this option, you can enable direct payment for your store, which means your customer can purchase without having to go to another site.
Customization
As mentioned above, PrestaShop is an Open-source website builder, and the customization possibility is endless. You’re going to need two modules for your store, one that’s easy to make fast, simple edit (User module) and an advanced module for tweaking the HTML, CSS, and JavaScript files to create a unique function for your site (Develop module).
Free & open source
It’s completely free to download and install PrestaShop. However, the process of setting up your store can be a little bit tricky and you might need some technical skills to get it done.
If you wish to know more about PrestaShop and what this self-hosted solution can do for your store, read our PrestaShop review!
Want to Migrate to PrestaShop?
If you are intending to migrate to PrestaShop, LitExtension offers a great migration service that helps you transfer your data from the current eCommerce platform to a new one accurately, painlessly with utmost security.
How to Install PrestaShop
Before diving in, check out our PrestaShop tutorial video for a visualized instruction!
Although PrestaShop is free to download and install, you still need to purchase a host and a domain name to get started. This will cost you from $50-$200 depending on the quality and capacity of your host.
Basically, there are two ways to install PrestaShop: one-click install with your host or do it manually. Let’s go into detail!
1. One-Click Install PrestaShop
Normally, hosting providers will include One-click installation into their system and you can easily make use of it on their website. If this is the case, contact your provider for hosting PrestaShop tutorial.
2. Install PrestaShop Manually
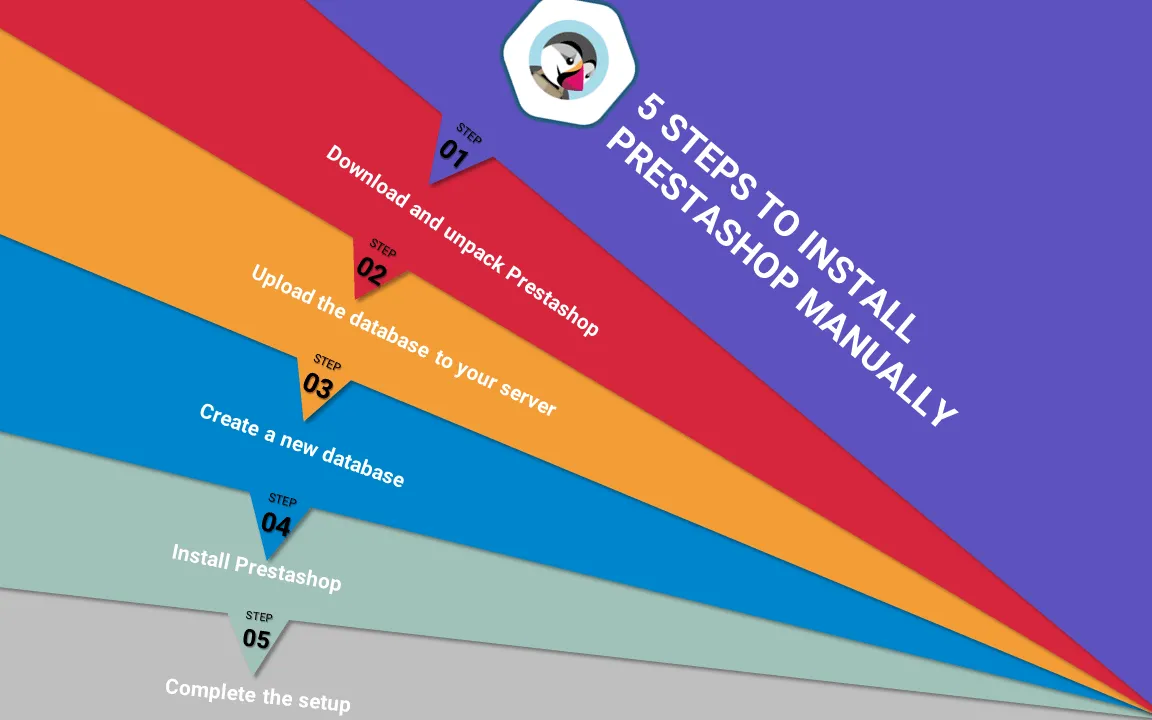
You will need to go through 5 steps in order to install PrestaShop:
- Step 1: Download and unpack PrestaShop
- Step 2: Upload the database to your server
- Step 3: Create a new database
- Step 4: Install PrestaShop
- Step 5: Complete the setup
Now, let’s go into detail!
Step 1: Download and unpack PrestaShop
Before getting started, you need to check if your server meets these requirements:
- System: Unix, Linux, or Windows
- Web server: Apache Web Server 2.2 or any later version
- PHP: The recommendation version is 7.1 or later
- MySQL: 5.6 minimum
- Server RAM: The more the merrier. Make sure the memory allocation per script (memory_limit) is at least 256M
You can check if everything is ready or not by using the PrestaShop system requirements tool.
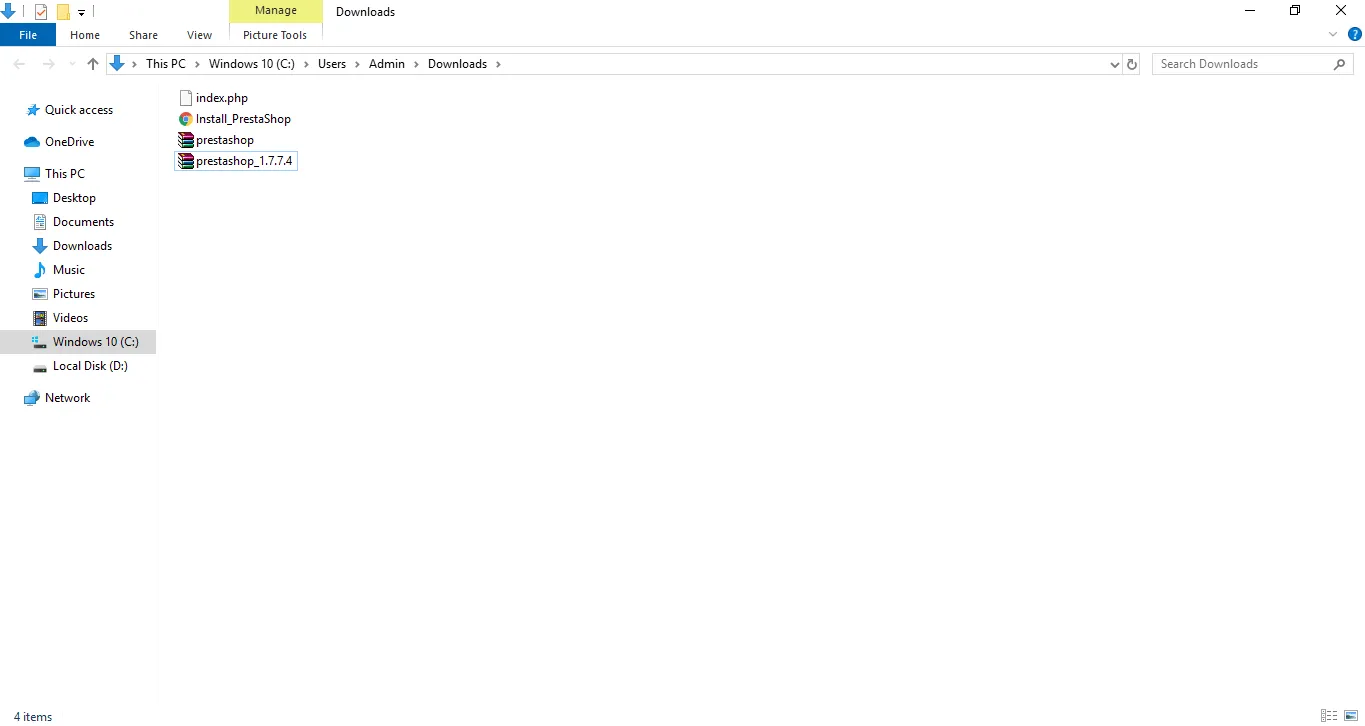
To begin, go to the PrestaShop website to download the version you want. Currently, the newest version is PrestaShop 1.7.7.4. Just fill in your email and click “Download”, then you’ll receive a Zip file. Extract it then you’ll have these files.
Step 2: Upload the database to your server
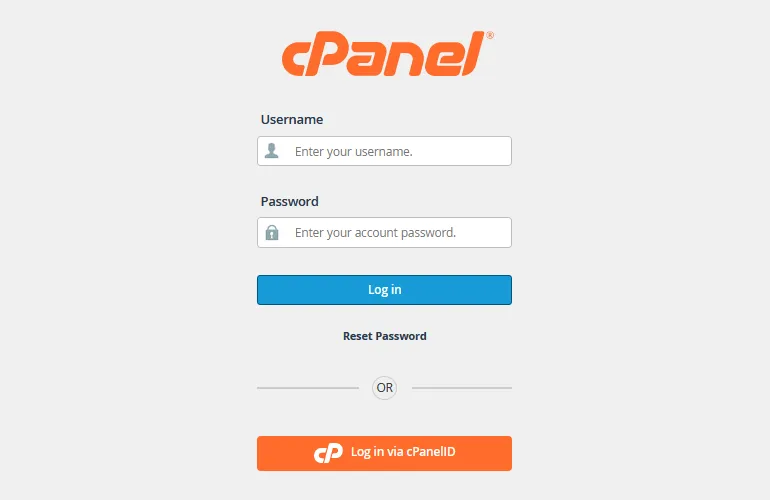
Next, you need to upload PrestaShop into your root folder using cPanel. First, log in to your cPanel. There Are two ways for you to access your cPanel:
- Go to: http//yourdomain.com:2082/2083
- Go to: http//yourIPadress:2082/2083
- Go to: http//yourdomain.com/cpanel
After that, fill in your username and password.
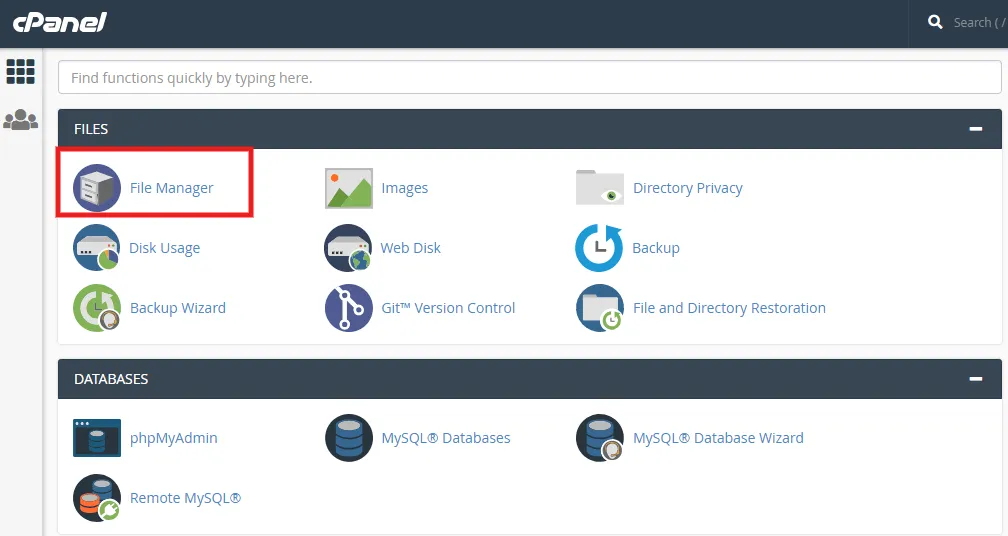
Now, you can upload the PrestaShop Zip file to your webserver. First, go to “File Manager” from your Cpanel.
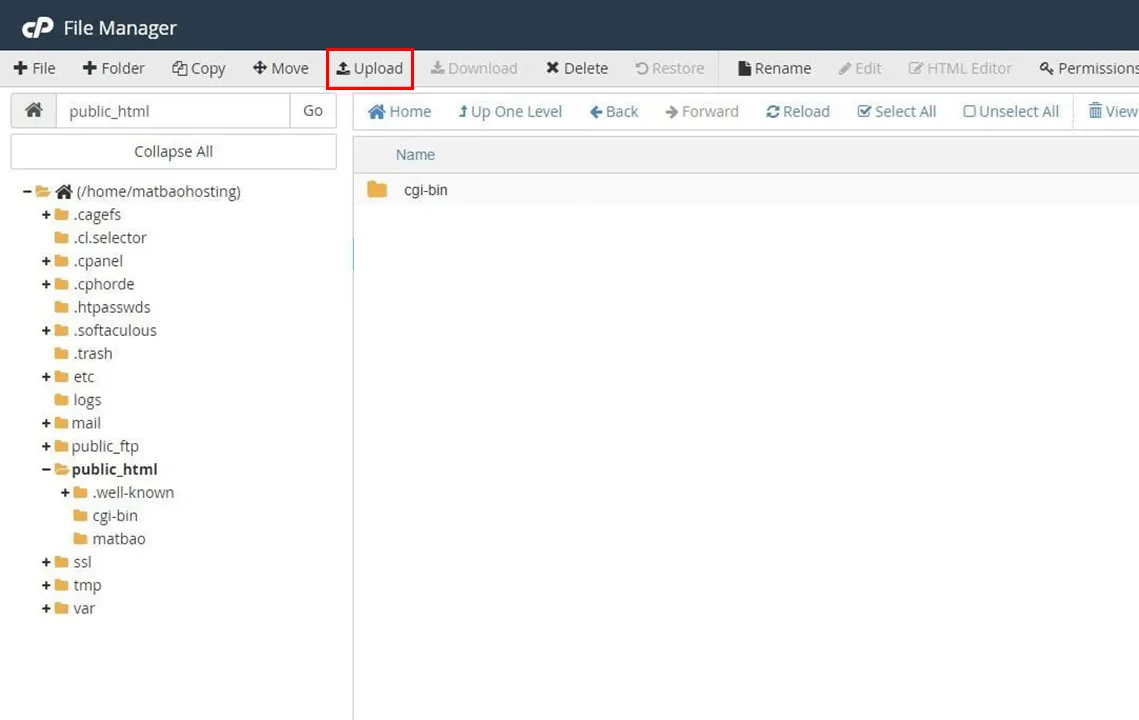
At this step, you need to access your domain, to do so, click the “public_html” folder
Make sure this directory only contains the “cgi-bin” folder. If anything else is stored here, delete it to ensure this folder is empty. Next, click “Upload” at the top of your screen.
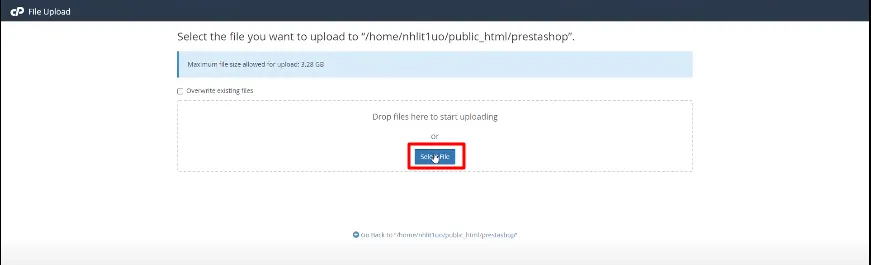
Drag and drop the PrestaShop (zip file) or click “Select File” to add the PrestaShop file.
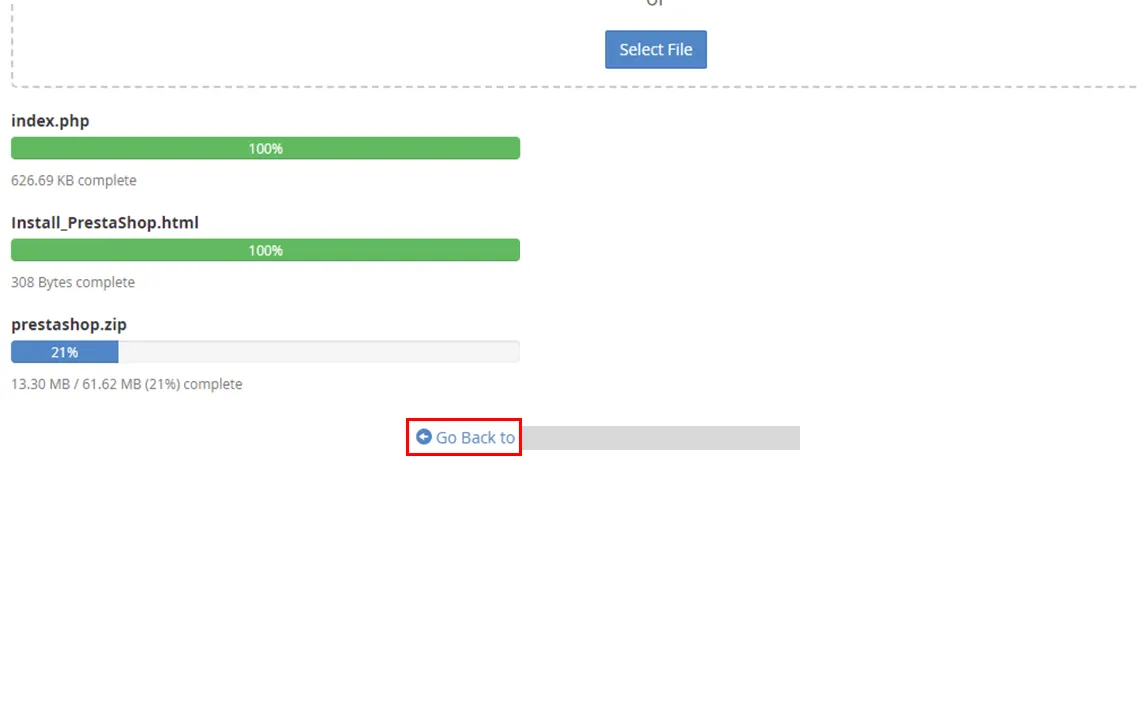
After completing the upload process, click “Go Back” to navigate to your website.
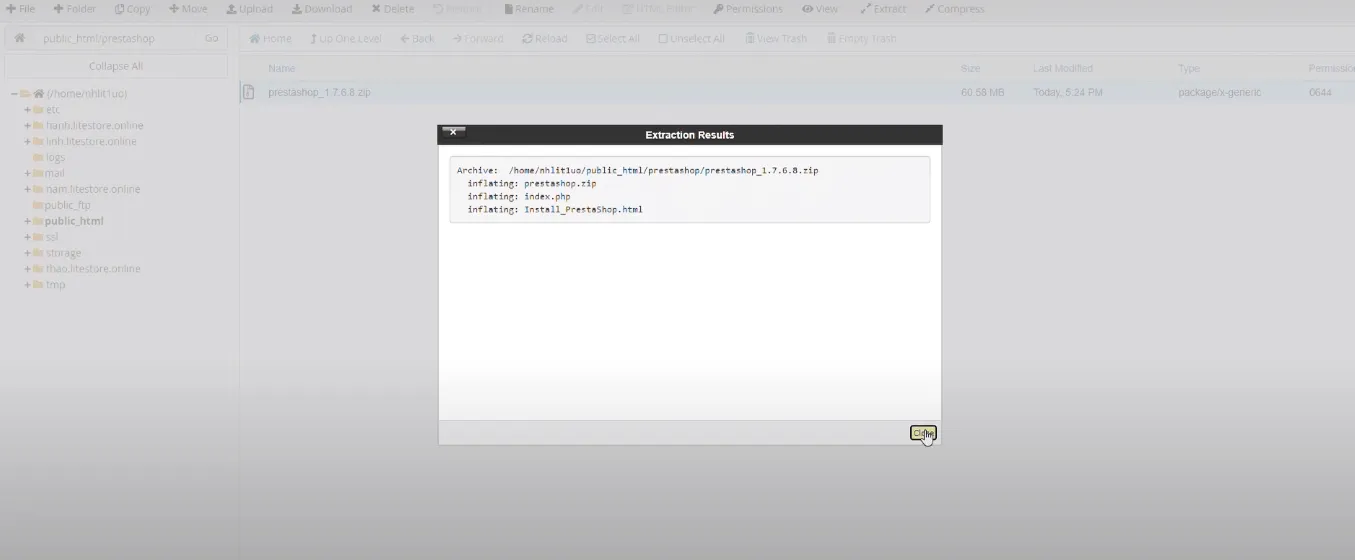
Next, extract the PrestaShop Zip file.

Click “Close” when the extraction results show up.
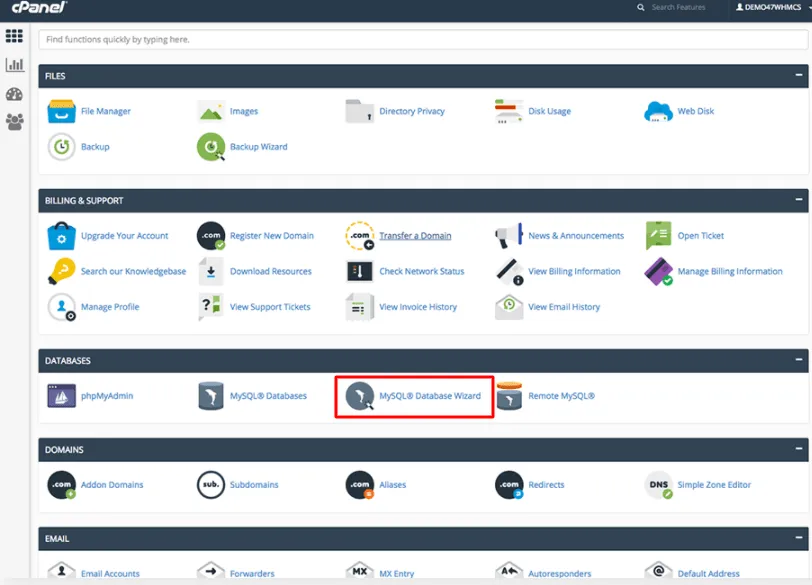
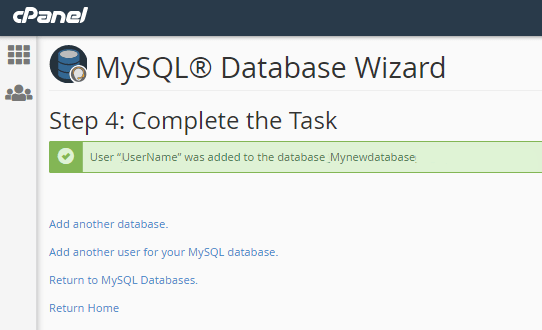
Step 3: Create a new database
From cPanel, navigate to the MySQL Database Wizard.
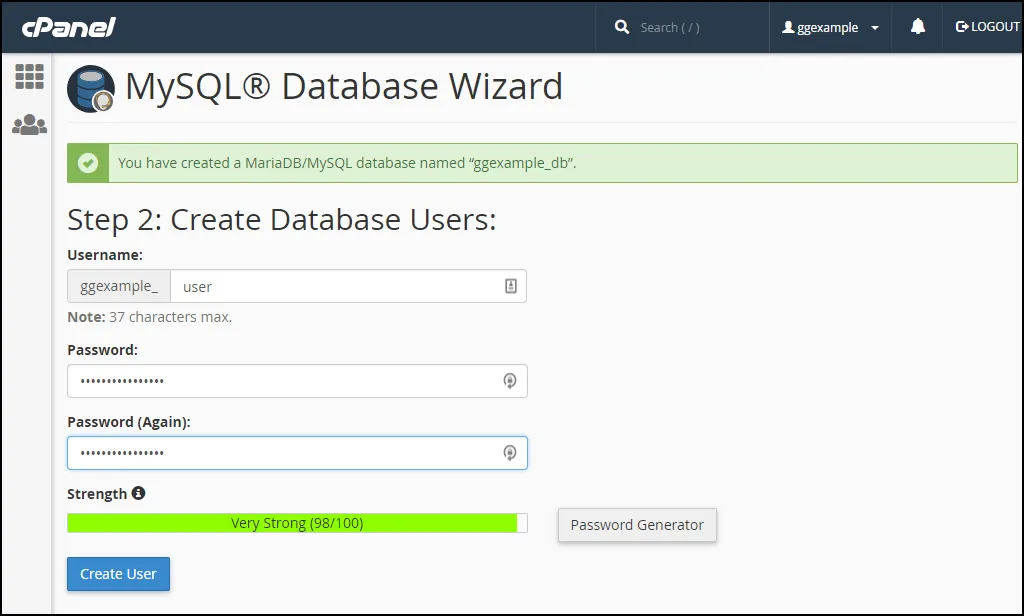
Next, start to create your new database by filling in your database name, password and confirming it again. Click “Create User”.
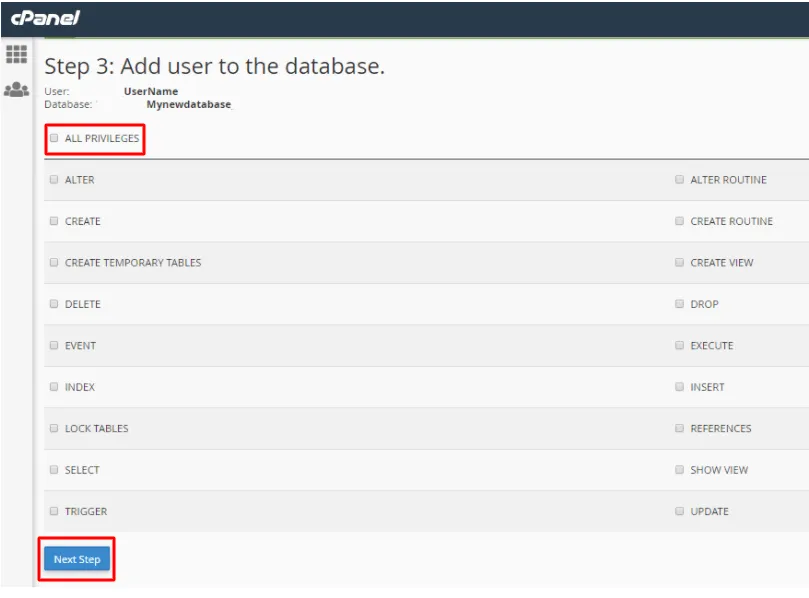
Now, you need to decide which privileges the user will have.
Select the checkboxes that correspond to the privileges that you want to grant the user, or select ALL PRIVILEGES.
For more information about user privileges, read the MySQL documentation.
When finished, click “Next Step”.
Click “Return Home” to complete the process. Now you have a brand new database for your website. Let’s move on to the next step – Install PrestaShop.
Step 4: Install PrestaShop
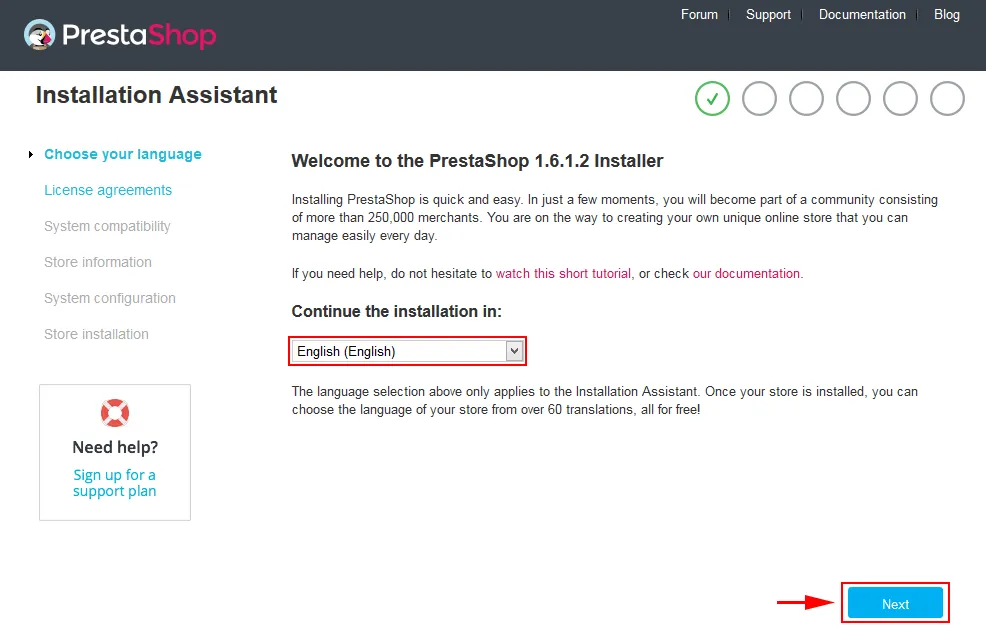
Now, you have a new database along with PrestaShop placed properly on your server, it’s time to kick off the PrestaShop installation.
First, go back to your website to get the Installation Assistant. You’ll go through 6 steps to successfully install PrestaShop.
Choose your language from the dropdown list then click “Next”.
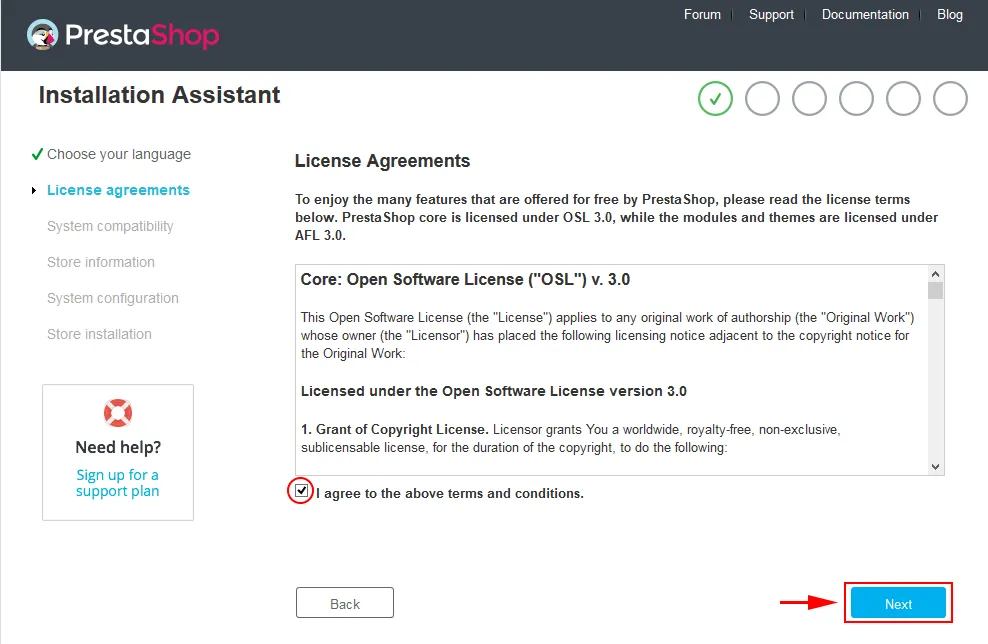
Hit the box “I agree to the above terms and conditions” then click “Next”.
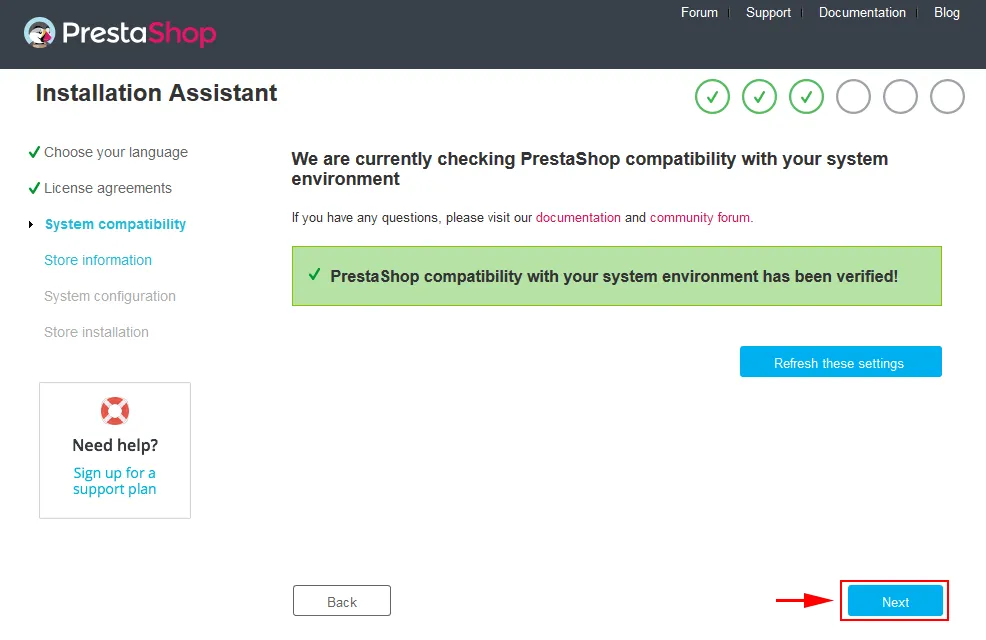
Check the PHP settings and directory permissions. If you meet any issues, please contact your hosting provider for further assistance.
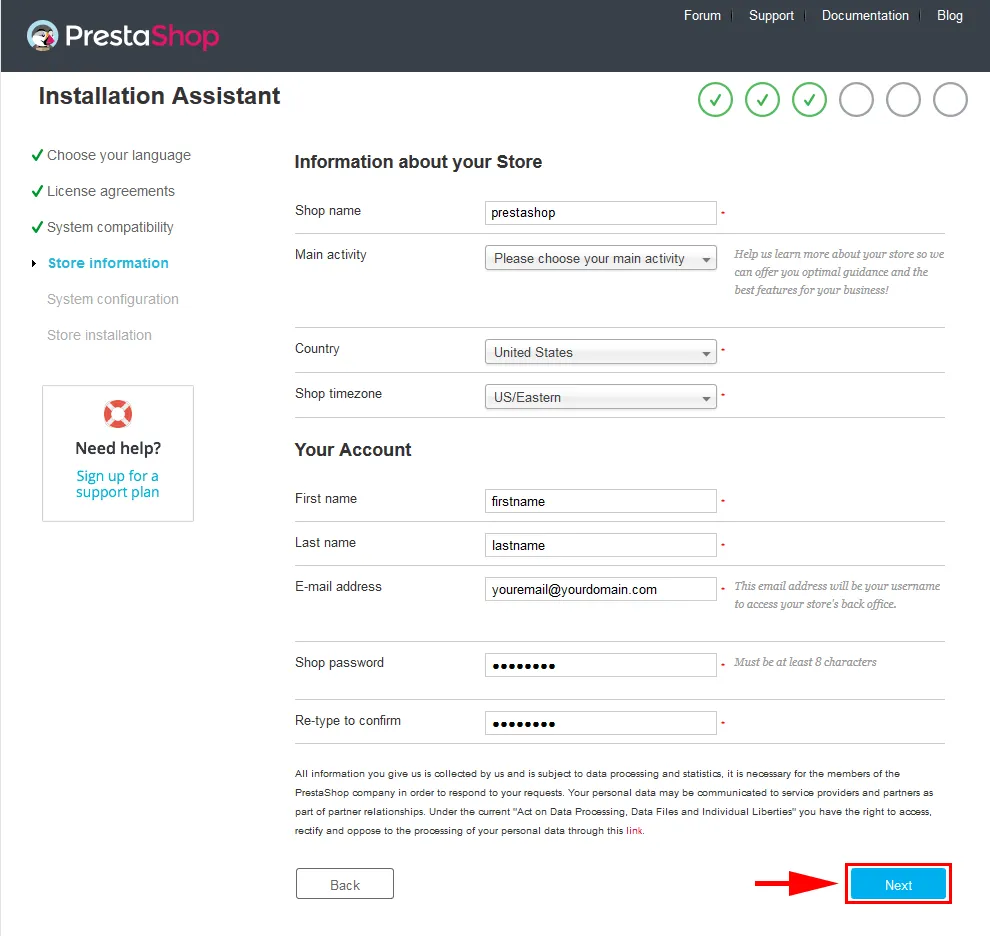
On this store information page, fill in the required information of your store and hit “Next”.
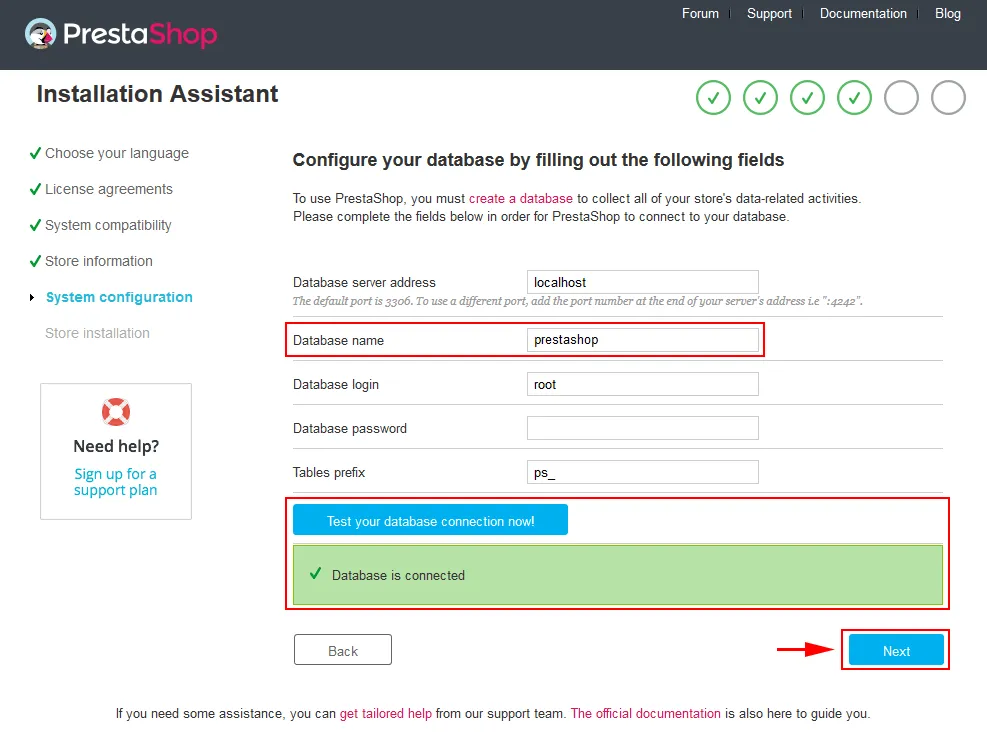
Now, put in your database information which you’ve created. Click “Test your database connection now” to connect with your database.
Click “Next” and wait for the installation process to finish.

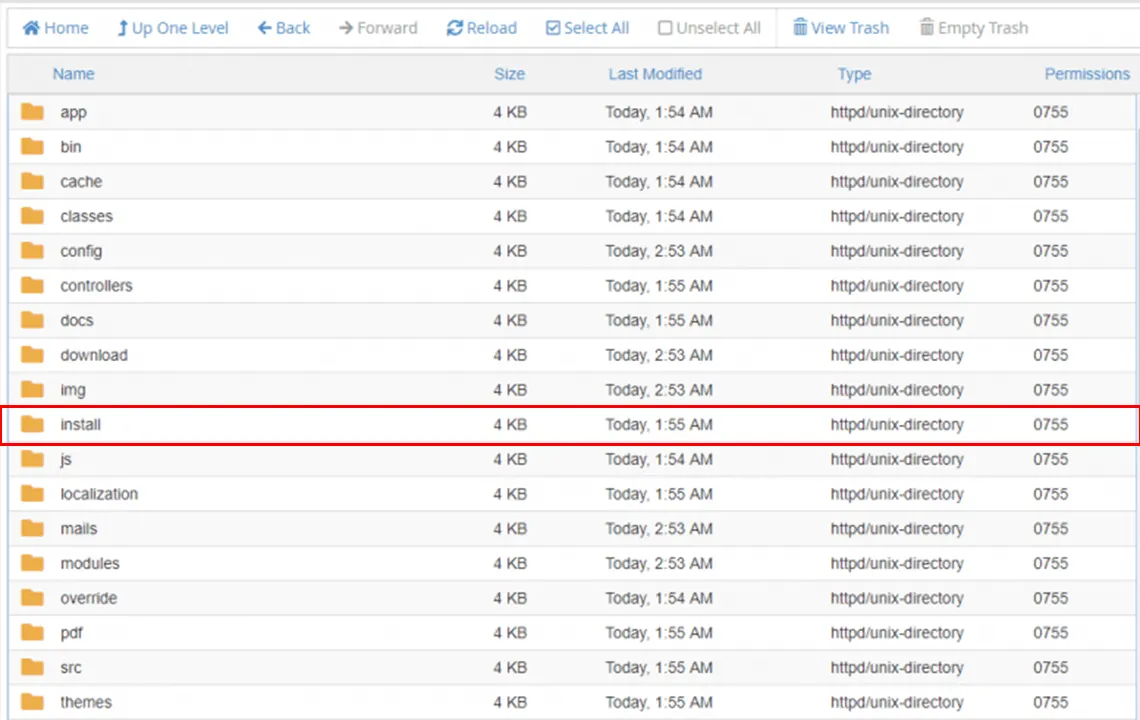
It might take a few minutes. Once the installation is completed, you need to open the PrestaShop installation directory and delete the “/install/” folder to improve your store security.
Step 5: Complete the setup
From now you have full control over both the backend and front end of your e-store. Go back to your website, PrestaShop will require you to access your store with a new URL.
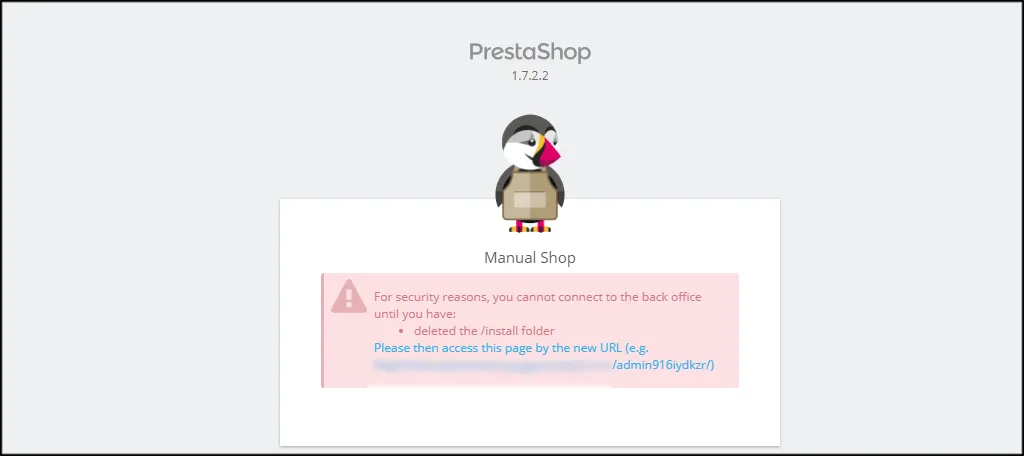
To kick start the new PrestaShop, you need to rename the “Admin” folder into the new URL that appeared on the previous step.
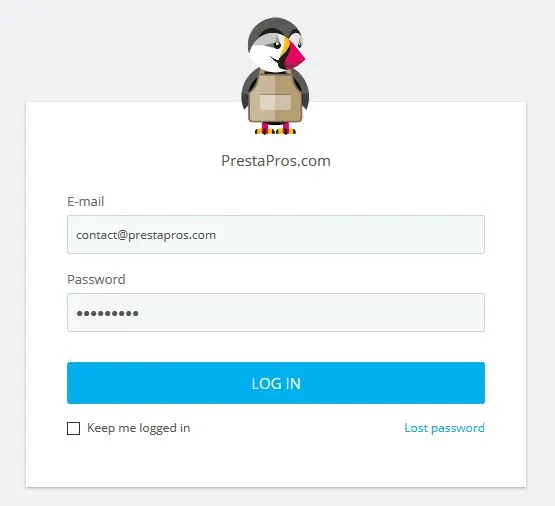
Now go back to the PrestaShop admin panel, provide your Email address and password to log in.

Setting Up PrestaShop
After successfully installing PrestaShop to your website, let’s go through some of the basic setup for your store.
1. Create New Pages
To create a new page, from your dashboard, navigate to Design > Page > Add new page.
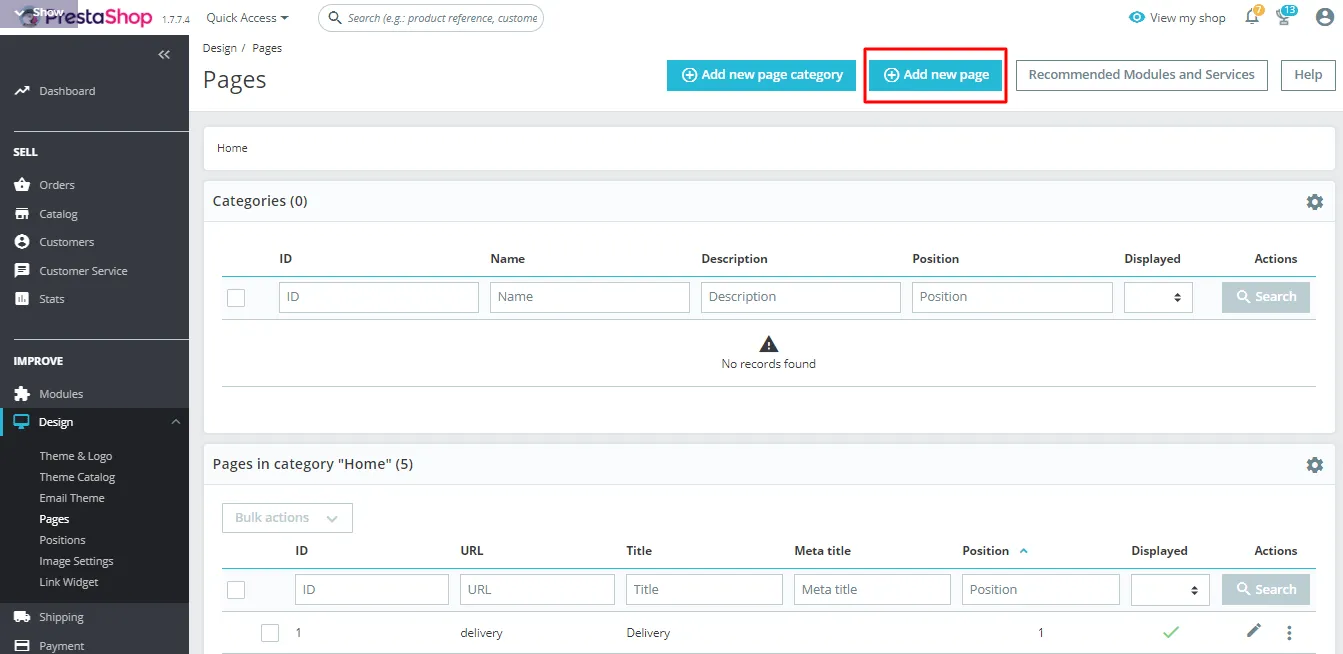
Next, fill in your information for the new page.
- Page category: This helps to build your website structure by arranging pages or posts into a certain category.
- Title: Equivalent to the H1 of your page. This will also be the SEO title as default but you can still adjust the SEO title as you like.
- Meta Title, description, and keyword: These will be the three elements that appeared as search results.
- Friendly URL: You can adjust your URL/Slug here.
- Page content: Choose a language for your page here.
When it’s all done, you can save and preview by selecting “Save And Preview” or “Save”
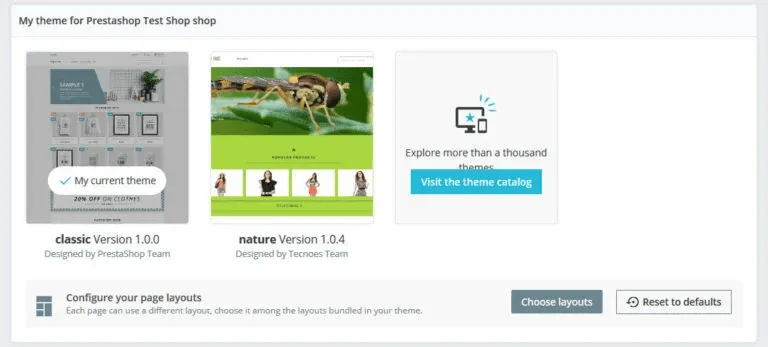
2. Install PrestaShop Themes
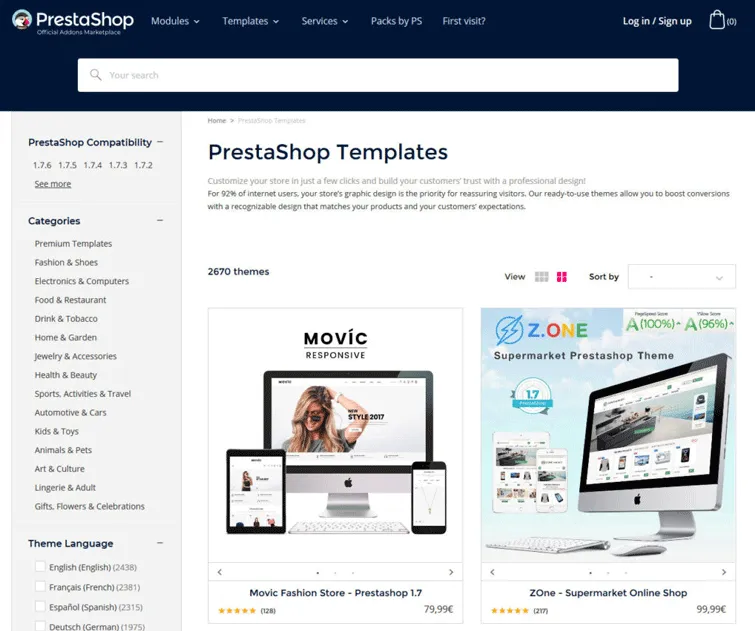
First, you need to get a new theme for your site. Go to PrestaShop Marketplace and find the suitable one. As you can see, there are more than 3,200 templates and a vast collection of customizable themes for you to choose from. You can easily filter according to your version, shop category, language, and much more. For more information to select the best theme, check out the top 8 PrestaShop themes.
Once you have settled on a theme, let’s apply it to your store. To install a new theme or change your current theme, navigate to Design > Theme Catalog.
Click on “Add new theme” at the top.
Basically, there are three ways of getting your theme on your site:
- Upload it as a zip file
- Import it directly from its URL
- FTP it into the themes folder in your PrestaShop installation and pick it from the drop-down menu
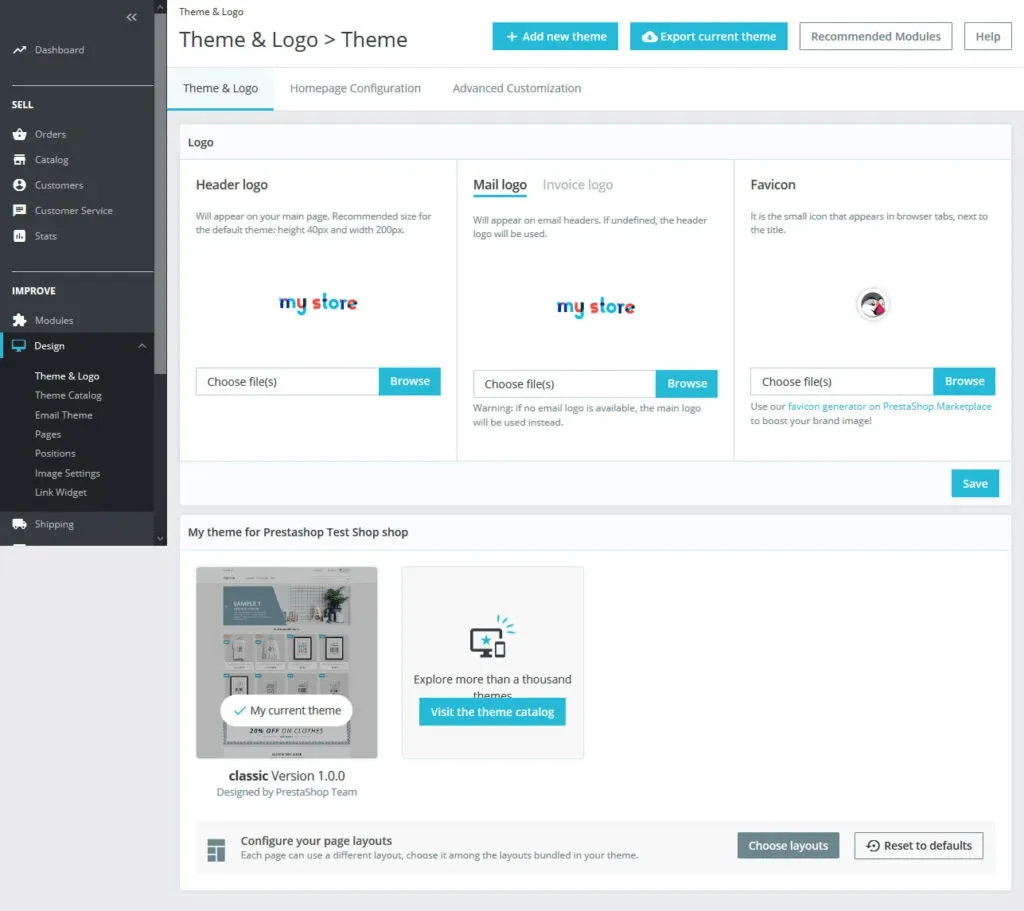
Pick it from your dropdown menu
After importing your new theme, scroll down to the bottom of the “Theme and Logo” page, you’ll see a list of all your available templates. Choose a theme then click “Use this theme” to activate the theme.
3. Setting up PrestaShop Payment Gateway
Payment gateways play a critical role in your store. To set up the payment method, navigate to Payment > Payment methods.
You can choose to use PrestaShop check-out by clicking “Configure” or use a third-party provider by clicking “Install”. Please note that some payment providers allow you to run them in test mode so you can try them out in advance.
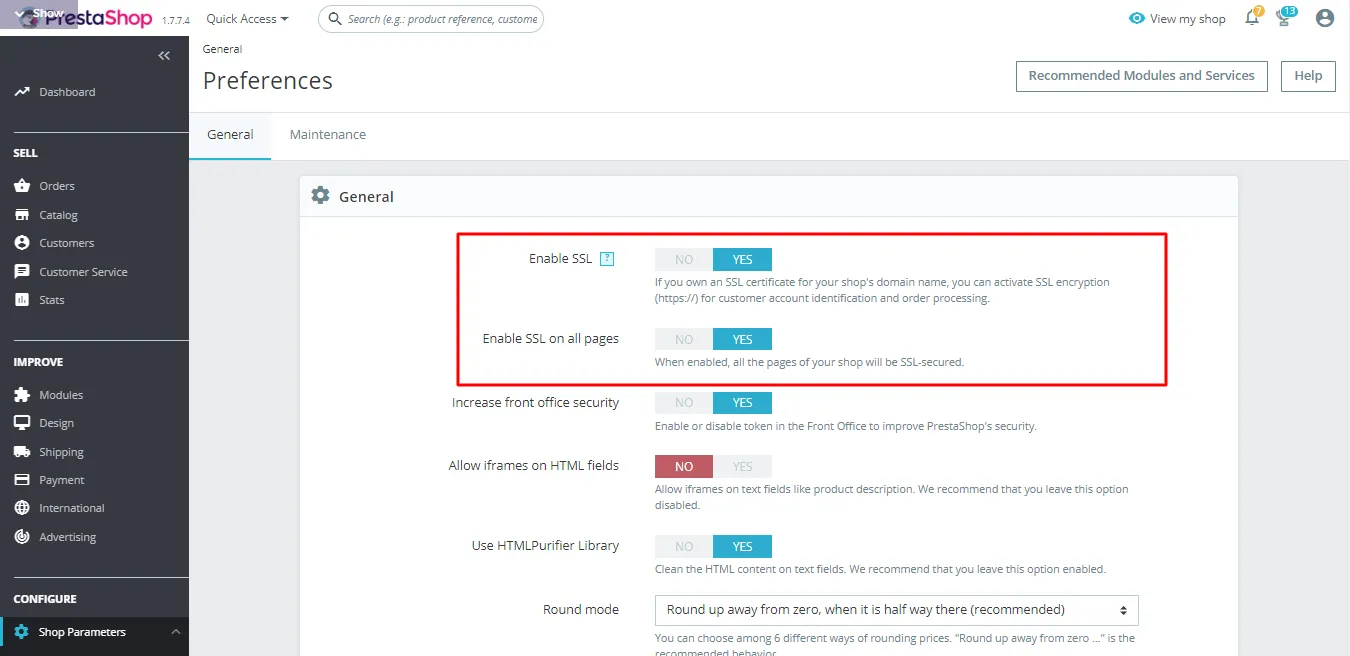
4. Adding an SSL Certificate to PrestaShop
SSL (Secure Sockets Layer) certificate is a protocol for establishing authenticated and encrypted links between networked computers. It helps to improve the security of your website. In addition, search engines also consider SSL certificate as one of the important elements for ranking your site.
Normally, an SSL certificate will be enclosed when you purchase your domain. If you don’t have it yet, you can get one from the PrestaShop marketplace or a third-party hosting provider.
To enable your SSL, from the dashboard, go to Shop Parameters > General, then choose Yes on “Enable SSL” and “Enable SSL on all pages”.
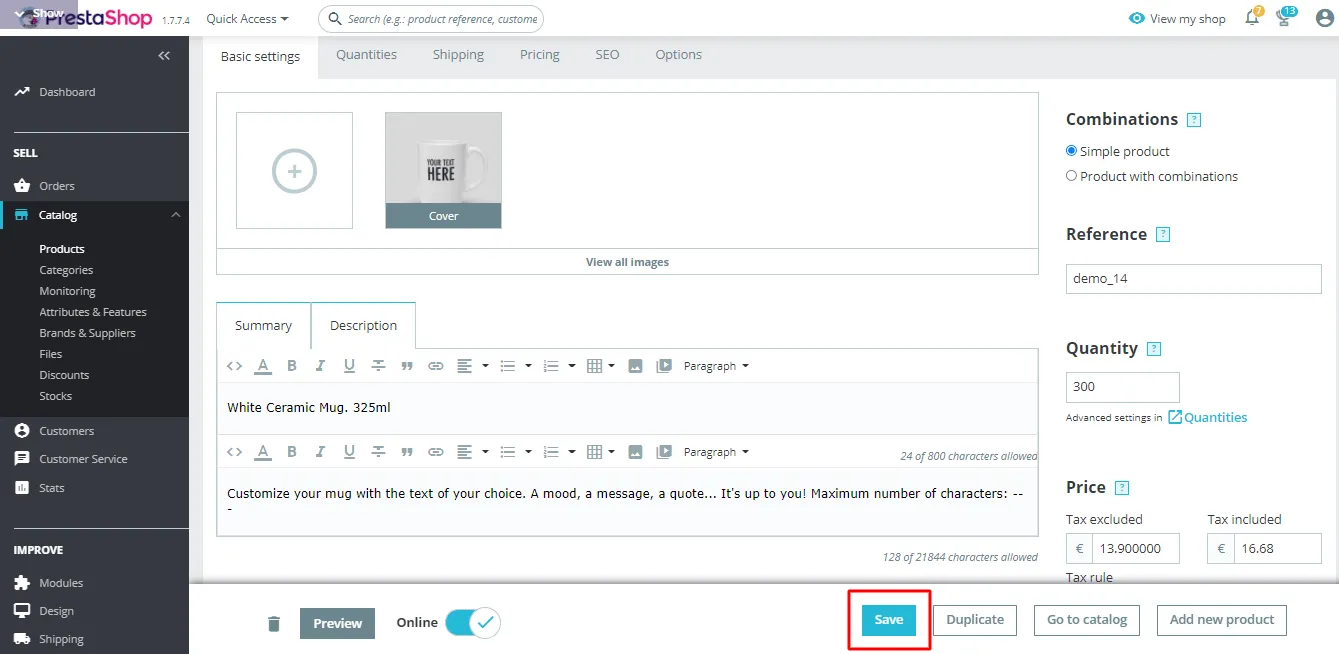
5. Adding PrestaShop Products
Products should be the center point of your store. A good product management system means a small success for your business. Fortunately, PrestaShop gives you amazing products’ features and it’s super easy to add new product
To add new products, navigate to Catalog > Products.
Here, you can put in the product picture, description, summary, set up product features, and categorize your items.
At the top of the product page, you can add quantities, shipping, SEO, pricing as well as additional options. PrestShop also allows you to preview the product before publishing it. After completing the setup process, click “Save” at the bottom of the page.
6. Localization and Tax
Last but not least, we need to set up tax as well as localize and translate your store for customers all around the world. To do so, from the main dashboard, navigate to International > Localization.
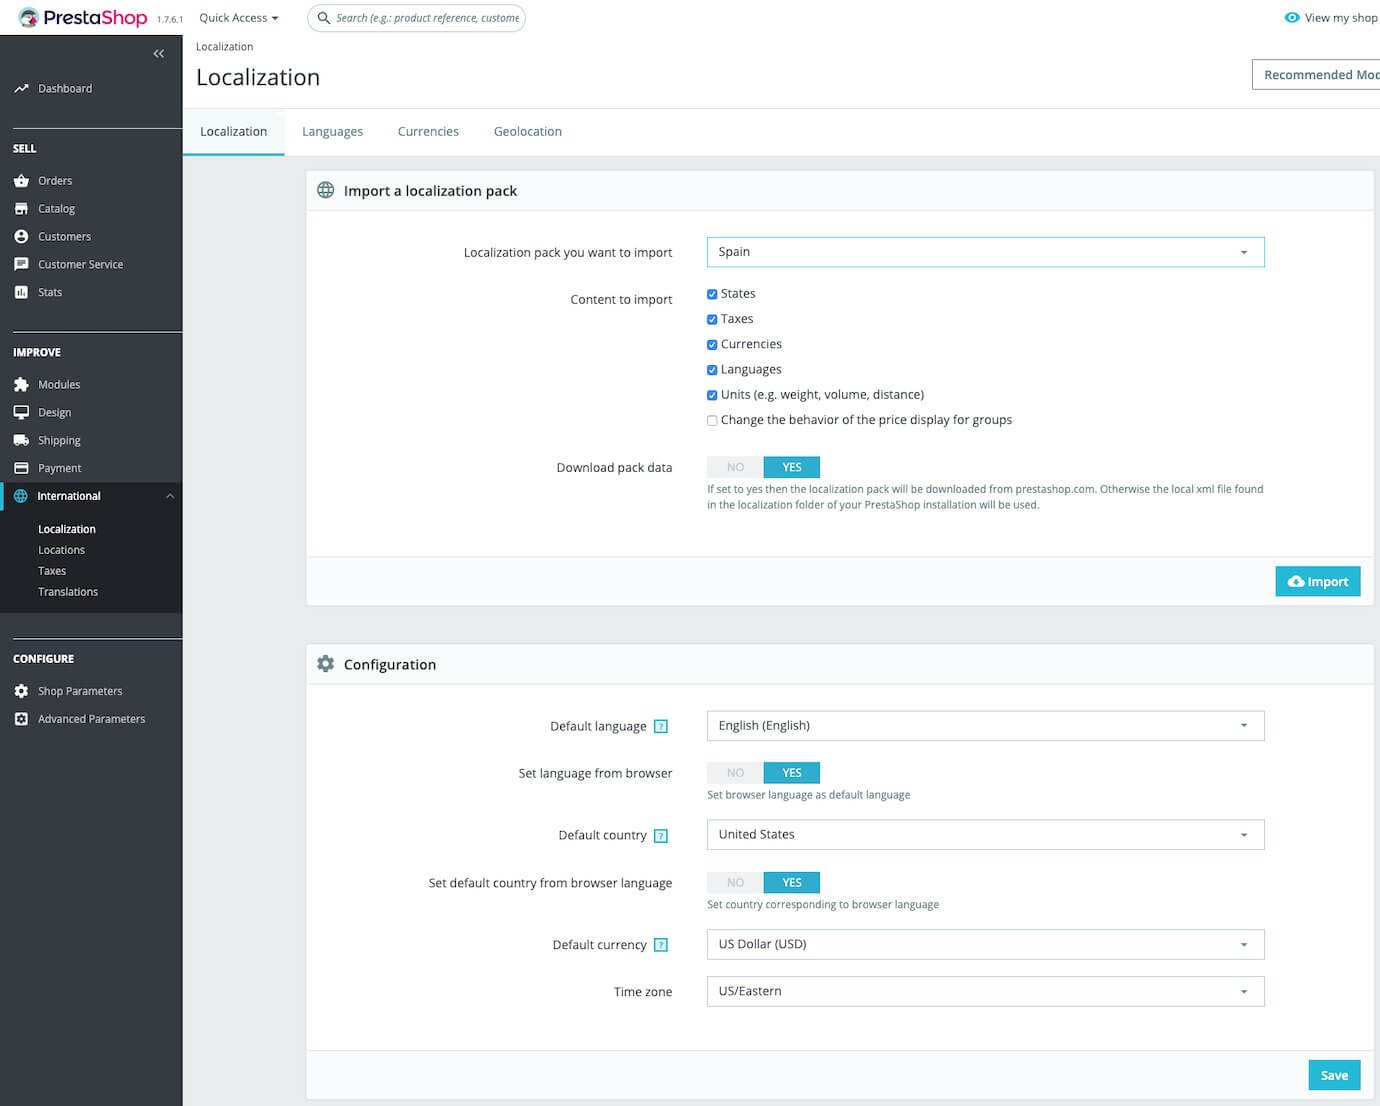
Here, you can import a localization pack, put it in local units, implement basic configuration, and advanced settings.
- Import a localization pack: One of the great things about PrestaShop is that they prepare for merchants so-called localization packs as a built-in feature. All you need to do is choose the content you need in each package such as States, Taxes, Currencies, languages, and so on. Click “Import” to apply it to your store.
- Configuration: This part is for basic settings such as default languages, country, currencies, or time zone.
- Local units: You can set up the default measurable units such as weight, distance, volume, or dimension.
- Advanced: Finally, you can perform some advanced setup at this part. There are two options for you: Language Identifier which identifies the language of the country where your web server is located; Country Identifier determines the country/region where your web server is located.
In case you’re still considering whether PrestaShop meets your needs, we’ve covered extensive comparisons with other platforms to help you get the picture. Check out now:
PrestaShop Tutorial: FAQs
[sp_easyaccordion id=”48416″]
PrestaShop Tutorial: Launch your PrestaShop
PrestaShop is a great combination of a powerful Open-Source eCommerce platform with endless customization possibilities and a CMS system that brings more conveniences and ease of use for customers. Apparently, you are still going to need a certain amount of time to get used to PrestaShop. Yet once everything is on track, it’ll be super easy to manage your store effectively.
If you decide to move to PrestaShop (i.e. Shopify to PrestaShop; WooCommerce to PrestaShop; OpenCart to PrestaShop) and are looking for an automated migration solution to transfer your data, LitExtension – #1 Shopping Cart Migration Expert can help you solve the problem in just a few simple steps. We offer a high-quality migration service at an affordable price (just from $49). If you need more information for your migration to PrestaShop, please contact the support team, they’ll be happy to help!
You can also join our community to get more excited eCommerce news and tips
Good luck!
You might also interested in reading: