Are you looking to optimize your Shopify store’s billing process? If so, you should not miss out Shopify invoice. Invoices play an important role in a smooth payment process, and with well-structured invoices, you can easily boost customer satisfaction and build trust in your buyers.
In this blog, LitExtension – #1 Shopping Cart Migration Expert will provide everything about Shopify invoices:
Don’t let a messy billing system hold you back – take the first step towards a streamlined and professional invoicing process today!
Want to Migrate to Shopify?
If you are intending to migrate to Shopify, LitExtension offers a great migration service that helps you transfer your data from the current eCommerce platform to a new one accurately, painlessly with utmost security.
A Glance At A Shopify Invoice
Shopify invoice is a legal document that records all transaction-related information at your Shopify store. It helps you confirm and log the products and the final payment of a customer. Additionally, your clients can use Shopify invoices to get a clear summary of their transactions.
Common types of Shopify bills
Here are the 6 different types of Shopify invoices you can use to support your customers’ billing process.
#1. Pro formal invoice
A pro forma invoice displays the goods’ price and your commitment to deliver them to the customer. It is generally released in advance, supporting your client’s purchase plan and budget estimation before buying.
#2. Recurring invoice
A recurring invoice is a type of invoice that is sent to a customer for repeat transactions. Normally, you can find this invoice with recurring billing cycles, like monthly subscriptions or memberships.
#3. Credit invoice
A credit invoice is issued when your customer is entitled to a refund or a discount for a specific return. Sometimes, you can call it a credit memo or credit note. When your customer uses this invoice, he/she can get a charge reversed from a previous invoice.
#4. Commercial invoice
Commercial invoices are crucial for global sales, used for customs declaration and fee calculation when exporting or importing across borders. On these invoices, you need to cover the following information:
- Buyers and sellers;
- Contents of package;
- Size and weight;
- Origin of the product;
- Total cost;
- Export and order time;
- Signature.
#5. Debit invoice
A debit invoice also called a debit note, informs the buyer of his or her current debt obligations. You issue this invoice only when your customer’s debt increases after the first order.
For example, your client placed an order and received an invoice from you, but he or she wants to change the amount to a higher amount at a later date. It’s time to send a debit invoice to your client.
#6. Past due invoice
A past-due invoice is an overdue unpaid invoice. Indeed, the more past-due invoices you have, the worse your cash flow is. As a result, you will not have enough money to pay your employees, suppliers, and devices rent. To prevent this problem, you need to manage your accounts receivable diligently.
What should be included in an invoice?
Being considered a transaction record, a standard Shopify invoice should contain the 7 following details:
- An invoice number: A unique number that matches a specific transaction;
- Business information: Name, Contact (phone number & email), and Address;
- Client information: Name, Contact (phone number), and Address (work/home);
- Service/Product Description: A quick explanation of products/ services (e.g., name, unit price, quantity, and line total;
- Transaction date: A detailed time of payment completed;
- Total amount: A final cost, including additional costs and taxes;
- Payment terms: All required terms of payment, like Net X, Payment/Cash in advance, Upon receipt, or exchanges and returns.
How To Create A Shopify Invoice
Once you have gained a comprehensive understanding of Shopify invoices, you can proceed to learn how to create invoices on Shopify. There are 2 following methods:
- Release invoices together with your orders;
- Use a free Shopify invoice generator.
Method #1: Creating invoices with orders
Step 1: Create a new order
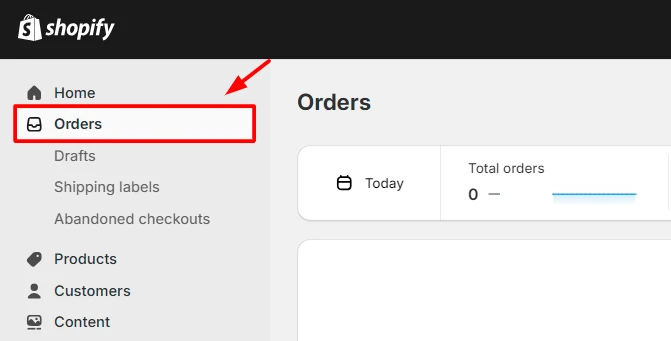
In the Shopify Dashboard, click Orders to open the Orders page.
Then, click the Drafts tab to navigate to the Draft orders page.
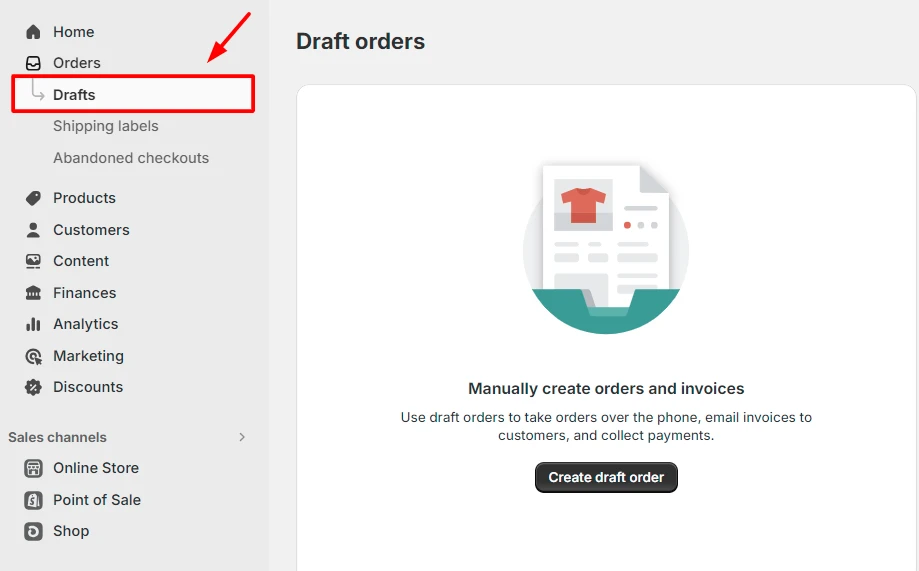
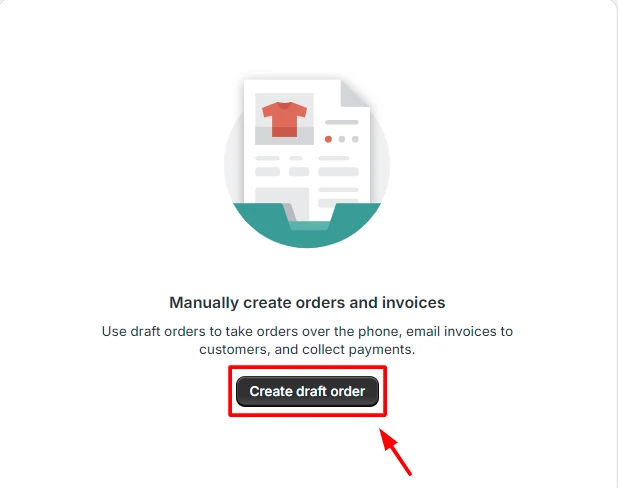
After that, click the Create draft order button to finish.
Note: All our actions above are completed with a Shopify free trial. In case you register for an official Shopify plan, you need to select the Orders tab (instead of the Drafts tab) and click the Create order button to open the Create order page.
Step 2: Fill in relevant information
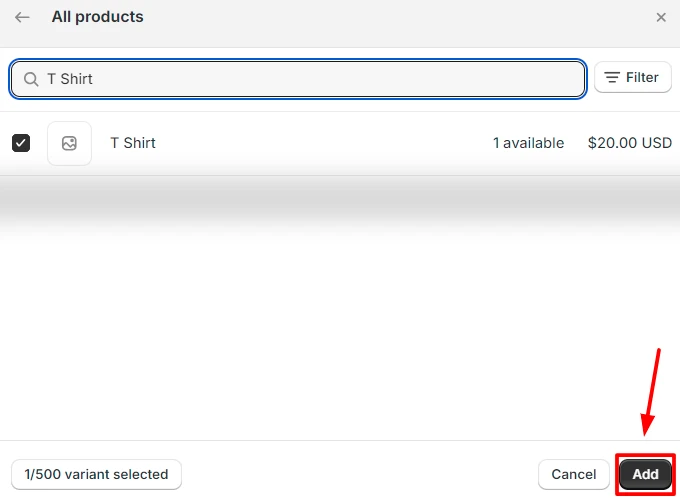
In the Create order page, enter the targeted products’ names in the Search products box.

Then, select proper products and click Add button.
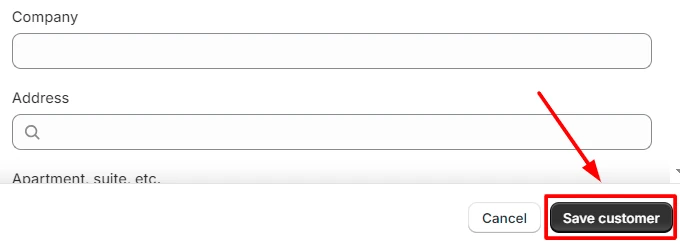
In the Customer section, click the Search box to find an old customer or create a new one. When creating a new client, you should fill in basic information, such as first and last name, language, email, shipping address, and phone.
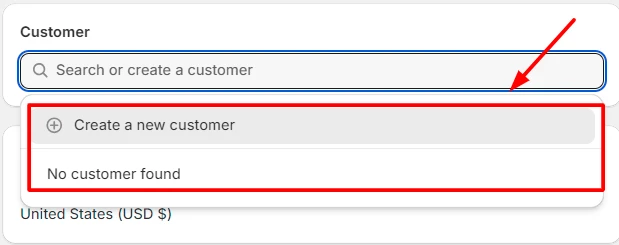
After that, click the Save customer button to finish.
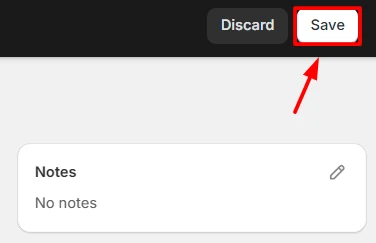
Step 3: Customize and save your Shopify invoice
In this step, you can customize your Shopify invoice with:
- Notes: You type any special requirements from your customers or even your products’ usage instructions.
- Market: You need to opt for a market to employ its pricing on the orders.
- Tags: You can attach specific customer tags to their invoice if you want.
Finally, click the Save button on the top bar to save your Shopify invoice.
Method #2: Using Free Shopify Invoice Generator
To begin with, you need to navigate to Shopify Free Invoice Generator. On this site, you will find 3 detailed steps to create a Shopify invoice for customer, including:
Step 1: Fill and customize business-relating information
In Enter your company information section, fill in the required fields below:
- Company name;
- Email address;
- Address;
- City & Zip/postal code;
- Country/Region;
- State/Province.

Besides that, you can click the Choose File box to update your company’s logo.
Step 2: Add customer and product information
In this step, you need to complete the 2 following sections:
- Enter customer and invoice information: customer name, email, address, city, zip/postal code, country/region, state/province; invoice number, and date.
- Enter the items you wish to bill: item, description, quantity, and price.
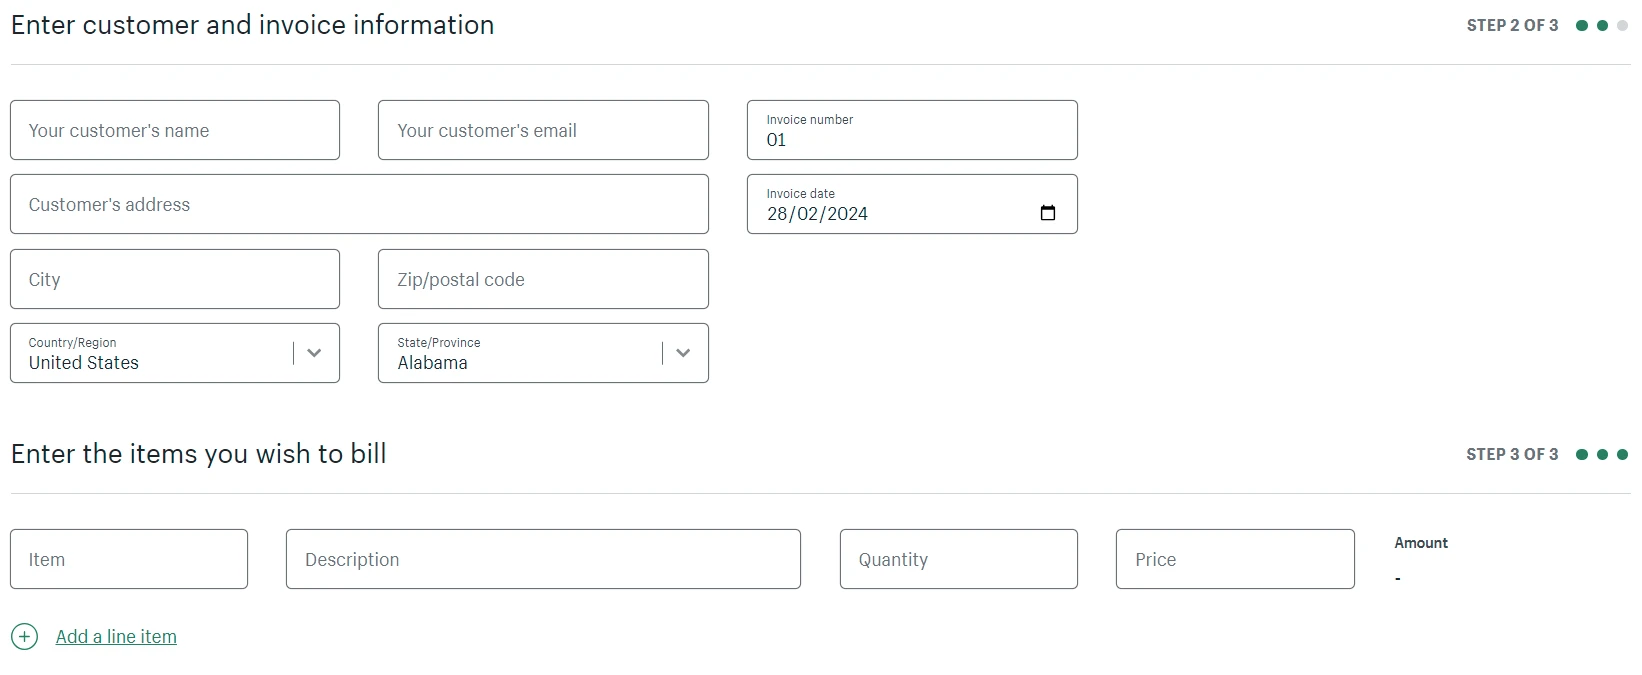
In case your order has different products, click Add a line item to have new products added.
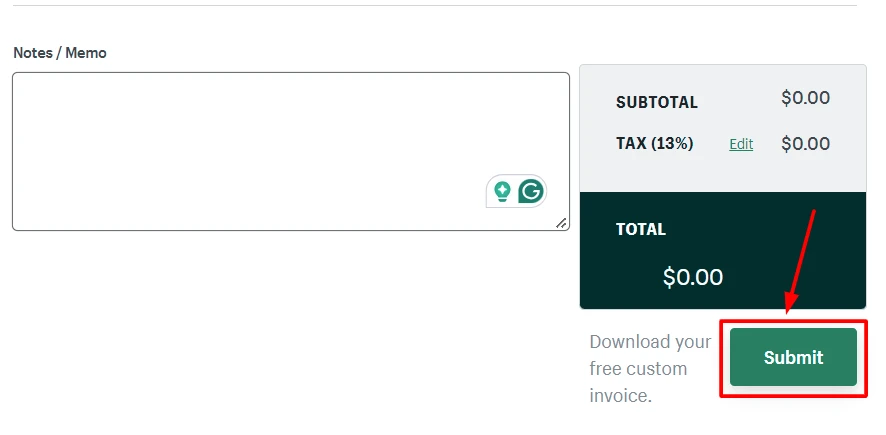
Step 3 – Review and submit
Finally, review all information and add Notes/Memos (optional). After that, click the Submit button to end the process.
With this free invoice generator, a Shopify invoice download is possible and can be used for several purposes.
Whatever method you pick, it only takes 3 simple steps to complete.
To get paid on time with your Shopify invoices, you can use the following tips:
- Always release a clear and well-structured Shopify invoice;
- Keep track of your payment status, including overdue payments or relevant issues;
- Provide convenient payment options, such as online payments, bank transfers, and debit/credit cards;
- Send friendly reminders before the due dates;
- Integrate with third-party Shopify invoice apps for advanced options;
- Encourage timely payments by offering incentives to customers;
- Use a professional Shopify invoice template to impress clients easily.
How To Send Shopify Invoices To Customers
After creating a Shopify invoice, you can deliver it to your customer immediately. Below are the 2 basic methods:
#1. Mail
You can print your saved Shopify invoice and send it to your customer’s address. Currently, you seldom see anyone transfer eCommerce invoices through the mail, which is time-consuming. However, if an electronic delivery doesn’t work well, you should prefer paper documents.
#2. Email
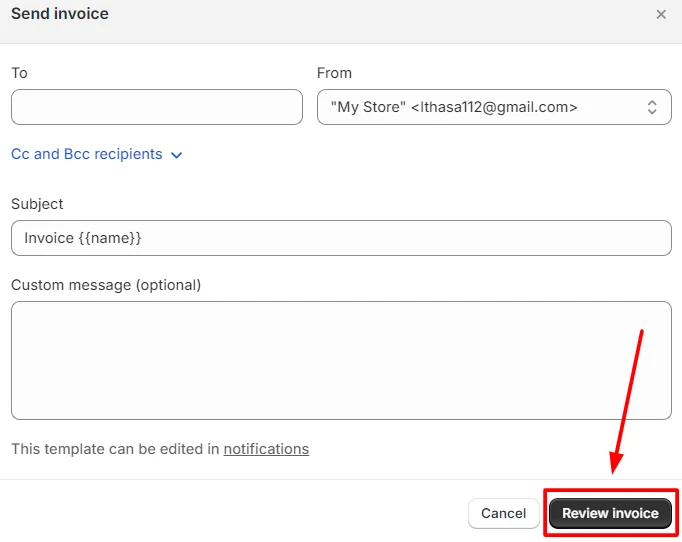
After reviewing all invoice information, click the Send invoice button to open the Send invoice tab.
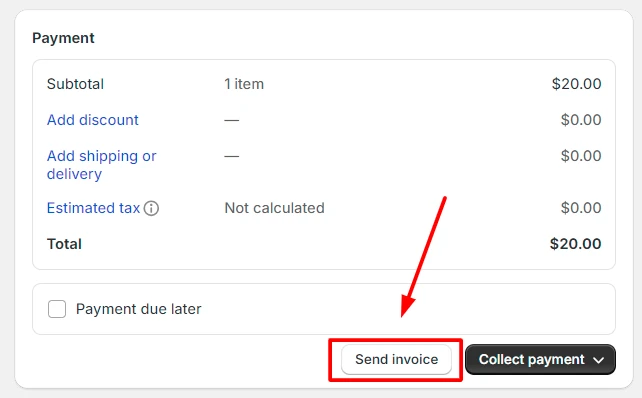
In the Send invoice tab, fill in basic fields, including: To (your customer email), From (your store), Subject (invoice), and Custom message (optional). Then, click Review invoice and Send notifications to finish.
Compared to the mail method, emailing your Shopify invoice is more simple and effective. Thus, it becomes the leading option for Shopify store owners.
Here is a standard email structure you can use to optimize your invoice-sending process.
Hi/Hello [ Mr./Ms./Mrs. ….],
We hope you’re doing well. Your invoice for the purchases provided on [date] is now available. Please find detailed information about the [products/services] and the total amount due.
If you have any questions about this invoice, please contact us at [your email] or [your phone number].
Best regards,
[Your Name/Company]
FAQs – Shopify Invoice
[sp_easyaccordion id=”71471″]
Conclusion
Our blog has just introduced everything about a Shopify invoice, including its standard structure and how to create/send it to customers. Depending on your requirements, you can generate Shopify invoices directly in your Shopify Dashboard or using a free tool. However, remember to check your invoice’s information carefully.
LitExtension, #1 Shopping Cart Migration Expert, hopes you use Shopify invoices to simplify your store’s billing process effectively. Check out our LitExtension Blog or join our Facebook Community Group for more valuable insights.