At this moment, if you are looking for a simple way to migrate Wix to Shopify, don’t look further because you are already in the right place. Within only 06 simple steps, you will finish transferring data from Wix to Shopify.
- Step 1. Decide how to migrate from Wix to Shopify
- Step 2. Backup Wix site
- Step 3. Export data on Wix
- Step 4. Set up Shopify store
- Step 5. Import Wix data to Shopify
- Step 6. Perform post-migration activities
Make Your Migration Project A Breeze with LitExtension
Don’t have time to switch from Wix to Shopify? Opt-in for our All-in-One Migration Service to have an exclusive Personal Assistant carry out the Shopify Migration for you without having to lift a finger.
1. Decide How to Migrate from Wix to Shopify
There are several ways to perform the Wix to Shopify migration. They are manually copy and paste data from Wix to Shopify, import CSV files, use a third-party app, or get help from a professional Shopify migration service. I’ve spent some time testing all these approaches, and here’s our summary of each migration method.
[wptb id=72117]
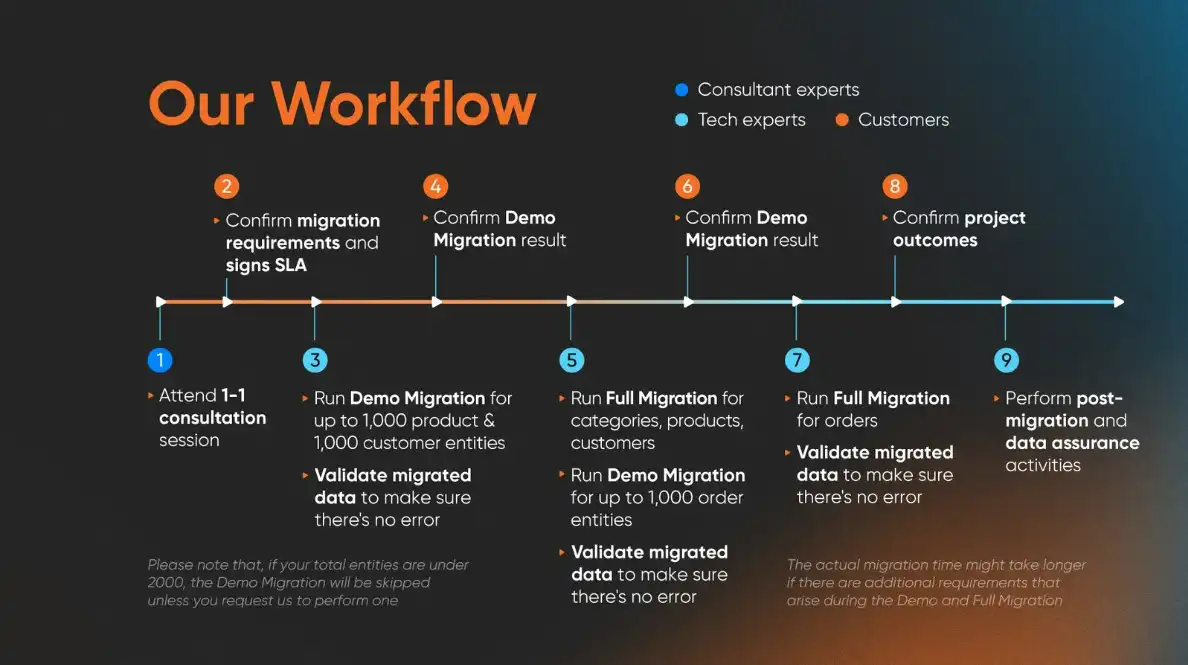
From my personal experience, I highly recommend that you hire a professional Shopify migration expert to minimize risks and maximize efficiency. Take LitExtension – #1 Shopping Cart Migration Service as an example. Upon purchasing the package, you will get an exclusive Personal Assistant to handle all the technical aspects for you. Additionally, if you have special data types that need to be transferred, this reliable Shopify migration expert will make the necessary customization and ensure data compatibility.
2. Backup Wix Site
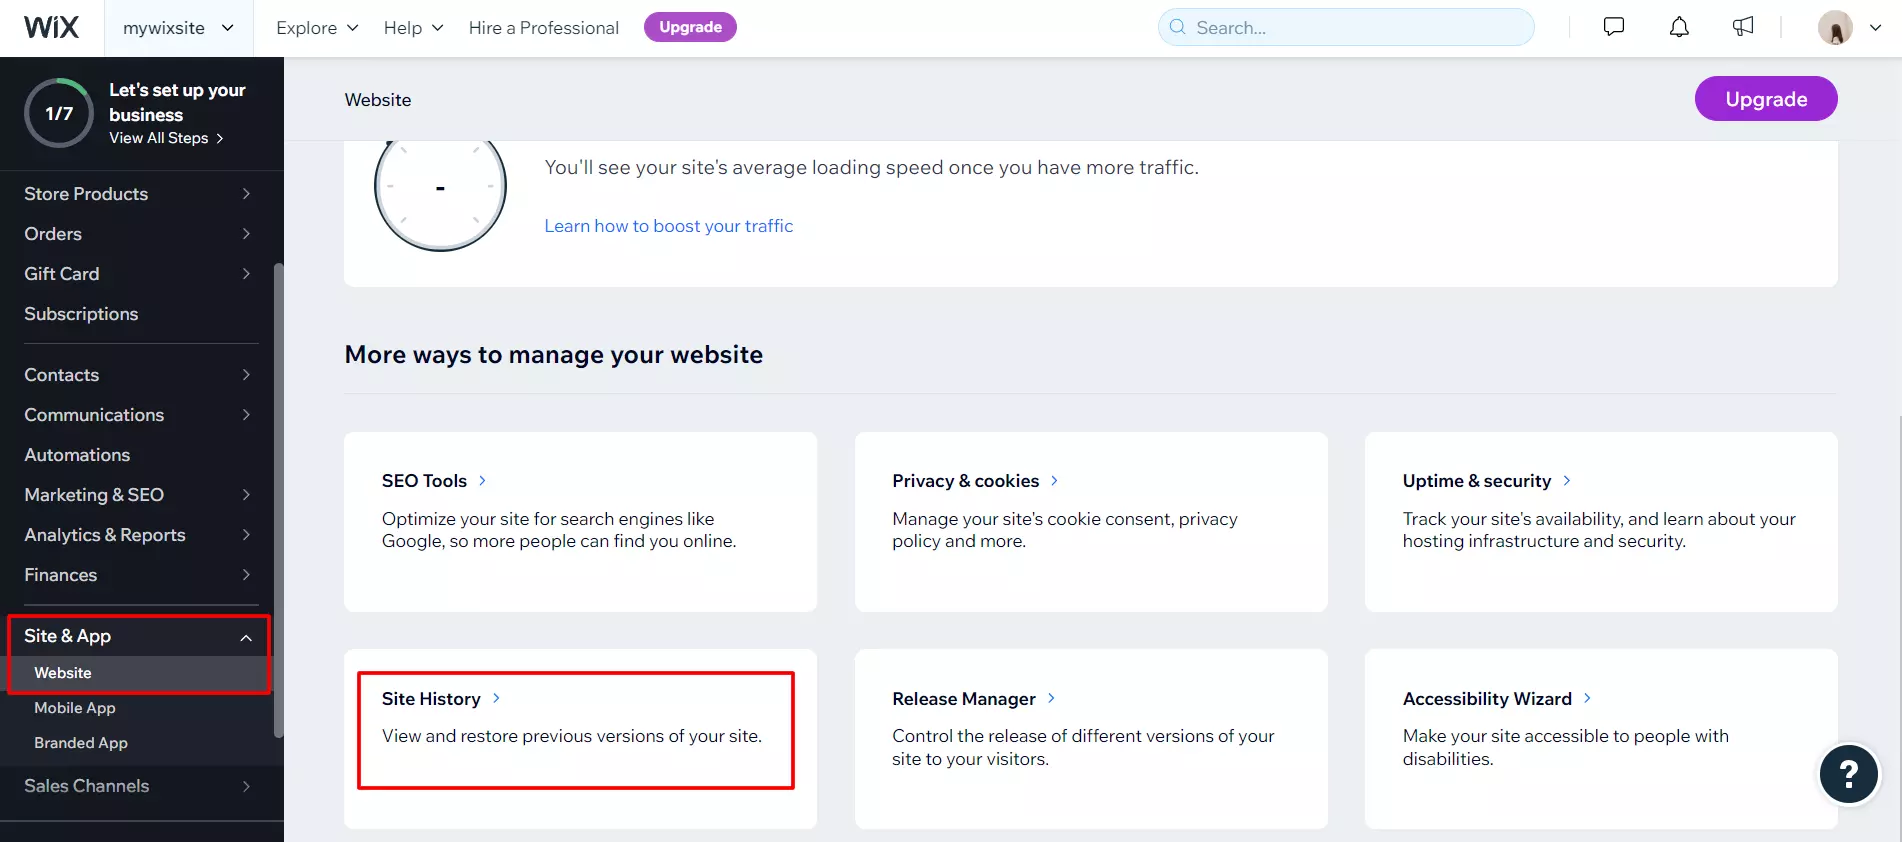
Before officially transfer Wix to Shopify, it is crucial to store all your data in a safe place. Though LitExtension guarantees to perform your migration with no data left behind, we recommend making backups of your Wix store database in case of conflicts and errors. How can you manually back up the Wix site? Currently, Wix’s backup service is quite simple with a few clicks. Whenever you modify your website, Wix automatically creates a backup called the Site History feature. In simpler terms, if you make a mistake, you can select the previous version of your site and restore it easily.
Plus, you can duplicate your site at any time to create a manual backup in your Wix account. Be aware that this copy is not automatically updated when you change your original site.
- Step 1: Log in to your Wix dashboard and choose the desired Wix site.
- Step 2: Once selected, click Site Actions, then Duplicate Site.
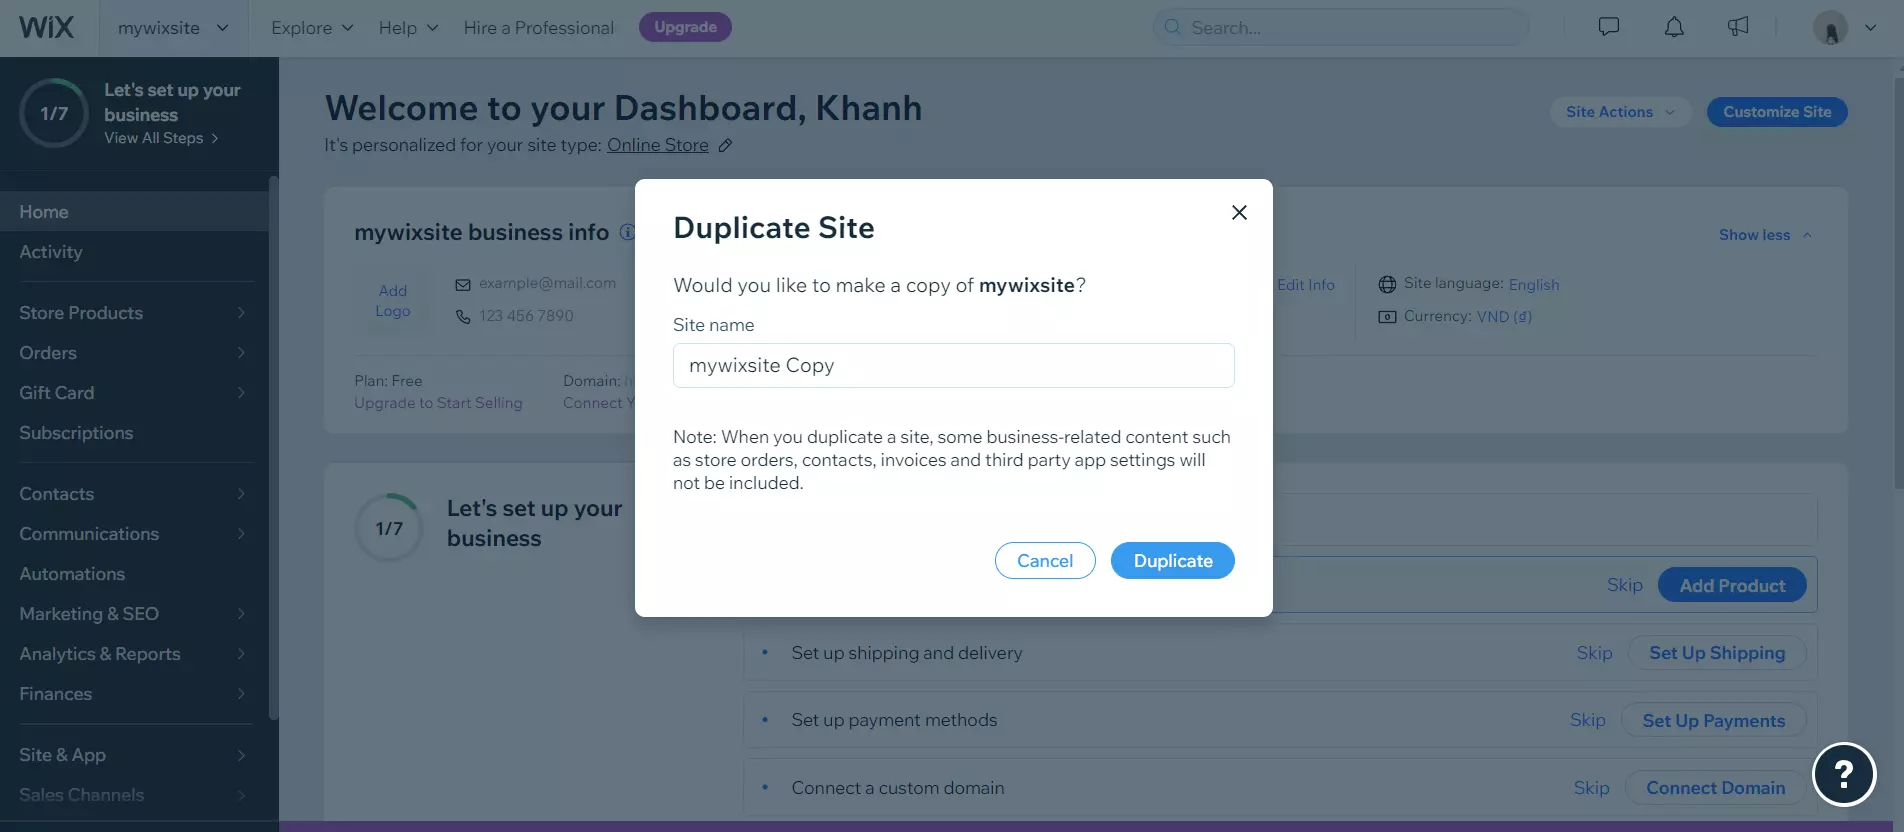
- Step 3: Rename the copy to distinguish between two versions, and you’ll see this file in your dashboard.
⚠️ Note: This process does not back up all the data after the duplicating process. Thus, you need to do an additional step to preserve your information.
- Step 4: Exporting orders on Wix Store.
First, go to the Orders tab in Wix’s dashboard. After that, tick the Order checkbox to select all orders and Export this into a CSV file on your browser.

If you also want to back up your store’s contacts, refer to this instruction.
3. Export data on Wix
There are three core entities you need to export and migrate to Shopify: products, customers (contact list), and orders. Here’s how!
How to export products on Wix
- Go to your site’s dashboard and select the ‘Product’ tab.
- Tick on what you want to export:
- All products
- A single category or other filter products
- Only selected products
- Click ‘More Actions‘ then select ‘Export‘ from the dropdown menu.
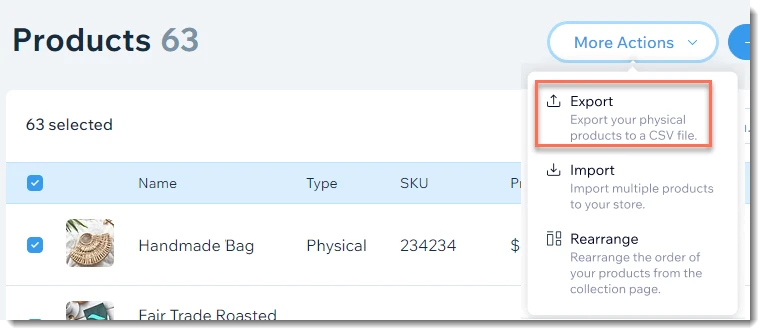
Please note that this guide applies to physical products only. Unfortunately, Wix has not supported exporting digital products yet, but I believe they are working on this feature now.
How to export Wix customer data
Before we go to the detailed guide, here’s a quick heads-up. Wix stores its customers’ data under Contacts, so don’t be confused when you cannot find the customer exporting button.
And now, without further ado, let’s see how to export Wix contacts into CSV files.
- Navigate to your Contact List.
- Tick on the box next to the specific you want to export.
- Select ‘More Actions‘ and click ‘Export contacts‘.
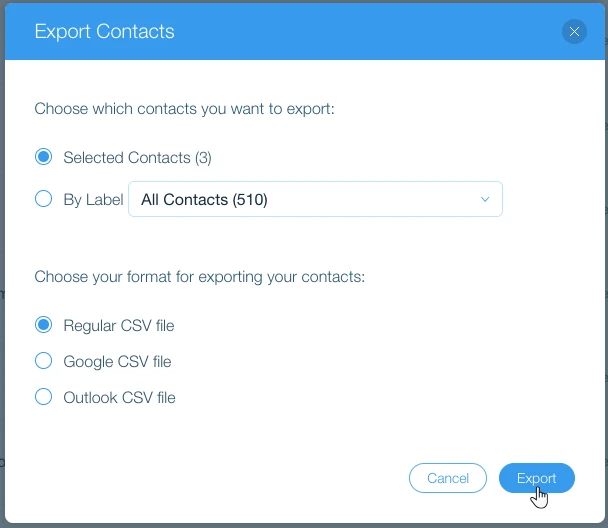
- Choose the entities you want to export:
- Selected Contacts: Only export the chosen contacts in step 2.
- By Label: Click the drop-down menu and select a contact group, or simply choose All Contacts.
- Select the relevant file format, including Regular, Google, or Outlook CSV file.
- Finally, click ‘Export‘, and your contact list will be downloaded in no time.
Please note that Wix allows a maximum of 50,000 contacts per CSV file. Therefore, if you have more than this limited amount, you might need to export several times.
How to export orders on Wix
- First, from your site dashboard, navigate to the Orders tab.
- Select the orders you want to export. Here, you can choose to only export a few orders, or export all of them.
- Click ‘Export‘.

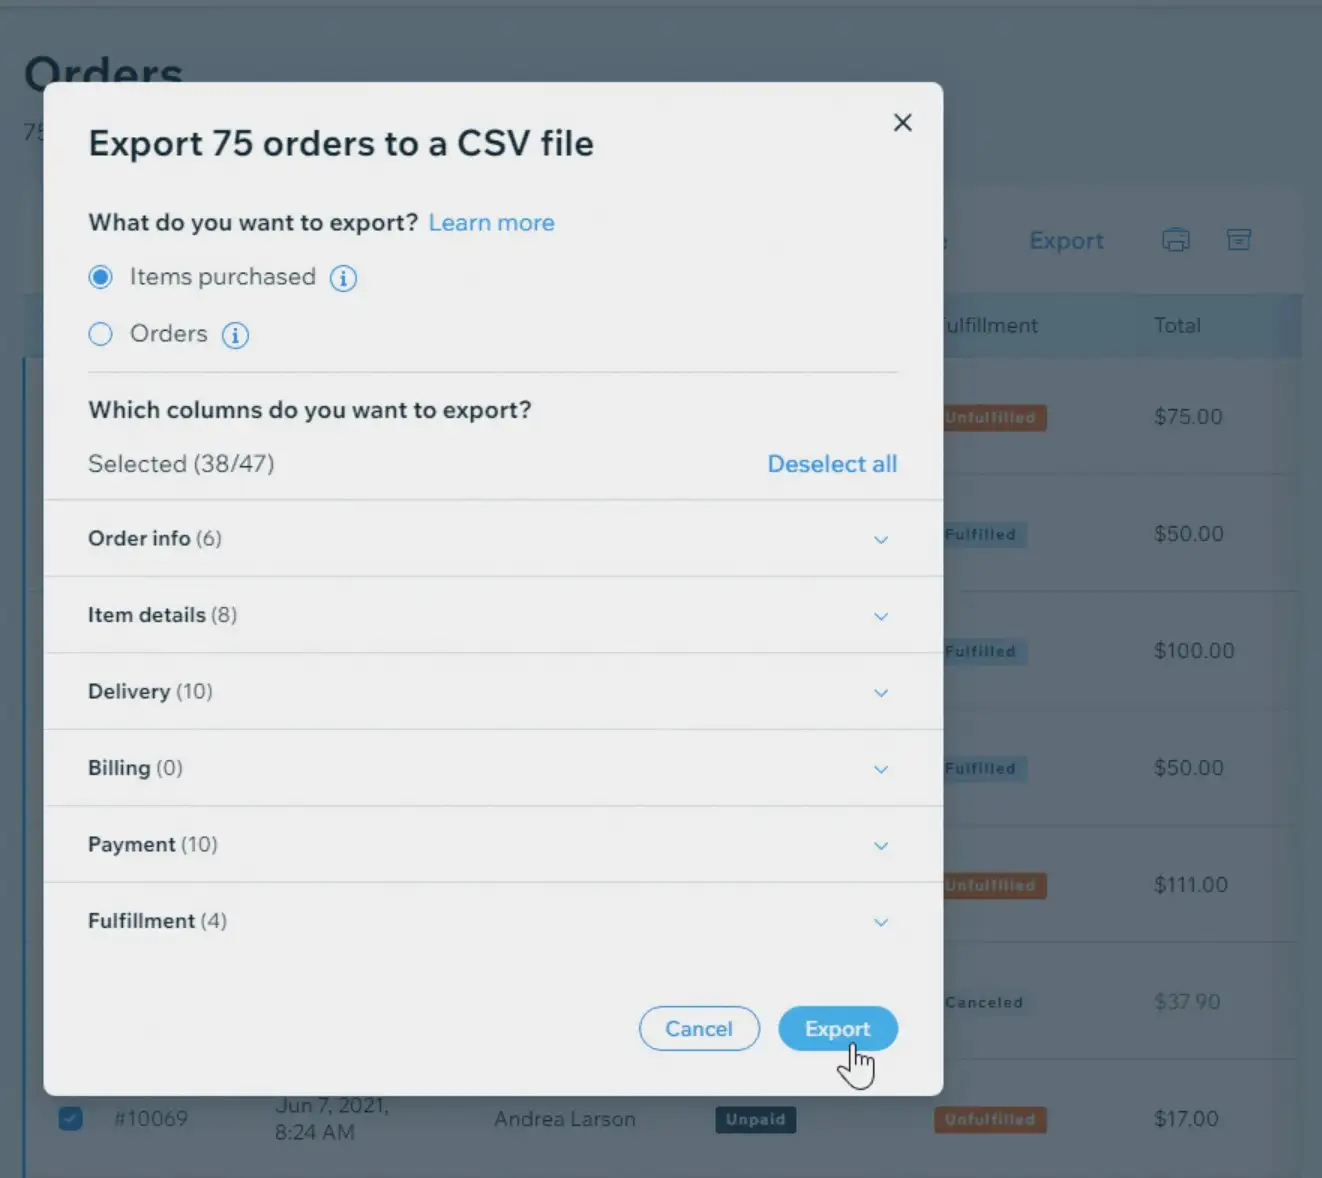
- Select how you want to display exported orders:
- Item purchased: Each item purchased is displayed in a separate row, even if they are part of the same order.
- Orders: Each order is displayed in one row, even if multiple items were purchased.
- Here, you can deselect the columns that you do not want to include in your CSV file.
- Lastly, click ‘Export‘ and save the file to your computer.
And that’s everything! Now you are ready for the next step of the Wix to Shopify migration.
4. Set up a New Shopify Store
Now, let’s move to set up your new Shopify store! If you have not had a Shopify store yet, you can create a free-trial Shopify account. First, navigate to the Shopify website, fill in your email address, and click “Start Free Trial“.

Now, Shopify will ask for some basic information about your business, including your business needs, channels to sell, business location, etc. You can answer them or skip every question and jump right in to set up a Shopify store. After completing the initial steps, you will be directed to your Shopify Admin dashboard.
Here, you can personalize your new Shopify store by browsing an eye-catching Shopify theme and integrating it with necessary Shopify apps to help you manage your store better. And finally, don’t forget to pick a suitable Shopify pricing plan and publish your website. If you’ve decided to migrate to Shopify, you may have been impressed by this eCommerce platform and want to generate profit with it in the long term. For that reason, we suggest you choose Shopify annual plan to save 25% of your subscription cost!
Or carefully read our Shopify pricing analysis to make the right decision. Please note that Shopify is now offering a 3-day free trial, and you can enjoy Shopify for $1 for the first month.
Now you’re ready to transfer from Wix to Shopify!
5. Import Data to Shopify
Now, let’s begin the most important step: importing CSV files to Shopify. Here are two things you need to keep in mind and make changes if needed to perform the migration seamlessly.
- Customer CSV files should not exceed 1MB in size.
- Product CSV files are under 15MB each.
After ensuring all the requirements are met, let’s start the importing process as guided below!
- Go to your Shopify dashboard and navigate to the Products or Customers page.
- Click on ‘Import‘.

- Then, select ‘Add file’ and choose the CSV file you want to import.
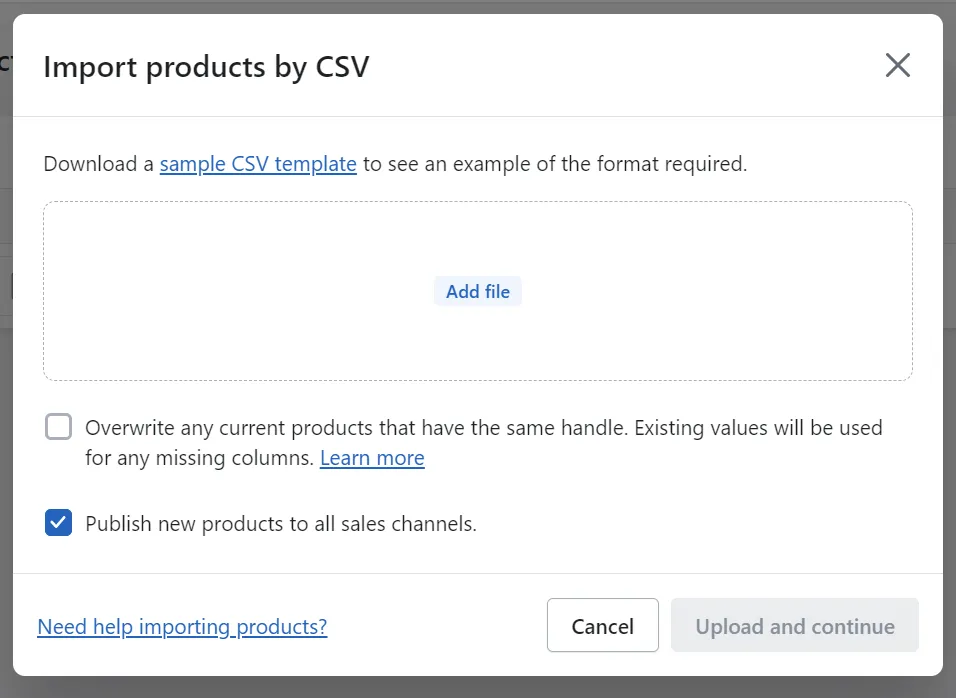
- After that, tick on ‘Publish new products to all sales channels‘. Next, click the ‘Upload and continue‘ button.
- Don’t forget to review your file before proceeding to the ‘Import‘ button.
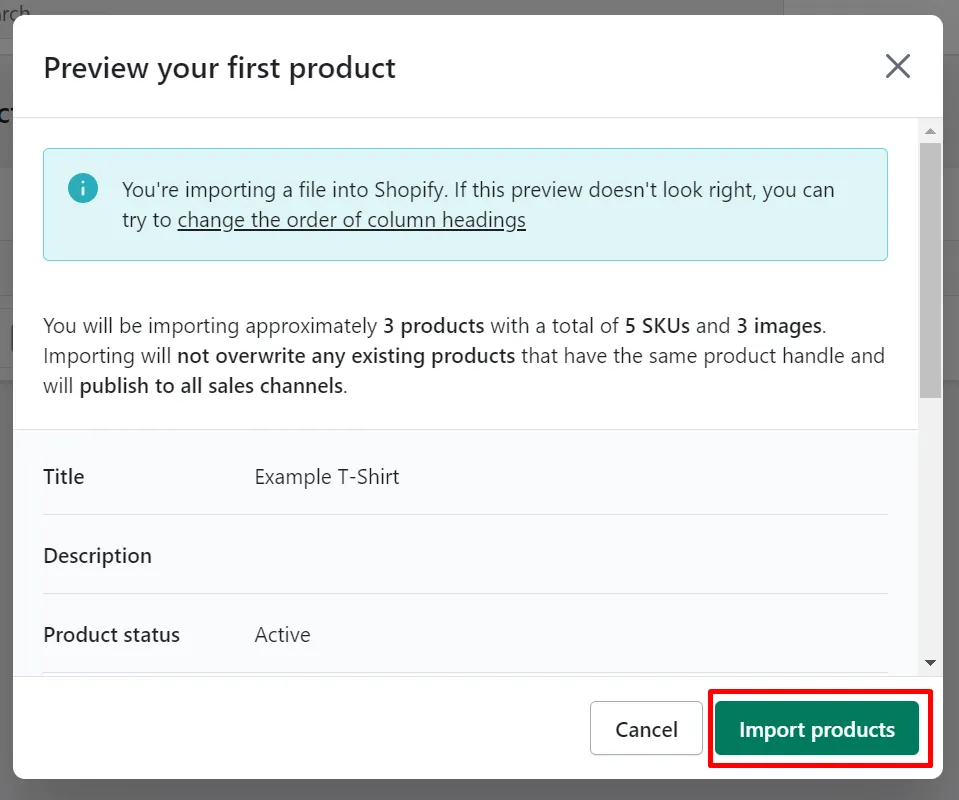
And that’s it! You’ve successfully switched from Wix to Shopify.
6. Migrate Wix to Shopify: Post-Migration Activities
Once completing the Wix to Shopify migration procedure, you should pay more attention to customizing your store before going live. Here is the checklist of all the tasks that need to be taken:
1. Check Results After the Full Migration
When the Wix to Shopify migration is successful, you need to check if all of your data has been migrated accurately to your Shopify store. Remember that you have to check your data in both the back-end and front-end. Most importantly, check product data first, both in the Shopify front and back ends. The migrated products will be visible in the catalog or through an onsite search. Therefore, you should pay close attention to all product details, including product descriptions, images, variants, and meta descriptions.
2. Personalize Your New Shopify Store
After successfully performing your Wix to Shopify migration, you can customize the store by selecting a Shopify theme via Shopify Theme Store, visiting Shopify App Store to integrate third-party apps, configuring payment options, shipping methods, etc.
3. Try Placing Orders on Shopify
This step ensures that the transaction proceeds smoothly following the Wix to Shopify migration. As a result, you will know whether your store works as expected, and if not, you will know what to change to facilitate your sales and comfort your customers. Furthermore, take a look at our specific guidance on a Shopify launch checklist to help you get your store up and running faster.
Wix vs Shopify – Why Make The Move?
There’s no doubt that both Wix and Shopify are among the best eCommerce platforms in the world. Nonetheless, Shopify has proved itself to be more optimal than its counterpart. In case you are still wondering if you should switch from Wix to Shopify, here is a quick comparison of Wix vs Shopify.
[wptb id=64895]
Wix to Shopify Migration – FAQs
[sp_easyaccordion id=”46056″]
Final Words
In summary, re-platforming from Wix to Shopify has witnessed an upward trend to meet the merchants’ demands. Shopify is a great alternative option if you want to move away from Wix. This article is a detailed guide on transfer from Wix to Shopify by importing CSV files. We hope you find it helpful to you in some way.
Lastly, don’t forget to take a look at our LitExtension blog and join our Facebook Community to get more eCommerce insights!