
What are Metafields in Shopify? The Ultimate Guide to Shopify Metafields in 2026
What are metafields in Shopify? This question usually comes up when Shopify’s default fields are no longer enough to handle product details, filtering needs, or structured data at scale.
In this guide, you will learn:
- What Shopify metafields are;
- How they are structured;
- How to add and display them correctly;
- and How to use them in more advanced setups.
Our goal is to help you understand metafields clearly and use them in a way that scales with your store.
What are Metafields in Shopify?
Definition and core concepts
Metafields in Shopify are custom fields used to store information that is not available in Shopify’s default product and store fields. They are used when standard fields like title, description, price, or images are not enough.
Metafields can store data such as materials, care instructions, size details, specifications, or downloadable files. They can be added to products, variants, collections, customers, orders, and other store resources.
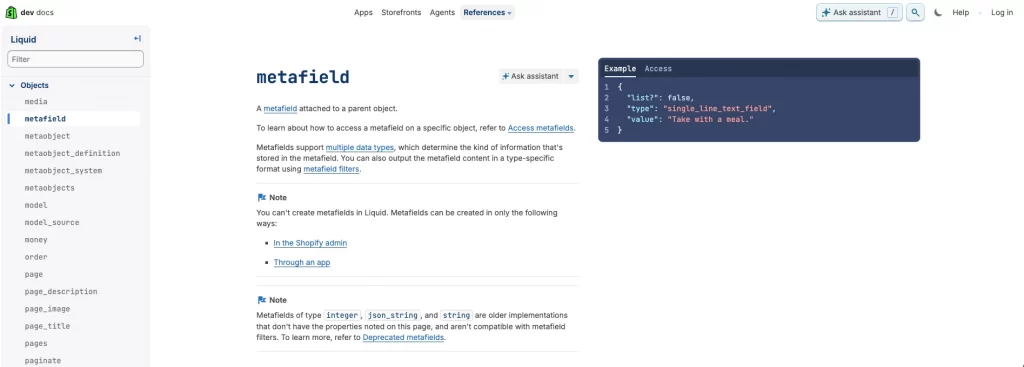
Each Shopify metafield has three basic parts:
- A namespace helps group related data.
- A key identifies the specific field.
- A value stores the actual information.
Shopify supports multiple data types, including text, numbers, files, colors, references, and JSON. You can also apply validation rules to keep data consistent. Shopify offers standard metafields, and you can create custom ones when needed.
Why metafields matter for Shopify merchants
Metafields give merchants better control over store data by keeping product information clear, structured, and separate from long descriptions. This makes product pages easier to manage and easier for customers to understand.
Because metafield data is structured, it also works well with filtering, search, and apps. As catalogs grow, metafields help stores scale by keeping data consistent across themes, sales channels, and integrations. For stores that need detailed product data, metafields are a core Shopify feature, not an advanced add-on.
How Shopify Structures Metafields (Conceptual Overview)
Metafields vs metaobjects
In Shopify, metafields and metaobjects are both used to store custom data, but they serve different purposes.
| Item | Metafields | Metaobjects |
| Purpose | Add extra data to existing Shopify resources | Create new structured data objects |
| Used for | Single fields like material, care instructions, specs | Grouped data like size charts or feature lists |
| Attached to | Products, variants, collections, customers, orders | Any resource through references |
| Reusability | Usually used per item | Designed to be reused across many items |
| Complexity | Simple to moderate | More advanced and structured |
Metafields are used to add extra fields to existing resources such as products, collections, or customers. They extend data that already exists. For example, adding a care instruction metafield to a product.
Metaobjects are used to create entirely new data structures. They group multiple fields together into a reusable object. For example, a size chart with multiple fields like size name, measurements, and notes. Metaobjects are useful when you need structured content that is shared across many products or pages.
In simple terms, metafields add extra information to something that already exists, while metaobjects create new structured content that can be reused.
Metafields by resource type
Metafields can be attached to different parts of a Shopify store. Where a metafield is attached affects how it is used and displayed.
| Resource type | What metafields are used for |
| Products and variants | Specifications, materials, dimensions, variant details |
| Categories | Standard attributes for filtering, search, and consistency |
| Collections | Extra descriptions, banners, layout or SEO content |
| Blogs and pages | Custom content blocks or metadata |
| Customers and orders | Internal data, automation, and system integrations |
Before creating metafields, you should decide which Shopify resource the data belongs to.
How to Add and Use Metafields in Shopify (Step-by-Step)
Step 1: Create a metafield definition
Before you can add metafield values, you must create a metafield definition.
The definition works like a template and tells Shopify what type of data you want to store.
Go to Settings → Metafields and metaobjects in your Shopify admin.
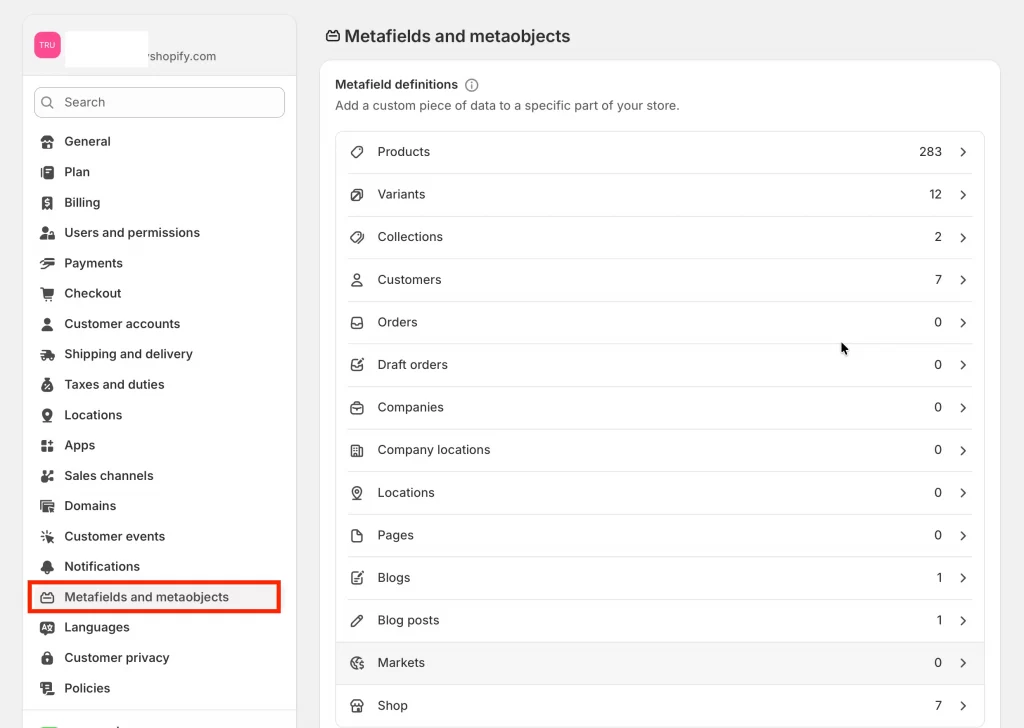
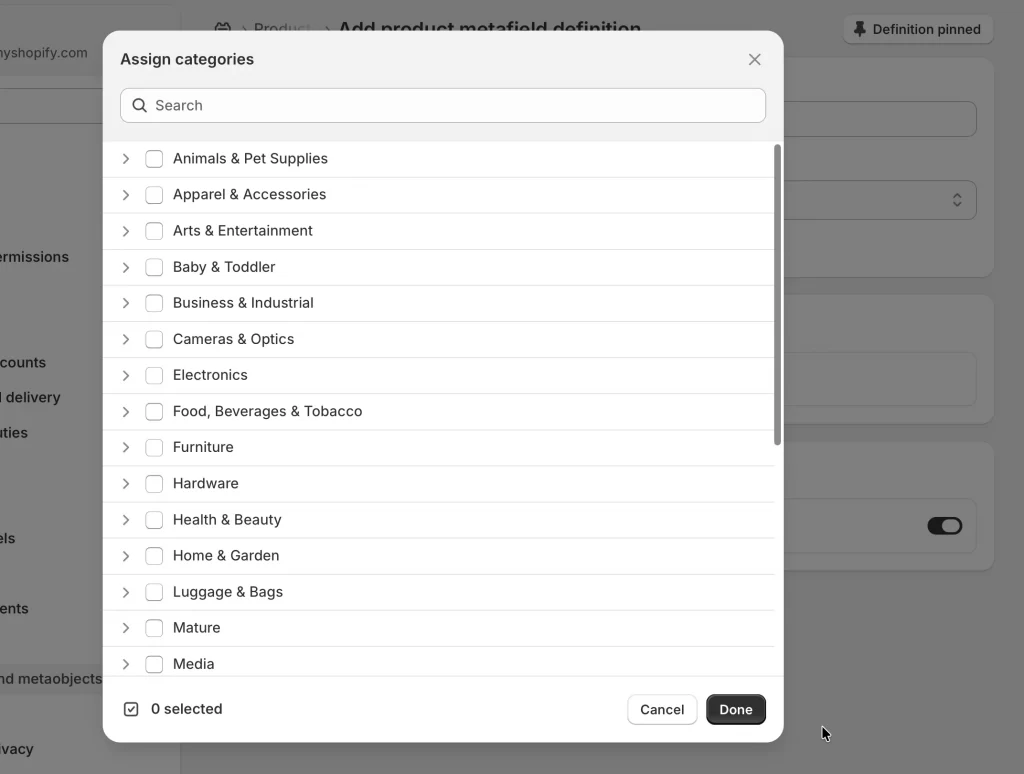
Select the part of your store where the metafield should be used, such as Products, Collections, Customers, or Orders.
Click Add definition.
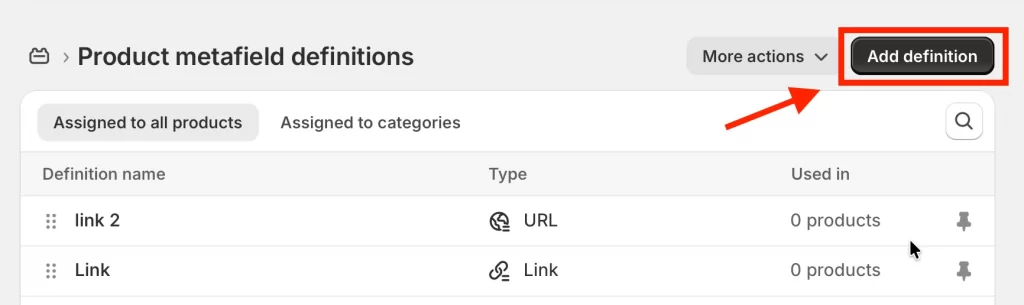
You can choose between two options.
- A standard definition is recommended when available because it is pre-configured and widely supported.
- A custom definition is used when standard options do not fit your needs.
Before creating a custom definition, review the available content types and settings to avoid changes later.
Step 2: Configure your metafield
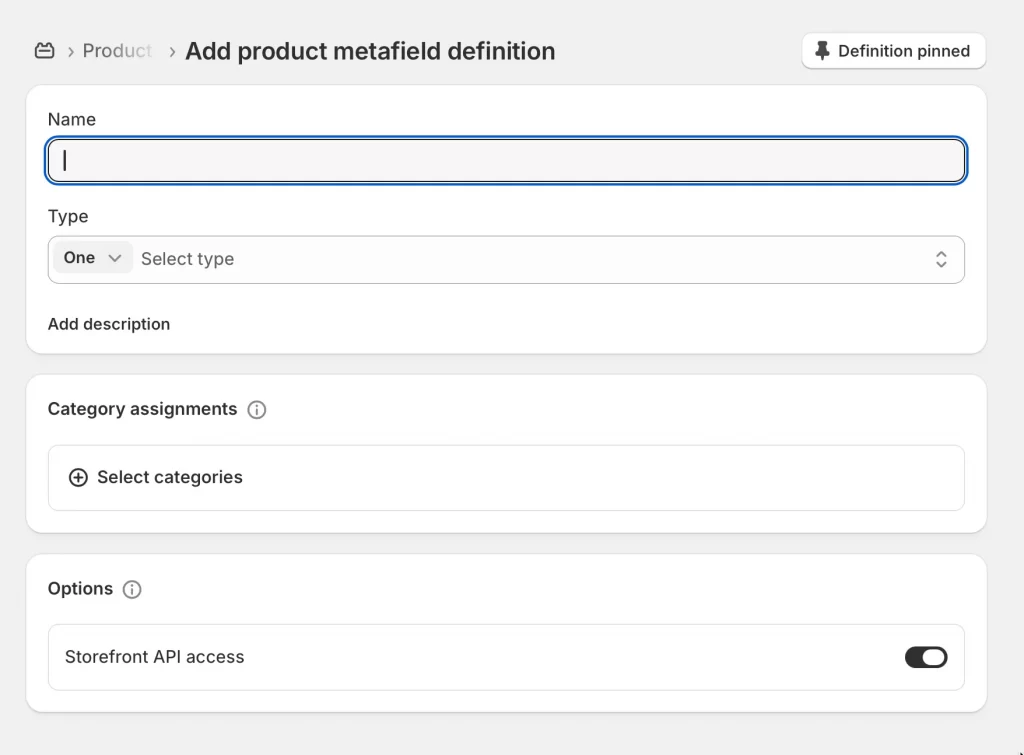
When creating a custom metafield definition, you need to configure how it works.
Required settings
| Setting | Explanation |
| Name | The label shown in the Shopify admin |
| Content type | The type of data allowed, such as text, file, color, reference, number, measurement, date, or JSON |
Optional settings
| Setting | Explanation |
| Namespace and key | The unique identifier used by themes and code |
| Description | Guidance for staff on what values to enter |
| Storefronts | Enable access for custom storefronts or headless setups |
| Smart collections | Allow product or variant metafields to be used in smart collections |
| Accept list of values | Allow multiple values in one metafield |
You can also add validation rules to limit accepted values. Examples include character limits, minimum or maximum numbers, measurement units, or currency defaults. Validation helps keep data consistent across your store.
By default, metafield definitions are pinned and appear automatically on admin pages. You can unpin a definition if you do not want it to display by default.
Click Save when finished.
Step 3: Add values to your metafields
After saving the definition, you can add real data.
Open the product, collection, customer, or other resource where the metafield belongs.
Scroll to the Metafields section.
Pinned metafields appear in a table.
Click a row to see the metafield type and description.
Enter a value that matches the content type, such as text, number, date, or file upload.
Click Save.
For metafield lists, you can add multiple values. This is useful for product references, multiple attributes, or advanced search filtering.
Step 4: Display metafields on your storefront
You can display metafields in two main ways.
Option A: Using the theme editor
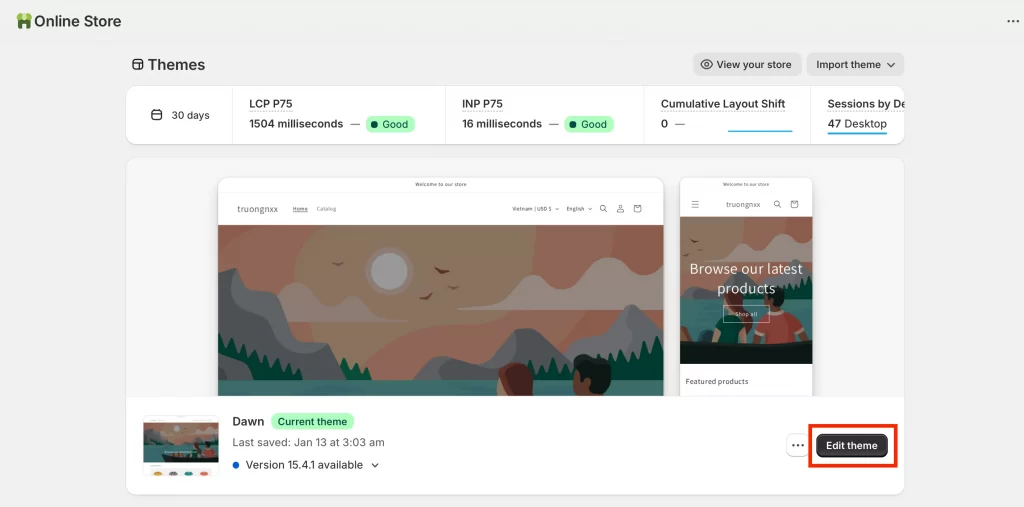
Go to Online Store → Themes and click Edit theme.
Open the template where you want to show the metafield, such as a product or collection page.
Add or select a section or block that supports dynamic sources.
Click Connect dynamic source and choose your metafield.
Save your changes.
You can display up to 20 metafields per template.
Option B: Editing theme code
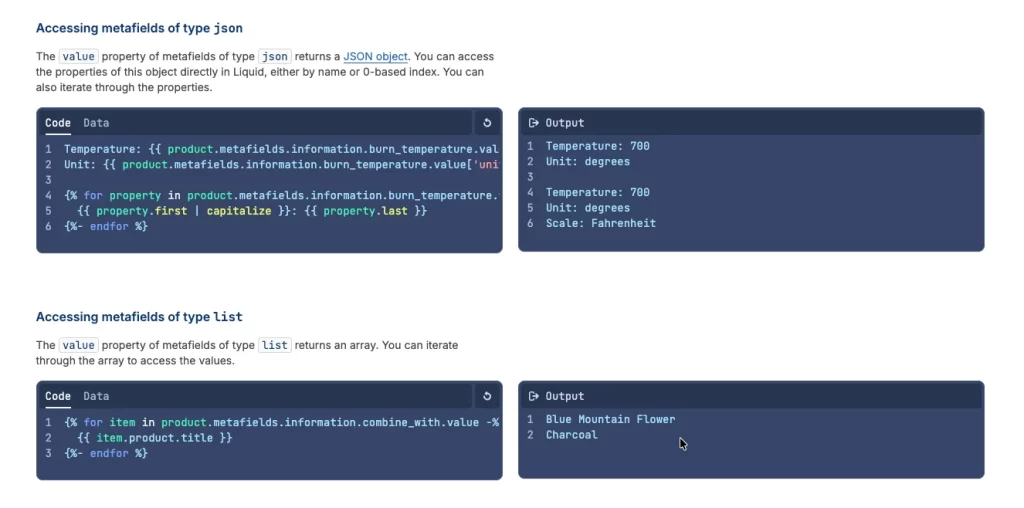
If your theme does not support dynamic sources or you need a custom layout or styling, you can display metafields using Liquid code.
For example, to display a product metafield using Liquid, you can use the below code:
{% if product.metafields.custom.fabric_composition %}

  <div class="product-metafield">

    <strong>Fabric composition:</strong>

    {{ product.metafields.custom.fabric_composition }}

  </div>

{% endif %}
This option requires experience with Liquid, CSS, or JavaScript.
Tip: Bulk edit metafield values for large stores
For stores with large catalogs, bulk editing saves time. Here’s when you should use bulk editing for Shopify metafields:
- Updating metafields across many products or variants
- Fixing validation errors after migration
- Adding initial metafield values at scale
How bulk editing works:
- Open the bulk editor from the metafield definition or error screen
- Select multiple cells and edit values directly
- Use copy and fill tools to apply values quickly
- Save changes and let Shopify validate the data
If values do not meet validation rules, Shopify will show errors that must be fixed before the metafield can be used.
Advanced Metafield Implementations (Liquid, Flow, and API)
1. Add Shopify Metafields in Liquid code
You can use Liquid to display metafields by editing your theme code. This method is used when you want full control over where and how metafield data appears on your storefront.
Liquid is commonly needed if your theme does not support dynamic sources, if you want custom placement or styling, or if you are building custom sections or templates. In Liquid, metafields are referenced using their namespace and key.
Editing theme code requires basic coding knowledge. If you are not familiar with Liquid, CSS, or JavaScript, it is recommended to work with a Shopify Partner, like LitOS, to avoid breaking your theme.
2. Trigger automations with Shopify Flow
Shopify Flow allows you to use metafields and metaobjects as part of automation workflows.
Flow can read metafield values to make decisions, update metafield values automatically, and in some cases, create metafield definitions. This makes it possible to build workflows based on custom data instead of only standard Shopify fields.
Common use cases include triggering actions when a product metafield changes, updating customer metafields based on purchase behavior, or processing form submissions that create metaobject entries. Shopify Flow is useful for stores that want automation without writing custom code.
3. Use Shopify Metafields API for headless or external integrations
The Shopify Metafields API allows external systems to read and update metafield data.
When creating metafield definitions, you can choose whether the data is accessible to storefronts. Standard metafields are usually available by default, while custom metafields often require Storefront API access to be enabled manually.
The Admin API can be used to retrieve metafield data for products, customers, or orders and send it to external systems. This is commonly used in headless Shopify setups, custom mobile apps, third-party integrations, and advanced reporting tools.
API-based metafield usage is the most flexible option, but it usually requires developer support and careful planning.
And that’s how to use metafields in Shopify in advanced.
Troubleshooting Shopify Metafields Errors
1. Metafields not showing on the storefront
This is the most common issue and usually has a simple cause.
Check these points first:
- Your theme must support metafields and dynamic sources. Vintage themes usually do not.
- The metafield must be connected to the theme. Creating a metafield and adding values is not enough.
- Make sure the metafield actually has a value for the product or resource you are viewing.
- Some metafield types, such as product reference lists, require custom sections or theme support.
Quick fix:
Go to Online Store → Themes → Customize, select a compatible section or block, then connect the metafield using the dynamic source option.
If your theme does not support this, you will need to use Liquid code or work with a Shopify Partner.
2. Validation errors when saving or importing data
Validation errors happen when metafield values do not match the rules set in the metafield definition.
Common causes:
- Existing values do not match a new definition after migration.
- CSV imports reference products or items that do not exist yet.
- Values exceed limits such as character length, number range, or image size.
How to fix:
- Shopify will redirect you to the bulk editor when errors occur.
- Open the Invalid metafield values screen and review the error messages.
- Edit values directly in the bulk editor until all errors are resolved.
- For CSV imports, import products first, then import metafield values in a second step.
You Shopify metafields cannot be used until all validation errors are fixed.
3. Metafields not available in the theme editor
If you cannot find a metafield when editing your theme, it is usually a theme or setup issue.
Common reasons:
- The theme or block does not support dynamic sources.
- The wrong section or block type is selected.
- The metafield definition has not been created yet.
- The content type is not supported by the theme.
What to do:
- Check that your theme supports Online Store 2.0 and dynamic sources.
- Use a section or block that matches the metafield resource type.
- Confirm the metafield definition exists in Settings → Metafields and metaobjects.
- If needed, display the metafield using Liquid code or upgrade to a modern theme.
Also, you should make sure staff accounts have permission to view and edit metafields in Shopify.
What are Metafields in Shopify: FAQs
How many metafields can I create in Shopify?
A Shopify store can have up to 250 metafield definitions. Each definition can store many values, such as one value per product, collection, customer, or order. This means you are limited in the number of metafield types, not in how many items can use them.
Can Shopify metafields affect SEO?
Yes. Metafields help SEO by adding structured product data and improving filtering and discoverability. Shopify also supports the seo.hidden metafield to hide items from search engines without deleting them.
Can I use metafields with Shopify POS?
Yes, but there are some limitations. Customer metafields are shown in Shopify POS only if they are pinned and only at POS Pro locations. They are useful for storing customer details like loyalty level or notes.
Product metafields can be viewed in Shopify POS and are useful for showing product details to staff during in-person sales. Metafields are still managed in the Shopify admin and then accessed in POS.
Do metafields work with all Shopify themes?
No, modern themes that support Online Store 2.0 allow you to connect metafields using the theme editor and dynamic sources. Older themes do not support this and require editing the theme code using Liquid.
When should I use Shopify metaobjects instead?
In simple terms, metafields extend existing data, while metaobjects create reusable content structures. You should use metafields when you need to add single custom fields to existing resources, such as products, collections, customers, or orders.
You should use metaobjects when you need to create a new structured data type made up of multiple related fields. Metaobjects are best for reusable content like size charts, product highlights, author profiles, or feature lists that are shared across many pages.
Key Takeaways
Metafields are Shopify’s way to store and manage custom data that does not fit into default fields. They allow merchants to add structured information to products, collections, customers, and other resources, making product pages clearer and store data easier to manage as catalogs grow.
When used correctly, metafields improve content quality, filtering, and compatibility with themes and apps. Modern themes can display metafields directly through the theme editor, while more advanced use cases may require Liquid code or APIs. For complex or reusable data structures, metaobjects are often a better choice than individual metafields.
Need help implementing Shopify metafields the right way?
At LitOS, we help merchants design and implement scalable Shopify data structures using metafields, metaobjects, and custom integrations. Whether you are improving product data, fixing theme limitations, or building advanced workflows, our team ensures your store is set up cleanly and ready to grow.
Talk to a Shopify Expert
